Get Started
Help Desk Migration is an automated data migration service that transfers data across help desks, service desks, and ITSM platforms. The Migration Wizard also supports CSV import and CSV export of customer service data.
New to Help Desk Migration?
Get started with a hassle-free test of our Migration Wizard in a free Demo Migration.
During this test transfer, you'll have access to all features and pre-built automation options available for a complete data migration experience, albeit on a limited batch of your data.
Follow these instructions to sign up, configure your migration settings, and initiate your test migration.
Step 1 Sign up for a Help Desk Migration account
Sign up at app.help-desk-migration.com. Use your Gmail, Microsoft accounts or work email to create your account. When all is set, you land on your migration dashboard.
Step 2 Connect your source platform
Choose your source platform from the list and provide the required access credentials.
Step 3 Connect your target platform
Select your target platform and provide the requested access credentials. If undecided, migrate to a trial version of the desired platform or to CSV.
Step 4 Select objects for migration
Choose the help desk entities and knowledge base entities (if applicable).
Step 5 Match and map data fields
Map the required and custom fields for data consistency. Select the pre-build customizations and proceed to Demo Migration.
Step 6 Start your test migration
Initiate your demo and view the result within minutes. Adjust settings and re-run your migration as needed.
Step 7 Go for your Full Data Migration
If satisfied with the demo, proceed to payment and start Full Migration.
Help Desk Migration terms and concepts
What is a “record” in data migration?
“Record” is a broad term for entities and data objects that can be migrated.
Records can be of two types:
- Help Desk Records - Agents, Contacts, Companies, and Tickets.
- Knowledge Base Records - Articles, Categories, and Folders.
Attachments, Comments, and Notes are not categorized as records. During the Free Data Migration, we assess all your records and provide an estimate for the Full Data Migration cost, detailing the total number of records by type.
The price depends on the number of records you plan to transfer.
What is a default value?
In data mapping, a default value refers to a fixed value assigned to a specific field in the target system. It establishes consistency and standardization, especially when certain data is missing or unknown.
For example, it can be used to transfer all source tickets to the target platform with a default "open" status or a "low" priority.
Why does the default value matter?
- Standardization: Ensures consistency by providing a predefined value when data is missing or unknown.
- Data transformation: Useful for transforming data between source and target systems, particularly when essential information is absent.
- Data validation: Acts as indicators or placeholders, flagging data points requiring further attention or manual review.
How does the default value work?
1. Go to ticket or article mapping.

Note: Setting up a default value works the same for both ticket and article fields.
2. Choose a source field and select a default value option.

3. Assign a target value as the default.

4. All entries for the mapped field in the target platform will adopt the chosen default value.

Note: Default values cannot be set for system fields or custom fields with only one value.
What are the ‘Required field’ and ‘Skip this field’ in ticket migration?
What are the required fields?
Required or mandatory fields are data fields that must be completed with specific information before a particular process can be successfully executed. In ticket management or data entry, these fields ensure the completeness and accuracy of records. In the Migration Wizard, these fields are marked with a yellow label and labeled as 'required.'

Can Required fields be skipped during ticket migration?
No, Required fields cannot be skipped during ticket migration. They must be filled with appropriate values as they are essential for creating or closing tickets, especially when transitioning them to the "closed" status. Skipping these fields can lead to errors or incomplete ticket records.

What does "Skip this field" mean during ticket migration?
The term 'Skip this field" in ticket migration refers to the target field. When selected, it means the corresponding target field will remain empty for all migrated tickets.

This option is typically used when there is no equivalent field in the source account, and a new field is added to the target account. In such cases, there's no data to migrate from the source to this newly created field.
What is a Demo Migration?
Appear on a new help desk platform. By default, it imports a small portion of data: 20 random tickets and 20 random knowledge base articles. However, we now offer a new, free option: a free custom Demo with custom data.
How does the Free Demo Migration work?
The Free Demo Migration operates similarly to the Full Data Migration. The Migration Wizard randomly selects twenty tickets and knowledge base articles (if chosen) and migrates them to your target platform along with contacts, comments, attachments, and related records. Typically, the Demo Migration completes within five minutes.
Note: The Demo Migration mirrors the process of the Full Data Migration. If you have questions or seek improvements in your Demo results, contact our support team for assistance.
What is a Free Custom Demo Migration?
Enables you to select specific records for import in a test migration by adding their IDs within the Migration Wizard. You can add up to 20 record IDs for tickets and articles. If you wish to use this option, add at least one record ID. If not, uncheck the box and proceed with setting up your Demo.

To enhance your experience and fully explore our Migration Wizard, hand-pick records with:
- many attachments
- inline images in the tickets
- call recording
- and more, tailored to your business needs
Take the Migration Wizard for a spin and give it a thorough test drive. Get behind the wheel and harness the power of the Custom Demo option to migrate carefully selected tickets and KB articles.
Simply input the ticket IDs and knowledge base article IDs into their respective fields, and let the magic happen as you initiate your complimentary Demo Migration. Refer to the table below for source platforms fully supporting this feature.
| Platform | Choose ticket IDs for a custom Demo | Choose KB article IDs for a custom Demo |
| Autotask PSA | + | |
| ConnectWise | + | |
| CSV | + | |
| Deskpro | + | + |
| Dixa | + | |
| eDesk | + | |
| FreeScout | + | |
| Freshdesk | + | + |
| Freshservice | + | + |
| Front | + | |
| Gorgias | + | |
| Groove | + | + |
| Helpdesk | + | |
| Help Scout | + | + |
| HelpShift | + | + |
| HelpSpot | + | |
| HubSpot Service Hub | + | |
| Intercom | + | + |
| Jira Service Management | + | + |
| Jitbit HelpDesk | + | + |
| Kayako | + | |
| Kustomer | + | + |
| Lansweeper | + | |
| Live Agent | + | + |
| LiveChat | + | |
| Manage Engine | + | |
| Oracle Service Cloud (RightNow) | + | + |
| osTicket | + | |
| ((OTRS)) Community Edition | + | |
| Re:amaze | + | |
| Salesforce Service Cloud | + | + |
| Servicedesk Plus | + | |
| ServiceNow | + | |
| ShepraDesk | + | |
| SolarWinds Service Desk | + | |
| SolarWinds Web Help Desk | + | |
| Spiceworks | + | |
| Spiceworks Cloud | + | |
| SuperOps | + | |
| SupportPal | + | |
| SysAid | + | |
| TeamSupport | + | |
| TeamworkDesk | + | |
| TOPdesk | + | |
| Trengo | + | |
| Vivantio | + | |
| Zendesk | + | + |
| Zoho Desk | + | + |
* Other help desk systems are under the hood at the moment.
What to do after the Free Demo is completed?
After completing the Free Demo Migration, review the migrated records in your target help desk. Thoroughly check the results to ensure they meet your requirements. Visit our help section to learn how to review the demo results for your specific platform. Verify if the Type, Source, Status, Priority, Custom Fields, Requester, Agent, and Tags migrated correctly. For Knowledge Base migrations, check the status of articles.
Important specs of the Free Demo Migration
1) To rerun your Demo Migration, return to the previous step, make necessary changes, and rerun the Demo. Our service automatically removes previously migrated tickets to prevent duplicates.

2) Upon starting the Full Data Migration, our service removes tickets transferred during the Demo to avoid duplicates.
3) You can request a Custom Demo Migration. Specify the IDs of specific tickets you want to transfer to test how our service handles them. However, you can transfer only 20 tickets.
Will the skipped/failed records in the Demo Migration be skipped/failed in the Full Data Migration?
Skipped or failed records in the Demo Migration typically lack essential data, such as contact information or inactive support agents. In the Demo Migration, the Migration Wizard selects 20 random tickets for migration. Therefore, the number of skipped or failed records in the Demo does not necessarily reflect the same amount in the Full Data Migration.
To reduce the number of skipped or failed records, download a Demo report to identify issues with those tickets. Alternatively, opt for the Signature support plan to have skipped or failed records checked and migrated.
How to restart my suspended Demo Migration?
If your test migration is suspended, contact our support team for assistance. If there are failed records in the report, fix them and restart your Demo.

Also, you can take advantage of the Help Desk Migration report option to identify records causing suspension and resolve them before restarting your Demo.

How to check the result of the Free Demo Migration?
To check the result of the Free Demo Migration, follow these general steps:
Once the Demo Migration is complete, you'll receive a summary table showing the number of transferred records along with downloadable files.

Click on the migrated records to access a list of records used for the Demo, along with their IDs from the source and target databases. Each record ID will be clickable, providing a direct link to its location in both systems.

Alternatively, if you choose to download reports or dumps, the IDs will be included in CSV- or ZIP-formatted files. While the IDs themselves won't be clickable, the CSV file will contain essential information to help you locate the tickets manually in your help desk accounts.

The ID list after pressing the ‘Download report” button
Pay special attention to tickets and ensure that essential entities such as Type, Source, Status, Priority, Custom Fields, Requester, Agent, Tags, and Knowledge Base article statuses (if applicable) have migrated correctly.
If satisfied with the Demo Migration outcome, proceed to launch the Full Data Migration. However, ensure you've thoroughly checked all migrated data and its interrelations before proceeding. By initiating the full migration, you confirm your satisfaction with the demo migration's quality and agree to the Service Level Agreement of Help Desk Migration.
Note: The test portion of data will be automatically removed from the target help desk after the Full Migration to prevent duplicates.
What is a Rollback Demo, and how does it work?
The Rollback Demo option allows you to remove migrated entities from the target platform after completing a Demo Migration. However, it is important to note that this option is applicable only on platforms that support it.
Not all data can be deleted, as removing certain entities may lead to misadjustments in the future. Consequently, such records are preserved on your target platform.
Locate the Rollback Demo option after your Demo Migration has concluded. It's typically found right under the details on available and migrated entities in the Migration Wizard.

Clicking on the Rollback Demo option opens a window displaying a list of entities that can be deleted from your target platform. You can choose which records to delete from the list provided.
Once you've made your selection, click the Continue button to proceed with the rollback process.

In this example, if you choose to delete 20 tickets, upon completion of the Demo rollback by the Migration Wizard, there will be no migrated tickets on your target platform anymore.

Upon revisiting the Rollback Demo option after completion, you'll receive a message indicating that there is currently no data to delete.

You can rerun your Demo as many times as necessary, and after each completed Demo, the rollback option can be utilized if needed.
What does “Demo migration is suspended” Mean?
When you encounter the message "Demo Migration is Suspended" during your migration process, it means that the migration has been temporarily halted due to certain issues.

Let's delve into what this means and how you can navigate through this situation:
Why Demo Migration is suspended: Unraveling the mystery
Various errors can lead to the suspension of a migration process. These errors are often specific to the platforms involved and can hinder a successful migration. Here are some common reasons why a Demo migration may be suspended:
- Platform Specific Requirements: Each platform has its unique structure and requirements. For example, certain features may need to be activated or configured correctly before migration can proceed. Failure to meet these requirements can cause the migration to be suspended.
- Duplication Issues: Some platforms prohibit the creation of duplicate records or fields. If such duplicates are detected during migration, it can lead to suspension.
- Authentication and API Access: Platforms that use OAuth authentication require valid access tokens for API access. If the access token is expired or invalid, the migration process may be suspended due to inability to establish the necessary API connection.
- Invalid or Suspended Contacts: Contacts that are invalid or suspended may not be processed or created on the target platform, leading to migration suspension.
Empowering you to take control: navigating a suspended migration
If your Demo Migration is suspended, here's how you can navigate through the situation:
Check the Reason: Determine why your Demo Migration was suspended.

If it's due to skipped or failed records, it's best to wait for assistance from the support team to resolve the issue.

Resolve Issues: If you notice failed records, review the reasons for suspension and take action to fix the issues.

Once resolved, indicate that you've fixed the errors and restart the Demo migration.

How to Find Ticket IDs for Free Demo with Custom Data?
To find ticket IDs for conducting a Free Demo with Custom Data, follow these steps for each respective platform:
How to find an Autotask PSA ticket ID?
- Open the ticket you want to include in the Custom Demo.
- Look at the URL and find the ticket ID, which is typically at the end of the URL.
Important: T20230127.0001 is a ticket number, not a ticket ID required by our Migration Wizard.

https://www.autotask.net/Mvc/ServiceDesk/TicketDetail.mvcworkspace=False&ids%5B0%5D=8020&ids%5B1%5D=8040&ids%5B2%5D=8025&ids%5B3%5D=8026&ids%5B4%5D=8027&ids%5B5%5D=8028&ids%5B6%5D=8029&ids%5B7%5D=8030&ids%5B8%5D=8031&ids%5B9%5D=8032&ids%5B10%5D=8033&ids%5B11%5D=8034&ids%5B12%5D=8035&ids%5B13%5D=8036&ids%5B14%5D=8037&ids%5B15%5D=8038&ids%5B16%5D=7984&ids%5B17%5D=8000&ids%5B18%5D=8016&ids%5B19%5D=8017&ids%5B20%5D=8018&ids%5B21%5D=7983&ids%5B22%5D=7725&ids%5B23%5D=7717&ids%5B24%5D=7726&ticketId=8025
Input 8025 in the migration and separate each subsequent ID with a coma.

Note If you provide incorrect details or add unnecessary characters, be prepared to have your ticket or article ID removed.
How to find ConnectWise ticket ID?
- Navigate to the "Service Desk" in your ConnectWise account.
- Locate the ticket you want to include in the Custom Demo.
- Note the ticket ID from the "Ticket #" column.
- Input the ticket ID into the Migration Wizard.

How to find a Dixa ticket ID?
- Log into your Dixa account and go to the admin panel.
- Click on "Conversations" and locate the column labeled "ID."
- Find the ticket ID needed for the Custom Demo.
- Input the ticket ID into the Migration Wizard.

How to find eDesk ticket ID?
- Visit your eDesk mailbox and go to the tickets.
- Click on the ticket you want to include in the Custom Demo.
- Look under the ticket subject to find the ticket ID.
- Input the ticket ID into the Migration Wizard

How to find Freshdesk ticket ID?
- Navigate to your Freshdesk account and go to the tickets section.
- Find the ticket you want to include in the Custom Demo.
- Look for the ticket ID in the URL or above the ticket action bar.
- Input the ticket ID into the Migration Wizard.

How to find a Freshservice ticket ID?
- Go to your Freshservice account and navigate to the tickets section.
- Find the ticket you want to include in the Custom Demo.
- Look for the ticket ID in the URL or above the ticket action bar.
- Input the ticket ID into the Migration Wizard.

How to find a Front ticket ID?
- Open the required conversation in Front.
- Click on the "More menu" option.
- Select "Copy conversation ID" from the menu.
- Paste the conversation ID into the Migration Wizard.

How to find a Gorgias ticket ID?
- Open a ticket in Gorgias.
- Find the ticket ID within the URL.
- Input the ticket ID into the Migration Wizard.
Allow us to illustrate with an example: suppose you have a ticket URL like this https://john-doe.gorgias.com/app/ticket/37206273. In this case, the ID of the ticket is 37206273.

How to find a Groove ticket ID?
- Create a ticket in Groove and find the ticket ID in the URL.
- Input the ticket ID into the Migration Wizard.
Allow us to demonstrate through an example: let's say you possess a ticket URL similar to this https://john-doe.groovehq.com/ticket/3. In this scenario, the ticket's ID is 3.

How to find a Help Scout ticket ID?
- Go to your Help Scout mailbox and select the conversation.
- Look at the URL to find the conversation ID.
- Input the conversation ID into the Migration Wizard.
An example URL is https://secure.helpscout.net/conversation/2244913723/139949/, where the conversation ID is 2244913723.

How to find HelpDesk ticket ID?
- Select the ticket you need in HelpDesk.
- Look at the URL to find the ticket ID. The ticket ID appears right after the forward-slash (/). You'll find the ID required for a test Demo Migration with custom data.
For instance, if your URL is https://app.helpdesk.com/tickets/c1aecad3-061c-4208-be85-7a0fee80d0d2, the ticket ID is c1aecad3-061c-4208-be85-7a0fee80d0d2.

Pay attention: the ticket ID in the details won’t work in the Migration Wizard, and after the Demo, no data will be transferred.
How to find a HubSpot Service Hub ticket ID?
- Open your HubSpot Service Hub account and navigate to the ticket.
- Look at the URL to find the ticket ID.
- Check the URL - the ticket ID can be found right after "ticket/." This ID is necessary to conduct a test Demo Migration with custom data.
For instance, if your URL is https://app.hubspot.com/contacts/74452412/ticket/1381335341, the ticket ID you need is 1381335341.

How to find an Intercom ticket ID?
- Open your Intercom mailbox and select the conversation.
- Look at the URL to find the conversation ID. The conversation ID can be found after "conversation/". It is the necessary ID for conducting a test Demo Migration with custom data.
For instance, if your URL is https://app.intercom.com/a/inbox/ioijicjl/inbox/admin/419475858742/conversation/160244800009737, the conversation ID would be 160244800009737.

How to find a Jira Service Management ticket ID?
- Hop over to your Jira Service Management account and go to the issue section.
- Find the ticket you want to include in the Custom Demo.
- Copy the Issue Key and pop it into the appropriate field of our Migration Wizard.
How to find a Kayako Classic ticket ID?
- Go to your Kayako Classic account and select the ticket.
- Look at the URL to find the ticket ID. Take a peek at the URL, and you'll find the ID you need for your test Demo Migration with custom data.
- Input the ticket ID into the Migration Wizard.
How to find a Salesforce Service Cloud ticket ID?
- Open your Salesforce Service Cloud account and go to the Case section.
- Find the case you want to include in the Custom Demo.
- Look at the URL to find the case ID. You'll discover the precious case ID you need for your splendid test Demo Migration with custom data there.
For example, you have a URL https://company-domen.lightning.force.com/lightning/r/Case/5006g00000sLZfyAAG/view, and the case ID is 5006g00000sLZfyAAG.

How to find ServiceNow ticket ID?
- Log in to your ServiceNow account and go to incidents.
- Select the incident you want by clicking on it.
- Check the URL to find the incident ID.
Check the URL:
https://company-domain.service-now.com/now/nav/ui/classic/params/target/incident.do%3Fsys_id%3D9d385017c611228701d22104cc95c371%26sysparm_record_target%3Dincident%26sysparm_record_row%3D1%26sysparm_record_rows%3D40%26sysparm_record_list%3Dactive%253Dtrue%255EORDERBYnumber.
The incident ID: 9d385017c611228701d22104cc95c371 is necessary for conducting a test Demo Migration with custom data.
How to find a Zendesk ticket ID?
- Go to your Zendesk account and navigate to the tickets section.
- Find the ticket you want to include in the Custom Demo.
- Look at the URL or above the ticket subject to find the ticket ID.

How to find a LiveAgent ticket ID?
- Go to your LiveAgent account and navigate to the tickets.
- Locate the ticket you want to include in the Custom Demo.
- Find the ticket ID displayed in the right sidebar.
- Copy the ticket ID and paste it into the Migration Wizard.

What is Delta migration?
Delta migration is a feature offered by Help Desk Migration service for customers who want to continue to use their source help desk while the migration process is ongoing. It allows for the migration of newly created and updated tickets and knowledge base articles to the target platform after the initial full data migration.
How does Delta migration work?
During this process, we remigrate the tickets and knowledge base articles that were updated and also migrate those that were created during the Full migration.
There is no possibility of duplicates when migrating updated tickets and articles, as our tool automatically finds the new data in the source platform. Then, the Migration Wizard deletes its copy from the target to move only the updated version of the ticket or article there.
In the case of the newly raised tickets and articles, they simply migrate to the new system.
What is recurring Delta migration?
Companies often continue using their source help desk post-migration and require new tickets to be seamlessly moved to the target platform for their support agents. Recurring Delta migration fulfills this need. Simply reach out to us anytime to initiate another migration and map your records. Ensure you provide us with your previous Full Data Migration report, which includes ticket IDs (downloadable upon completion of Full Data Migration).
Note that not all help desk platforms support recurring Delta migration. Contact our migration experts to verify compatibility with your data migration platform.
How much does recurring Delta migration cost?
Recurring Delta migration is available for an additional fee and is not included in the Signature package. Each new recurring Delta migration is charged separately.
Key Points about Delta migration
- Any changes made to updated tickets or articles on the target platform post-migration will be overwritten. The version on the target platform will reflect updates made on the source help desk before Delta migration.
- Delta migration may not be feasible if your target platform's API prohibits third-party services from deleting data. This limitation applies to platforms like Intercom.
- In Front, Delta migration allows updating existing data without deleting previously imported tickets. However, outdated tickets must be manually removed post-Delta migration. Our Help Desk Migration team will provide a list for easy deletion, ensuring your data stays current and clutter-free.
- You have 10 days after completing Full Data Migration to initiate Delta migration. After 5 days, all information about your data migration will be removed for security purposes.
- Delta migration can be started between 9 am to 9 pm during weekdays in EET/GTM +3. Contact us to schedule for different timings or days.
What Is an Interval Migration? And how can you benefit from it?
Interval Migration provides the flexibility to pause help desk data migration during the workweek and resume on weekends or at other times that align with your business requirements.
This option ensures continuous customer service without any interruptions or downtime. Additionally, when used alongside Delta Migration, all your data is resynchronized after the initial migration.
How does the interval migration work?
Interval Migration involves two steps: data reading and data transfer. Once all entities in the 'Retrieved' column have a green checkmark, your data has been read, and the Migration Wizard begins transferring it.

During Live Migration, data transfer occurs continuously. However, with Interval Migration, you can pause the data transfer process while actual records are being imported.
How many times can an interval migration be applied?
Interval Migration can be applied up to five times during your help desk migration process. Each pause must not exceed five days, and the transfer must be resumed within this timeframe.
How actually to pause and resume migration?
To pause and resume migration, contact our sales team to coordinate the timing for pausing and later resuming your Full Migration. Note that the Interval Migration option is available during our operational hours:
- Monday through Friday: 8 am to 12 am (UTC+2)
- Saturday and Sunday: 12 pm to 8 pm (UTC+2)
What is the use case of interval migration?
When a company transitions its customer service operations from a legacy help desk to a new live help desk instance, support representatives are already actively using the new platform and cannot afford to turn off notifications during data transfer migration.
This means the company can only execute help desk migration after business hours or on weekends. However, with Interval Migration, they can conveniently pause and resume their records importing to align with their business hours.
What’s the difference between Automated and Custom Migration?
Help Desk Migration service offers two types of migration: Automated and Custom.
Automated migration enables you to map and transfer basic records (Tickets, Contacts, Users, Attachments, Custom fields, etc.) using the Migration Wizard. You can easily migrate data by following a few simple steps, and the Migration Wizard will calculate the total number of records, determining the price automatically.
Alternatively, if you have specific migration needs such as custom mapping, adding additional fields, tags, or any other requirements, you can opt for our Custom migration service. The cost of this service depends on your specific needs and the amount of data. Simply reach out to us with your requirements, and one of our agents will contact you shortly.
My help desk system is not supported. Can you help me?
If your help desk software is not listed or supported on our website, we recommend reaching out to our customer service team for assistance.
Our experts will evaluate the software and explore potential options for migrating your data.
How Can I Customize My Migration?
If you have specific requirements for your migration, you can start a Free Demo Migration and then contact us using the form provided to discuss the details.
Here are some possible customizations:
- Applying custom filters to imported data.
- Data deduplication. Note, that Help Desk Migration Service doesn’t create duplicates and doesn’t check for them.
- Matching pre-existing data in your target (new) system.
- Migrating one object as another (i.e. Users as Contacts).
All customizations require additional development, which may increase the cost of migration.
We can provide you with a quote only after your Demo Migration is complete and after we receive all of your requirements.
How to allow support access to your help desk data migration?
To uphold data security standards, we may require you to grant support access for our customer service and technical teams to facilitate data migration and configuration adjustments necessary for troubleshooting and issue resolution. Access will be granted to all migration steps until the completion of migration or until you manually revoke access.
The client understands that without granting such access, we are limited in ability to address and resolve data migration-related questions or issues.
How to grant access to our support team?
Granting support access is a straightforward process and can be completed directly from the Migration Wizard:
- Access your migration dashboard and locate the data migration you need assistance with.
- Click on the wrench icon (🔧) next to the relevant migration. A message will appear explaining the access required.

Click 'Save' to proceed with granting access and confirm the support access.

If you haven't granted support access but require assistance, our support representatives will send you a support access request. You'll receive an email containing a link to the Migration Wizard. Simply click the link to open a window where you can grant access and save your choice. This allows our support reps to efficiently troubleshoot your request and provide the necessary guidance.
To verify if you've granted support access to your data migration (especially if you have multiple Demos), navigate to migration details and check the access status. You can also provide support access from the same menu.

We appreciate your cooperation in ensuring a smooth and efficient support experience.
Migration sharing: How to share your data migration?
The Migration Sharing option allows you to provide controlled access to your migration for your colleagues or clients to review data mapping or perform other necessary checks.
How to share your data migration?
Go to your migration dashboard at https://app.help-desk-migration.com/. Click on a sharing icon next to the wrench icon.

Enter the name and work email of your colleague or client. Choose the access scope you wish to allow:
- Global grants full access, allowing your colleague or client to see the migration as you do.
- Restricted limits access, preventing your colleague or client from viewing support plans, prices, or starting the Full Migration.
Click 'Save' to share the migration.
Once saved, your colleague or client will receive an email notification about being granted access to the data migration at Help Desk Migration. If they don't have an account at https://app.help-desk-migration.com/, they will be directed to the sign-up page before accessing the migration settings.

To modify or revoke access for your colleague or client, click the sharing icon. Then, select the appropriate option from the drop-down menu next to the shared person's email address.

Custom name for data migration: How to label your migration?
Managing multiple help desk migration projects can be challenging, especially when you need to distinguish between them. Our new feature allows you to give each migration a custom name for easier identification.
Here's how to label your migration:
Go to your migration dashboard at https://app.help-desk-migration.com/. Click on the 'Edit' icon above the data migration you wish to customize.
![]()
Enter your desired custom name for the migration, and click the 'Done' button to save the changes.

You can follow the same process to change the name of your migration at any time.
How to map default and custom fields?
In the Migration Wizard, mapping default and custom fields is straightforward, regardless of whether you’re working with tickets, contacts, organizations, problems, or changes. This process ensures your data transitions smoothly between your Source and Target.
Understanding default and custom fields
Default fields are pre-configured to address common support scenarios. They can be categorized as follows:
| Type | Examples | Peculiarities |
| System fields | Subject, Tags, Organization, Group, CC, Assignee, Contact, Comments, Created date, Updated date, and Closed date | These fields are matched automatically and can’t be modified. |
| Default fields | Type, Source, Priority, and Status | These fields can be adjusted as needed. If your Source and Target share the same fields, they will be mapped automatically. |
Understanding custom fields
Custom fields offer the flexibility to tailor your help desk to specific workflows. Depending on your Source/Target functionality, you can map various custom fields as follows:
| Type | Peculiarities |
| Drop-down fields | These fields feature predefined options and can be mapped as drop-downs. |
| Checkbox fields | These displayed as drop-downs during mapping, checkboxes fields will migrate as checkboxes if they match the same type. |
| Multi-level fields | These fields are shown as drop-downs in the mapping step but become multi-level fields when matched with the corresponding type. |
| Multi-select fields | They are displayed as drop-downs during mapping and turn into multi-select fields when mapped with the same type. |
| Text/string fields | They can be single-line or multiline; these fields are mapped without length validation in the Migration Wizard. |
| Numeric fields | Map this field to a corresponding numeric field in the Target, or, if needed, match a Source numeric with a Target custom text field. |
| Date fields | Review the formatting of this field. Some platforms use a date-only format, while others can include a date with a timestamp. |
| Reference fields | These fields are not visible during the mapping process. |
| Regex fields | Not available for mapping. |
| Formula fields | Supported only for specific Source-Target pairs. |
How to start mapping fields
Choose the records you want to migrate. Click the "Map fields" button next to any record. A form will open, displaying system, default, and custom ticket fields. Start by matching the default fields from the Source with those in the Target.
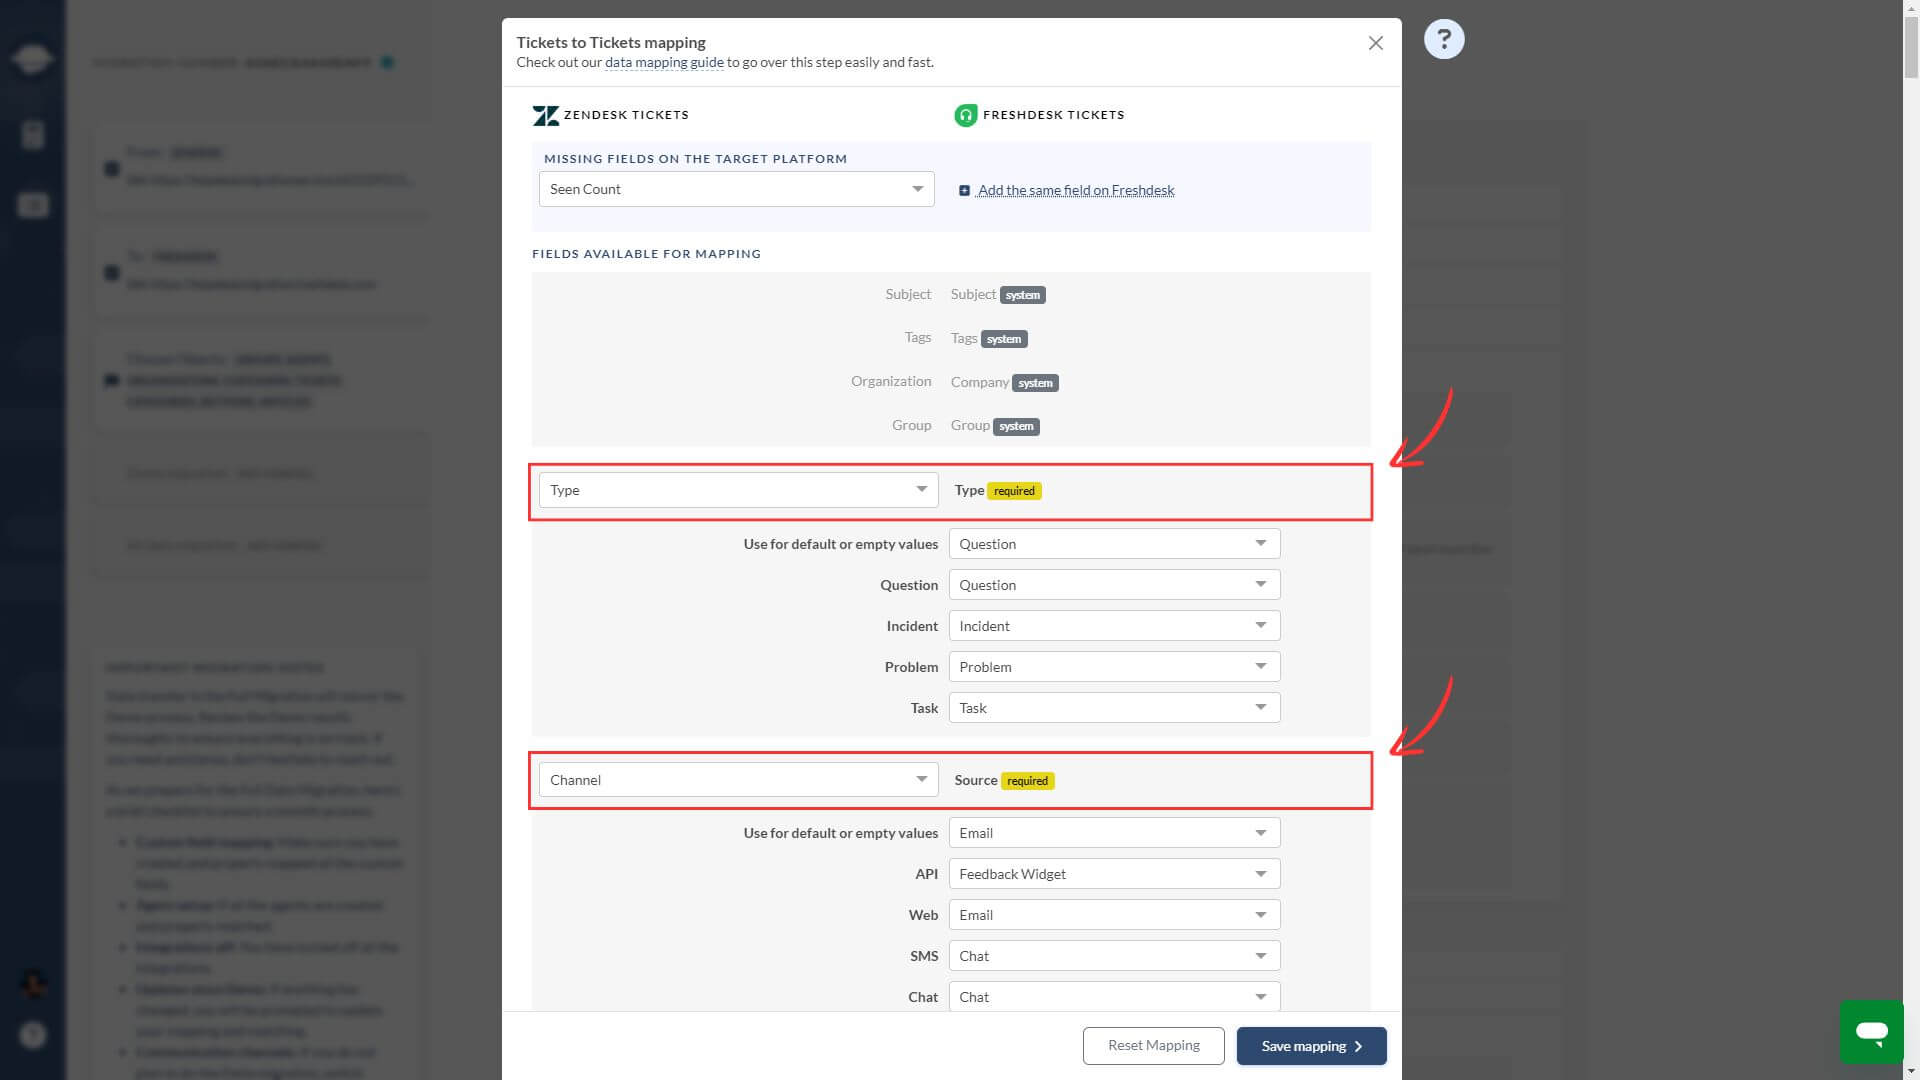
Scroll down to map custom fields. Make sure you’ve created these fields in advance and match them to the appropriate field type.

Additional Feature: For greater flexibility, you can use the “Add the same field” option.
General mapping rules
1. Field type matching: Ensure fields are of the same type—text fields to text fields, numeric fields to numeric fields—when mapping.

2. Custom field setup: Create custom fields on your Target before migration. If not set up in advance, you’ll see those Source custom fields, but if they don’t exist on Target, you won’t be available to map them to their counterparts.
3. Automatic mapping: Fields with the identical names on both Source and Target are automatically mapped. This includes predefined options for drop-downs, multi-level, multi-select, and checkbox fields.

4. Unmapped fields: Migration Wizard highlights unmapped options in yellow, indicating that you need to map them.

5. System fields: These fields are mapped automatically and can not be changed.

6. Required fields: Ensure all required fields are mapped, as they are mandatory for creating or closing tickets. Some fields may have settings or rules that prevent ticket migration if left empty.

7. Skipping fields: Use the "Skip this field" option to leave the Target field blank in all migrated tickets. This option is available only for non-required fields.

8. Default value: For added flexibility, consider using features like 'Skip this field' and 'Default value.' These options are particularly useful when required fields on the Source and Target don’t align or when you have empty fields on the Source.
If a field isn’t mandatory on your Target or the data isn’t necessary, choose 'Skip this field.' Alternatively, if your Target requires a field that the Source doesn’t have, use the 'Default value' option to create tickets with this option for all migrated tickets.
Custom field mapping essentials
1. Custom text fields:
Each platform has its own character limits for custom text fields. Map single-line text fields to single-line fields and multi-line text fields to multi-line fields.
If you map a Source multi-line text field to a Target single-line text field, any text exceeding the limit on the Target will be truncated.
2. Custom multi-select fields:
Ensure that the Target multi-select field is mapped to a corresponding multi-select field on the Source. If you map a Target multi-select field to a Source select or checkbox field, only the first value will be migrated.
3. Custom multi-level fields:
A multi-level (nested) fields contain several tiers of options, where each lower level depends on the selection made at the higher level.

Example of multi-level field on Zendesk
Map your Target multi-level field to the corresponding Source field, ensure each level in the Source field matches the corresponding level in the Target. This includes aligning values at each level, whether first, second, or third, according to the field's structure.

4. If Multi-Level Fields Are Unsupported
If your Target does not support multi-level fields, create separate drop-down fields for each level. For example, if your Source multi-level field has three levels, create three drop-down fields in the Target, each containing the values of one level.

Example of corresponding drop-down fields on Freshdesk
Start by mapping the Source multi-level field to the first Target drop-down. Align each first-level option with the first Target drop-down. Then, repeat for the subsequent levels, mapping each to its respective drop-down field.

5. Creating custom fields while mapping:
For certain Targets, you can create custom fields directly within the Migration Wizard. Keep the following in mind:
- You can not create the same field more than once.
- Migration Wizard will create drop-down fields with the same predefined options as the Source.
- Checkbox, multi-level, and multi-select fields will be created as drop-down fields on the Target. For better results, create these fields manually to ensure they migrate correctly as their respective field types.
How to migrate custom fields?
Log in or sign up for Help Desk Migration. Connect your source and target systems. You'll reach the Select Object page to choose options for a seamless data migration.

Tap the "Map Fields" button next to "Tickets" to access the Migration Wizard. Here, you'll find a form displaying both default and custom ticket fields. Custom ticket fields are conveniently located at the bottom of the form. This is your opportunity to effortlessly align fields between your help desk systems.
Explore the "Add the same field on [target]" option, located at the top of the page. This feature allows you to craft custom fields on the target help desk.

If the button seems to have disappeared, it could be due to two reasons:
- The target help desk may not support custom fields.
- The target help desks API methods might be restricted, making it difficult to migrate those values.
If you're confident that your target system supports custom fields but the button is missing, don't worry. You can handle it manually.
Here are some helpful tips for field creation:
- Maintain consistency by naming the fields the same as they were in the old help desk. You can adjust the titles later for a perfect fit.
- Stick to the original field types for seamless migration. Remember, you can only map fields with the same types (e.g., Text to Text, Drop-down to Drop-down).
What are the types of custom fields and their uses
Here's a breakdown of common custom field types and their typical uses:
| Custom field type | Example use-cases |
| Single line text | "Customer name: Jane Doe", "Company name: TechWave Inc." |
| Multiline text | "Additional descriptions: Product specifications", "Address: 123 Main Street, Anytown" |
| Checkbox | "Subscriptions: Newsletter", "Agreements: Terms and Conditions" |
| Number | "Order ID: 789456", "Phone number: 555-1234" |
| Dropdown | "Quantity: 10 items", "Size: Large" |
| Date | "Purchase date: August 15, 2023", "Complaint date: July 3, 2023" |
| Decimal | "Discount percentage: 15.5%", "Tax rate: 7.25%" |
Map Contact and Company's Custom Fields
To efficiently map custom fields for contacts and companies during your data migration process, take advantage of this feature available on the data mapping step. This option is supported when migrating data across the following platforms:
- Ivanti
- Freshdesk
- Freshservice
- Front
- HappyFox
- HelpScout
- HubSpot Service Hub
- Intercom
- Kayako
- Kustomer
- Salesforce Service Cloud
- Vivantio
- Zendesk
- Zoho Desk
For CSV migrations, custom field mapping for contacts and companies is supported conditionally. Please note that the specifics of custom field mapping for CSV files are managed behind the scenes.
Below is a sample illustrating custom contact field mapping:

This streamlined process saves you time and effort, ensuring a smooth transition of your data with customized field mappings tailored to your needs.
How to migrate inline images?
Migration Wizard can seamlessly migrate inline images in Knowledge Base articles. For tickets, however, inline images can’t be transferred as inline images due to platform limitations. Instead, you can migrate them as ticket attachments by selecting the Migrate inline images as ticket attachments option.
Here’s what to expect:
- If your Target supports inline images in Knowledge Base articles, they’ll migrate just as they appear in the Source.
- Inline images in tickets cannot be transferred as inline images. However, by enabling the Migrate inline images as ticket attachments option, you can ensure they remain accessible as attachments.
Note: The option to migrate inline images as ticket attachments is currently available for Freshdesk, Freshservice, Gorgias, Help Scout, HubSpot Service Hub, Jira Service Management, Kayako, Zendesk, and Zoho Desk. For more information or assistance, feel free to reach out to our support representatives.
What does happen with the old links in the comments?
During the migration process, the old links in the comments will remain unchanged from how they were on the Source . However, any attachments associated with these links will be relocated to the Target. This ensures that the integrity of the comments is maintained, while the attachments are appropriately transferred to the new location on the Target platform.
How to migrate multiple languages in knowledge base?
Have a multilingual knowledge base and want to preserve all localized articles after data migration? You can migrate content translations if both source and target platforms include multilingual support. Just make sure to add the same language versions on the source help desk to the target.

How to migrate call recordings?
Looking to migrate call recordings from your Zendesk account seamlessly? Opt for our solution to attach call recordings as ticket attachments.

Prior to migration, call recordings exist as individual messages within Zendesk tickets.

By selecting this option, call recordings will be attached to tickets. Post-migration, they'll be linked as mp3 files beneath ticket descriptions, accessible via provided links.

How to skip attachment?
Take control over which attachments you choose to manage:
- All tickets
- Tickets last updated more than 6 months ago
- Tickets last updated more than 12 months ago
- Tickets last updated more than 24 months ago
This enhanced functionality enables precise control over attachment handling, optimizing data storage and expediting migration processes. It's a versatile tool for tailoring attachment management to your specific needs, ensuring efficiency across your platform.

How to add a new tag to the migrated tickets?
Selecting to add a new tag to migrated tickets activates the tag field, appearing below.

You need to provide at least one tag to activate this option.

Moving forward with the Full Data Migration
To proceed to Full Data Migration seamlessly:
- Log in to your account and navigate to the payment page.
- Complete the payment and for a few minutes for confirmation.
- Once confirmed, go for starting your migration.
Remember:
- Use the original migration request for Full Data Migration; no new request is necessary.
- Demo Migration data is deleted before initiating Full Migration.
- Full Migration initiates afresh, transferring all current information from the source help desk system.
For data transfer to a new instance of your database (e.g., from sandbox to production), submit a ticket for assistance.
How to restart a data migration?
The Data re-migration option enables the removal of previously migrated data from the target platform, allowing for a fresh transfer with adjusted settings, mappings, etc. This feature is particularly useful after completing a Full Data Migration, providing the opportunity to rectify any issues.
Reasons for re-migrating data include:
- fixing errors
- applying custom field mapping
- updating user profiles in a target platform
- enabling audit fields
- customizing data movement
Keep in mind that this process removes all previously moved data, including any edits or updates. It initiates the migration anew from the current platform.
What are the benefits of data re-migration?
1. Correct mistakes:
Address any errors or oversights from the initial migration, ensuring perfection.
2. Test sandbox migration:
Conduct a test migration to the sandbox, verifying report generation. Proceed to migrate to the live account upon successful testing.
3. Improve data consistency:
Refine data mapping for tickets, articles, agents, contacts, or organizations, including custom field mapping to meet specific requirements.
Which support plan includes data re-migration?
Premium and Signature plans include data re-migration, with the following distinctions:
- In a Premium plan allows re-migration within 5 (five) days after completing Full Data Migration.
- In a Signature plan permits re-migration within 10 (ten) days post Full Data Migration.
After the specified timeframe, the Migration Wizard automatically archives all Demo and Full Data Migrations in accordance with our security policy.
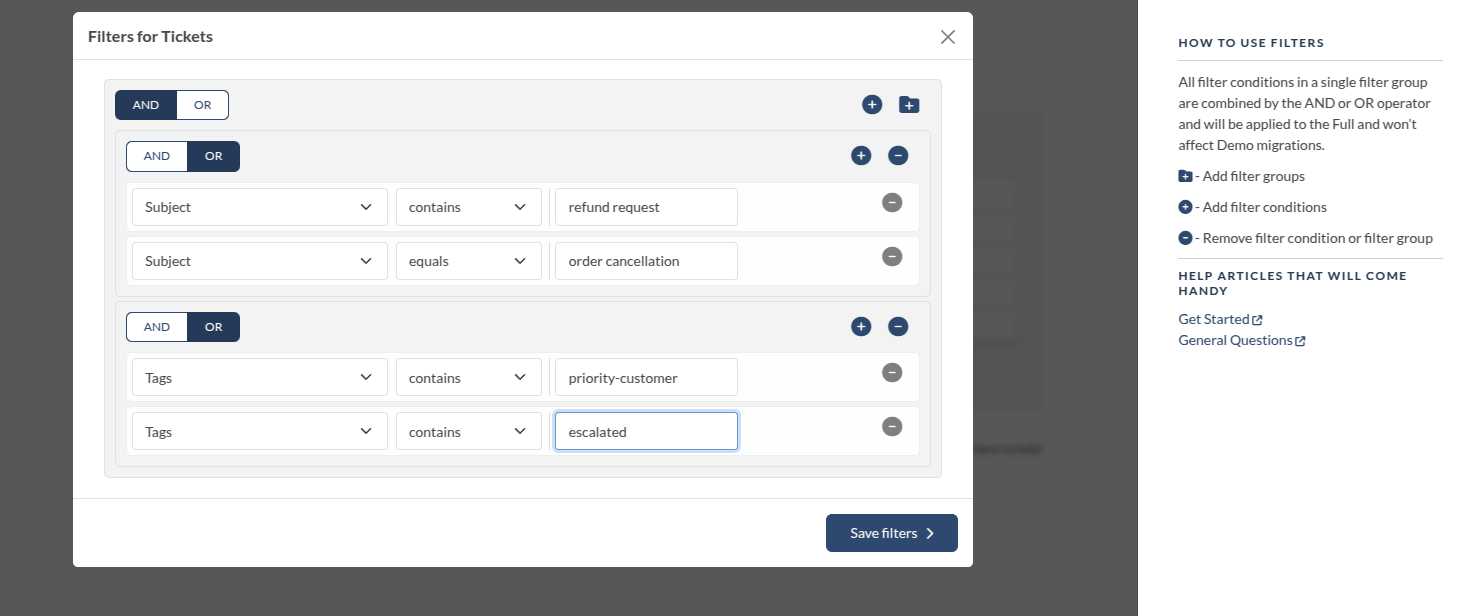
How to use ticket filters in the Migration Wizard?
After running a Demo Migration, you can apply filters to refine which tickets get migrated. This feature is available for CSV, Freshdesk, Freshservice, Front, Gorgias, Groove, LiveChat, SmarterTrack, Spiceworks Cloud, SysAid, Track-It, and Zoho Mail.

You can filter tickets based on specific criteria by selecting conditions and using AND/OR operators. You can also create filter groups to set up multiple conditions for a more precise selection. Once your filters are set, click Save Filters to apply them.

Example 1: Filtering by subject
Let’s say you want to migrate tickets with a subject that contains "refund request" AND equals "order cancellation." You can then add another filter group to refine the selection further, such as filtering by tags that contain "priority-customer" OR equals "escalated."
The Migration Wizard lets you filter data based on a variety of conditions, helping you refine results for greater accuracy. You can filter by ticket status, date ranges, priorities, or other predefined attributes to streamline data management and get the insights you need.
Example 2: Filtering by agent
Here's how this can work:
- Select One or More Agents: Choose one or multiple agents from a list, or apply advanced search options like agent names, roles, or departments to customize your filter.
- Agent-Specific Views: Focus on data relevant to particular agents, whether you're tracking performance, ticket statuses, or other details tied to specific individuals in the system.
- Contextual Filtering: Combine this new agent filter with other filters, like viewing "open tickets assigned to Agent X" or "high-priority tickets handled by Agent Y." This makes filtering even more flexible and powerful for managing complex workflows.

Set your filters, and the Migration Wizard will take care of the rest.
If you need more advanced filtering options, contact our support team for details on custom data filtering.
How to map groups?
In Migration Wizard, groups work like any other ticket field during the mapping setup. You can match them between Source and Target based on how each platform handles groups.
How to start mapping groups
Select Tickets to open the field mapping step automatically. You’ll see a window with system, default, and custom ticket fields.

Scroll to the Groups field and start matching Source groups with Target groups.
What to expect during mapping
- Groups act as a default field—you can map them one-to-one or match multiple Source groups to a single Target team.
- If the group field isn’t required on the Target, you can choose to skip it during mapping.
- You can’t create groups directly from within the Migration Wizard.
How the Unassigned option works
Use the Unassigned option when your Source has tickets without an assigned group or your Target doesn’t have any teams set up. Whether this option appears during mapping depends on the following:
1. If the Source platform supports tickets with an empty group field, Unassigned appears as an option on the Source side.

2. If the Target platform allows creating tickets without an assigned group, you’ll see Unassigned on the Target side.

3. If the group fied is required on the Target, the “unassigned” option won’t be available for mapping. Instead, you’ll need to set up a default value.
