General Questions
How to migrate only closed tickets?
The migration of only closed tickets is available in an automated migration for a selection of platforms that support filtering. If the platform you want to migrate from doesn’t have filtering, you can reach out to our Support Team, and we'll explore the option of transferring exclusively closed tickets through a custom migration process tailored to your specific needs.
The list of platforms that support filtering feature:
- Autotask
- BMCHelixITSM
- BoldDesk
- ConnectWise
- Deskpro
- DevRev
- FreeScout
- Freshdesk
- Freshservice
- Front
- GLPI
- Groove
- Halo
- HappyFox
- HelpCrunch
- HelpDesk
- HelpScout
- HubSpot Service Hub
- Intercom
- Jira Service Management
- Kustomer
- Plain
- RequestTracker
- Salesforce Service Cloud
- ServiceNow
- SuperOps
- TeamworkDesk
- Zendesk
- ZohoDesk
Can I migrate tickets without contacts?
Unfortunately, migrating tickets without contacts is not possible. To maintain all relationships between records, including tickets, agents, contacts, groups, etc., you must migrate all objects. Our migration service ensures that everything is transferred in the same order as it was on your legacy help desk, allowing your agents to work with accurate records.
Why do contacts matter?
Contacts are crucial because they serve as connection points between all records. Some platforms, like Freshdesk, Freshservice, and Kayako, do not allow complete removal of data, especially users (agents and contacts), as they are essential for maintaining data integrity.
For example, in Freshdesk, when a contact is deleted, it's not completely removed but marked as "DELETED." If that deleted contact submits a new request, their email may be treated as spam or sent to the trash folder.
Importing Contacts beforehand
If you've imported contacts beforehand and want to skip them during migration, unfortunately, it's not possible. The API does not allow excluding contacts from migration, and the Migration Wizard needs to check for duplicates by migrating all data to compare information.
How to filter tickets during migration?
Data filtering lets you define conditions that limit which tickets get migrated — so instead of moving your entire ticket history, you transfer only the records that matter for your business. Filtering is available in a default migration.
Why do businesses use data filtering?
Migrating your entire ticket history might seem like the safest approach, but for most organizations it creates more problems than it solves.
- Prepare for AI-ready migration. You can use filters to migrate the data your AI agents in the target platform need for training. This helps them handle basic customer requests more effectively and reduces the workload on your support team.
- Cleaner destination system. Importing years of resolved or auto-generated tickets adds noise without value. Filtering keeps the new platform focused on what agents actually need.
- Compliance and data retention. Many industries require data to be kept only for a defined period. Filtering by date ensures you migrate within your retention window and avoid carrying over records you're obligated to eventually delete.
- Phased cutovers. When a platform doesn't support delta migration, filtering makes a staged go-live possible — move open tickets first so agents can start working immediately, then bring historical records over in a second run.
- Multi-workspace architectures. Organizations segmented by brand, group, or region often can't migrate everything into a single destination. Filtering lets each segment move independently into the right workspace.
- Faster, leaner migrations. Moving less data means shorter processing times and a lower risk of hitting API rate limits or timeouts.
How do filters work?
Filters use AND logic — every condition you set must be met for a ticket to be included. For example, if you filter by date range AND by status, only tickets that satisfy both conditions will be migrated.
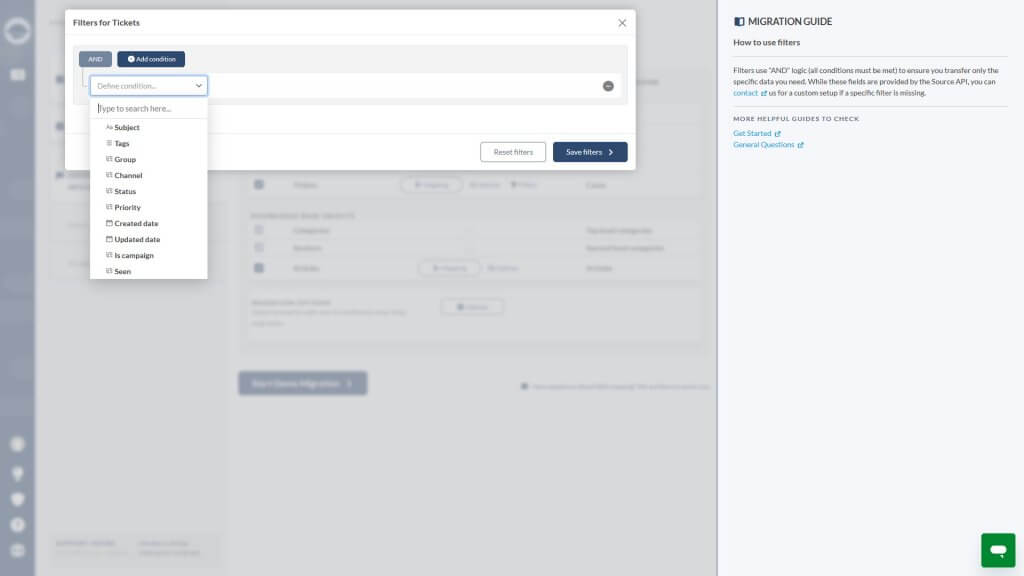
What are the most common filtering use cases?
1. Filter by ticket creation or last update date
This is the most frequently used filter. Some teams choose to migrate only the last 2–3 years of tickets rather than their full history.
Why teams do this:
- Legal/compliance requirements — some organizations are required to retain data only for a defined period, and migrating beyond that scope is unnecessary or even undesirable.
- Operational reference — agents simply don't need older records in the new system and prefer a cleaner, more relevant dataset to work from.
2. Filter by ticket status
Teams often exclude tickets in certain statuses — most commonly Closed or Solved — to avoid importing resolved, inactive records into the new platform.
A more advanced use case arises when a platform doesn't support Delta Migration and the team has a hard go-live deadline. In that situation, the migration is split into two separate runs:
- Migration 1: Tickets with status Open only — agents can start working in the new system immediately.
- Migration 2: All remaining tickets (everything except Open) — historical and resolved records are brought over after the cutover.
3. Filter by group or brand
This filter is used when the source platform organizes tickets by groups or brands (brands are specific to Zendesk), and the target platform requires data to be separated by workspace or team.
A typical example: migrating from Zendesk to Freshservice, which supports only one workspace per migration run. If the source has multiple groups or brands, each one is migrated separately into its own Freshservice workspace — and group/brand filtering makes that segmentation possible.
4. Filter by ticket subject
Subject-based filtering is typically requested to exclude automated or system-generated tickets that have no operational value in the new platform. Common subject patterns teams filter out include things like "Notification from…" or "Automated notification" — messages generated by integrations or bots that clutter the ticket history without representing real customer interactions.
Can I combine multiple filters?
Yes. Because filters use AND logic, you can stack conditions — for example, filtering by date range AND status AND group simultaneously. Only tickets matching all specified conditions will be included in the migration.
What if the filter I need isn't available?
The available filters depend on what your source platform's API exposes. If a specific filter is missing, reach out to our team to discuss a custom configuration.
Will migrated tickets keep their ID numbers?
No, migrated tickets will not retain their original ID numbers; they will be assigned new IDs.
Each help desk platform has its own method of assigning ticket IDs. For example, Zendesk IDs typically consist of digits, while Salesforce have digits and letter. Our migration tool adheres to the settings of the target help desk to ensure the accurate transfer of your data.
However, if you wish to retain the original ticket IDs from your source platform for future reference, you can follow these steps:
- Create a custom text field in your target help desk.
- During the ticket field mapping process, locate the "ID" option from the drop-down menu and map it to your custom text field.
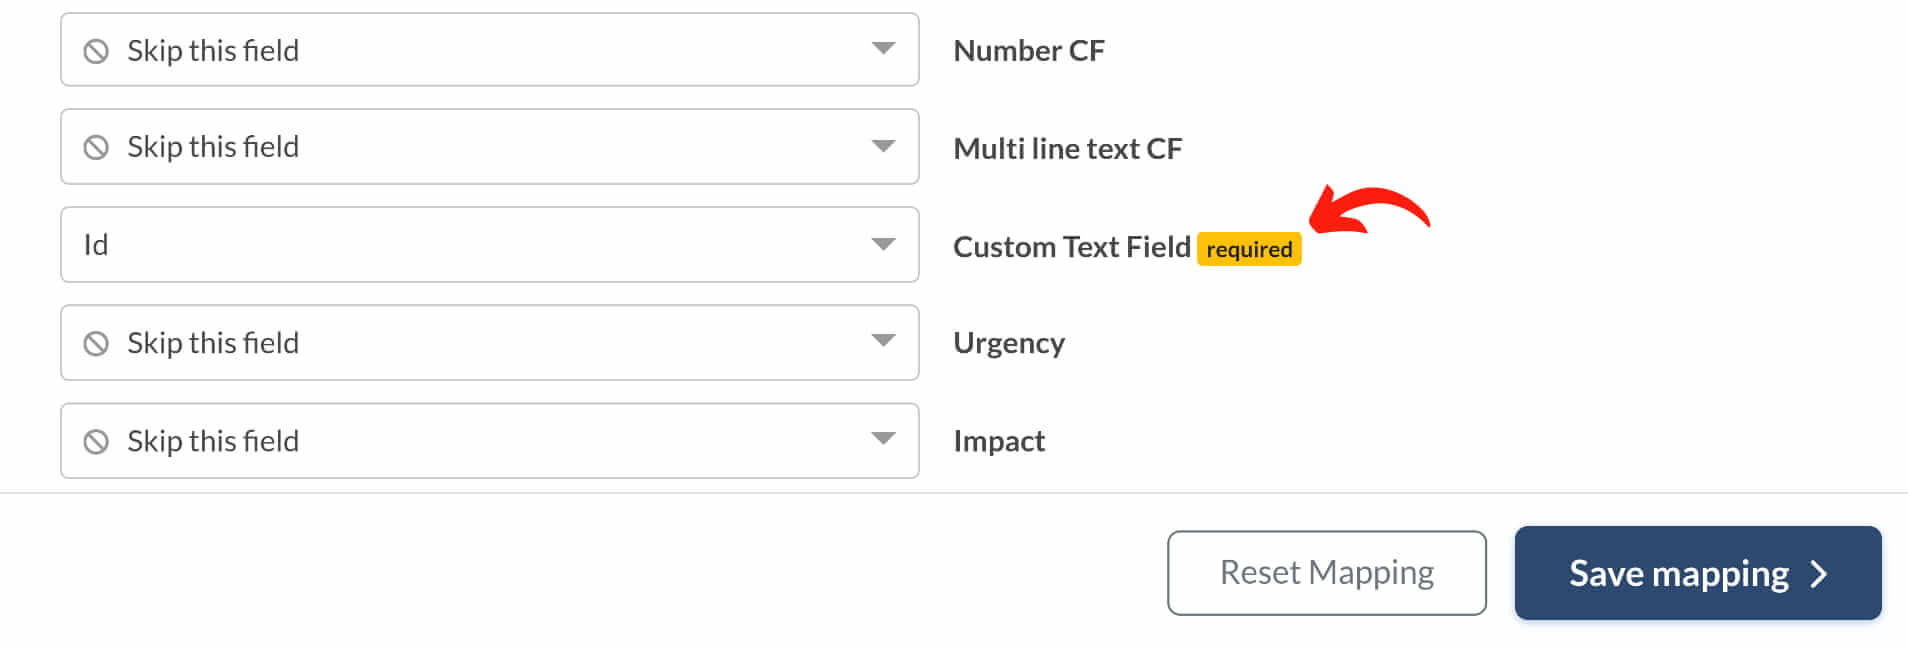
Note:
- If you do not see the "ID" option, it's likely that the custom field in your target help desk is not a text field, which is why the Migration Wizard offers different options.
- After mapping the custom text field, click "Save mapping" and proceed with your migration.
Will the ticket ID order be preserved after the migration?
No, the order of ticket IDs will not be preserved after the Full Data Migration. The order of tickets depends on the source platform, and the Migration Wizard transfers tickets either from old to new or from new to old, depending on the platform.
Refer to the table below for the ticket order of various platforms:
| Platform name | Ticket order |
| ConnectWise | from old to new |
| CSV | from new to old |
| Deskpro | from old to new |
| Dixa | from old to new |
| eDesk | from old to new |
| Freshdesk | from old to new |
| Freshservice | from old to new |
| Front | from old to new |
| Gmail | from new to old |
| Gorgias | from new to old |
| Groove | from new to old |
| HappyFox | from new to old |
| Help Scout | from old to new |
| HelpDesk | from old to new |
| HelpShift | from old to new |
| HelpSpot | from old to new |
| HubSpot Service Hub | from old to new |
| Intercom | from old to new |
| Jira Service Management | from old to new |
| JitBit Helpdesk | from new to old |
| Kayako | from new to old |
| Kayako Classic | from old to new |
| Kustomer | from old to new |
| Lansweeper | from old to new |
| Live Chat | from old to new |
| LiveAgent | from old to new |
| ManageEngine | from old to new |
| OracleCloud | from old to new |
| osTicket | from old to new |
| OTRS | from old to new |
| Outlook | from new to old |
| Re:amaze | from new to old |
| Salesforce Service Cloud | from old to new |
| SolarWinds Service Desk | from new to old |
| ServiceDeskPlus | from old to new |
| ServiceNow | from old to new |
| SherpaDesk | from old to new |
| SmarterTrack | from new to old |
| Spiceworks | from old to new |
| Spiceworks Cloud | from old to new |
| SupportBee | from old to new |
| TeamSupport | from new to old |
| Teamwork Desk | from old to new |
| TOPdesk | from old to new |
| Zendesk | from old to new |
| Zoho Desk | from old to new |
| Zoho Mail | from old to new |
How unassigned tickets migrate?
During data migration, unassigned tickets from the source help desk are automatically assigned to a default agent in the target help desk. This process is facilitated by dynamic data mapping, which allows customers to customize ticket field mapping according to their preferences.
The main reasons for automatically assigning unassigned tickets to a default agent include:
- Dynamic Data Mapping: Customers have the flexibility to adjust ticket field mapping as needed. However, to ensure accuracy and maintain relationships between records, unassigned tickets are linked to a default agent.
- Platform Limitations: In most help desks, it's not possible to create a ticket without assigning it to an agent. Therefore, the data migration process requires assigning unassigned tickets to proceed smoothly.
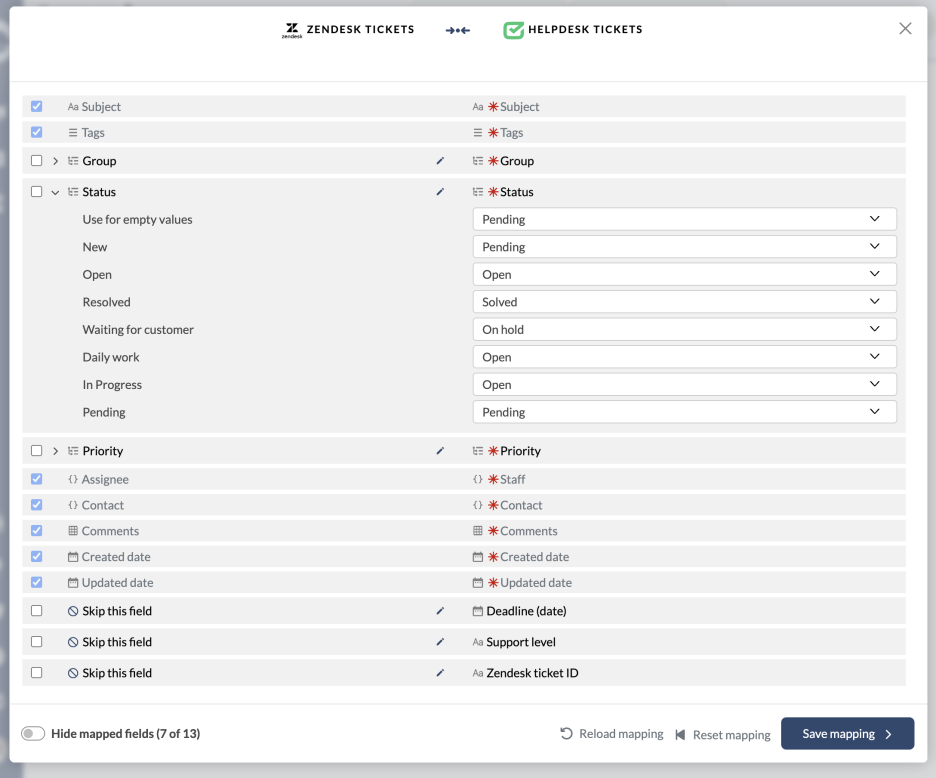
Before the data migration, customers can specify which agent will serve as the "default" one.
If you prefer to migrate unassigned tickets as they are without assigning them to a default agent, you have the option to request customization for your data migration. We can tailor the migration process to meet your unique requirements and transfer unassigned tickets accordingly.
Platforms that support migrating unassigned tickets or unresolved/unclosed tickets as unassigned include:
- Zendesk
- Freshdesk
- Jira Service Management
- Gorgias
- DeskPro
Note that custom data migration is a paid option, and you can inquire about the pricing details with our support team.
Can I migrate CC in tickets?
Yes, you can migrate CC recipients in tickets during the data migration process. CC is a mappable field in tickets. Here are some details about the process:
What is CC?
CC, or Carbon Copy, is a way to send copies of an email or ticket to additional recipients who may need to be informed or kept in the loop about the conversation. It's commonly used to ensure that relevant parties are aware of the communication, without requiring them to take any specific action or respond. Such copies often contain essential information, which can not be lost. So if you decide to transfer to another help desk, you can take CC with you.
As of now, we fully support migrating CC data for the following platforms:
- Zendesk
- Freshdesk
- Freshservice
- Deskpro
- Front
- Supportpal
- CSV
Peculiarities
- The process of CC migration is complex and requires significant effort.
- Additional support for exporting CC data is available for Help Scout, FreeScout, Jira Service Management, Salesforce Service Cloud, Outlook, and Vivantio.
- Customized migration options are offered for Gmail, HappyFox, HelpDesk, HubSpot, Kayako (including import), Manage Engine, and Teamwork Desk.
How can I map Ticket Statuses?
Mapping ticket statuses is an important step in the data migration process to ensure that the statuses from the source platform align correctly with those in the target platform. Below is a sample mapping of ticket statuses for various platforms:
| Zendesk | Open | On-hold | Solved | Closed |
| Intercom | Active | Snoozed | - | Closed |
| Freshdesk | Open | Pending | Resolved | Closed |
| Freshservice | Open | Pending | Resolved | Closed |
| Kayako | Open | Pending | Completed | Closed |
| Groove | Unread, Opened | Pending | - | Closed |
| Gorgias | Active | Pending | - | Closed |
| HappyFox | New, Open | On-hold | Solved | Closed |
| LiveAgent | New, Open | Answered, Chatting, Calling | Postponed | Resolved |
| Help Scout | Active | Pending | - | Closed |
How to download data mapping?
After completing your Demo or Full Migration, you can download and review your data mapping. This file contains all saved mapping configurations between your Source and Target.
How to download the mappings.xlsx file?
After migration is complete, you'll receive a summary of the migrated records. Click "Download Reports".
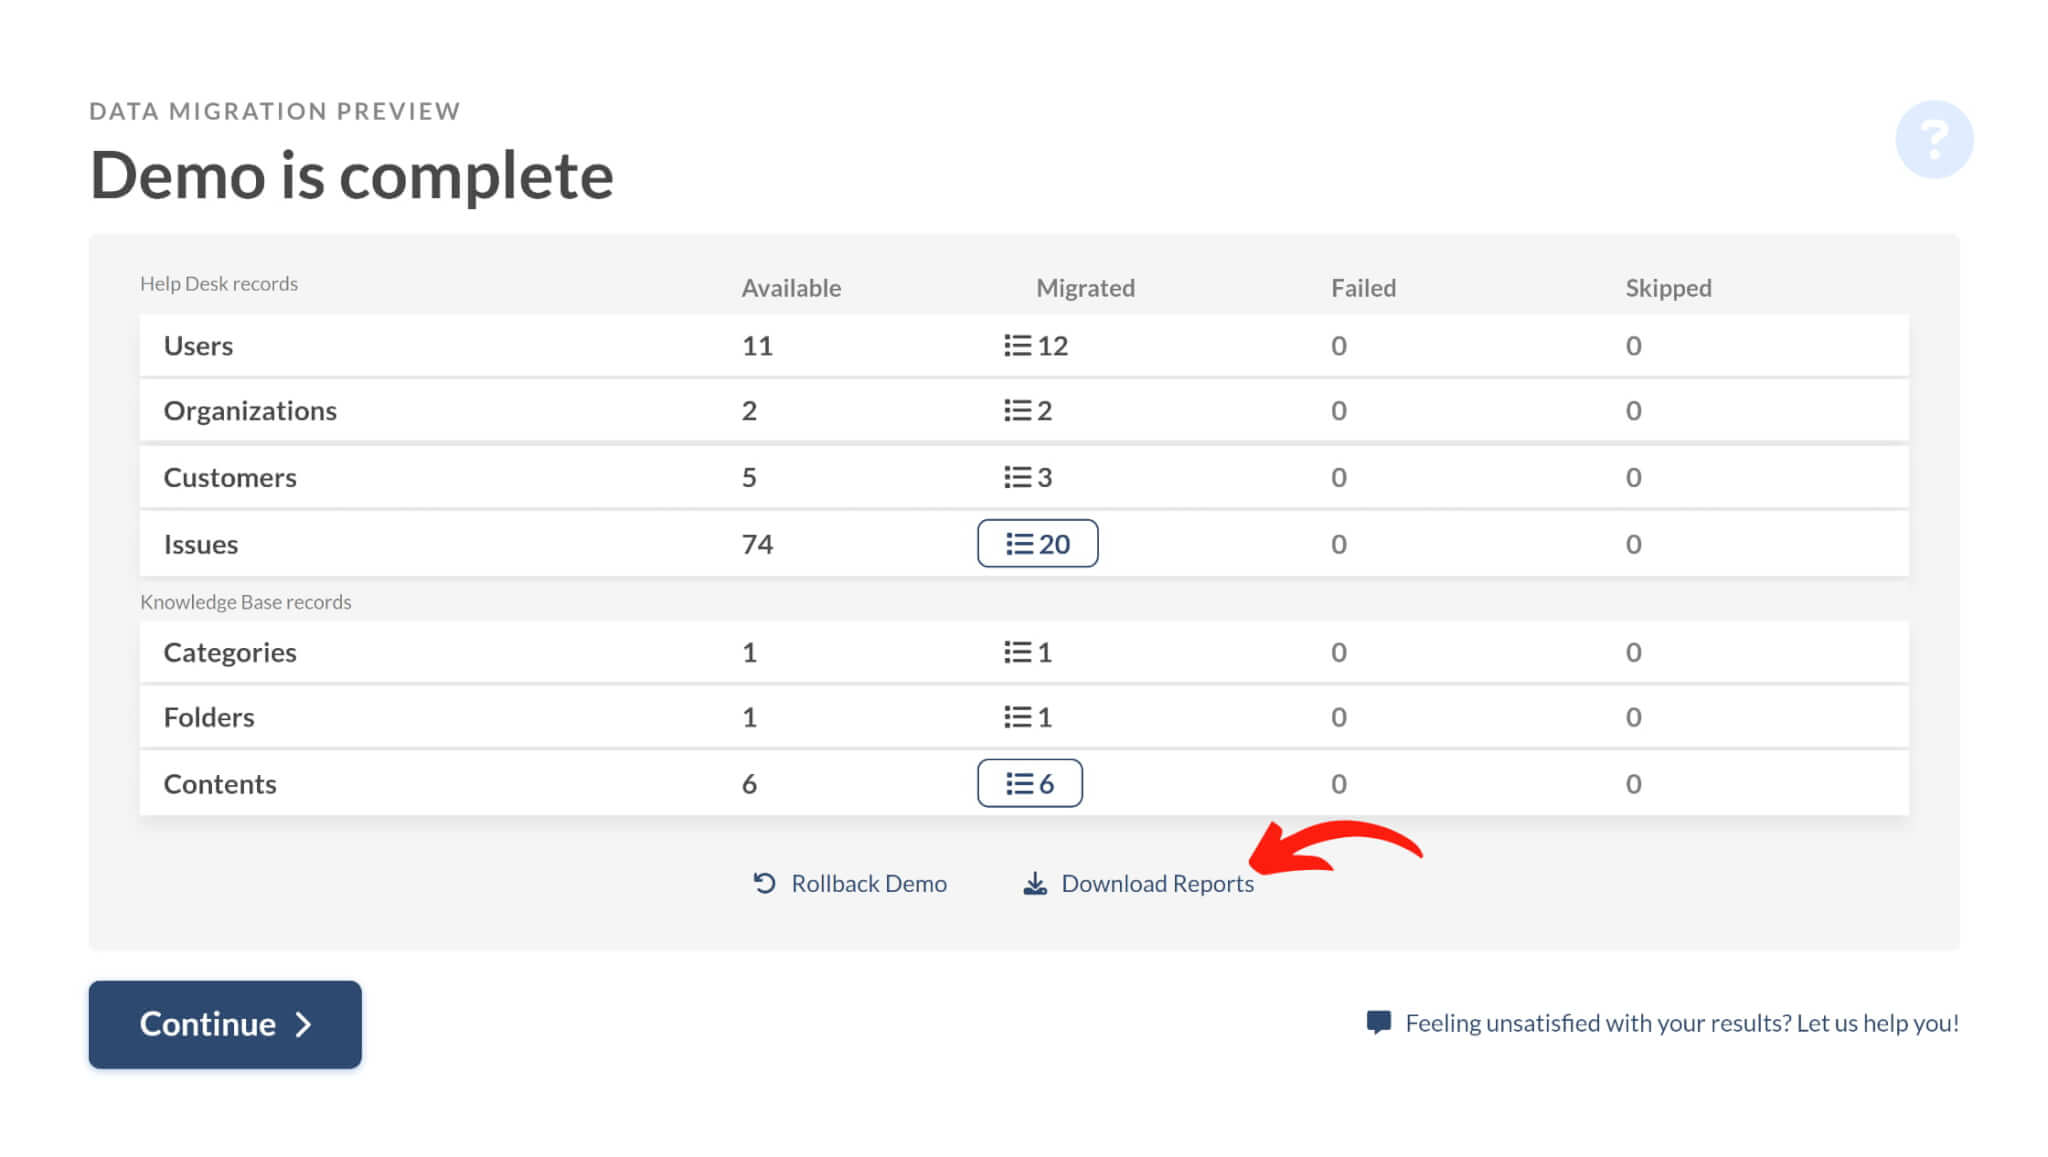
The archive will be downloaded to your device. Extract it to access the mappings.xlsx file. Open the file in any spreadsheet program (e.g., Microsoft Excel, Google Sheets, or LibreOffice Calc).

The file organizes mappings by entity type (e.g., ticket, contact, article) across separate sheets, including both default and custom fields.
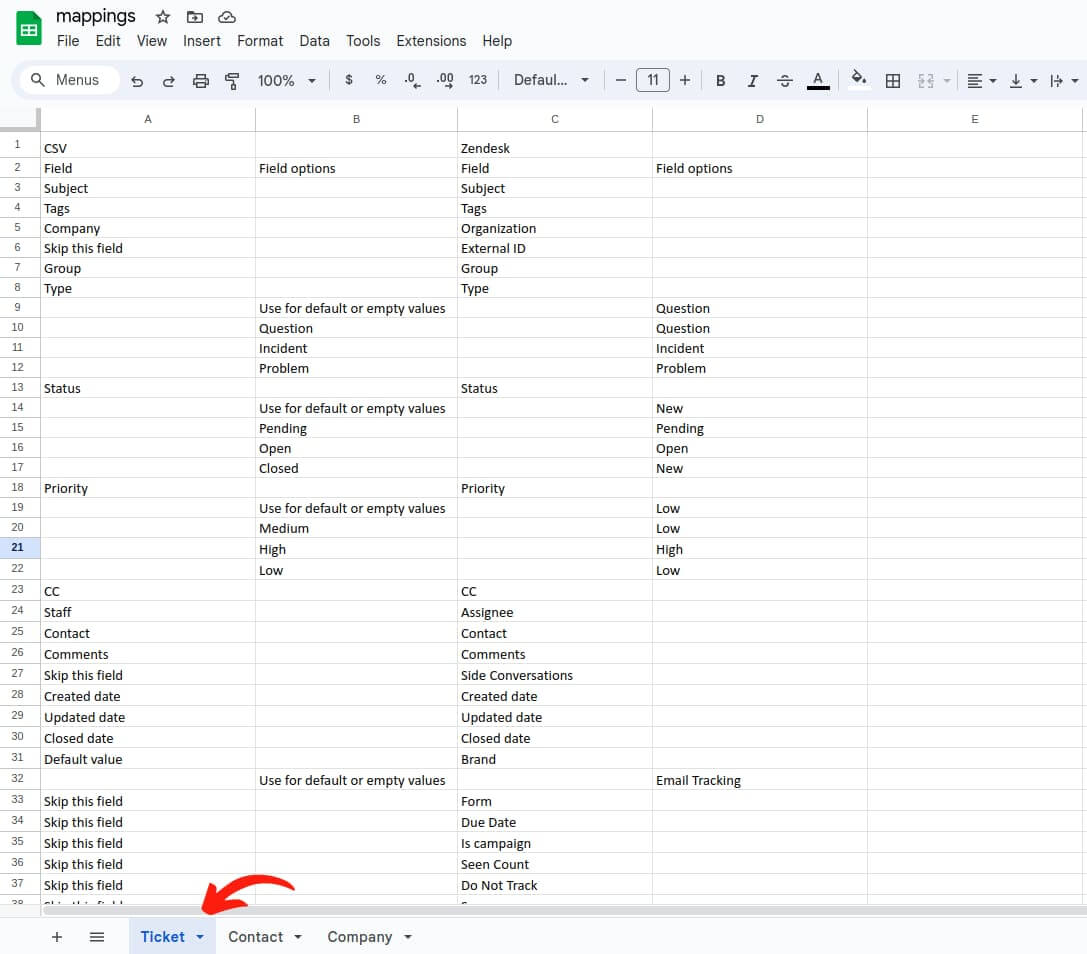
Use this file to review how the entity fields were mapped.
How the agents are migrated?
Agent migration with Help Desk Migration service involves matching agents from the source platform to agents on the target platform. Using it, you can easily re-assign tickets between agents. For instance, if you had a retired agent on the source help desk, you can choose which target agent to assign their tickets to.
How Agent Matching Works
On the mapping page, you will see the "Matching" button next to Agents.
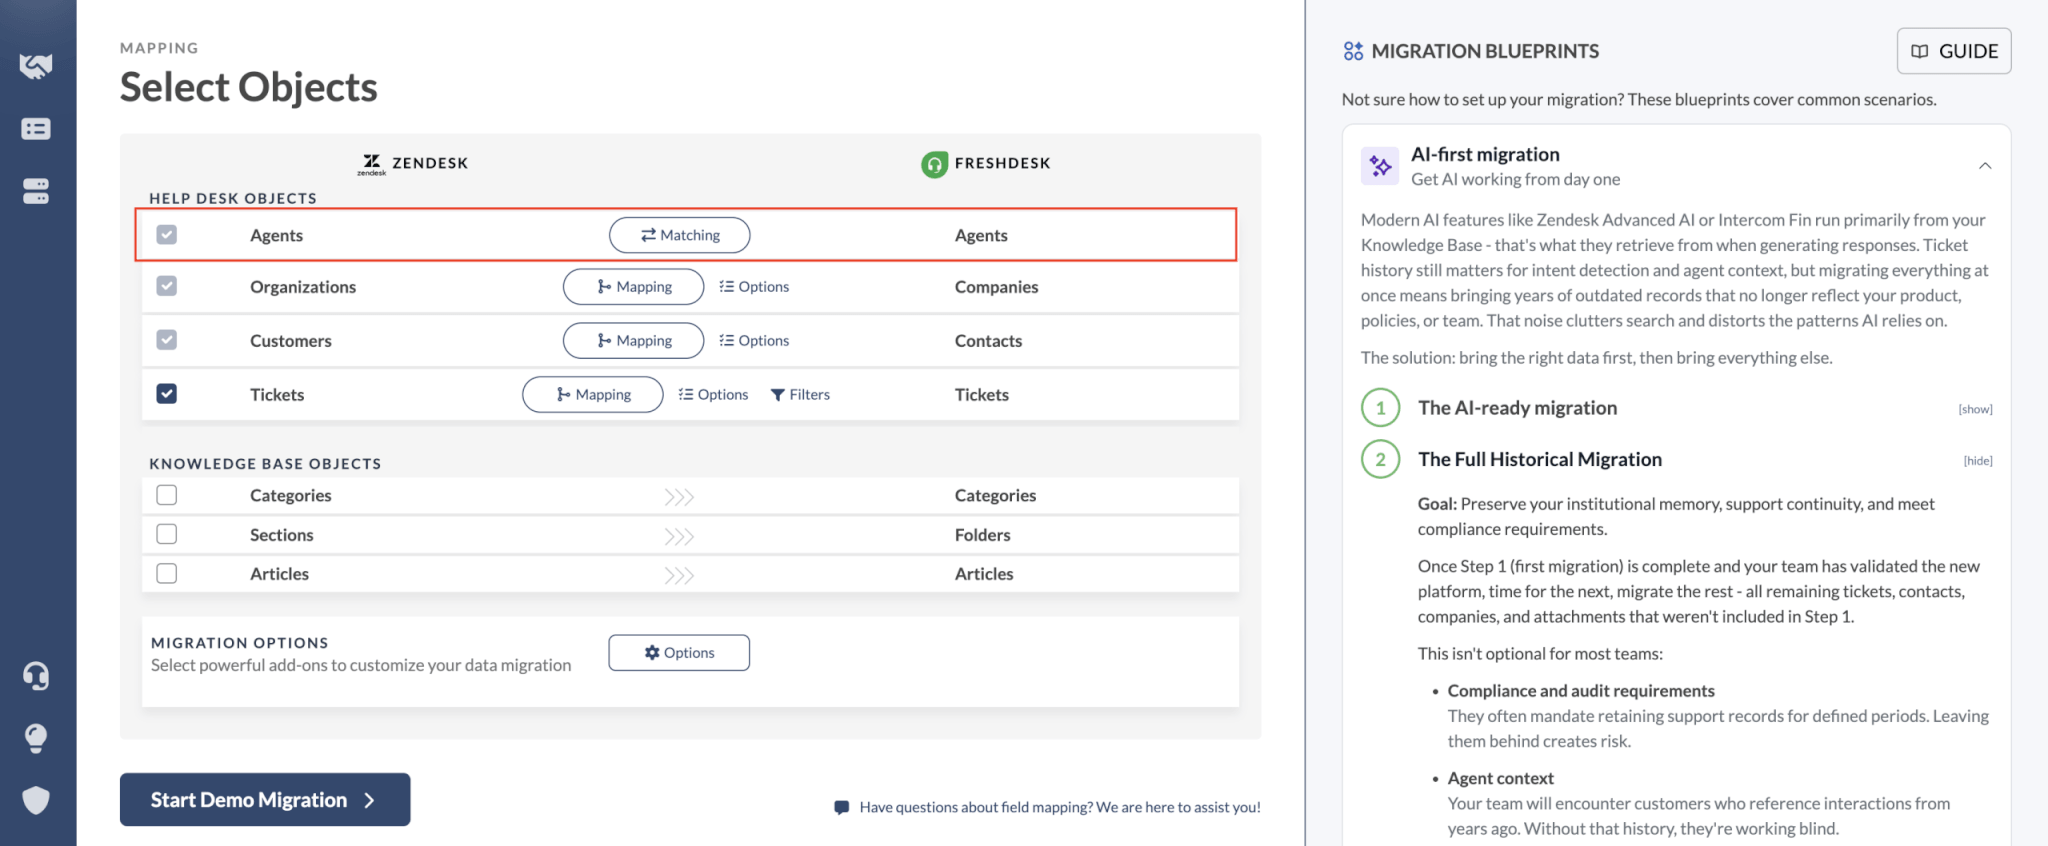
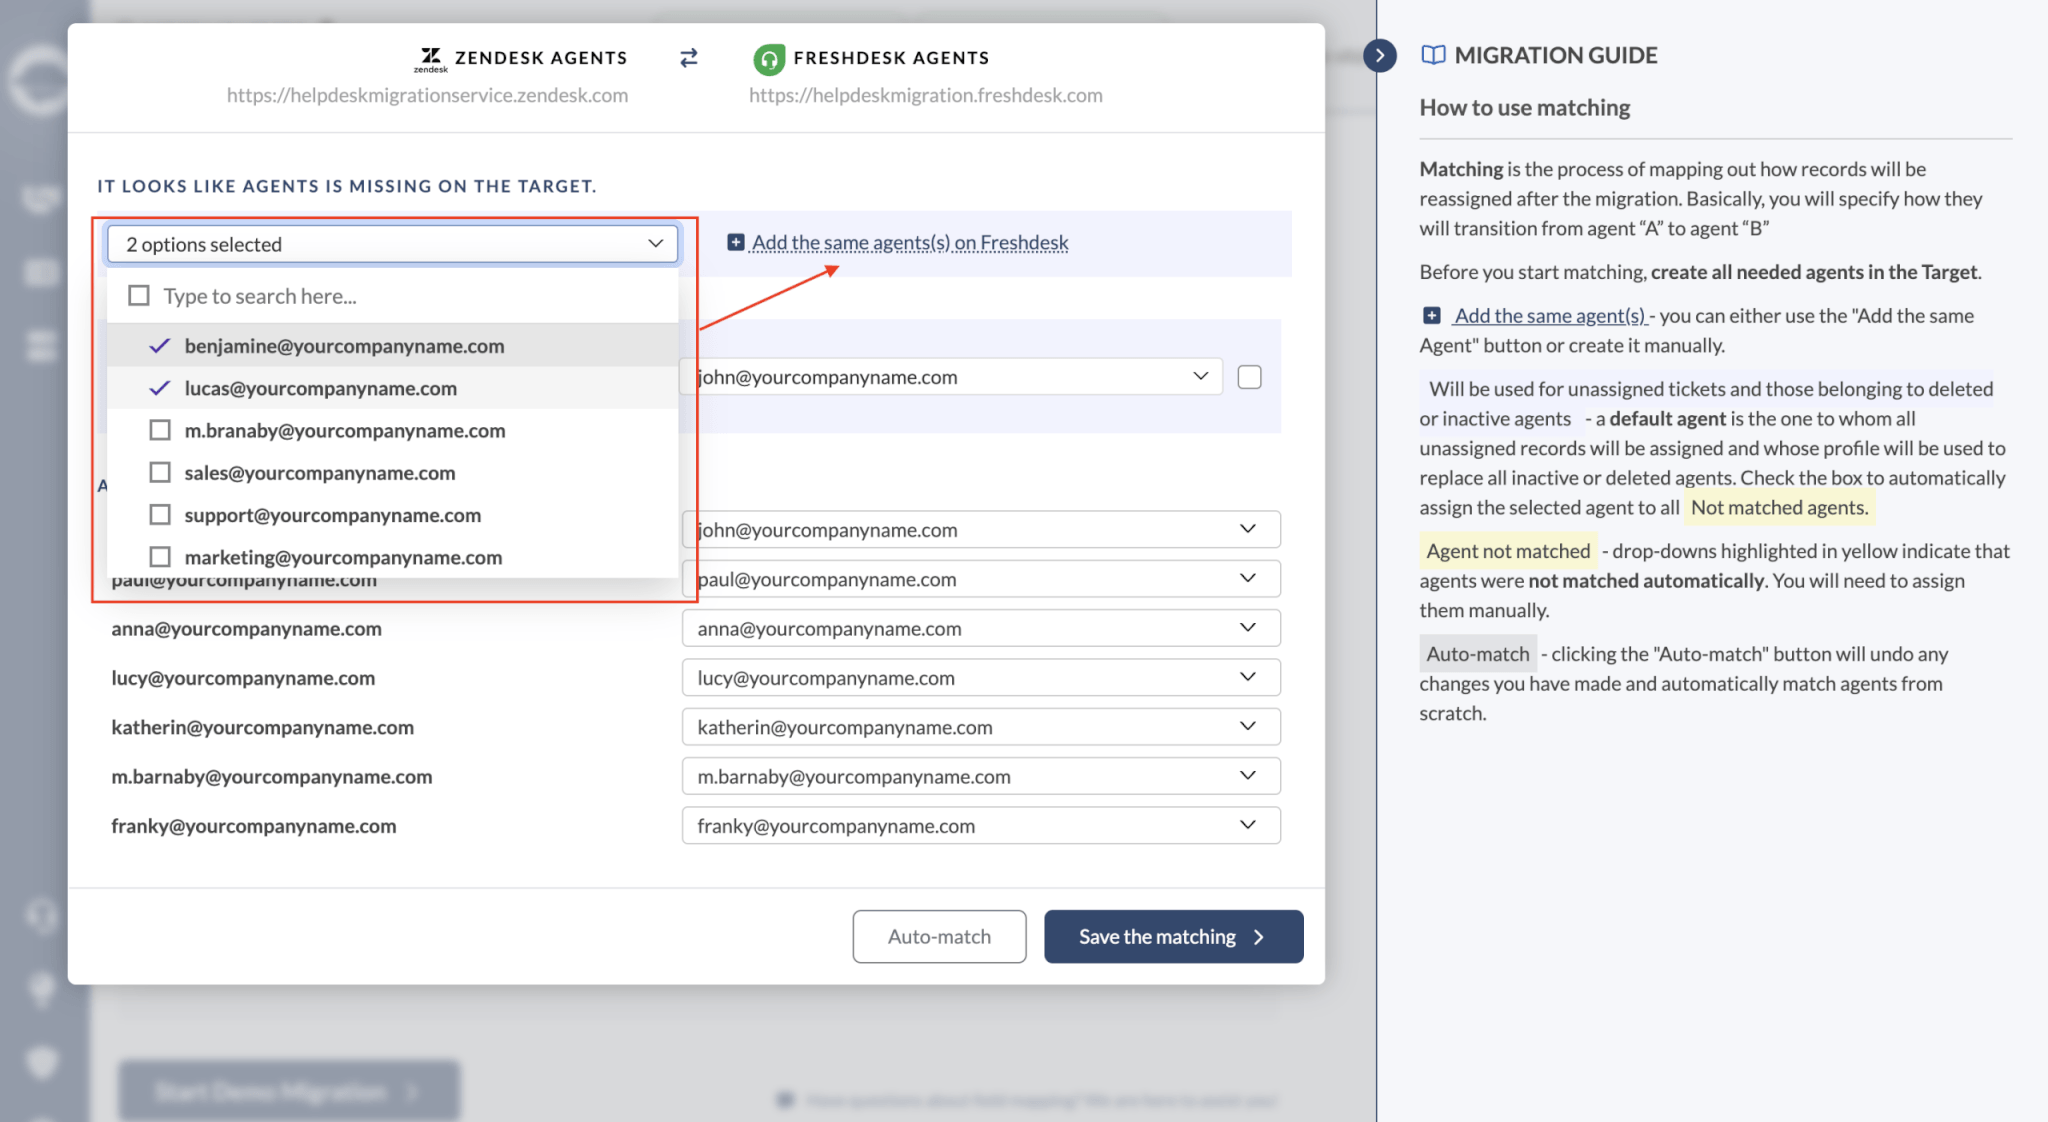
Then, the scenario could go one of the two ways. If the target help desk already has some agent profiles created, you will be able to map their emails by clicking on the drop-down menu.
You can easily add agents on the target platform without leaving the Migration Wizard. At the top of the form, pick the email to create on the target help desk, then click the "Add the same staff on {target}." Wait for a few moments while the tool is creating the user.
Some help desk platforms do not allow creating agents via API. If you don't see the "Add the same staff on {target}" , then you have to create agent profiles on the target help desk manually.
Do you migrate internal links?
When migrating links to Knowledge Base articles, note that they won't update automatically. For instance, moving from Zendesk to Freshdesk keeps links directing users to Zendesk. This happens because each platform handles internal links differently, making it impossible to predict the new IDs during migration.
We recommend conducting a thorough link audit and manually updating URLs to avoid potential disruptions. While this may cause inconvenience, it's crucial to prioritize caution with internal links. Rest assured, we're committed to addressing this challenge in future updates.
How to migrate tags to a non-tag based help desk?
Our Help Desk Migration Service enables you to migrate tags, even if your new target system doesn't support this feature.
The best approach is to create a custom text field and map the tag field to it.
What is the Archived status of migration?
Your Full migration data is securely stored for either 3, 5 or 10 days, based on your chosen support package, as per our Terms of Service and Service Level Agreement.
Demo migrations are archived after 30 days of inactivity.
If you want to archive the migration sooner, you can do so from the Migration Details page or by contacting our support team.
Once the storage period ends or upon receiving your deletion request, your migration status will be updated to "Archived," and all associated data will be permanently removed from our system.
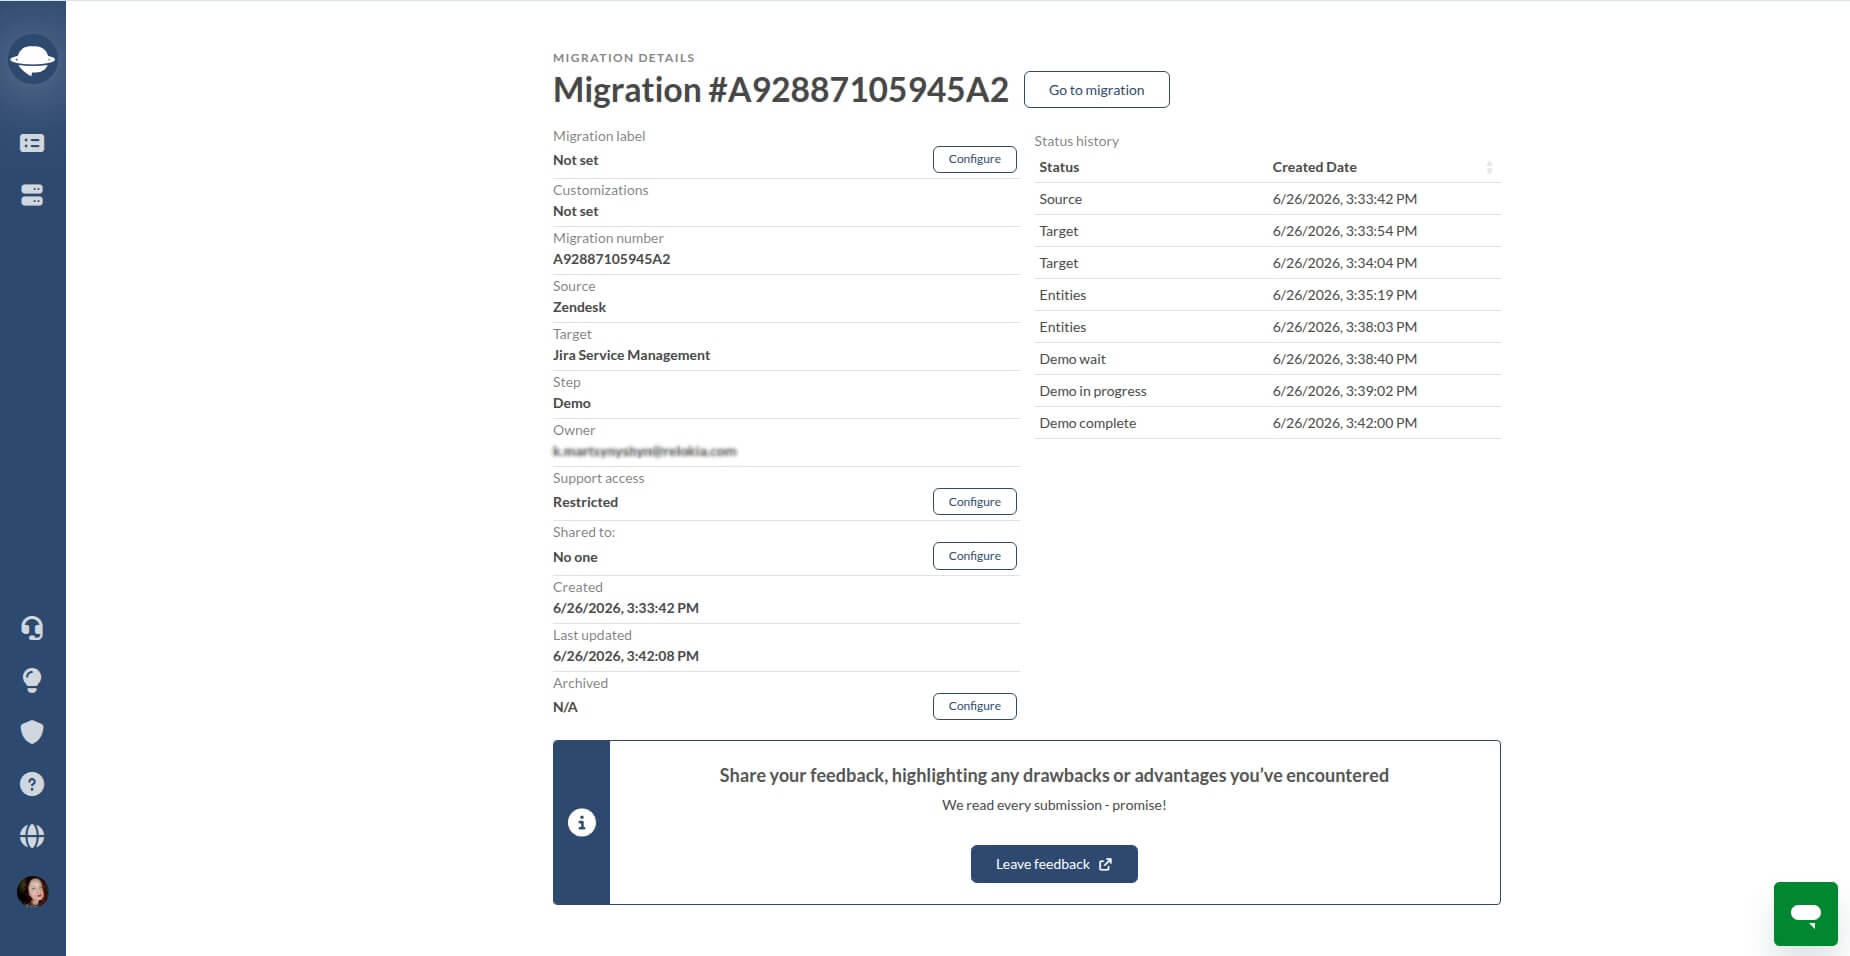
Please note that no further modifications can be made after the migration is archived.
Why was my data migration archived, and how do I reactivate it?
Depending on your support package, the system automatically archives Full Migrations three (Essential Service Package), five (Advanced Service Package) or ten (Premium Service Package) days after completion. Demo Migration gets archived if you don’t update it for 30 days.
You can update or redo the Demo Migration anytime before the archiving period ends. Once a Demo or Full Migration is archived, you cannot reactivate it, because the app deletes all data and access to your accounts
How to use Two-Factor Authentication and User Activity Monitoring in Migration Wizard?
Help Desk Migration helps safeguard your data in the Migration Wizard through Two-Factor Authentication (2FA) and User Activity Monitoring.
Two-Factor Authentication
Enable 2FA by following these steps:
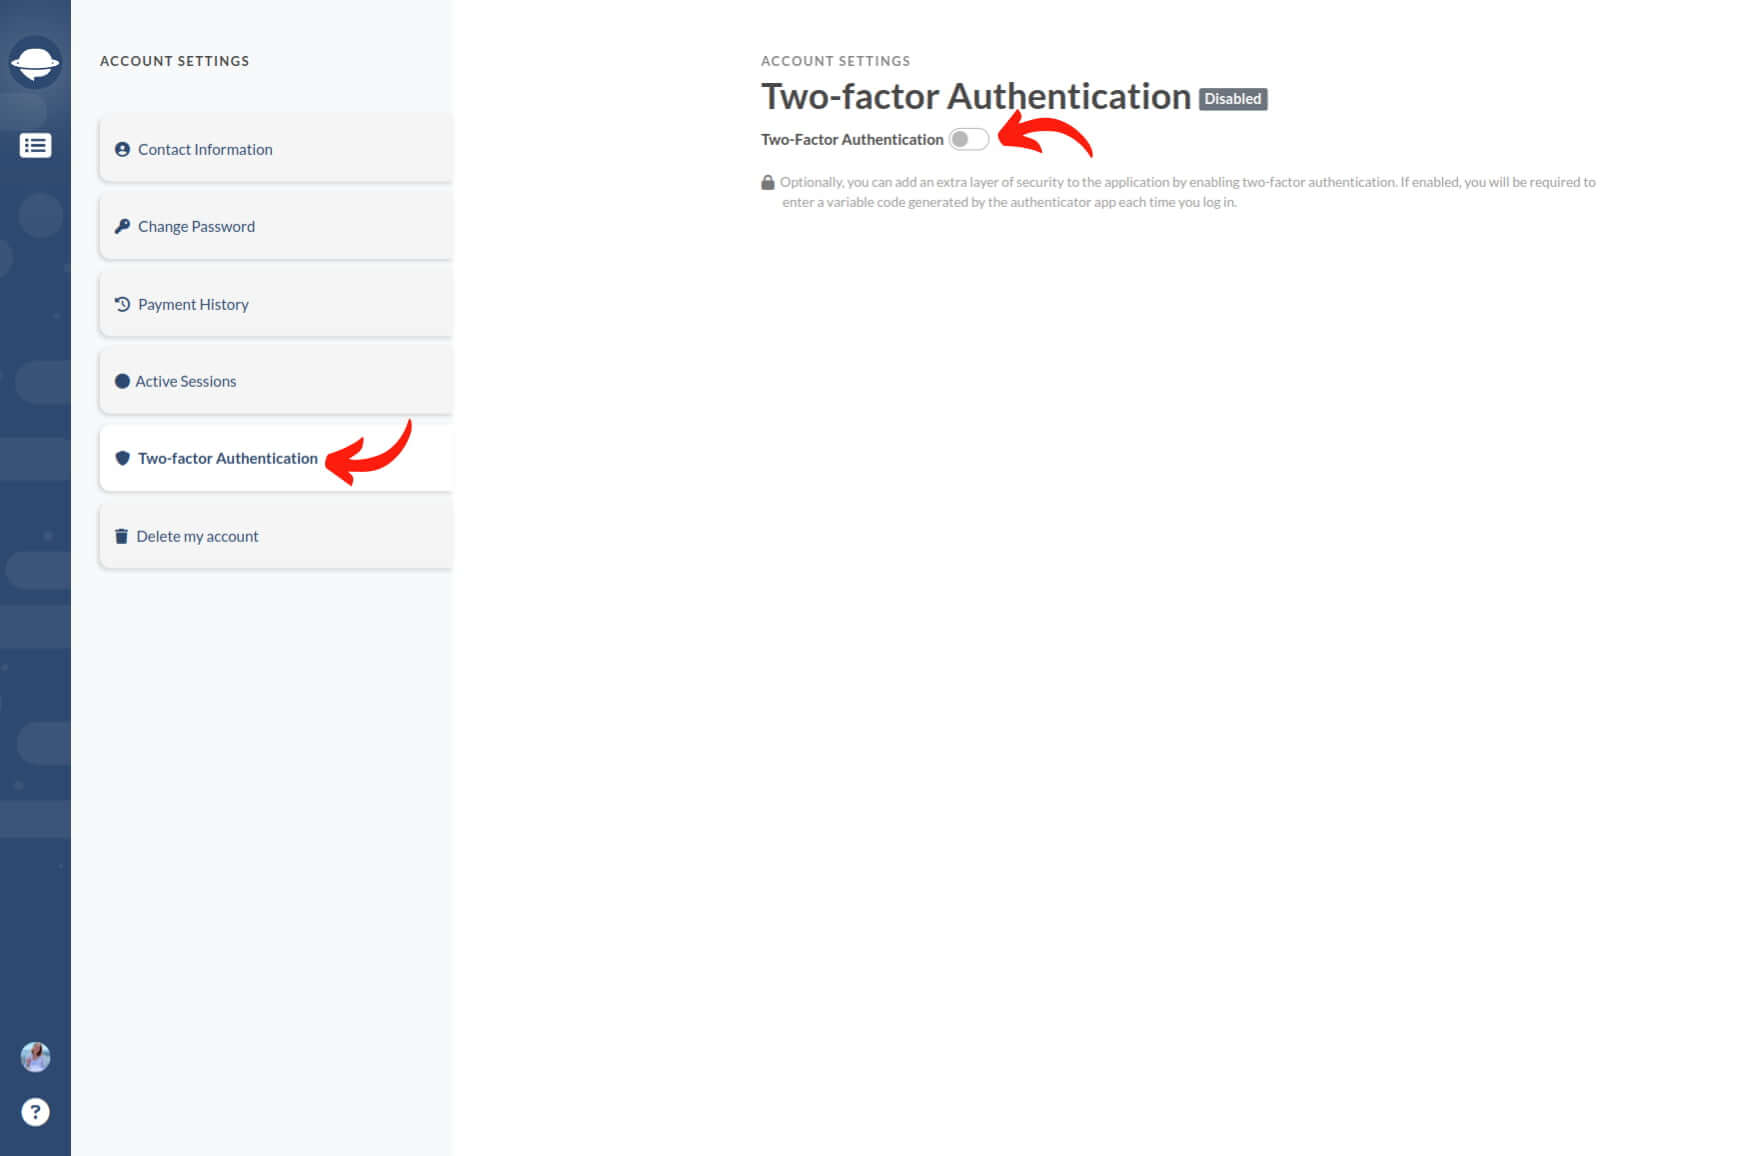
1. Navigate to Account Settings > Two Factor Authentication and toggle the switch.
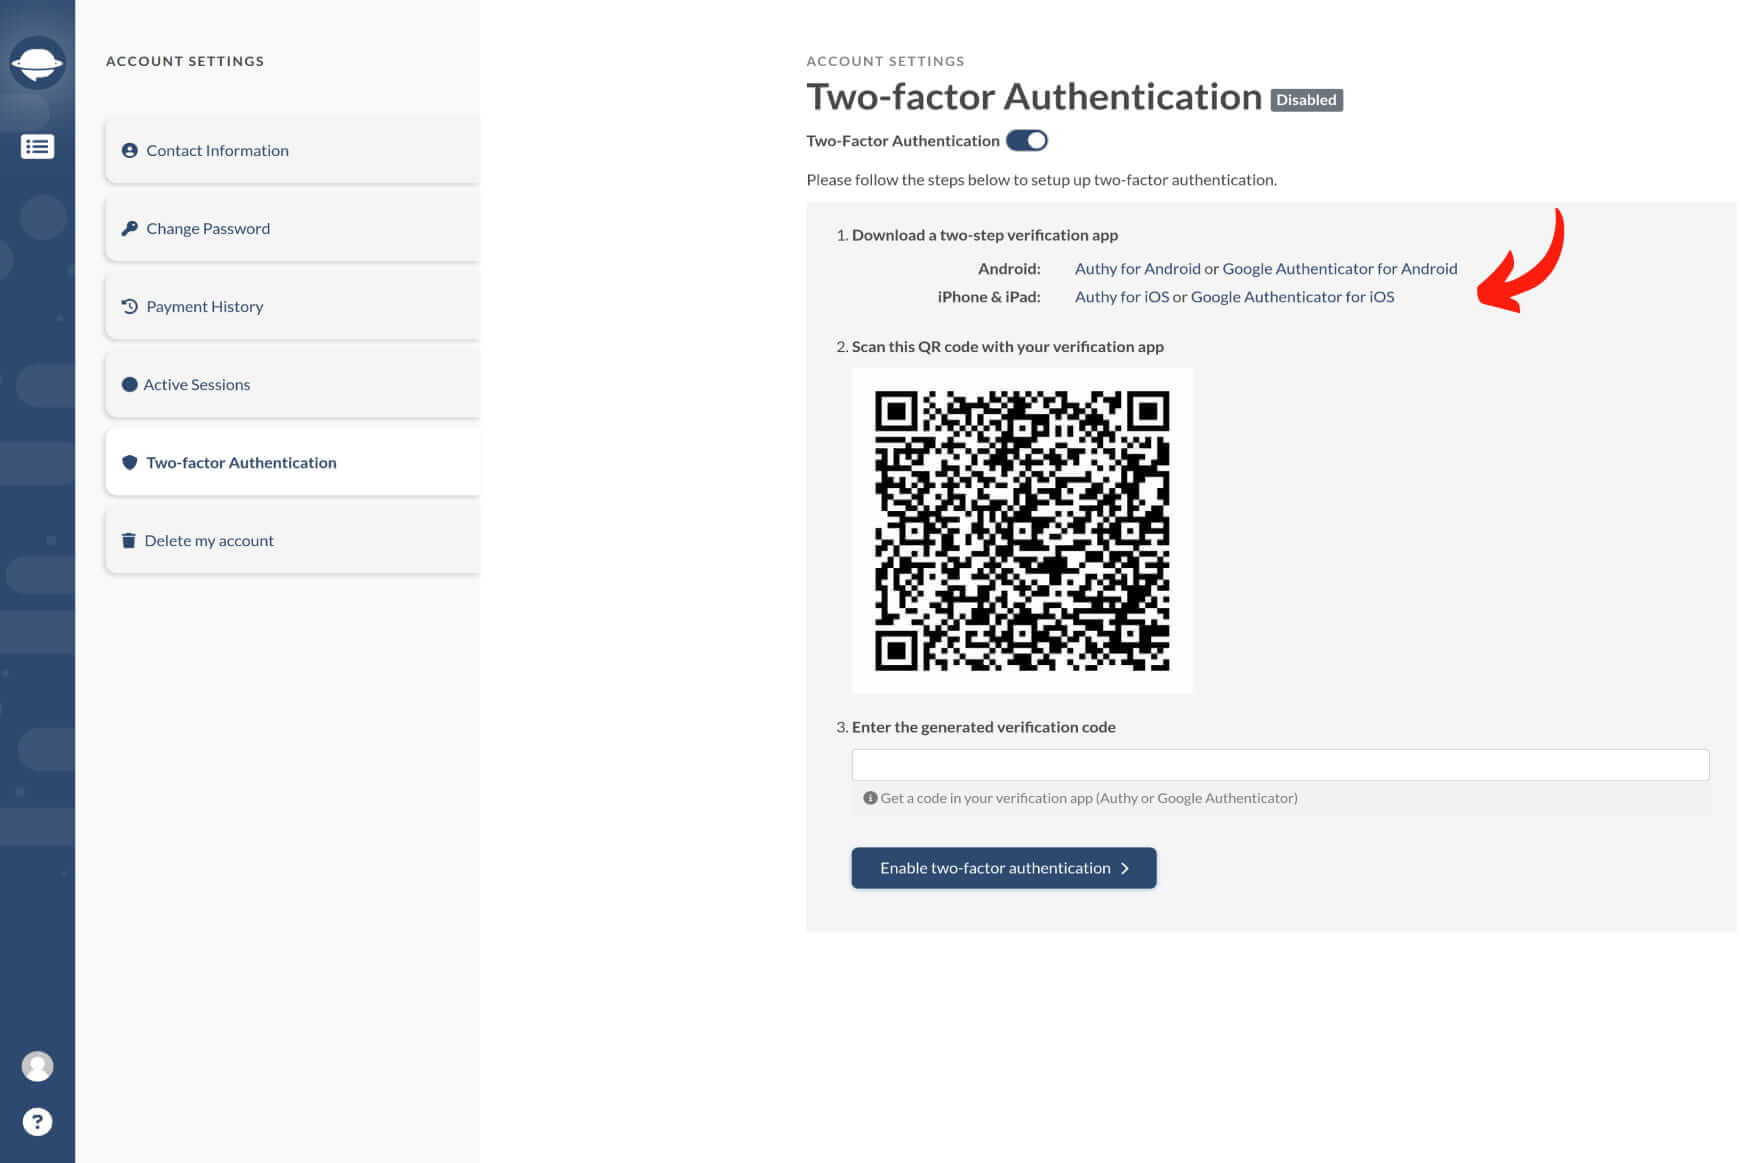
2. Download a 2FA verification application (e.g., Twilio Authy or Google Authenticator.)
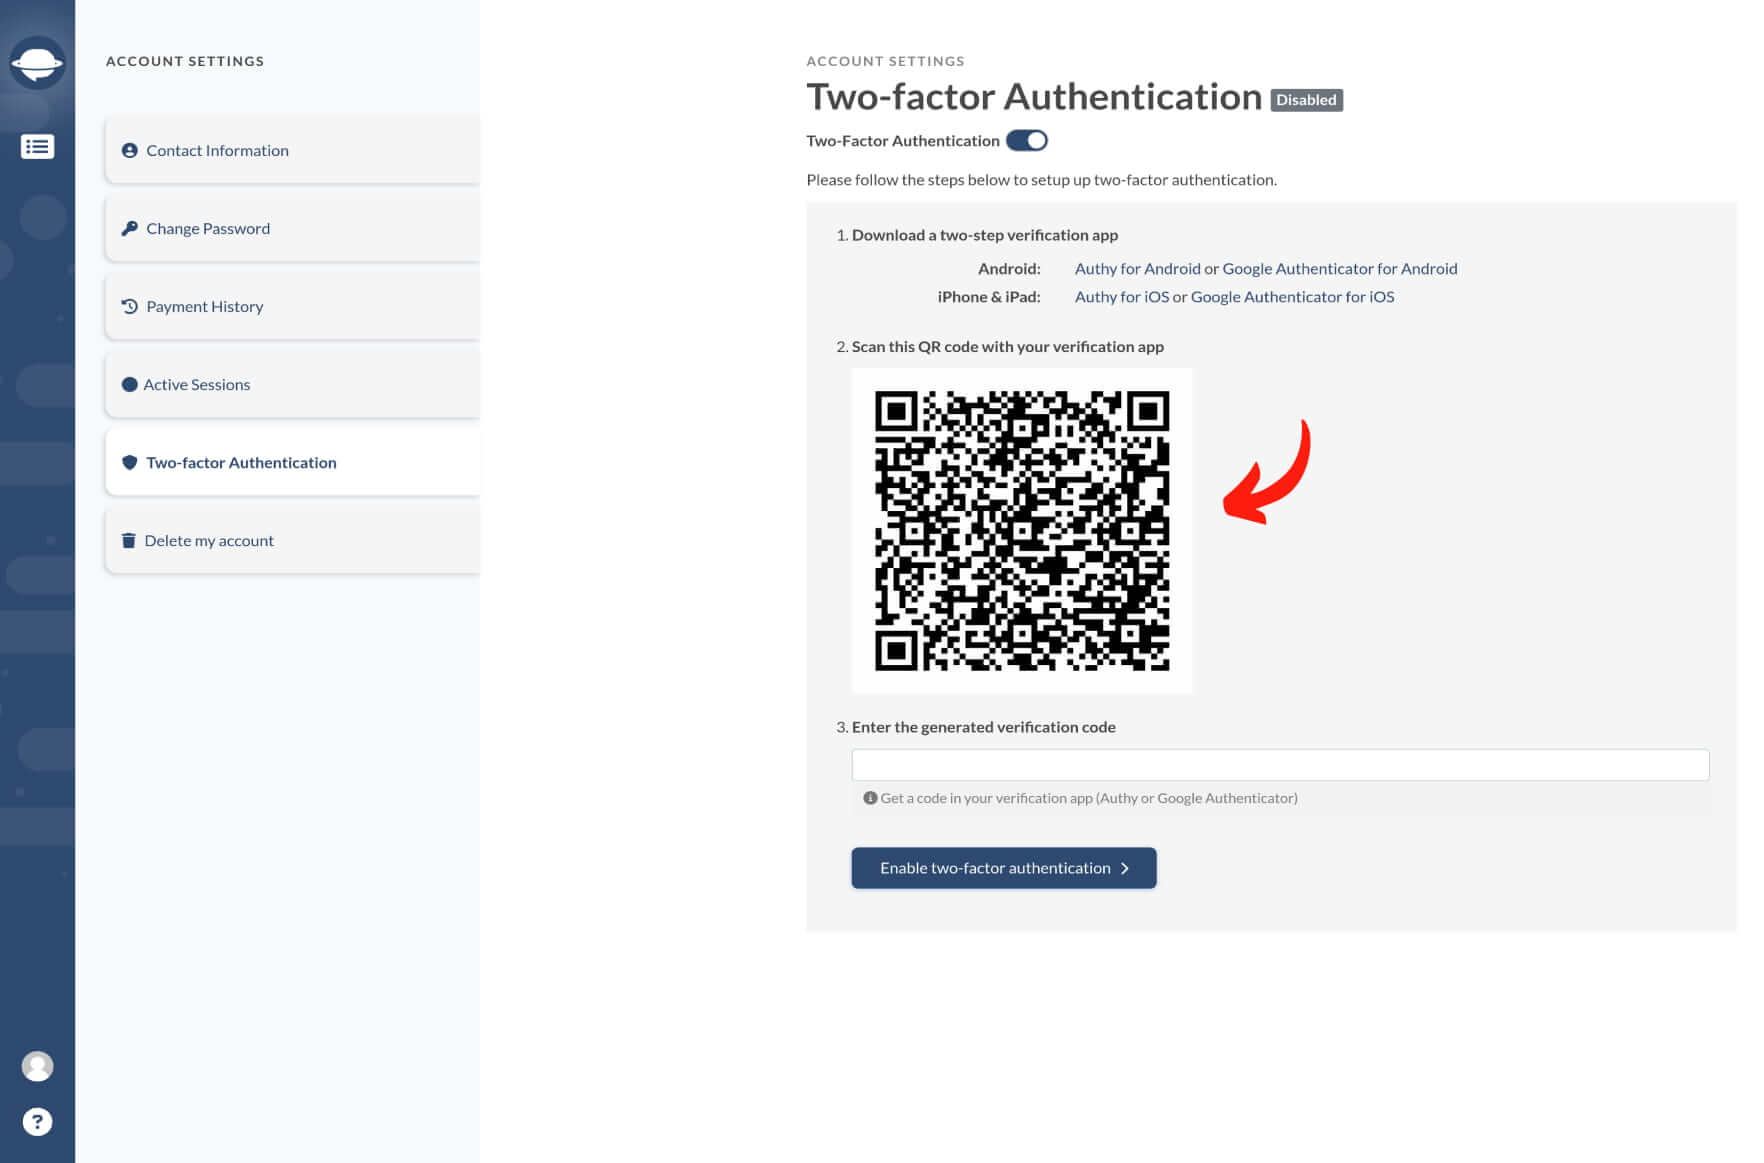
3. Scan the QR code displayed on-screen using the verification app.
4. Enter the verification code from the app.
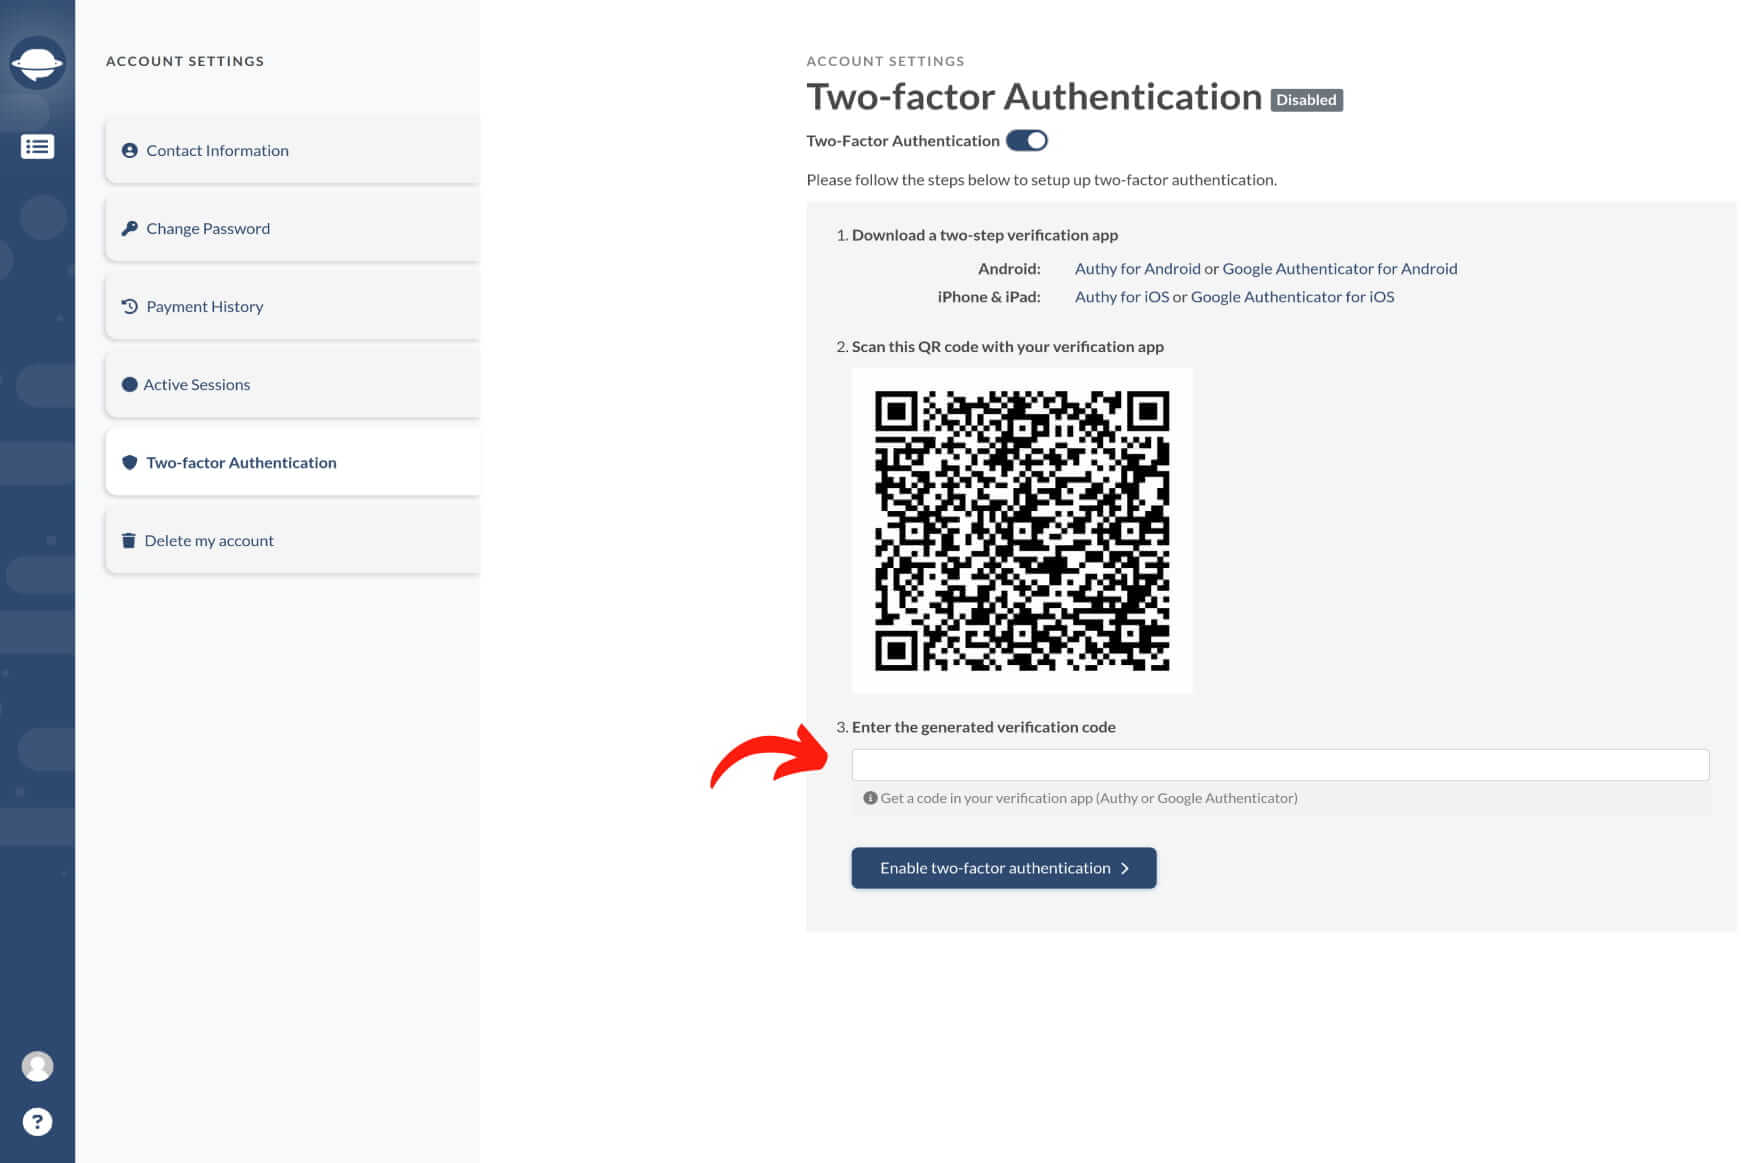
5. Click Enable Two-Factor Authentication.
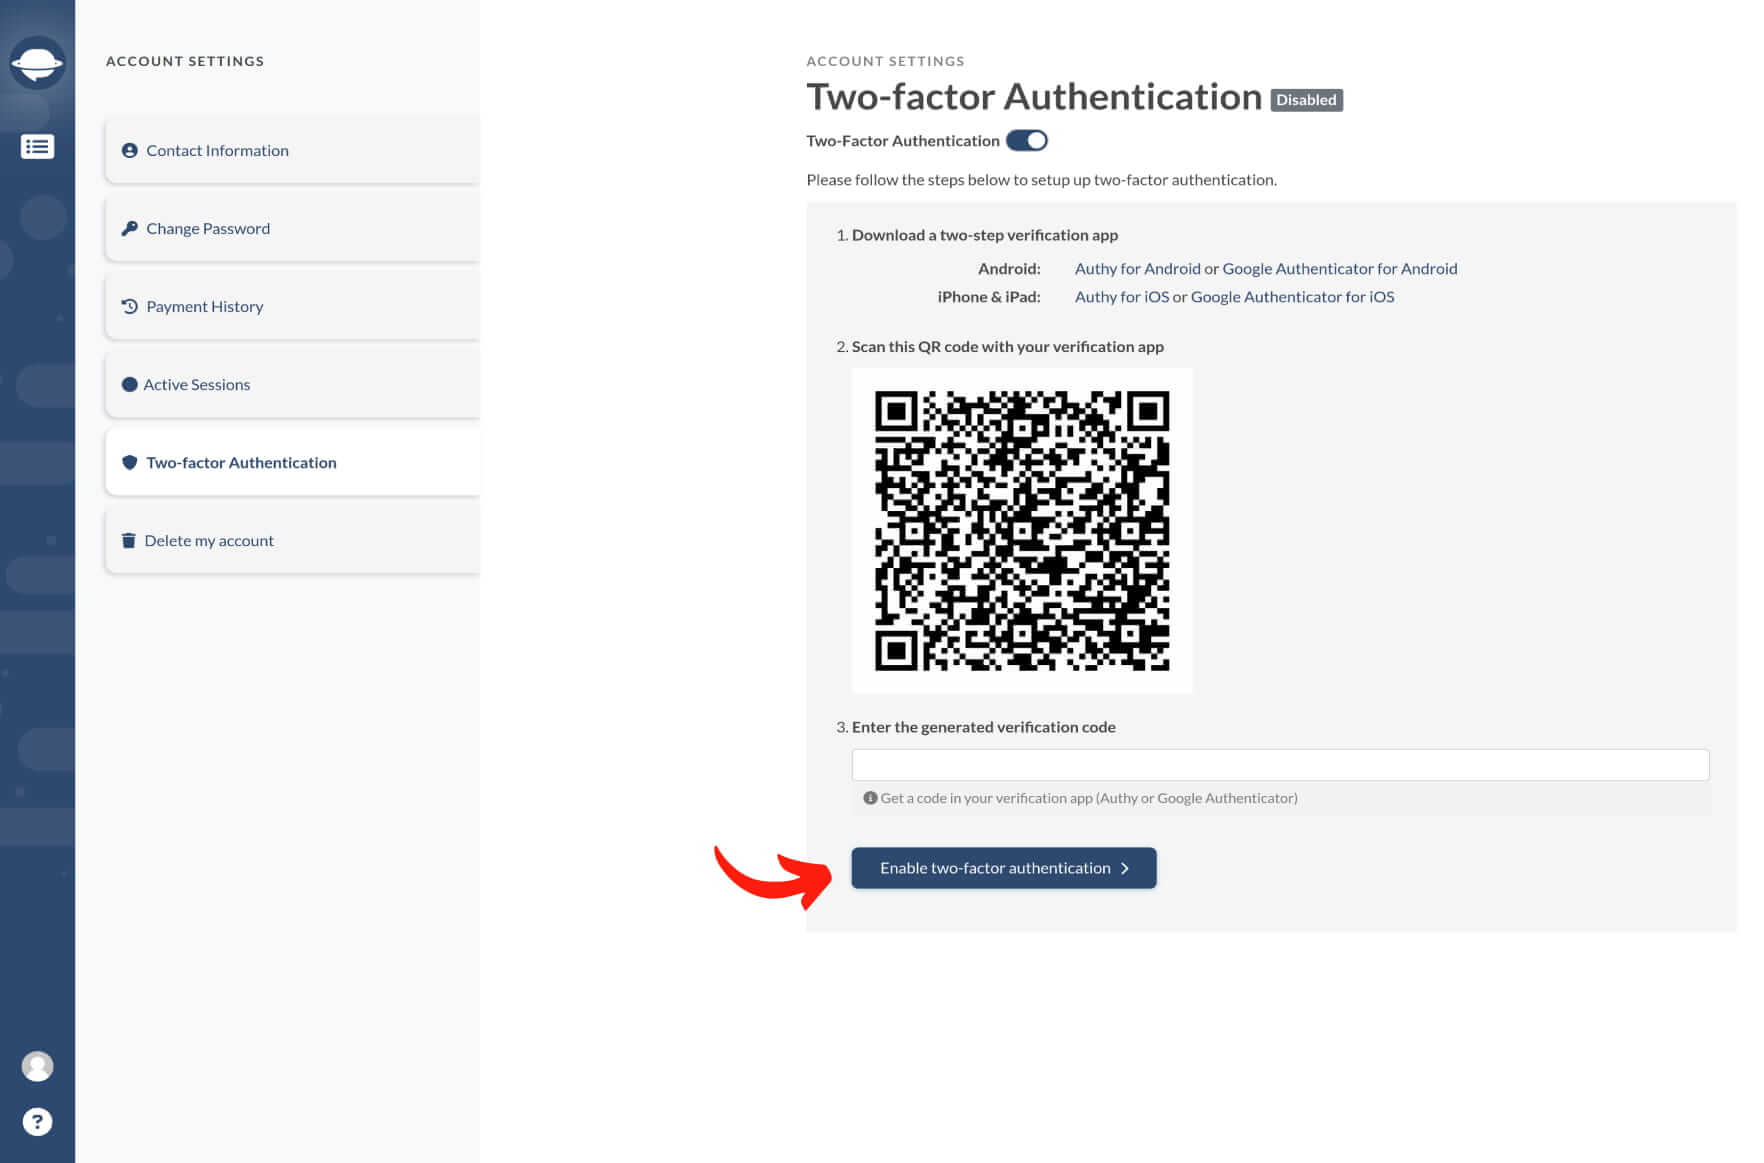
After you have enabled the two-factor authentication, you’ll have to type in the verification code each time you log into your Migration Wizard account.
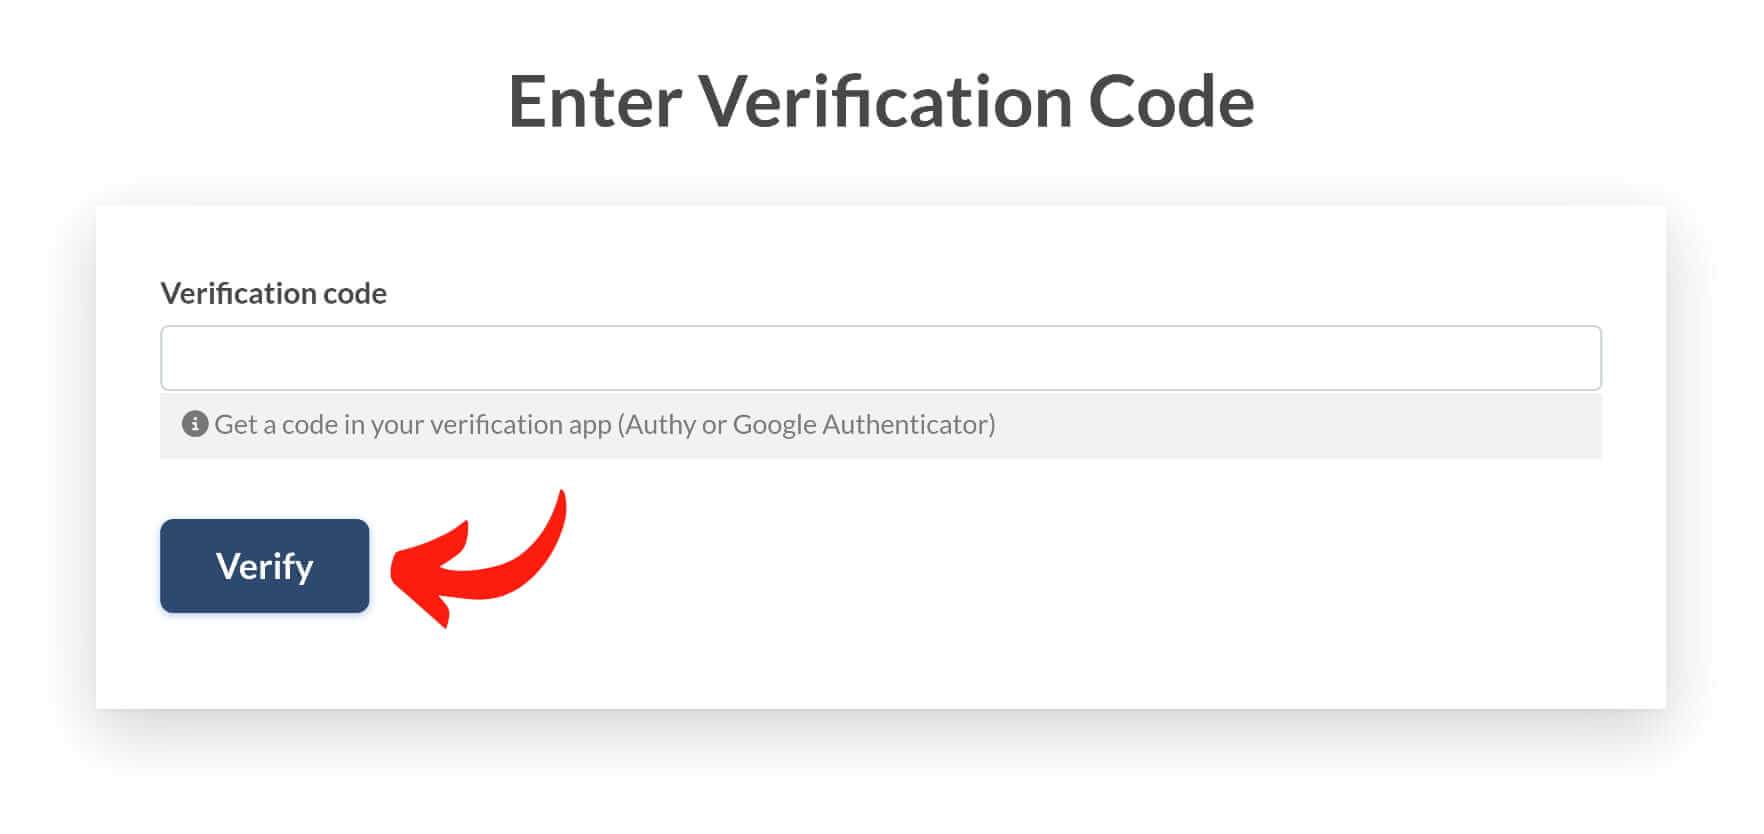
2FA offers an additional layer of protection for your data. Even if your password is compromised or you lose your phone, your records remain secure. The likelihood of someone accessing your second-factor authentication information is minimal, ensuring the ongoing safety of your data.
The monitoring of user activity sessions
Monitor the user activity sessions by following these steps:
1. Navigate to Account Settings > Active Sessions.
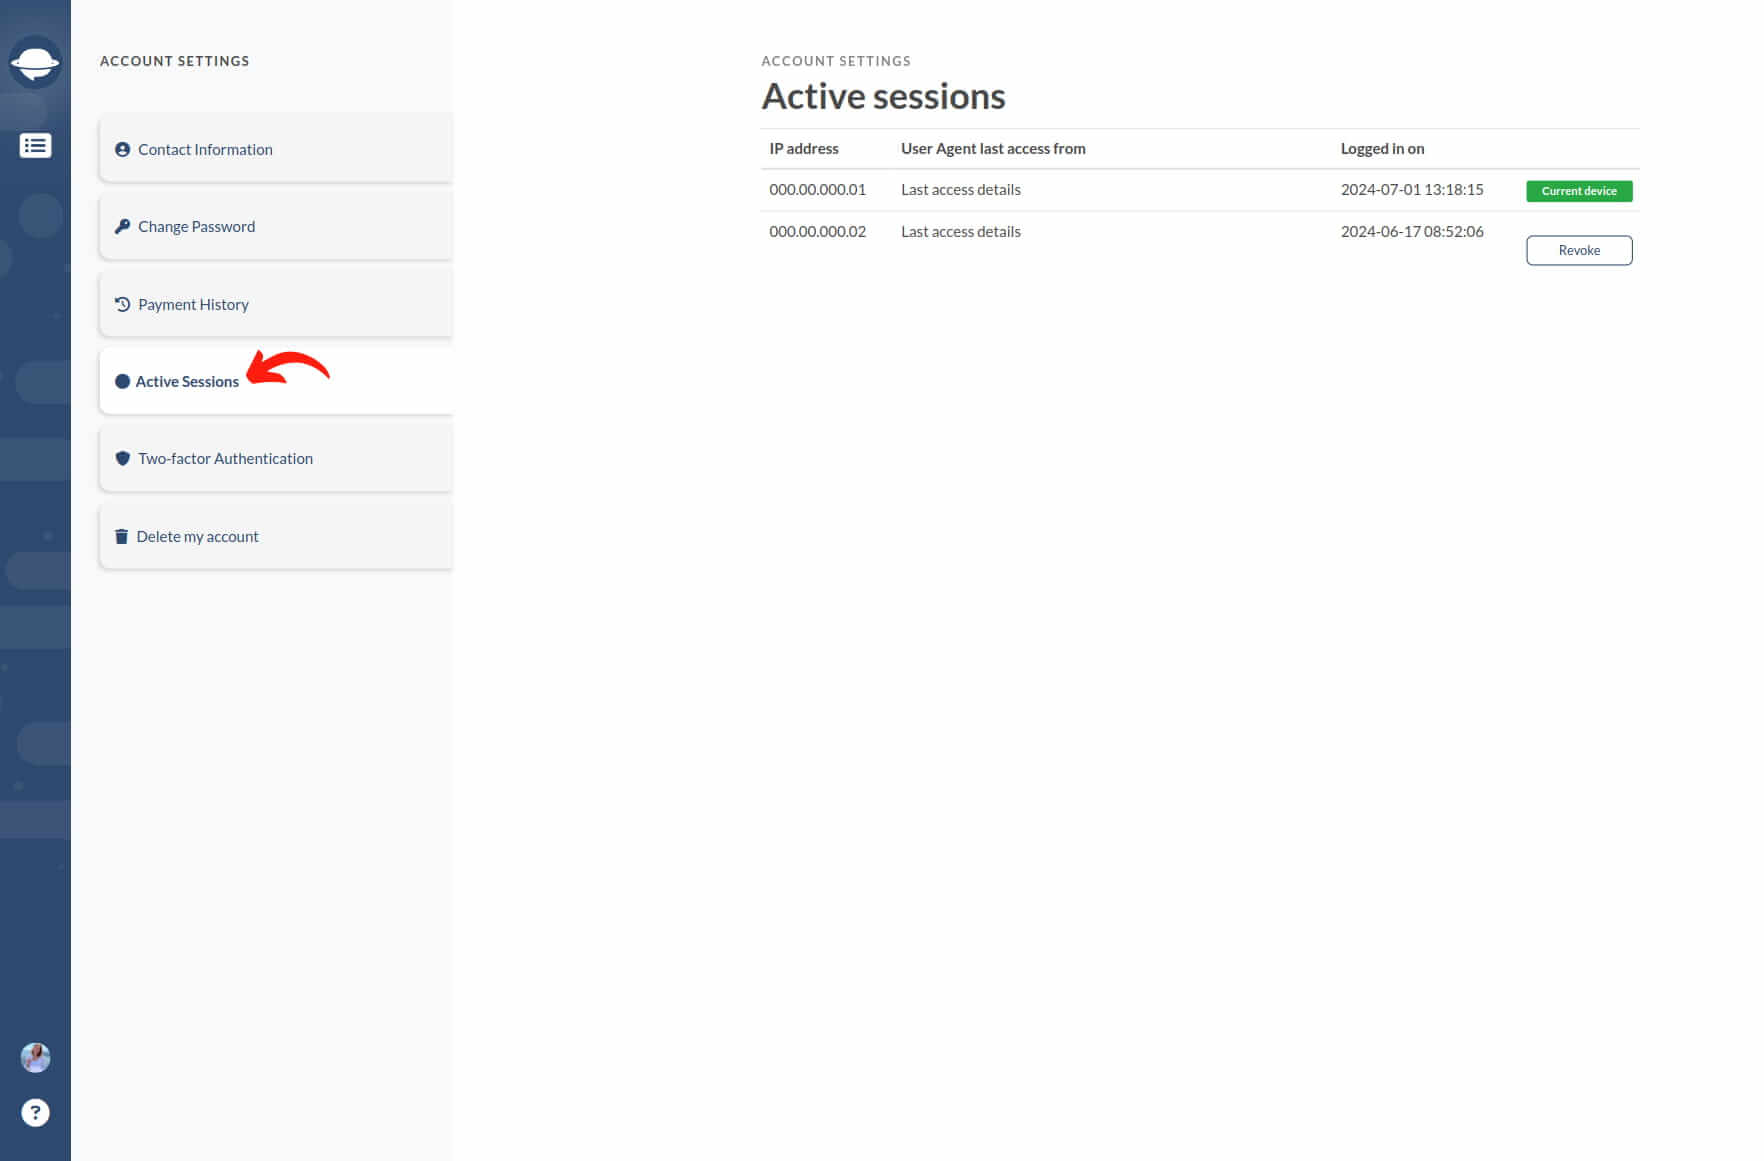
2. Review session details including IP address, browser, and login time.
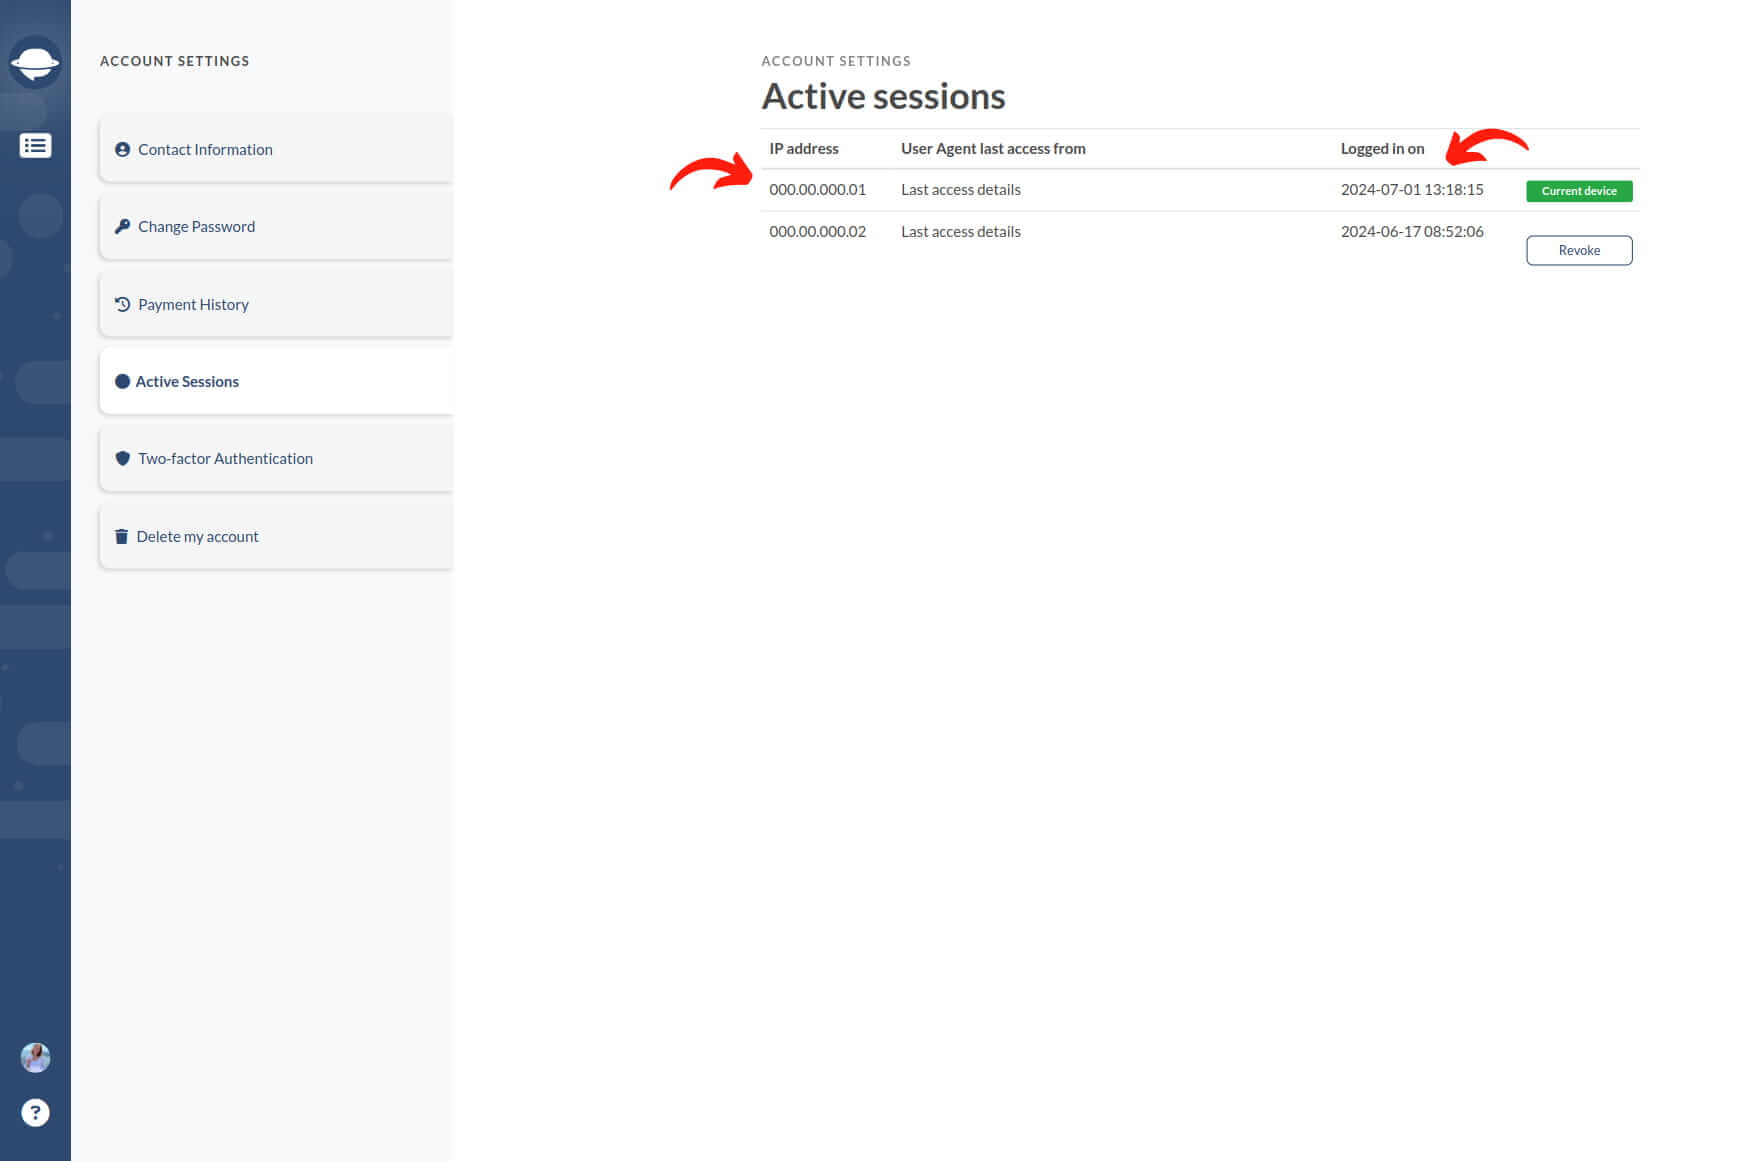
3. Optionally, revoke any session by clicking the “Revoke” button.
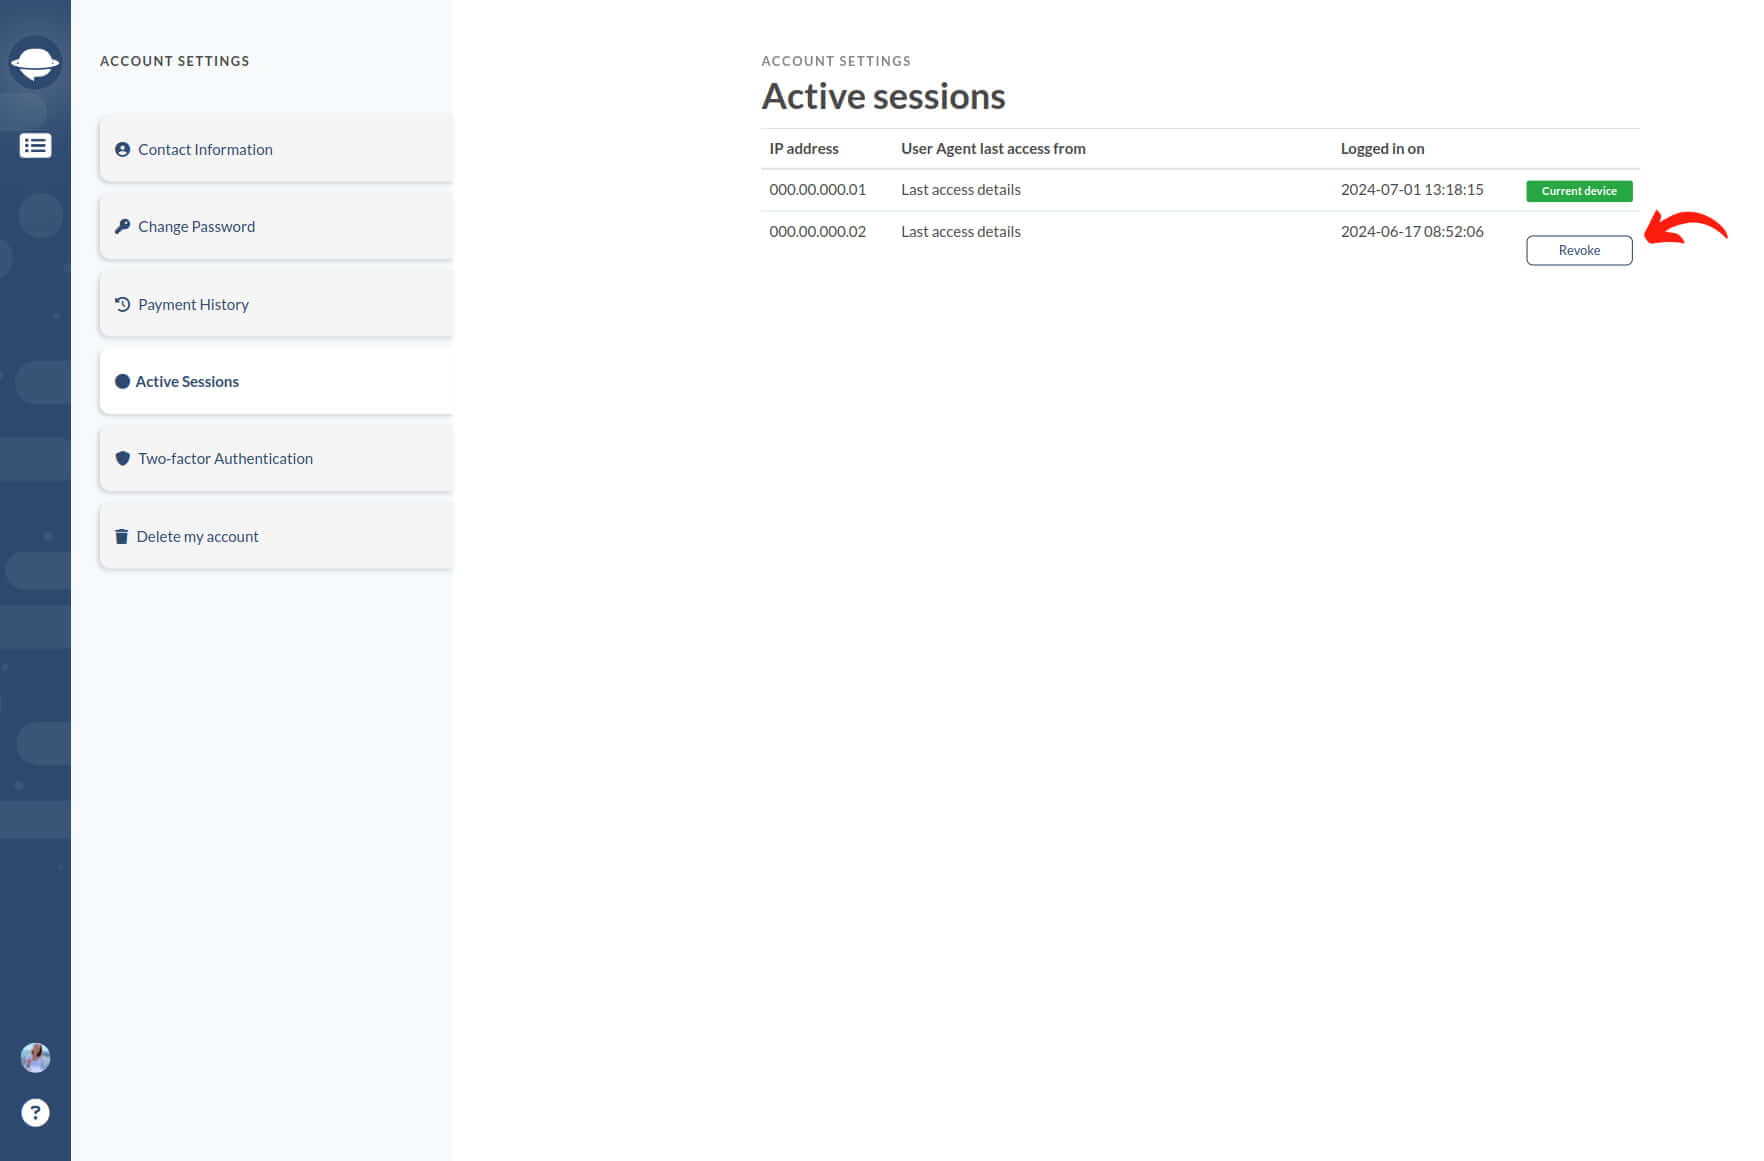
This feature not only allows tracking of active sessions but also enables session revocation for added security.
Why disable automations before migration?
It's strongly recommended to disable automations on your new platform before migration to avoid unexpected changes to migrated tickets, such as status alterations or reassignments.
If disabling automations isn't possible, consider the following workaround:
a) Request support to apply a tag to all migrated tickets.
b) Use the "Add a new tag to the migrated tickets" option if available in the pre-built automation list on the mapping settings.
Then, establish specific rules for automations and notifications to avoid triggering them for tickets with the added tag. This approach allows for data migration while keeping automations enabled.
How long does data migration take?
Predicting the exact duration of your data migration is complex due to various factors impacting speed.
The migration involves two main steps: reading and writing. Reading retrieves records from the source help desk, while writing transfers them to the target help desk.
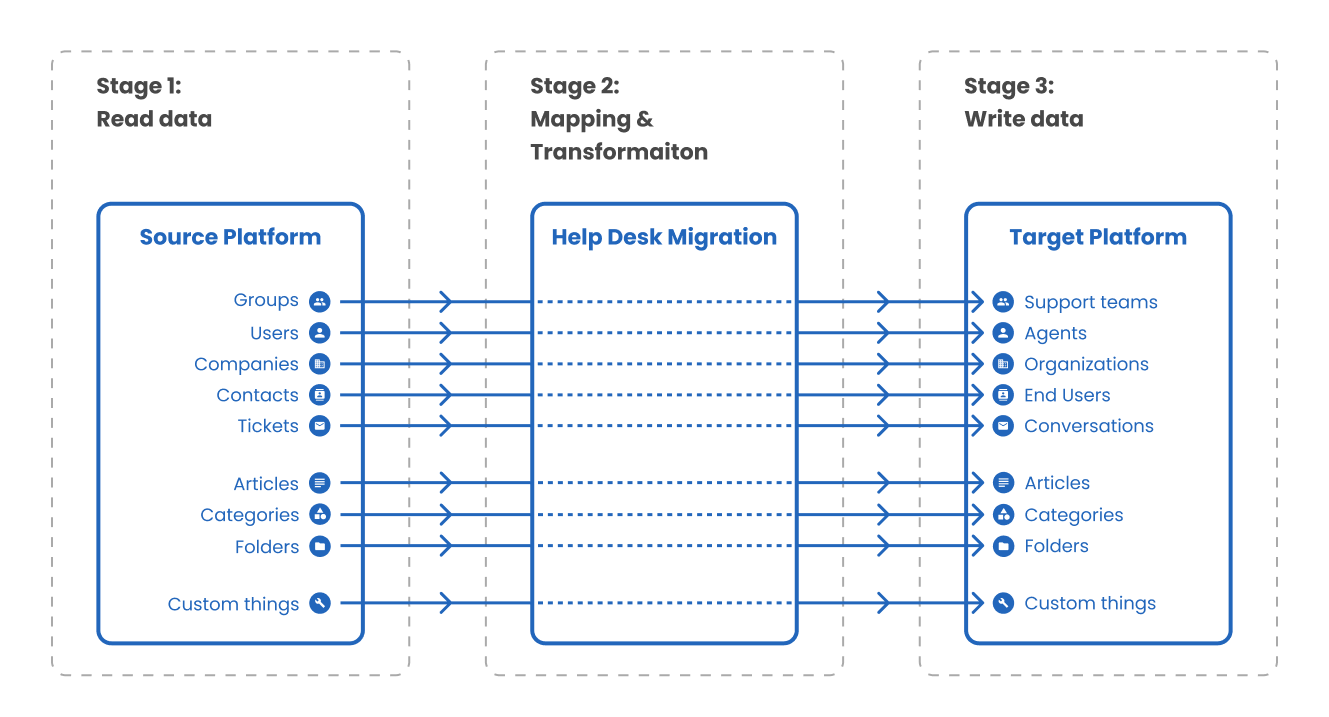
Factors affecting migration time include:
The duration required to complete each step is contingent upon various factors, including:
- Record Volume: The more records, the longer the migration.
- Attachments: Large or numerous attachments can extend retrieval.
- API Limits: Source and target help desks impose limits on requests.
- API Architecture: Some platforms require multiple requests per record.
Here's how each aspect relates to your migration process
Records: The quantity of records impacts migration time. More records mean longer durations, although high API limits can mitigate this.
Attachments: Attachment presence and size influence migration time, with larger or numerous attachments extending the process. Estimating accurately is challenging without prior knowledge of attachment quantity.
API Limits and Specifications: API limits determine the maximum requests allowed within a timeframe, varying by platform and subscription tier. Understanding API architecture nuances is vital for optimizing migration strategies.
In this hypothetical scenario, let's consider migrating from Zendesk to Freshdesk. Below is a summary of each API's functionality and the corresponding number of calls needed for effective data migration:
| Reading data | Writing data | ||
|---|---|---|---|
| Zendesk entities | API calls used | Freshdesk entities | API calls used |
| Staff | Count - 1 call Fetch - 1 call per 100 staff members + 1 call to get relations for each staff. |
Staff | Search - 1 call per 100 staff members Create - 1 request to check if there’s a contact with the same email as the agent has. If there isn’t, then 1 request to create a contact + 1 request to update is as agent |
| Companies | Count - 1 call Fetch - 1 call per 100 companies |
Companies | Search - 1 call per 100 companies Create - 1 call per company |
| Contacts | Count - 1 call Fetch 1 call per 100 contacts |
Contacts | Search - 1 request per 100 contacts. If the same Zendesk contact is found on Freshdesk then +1 call to assign it to a company. If not, then we create a contact. Create - 1 request per contact |
| Tickets | Count - 1 call Fetch - 1 call per 100 tickets + 1 call for each ticket to assign the relations |
Tickets | Create - 1 call per ticket + 1 call per reply |
| Knowledge base articles | Count - 1 call Fetch - 1 call per 100 articles + additional requests to retrieve attachments |
Knowledge base articles | Create - 1 call per article |
| Categories | Count - 1 call Fetch - 1 call per 100 category |
Categories | Search - 1 call per 100 categories Create - 1 call per category |
| Folders | Count - 1 call Fetch - 1 call per 100 folder |
Folders | Search - 1 call per 100 folders Create - 1 call per folder |
| Count - getting the total amount of records | Search - means that Migration Wizard checks records for duplicates before creating new ones. Only true if you already have records in the target help desk. | ||
| Fetch - retrieving records. | Create - creating a record in the target help desk. | ||
Target Help Desk Considerations:
- Empty Target Help Desk: Migrating to a clean target help desk usually takes less time.
- Existing Data: If your target help desk already has tickets, contacts, or other data, the Migration Wizard will allocate additional time to verify and prevent duplication.
What you can do to fix it?
- Request API Limit Increase: Contact the new platform provider to request a temporary increase in API limits. This can speed up the migration process significantly. Make sure to address this well in advance of the migration date to prevent delays.
- Calculate Migration Duration: Gather information about API limits for both the source and target help desks. This will help you estimate the time needed for the migration process accurately.
How to speed up the Full Data Migration?
Full Data Migration is a comprehensive process that cannot be completed swiftly; it requires careful consideration due to the substantial volume of data involved.
Over time, as you utilize your current help desk platform, your data accumulates significantly. Therefore, when transitioning to a new help desk, the goal is to preserve all data comprehensively, not just individual records.
The duration of Full Data Migration can vary significantly, ranging from a few hours to up to a week. However, migration speed depends on various factors, including:
- The number and size of attachments.
- API limits on both source and target platforms.
- API specifications.
- Characteristics of your target help desk.
- The processing speed of data by server infrastructure.
To speed up Full Data Migration, several strategies can be employed. For example, consider migrating open and closed tickets separately or excluding historical data. However, such measures may offer only marginal improvements, and you may still experience wait times during the migration process.
A highly recommended step is to increase API limits on both source and target platforms. Contact the support teams of both solutions well in advance of migration to request temporary increases in API limits.
You can also take advantage of the Multithread Migration feature, available in the Premium service package, which allows running the migration process at the maximum speed supported by the platforms. Contact our support team to access this feature.
Additionally, you can opt for an automated approach by selecting the "Skip attachments" option. This simplifies the migration process by focusing solely on transferring core customer data, which can be selected during the Demo Migration at the "Select Object" step.
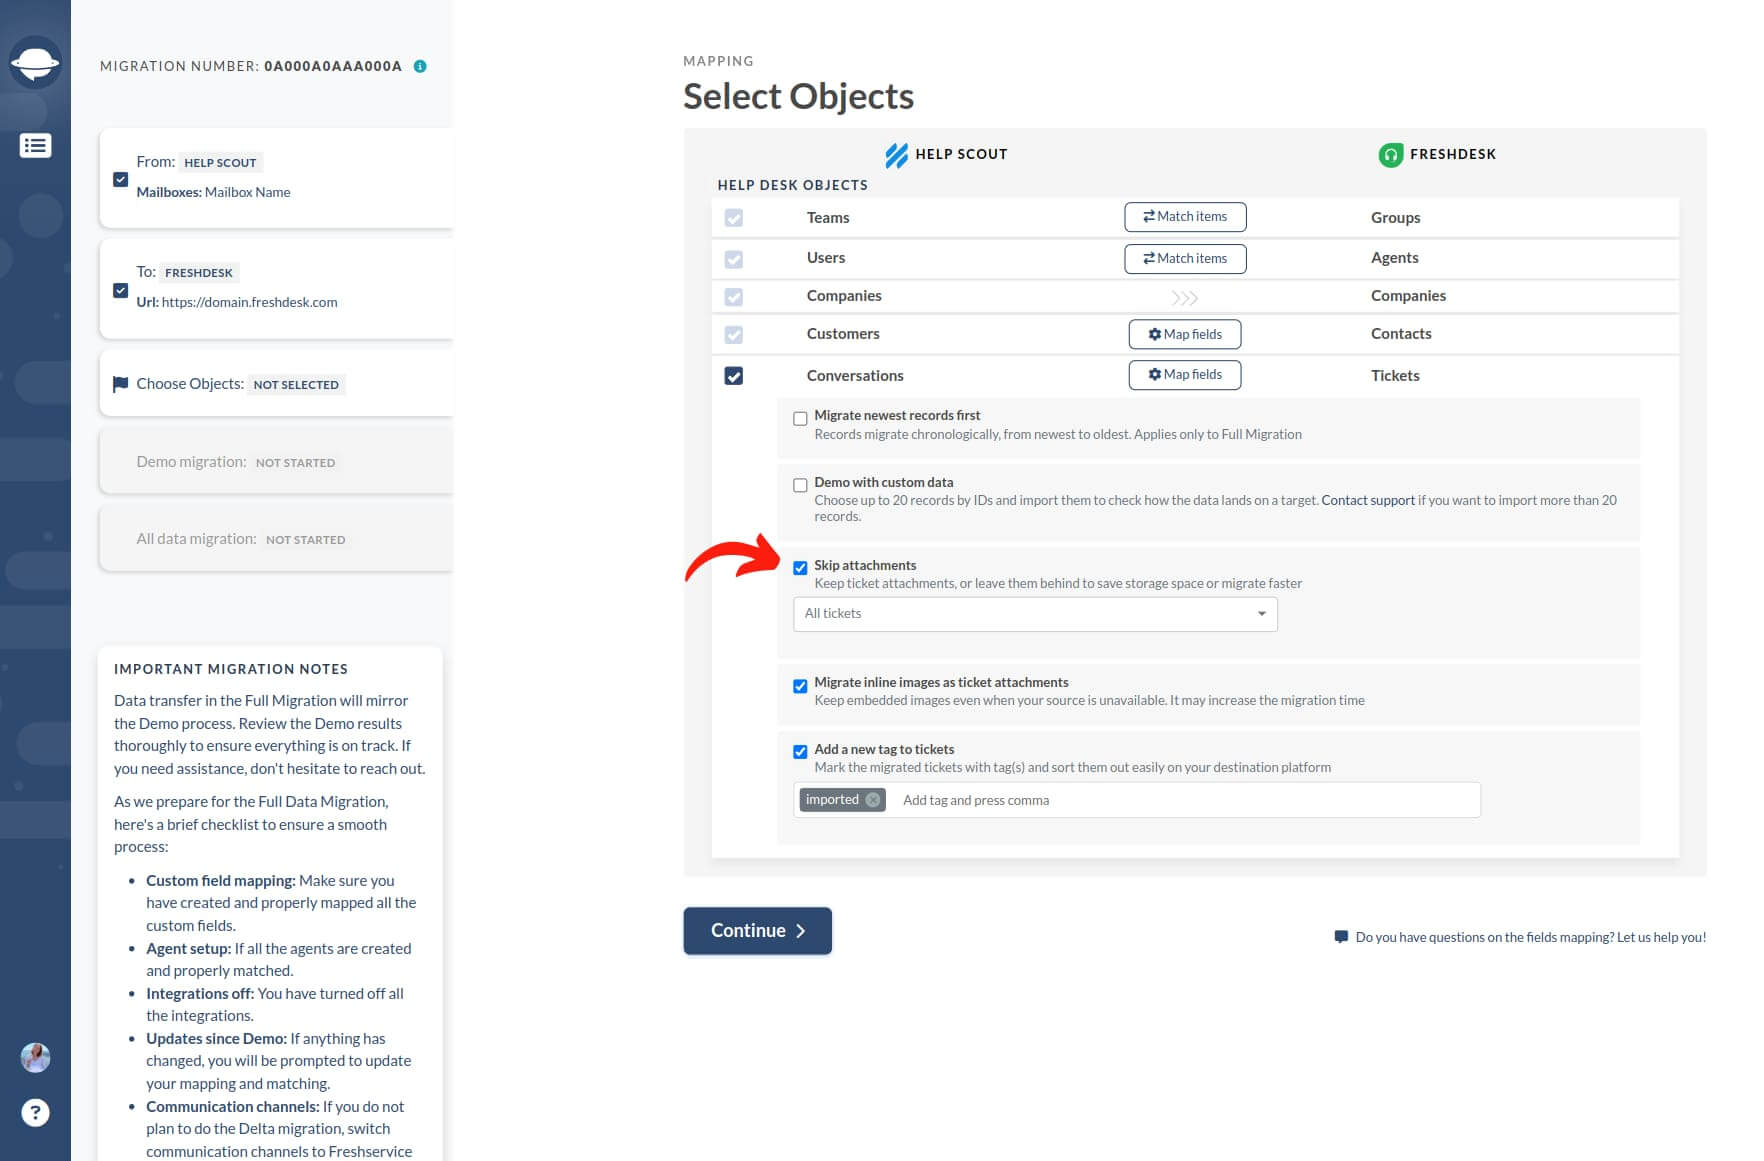
The automated option is available if your source platform is: Zendesk, Freshdesk, Freshservice, Jira Service Management, Help Scout, Gorgias, Zoho Desk, Reamaze, Intercom, Kayako, ServiceNow, or HubSpot Service Hub. Other platforms are also supported.
How to clean up data prior to migration?
Cleaning up your data prior to migration is a crucial step to enhance the efficiency and reduce the cost of the process. The volume of data in your source help desk directly impacts processing time and overall migration expenses.
What to do before the data cleanup?
1. Identify Unnecessary Data:
- Review all records and exclude data not essential for migration. Our data transfer tool automatically excludes spam-marked tickets, but ensure to manually remove any bypassed spam tickets.
- Consider removing historical data not utilized for an extended period.
- Eliminate ticket duplicates to prevent migration failures.
2. Validate data integrity: Verify the validity of information, especially within older entries. Delete or update outdated or irrelevant details.
3. Complete missing data: Ensure all ticket fields contain necessary information, especially mandatory fields on certain platforms.
4. Backup your data: Maintain a backup to guard against accidental loss and ensure important records can be restored if needed.
Transfer data from a self-hosted or on-prem ticketing system
Help Desk Migration service offers assistance with exporting data from self-hosted or on-premise ticketing systems. To facilitate this process, follow these steps:
Whitelist the IP address: Ensure that the IP address 18.198.164.195 is whitelisted to allow access to your system.
Open ports 80 and 443: These ports need to be open to enable communication with the Migration Wizard.
By completing these steps, the Migration Wizard will seamlessly fetch and migrate your data.
Can I close the browser window after the migration has started?
Yes, you can. Both Demo and Full data migrations are performed in the cloud, eliminating the need to keep your browser window open.
The duration of your transition may vary based on the volume of records being moved. Rest assured, you'll receive an email notification upon completion of the migration process.
Can I make changes during migration?
Once Full Data Migration begins, it's best to avoid making alterations. Avoid making changes or deletions during the import process. Editing or deleting records while the migration is underway can lead to disruptions and potentially irreversible consequences.
If you need to refine your records, we recommend doing so either before or after the import process.
Can I use my help desk systems during data migration?
During the data migration process, you can continue using both your source and target platforms. However, considerations vary depending on which platform your team primarily works with during the transfer.
Using the Target platform:
If you opt to use the target platform while data is being transferred, be aware that certain help desk systems may require temporarily disabling triggers and notifications. This approach has its pros and cons:
Pros: Reduced influx of messages during data migration.
Cons: Ensure that your workflow operates smoothly without triggers and notifications for the duration of the migration.
Using the Source platform:
If you choose to continue using your source platform during the migration, consider the following:
- Any data created or updated after the Full migration has started will not be included in the migration.
- If you want to migrate this new or updated data, you can use the Delta migration feature, which captures and migrates it automatically
What is Delta migration?
Delta migration involves the transfer of updated and newly created tickets to the target platform. This process eliminates duplicate records, as our service automatically detects and handles new and updated data.
When and why do you need Delta migration?
Delta migration becomes necessary when using the source platform during migration. It ensures that updated and newly created tickets during the data migration process are seamlessly switched over to the target platform. Our Premium support package offers this specialized option for a smooth transition.
What happens if a customer replies to an open ticket during migration?
Help Desk Migration does not capture client replies or forward them to the target help desk during migration. Our service does not check for new data while the migration is ongoing.
Here are possible scenarios:
- Target platform is active: If the new system is active and the client replies after the ticket has been imported, their response will go to the new help desk provided communication channels were switched to Target.
- Source system in use: If the ticket has not yet been imported and the old system is active, the reply will remain in the old system. However, the data migration service will not include it in the import.
- Target platform in use: If the ticket has not yet been imported and you're using the new help desk, the customer's reply will create a new ticket in the new system.
To mitigate such situations, we recommend scheduling the migration during periods of lowest support load.
Where will a response for a migrated ticket go?
After completing the data migration, you may wonder where responses to migrated tickets will be directed. There are two primary scenarios:
- Reply to the Migrated Ticket: The response may be directed back to the original ticket that was migrated to the new platform.
- Creation of a New Ticket: Alternatively, the reply could result in the creation of a new ticket.
To offer a comprehensive understanding, we conducted tests using Email and the Self-Service Portal to reply to migrated tickets across various popular platforms. Here's what we discovered:
| Email reply | Portal reply | |
|
Zendesk |
Into new ticket | Into migrated ticket |
|
Freshservice |
Into new ticket |
Into migrated ticket |
|
Freshdesk |
Into new ticket |
Into migrated ticket |
|
Kayako |
Into new ticket |
Into migrated ticket |
|
Gorgias |
Into new ticket |
- |
|
Jira Service Management |
Into new task (type Email request) |
- |
|
Teamwork Desk |
Into new ticket |
Into migrated ticket |
|
Reamaze |
Into migrated ticket |
Self-Service Portal allows to view help articles only |
|
Zoho Desk |
Into new ticket |
Into migrated ticket |
|
Help Scout |
Into new ticket |
- |
If you encounter a '-' (dash) sign, it indicates that we were unable to conduct tests for replies due to specific platform constraints.
Do you delete data from the source platform?
No, the Migration Wizard does not delete any data from the source platform. The migration service is designed not to modify data in any way. Instead, it follows a structured process:
- Read Source: The Migration Wizard reads the data from the source database without making any changes to the original records.
- Make a Copy: It then creates a copy of the records to be migrated to the target platform. This copy is used for the migration process.
- Import to Target: The copied records are imported into the target platform, ensuring that the original data on the source platform remains unchanged.
- No Deletion or Modification: At no point does the Migration Wizard delete or modify any data on the source platform. The original records are retained and accessible on the source platform even after migration.
You can access your data on the old platform at any time without any concerns.
How do I get help migrating data between help desk platforms?
You can get support depending on your needs. If you have questions while setting up a Demo Migration, schedule a Migration tool training call via Calendly. If issues occur during a Demo or Full Migration, use the chat in the Migration Wizard or book a Migration troubleshooting call.
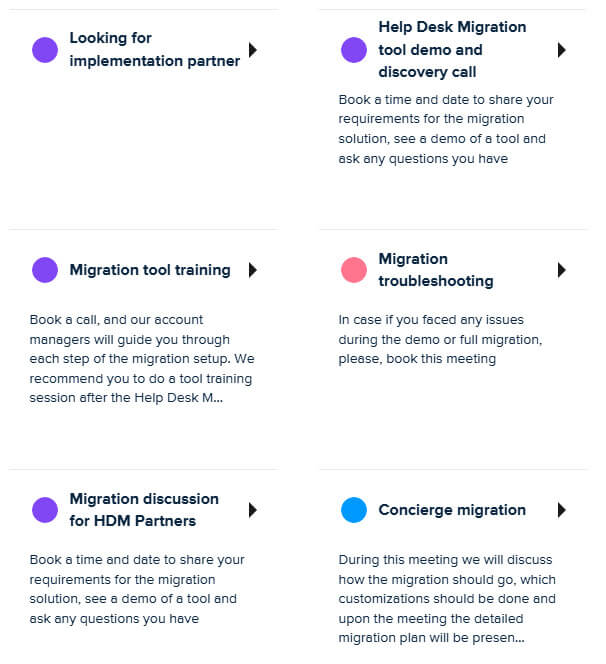
For full guidance through every step, book a Concierge Migration meeting for hands-on assistance from our team.
Why can’t I start the full data migration after a successful demo migration?
If you can't start your full migration right after a successful demo, then the most common issue is that payment has not been processed yet. Contact our support for an update on the transaction status.
If you have requested any customization work, make sure to wait for it to complete before proceeding.
Once payment is completed and custom work done, you can start the Full Migration.
Where do I find the credentials needed to connect my help desk account to Migration Wizard?
To connect your help desk account to the Migration Wizard, you typically need admin credentials or an API token from your source and target platforms. You can find these in your help desk’s account settings or developer/API section: for example, in Zendesk under Admin - Channels - API, in Freshdesk under Admin - API, or in other platforms’ developer settings. If your platform uses SSO or IP restrictions, you may need to generate a dedicated API token or bypass account and ensure any required IP addresses are allowlisted.
Make sure to check the Migration Guide panel in the Migration Wizard - it lists all steps necessary to connect Source and Target platforms you’ve selected.
What are common login and registration issues on the Help Desk Migration platform?
- Incorrect credentials: Entering the wrong email, password, or API token can prevent login. Always double-check credentials and ensure you’re using the correct account.
- Browser issues: Outdated browsers, disabled cookies, or browser extensions may interfere with login or registration. Clearing the cache or trying a different browser often resolves this.
- Account verification: New accounts may require email verification before you can log in. Check your inbox (and spam folder) for the confirmation email.
Why is my demo migration stopping at different stages?
- Connectivity Issues: Temporary network interruptions between your source and target platforms can cause the process to pause.
- Platform limits & safeguards: Demo migrations may pause or slow down because platforms like Zendesk, Freshdesk, or Jira limit how many requests a tool can make at once, and the system includes checkpoints to safely test data transfers.
- Migration may encounter issues with data incompatibility between the Source and Target platforms. For example, some Source tickets may be missing assignees or requesters, while the Target platform doesn't allow creating tickets without them. Consult our support team for details specific to your Demo migration.
How do I start a free demo migration with Help Desk Migration Service?
To start a free demo migration with Help Desk Migration Service, sign up and connect your source and target platforms using the required credentials or API tokens. For the Demo Migration, you can either let the system automatically transfer 20 random tickets with their related data. Alternatively, you can request to migrate specific tickets of your choice.
Once you’ve made your selection, simply click to start free Demo Migration, and within a few minutes, you’ll be able to review the results in your target platform.
How can I check the status and results of my demo migration?
You can track your migration status in real-time with the progress bar, which typically completes in just a few minutes.
Once finished, you’ll get a detailed list of migrated tickets to review and confirm the success of the transfer.
How can I pass security and compliance audits required by third parties to work with Help Desk Migration?
You can pass security and compliance audits required by third parties when working with Help Desk Migration as we are following these practices:
- Rely on certified infrastructure: All data transfers run on secure cloud servers that comply with industry standards.
- Use encryption: Data is encrypted both in transit (via HTTPS/SSL) and at rest, ensuring sensitive information is protected.
- Leverage role-based access: Only authorized team members and migration personnel can access your data.
- Documentation available upon request: Help Desk Migration provides details about its security policies, data handling practices, and compliance certifications, which can be submitted during vendor audits.
- Additional safeguards: With advanced support packages, you can request custom security measures or sign non-disclosure agreements (NDAs) to meet the stricter requirements of third parties.
How can I verify my data migration and identify potential issues quickly after using Help Desk Migration, especially with limited time?
After completing your migration with Help Desk Migration, run a post-migration audit by checking a sample of tickets, users, and attachments in the target platform to confirm accuracy. If you have limited time, use the migration summary report in your account or contact support to quickly identify and resolve potential issues.
Common issues:
- Incorrect field mapping: Double-check ticket fields, custom fields, and statuses to ensure they align between platforms before running a full migration.
- Empty or duplicate records: Apply filters to skip blank tickets and merge or exclude duplicates during setup.
- Tickets assigned to a wrong agent: Check agents matching or contact our support team to investigate the issue.
We’re Consolidating Multiple Support Tools into One — How do We Migrate Data Safely?
When consolidating multiple support tools into one, speed and security are key. Help Desk Migration, an automated migration tool, enables you to move data from multiple platforms into a single support system in just minutes to a few hours, while maintaining the top-tier standards of data security.
Help Desk Migration securely transfers tickets, contacts, and historical records across platforms using automated processes and batch migration to handle large, enterprise-scale datasets efficiently. The service meets strict security standards, including SOC 2 Type II & III, GDPR, PCI-DSS, and HIPAA readiness, and runs on secure AWS infrastructure.
Key Phases and Steps of Consolidating Multiple Support Tools into One
Migration planning
- Define migration scope: Select the data to transfer (brands, tickets, contacts, companies, agents, knowledge base articles, attachments, custom fields).
- Map systems and fields: Configure field mappings between each source help desk and the target platform.
Data preparation
- Filter and organize data: Migrate only the records you need (by date, status, groups, or agents).
- Preserve relationships: Ensure tickets remain linked to the correct contacts, companies, and attachments. Choose to migrate all tickets or transfer only those with related data, while leaving unassigned tickets on the Source platform if needed.
- Maintain structure: Keep tags, statuses, priorities, and custom fields aligned with the new system.
Demo & Validation
- Run a : For a more accurate migration, you can select additional migration options. Test the process with sample data to verify mappings and results before the full migration.
- Preview results: Review migrated records after the Demo to confirm accuracy.
- Adjust mappings if needed: Update field mappings or filters before running the full migration.
Full Migration and Monitoring
- Run the Full Migration: Automatically transfer all selected data without interrupting support operations.
- Delta migration option: Move newly created tickets before final cutover to keep data up to date.
Why am I seeing repeated refund requests with the same email address and empty/duplicate descriptions?
- Multiple submissions by users: Customers may have resubmitted requests during the migration process, creating duplicates.
- Migration artifacts: During data transfer, Help Desk Migration may import multiple versions of the same ticket if records were not fully deduplicated or filtered.
- Empty or missing fields: Some tickets may have lacked descriptions in the source platform, resulting in empty fields after migration.
Preventative measures: Use filtering and mapping options during migration to merge duplicate tickets, skip empty entries, and maintain clean data.
Partnering with Help Desk Migration Service
If you're a help desk vendor, we invite you to collaborate with us as an authorized data migration service provider, benefiting from exclusive migration conditions for your potential customers.
For implementation specialists, partnering with us presents a fantastic opportunity to broaden your service offerings and effectively cater to a diverse range of clients through Help Desk Migration.
To explore partnership opportunities or discuss collaboration further, please fill out the form. Alternatively, feel free to reach out to us directly via email at contact@help-desk-migration.com.
We look forward to the possibility of working together and delivering exceptional migration solutions to our mutual clients.
Why can't I connect to a source or target platform during migration?
There are several common reasons you might be unable to connect your Source or Target platform during migration:
- Admin rights: You need administrator access on both the Source and Target platforms. Without proper permissions, the Migration Wizard cannot access the data.
- Platform availability: If your team deactivated the Source platform too soon or your Target platform was on a trial that has expired, the connection will fail.
- Credentials and tokens: Double-check that you entered the correct login credentials. For platforms that use API tokens, ensure the token hasn’t expired; generate a new one if necessary.
If none of these reasons apply, contact our support team. They can help you identify the issue and guide you to a solution so your migration can continue smoothly.
Why am I still receiving Google Calendar event change notifications at contact@help-desk-migration.com even after subscribing to calendar updates?
If you continue to receive notifications, it usually happens because Google Calendar sends event updates to the original email address associated with the calendar invite, even if you’ve subscribed to updates using a different account.
To stop receiving notifications at contact@help-desk-migration.com:
- Check the calendar invitation – Ensure the subscription was applied to the correct Google account.
- Update your notification settings – Open Google Calendar, locate the calendar you've subscribed to, and adjust or disable notifications for specific events.
- Remove the original email from notifications – If the original invite included contact@help-desk-migration.com, you may need to remove it from the event or calendar sharing settings.
If the issue persists, contact our support team.
How do I unsubscribe from Fireflies.ai meeting recording notifications related to Help Desk Migration?
If you’ve received email notifications from Fireflies.ai about meeting recordings connected to Help Desk Migration calls, you can easily unsubscribe.
Fireflies.ai is the meeting assistant we use to capture notes and transcripts during calls. If you no longer wish to receive these emails, open any Fireflies.ai notification and scroll to the bottom. There, you’ll find an “Unsubscribe” link that lets you opt out of future notifications.
Keep in mind that unsubscribing won’t affect your ability to access Help Desk Migration services or communicate with our team—it only stops Fireflies.ai from sending you recording-related updates.
Looking for more data migration details?