In customer service management, Zendesk stands as a stalwart platform, empowering businesses of all sizes to streamline their support operations. At the heart of Zendesk's functionality lie two key components: macros and triggers. These business rules serve as the backbone of efficient customer support workflows, allowing organizations to automate tasks, enhance agent productivity, and deliver exceptional service experiences.
What are macros in Zendesk?
Macros in Zendesk are predefined sets of actions that enable support agents to execute common tasks with a single click. From responding to frequently asked questions to assigning tickets to specific agents or departments, macros streamline repetitive processes, ensuring consistency and efficiency in customer interactions. By automating routine actions, macros empower agents to focus their efforts on more complex inquiries, ultimately enhancing overall productivity and customer satisfaction.
What are triggers in Zendesk?
Triggers in Zendesk are automated rules that are triggered by specific events or conditions within a support ticketing system. These rules enable businesses to set up automatic responses, notifications, and ticket assignments based on predefined criteria. Whether it's sending a follow-up email to a customer after a certain period of inactivity or escalating urgent tickets to a higher priority status, triggers empower organizations to deliver timely and personalized support at scale.

Ready to switch to Zendesk?
Type in URL of your Zendesk and set up free trial migration.
Don’t have Zendesk account? Take it for a spin for free with 14 days trial .
Creating and editing macros and triggers: Tips for success
When it comes to creating and editing macros and triggers in Zendesk, precision and foresight are key. Here are some tips to help you make the most of these powerful business rules:
Clarify Your Objectives: Before diving into macro and trigger creation, take a moment to define your support objectives. Are you aiming to reduce response times, enhance customer satisfaction, or something else entirely? Clear goals will guide your efforts and ensure alignment with your broader support strategy.
Start Small, Think Big: Begin by crafting simple macros and triggers to address immediate needs. As you gain confidence and expertise, don't be afraid to dream big and experiment with more advanced configurations. The key is to start somewhere and iterate as you go.
Embrace Continuous Improvement: Customer needs evolve, and so should your support workflows. Regularly review and refine your macros and triggers to keep pace with changing requirements and emerging opportunities. Continuous improvement is the hallmark of exceptional support.
Test, Test, Test: Before deploying new macros or triggers in a live environment, conduct thorough testing to identify any potential issues or optimizations. Solicit feedback from your team and iterate until you achieve the desired results. Rigorous testing ensures seamless integration and enhances the overall effectiveness of your business rules.
Comprehensive guide on how to create a macro in Zendesk
Macros in Zendesk are pre-defined sets of actions that can be applied to tickets to save time and ensure consistency in your customer support workflows. Here's how to create a macro in Zendesk:
1. Access the Macro Settings: Log into your Zendesk account and navigate to the Admin Dashboard. From there, click on the "Manage" section and select "Macros".
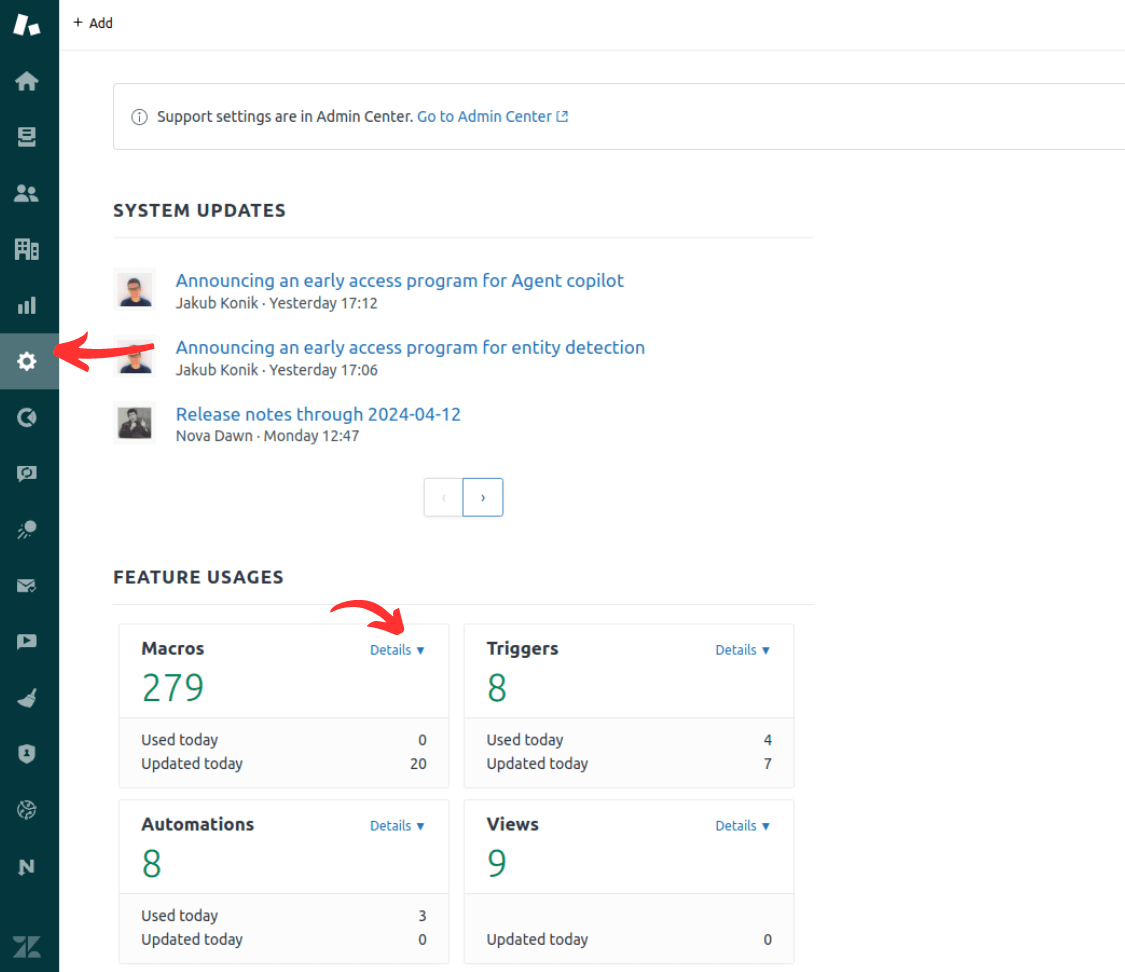
2. Create a New Macro: Click on the "Add Macro" button to begin creating a new macro. You'll be presented with a form to fill out the details of your macro.
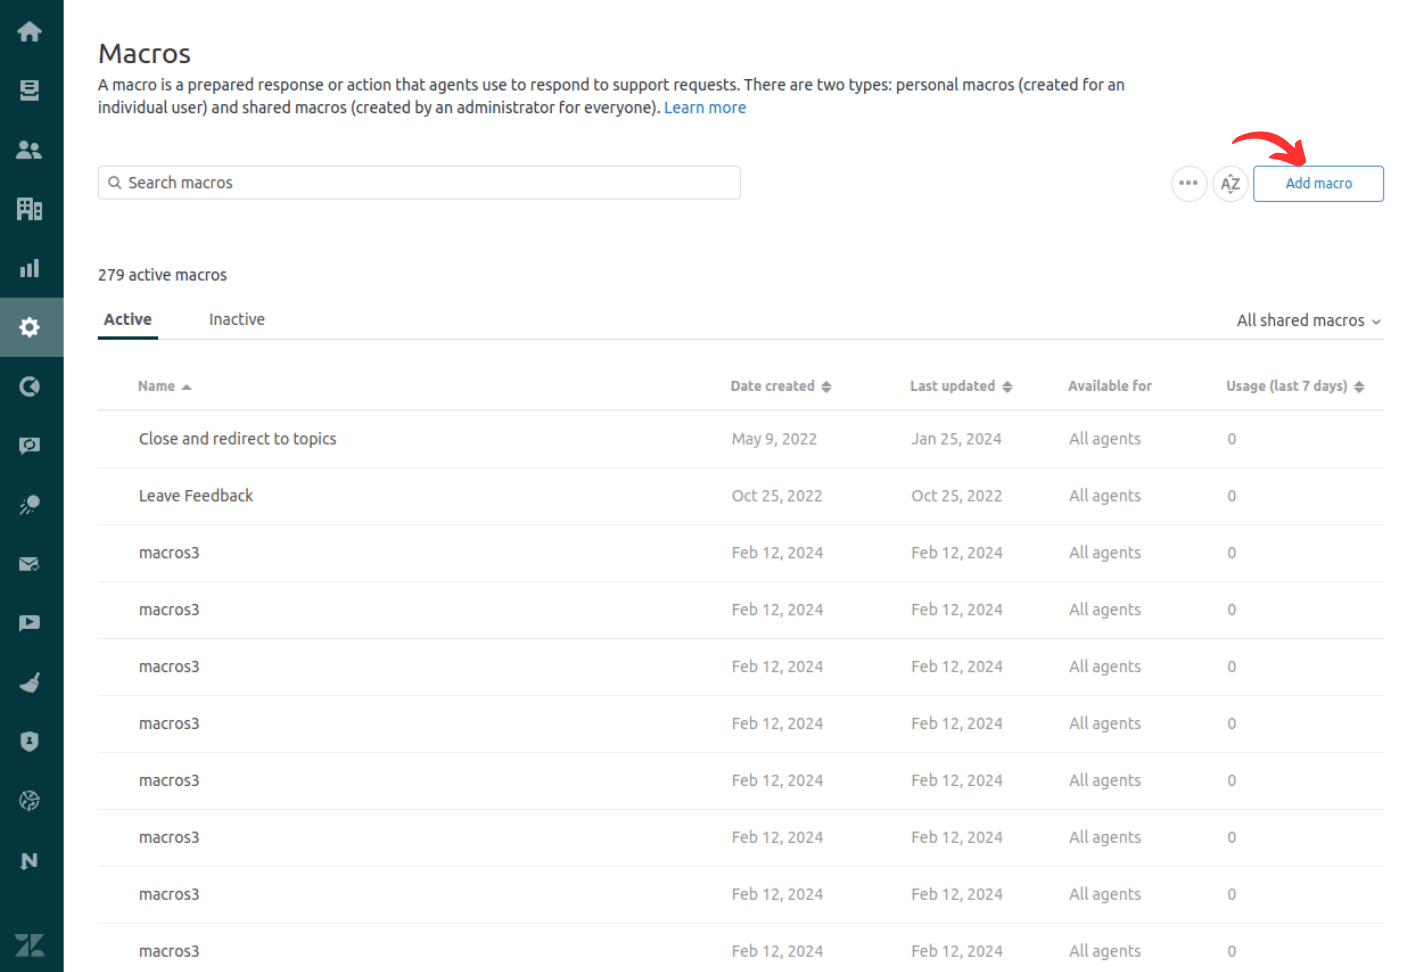
3. Name and Describe the Macro: Give your macro a descriptive name and provide a brief explanation of its purpose. This will help your team understand the functionality of the macro.
4. Define the Macro Actions: This is where you'll specify the actions that will be performed when the macro is applied to a ticket. Some key fields to consider include:
- Ticket Fields: Update ticket details such as the subject, description, priority, or status.
- Assignee: Assign the ticket to a specific agent or a team.
- Tags: Add or remove tags to the ticket.
- Comment: Insert a predefined comment or response to the ticket.
- Notification: Send an email notification to the requester, assignee, or other stakeholders.
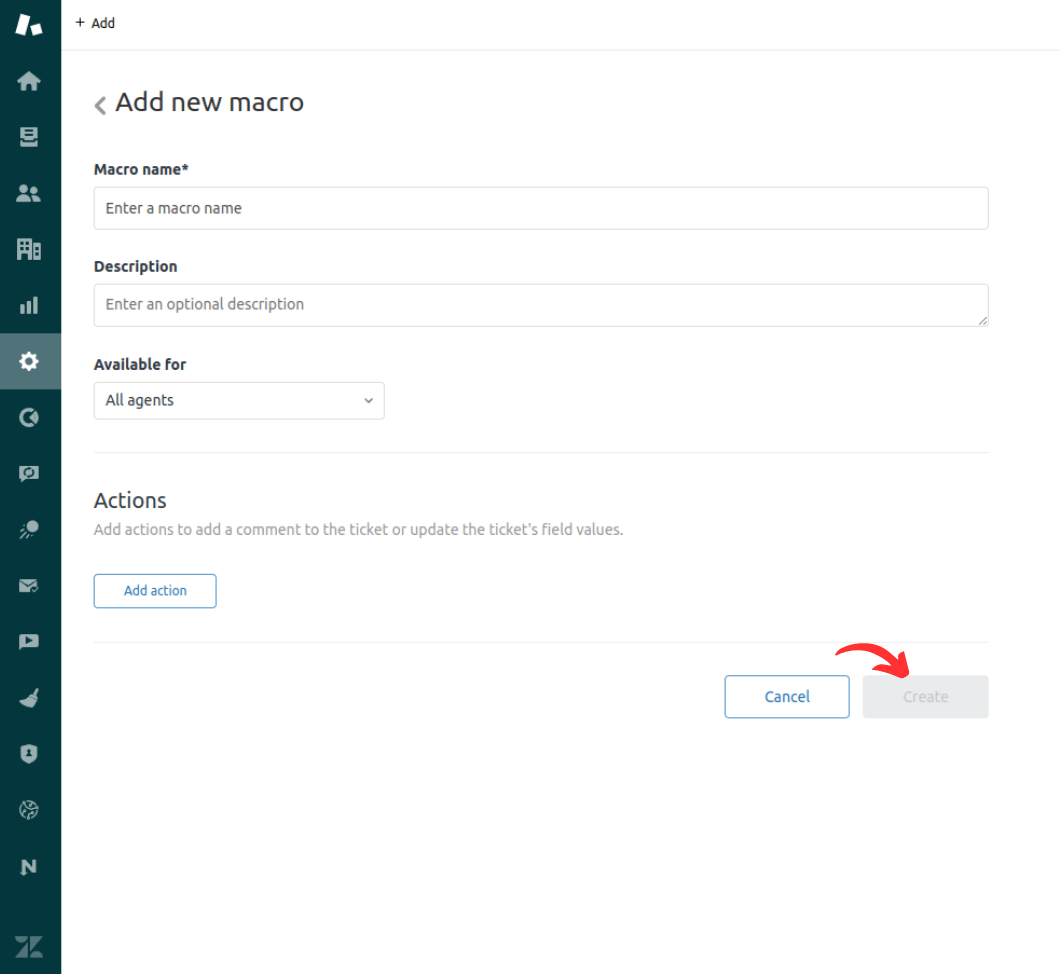
5. Preview and Create the Macro: Once you've configured the macro actions, preview the macro to ensure it's working as expected. If everything looks good, click "Create" to add the macro to your Zendesk account.
How to Setup Zendesk Triggers
Zendesk triggers are automated actions that are performed when specific conditions are met, such as when a new ticket is created or when a ticket is updated. Here's how to set up a trigger in Zendesk:
1. Access the Trigger Settings: From the Zendesk Admin Dashboard, navigate to the "Manage" section and select "Triggers".
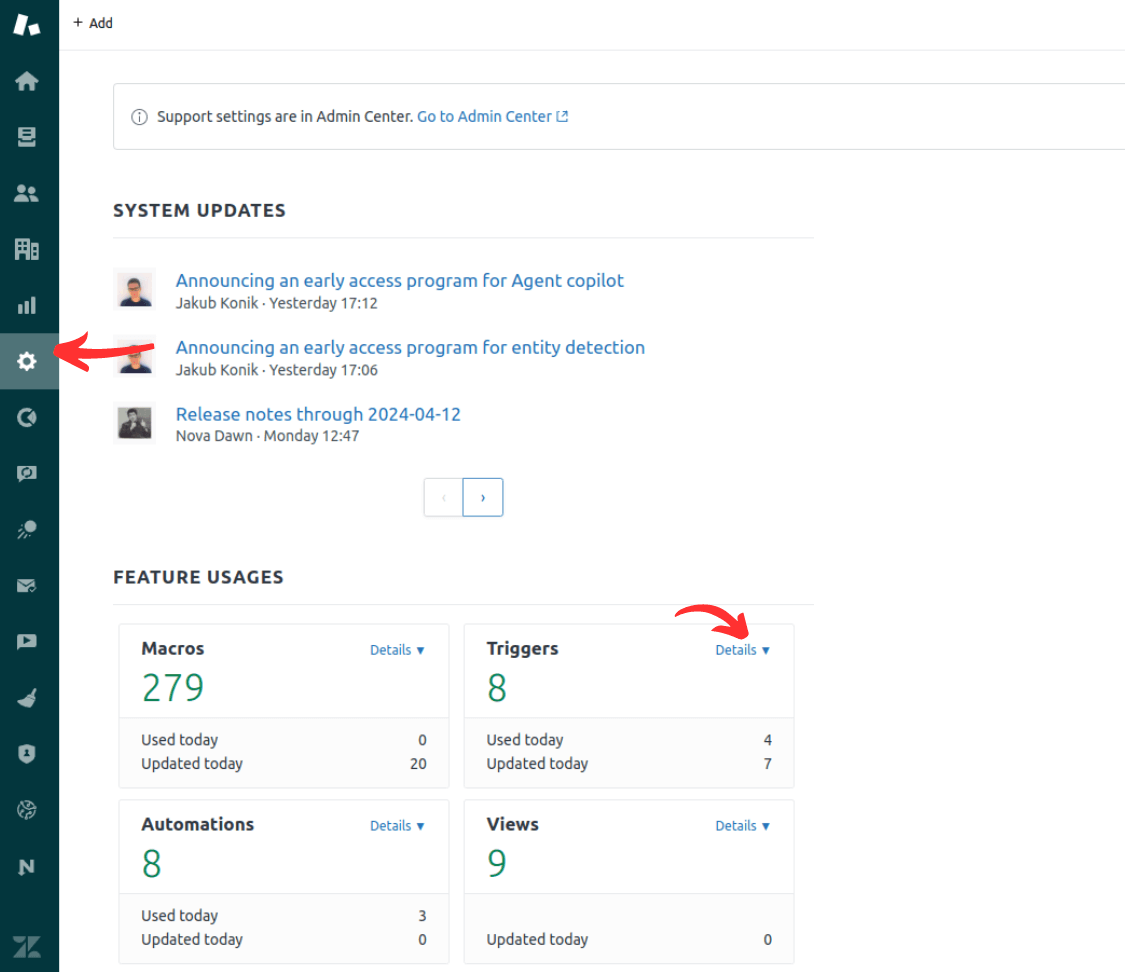
2. Create a New Trigger: Click on the "Add Trigger" button to begin setting up a new trigger.
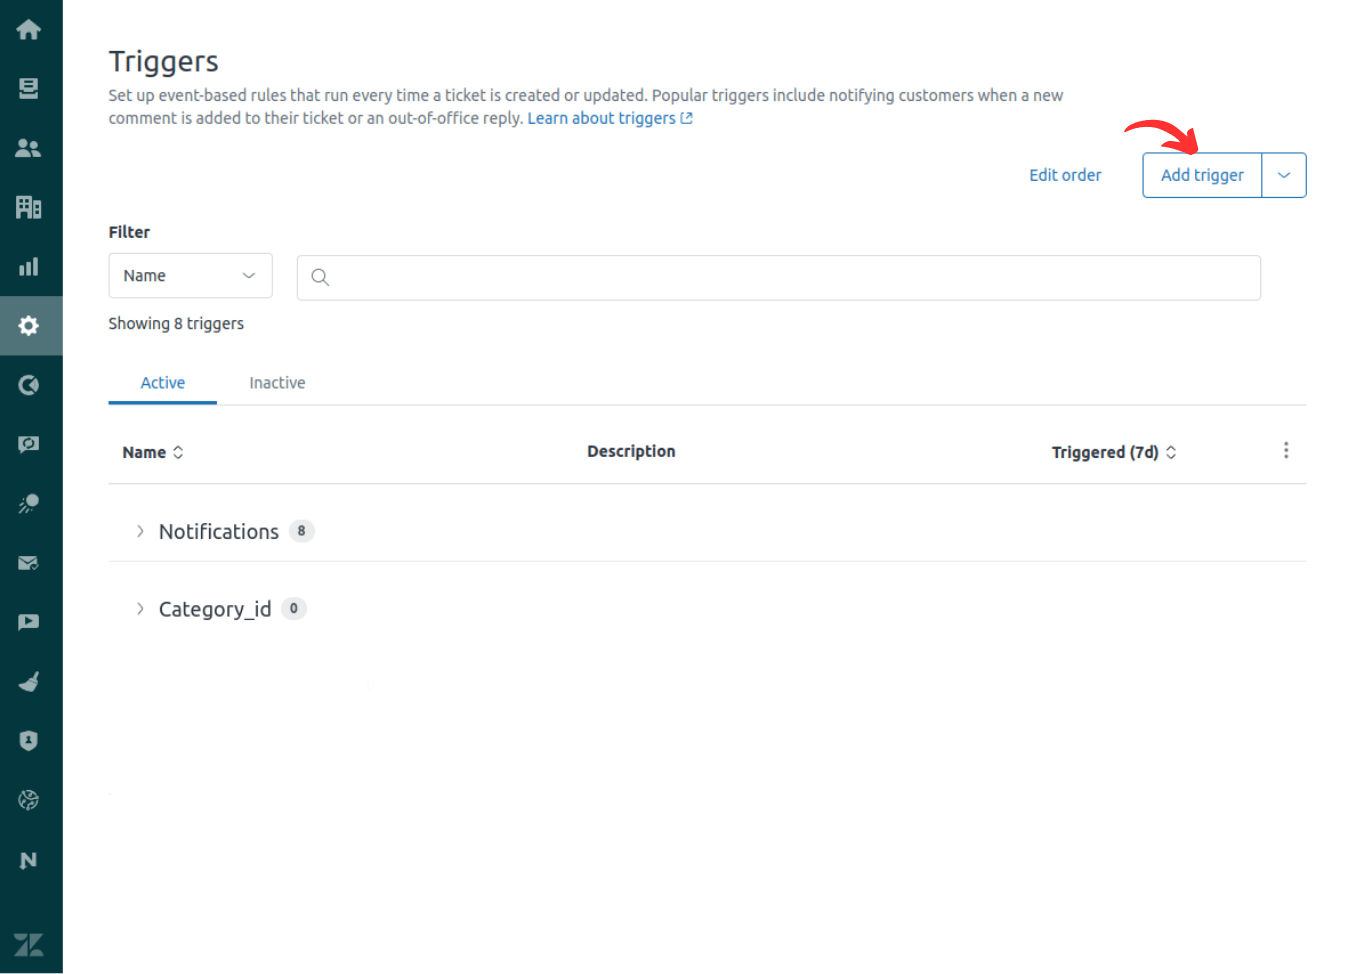
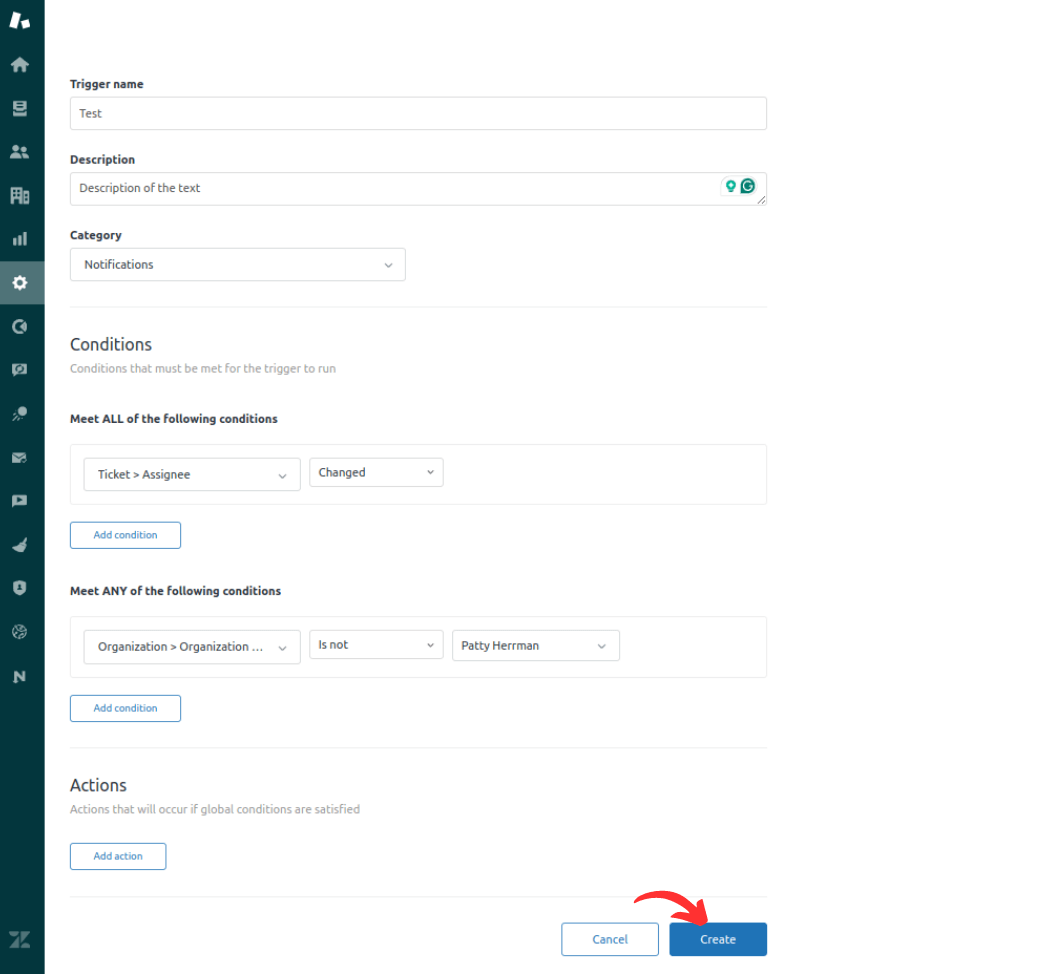
3. Name and Describe the Trigger: Give your trigger a descriptive name and provide a brief explanation of its purpose.
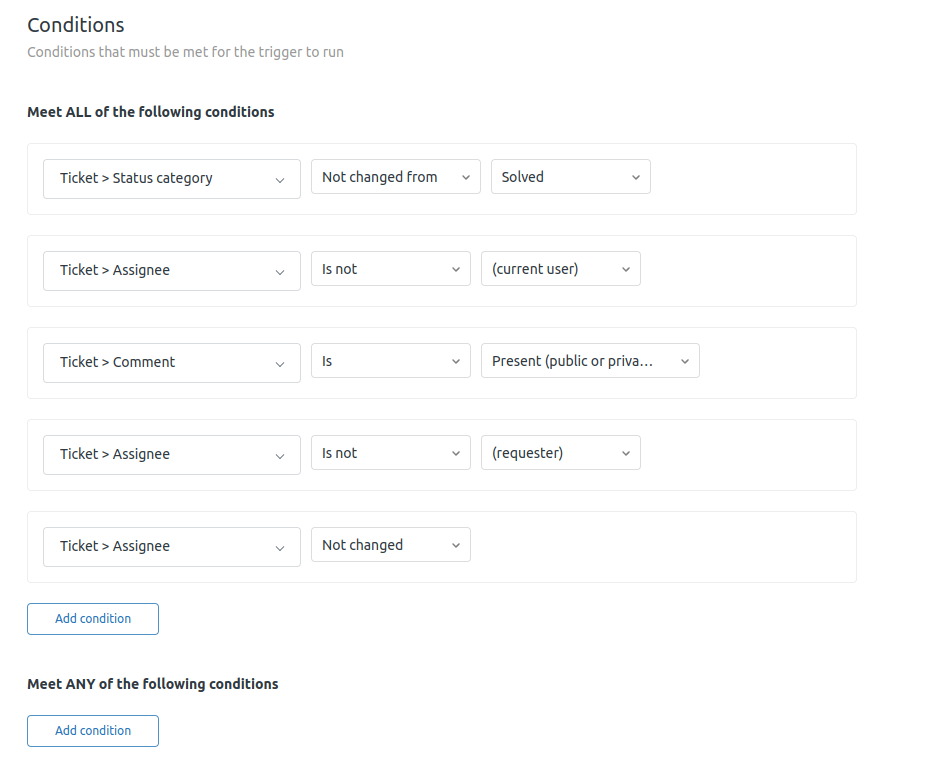
4. Define the Trigger Conditions: This is where you'll specify the conditions that will cause the trigger to be activated. Some key fields to consider include:
- Ticket Status: Trigger based on the ticket's status (e.g., new, open, pending, solved).
- Ticket Priority: Trigger based on the ticket's priority (e.g., low, normal, high, urgent).
- Ticket Assignee: Trigger based on the ticket's assigned agent or team.
- Ticket Tags: Trigger based on the tags associated with the ticket.
- Ticket Channel: Trigger based on the channel through which the ticket was created (e.g., email, web form, social media).
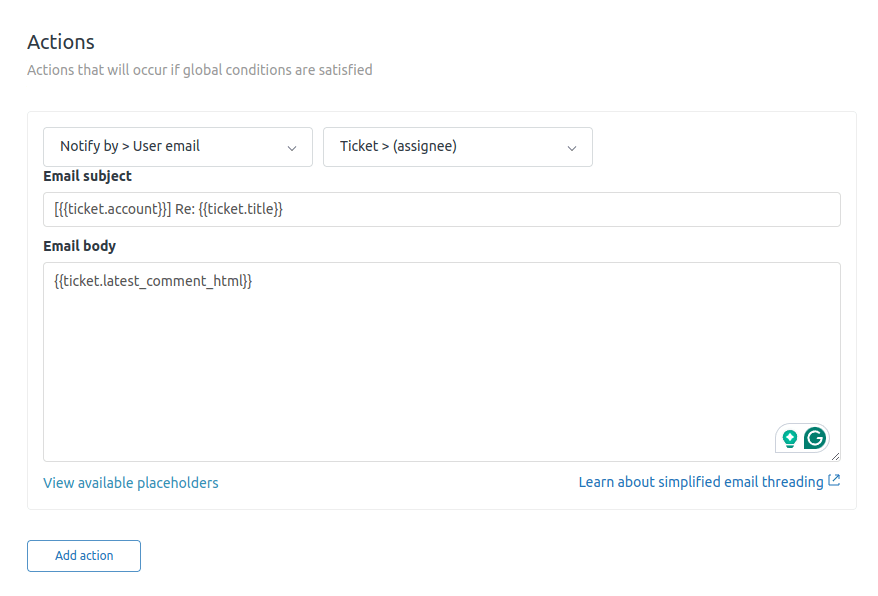
5. Specify the Trigger Actions: Once you've defined the trigger conditions, you'll need to specify the actions that will be performed when the trigger is activated. Some common actions include:
- Notification: Send an email or in-app notification to the requester, assignee, or other stakeholders.
- Ticket Update: Update the ticket's status, priority, assignee, or other fields.
- Macro Application: Apply a predefined macro to the ticket.
- Ticket Escalation: Escalate the ticket to a higher-level support team or manager.
6. Preview and Create the Trigger: Before saving the trigger, preview it to ensure that it's working as expected. If everything looks good, click "Create" to add the trigger to your Zendesk account.
By carefully considering the available fields and options for macros and triggers, you can create powerful and efficient workflows to streamline your customer support processes in Zendesk.
Remember, creating effective macros and triggers can greatly streamline your customer support workflows and improve the overall efficiency of your Zendesk implementation. Experiment with different configurations and gather feedback from your team to optimize your Zendesk setup for your unique business needs.
6 Examples of Zendesk Macros to get started
When creating macros in Zendesk, it's best to start with some commonly used and widely applicable macros to streamline your most frequent support workflows. Here are a few examples of macros you may want to consider implementing:
- New Ticket Response Macro: You can use this macro to automatically add a standardized response when a customer creates a new ticket. The response could welcome the customer, provide basic troubleshooting steps, or direct them to relevant self-service resources.
- Priority Update Macro: Assign this macro to a button or trigger that allows agents to quickly update a ticket's priority. This can be especially useful for handling high-priority or urgent issues.
- Ticket Escalation Macro: Create a macro that agents can use to escalate a ticket to a manager or specialized support team. The macro could update the ticket status, assign it to the appropriate person, and include a pre-written message.
- Ticket Disposition Macro: Develop a macro that agents can use to quickly close a ticket and select the appropriate disposition (e.g., solved, refunded, not resolved). This can help maintain consistency in your ticket resolution process.
- Frequently Used Response Macro: If your agents find themselves typing the same lengthy responses repeatedly, consider creating a macro that inserts a pre-written response. This can save time and ensure that customers receive accurate, well-crafted information.
- Ticket Tagging Macro: Implement a macro that allows agents to easily add relevant tags to a ticket. This can improve your ability to track, analyze, and report on your support activities.
Start with these types of macros, and then expand your macro library based on the specific needs and workflows of your customer support team. Regularly review and update your macros to ensure they remain relevant and effective.
6 Examples of Zendesk Triggers
When setting up Zendesk triggers, it's best to start with some commonly used and widely applicable triggers to automate your most frequent support workflows. Here are a few examples of triggers you may want to consider implementing:
- New Ticket Trigger: Create a trigger that automatically fires when a new ticket arrives in your Zendesk queue. You can use this trigger to perform actions such as assigning the ticket to a specific agent or team, adding relevant tags, or sending a notification to the assigned agent.
- Ticket Status Change Trigger: Develop a trigger that activates when the status of a ticket changes, such as from "New" to "Open" or from "Open" to "Solved". You can use this trigger to update the ticket's priority, send a notification to the customer, or apply a relevant macro.
- High-Priority Ticket Trigger: Set up a trigger that identifies high-priority tickets, such as those with a "urgent" or "high" priority. This trigger could automatically escalate the ticket, notify a manager, or apply a macro to handle the issue quickly.
- Unassigned Ticket Trigger: Create a trigger that detects unassigned tickets in your queue and automatically assigns them to the appropriate agent or team. This can help ensure that no tickets fall through the cracks.
- Ticket Reopen Trigger: Implement a trigger that monitors for tickets that have been reopened by customers. You can use this trigger to notify the original agent, update the ticket's priority, or apply a specific macro to handle the re-opened issue.
- Overdue Ticket Trigger: Develop a trigger that identifies tickets that are approaching or have exceeded their due date. This trigger could send reminders to the assigned agent, escalate the ticket to a manager, or apply a macro to prevent SLA breaches.
Start with these types of triggers, and then expand your trigger library based on the specific needs and workflows of your customer support team. Regularly review and update your triggers to ensure they remain relevant and effective.
Streamlining macros and triggers migration with Help Desk Migration
Now, let's talk about Zendes data migration. Consolidating your Zendesk help desk instances is a monumental task, but fear not – Help Desk Migration is here to simplify the process. With our Business Rules Migration feature, importing macros and triggers has never been easier.
This new feature allows businesses to import their macros and triggers seamlessly during the consolidation of their Zendesk help desk instances. Unlike other data migration options, Help Desk Migration offers this as an automated feature, saving time, effort, and budget either for SMBs and SME companies.
How to migrate Zendesk macros?
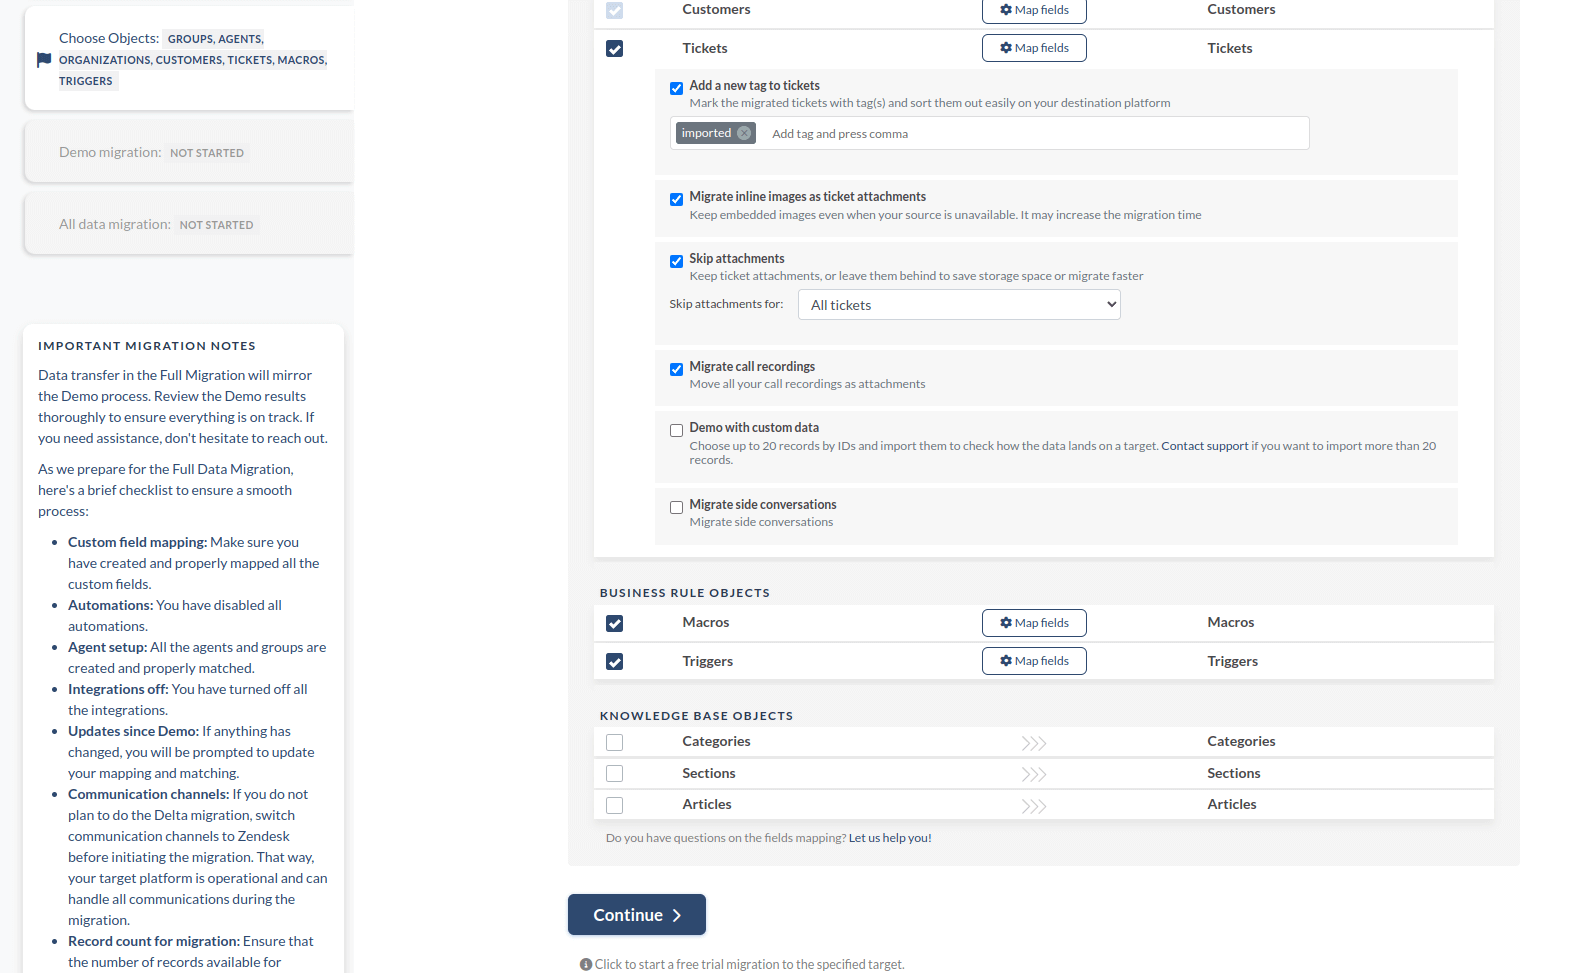
On the select object step, you can choose Macros or/and Triggers in the Business Rules Objects part.
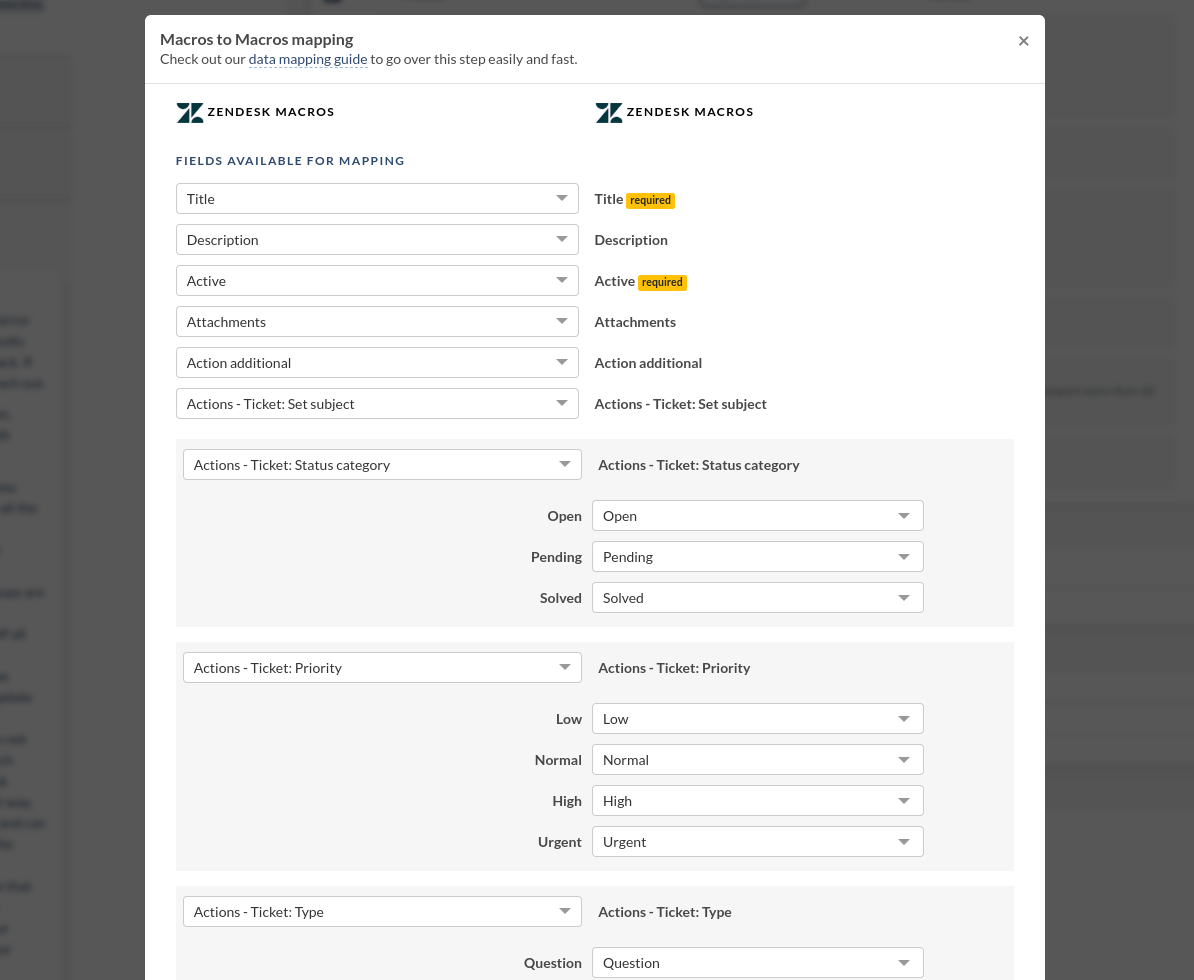
Then go to mapping your Macros fields: title, description, active status, attachments, action additional, and ticket actions. As for the ticket actions, you can match such fields as status category, brand, form, priority, type, group, assignee, set tags, add tags, remove tags, add follower, custom drop-down, checkbox, multi-select fields, etc.
How to migrate Zendesk triggers?
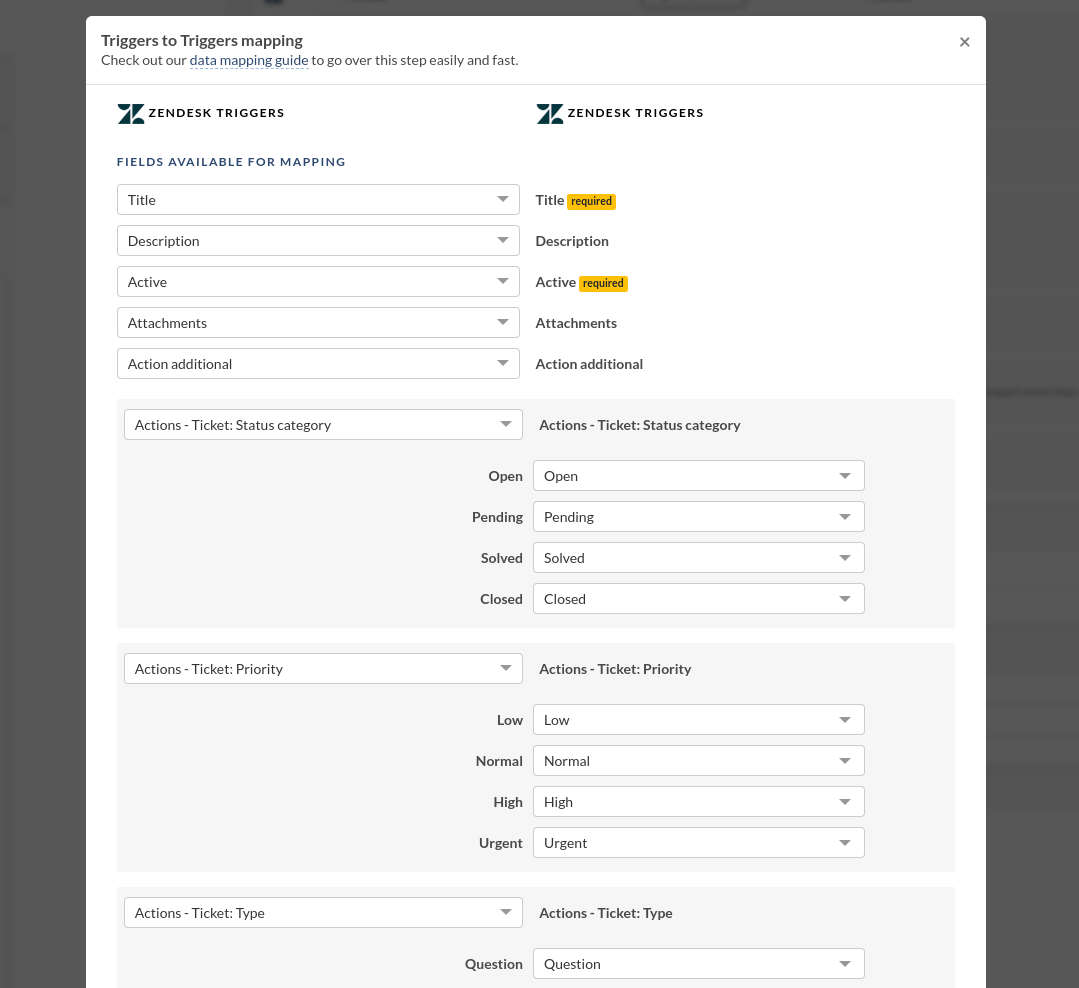
Next is the triggers field mapping, where you have to map title, active trigger categories and auto match or map: description, attachments, action additional. And as for the Actions and Conditions.
| Actions include but are not limited to: | Conditions include but are not limited to: |
|
|
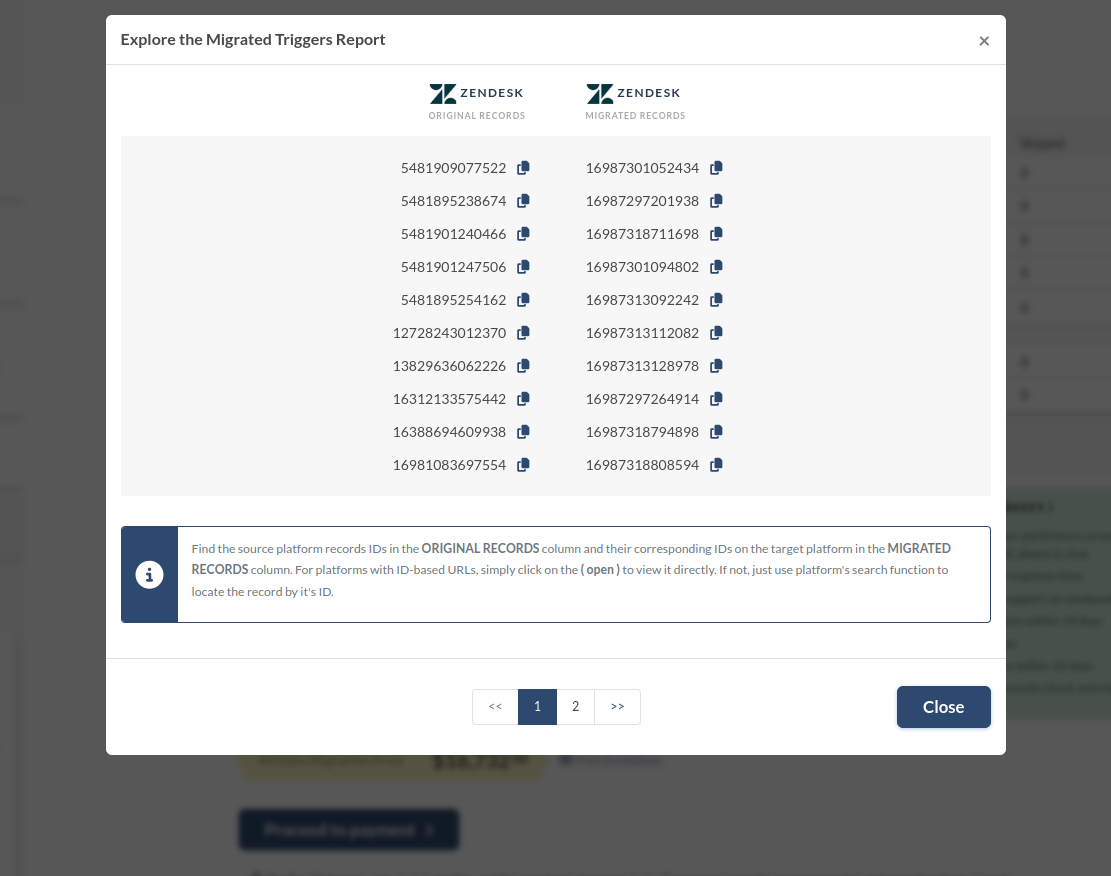
Once all selections and mappings are completed, proceed to the demo phase to ensure accurate data migration. This allows you to review the migrated macros and triggers before the full migration. Usually, it is done in a couple of minutes and you can check up on how your data migrated, including macros
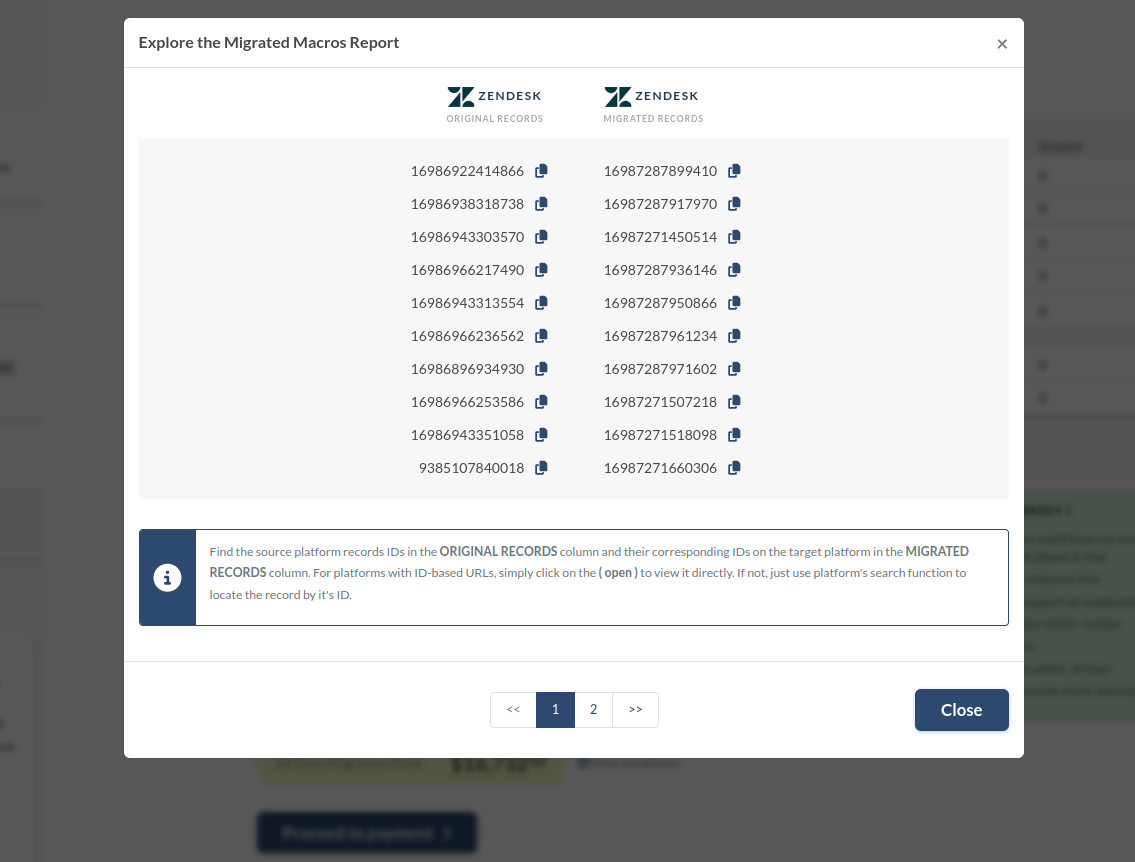
and triggers reports.
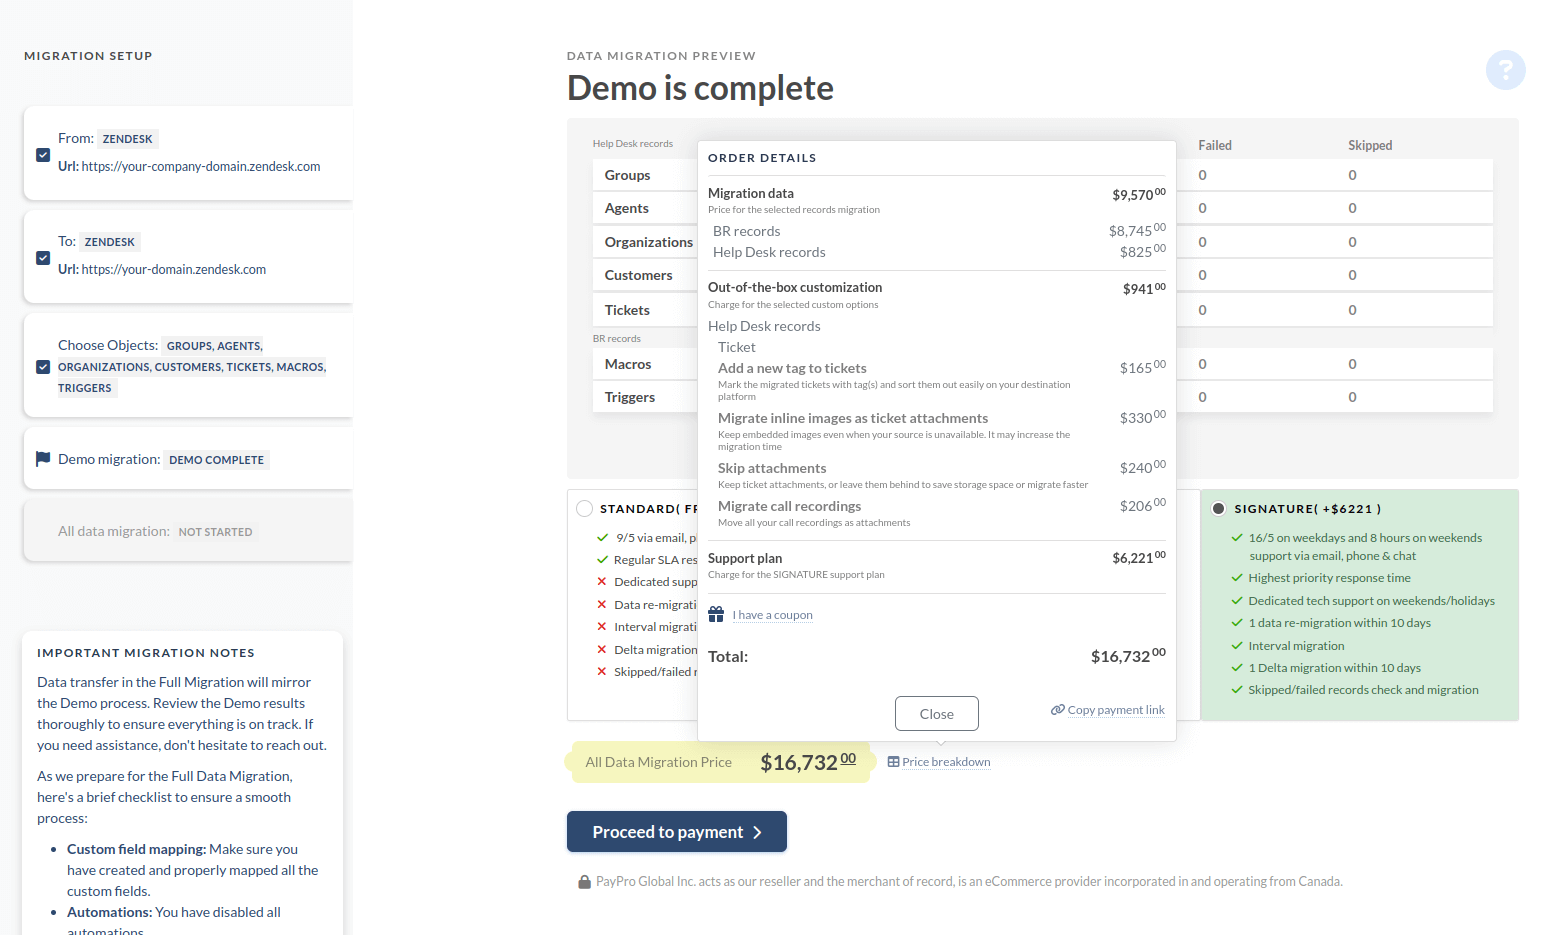
Review the detailed breakdown of Zendesk migration costs before proceeding further.
If necessary, return to the Object Selection step to make any adjustments or customizations. Remember, any changes made during the demo will be reflected in the full migration. Remember, though, in the Demo migration data is transferred the same way it will be in the Full Migration.
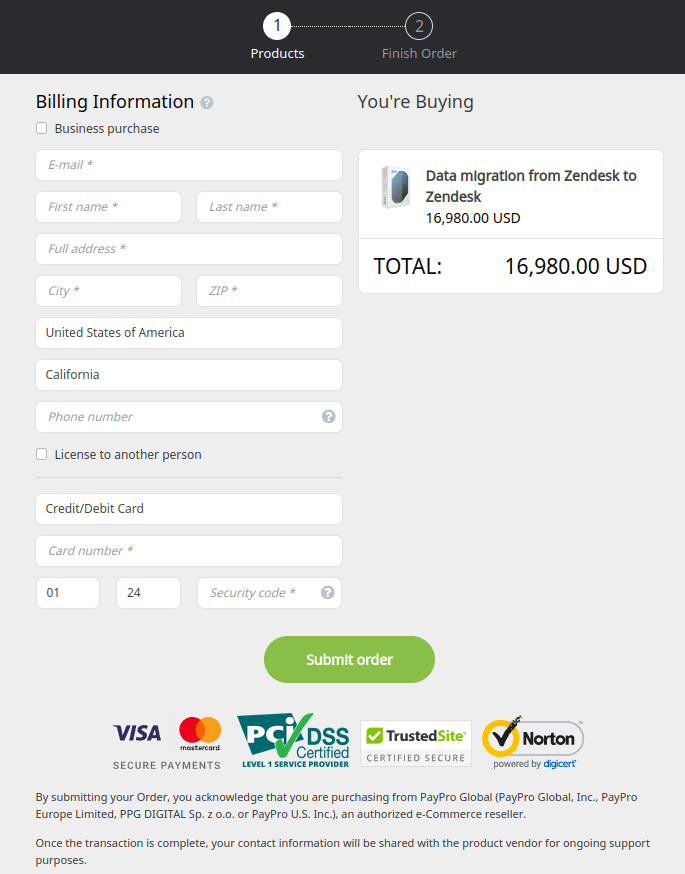
Ready to migrate? Click on the "Proceed" button to initiate the full migration process. Payment options include credit/debit cards, PayPal, or Wire transfer.
When everything is confirmed, your Zendesk migration is ready to be started. Choose the perfect time and click the Start full data migration button.
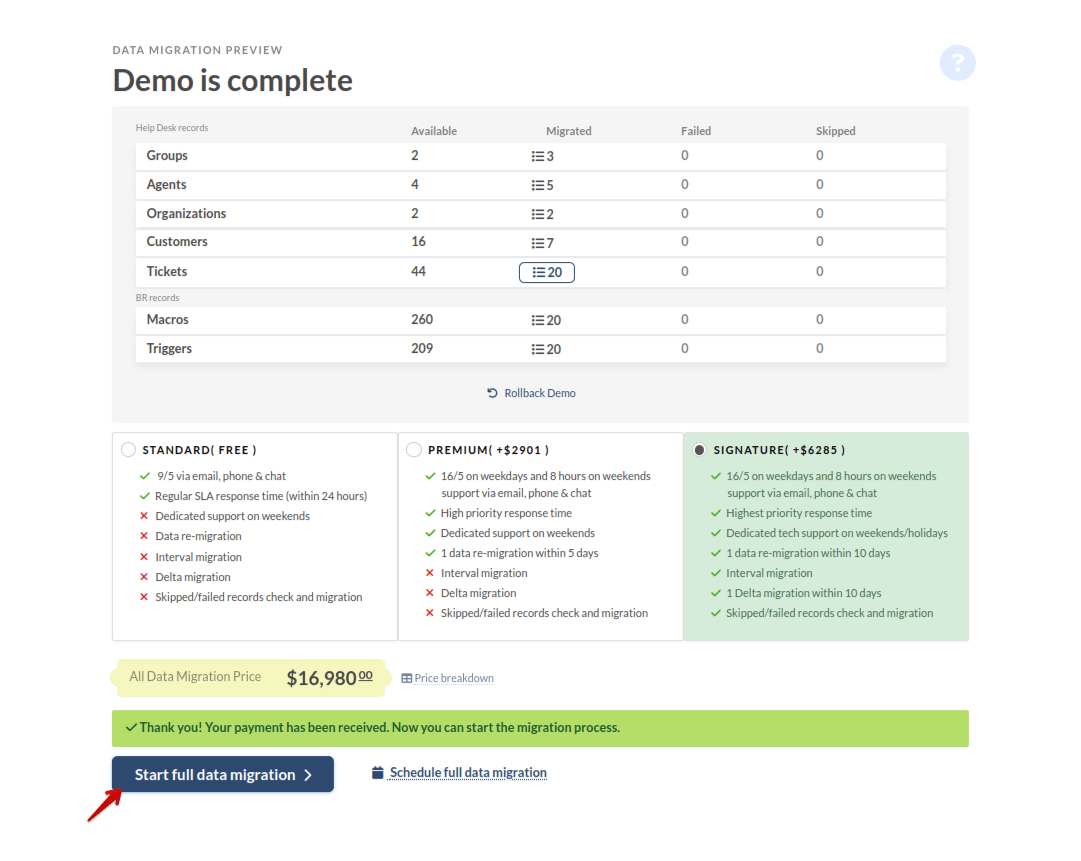
By following these steps meticulously, your Zendesk migration will be smooth and efficient, ensuring seamless continuity of operations.
In conclusion
With Help Desk Migration, businesses can test the Business Rules Migration feature during a Free demo, ensuring a smooth transition and uninterrupted support operations. By leveraging this innovative tool, organizations can consolidate their Zendesk instances with confidence, knowing that their macros and triggers will be imported accurately and efficiently.
Macros and triggers are indispensable tools for streamlining support operations and delivering exceptional customer experiences in Zendesk. By following best practices for creating and editing these business rules and leveraging Help Desk Migration's Business Rules Migration feature, businesses can optimize their support workflows, enhance agent productivity, and drive overall customer satisfaction.
Frequently Asked Questions
Key things to know about Zendesk macros:
- Macros allow you to automate common actions like updating ticket fields, adding comments, or changing status.
- Macros help maintain standardized responses and workflows across your support team.
- You can create macros tailored to your specific support needs and processes.
- Agents can easily apply macros to tickets, either manually or through automated triggers.
- Macro usage can be tracked and analyzed to optimize your support operations.
- Log into your Zendesk account and navigate to the Admin Dashboard.
- In the Admin Dashboard, locate the "Manage" section and click on it.
- In the "Manage" section, you should see an option for "Macros". Click on this to access the Macros settings.
- On the Macros page, you'll see a list of all the macros that have been created for your Zendesk account.
- Navigate to the Admin Center and click on Workspaces in the sidebar.
- From there, select Agent tools > Macros.
- Locate the All shared macros drop-down menu and choose Personal macros.
- Hit the Add Macro button to get started.
- Navigate to the Macros page, where your macros await.
- Hover your cursor over the chosen macro to reveal the options menu icon.
- Click the icon and choose "Edit."
- Modify the title and actions as required.
- Save your changes.
- Go to the Macros page and find the macro you want to clone.
- Hover over the macro, click the icon and select "Clone."
- Enter a new title and adjust the actions as necessary – click "Create."
- Locate the macro you wish to deactivate on the Macros page.
- Go to the macro to reveal the options menu icon, and choose "Deactivate."
- The macro will be moved to the Inactive macros list.
Macros containing unavailable values in action statements cannot be deactivated. Attempting to do so will result in failure, and the macro will remain in the Active macros list with a red exclamation point.
- Access the Inactive tab on the Macros page to view all inactive macros.
- Go to the macro you wish to activate to reveal the options menu icon.
- Click the icon and select "Activate."
- The macro will be restored to the Active macros list.
- Switch to the Inactive tab on the Macros page to view all inactive macros. If the macro is active, deactivate it.
- Hover over the macro you want to delete to reveal the options menu icon, then click the icon, and choose "Delete."
- The macro will be permanently removed from your account.
- New Ticket Trigger: This trigger fires when a new ticket is created in Zendesk. You can use it to perform actions like assigning the ticket, adding tags, or sending notifications.
- Ticket Received by an Agent Trigger: This trigger activates when an agent views or responds to a ticket. You can use it to update the ticket status, send a notification, or apply a macro.
- Ticket Solved Trigger: This trigger fires when a ticket is marked as solved. You can use it to send a customer satisfaction survey, update the ticket's status, or notify the customer.
- Ticket Opened Trigger: This trigger activates when a ticket is reopened. You can use it to notify the agent, escalate the priority, or apply a specific macro.
- Ticket Priority Changed Trigger: This trigger fires when a ticket's priority is updated. You can use it to notify the agent, update the SLA, or apply a macro.
- Ticket Assigned Trigger: This trigger activates when a ticket is assigned to an agent. You can use it to send a notification to the new assignee or update the ticket's status.
- Ticket Comments Added Trigger: This trigger fires when a new comment is added to a ticket. You can use it to notify the customer, update the ticket's status, or apply a relevant macro.
- Ticket Status Changed Trigger: This trigger activates when a ticket's status is updated. You can use it to notify the customer, update the ticket's priority, or apply a specific macro.
- Ticket Lifecycle:
- You can have various ticket statuses, such as "New", "Open", "Pending", "Solved", and "Closed".
- You can reopen tickets after solving or closing them.
- You can associate tickets with a priority, such as "Low", "Normal", "High", or "Urgent".
- Ticket Assignments:
- You can assign tickets to individual agents or teams.
- Agents can have different roles, such as "Agent", "Manager", or "Administrator", which determine their permissions and access levels.
- You can automatically assign tickets based on business rules or trigger conditions.
- Ticket Collaborations:
- Agents can add internal comments to a ticket, which are visible only to other agents.
- Agents can also add public comments, which are visible to the end-user.
- Customers can add their own comments to a ticket.
- Ticket Notifications:
- Zendesk can send notifications to agents, customers, or other stakeholders when certain events occur, such as a new ticket, a ticket update, or a ticket resolution.
- You can use notification channels like email, in-app notifications, and third-party integrations.
- Ticket Automation:
- You can use macros and triggers to automate common support workflows and actions.
- You can apply macros to tickets to perform predefined sets of actions.
- You can set up triggers to fire based on specific conditions, such as ticket creation, status changes, or specific keywords.
- Ticket Data and Reporting:
- Zendesk stores tickets and related data (e.g., comments, attachments) in the Zendesk database.
- Agents and administrators can access and analyze ticket data using Zendesk's reporting and analytics features.
- You can export ticket data for further analysis or integration with other systems.


