When it comes to delivering seamless customer support, automation is a game-changer. By automating ticket creation from emails, you can ensure that no customer query slips through the cracks. This not only streamlines communication but also boosts response times and enhances the overall efficiency of your support team. In this guide, we’ll walk through how to set up email-to-ticket automation for some of the top customer support platforms: Zendesk, Freshdesk, Freshservice, Intercom, Jira Service Management, ServiceNow, Front, HelpDesk, Zoho Desk, Kayako, and Salesforce Service Cloud.
Zendesk
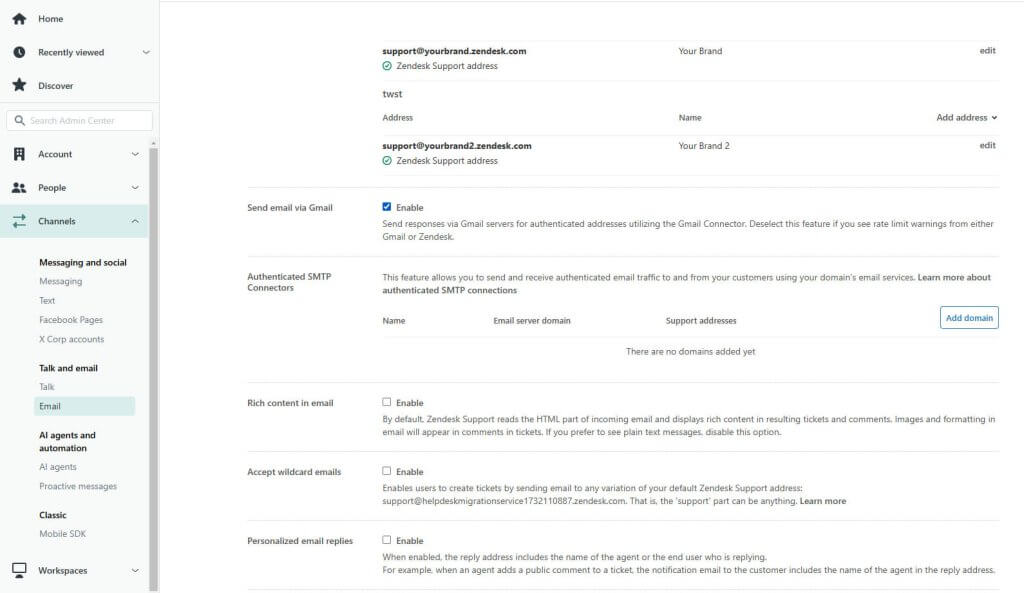
Zendesk provides an intuitive way to convert emails into tickets. Follow these steps:
- Navigate to the Admin Center in Zendesk and go to Channels > Email.
- Add your support email address and forward it to your Zendesk-provided email address (e.g., support@yourcompany.zendesk.com).
- Set up email forwarding in your email provider (Gmail, Outlook, etc.) to redirect emails to Zendesk.
- Use triggers in Zendesk to automate workflows like assigning tickets or notifying teams.
Source: Zendesk
Automating from Gmail and Outlook:
- Gmail: In Gmail, go to Settings > Forwarding and POP/IMAP, add your Zendesk email address as a forwarding address, and verify it. Then, click on "Add a forwarding address" and enter your Zendesk forwarding email. Confirm the code sent to your Zendesk account to activate forwarding. Optionally, create filters to forward only specific emails.
- Outlook: In Outlook, navigate to Rules and Alerts, create a new rule for incoming emails, and set forwarding to the Zendesk email address. Make sure to specify conditions like sender, subject, or keywords to refine the rule if needed.
Freshdesk
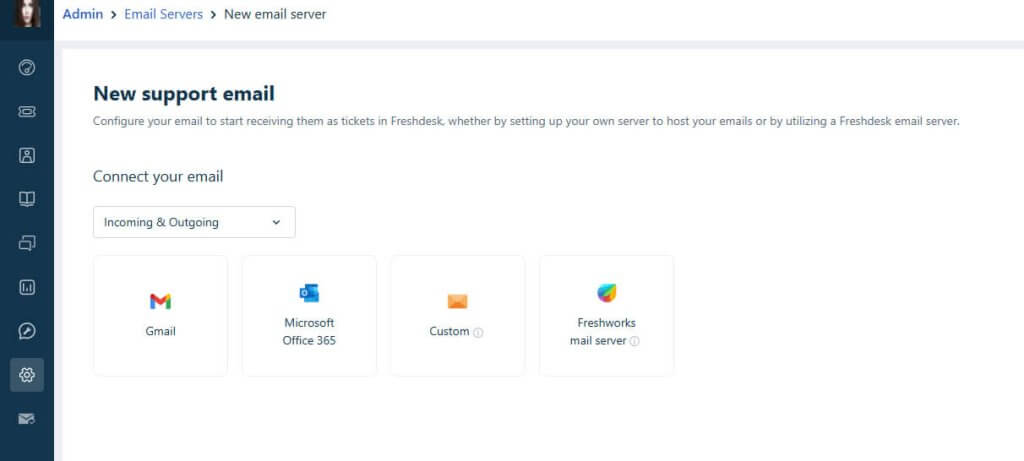
Freshdesk simplifies email-to-ticket conversion. Here’s how to set it up:
- Log in to your Freshdesk account and navigate to Admin Settings > Email.
- Add your support email address, and Freshdesk will provide you with a forwarding address.
- Configure email forwarding in your email client to send all emails to Freshdesk’s forwarding address.
- Use automation rules in Freshdesk to assign tickets, set priorities, or send acknowledgment emails.
Source: Freshdesk
Automating from Gmail and Outlook:
- Gmail: Set up forwarding by navigating to Settings > Forwarding and POP/IMAP, add the Freshdesk forwarding address, and confirm. After confirmation, choose whether to keep a copy of the forwarded email in your inbox or archive it.
- Outlook: Create a rule in Rules and Alerts, select "Apply rule on messages I receive," and set the forwarding address provided by Freshdesk. Specify criteria to ensure only relevant emails are forwarded.
Freshservice
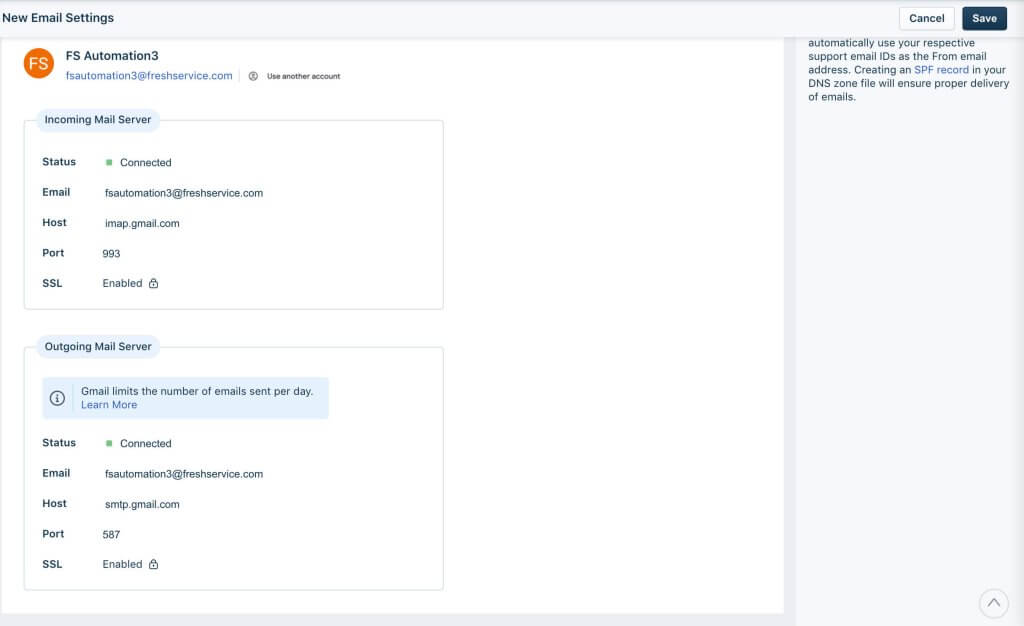
Freshservice supports IT service management through email-based tickets. To enable this:
- Go to Admin Settings > Email Settings in your Freshservice account.
- Add your IT support email address and configure it for forwarding to the Freshservice-provided email address.
- Enable rules in the Automation section to route tickets to specific agents or departments.
Source: Freshservice
Automating from Gmail and Outlook:
- Gmail: Add the Freshservice-provided email as a forwarding address in Settings > Forwarding and POP/IMAP. Confirm using the verification email sent to your Freshservice inbox.
- Outlook: Use Rules and Alerts to forward emails based on predefined conditions. For example, forward emails containing "IT Support" in the subject line directly to Freshservice.
Intercom
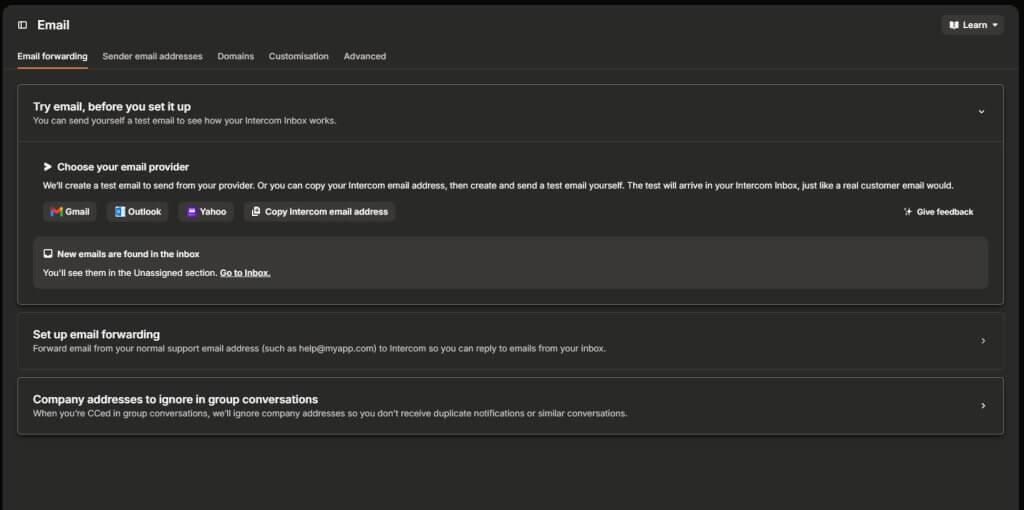
Intercom’s email integration ensures smooth ticketing. Here’s how to do it:
- Go to the Email Settings in Intercom and connect your email address.
- Set up email forwarding in your email provider to redirect emails to the Intercom-generated email address.
- Use Inbox Rules to automatically tag or assign incoming tickets to the right team.
Source: Intercom
Automating from Gmail and Outlook:
- Gmail: Add Intercom’s email address to the forwarding list in Settings > Forwarding and POP/IMAP, verify it, and activate automatic forwarding.
- Outlook: Create a forwarding rule under Rules and Alerts, selecting Intercom’s email address. Add conditions to forward only customer inquiries if desired.
Jira Service Management
For Jira Service Management, follow these steps to enable email-to-ticket creation:
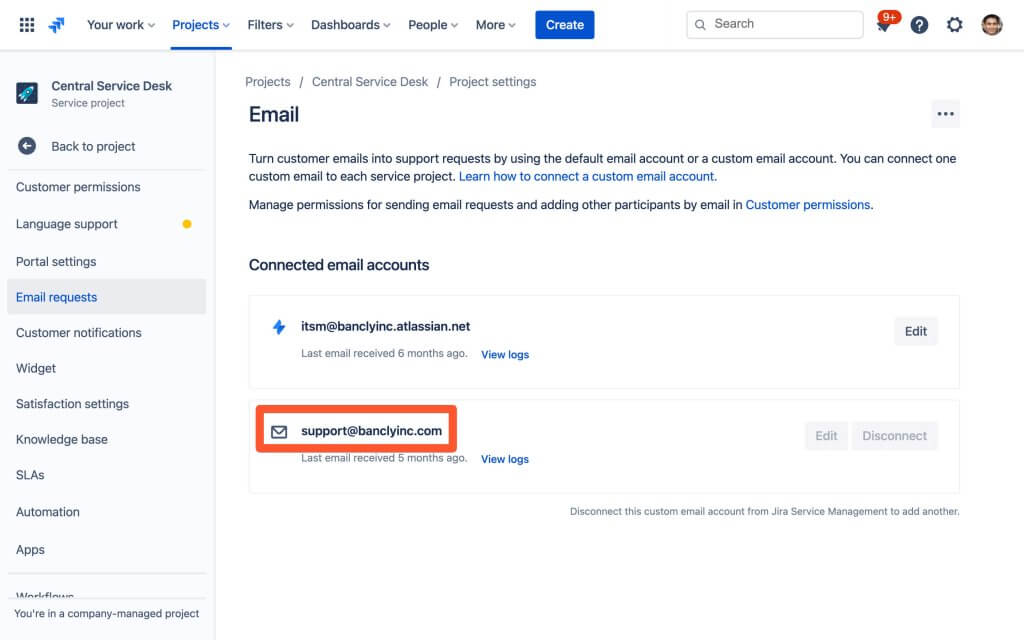
- In the Project Settings, navigate to Email Requests.
- Configure an incoming email handler and associate it with your support project.
- Set up email forwarding in your email provider to route messages to Jira’s email address.
- Use automation rules to categorize and escalate tickets based on email content.
Source: Jira Service Management
Automating from Gmail and Outlook:
- Gmail: Add the Jira email address as a forwarding address in Settings > Forwarding and POP/IMAP. Once verified, set filters to forward emails based on specific criteria like "support" in the subject.
- Outlook: Set up a new rule under Rules and Alerts to forward emails to Jira’s handler address. Customize the rule to forward emails from key customers or departments.
ServiceNow
ServiceNow’s email-to-ticket functionality can be set up as follows:
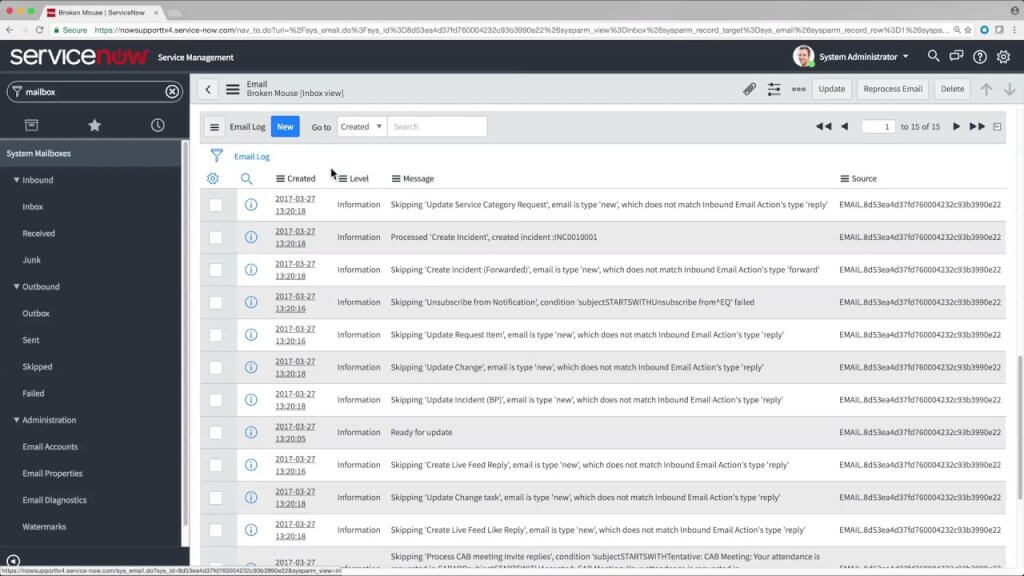
- In the ServiceNow instance, go to System Mailboxes > Inbound.
- Create an inbound email action to parse incoming emails and create incidents or tasks.
- Configure your email server to forward messages to the ServiceNow instance.
- Use Business Rules to enhance workflows and automate ticket management.
Source: ServiceNow
Automating from Gmail and Outlook:
- Gmail: Configure forwarding in Settings > Forwarding and POP/IMAP, directing emails to ServiceNow’s inbound address. Confirm the forwarding address in your ServiceNow instance.
- Outlook: Use Rules and Alerts to forward relevant emails to the ServiceNow address. Set additional rules for subjects like "Error Report" to streamline incident creation.
Front
Front enables email-to-ticket conversion seamlessly. To set it up:
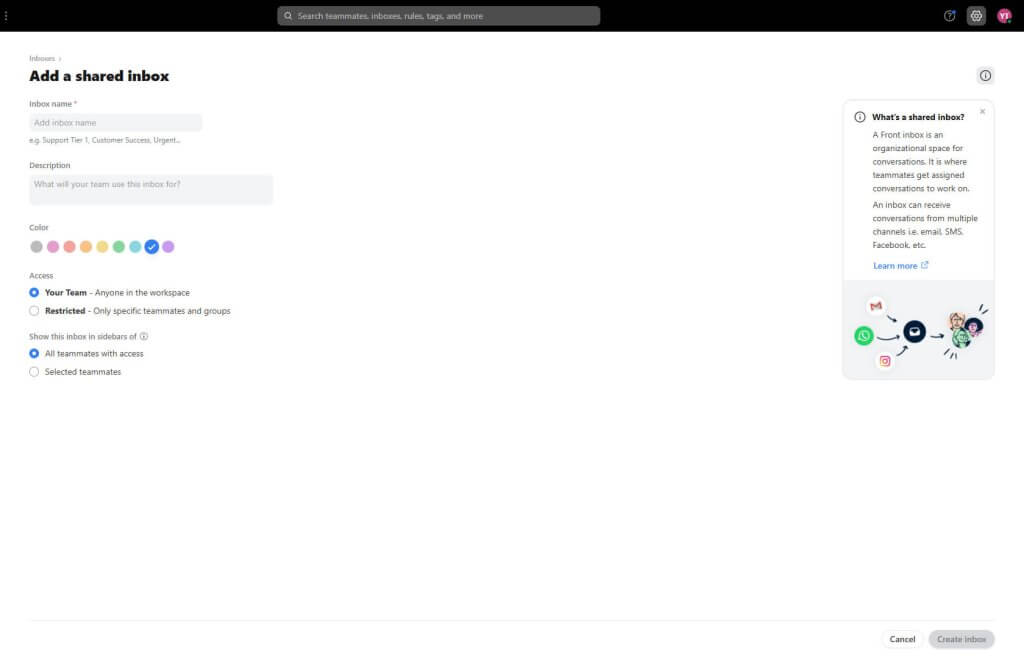
- Add your email address to Front by navigating to Settings > Inboxes > Add Inbox.
- Choose the email provider and follow the steps to connect your support email.
- Use rules to automate ticket assignments and apply tags for better organization.
Source: Front
Automating from Gmail and Outlook:
- Gmail: Forward emails to Front’s address through Settings > Forwarding and POP/IMAP. Confirm the address, then activate automatic forwarding.
- Outlook: Create a rule in Rules and Alerts to redirect emails to Front’s inbox. Add criteria to filter specific types of messages.
HelpDesk
HelpDesk’s email integration is simple to configure:
- Log in to HelpDesk and go to Settings > Email Channels.
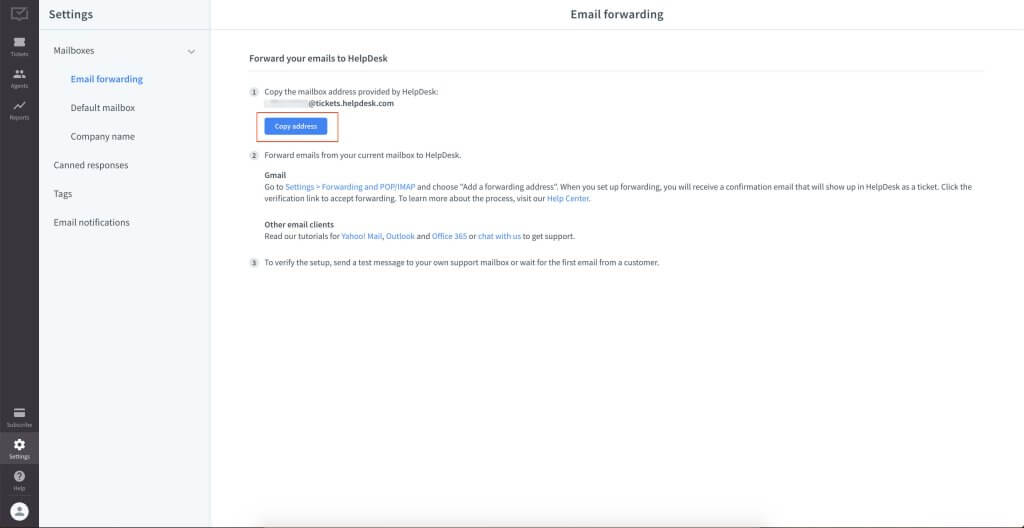
- Add your support email address, and HelpDesk will provide a forwarding address.
- Set up email forwarding in your email client to route messages to HelpDesk.
- Use Automation Rules to streamline ticket assignment and categorization.
Source: HelpDesk
Automating from Gmail and Outlook:
- Gmail: Add HelpDesk’s email address in Forwarding and POP/IMAP under Gmail settings. Verify the forwarding address and activate it.
- Outlook: Create a new forwarding rule in Rules and Alerts for HelpDesk. Include conditions for keywords like "urgent" in the subject line.
Zoho Desk
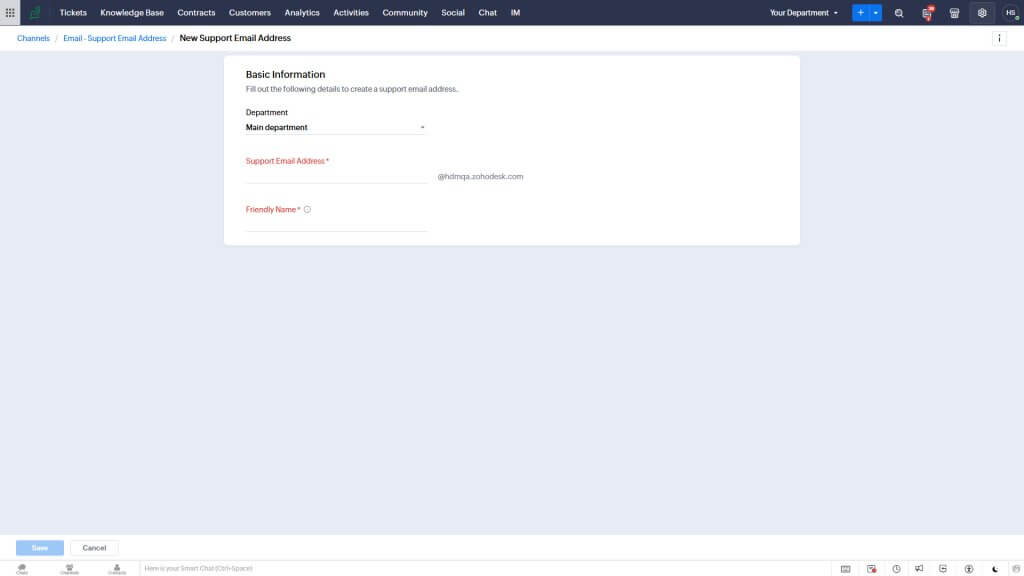
Zoho Desk’s email ticketing feature is robust. Here’s how to enable it:
- In Zoho Desk, go to Setup > Channels > Email.
- Add your support email address and configure email forwarding to the Zoho Desk-provided address.
- Create Workflows to automate ticket assignment and prioritization.
Source: Zoho Desk
Automating from Gmail and Outlook:
- Gmail: Set up forwarding under Settings > Forwarding and POP/IMAP, entering Zoho Desk’s forwarding address. Confirm and activate the forwarding rule.
- Outlook: Configure forwarding under Rules and Alerts to Zoho Desk’s email. Add custom criteria for filtering support-related emails.
Kayako
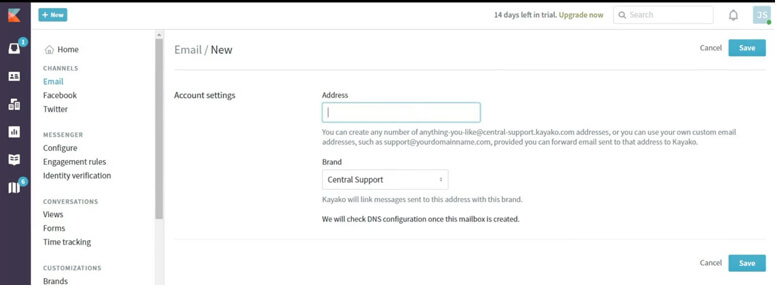
Kayako allows for efficient email-to-ticket setup. Follow these instructions:
- Log in to your Kayako instance and navigate to Admin Settings > Email Settings.
- Add your support email and set up forwarding to the Kayako-provided email address.
- Use Macros and Workflows to automate ticket responses and routing.
Source: Kayako
Automating from Gmail and Outlook:
- Gmail: Add Kayako’s address under Forwarding and POP/IMAP in Gmail settings. Confirm the verification email sent to your Kayako inbox.
- Outlook: Set up a new rule in Rules and Alerts for Kayako emails. Specify conditions like sender or keywords to forward only relevant messages.
Salesforce Service Cloud
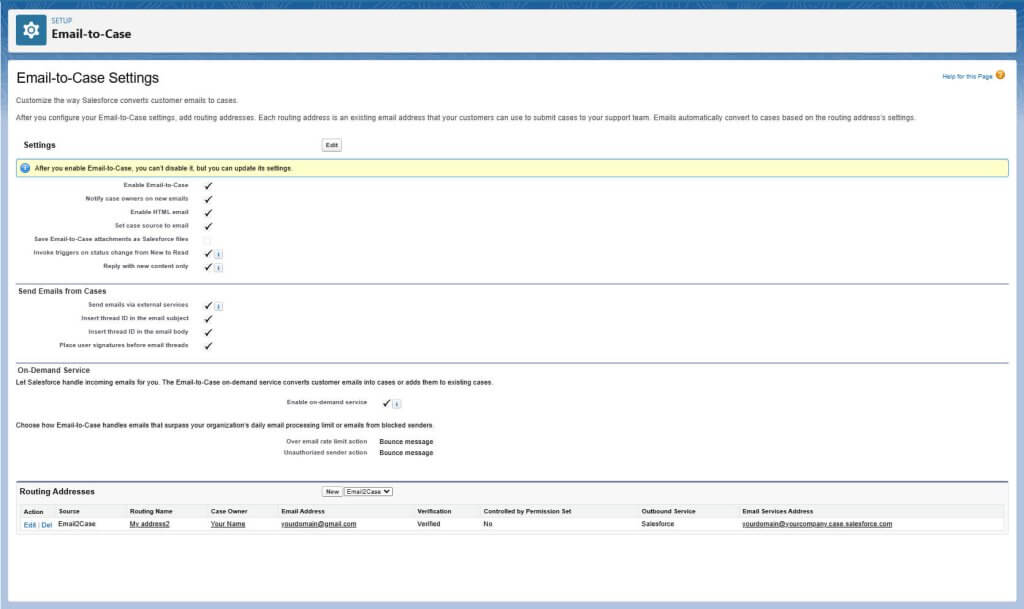
Salesforce Service Cloud’s email-to-case functionality can be enabled as follows:
- In Salesforce, navigate to Setup and search for Email-to-Case.
- Enable the feature and generate the Salesforce-provided email address.
- Configure your email server to forward emails to the Salesforce-provided address.
- Use Case Assignment Rules to route cases to the appropriate queues or agents.
- Customize workflows to automate responses, escalations, or updates on new cases.
Source: Salesforce Service Cloud
Automating from Gmail and Outlook:
Gmail:
- Go to Settings > Forwarding and POP/IMAP in Gmail.
- Click Add a forwarding address, input the Salesforce-generated email address, and save.
- Salesforce will send a verification email to the address. Log in to Salesforce to confirm.
- After verification, select "Forward a copy of incoming mail to" in Gmail and activate forwarding.
- Use Gmail filters to forward specific types of emails, such as those containing certain keywords or coming from certain senders.
Outlook:
- In Outlook, open File > Manage Rules & Alerts.
- Select New Rule, choose "Apply rule on messages I receive," and click Next.
- Set conditions like specific sender domains (e.g., @customer.com) or keywords in the subject line.
- In the Actions section, choose "Redirect it to people or public group," and enter the Salesforce email address.
- Save and activate the rule to start forwarding.
Enhancing Support with Email-to-Ticket Automation
Setting up email-to-ticket automation is a powerful way to increase your support team’s efficiency, reduce response times, and ensure that no customer query is left unanswered. Whether you're using Zendesk, Freshdesk, or any of the other platforms we’ve covered, the process is simple and effective. By automating this task, you can provide better, faster service to your customers, freeing up your support team to focus on more complex issues that require a human touch. Embrace the power of automation and transform your customer service experience today!


