
If you found yourself in a place where your email just doesn’t cut it, then you’ve probably been thinking about moving to a dedicated help desk platform. After all, they are much more capable and can be used in other ways as well. But how does one move swiftly from say, Gmail or Outlook to Zendesk?
That is a good question and sufficed to say, a complicated one too. But worry not, we’ve taken the time and effort to devise a complete migration plan for a Zendesk onboarding process. This is a complete onboarding checklist that you can use to move all your records and data without a hitch. There is a ton to cover, so let’s not waste any time and dive into the process itself.
Why Zendesk?
Let’s start our guide with a look at the platform. As many of you know, Zendesk is a pioneer when it comes to all-inclusive help desk software for support teams. They have been on the market for many many years now. With each new software update, the system becomes even more indispensable in customer service.
Even if you opt to use their cheapest plan (which is only, at the time of this writing, 5$ per agent per month) you get access to Pre-defined Business Rules, Interactions History, Web Widget & Mobile SDK, among other things.
Furthermore, the system is highly scalable and provides enough room for even incremental upgrades for customer service and company network if your business development is slow. Overall, it is a very solid system that is praised by many, averaging at 4.2 out of 5 on popular review aggregators such as G2 Crowd. All because of its ability to help companies significantly increase customer satisfaction level.
If you don't have a Zendesk profile, you can easily set up your free trial with Zendesk right here.
Hooking-up Gmail or Outlook to Zendesk
Connecting your mail of choice to Zendesk is not really a challenge but it is a lengthy process. You have to perform a series of steps surrounding the two platforms to secure a proper data traversal channel. Let’s start with Outlook and then move to Gmail as we finish off this block.
Outlook Integration
If you are moving from Outlook, then your entire Zendesk onboarding process should be pretty straightforward. Log in to your Microsoft account as an administrator (otherwise, you won’t be able to perform a crucial step later) to start the process. See if you have the permission to add Outlook extensions. Once clarified, make sure that you also have Zendesk admin rights. If all of this is met, proceed to the following three-step plan:
- Install the Zendesk add-in to Outlook.
- Set up the Zendesk extension.
- Configure the integration system.
Step #1: Installing the Zendesk extension
1. Log in to your Office 365 account and navigate to the Admin options.
2. Once you are in the Admin menu, you’ll need to select the Exchange menu.
3. After that, you’ll also need to click on the add-ins menu in the Organizations sub-menu.
4. Select the “+” icon and pick the first option (in this case it is Add from the Office Store).
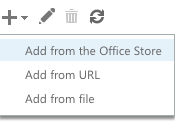
5. Select Zendesk and click on the Add button.
6. After you’ve added Zen, you will need to return to the add-in list and double-click Zendesk Add-in.
And there you have it, the Zendesk extension is now installed on your MS account. Now we need to configure it for it to work as intended.
Step #2: Configuring Zendesk add-in
1. Go to your Outlook account and pick an email.
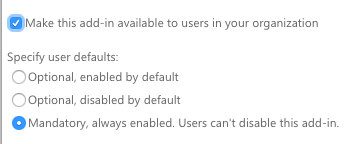
2. Select the Zendesk extension and make sure that you mark the following fields:
a. Make this add-in available to users in your organization
b. Users can't disable this add-in
3. After you’ve done the marking, you will need to select the Zendesk button which is on the upper-right part of the screen.
4. You now need to create a Ticket.
This will prompt an error message that will say something in the lines that you should configure an integration. You can follow the link included to set up the integration system. It is pretty simple too, all you need to do is type-in your subdomain and authorize it. Reboot Outlook by closing and opening it, and that’s it.
Gmail Integration
And now let’s talk about Gmail and how you can connect that platform to Zendesk. The process is pretty much the same minus a few steps here and there.
Step #1: Connecting Zendesk
1. Login to your Gmail account
2. Select the Cog icon to the right and pick Channels > Email
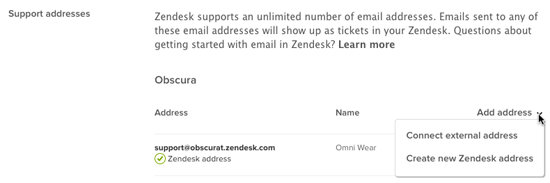
3. This will take you to the Support addresses sub-menu where you’ll need to pick “Add address” followed by “Connect external address”.
a. This might ask you to sign-in to your Gmail account once more;

4. Pick the option to connect with Google.
5. This will take you to an interactive guide so we suggest that you follow the steps presented by Google.
6. Once done, just click Finish.
And that it. As you can see, Google is much faster in this regard but keep in mind that you might get an email from Zendesk to verify the connection so don’t forget about that. Other than that, Zendesk will scan your email account for new incoming messages and if it detects new mails, it will convert them automatically into tickets. In case you need to connect more than one mail, just repeat the entire process again.
Configuring Basic Settings
Now that we’ve connected the systems to our a Zendesk account, let’s take a few more steps to configure basic things such as agents, fields, macro sets, among other things. We’ll divide all of these into three sections as seen below. We should also stress that configuring basic settings is beneficial as it will allow you to take full advantage of the tool, as well as accelerate a few business operations.
Setting a Support Email
One of the best things about Zendesk is that it allows you to hook up more than one email address as a channel for your support team. To do so, head over to the Email administration menu where you’ll find a small menu called Support Addresses. Once there, you can provide a list of emails that you want to use as support channels.
It doesn’t matter if the email address is a Zendesk, Gmail, or an Outlook one. All of them will work as intended but you will need to authorize them on both ends. If you have a hefty install-base that uses your previous email, we suggest that you migrate them to a single address. The reason being is that it is easier to manage a single entry point.
Adding People
To make your Zendesk onboarding process streamlined, we suggest that you head over to the People admin page to create users, organizations, and groups. While you are there, you can also settle on a welcome email and a proper verification link. If you are doing this for the first time, or want to learn more about the execution, you can add a few dummy users to see how the entire journey looks like for yourself.
How to add a new user to the system:
1. Navigate to the “+Add tab” menu and then hit the User option.
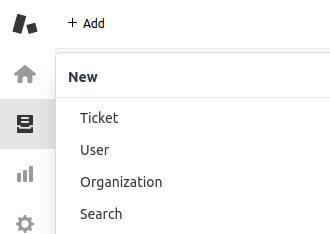
2. Provide the necessary details such as Name and Email, and then designate a specific Role.
3. Click on the Add button.
4. You will see a user profile where we suggest that you enter the required information and permissions. Also, if you are using a higher tier plan, you might also want to create custom roles.
Each newly created user is saved automatically so you don’t have to worry that you might lose some progress if something goes wrong. Creating dummy users before actually adding new employees is a good way to learn what aspects of your Zendesk onboarding process you need to tailor more.
Macro Creation
Zendesk allows you to create two types of a macro. Specifically, macro for agents (private) and macro for administrators (shareable). Let’s take a look at each method and see how they differ.
Personal macros for tickets - Agents version
One of the most important aspects of Zendesk Support is that it offers options. In case of macro functionality, Zendesk allows you to create personal macros sets that your agents can take advantage of, here’s how it’s done:
1. Select the Admin option and click on the “Macros” menu.
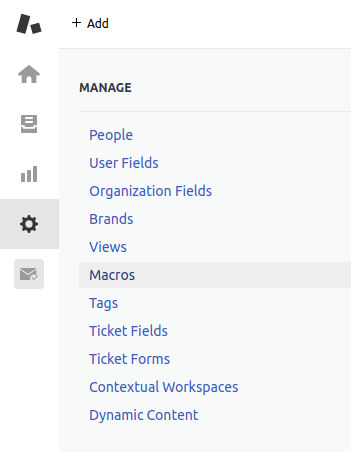
2. Pick “All shared macros” and find “Personal macros”.
3. Hit the “Add macro button”.

4. Pick a name for the macro, and add actions as described in the “Building macro action” statements.
5. Click Create.
Shared macros for tickets - Administrator version
Now unlike Agent macro, the Admin macro is sharable and viewable by anyone with enough permissions. The process is a little bit more involved but follows the same basic rules that are described in the “Building macro action” statements. Here’s how the process looks like:
1. Select the Admin option and click on the “Macros” menu.
2. Press the “Add macro” button.
3. Provide a name for the macro.
4. You will then see a new menu called “Available” that allows you to configure accessibility. You can pick from the following list of options:
- All agents.
- Agents in the group.
- Me only.
5. Add actions as described in the “Building macro action” statements.
6. Click Create.
Useful Links
Since we can’t outline everything in one article, we can provide you with a list of helpful articles for you to follow. We will try to keep it brief and limit the list to just five links that we find super useful for new users.
2. Getting Started With Support — The second on our list is not a typical resource but a list of lessons designed by Zendesk themselves to get you started.
3. 10 Best Apps for Zendesk to Make Your Life Easier in 2020 — The title says it all. Zendesk is a powerful system that can be expanded with third-party apps. This list offers a wide range of tools that you can use to boost your productivity.
4. HelpDesk vs Zendesk Comparison 2020 — This is another good article by yours truly that’ll help you see how Zendesk stacks up against the competition in providing benefits for customer service. It covers both features and prices and even touches upon vendor backgrounds.
5. How to Use Zendesk Like a Pro: 5 Tips and Tricks — If you already know your way around basic functionality, these five tips and tricks just might take you to a whole new level of using Zendesk for customer service.

Zendesk Professional Services vs Help Desk Migration
In any case, Zendesk provides Professional Services to help you migrate your customer data from Gmail or Outlook. In addition, the CX experts can assist you in a) launching a new Zendesk channel, b) tuning up features in Zendesk Suite, or c) deploying a scalable solution. As for pricing, Zendesk includes four Suite Transition Services packages, where the basic one starts at $8K. However, they are just available for existing Zendesk users.
By contrast, you can consider Help Desk Migration. Our Professional Services take care of your Zendesk setup, so you don’t have to. From mapping tickets and contacts to configuring macros, workflows, and user roles, our experts ensure every detail is correct.
Test migrations validate accuracy and maintain historical data integrity. With a fully configured target help desk, your team can start supporting customers immediately, avoiding manual setup or downtime.
How to Migrate Data from Gmail and Outlook
Alright, now that we’ve covered everything we could about the Zendesk onboarding process let’s address the elephant in the room, the “how do I move my stuff to Zendesk”. And the answer is quite simple, you use our dedicated migration system to simplify the process of whole data migration. It is a paid solution that not everyone will accept but don’t run away just now. Check out how it works and why it isn’t a waste of your time and money.
How it works
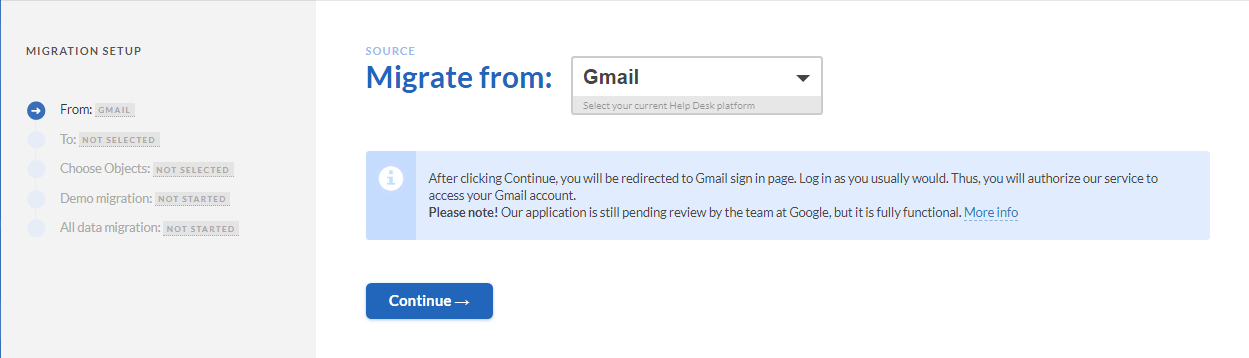
To start your migration process, you must first head over to our migration page where you’ll see two fields. In the source field, select the email platform you would like to move your data from and in the target field pick Zendesk.
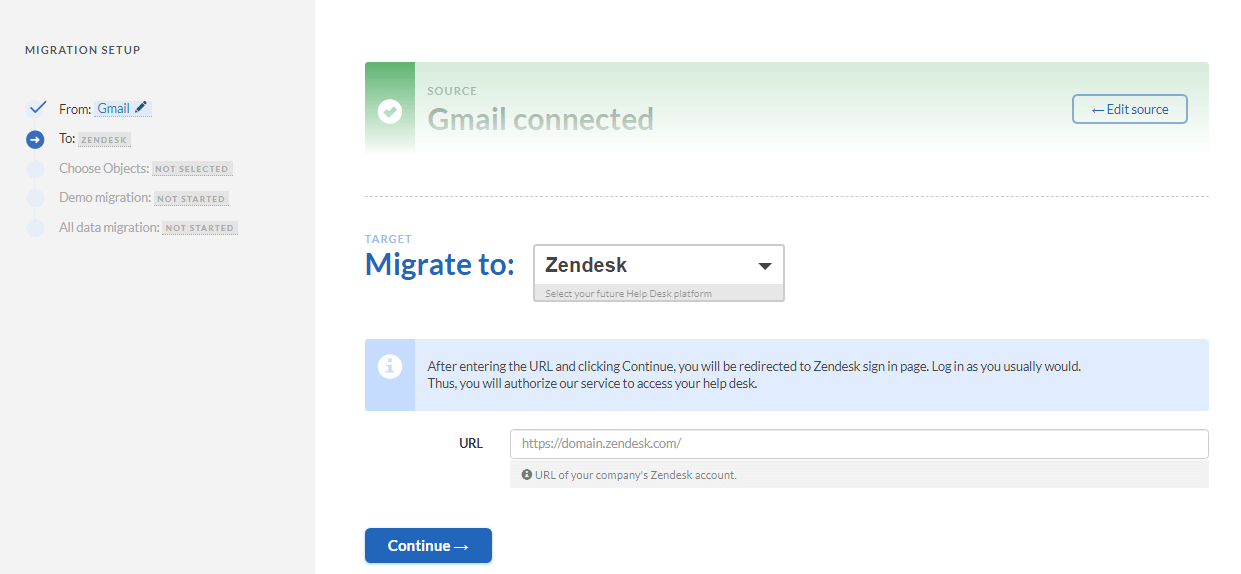
You will then be asked to provide credentials to both platforms (this is necessary for our system).
This will take you to a data mapping screen where you’ll be able to pick what stuff you’d like to move.
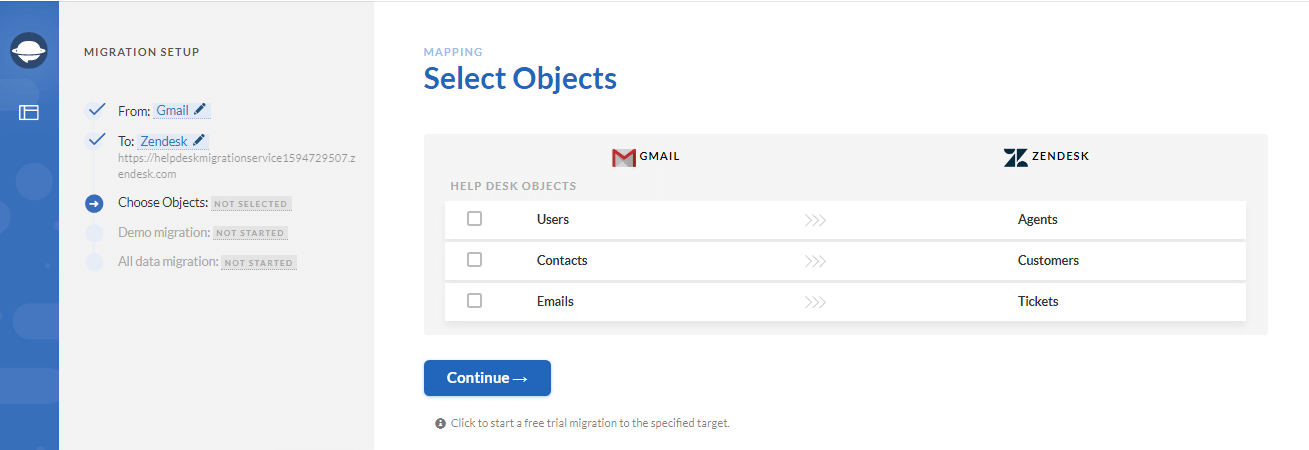
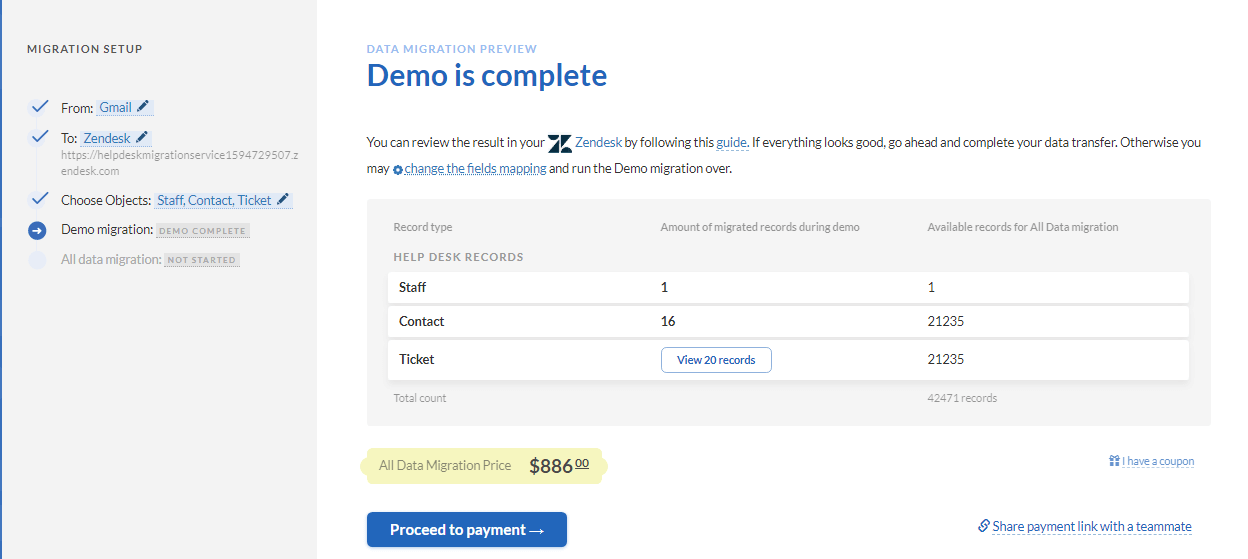
Select the info you need and proceed to do a demo migration - a process where a small amount of your info is taken for migration in order to see if everything lands correctly in the designated system.
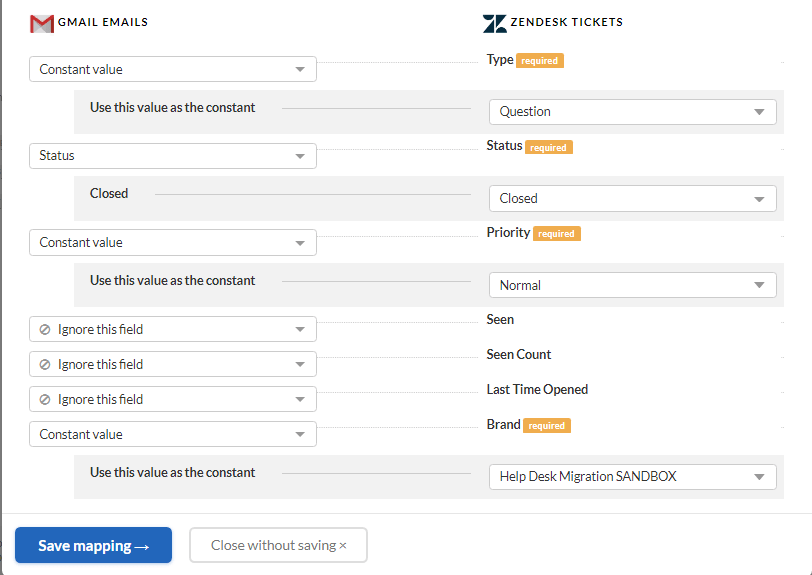
Now some of you might be wondering how on Earth email data will work in a help desk environment, and we are glad that you asked. Our solution will convert your email info into a compatible format, namely:
- Attachments in emails will become Ticket Attachments;
- Emails will become Tickets;
- Contacts will become Customers;
- Inline Images will migrate in Ticket Attachments;
- The account owner(user) will become an Agent;
- Email replies will become Public Notes;
The entire process is quite fast and will take you upwards of five to ten minutes because it eliminates all the factors that make it time-consuming. Once done you can start verifying everything and if all is good, it is your call, to commit or not to commit.
Key Benefits
There are a ton of different benefits you can get when using our service. Listing them all would take a while so here are some of the most prominent ones:
- You pay only for the records transferred
- You get dedicated support before, during, and after migration
- All your data is protected using the latest say in cybersecurity
- The migration process is accurate and retains data structure
- Everything is automated
Let’s Migrate Together
If you want to learn more about our migration wizard or maybe you have some questions regarding the Zendesk onboarding process just drop us a message. Our experts will get back to you as soon as possible to discuss all the details but for now, thank you for dropping by. Be sure to come back as post stuff like this all the time!
Frequently Asked Questions
You can import contacts through CSV files by creating new users or updating existing ones. As for tickets, you require developer resources that would help you import the records with the imports API. Or go to the Zendesk marketplace and look for a secure third-party app like Help Desk Migration.
Zendesk offers a few in-built options like the imports API. However, that requires the developer's resources and coding skills. Or you got a chance to use the Help Desk Migration services to import tickets and related data automatedly.
Zendesk doesn’t have a pre-built option to create a bulk ticket in Zendesk. You require a bunch of API expertise and Python code to do it on your own. So instead, you got a few paid options on the Zendesk marketplace. For instance, you can use Proactive Campaigns.


