Reliable Help Scout to Zendesk data migration services
Encrypted conversations, secure servers, leading authorization methods
Automated method, don't have time-out, avoiding any workflow drops
Flexible charging to guarantee a feature + charge balance
Companies across many verticals prefer us


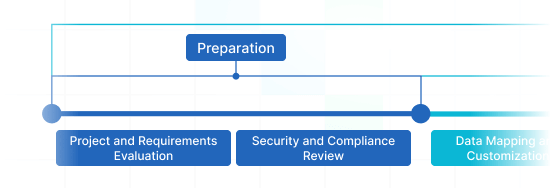
Data migration timeline: 1-2 weeks
Preparation
Project and Requirements Evaluation
Initiate your transmit by determining Source data, workflows, and apps. Review data cleansing and field matching to the Target. Create a transition tactic, that consists of the agenda and customer service reps coaching.
Security and Compliance Review
Confirm data adheres to security requirements. Grant permissions and access settings to secure the migration.
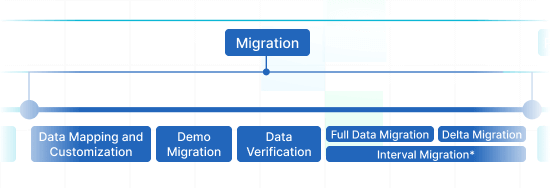
Migration
Data Mapping and Customization
Connect records fields among the Source and Target. Select pre-built custom settings from the menu or discuss particular personalization for the record transfer.
Demo Migration
Do a test Demo to identify how the movement tool functions. Review outcomes and adapt settings as required.
Data Verification
Ensure all moved records in the Target is genuine, fully captured, and appropriately formatted.
Full Data Migration
Move all chosen records, involving tickets, contacts, attachments, and linked information.
Delta Migration
Catch any fresh or updated records that changed at the time of the Full data transition.
Interval Migration*
Data transfer can be halted and resumed to suit your outline, with zero interruption. You can pause up to five instances for a duration of five days each, arranged by our sales crew during operating hours.
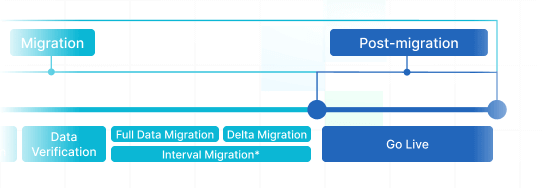
Post-Migration Phase
Go Live
Roll out the Target for all reps. Turn off the Source if needed and protect data backups.
What Data Can You Import from Help Scout to Zendesk ?
With our Migration service, you can simply migrate big portions of various records entities to or from Help Scout to Zendesk. Review the list of data types you can import applying automation service without extra guidance from tech support team.
Do you have exclusive Help Scout to Zendesk migration demands?
Let's discuss your requirements for a customized data import.
| Help Scout objects | Zendesk objects | |
|---|---|---|
| Help desk | ||
| Users | Agents | |
| Companies | Organizations | |
| Customers | Customers | |
| Conversations | Tickets | |
| Knowledge Base | ||
| Collections | Categories | |
| Categories | Sections | |
| Articles | Articles | |
Why transfer with Help Desk Migration?
-
No downtime
Migrate records seamlessly - preserve workflows on track and support customers effectively. -
Enhanced efficiency
Seamlessly transfer data and arrange default and tailored fields with the automated Migration Wizard. -
Easy ticket transmiting
The Migration Wizard moves tickets and all associated data, ensuring the data structure unaffected on the Target. -
Always here for you
Our support agents is available to assist you using chat, email, or phone. -
Detailed import planning
Managers will develop a well-defined plan for data import, providing a seamless process and protected data. -
Custom options available
Choose automated options or inquire about customization, and we'll confirm your data is accurate.
How Help Scout to Zendesk Data Migration Runs
Our automated migration solution allows you import and export records in a few simple actions. If you’re trying to organize a elaborate data structure, feel free to select our tailored mode. We’re in place to fulfill your non-standard demands.
Connect platforms
Connect your source and target platforms
Map and match data
Specify how your data should be transferred
Test-drive
Start a Demo to access the replication tool and its results
Full Data Migration
Start or plan your data transition
Enhance Your Help Scout to Zendesk Migrate
with These Functions
Have a seamless data replication experience that matches your business needs. The Help Desk Migration service brings functions to aid you to succeed your support service records transfer in the painless route.
-
Bypass attachments
Does your destination help desk platform deliver small data storage? Omit attachments, especially if your historical support service data drop none of its value without them. The data import and export time will scale down greatly.
-
Choose a additional tag to the migrated tickets
Are you going to work a current help desk system during data import? To exclude chaos, apply tags to the imported tickets to distinguish them from the left ones.
-
Import inline images as attachments
Import the images added into tickets as attachments. The data export time might take more time, but the images will stay along on a new help desk platform.
-
Give a try to our Demo with custom records by transferring 20 entities
Avoid any guessing. Ensure you comprehend absolutely how the entities look like after you’ve copied them. Help Desk Migration’s Demo with custom data empowers you choose 20 entities for a test transfer.
-
Transfer newest data first
Opt for this option to move your newest records in a chronological flow, from most recent to oldest. The option is applicable exclusively to Full Migration.
Your Help Desk Data Import is the Whole Way Through
Employing Help Desk Migration app, don't worry about safety of critical data. We properly scan all servers and make improvements, so that your business data is safe according to the latest recommendations.
We apply a strict two-factor access policy
Help Desk Migration Wizard secured your business data from unauthorized acquiring access with 2FA access. Additionally, only your business reps with admin rights can export your Help Scout records. Combined, these safety measures eliminate the dangers of information leakage.
Three-layer business data security
We deliver 3 levels of data protection: physical (we take care of our hosting equipment against physical and logical intrusion), network (we secure our networks against digital abuse), and app (we secure your data within our importing platform against forbidden log in).
We comply with security levels
We take care of your business data based on all essential security principles. Help Desk Migration has an broad list of compliance, and we are growing it. Presently, we are compliant with GDPR, CCPA, HIPAA, PCI (Level 1), and other data security levels.
How much does Help Scout to Zendesk data migration cost?
How much will you need to invest in the switch from Help Scout to Zendesk? The cost will mostly depend on the business data volume you want to migrate, the complexity of your demands, and the options you’ll choose or customizations you’ll inquire. Start a Free Demo to test the Migration Wizard performance and find out how much your data switch will cost.
Run a Demo to get the priceFeedback encourages us advance our service: Several words from our clients
Focus on efficiency During Zendesk Import
Are you seeking a seamless and efficient way to perform Zendesk data import? Look no further than Help Desk Migration! Our platform offers comprehensive Zendesk import solutions, simplifying the process of migrating your valuable data into Zendesk Support. Whether you're dealing with Zendesk CSV import, custom fields, or business rules, we've got you covered. With our automated Zendesk data importer, you can effortlessly transition your support operations to Zendesk, ensuring a hassle-free experience.
Help Desk Migration redefines Zendesk data migration with precision and customization at its core. Our platform excels in Zendesk import, providing an array of solutions tailored to your needs. Seamlessly import data to Zendesk, leveraging our advanced Zendesk data importer. Whether it's Zendesk CSV import, custom fields like custom user field and custom organization field, or email addresses subject to your business rules, we've perfected the process.
Experience unparalleled efficiency with our CSV import feature, enabling smooth handling of substantial data volumes. Customize import types and options, ensuring a seamless transition. Our bulk user import option empowers you to transfer users en masse, while the bulk organization import feature offers a streamlined approach to organizational data migration.
Trust in Help Desk Migration's expertise for a seamless Zendesk import process. Leverage the power of CSV data files, executing actual imports effortlessly. From ticket imports to automating the entire Zendesk import process, we provide the solutions you need. Partner with us for a migration that exceeds expectations.
Frequently Asked Questions
Prepare your Help Scout account for migration by auditing and cleansing data. Plan the migration by selecting a date, creating a checklist of settings, turning off the source tool, and applying settings to Zendesk. Initiate the data transfer process and compare the IDs of the source and target for a successful migration. Review our step-by-step checklists for guidance:
Help Desk Migration allows for a seamless transition from Help Scout to Zendesk, migrating important records such as tickets, groups, agents, contacts, companies, ticket attachments, ticket private and public notes, inline images, ticket and contact custom fields, CC in tickets, and Created_at, Updated_at, and Closed_at dates. Additionally, the Help Scout to Zendesk migration includes knowledge base articles with folders, categories, attachments, tags, and inline images.
To migrate from Help Scout to Zendesk, you will need to gather access credentials from both help desk platforms, including your organization’s Zendesk URL and the Docs API of Help Scout for migrating knowledge base data. Additionally, sign in to the Zendesk and Help Scout accounts.
To ensure a successful Help Scout to Zendesk migration, start by running a Free Demo Migration. This allows you to test the data transfer process and review the results table for any migrated, failed, or skipped records. Download the reports and copy the record IDs to verify the accuracy of all transferred data. If everything looks good, you can proceed with the Full Data Migration for a hassle-free transition.
By default, organization custom fields will not be transferred from Help Scout to Zendesk during a migration. However, if you require a tailored migration, you can request a Custom Demo by setting up a Demo Migration and contacting our support team.
The duration of your Help Scout to Zendesk migration is determined by the amount of data and attachments you're transferring and the API limits of both platforms. Higher API limits enable faster migration.
To ensure a smooth migration from Help Scout to Zendesk, there are a few data and settings changes that you need to make. These include:
- Creating custom fields with a matching 'type' in Zendesk.
- Setting up saved replies (macros) in Zendesk.
- Creating agent profiles in Zendesk.
- Activating the Help Center in Zendesk.
At Help Desk Migration, we offer a variety of resources to make your migration process as smooth as possible. Here are some of the resources you can access:
- Help Center: Our Help Center contains a wealth of information about migrating from Help Scout to Zendesk, including step-by-step guides, FAQs, and best practices.
- Blog: Our blog features articles with tips and tricks to help you optimize your migration process and ensure a successful data transfer.
- Support team: Our support team will assist you with any questions or issues you may have during the migration process.
- Free Demo Migration: You can run a Free Demo Migration to test the migration process and see how your data will look in Zendesk before proceeding with the full migration.
- Support packages: Choose a support package that suits your needs, such as Standard, Premium, or Signature, for seamless migration from Help Scout to Zendesk.
- Concierge Migration Service: select this option for full assistance and let our team handle the entire process.
We're here to help you every step of the way!
All-packed Help Scout to Zendesk Import in a Few Clicks
Import your records from Help Scout to Zendesk conveniently and with no disrupting your utmost objective of setting right your clients’ requests.
Find out more helpful insights about data migration
Interested in getting more? Our resources are constantly updating information on support service advancement and help desk data import and export. Explore it today!
Top GrooveHQ Alternatives: Best Help Desk Apps to Explore
So you are looking for a decent alternative to GrooveHQ but often find ...
Pricing Overview of 7 Help Desk Solutions: Which Works Best for You?
Raise your hand if you’ve thought about Zendesk pricing recently? Are you looking ...
Top 14 Freshdesk Alternatives to Fuel Your Support Strategy
As businesses aim to deliver exceptional customer support, the demand for Freshdesk alternatives ...




 Gauthier Escorbiac
  Chantelle Viani
  Nicola Mustone
 Ionut Birzu
  Steve Milligan
 Paul McCabe
 Andrew Cassano
 Tom Doulos
 Noga Edelstein