Zendesk Data Migration Checklist
To ensure a smooth Zendesk data migration, you need two key things:
- A clear, step-by-step checklist that covers every stage of the migration.
- A reliable third-party service like Help Desk Migration to automate and simplify the process.
Stage 1: What should I do before setting up a Zendesk migration?
Planning is critical. Around 60% of the migration effort happens before the data transfer begins. Before you start, take these key steps:
1. How do I create a Zendesk migration strategy?
To set up a successful Zendesk migration, follow this simple plan:
- Choose the best time for migration to minimize disruption.
- Communicate the schedule clearly with your team.
- Decide if the source system will remain active during migration.
- Prepare your Zendesk target by configuring custom fields, macros, and settings.
This approach helps ensure a smooth and well-coordinated migration process.
2. How should I prepare my team for Zendesk migration?
Keep your support team informed and ready. Here’s how:
- Share a clear migration timeline.
- Tell agents when to stop working in the old help desk.
- Give the team time to adjust to Zendesk.
3. How do I prepare Zendesk for data migration?
Before migrating data to Zendesk, set up your account to ensure all fields, agents, and articles transfer correctly. Here’s what to do:
How do I create custom fields in Zendesk?
To map your records properly, create custom fields that match your source data types. Zendesk supports custom fields for tickets, users, and organizations.
You have two options:
Option 1: Create custom fields manually in Zendesk
- Go to Admin → Manage → select User, Organization, or Ticket fields.
- Click Add field.
- Choose the correct field type (text, dropdown, checkbox, etc.).
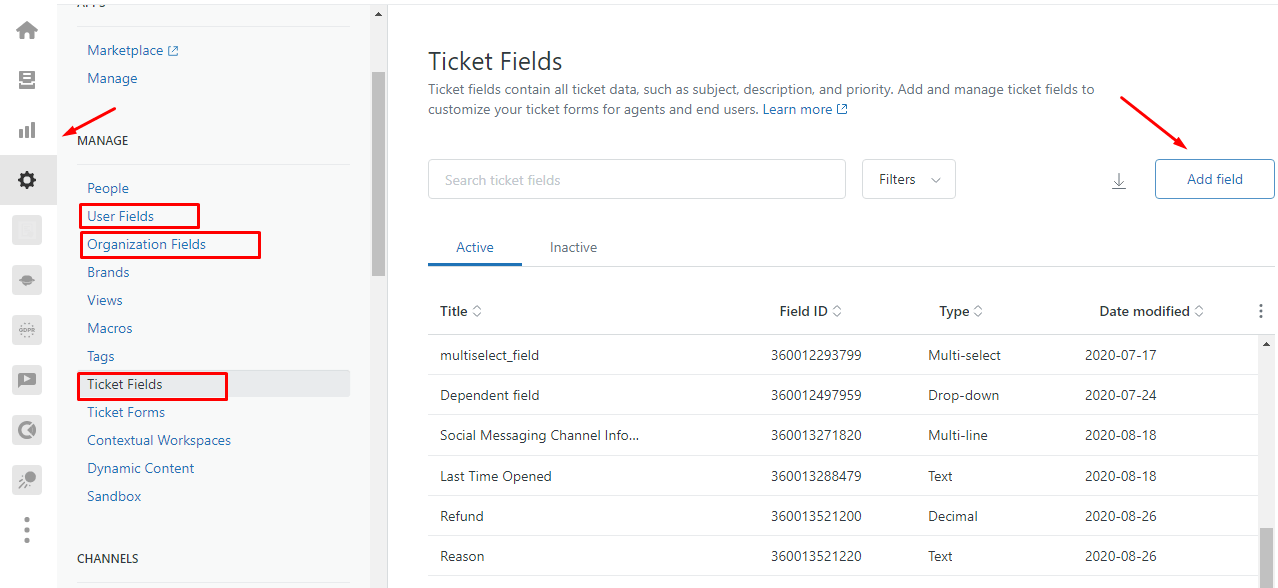
Option 2: Create custom fields in the Migration Wizard
- When mapping fields, select the source field.
- Click Add the same field in Zendesk.
- Wait a few seconds while the field is created.
- Map the field values once it appears.
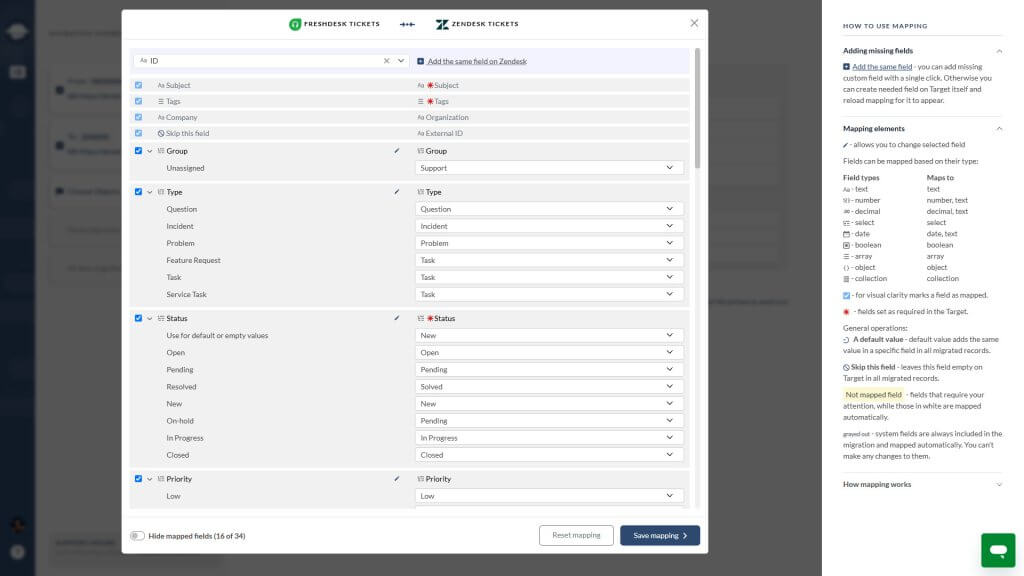
- Set fields as Unrequired to prevent empty values.
- Use a default value for each field when possible.
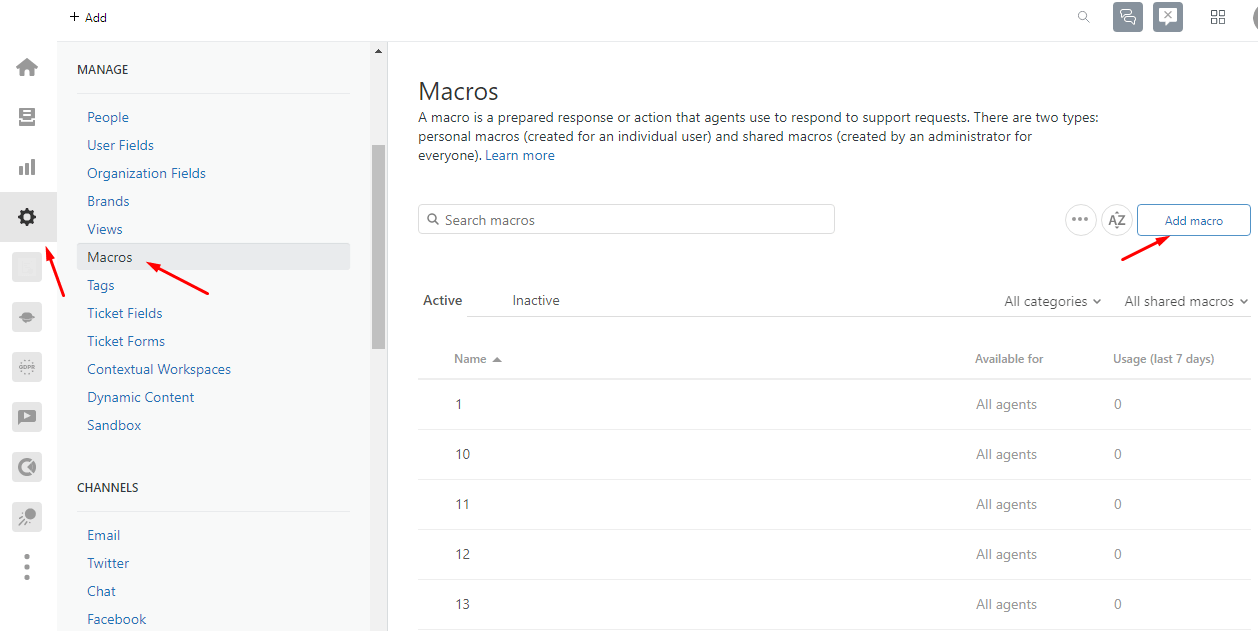
Should I set up macros (saved replies) in Zendesk?
Yes. Review and create any macros (also known as saved replies) you want to keep using in Zendesk. Shared macros (used by the whole team) are especially worth recreating.
To add macros in Zendesk: Go to Admin → Macros → Add Macro
What should I know about agent profiles during migration?
Migration Wizard sets up the agent profiles during the migration and uses only the slots available in your account.
If you have unassigned, inactive, or deleted agents:
- Assign a default agent in Zendesk when mapping agent profiles.
- This ensures all tickets are correctly associated with an agent.
Do I need to activate the help center before importing articles?
Yes. If you plan to import knowledge base articles, the help center must be active.
Only the account owner can activate it:
- Go to Guide → Settings in the sidebar.
- Click Activate.
4. What limitations should I know before migrating to Zendesk?
Zendesk has specific rules and system behaviors you should consider before migrating your data. Below is a list of key limitations and how to handle them:
- When migrating to Zendesk, your suspended Contacts will change their status to unsuspended; suspended contacts can't be the requesters in Zendesk.
- You cannot migrate tickets without contacts, organizations, and agents. These fields should be filled in.
- After 28 days, tickets marked as 'Solved' will automatically get updated to 'Closed'. And after 120 days of being 'Closed', tickets are automatically archived. It happens because of specific automation settings. You can reduce the number of days until they become 'Closed', but you can't expect tickets to stay 'Solved' until you manually close them.
- Zendesk does not show all ticket statuses in the main menu by default. To view all tickets, type * in the search bar and press the Enter key. This is the only way you can locate archived tickets.
- The tickets get relevant tags assigned automatically by Zendesk based on the custom field options.
- Only default language migrates by default for the Zendesk Guide.
- The agent roles you see on Zendesk depend on your subscription plan. For example, an administrator role defines everything in your account. A light agent role can leave private comments on tickets, but cannot be a closed ticket owner, etc. If you are an Enterprise plan user, ensure all of your agents receive the Staff role to solve the tickets.
- Each subscription plan has a limited amount of agents. Consider upgrading if you want to preserve the same number of agents you had on your source help desk. If you don't migrate specific agents to Zendesk, contact our team to reassign their tickets.
- Tickets without the agent get assigned to a default agent in Zendesk. Pick up a default agent while mapping agent profiles.
- You cannot store Knowledge Base Articles in categories, only in folders. If you had no folders on the source help desk, the articles would migrate to a default folder created automatically by the migration tool. Also, make sure that Zendesk Guide is activated.
- If you want to migrate articles to a particular brand, put its link in the URL field while connecting your Zendesk account.
- By default, Zendesk is configured to block unsafe HTML tags and attributes, to ensure that your customers can safely browse your knowledge base. For example, videos migrated as a part of Knowledge Base articles are referred to as unsafe content. To display them, go to Settings> Guide Settings, find Security, and check the Display unsafe content option.
- There are several types of tickets which migrate differently. For instance, merged tickets migrate as separate ones with private messages. Follow-ups transfer as one ticket. In the custom migration, you can transfer follow-ups that contain ID into a custom field or private note.
- The tickets CC field doesn't migrate, but all the other people's replies get reflected on the ticket. You can move those records to Zendesk from: FreeScout, Freshdesk, Freshservice, Help Scout, SupportPal.
- The order of tickets during migration depends on your source help desk API. It controls the process and determines whether new or old tickets get transferred first. Our service migrates the users and then tickets, to maintain the user-ticket relation.
- Set up mandatory and regex fields after the data migration. Regex fields in Zendesk only support such formats as yyyy-mm-dd date, URL validation, five-digit zip codes, and social security number in a pattern of 3-2-4 and each separated by a dash.
5. What data isn't transferred by default to Zendesk?
Some types of data don’t transfer unless you enable additional options during setup. Here’s the list of records available if you choose automated options:
- Inline images
- Call recordings
- Side conversations
- Content translations
- Links between knowledge base articles
To transfer these data, make sure to activate these features during migration setup.
6. Can I customize my Zendesk data migration?
Yes. You can fully customize your Zendesk migration using both pre-built options and advanced customizations. This helps you control how your data is transferred and ensures it fits your specific business needs.
What customization options are available?
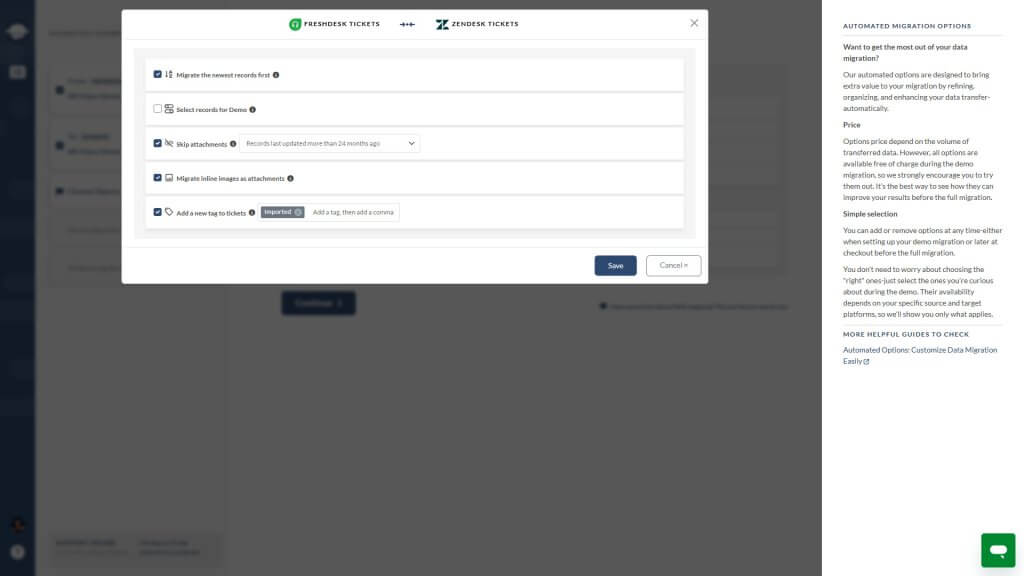
Use these pre-built features in the Migration Wizard:
- Migrate the newest records first;
- Add tags to migrated tickets;
- Migrate inline images as attachments;
- Skip attachments to speed up migration;
- Select records for Demo migration, available for tickets and articles;
- Migrate content translations;
- Transfer ticket side conversations as private notes;
- Migrate call recordings as mp3 attachments;
What advanced customizations can I request?
Our team can tailor your migration further:
- Filter data by tags, date, fields, groups, etc.
- Change default behavior, e.g., convert change/problem objects to tickets.
- Enrich migrated records with the original ticket IDs or extra tags.
Reach out to our support reps to set up a custom migration based on your needs.
Can I filter historical data before migrating to Zendesk?
Yes. Many companies choose to migrate only relevant records. You can:
- Exclude old or resolved tickets.
- Skip spam or irrelevant conversations.
- Migrate only data from a specific date range.
Use custom filtering to match your business needs. Contact our team to define what to include or exclude.
Do article dates stay the same in Zendesk?
No. When you import articles into Zendesk, the system replaces the original creation and update dates with the migration date.
Stage 2: What should I do right before starting the Demo Migration to Zendesk?
Before you begin the Demo Migration, take a few quick steps to prevent errors or unwanted changes.
1. Should I turn off Zendesk automations before migration?
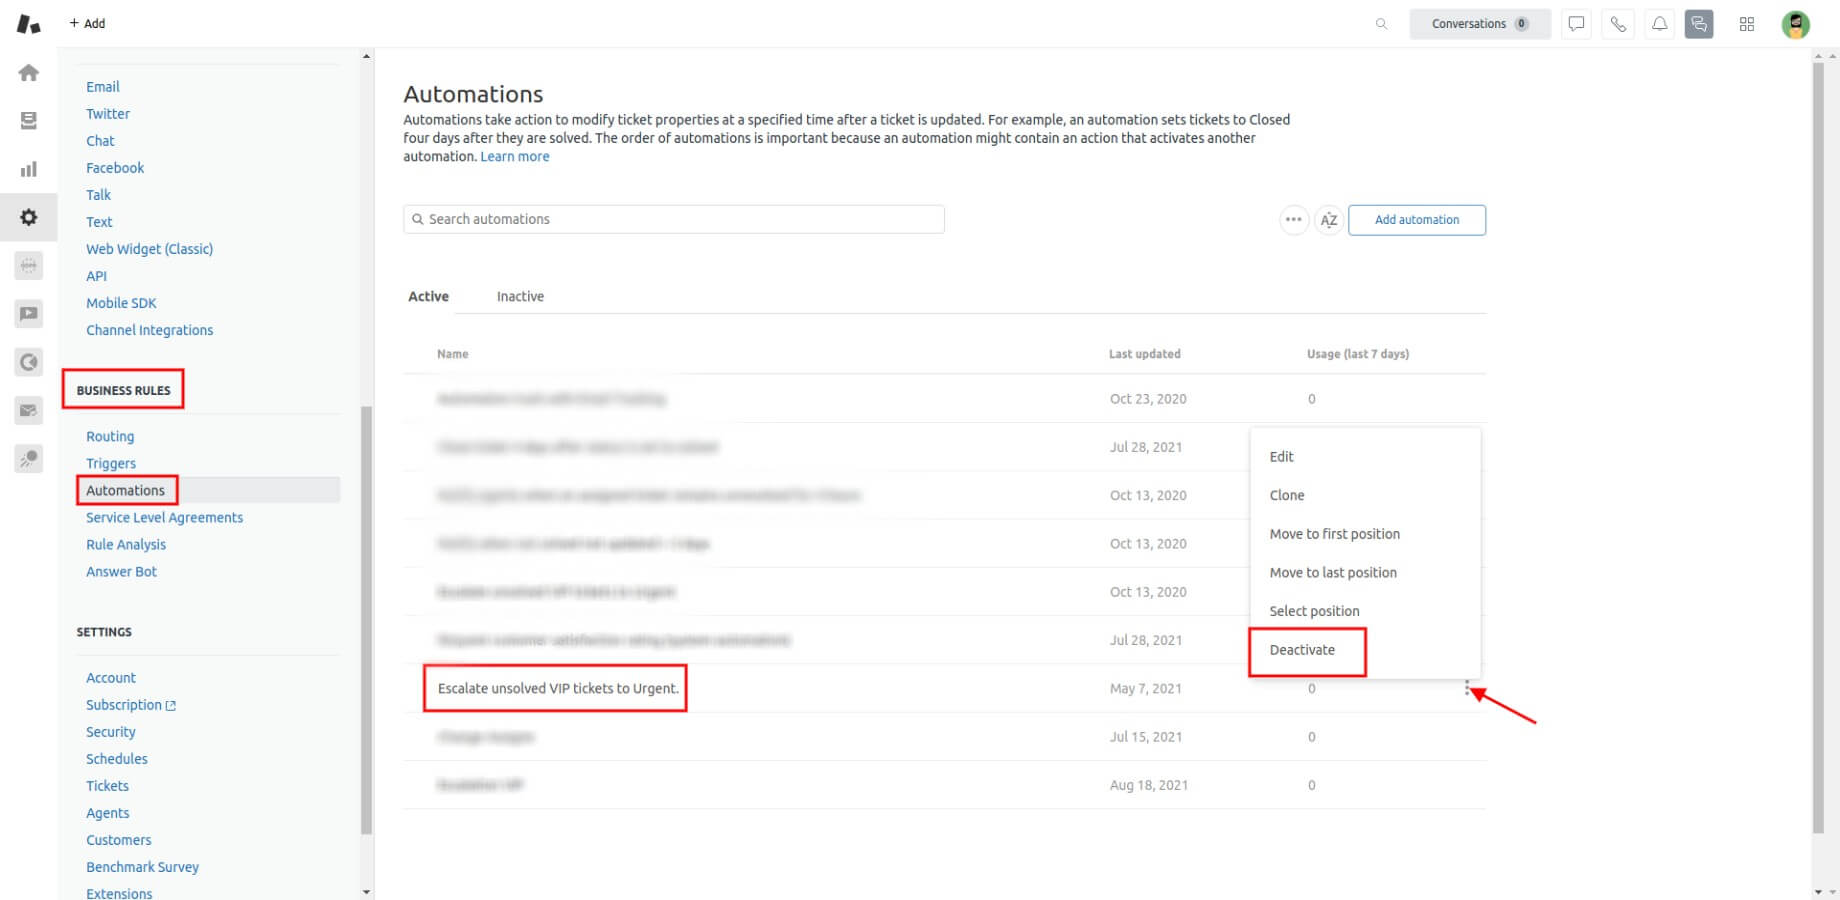
Yes. Disable all active automations in Zendesk to avoid triggering updates or notifications on imported tickets.
Here’s how:
- Go to Admin → Business Rules → Automations.
- Hover over an automation.
- Click the three-dot menu.
- Select Deactivate.
- Repeat for all automations.
Then, in Zendesk, update your automation rules to exclude tickets with that tag. This prevents them from being affected by existing workflows.
2. How do I turn off required field conditions in Zendesk?
To prevent errors during migration, disable all conditions that make fields required in ticket forms.
Step-by-step instructions:
1. Go to the Admin Center.
2. Click the Objects and rules icon
3. Navigate to Tickets → Forms.
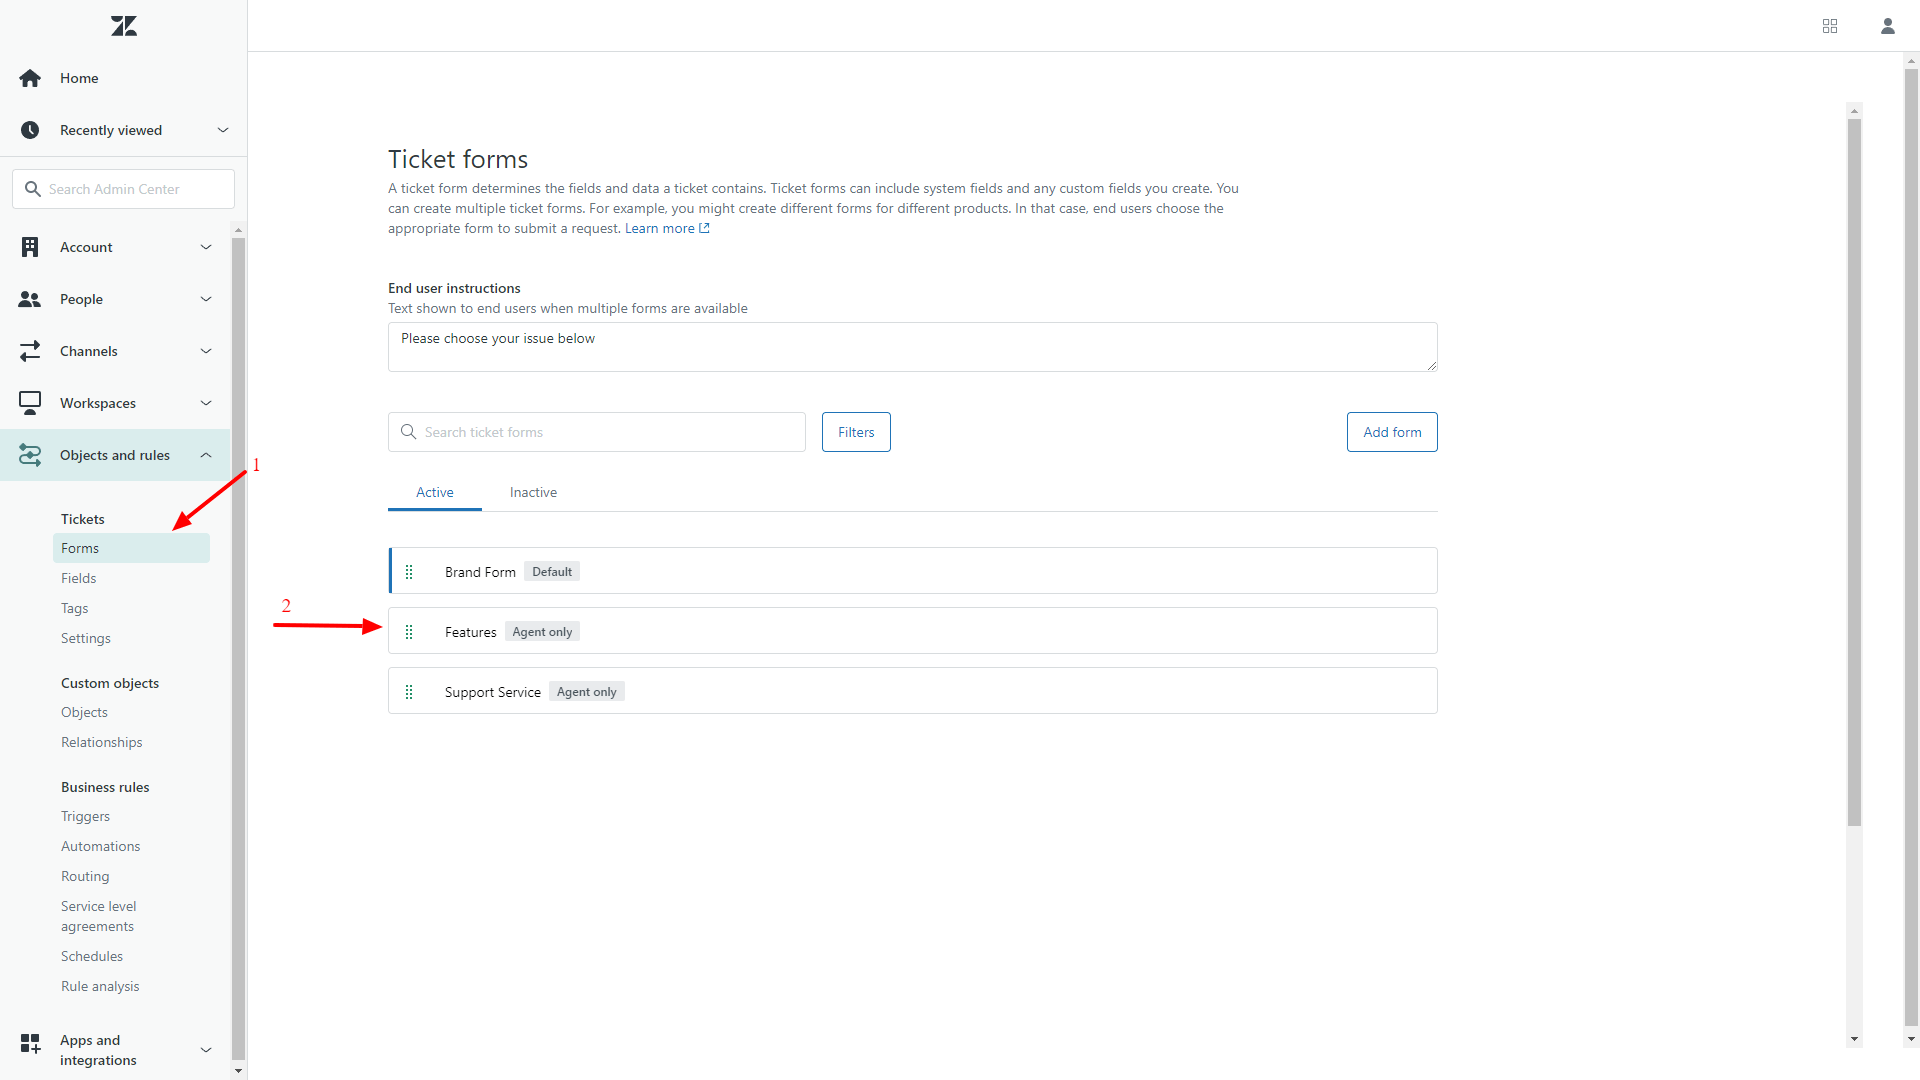
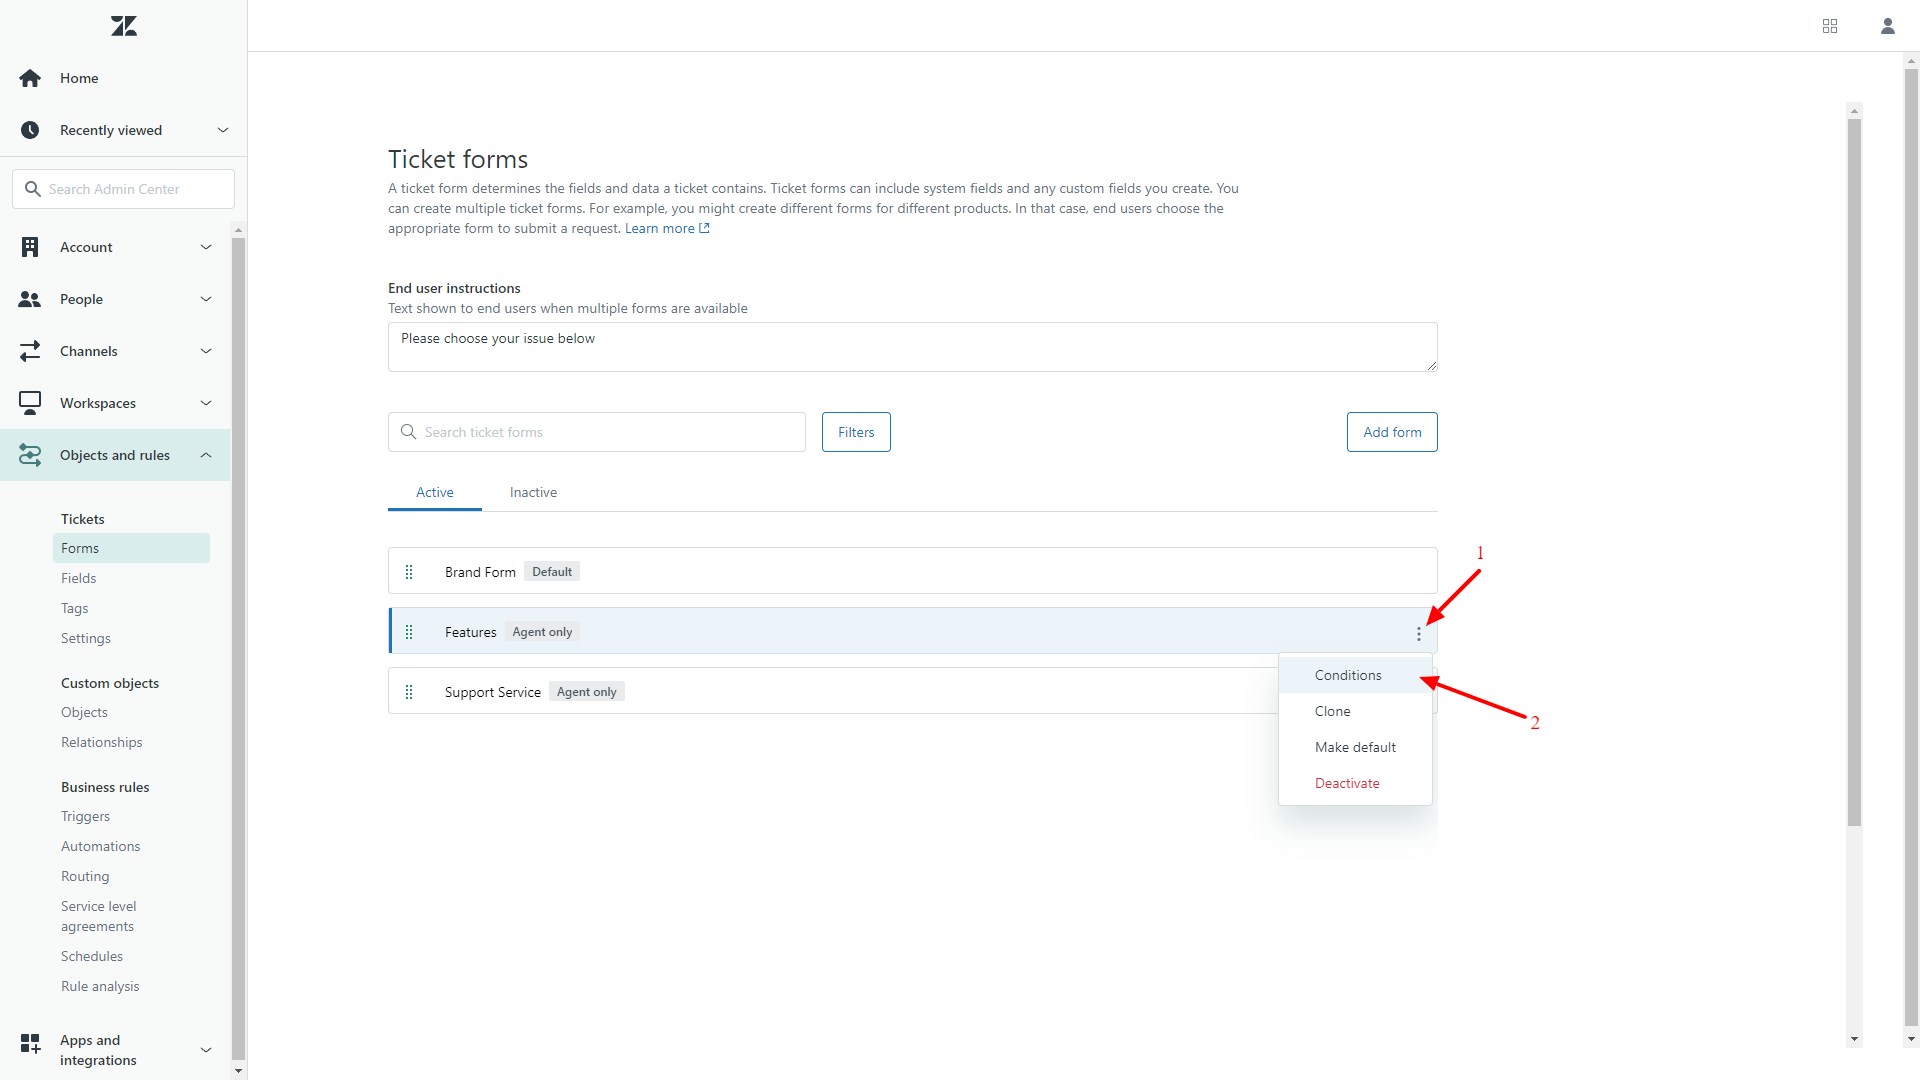
4. Open the ticket form and click the options menu.
5. Select Conditions.
6. Choose the user type (Agents or End users).
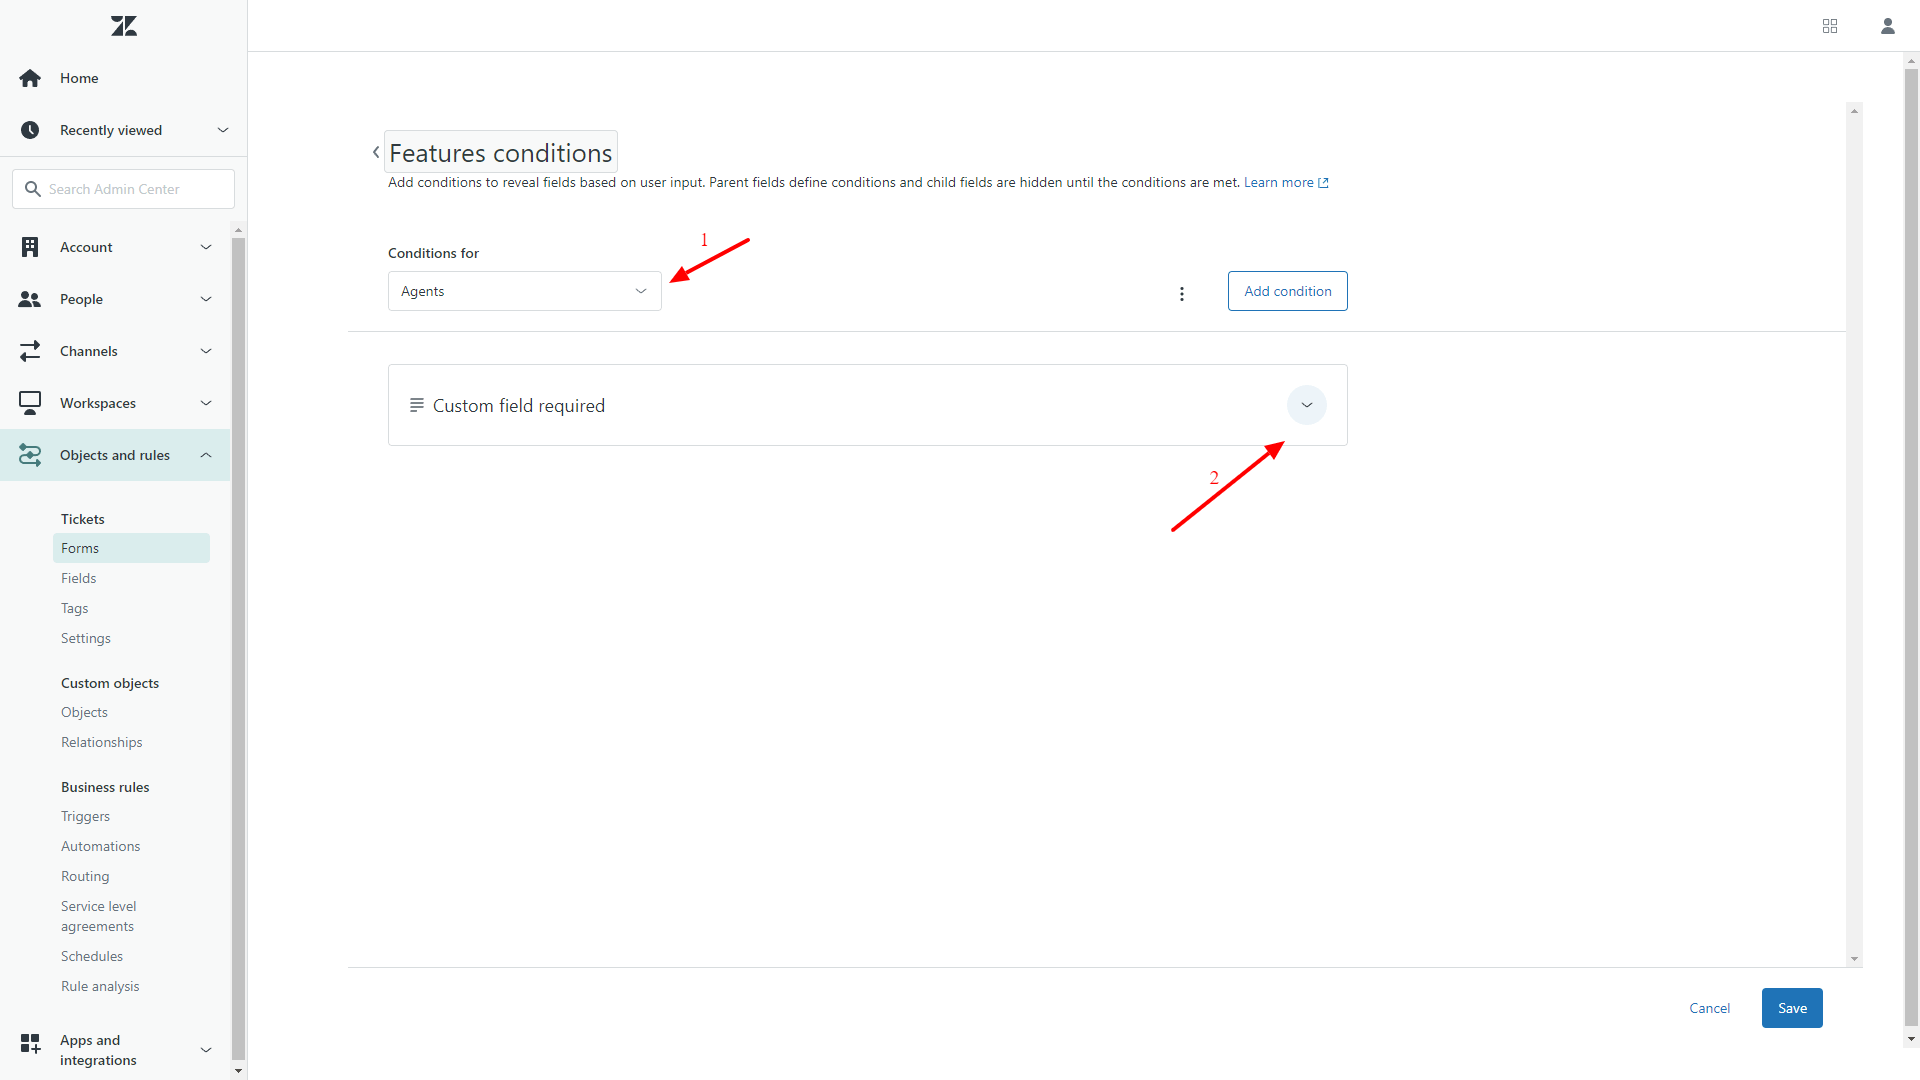
7. Click the pencil icon to edit each condition.
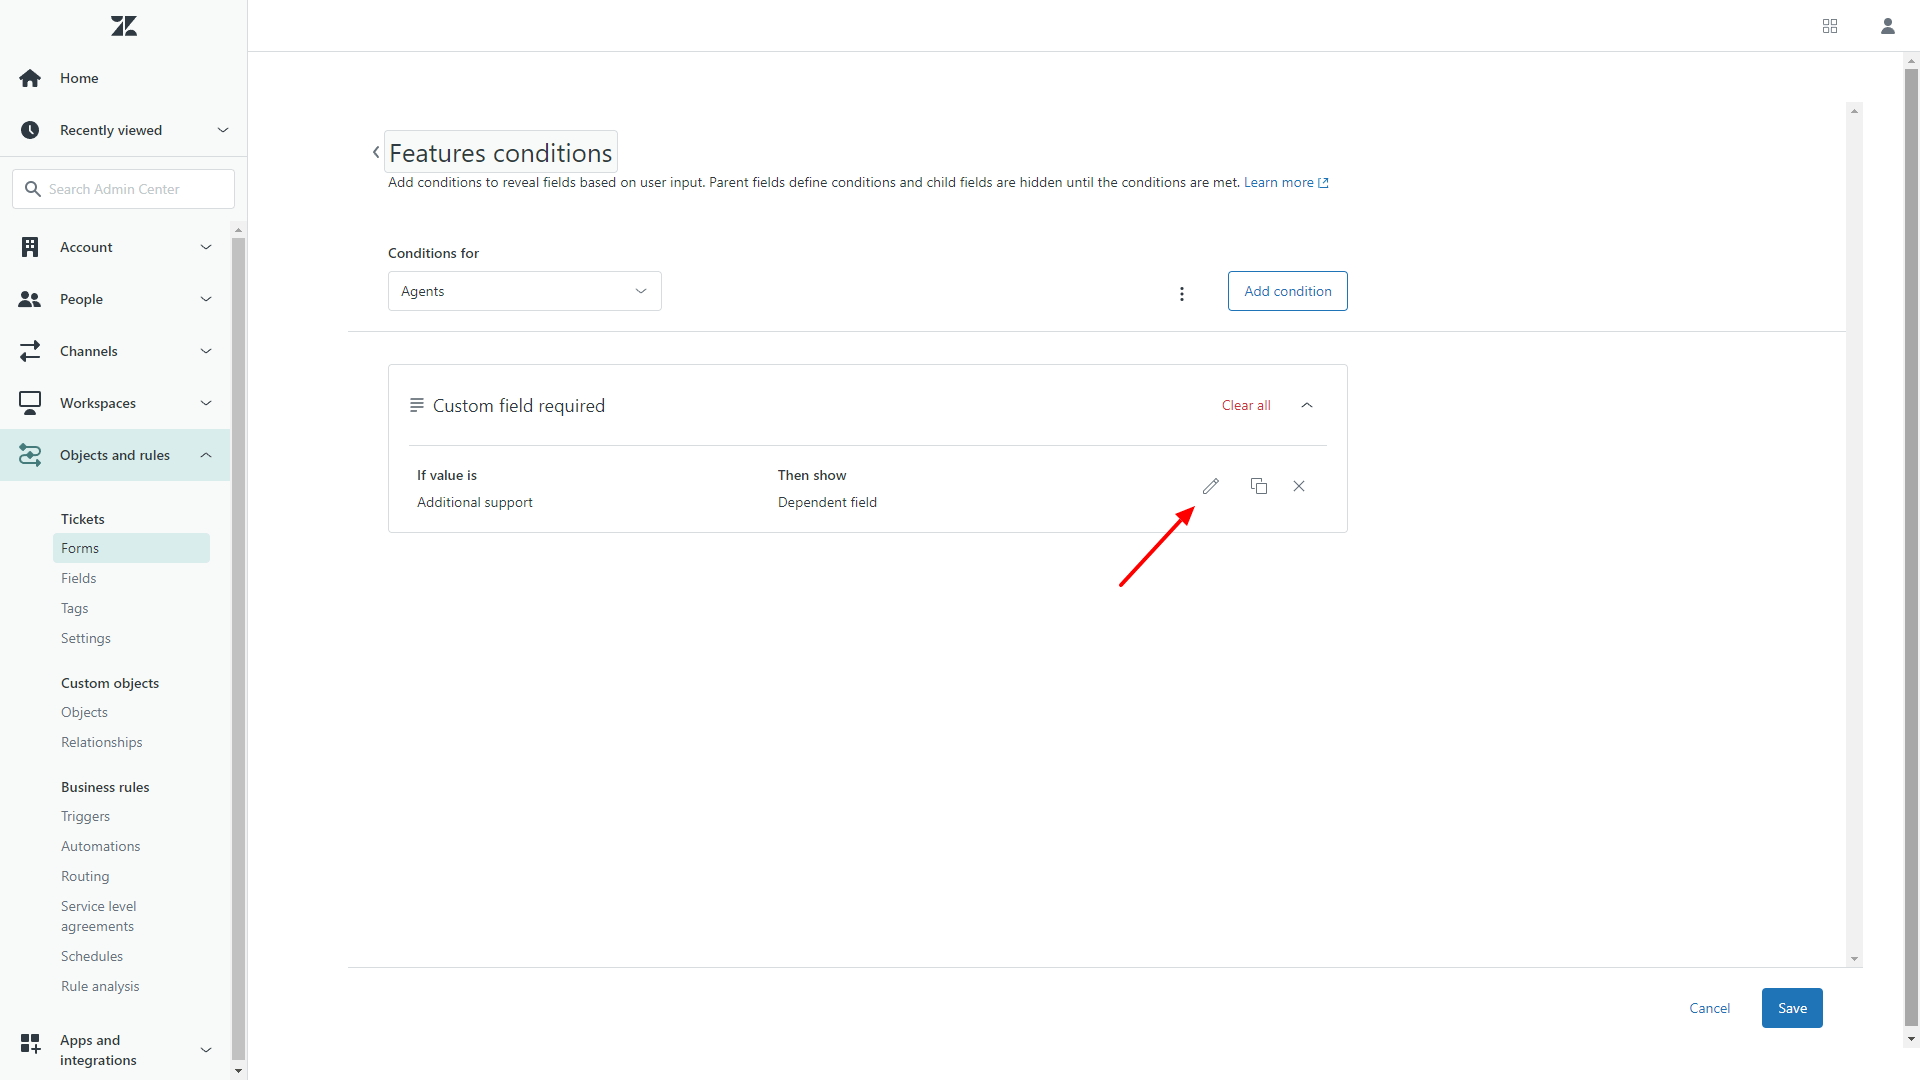
8. In the “Required” dropdown, select Never.
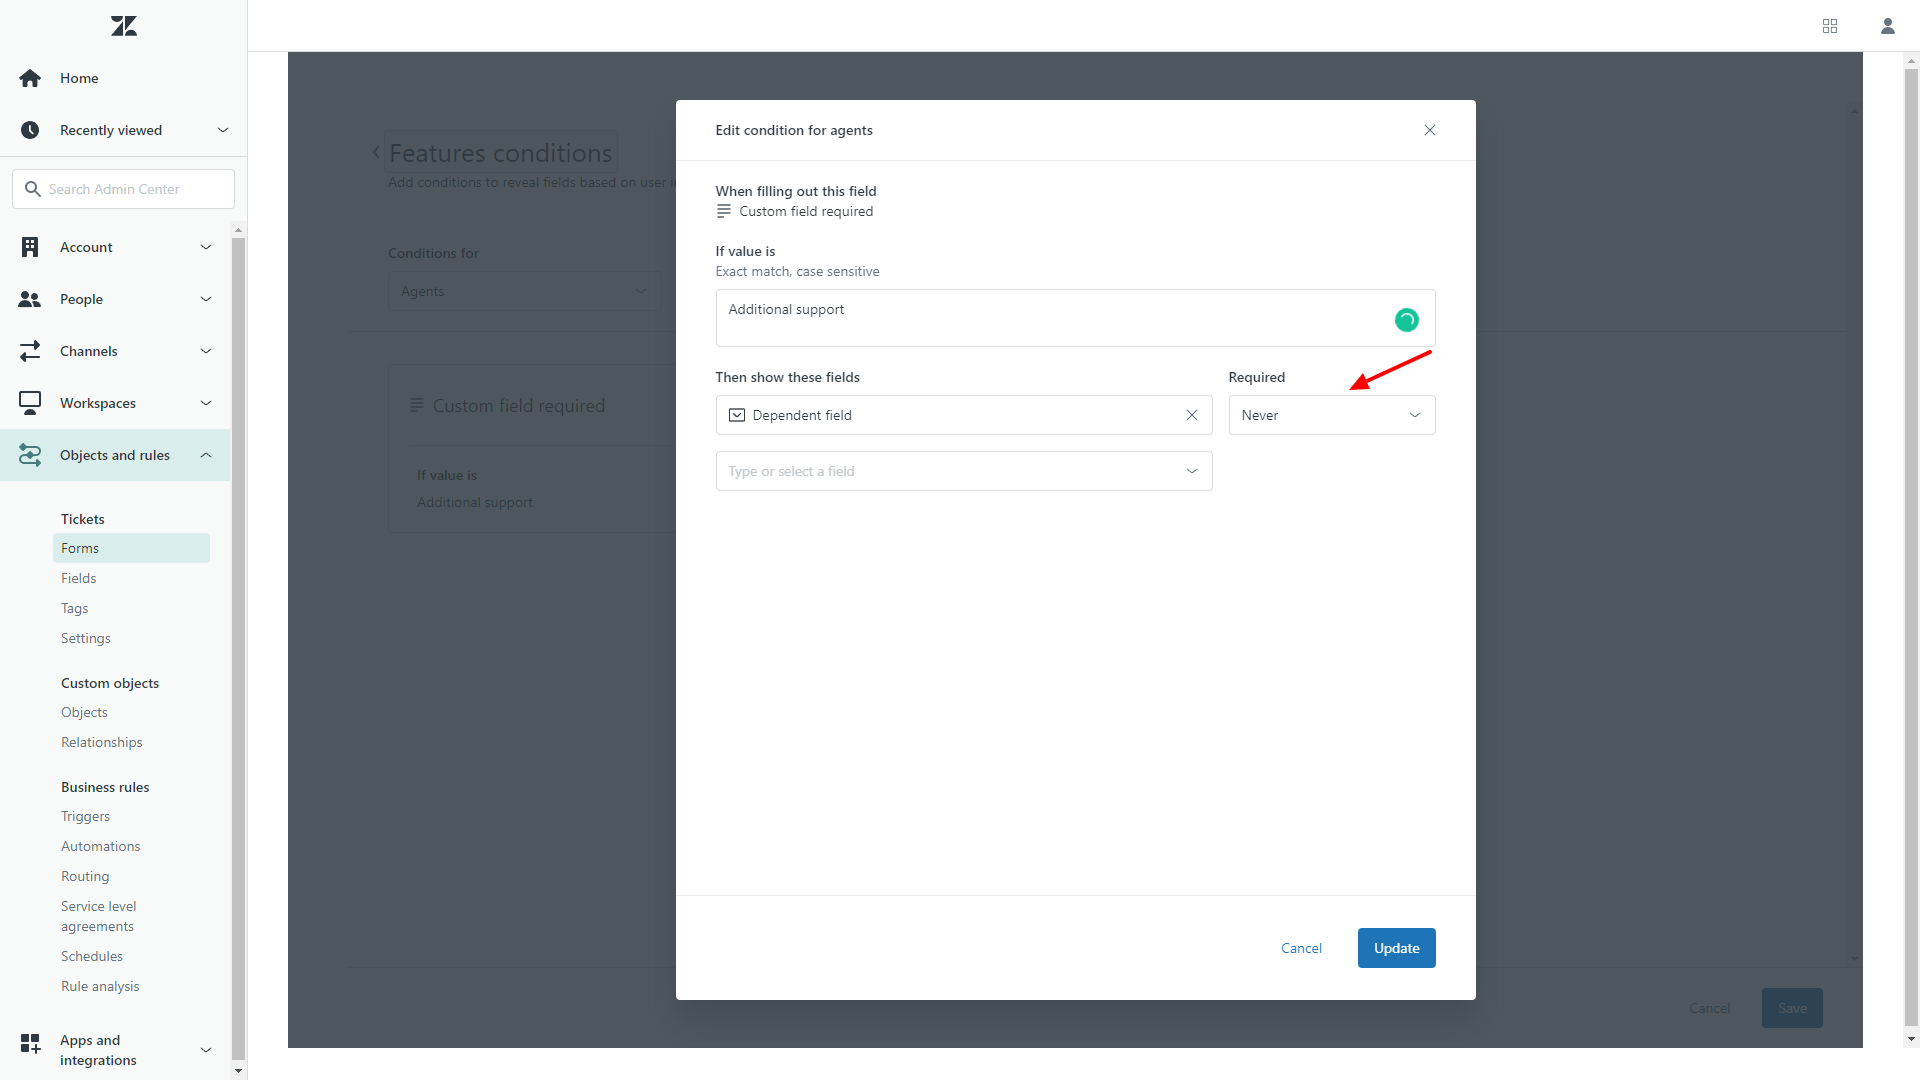
9. Click Update to save.
After your Full Migration is complete, return to ticket forms and re-enable required conditions as needed.
3. What access credentials do I need to set up the migration?
To run a Demo Migration, you’ll need credentials for both your source platform and Zendesk. For Zendesk, prepare:
- URL – Your Zendesk account’s URL.
- OAuth authentication – Log in to Zendesk when prompted.
4. How do I run a Free Demo Migration to Zendesk?
To test your setup before Full Migration, run a Free Demo Migration. It moves 20 random tickets and 20 help center articles to Zendesk.
To run your Free Demo Migration:
- Sign in or create an account in the Migration Wizard.
- Connect your source platform and Zendesk.
- Choose the data you want to import.
- Match agent profiles.
- Map fields for contacts, companies, tickets, and articles.
- Select automated options (e.g., migrate newest records first, skip attachments).
- Start the Free Demo Migration.
Does the Demo Migration work the same as the Full Migration?
Yes. Migration Wizard handles Demo and Full Migrations the same way.
If some ticket data is missing or incorrect in the Demo, the same issue will appear in the Full Migration.
How to check:
- Download Demo Migration reports.
- Review migrated, failed, and skipped records.
- Contact support if you spot issues before launching the Full Migration.
Stage 3: What should I check after the Demo Migration to Zendesk?
After your Free Demo Migration, review the results in Zendesk to ensure everything transferred correctly. The Demo simulates a Full Migration using a small sample—20 tickets and 20 articles—but the process is identical.
How to review your Demo Migration:
1. Go to your Migration Wizard dashboard and review the results table:
- All available records;
- Migrated records;
- Failed records;
- Skipped records;
2. Download reports for deeper insights
3. In Zendesk, verify the following:
- All comments migrated with correct authors;
- Tickets are assigned to the right agents;
- Custom field values are intact;
- Customers and organizations migrated;
- Attachments and labels are present;
- Knowledge base categories are correct;
- No automations altered demo data;
- Manually download a few attachments in Zendesk to check their integrity.
- You can run Demo Migrations as many times as needed. If some records don’t transfer properly, fix the issues and try again. This way, you can carefully adjust your data mapping and be sure everything migrates correctly before the Full Migration.
Can I run a custom Demo Migration to Zendesk?
Yes. If you want to test specific records, choose the Select records for Demo option separately for tickets and articles under Options.
- Enter up to 20 ticket IDs and 20 article IDs.
- This option is only available once per migration.
- Need more than one custom Demo? Contact our support team.
Stage 4: What should I know while running a Full Data Migration to Zendesk?
Once you launch your Full Data Migration, the process runs in the cloud—no need to keep your browser open. You can continue working in your source help desk, but remember:
- New or updated records added after Full Migration won’t transfer automatically.
- To move those later changes, run a Delta Migration (available with the Signature support package).
What else to keep in mind:
- Track progress in the Full Migration dashboard.
- Our team will notify you when it’s complete.
- Zendesk migration speed averages 2,000 tickets per hour.
- To speed it up, ask Zendesk and your source tool to increase API limits, and notify us before migration starts.
Can I make changes during Full Migration?
No, avoid changes during Full Data Migration. Editing records, removing duplicates, or altering fields mid-process may pause or delay your migration. If you discover unnecessary data, let it migrate and clean it up in Zendesk afterward.
How do I start a Full Data Migration to Zendesk?
To begin your Full Data Migration, make sure:
- Payment is confirmed.
- Pre-migration checklist is approved on the right sidebar.
Once both are done, the Migration Wizard will start transferring records in the cloud—no need to keep your tab open. You can track progress on the Full Migration page or wait for a message from our team.
Migrations typically take 20 minutes to a few days, depending on data volume.
Final Stage: What should I check after the Full Zendesk data migration?
Even if your Full Migration ran without errors, it’s important to verify everything:
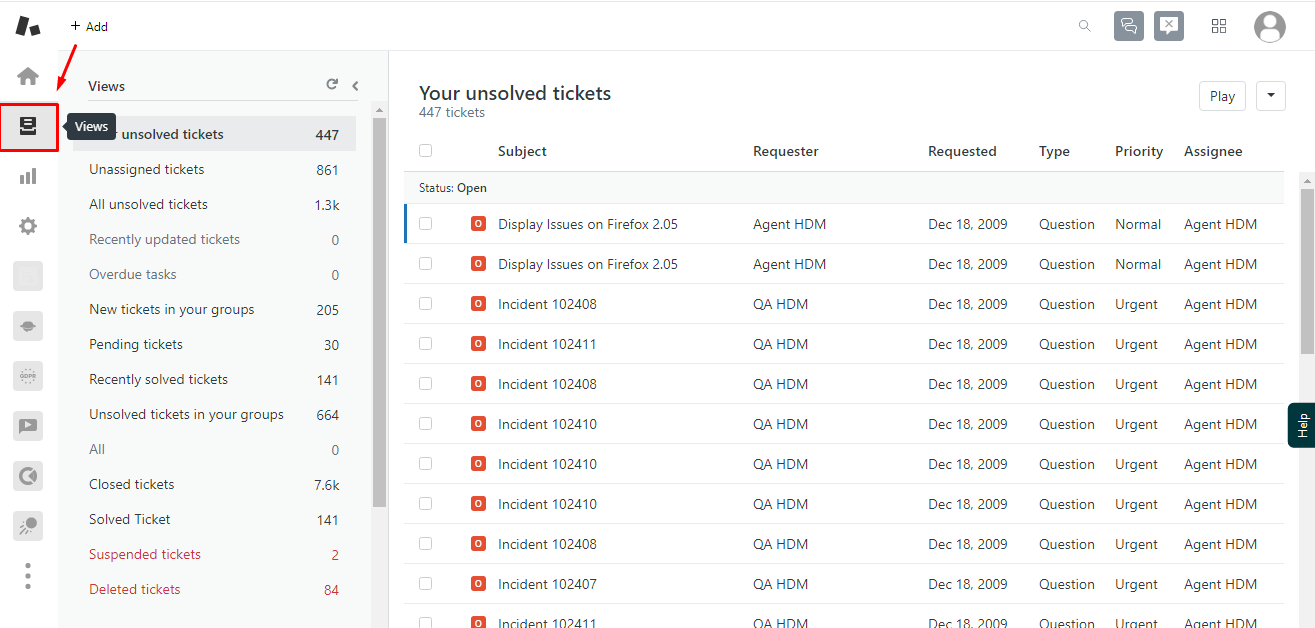
1. Go to Admin > Manage > Views > Open to access tickets by category.
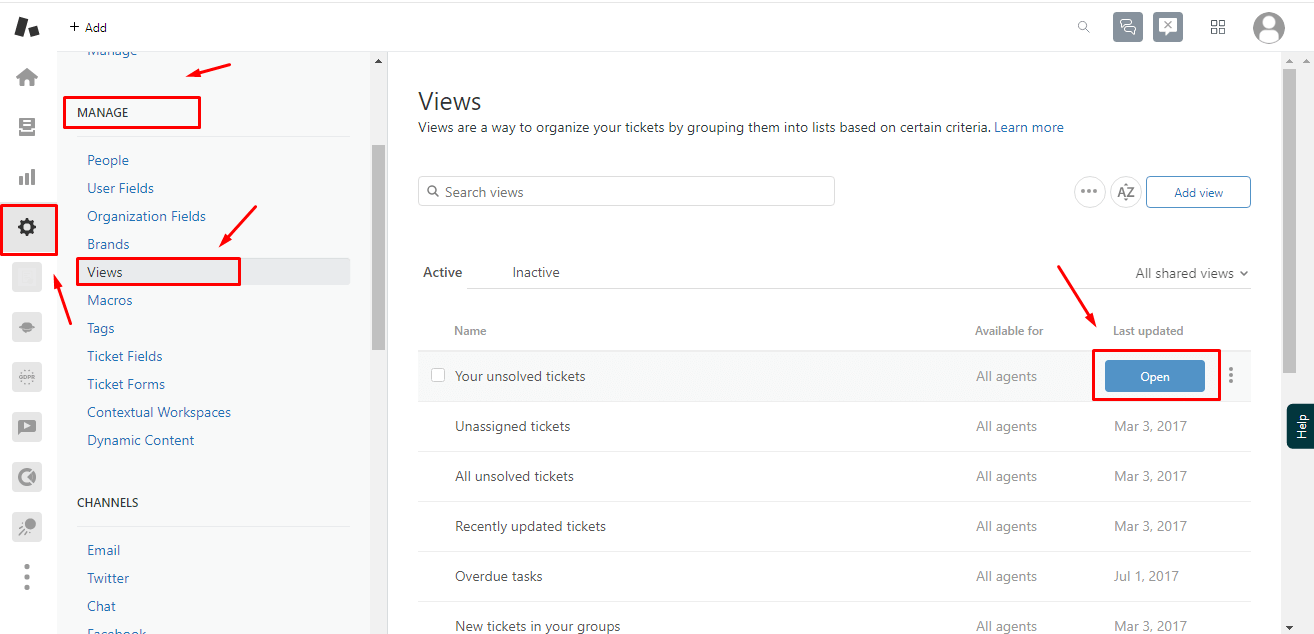
2. Type * in the Zendesk search bar to view all tickets.
3. Check ticket counts, field values, attachments, and agent assignments.
4. Make sure data is readable, complete, and in the right place.
How do I complete the setup in Zendesk?
Finalize your configuration to start working smoothly:
- Connect your email provider to Zendesk.
- Enable necessary notifications.
- Review and adjust automations, triggers, and ticket forms.
- Update internal links in your Knowledge Base.
- Set up email forwarding so new requests land in Zendesk.
What’s next?
Run test tickets to confirm everything functions correctly.
Have questions or want our team to double-check your setup? Contact us — we're ready to assist.

