If you ever wondered how to export tickets from Zendesk, then you aren’t the only one. There’s no denying, Zendesk is a great platform that has some of the best ticketing features in the industry. The data export option is also there for you to take advantage of it. But there’s a twist!
In this article, we’re going to break down all the ways you can get your data out of Zendesk. Let’s dive in!
So, what are your options?
Generally speaking, you get to choose from three options. First, you export ticket data directly from Zendesk Support. However, this option is only available to those who opted to use the higher-tier plans. Second, you can use Zendesk's API and run data export yourself. Third, opt for a pre-baked solution such as Help Desk Migration Service. Let’s take a look at each option in detail to see what pros and cons each solution has and what you can do to address the drawbacks.
Getting a Professional or Enterprise Plan
Ok, so in case you have the Professional plan, you first need to enable data export as by default, it is not activated. To do so, as an admin, head over to the customer support section and send a request using the method you like the most, to enable the feature.
How to Enable
As we already mentioned, just call Zendesk Customer Support to activate the option. Also, reaffirm that you included your Zendesk Support subdomain name.
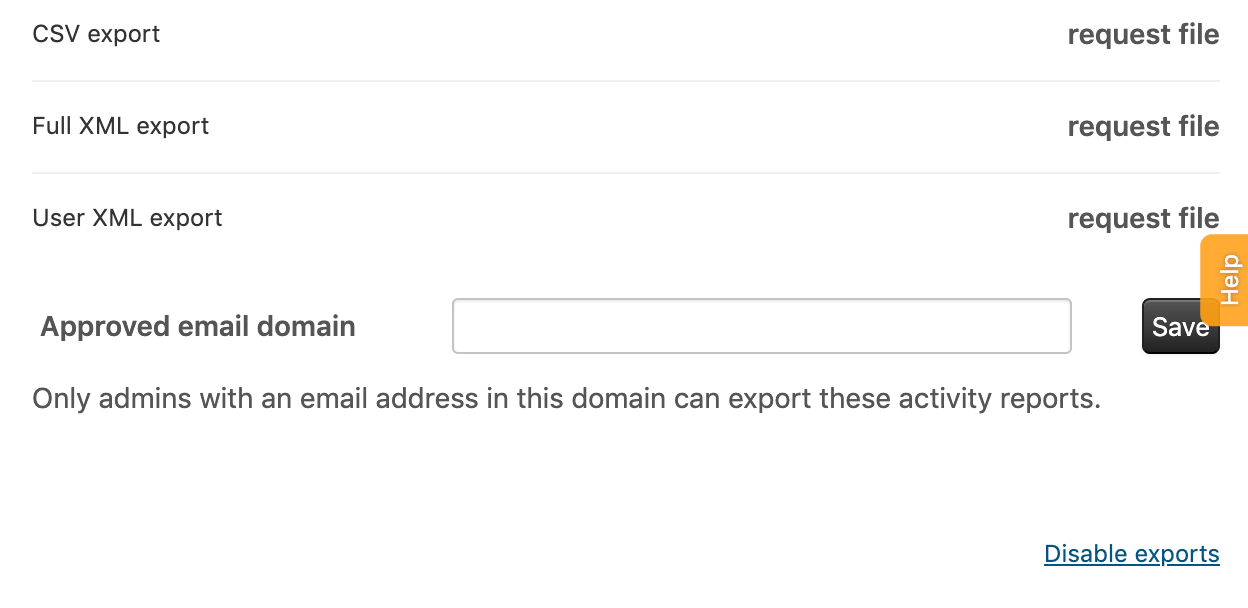
In case you need to edit your email domain to export data, here’s what to do:
1. Left-click on the Cog icon which is located on the sidebar, and pick the Manage > Reports option. If you wish to change the export options, just hit the Export tab but be aware that certain versions of Zendesk show export options in a separate tab.
2. Reinstate the domain in the Approved email domain option. If left unchecked, the option will no longer be exclusive to admins in that specific domain.

Source: Zendesk
3. Hit Save.
To disable exports for data
1. Click on the Cog icon which can be found on the sidebar.
2. Once open, pick the Manage > Reports option.
3. Select the Disable exports option.
Source: Zendesk
4. Click Ok to confirm.
After you are done enabling the export option, you can pick from three export formats, including conventional ones such as a CSV file, JSON one, and a full XML export. In most cases, the type of format doesn’t matter but as a rule of thumb, we suggest you export all three of them in case you want to import them in the future. But do keep in mind that you can only perform one export at a time.
Once you have done picking what fields you want to move, it’s time you hit the export button. This will prompt a process that will “cook” the file, and once it is done, you will get notified via email. At the end of the “cooking” process, you will get a link to the file (it’s available only three days). The file is practically the same so no worries here.
Pros
- You don’t have to write a script
- You don’t need to do the file cooking process
- Multiple file extensions to choose from
Cons
- The option is locked behind a specific tier
- The data export process can take a while to complete

Ready to switch to Zendesk?
Type in URL of your Zendesk and set up free trial migration.
Don’t have Zendesk account? Take it for a spin for free with 14 days trial .
Writing Your Own Script
If you are on Essential or Team pricing tiers, there’s still a way to export data from Zendesk. But it requires time and maybe some money. They have a well-documented API they want you to take advantage of. You can use the API to export the data you need to the file or other system. However, this option is certainly not the ‘go-to’ for people who have little to no experience in data export or coding in general. Even numerous pros have a hard time shining through the significant drawbacks.
Pros
- You don’t need to upgrade to export your data
- You’re in control of the whole data export process
- You can pack your data in any format you like
- Gain access to integrations
- Transfer data where needed
Cons
- Depending on the goals, you kill a lot of time and money for what is a one-time-use script
- The development process ain’t easy and will be costly, you either need an in-house developer or hire a specialist
- Lower plans have lower API rate limits, therefore, if you have a ton of export data, you’ll be forced to wait due to plan rate limits.
Opting For a Ready-Made Solution
Alright, now that you know how to move your stuff the traditional way, it’s time we answer the “how to export tickets from Zendesk the easy way” question.
First, we’d like to stress that our service is completely automated and doesn’t necessitate any hires. Furthermore, it will work any tier without a hitch. The best thing about our service is that it’s very flexible, allowing you to choose where to, how, and what to migrate.
Export into a file
If needed, you can export your Zendesk data (both Tickets and Knowledge Base records) over to the CSV file. The option isn’t free, but it’s not expensive either. What makes it different from the Zendesk option, is that the process of migration is pretty quick, meaning it won’t affect your normal workflow.
Export into a help desk
You can move your Zendesk data directly to virtually any help desk of your choice. It is pretty convenient especially considering that you don’t need any data migration expertise whatsoever. Everything is highly automated to ensure the best possible experience for our customers. We take the migration into our hands allowing you to focus on more important issues.
And we don't stop there. Our service allows you to cut the time needed for migration in half. This is probably one of many reasons we're proud to be called an authorized Zendesk partner. That alone shows that one can trust our service to handle their data, but if you still aren't convinced, here's a short guide on how to set up the migration with our service. The simplicity of the process will leave no one indifferent.
For complex Zendesk exports, automation alone isn’t enough. Help Desk Professional Services guides teams through every step, from exporting tickets, custom fields, macros, and triggers to fully configuring your new help desk.
We run test migrations, validate every record, and set up workflows, automation, SLAs, and permissions so your new help desk platform is ready for day-one use. Historical tickets and knowledge base articles remain complete, structured, and accurate, giving your team a seamless transition and immediate productivity—no data loss, no downtime.
How it Works
No matter the option you choose (migration into a file or directly into a help desk), the transfer process will have the following steps:
1. To initiate Zendesk data export, start by signing up on our website via email or link to one of the social media accounts.
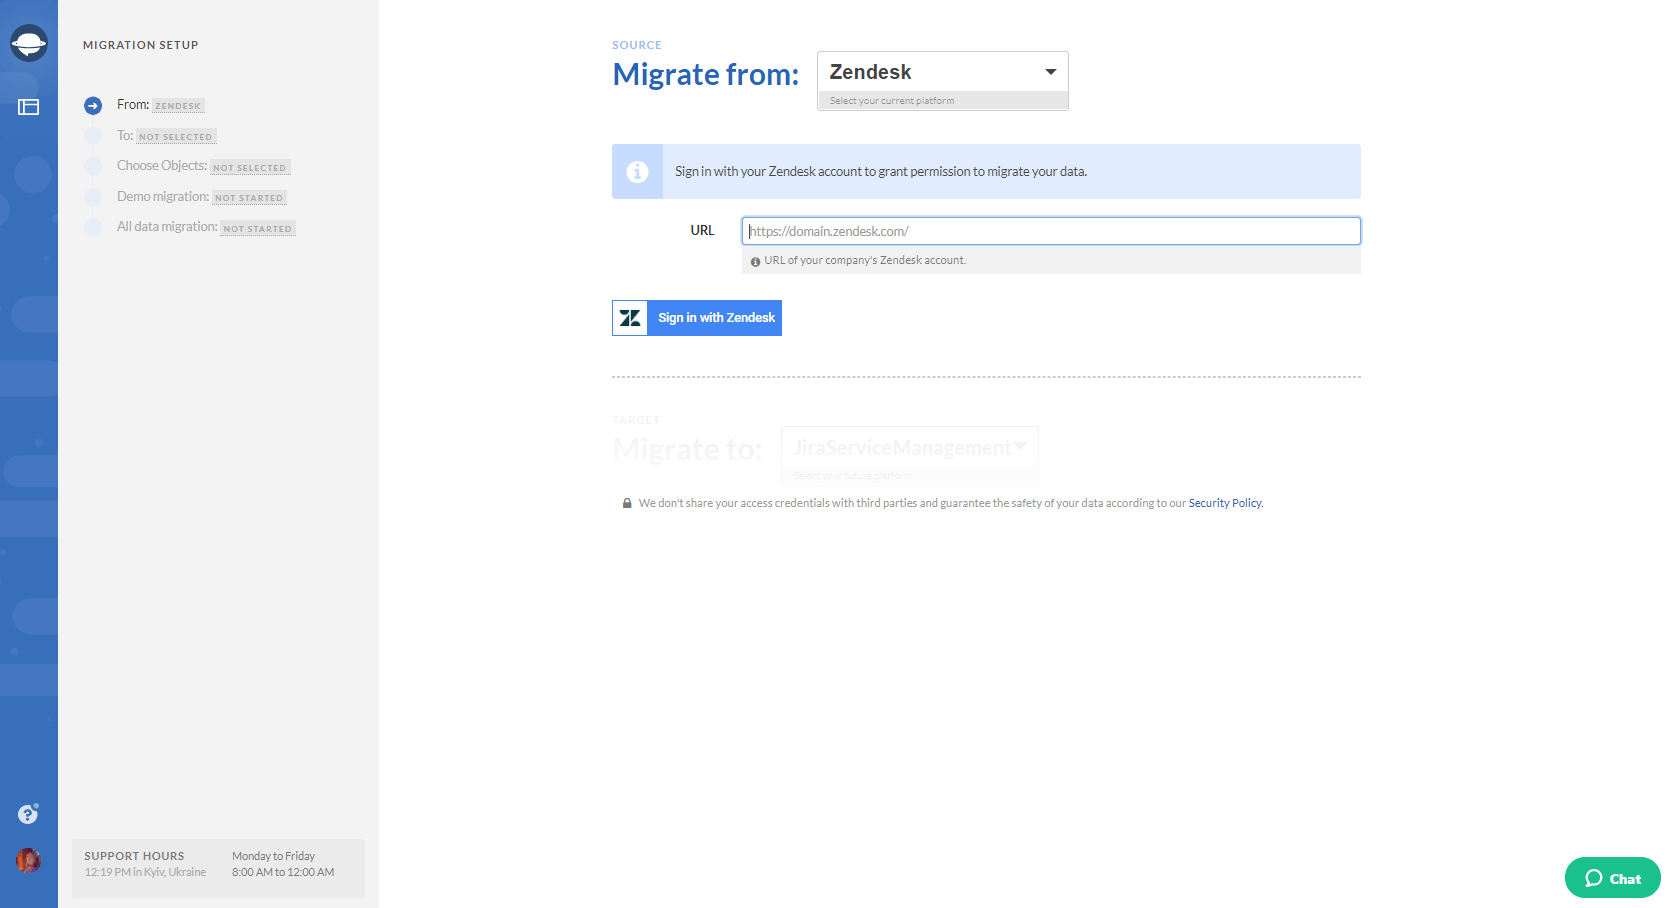
2. From the list of supported software, select Zendesk as your source platform. Put in the URL and sign up to your account like you normally would. Allow Migration Wizard to access your data and the first step is done.
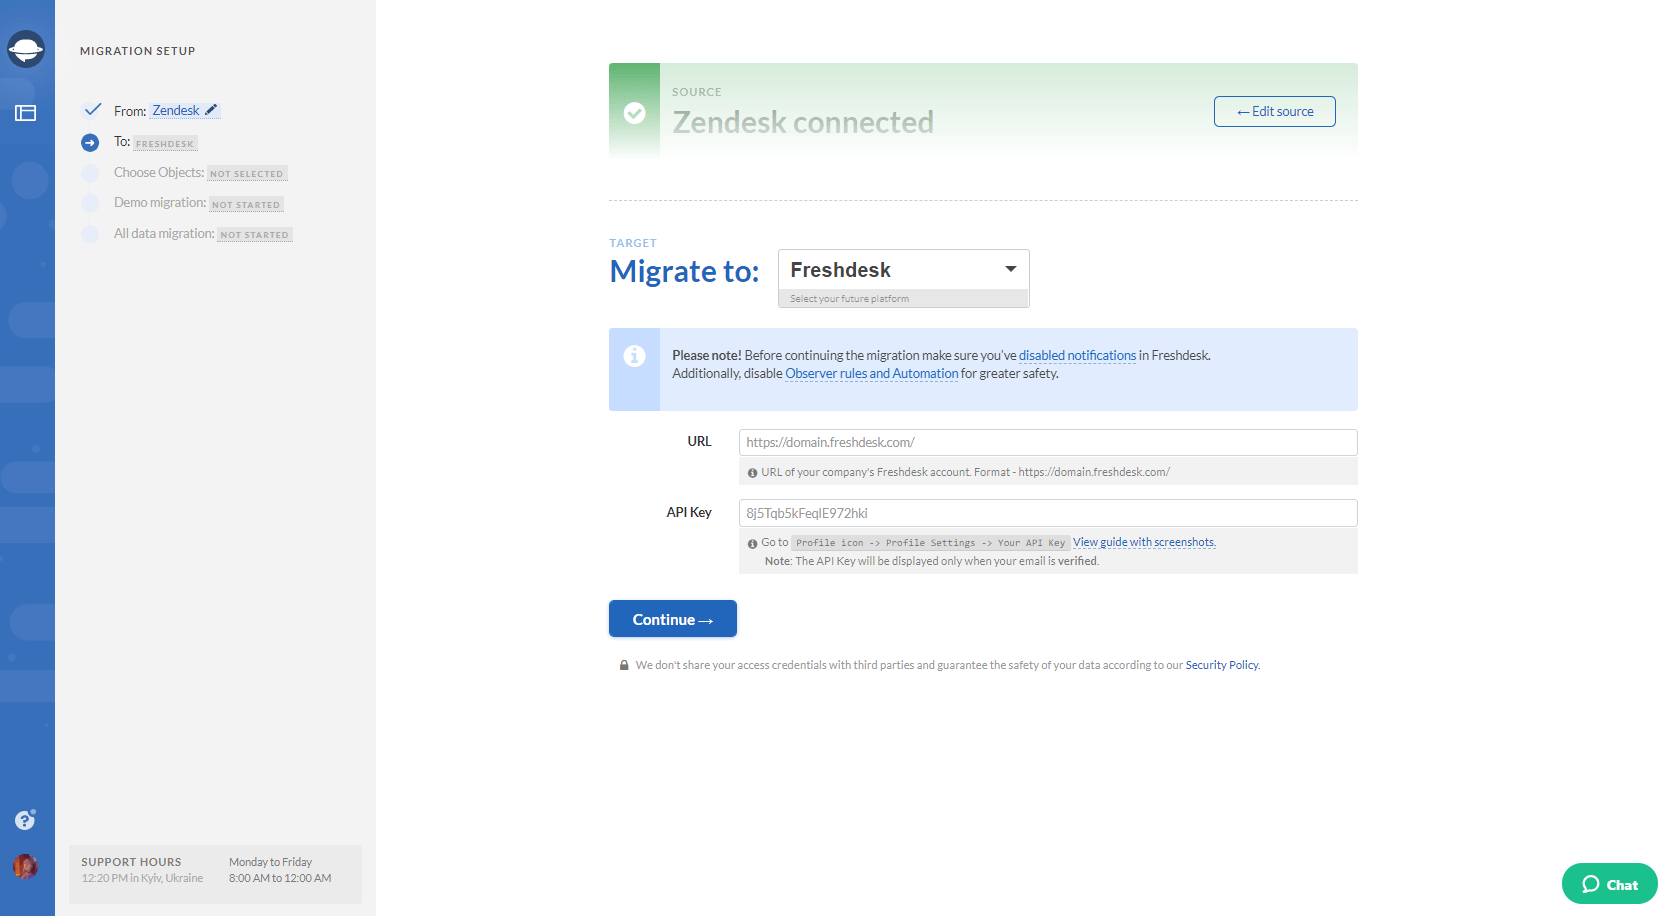
3. Repeat the same process when selecting the target platform of your choice. Provide the necessary credentials to establish the bridge between the platforms and our tool.
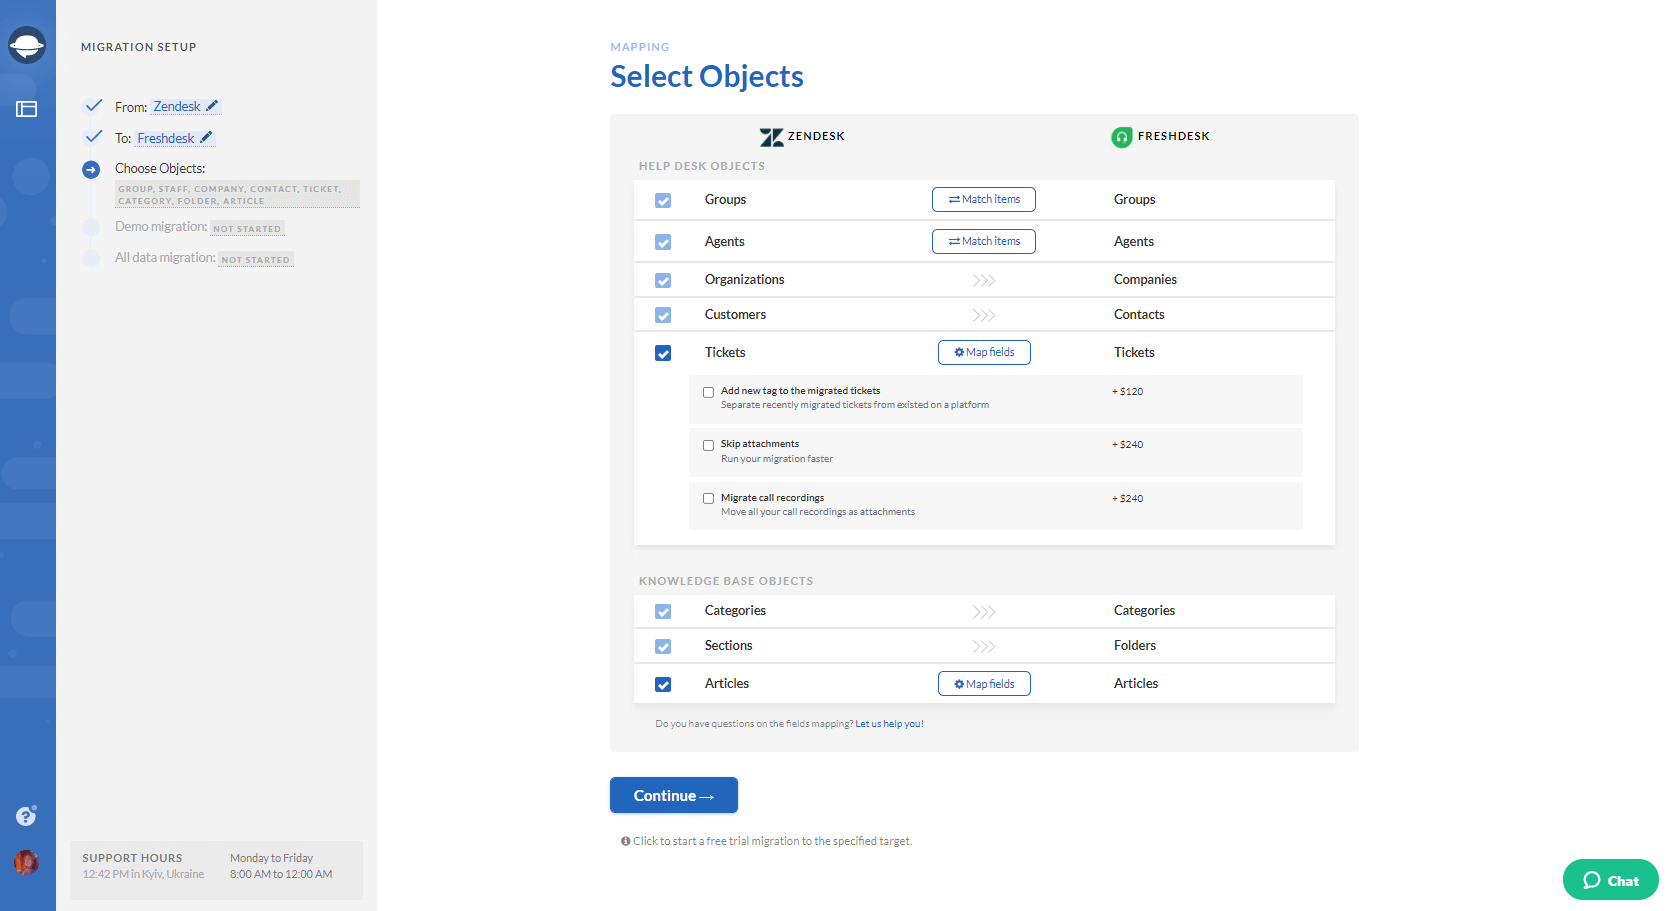
4. As soon as both platforms are successfully connected, you will be redirected to a new landing where you'll have to select the entities that you want to migrate. Please pay attention to this page, as it shows the modification names of certain records will undergo.
If you're considering consolidating your Zendesk help desk instances, Help Desk Migration offers a seamless solution for migrating your macros and triggers. With their Business Rules Migration feature, you can import your macros and triggers effortlessly, ensuring a smooth transition and minimal disruption to your support operations. Say goodbye to manual data transfers and hello to a hassle-free migration experience with Help Desk Migration.
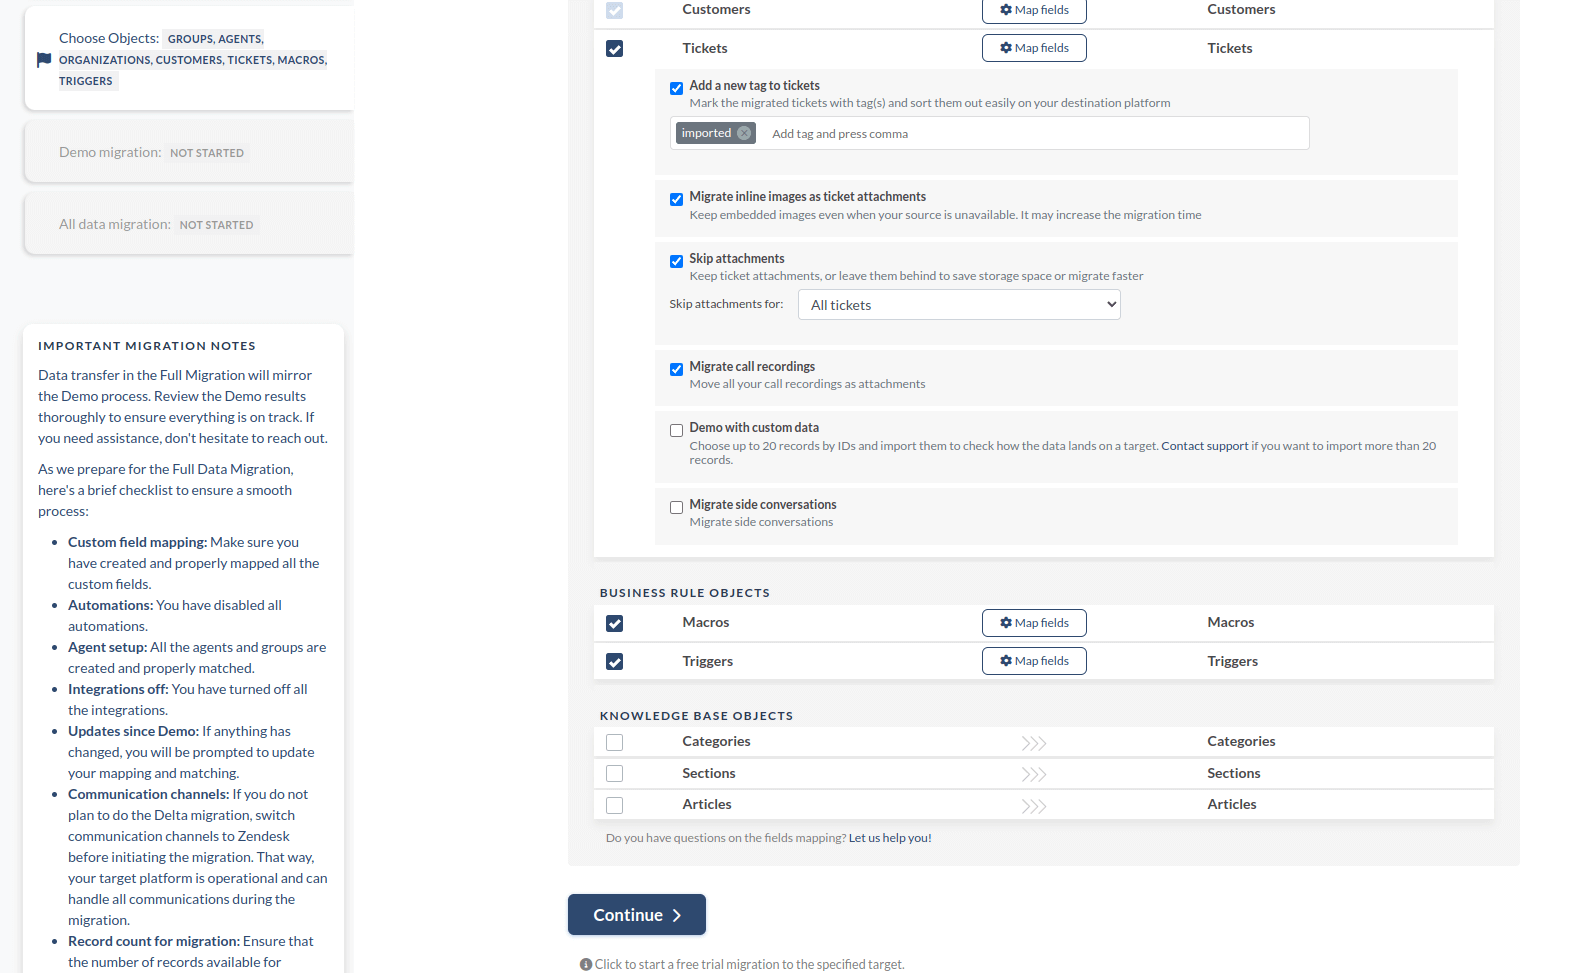
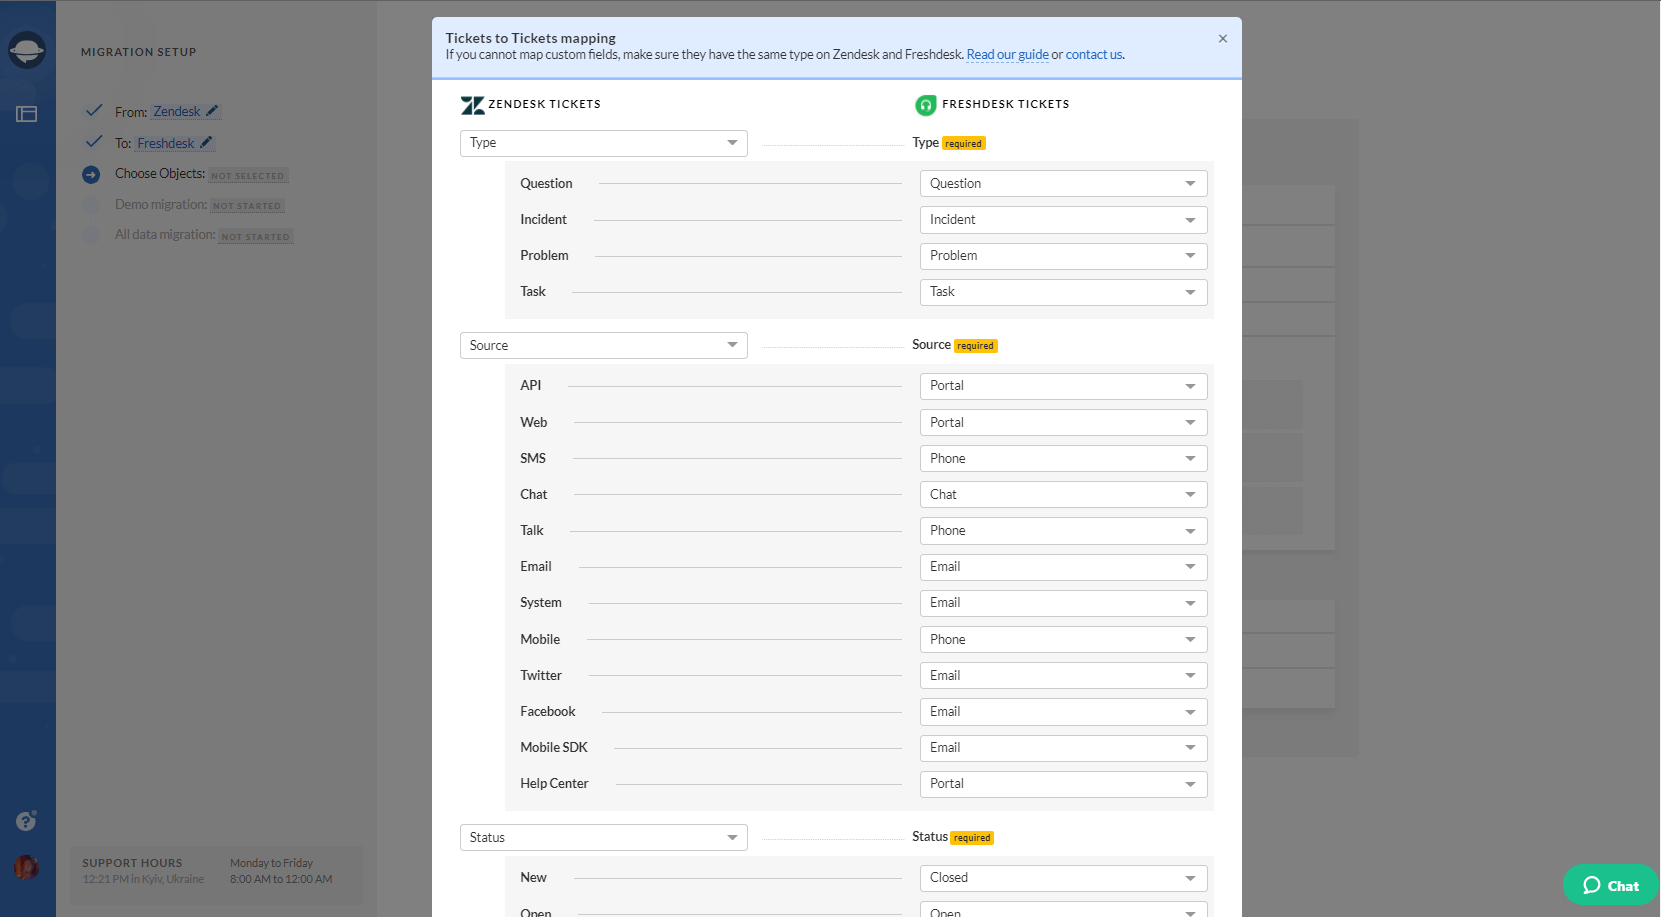
5. Here you will also see buttons like "Map fields" for ticket and knowledge base articles. Depending on the platforms, some buttons might be missing. Go through each type of record you can map to make sure they migrate properly during the test.
6. If everything looks fine, run the trial migration. During the demo, we take a small portion of the data from your Zendesk account and transfer it to your target help desk. Thanks to this sneak peek, you will be able to check the outcome as well as the performance of our tool. The demo process will last no more than 5 minutes and is completely free to try. If something doesn’t line up, go back to mapping, do the necessary adjustments, and repeat the demo.
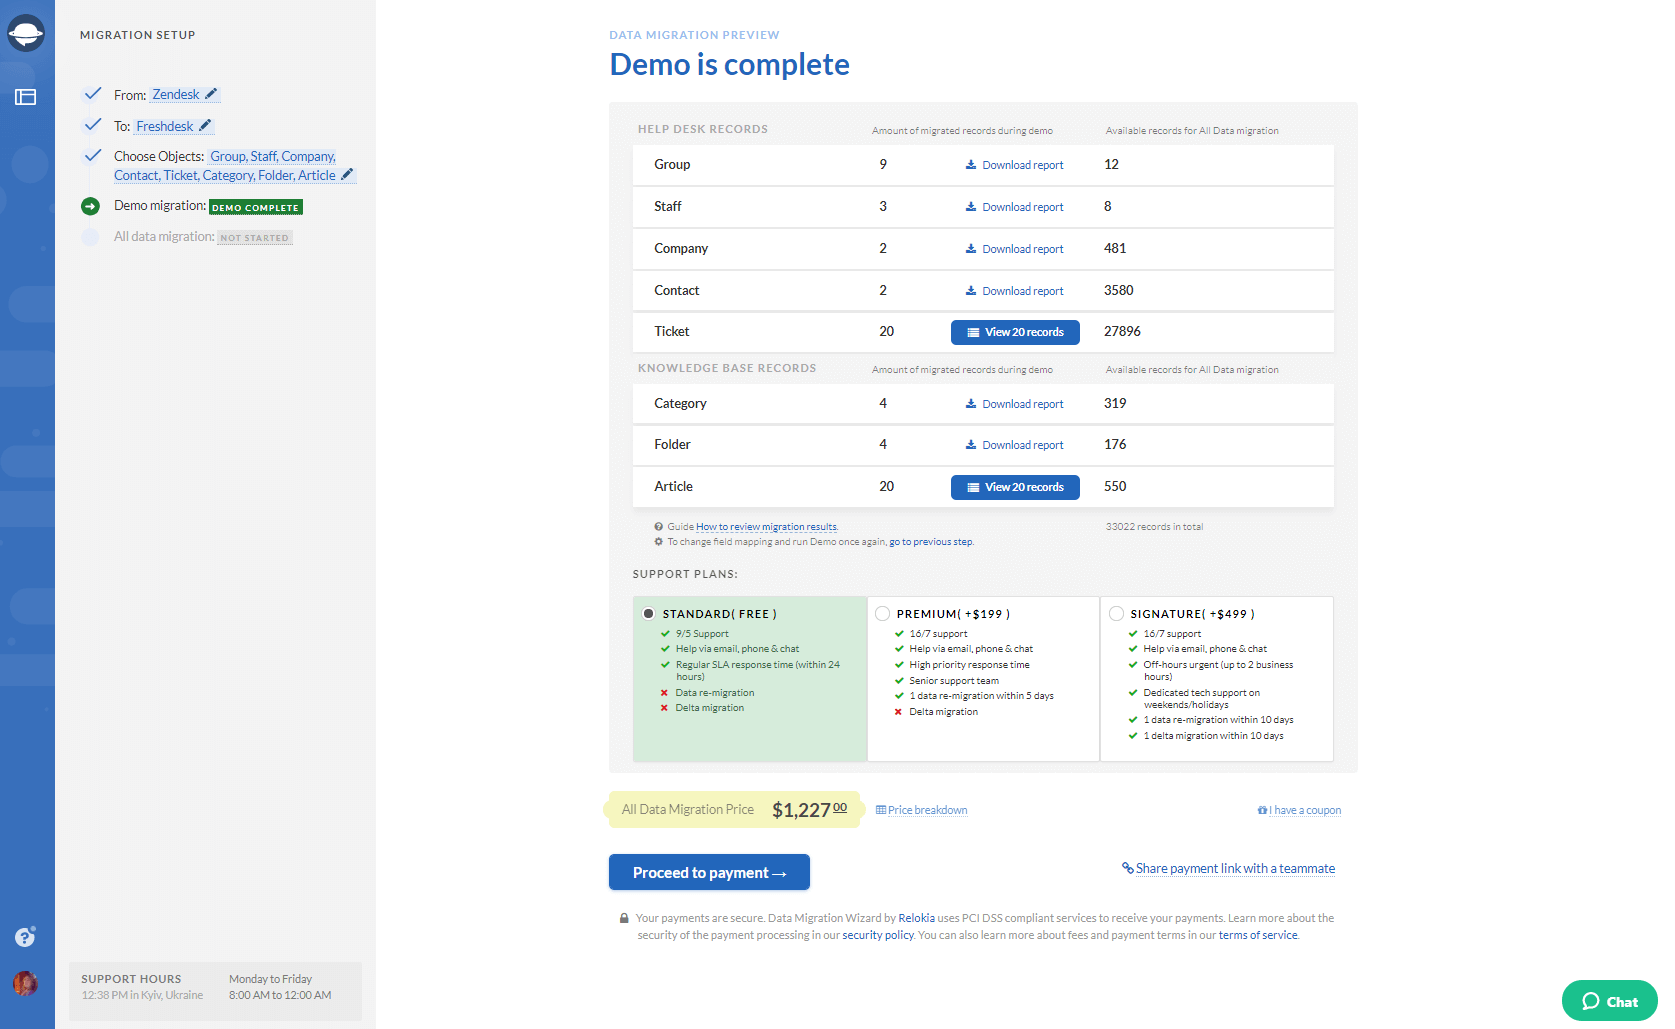
7. If you’re completely satisfied with the way the demo went, initiate Full Data Migration.
You can learn more about the whole process in detail by looking at the “How it works” section.
Conclusion
So that about wraps things up for our Zendesk export guide. Ultimately, your choice will depend on what you are trying to achieve. Our mission was to cover all the possible methods you can take advantage of and not just reinstate what Zendesk offers. If you have any questions regarding any of the methods, be sure to let us know.
Frequently Asked Questions
Yes, you can export data from Zendesk to a JSON, CSV, or XML file manually. Still, you can migrate records if you have admin rights on your account with access to native export options.
You can export a Zendesk user with the Zendesk Rest API, in XML or JSON formats. Plus, your accounts can export their customer lists in a CSV file. To do so, press on the Admin icon and choose Manage, then Reports. There click on the Export tab to see all options.
There isn't a pre-built Zendesk tool to export articles for Help Center content. Zendesk team recommends leveraging the Help Center API to export the articles. On the contrary, you can use a third-party tool such as Help Desk Migration to migrate the Help Center posts.
You got export all users from Zendesk in a few ways:
- Use the Zendesk Rest API Users endpoint to collect the list of users from your account.
- If you have an account with the customer lists, you can export your users in a CSV file.
- Export users in JSON or XML format.
- Use a third-party app like Help Desk Migration.
You can do a full XML export if you run admin rights on your account. Plus, you can schedule a dashboard export into Excel format if you have a table of tickets.
You can export a macro into a JSON file; however, one JSON file can contain up to 100 macros. Then, when you download the file on your computer, you can convert it into a CSV file.
You need to make requests to the Zendesk API, which would be fine if you want to get two dozen or so to help desk objects from Zendesk. However, if you seek to retrieve several hundred or several thousand records, you need to write a script with the following steps:
- Make the basic request
- Paginate through all the results
- Guard against the rate limit
- Sideload related data, if applicable
- Serialize the data, if you need to reuse it
Zendesk doesn’t offer a pre-built option to export the Help Center articles. So, you got two options: use the Help Center API to export articles or a third-party app available in the Zendesk marketplace.
The platform includes the pre-built options to export data from Zendesk to a JSON, XML, or CSV file. Yet, you cannot run multiple exports for the same type of data simultaneously. In addition, you should have an administrative role in exporting data. On the other hand, Zendesk supports third-party apps that can help you export all record types at once.


