Zendesk Implementation and Setup Guide
Zendesk is an AI-driven customer service platform that streamlines support operations for businesses of any size. Designed for easy setup, use, and scalability, it offers ready-to-use solutions that adapt quickly to changing needs. Zendesk helps teams resolve issues faster and more accurately, enhancing self-service, empowering agents, and improving oversight to drive efficient growth at scale.
This guide helps anyone setting up Zendesk, from new users to experienced teams. Whether you’re an admin, agent, or manager, you’ll find the essentials for a smooth and confident implementation.
1. Preparation for Implementation
What data should I prepare before starting?
Before setting up Zendesk, it’s important to gather and organize key information to ensure a smooth implementation:
- Team Structure: List all agents, admins, and support roles, including responsibilities.
- Support Channels: Identify which channels (email, chat, phone, social media) your team will use.
- Service Level Agreements (SLAs): Define response and resolution times for different ticket priorities.
- Workflows & Processes: Map out how tickets are routed, escalated, and resolved.
- Knowledge Base Content: Collect FAQs, articles, and resources to populate your self-service portal.
- Integrations & Tools: Note any third-party tools that need to connect with Zendesk.
Preparing this data upfront helps streamline the setup process and ensures your team can start supporting customers efficiently from day one.
2. Account Creation & Basic Settings
How do I sign up for Zendesk?
Follow these step-by-step instructions to create your Zendesk account:
1. Visit the Zendesk website and select the plan that fits your needs.
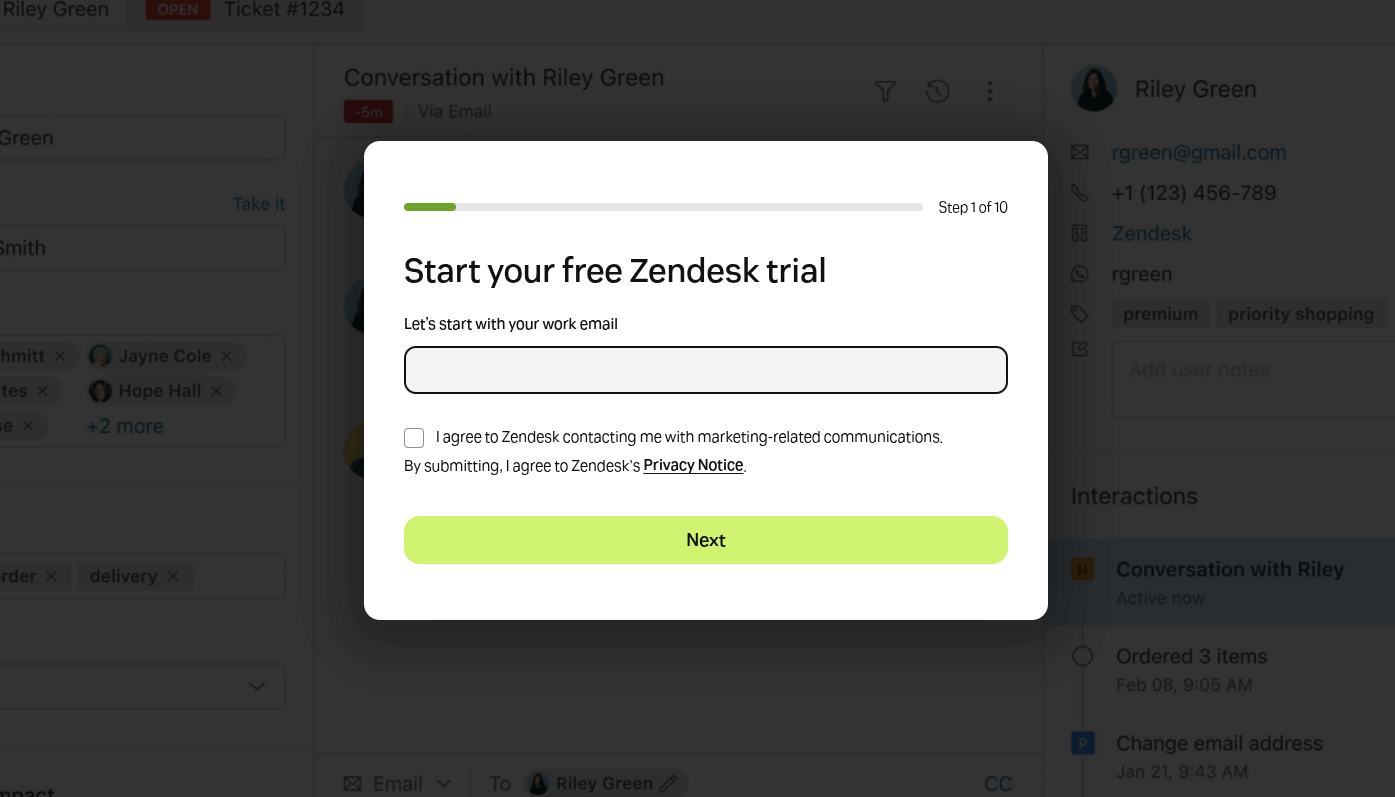
2. Click Sign Up and provide your email address and company information.
3. Verify your email and set a password to activate your account.
4. Log in to your new Zendesk account and access the admin dashboard.
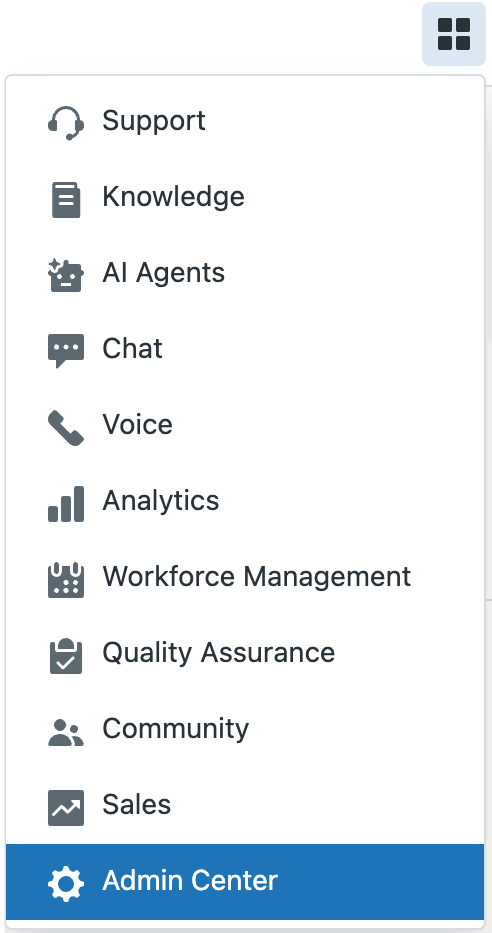
You can access the Admin Center either from the product tray or through links on Zendesk settings pages.
To open Admin Center:
1. Open any Zendesk product.
2. Click the Zendesk Products icon in the top bar.
3. Select Admin Center from the menu.
How do I configure timezone, language, and branding?
Customize your account settings to match your organization:
Setting Your Account’s Time and Format
1. In Admin Center, click the Account icon in the sidebar, then go to Appearance > Localization.
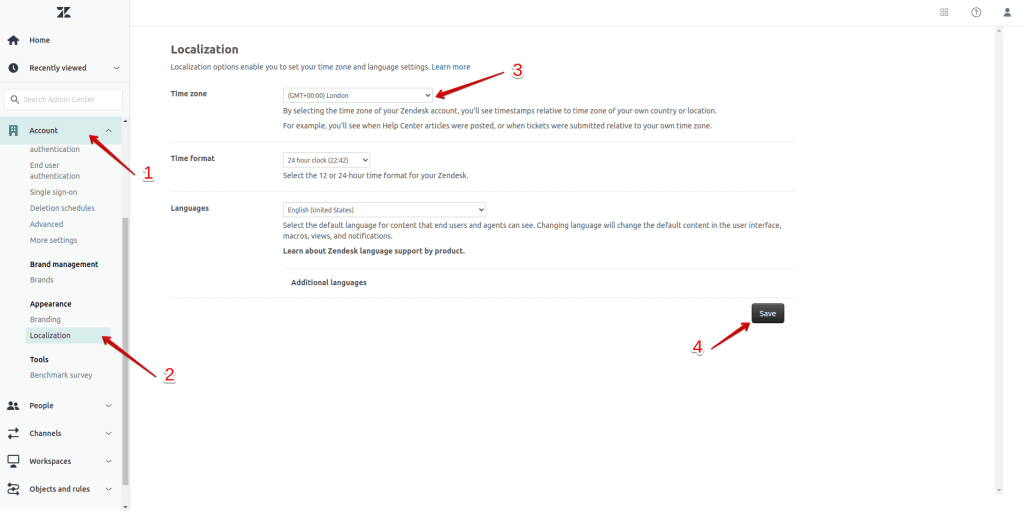
2. Choose the correct GMT Time zone for your account.
![]()
3. Select whether time should be displayed in 12-hour or 24-hour format.

- Locale-specific date and number formats are not currently supported.
- For Support Professional and Enterprise, agents and end users can set their own time zone in their individual user profiles.
Change language settings
When end users sign up, they automatically receive several email notifications. By default, these emails are in English, but you can easily translate them into other languages.
To edit the user welcome and verification emails:
1. In Admin Center, click People in the sidebar, then go to Configuration > End users.
2. User welcome email:
“Please follow the link below to choose a password, and we will log you in right away.”
3. Email verification email:
“We need to verify that you are the owner of this email address. Please follow the link below to verify.”
- If end users do not need to register or log in, they will not receive these emails. See Setting up to provide email-only support for more details.
- If you’re using dynamic content (for multi-language support), replace the text with placeholders that automatically insert the appropriate language when the emails are sent.
Adding Translated Text to Agent Signatures
- Configure agent signatures to appear in outgoing emails.
- Use placeholders to insert each agent’s signature and phone number automatically.
- Add extra text in the appropriate language to the account-wide signature for consistent multilingual messaging.

3. User & Role Setup
How do I add agents and administrators?
Before adding a team member, check the Seats remaining section on the Team members page to see if any seats are available. If no seats are left, you won’t be able to add a new agent or admin.
To add an agent or admin:
1. In Admin Center, click People in the sidebar, then select Team > Team members.
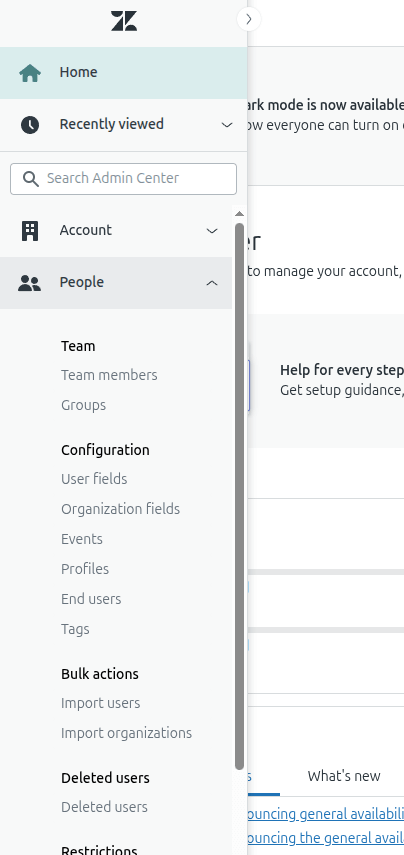
2. Click Create team member.
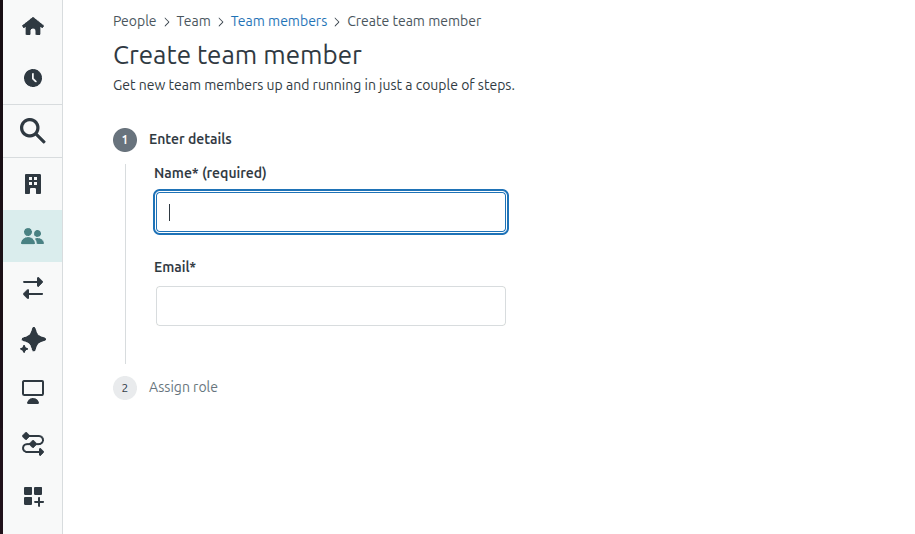
3. Enter the team member’s Name and Email, then click Next.
How do I assign roles and permissions?
1. In the Assign role section, select the user’s Support role from the dropdown, then click Next.
- Only the Support role is set at this stage; other roles can be added later.
- For AI agents – Advanced users, select Contributor so they don’t consume a Zendesk seat.
2. Click Save.
- If the Also send a welcome email option is selected, the new user will receive a welcome email with a sign-in link.
(Optional) Click the new team member at the top of the list to access their profile and assign additional roles as needed.
4. Support Channels
How do I connect email?
You can connect your support email so that tickets are automatically created from incoming messages.
You can set up support email addresses in two ways by navigating to: Product tray > Admin Center > Channels > Talk and Email > Email. Choose the option that fits your needs:
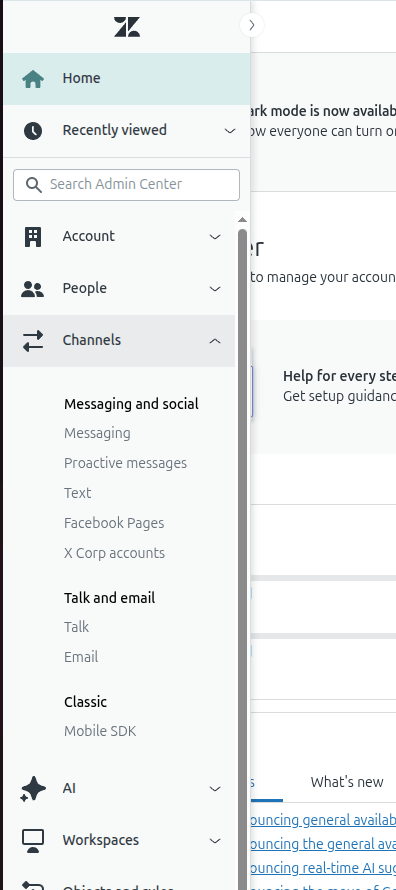
- Add a Zendesk.com support address – create a new email address hosted by Zendesk.
- Add your existing email address – connect an email you already use to Zendesk Support.
Verify Your Setup
If you connected an existing email address using your own domain, check your Email settings to confirm that the setup was successful. A confirmation message should appear indicating that your email is properly connected.

How do I enable chat or messaging channels?
With Zendesk, you can deliver real-time support through chat and messaging. You can enable these channels in the Admin Center.
Live chat (Web Widget Classic) and messaging (Web Widget) are separate features, each with its own settings. Live chat is a legacy option for chat and Help Center integration, while messaging supports social messaging, Help Center suggestions, bots, and AI.
To use more than one widget at the same time (for example, one on your website and another on a different site):
1. Enable the multibrand feature to create multiple brands.
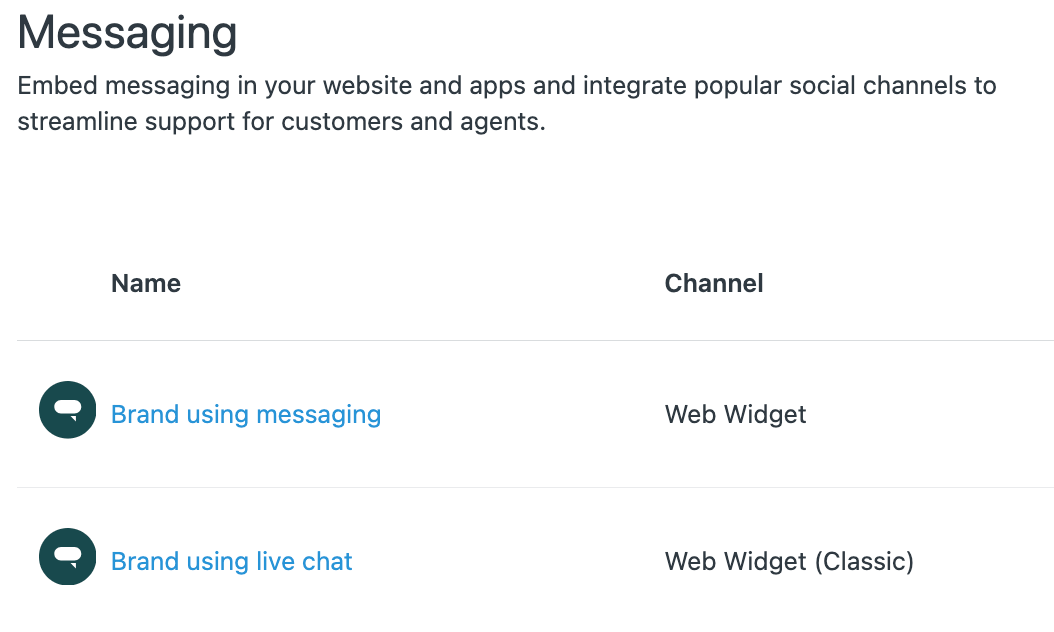
- If the option to create a brand is unavailable, check that your plan supports multiple brands.
2. Once multiple brands are set up, create widgets for each brand:
Go to Admin Center > Channels > Classic > Web Widget.
3. Before creating a new widget, ensure you don’t already have one for that brand.
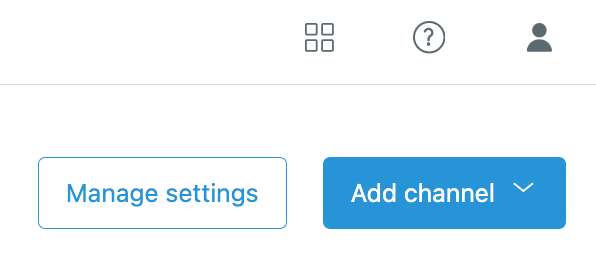
4. If your brand doesn’t yet have a Web Widget, click Add channel and follow the on-screen instructions to set it up.
How do I set up the Help Center?
You can enable your Help Center to start building your knowledge base. While in setup mode, end users won’t be able to see it, giving you time to customize the look and content before it goes live.
To enable Help Center in setup mode:
1. Click the Zendesk Products icon in the top bar, then select Knowledge.
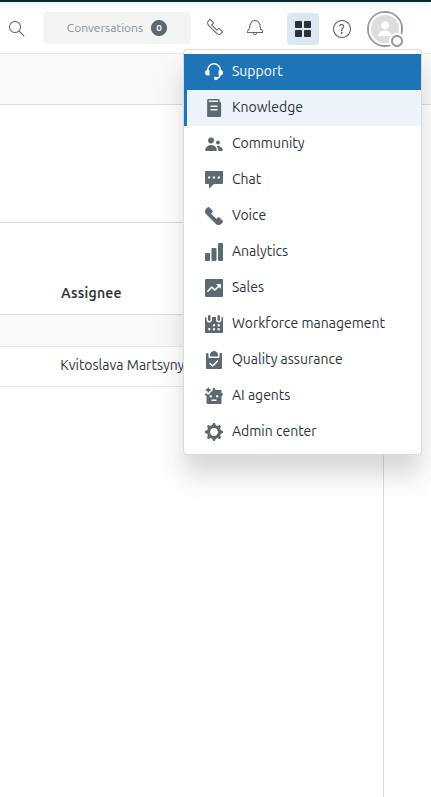
- Note: You must be the account owner to enable the Help Center.
2. On the page that appears, click Get started.
- If you don’t see this option and the Help Center opens instead, it has already been enabled.
Your Help Center starts with the default theme, which you can customize and populate with content while in setup mode.
5. Ticket Management
How do I create ticket fields and forms?
1. In Admin Center, click Objects and rules in the sidebar, then select Tickets > Forms.
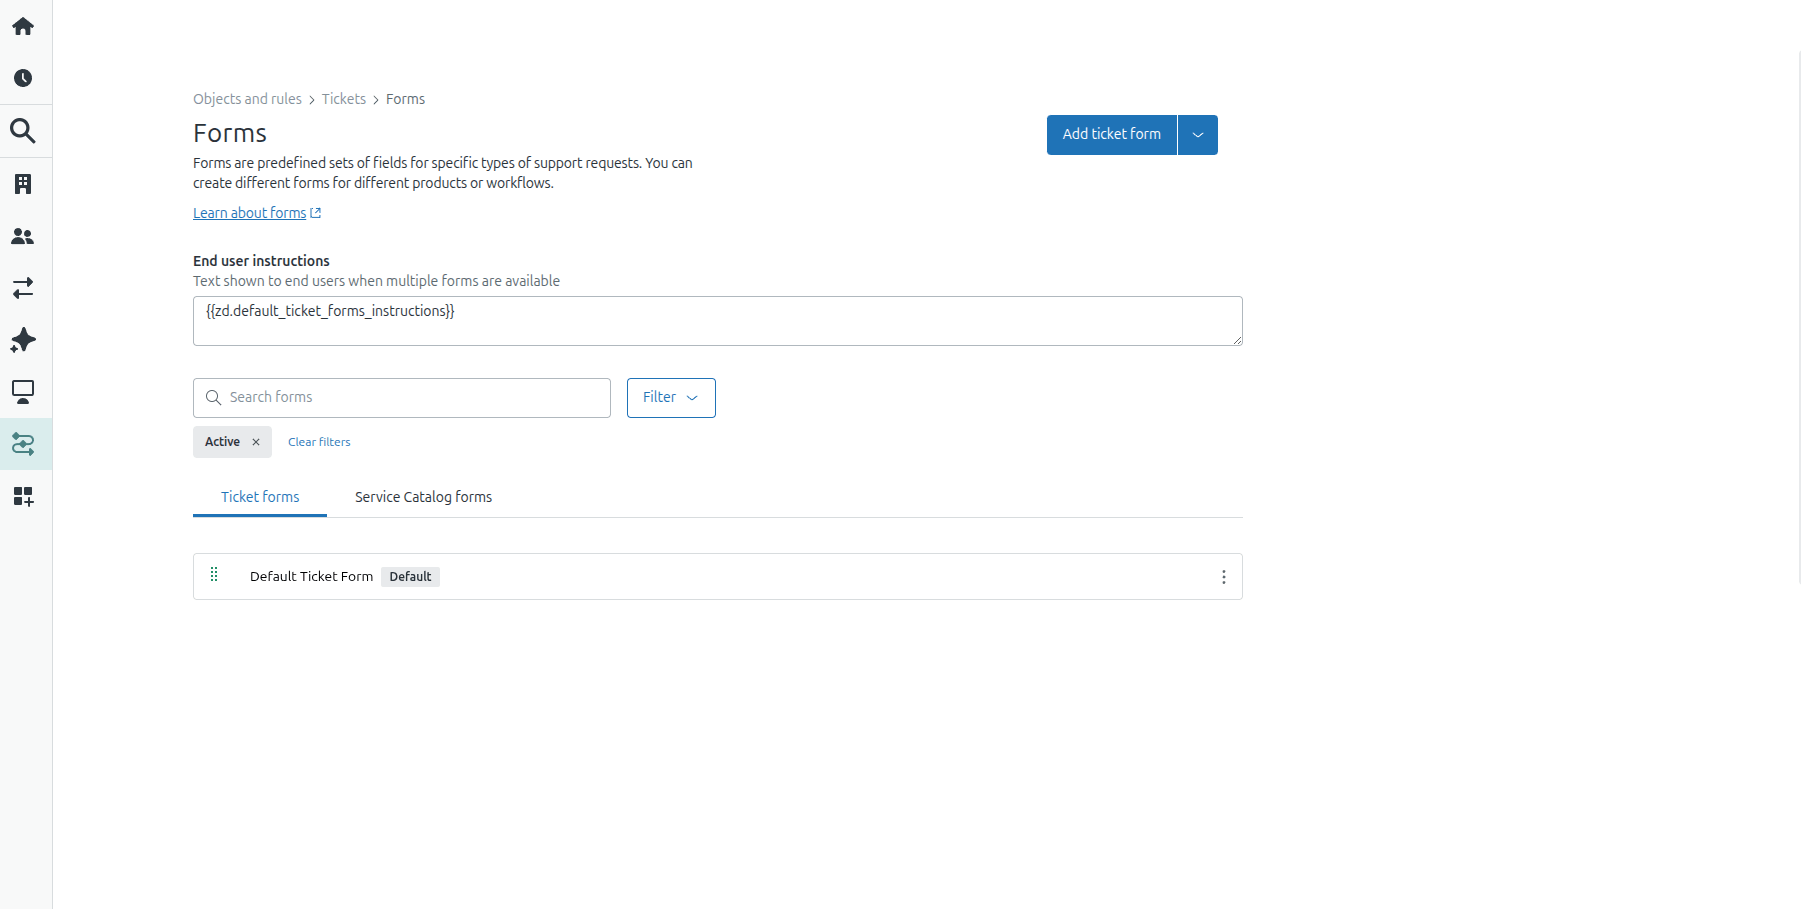
2. Click Add form, then select New form to edit the ticket form’s name.
- This is the name agents will see in the ticket form drop-down in the ticket interface.
3. To make the form visible to end users:
- Check Editable for end users.
- If you want a different name for end users, enter it in Title shown to end users.
- If you don’t enter an end-user title, the system uses the agent form name instead.

4. To restrict the form to specific brands:
- Deselect Apply to all brands, then select the brands that should use this form.
- For more details, see Branded ticket forms.
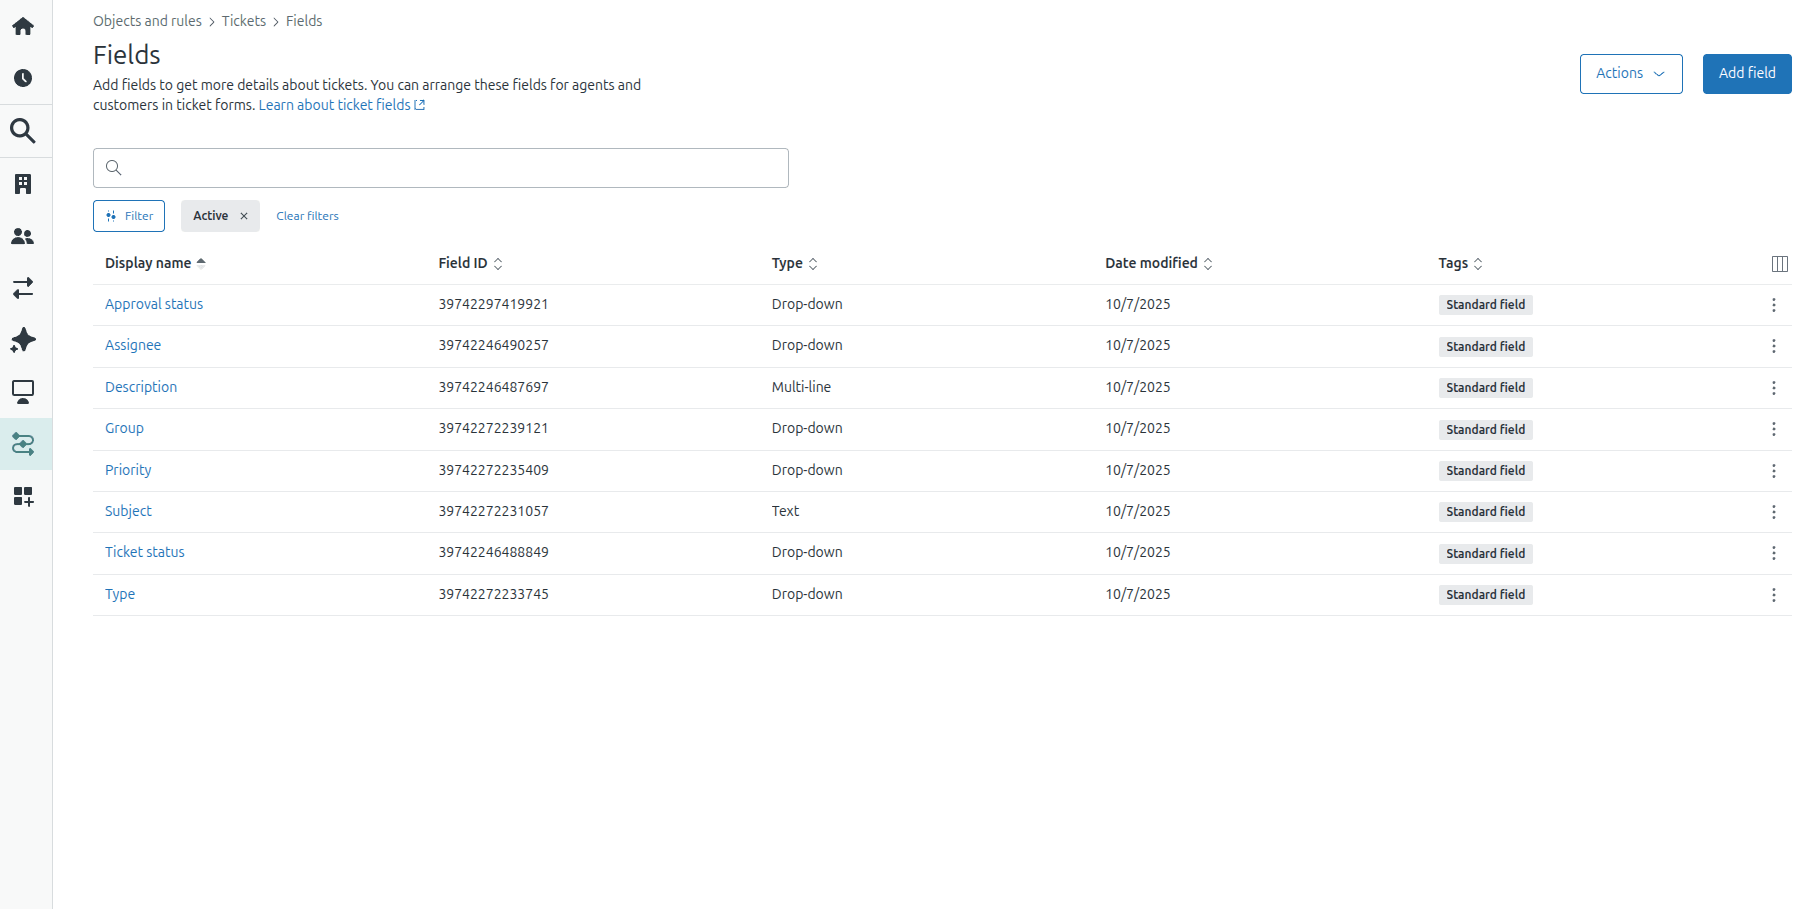
5. To add fields to the form:
- Drag a ticket field from the right-hand list and drop it onto the form on the left, or
- Click the Plus (+) icon to add a field.
- You can also search for a field and sort fields by name, date created, or date modified.
How do I set up queues, SLAs, triggers, and automations?
To apply a service-level agreement (SLA) to Zendesk tickets, you must first set the Priority field. You can automate this using triggers. The workflow includes three main steps:
- Create a trigger to set priority for all tickets
- Modify the trigger to set priority based on keywords or tags
- Verify that the trigger is working correctly
Step 1: Create a Trigger for All Tickets
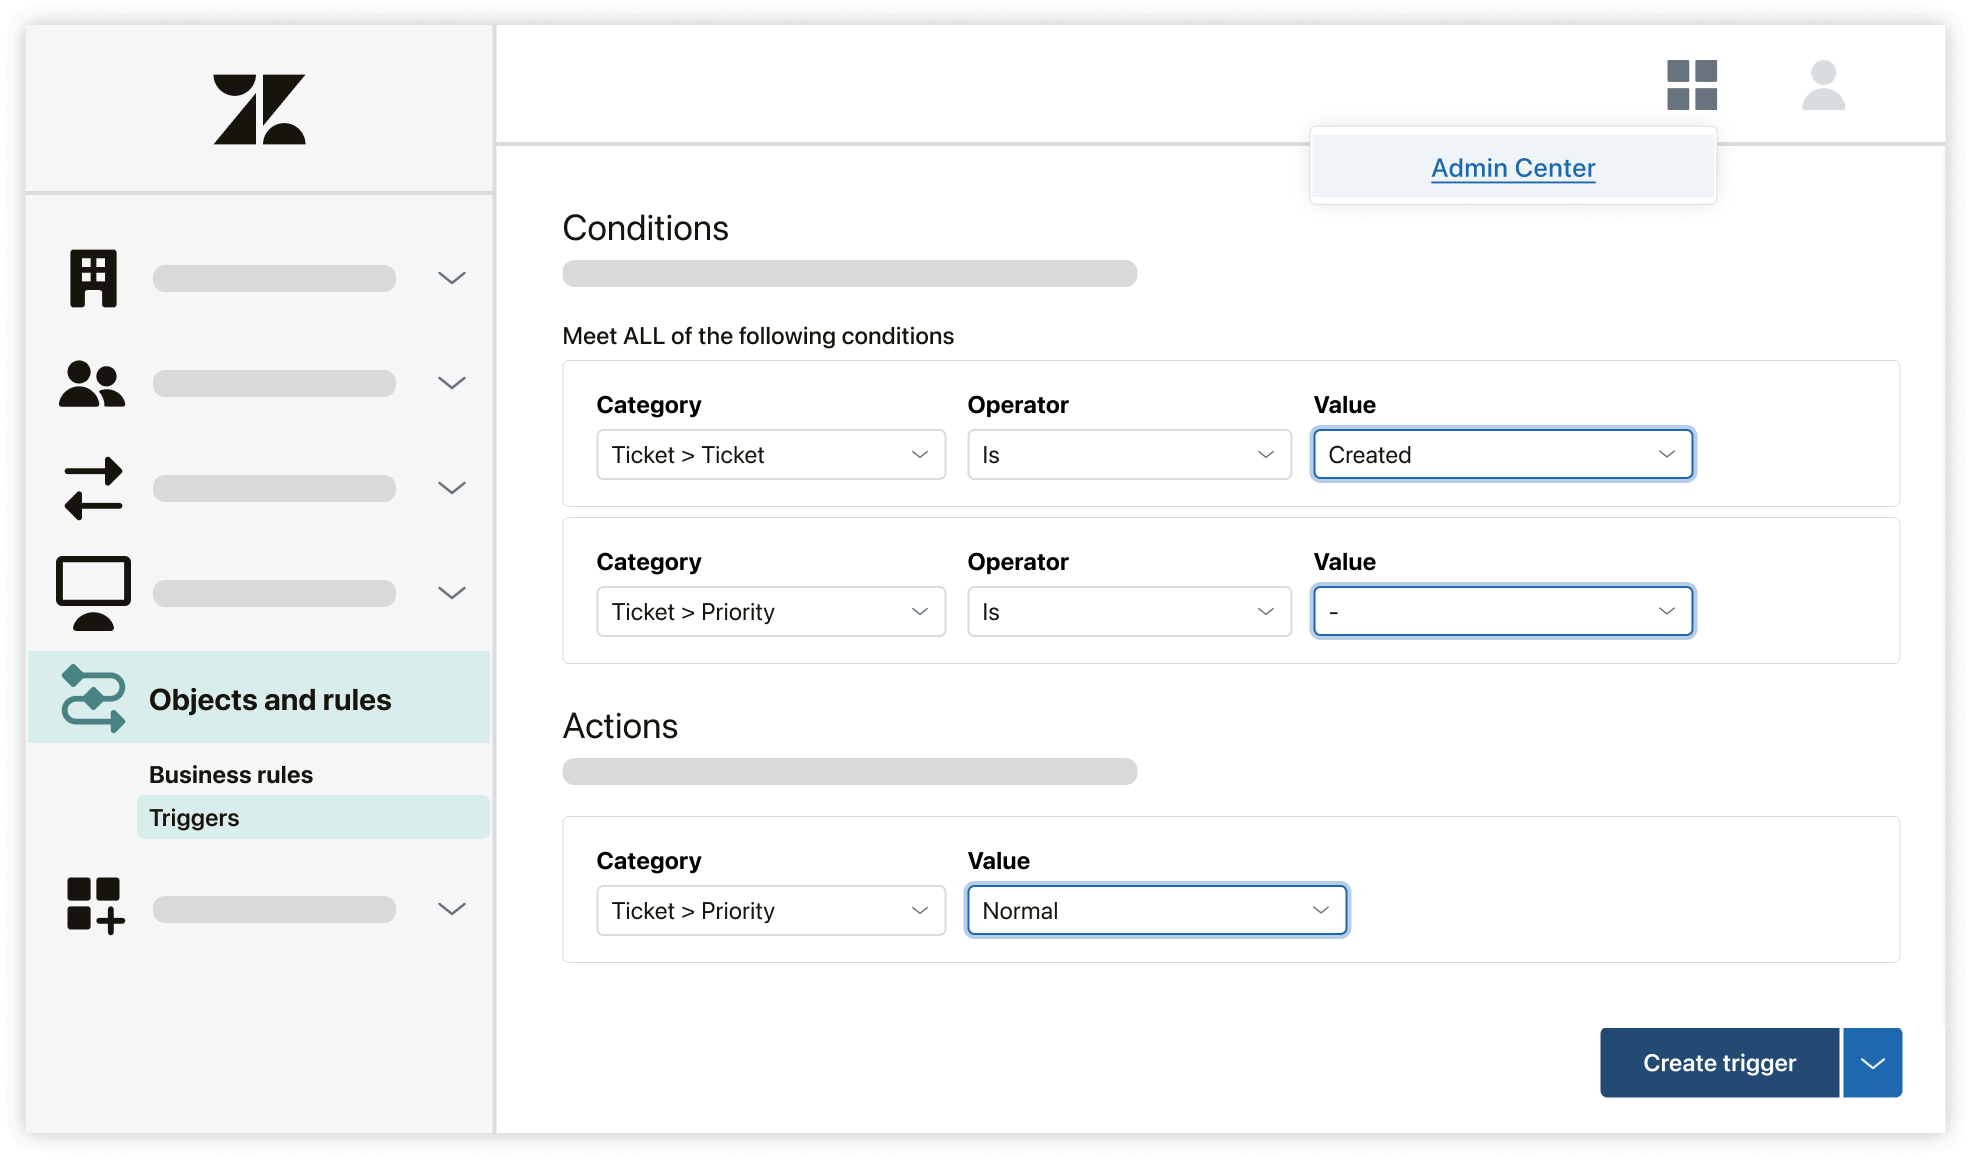
Triggers can automatically set ticket priority to ensure your SLAs are applied consistently.
To create a trigger that sets priority for all tickets:
1. Go to Admin Center > Objects and rules > Triggers > Add trigger.
2. Under Meet ALL of the following conditions, add:
- Ticket | Is | Created
- Priority | Is | -
3.Under Actions, add:
- Priority | Normal
4. Click Create trigger.
This trigger sets the same priority for all newly created tickets.
Step 2: Modify the Trigger to Set Priority Based on Keywords
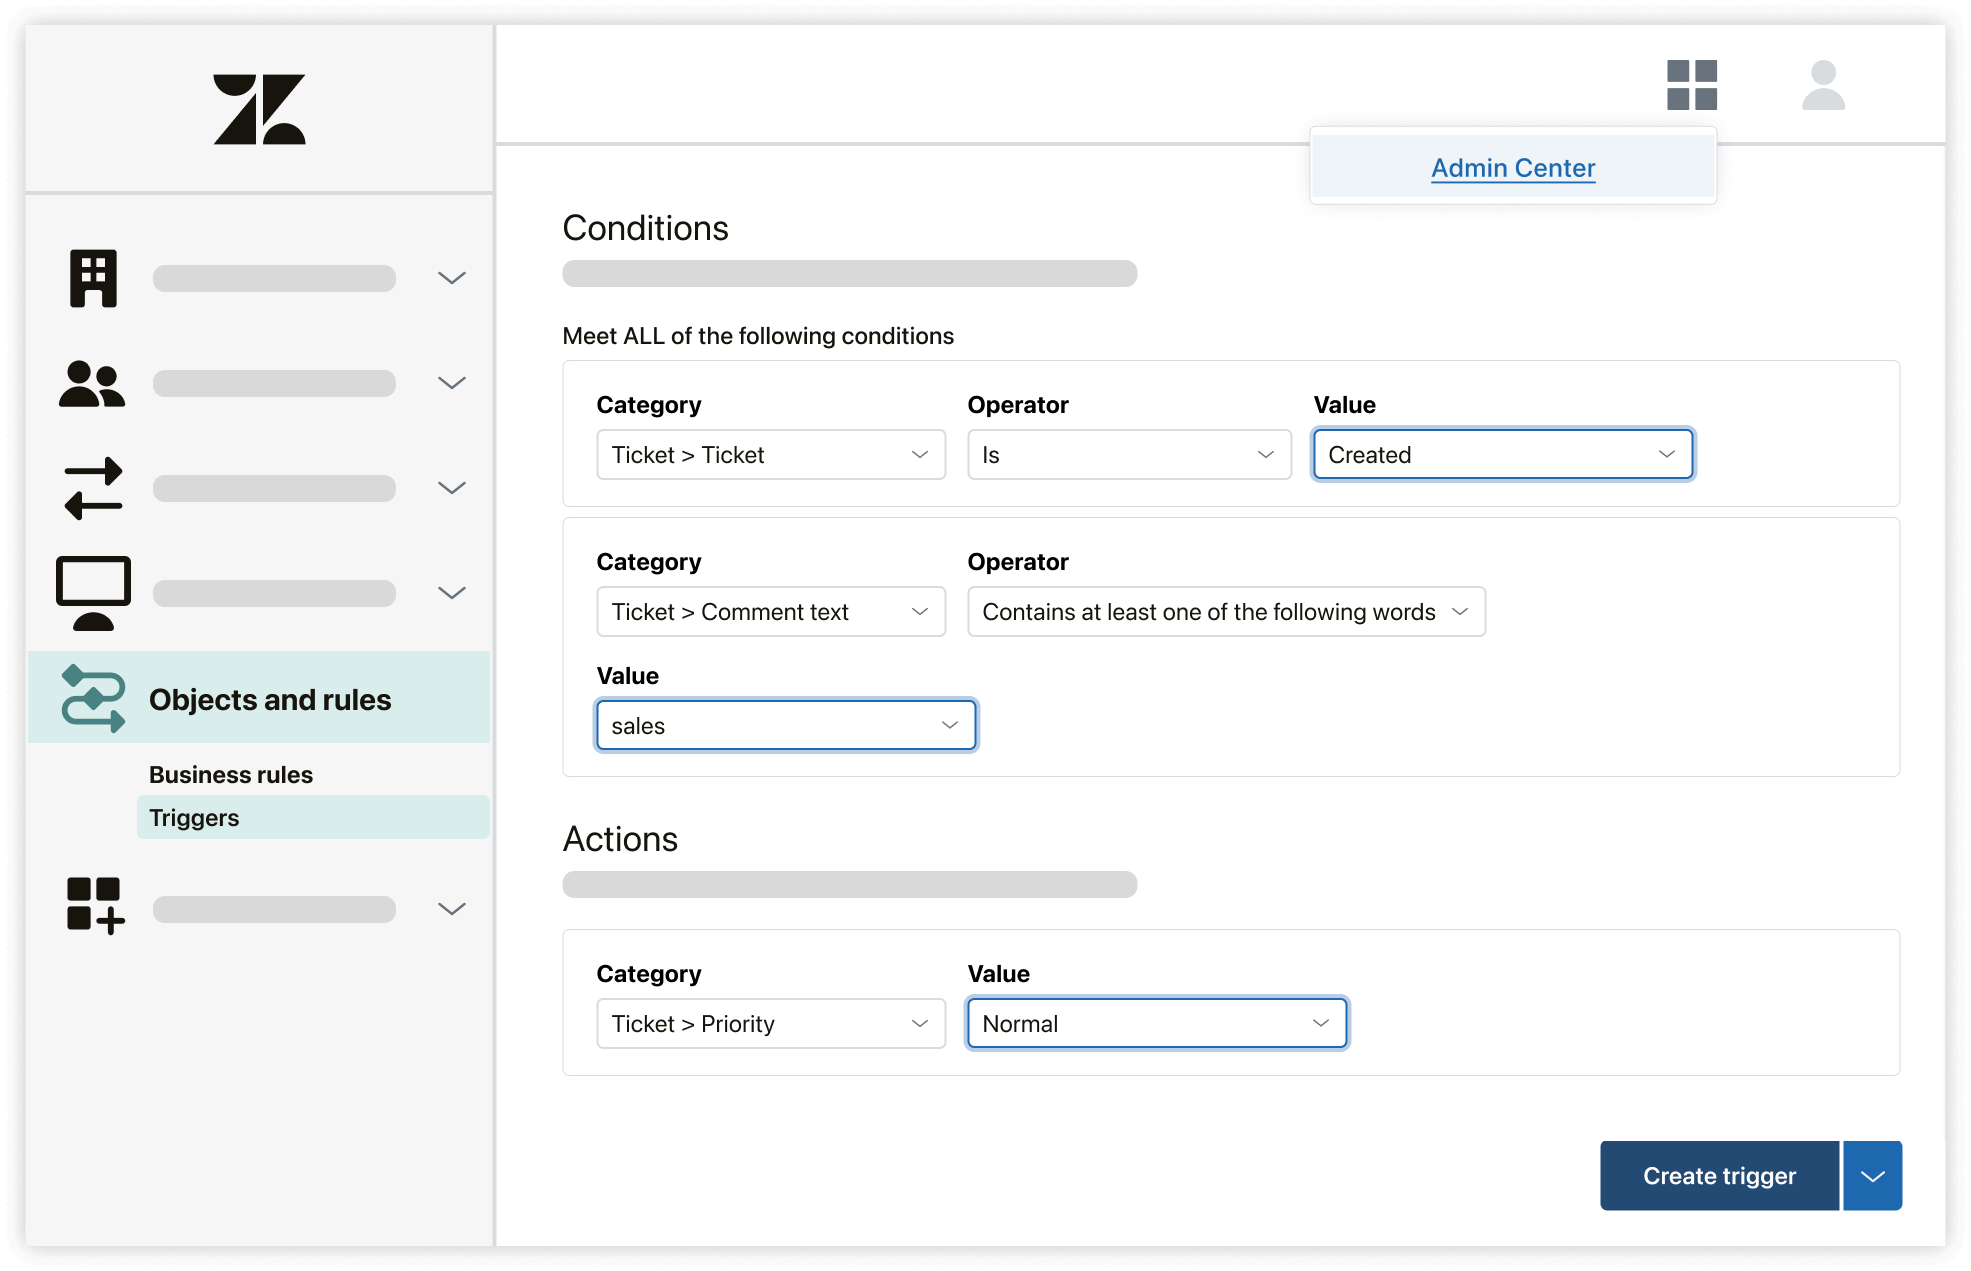
You can refine the trigger to set priority based on ticket properties such as keywords, tags, or custom fields.
Example: Set priority based on keywords in ticket comments:
1. Create or edit a trigger.
2. Under Meet ALL of the following conditions, add:
- Ticket | Is | Created
- Comment Text | Contains at least one of the following words | sales
3. Under Actions, add:
- Priority | Normal
4. Click Create trigger.
This ensures tickets containing certain keywords are automatically prioritized.
Step 3: Verify the Trigger
Check that your trigger is functioning as expected:
- View ticket events to see all triggers applied to a ticket.
- Confirm that the ticket priority updates correctly based on your trigger conditions.
6. Integrations & Extra Features
How do I connect integrations (CRM, Slack, etc.)?
Zendesk supports integrations with various tools to streamline workflows and centralize customer data.
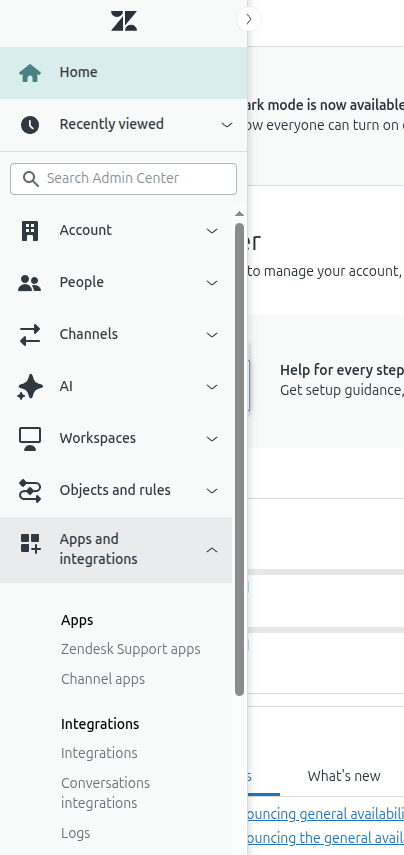
Connecting Slack to Zendesk
- Go to Admin Center > Apps and integrations > Integrations.
- Find Slack, click the options menu, and select View.
- Click the Connect workspace and follow the prompts to grant permissions.
- Configure notifications, Answer Bot, and other settings in Admin Center.
Connecting a CRM
- In Admin Center, go to Apps and integrations > Integrations.
- Select your CRM and follow the prompts to enable it.
- Assign users and configure integration settings to finalize the connection.
How do I use apps from the Zendesk Marketplace?
Apps from the Zendesk Marketplace add extra functionality to your account. You can browse, install, and configure apps for your support workflows.
7. Testing & Launch
How do I test that everything is working correctly?
Test your Zendesk setup by creating sample tickets, verifying triggers, automations, forms, and email notifications to ensure everything functions as expected.
How do I prepare my team for the launch?
Train agents on workflows, ticket handling, Help Center usage, and SLA policies. Confirm roles, permissions, and responsibilities are clearly defined.
8. Common Questions & Issues
Why are email notifications not being delivered?
Zendesk email notifications may fail if triggers are deactivated or misconfigured, the recipient’s inbox is full, spam filters are blocking messages, or the email address is invalid. To troubleshoot, check the ticket events log in the Agent Workspace for delivery failures, ensure the correct triggers are active and conditions are met, and ask recipients to review their spam or junk folders.
How do I reset an agent’s password?
To reset an agent’s password in Zendesk, an administrator should go to Admin Center > People > Team > Team members, select the agent, open their Account tab, and click Reset Password to send them a password reset email.
How can I document my Zendesk configuration?
Using Business Application Managers (Recommended)
Business Application Managers help automate configuration tracking, backups, and version control.
- Integrate: Connect the tool to your Zendesk instance.
- Automate: Schedule backups to capture changes to triggers, automations, macros, and more.
- Maintain: Keep a history of changes for easy review and rollback.
- Document: Link changes to your ticketing system (e.g., Jira) to track who made updates and why.
Manual Documentation Methods
1. Use the Admin Center:
- Check the home page for account details such as subdomain, pod number, and data center.
- Monitor dashboards to track data storage, API usage, and automated resolution activity.
- Review feature usage (macros, triggers, automations) to identify underutilized components that may need documentation or removal.
2. Document Setup Wizards:
- Use setup wizards for features like the Web Widget to capture and record your configuration settings as you go.