Freshdesk Implementation and Setup Guide
Freshdesk is a cloud-based customer support platform that helps businesses manage all customer conversations in one place. Built for simplicity and scalability, it offers automation, collaboration, and self-service tools that streamline support operations and improve response times. Freshdesk enables teams to deliver faster, more personalized service while maintaining full visibility across channels.
This guide is designed for anyone setting up Freshdesk for the first time or moving from email-only support. Whether you’re an admin, agent, or IT manager, you’ll find clear, step-by-step instructions to help you configure, customize, and launch your helpdesk with confidence.
1. Getting Started
What data should I prepare before setting up Freshdesk?
Before setting up Freshdesk, organize your existing data and workflows, especially if you’re transitioning from email-only support or another help desk platform.
Start off with the basic list:
- Team structure: List all agents, admins, and their types (support agents, field technicians, etc.). Define each person’s role, groups, and access level.
- Support channels: Identify which communication channels you’ll connect to, mainly email, chat, phone, portals, widgets, Facebook, or WhatsApp.
- Service Level Agreement (SLA) policies: Define response and resolution times for tickets based on priority (Low, Medium, High, Urgent).
- Workflows: Outline how tickets will be assigned, escalated, or closed. Identify which teams handle specific types of issues.
- Self-service: Collect existing FAQs, help articles, and troubleshooting guides to upload to your Freshdesk Solutions portal.
- Apps and integrations: List the CRM systems, chat apps, or automation tools you plan to integrate with Freshdesk (e.g., Slack, Salesforce).
2. Account Setup
How do I create a Freshdesk account?
You can create your Freshdesk account in just a few steps.
- Go to the Freshdesk page on the Freshworks website.
- Click Sign up on the homepage.
- Fill in your contact details (name, email, company, etc.) and press Try it free. Or you can sign up with your Gmail via Continue with Google.
- Freshdesk will create your trial account and send a verification email.
- Verify your email to access your new helpdesk.
How do I configure Helpdesk Settings in Freshdesk?
Configure your helpdesk to match your brand, language, and workflow requirements:
1. Go to Admin > Account > Helpdesk Settings.
2. Review the available helpdesk options and configure each according to your needs:
a) Helpdesk Name: Set the name displayed in the header and customer email notifications. You receive a default name when signing up, but you can change it at any time.

b) Helpdesk URL: This is the URL your agents and customers use to access Freshdesk.
- Click Edit to customize it to your brand.
- A new window opens where you can edit the Freshdesk address.

c) Language: Select the primary and secondary languages for your helpdesk interface.
- Click Manage languages and choose from the list of supported languages.
- Once added, you can manage the translations for the Help widget, ticket fields, customer portal, and Knowledge Base.

d) Date Format & Time Zone: Choose the date format and time zone for your account.

e) Next Ticket ID #: Set the ticket ID number for the next incoming ticket.
f) Sort Conversations: Decide how tickets should be sorted in your account.
- Show oldest on top
- Show newest on top
g) Ticket view layout: Choose a default layout for the ticket list (Card, Inbox or Table) or allow agents to select their preferred view.

h) Forums: Toggle this option to enable user forums if available on your plan, Pro or above
i) Ticket summary: Add a section for agents to summarize ticket conversations.
j) Freshdesk Branding: Remove Freshdesk branding from widgets and portals if you are on a paid plan.

k) Agent Portal Branding: Click Edit branding to update logos and portal colors for your agents.

l) Customer Portal:
- Choose Edit portal to customize the portal name, URL, and theme to match your brand.
- Go through options for Portal settings, Manage sections, and appearance.

m) Chat Support: Enable in-product chat support for agents to reach Freshdesk support.
n) Hide first response due: Toggle this to hide first response due times for all agents.
o) Agent portal font preferences: Set default font and size, and allow agents to adjust font styles while composing messages.

p) Helpdesk restrictions: Control who can log in or sign up to create tickets:
- Users from any domain
- Users from whitelisted domains
3. After configuring all options, click Save to apply your changes.

3. User Management
How do I add, edit, or delete agents in Freshdesk?
Administrators and above can add, edit, remove, or replace agents. Follow these steps to manage your team:
- Decide if the agent will log in full-time or occasionally.
- Determine what actions the agent should perform (see roles and custom roles).
- Decide which tickets the agent should access (all tickets, group tickets, or assigned tickets).
- Make sure that any seats are available.
Add an agent:
1. Go to Admin > Team > Agents.

2. Click New Agent at the top bar.

3. From the Agent type dropdown, select Support agent or Collaborator. If you pick a Support agent, choose Full-time or Occasional.
4. Enter Agent details:
- Email address (required)
- Upload profile photo
- Select time zone and language
- Customize email signature

5. Under Roles, assign one or more roles (default or custom).
6. Under Scope for ticket visibility, select:
- All tickets – agent sees all tickets
- Tickets in a group – agent sees only tickets assigned to their groups
- Assigned tickets – agent sees only tickets assigned to them
7. Under Groups, select the groups to add the agent to.
8. Click Create agent.

Edit an agent:
- Go to Admin> Team > Agents.
- Find the agent in the list or use the search box.
- Click the Pencil icon on the right of their row to open the Edit agent page.
- Update any fields such as Full-Time / Occasional status, roles, access, or scope.
- Click Update agent to save changes.
- Bulk editing of agents is not possible.
- Admins cannot edit an agent’s personal profile info or contact details. The agent must update this themselves.
How can I assign roles to agents?
You can assign roles in two ways: from Roles or directly from the Agent page.
Assign from Roles:
- Go to Admin > Team > Roles.
- Click the number in the Assigned agents column.
- In the Add Agent field, start typing the agent’s name.
- Select and Save.

Assign from Agent settings:
- Navigate to Admin > Team > Agents.
- Click New Agent or Edit an existing one.
- In the Roles section, open the dropdown.
- Select the roles and click Save Agent Roles.
What types of roles are available in Freshdesk?
Freshdesk includes several predefined roles that control what agents can access and do in the helpdesk:
- Account Administrator: Full access to all help desk and billing data.
- Administrator: Configures all features except billing.
- Supervisor: Manages agents and reports.
- Agent: Handles tickets and customer communication.
- Ticket Collaborator: Adds private notes and updates ticket status.
- Analytics Collaborator: Views reports.
- Freddy AI Copilot User: Uses AI-assisted features.
- Freddy AI Insights User: Accesses Freddy AI analytics.
How can you define an agent’s access additionally in Freshdesk?
You can refine agent access and workload management using these settings:
- Groups: Organize agents into teams and receive alerts for unattended tickets.
- Business Hours: Define working hours and holidays to align with SLAs.
- Skills: Auto-assign tickets based on agent expertise.
- Agent Shifts: Manage agent schedules in one place.
- Agent Statuses: Track agent availability and activity in real time.
4. Support Channels
How do I set up my support email to Freshdesk?
Connecting your email allows Freshdesk to automatically convert customer messages into support tickets.
Follow these steps:
1. In the Freshdesk Admin Center, go to Channels > Email.
2. Click Connect your company email.
3. Choose one of four options:
- Freshdesk email (e.g., support@yourcompany.freshdesk.com), or
- Custom / your own domain email (e.g., support@yourcompany.com).
- Gmail (e.g., support@gmail.com)
- Microsoft Office 365 (e.g., support@contoso.onmicrosoft.com)
4. Save your settings.
5. Send a test email to verify that new messages create tickets automatically.

How do I configure a Freshworks mail server?
1. Enter your Support email name and Email alias (reply-to address).
2. Configure Incoming Email:
- Copy the Freshworks forwarding address.
- Set up forwarding rules in your existing mailbox (e.g., Gmail).
3. Configure Outgoing Email: You can use Freshworks or connect Gmail, Microsoft 365, or another server.
4. Assign to a Group (e.g., Billing, Support) and link to a product if needed.
5. Click Save to finish setup.
How do I verify my support email?
1. Go to Admin Settings > Channels > Email and click Verify next to your address.
2. Configure DKIM to secure your domain and prevent spam.
3. Complete email verification and forwarding setup.
How can I set up Freshchat as chat?
You can connect Freshchat to handle real-time customer chats directly in Freshdesk.
Connect Freshchat as a chat:
1. Log in as an Admin and go to Admin > Chat.
2. Find your Freshchat account on the page:
- Click Sign up if you don’t have an account.
- Click Connect Account to link an existing account.
3. Configure chat settings in Freshchat as needed.
4. Update the API key if your organization changes.

Disconnect Freshchat:
1. Click Disconnect account from the dropdown.
2. After disconnecting:
- CRM fields no longer appear on Freshdesk tickets.
- Existing contacts stay, but new contacts won’t sync.
- Chat conversations can’t be converted into tickets.
- Imported knowledge base articles remain; new ones won’t appear.
- Tasks and Task Management features become unavailable.
- Integration with Freshsales uses a one-click setup.
- You can create multiple chat widgets and host them on websites.
How can I add a phone channel to Freshdesk?
You can integrate phone support using Freshcaller to handle customer calls directly in Freshdesk.
1. Go to Admin > Channels > Phone.
2. Click Create a Freshcaller account.

3. Press Manage settings in Freshcaller.
4. Configure your call center workflows in Freshcaller. These settings sync automatically with the Freshdesk phone widget.
5. Add agents to Freshcaller directly from Freshdesk by enabling the Freshcaller Agent toggle.
- Ensure you have available agent licenses in Freshcaller.
6. Start taking calls and convert call recordings into tickets.
- You can link an existing Freshcaller account by entering login credentials or create a new one.
Managing the integration:
- Temporarily disable the integration to handle only emails during lean support periods.
- Disconnect and reconnect Freshcaller to start fresh or link a different account.
How can I set up my customer portal?
You can create additional portals to tailor the self-service experience for each of your products.
Before you begin:
- Ensure you have created a product. Each portal must be linked to a product.
- You can create multiple products and assign a portal to each.
- Multi-product portal management is available on Pro plans or above.
Steps to create a new portal:
1. Log in as an Admin.
2. Go to Admin > Channels > Portals > New Portal.

3. Fill in the Portal name, product name, and product support email address.
4. Click Start Setup to open the setup page.

Portal setup includes:
- Portal Settings: Customize the portal name, URL, primary language, and more.
- Manage Sections: Organize portal sections, set access to Knowledge Base and Community, and configure ticket forms.
- Appearance: Adjust themes, colors, and layout to match your brand.

5. Ticketing and Workflows
How do I create ticket fields in Freshdesk?
Freshdesk lets you create custom ticket fields to capture information specific to your business.
Create or edit fields:
1. Go to Admin > Workflows > Ticket Fields.
2. Drag a field from the left panel into the page body to create a new field.

3. Configure the field properties as needed and click Save field.

4. To edit a field, click it in the page body, update its properties, and click Save field.
5. Rearrange fields by dragging them into your preferred order.
- Plan your data structure before adding fields to keep tickets manageable.
- Use standardized options (like dropdowns) where possible.
- Update tickets before changing or deleting dropdown choices to avoid losing data.
- Changes to field labels will reflect on all existing tickets.
How do I set up SLA policies in Freshdesk?
SLA policies help ensure your team responds to tickets within agreed timeframes.
Here is a guide to set up an SLA policy:
1. Go to Admin > Workflows > SLA Policies.
2. Set targets for each ticket priority (Urgent, High, Medium, Low).
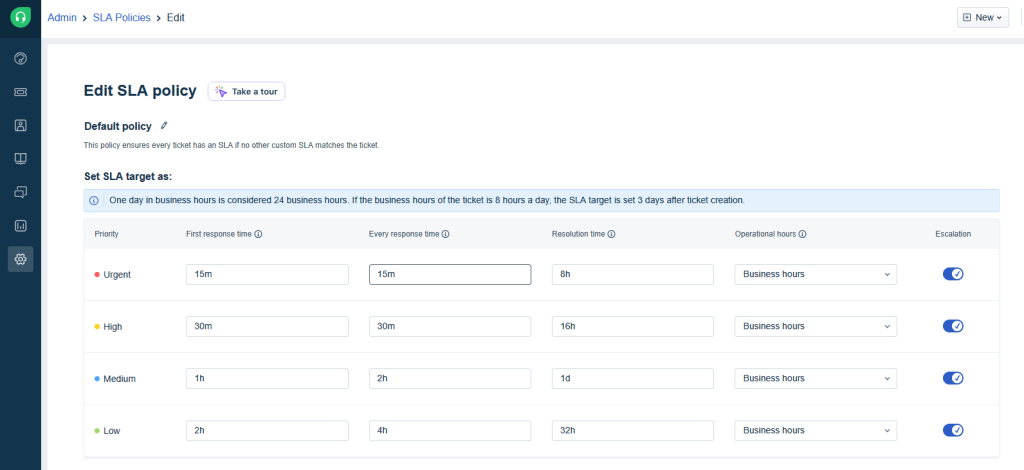
3. Choose whether to measure SLA timers in Business hours or Calendar hours.

4. Enable Escalations to trigger actions when service levels are missed.

5. Click Save to apply your SLA policy.
Enable reminders and notifications
- To notify agents via email for SLA breaches or upcoming deadlines, go to Admin > Workflows > Email Notifications and toggle Next response SLA reminder and Violation.
- To enable desktop notifications, click the bell icon at the top-right of your screen, then select Settings and toggle notifications on.
How do I create canned responses?
Canned responses let your team reply faster with prewritten messages.
To create one:
1. Log in to your Freshdesk account.
2. Go to Admin > Agent Productivity > Canned Responses.
3. Click New Folder, name it, and select Create.

4. Inside the folder, click New Canned Response.
5. Add a title and message.
- Use the green plus icon to insert placeholders (like Ticket ID, Subject, or Requester Name).
6. Choose who can see it:
- Myself – for personal use.
- All agents – shared across your team.
- Agents in group – visible only to selected groups.
7. Choose the folder and click Save.

To organize canned responses:
- Move or categorize them into folders for quick access.
To delete canned responses:
- Go to Admin > Agent Productivity > Canned Responses.
- Open a folder, select the responses, and click Delete.
How do I add scenario automations?
Scenario automations let agents perform multiple ticket actions with a single click — saving time and ensuring consistency.
To create a scenario:
1. Go to Admin > Agent Productivity > Scenario Automations.

2. Click New Scenario.

3. Add a name and description.
4. Under Actions, define each step in order:
- Choose a task and select the corresponding action from the dropdowns.
- For example, to set ticket priority to High, select Set Priority and then High.
5. Choose who can use the scenario: Only me, All agents, or Specific groups.
6. Click Save.
You’ll see your scenarios listed on the Scenario Automations page.
Hover over any entry to Clone, Edit, or Delete it.
6. Apps and Integrations
How can I integrate other Freshworks products with my Freshdesk?
To set up Freshservice:
- Go to Admin > Support Operations > Freshservice.
- Connect an existing account or create a new one.
- Enter your Freshservice domain and API key. Repeat from Freshservice to link Freshdesk.
- Set agent visibility: all conversations or public notes only.
- Create automation rules to generate Freshservice tickets based on Freshdesk conditions.

To integrate the Freshsales Suite:
- Retrieve your Freshsales API key (Profile > Settings > API).
- Go to Admin > Support Operations > Freshsales Suite in Freshdesk.
- Sign in with your Freshsales account and enter the API key.
- Select fields to display for Contacts, Leads, Deals, and Accounts (up to 10 each).
- Click Update to finish setup.

How do I connect apps from the Freshworks marketplace?
Freshdesk lets you extend your helpdesk functionality by installing apps from the Freshworks Marketplace.
Follow these steps to connect an app:
- Log in to your Freshdesk account as an admin.
- Go to Admin > Support Operations > Apps > Get More Apps.
- Browse or search for the app you want to install. Use filters to narrow results by category.
- Click the app to view details, including features, screenshots, and how it integrates with your helpdesk.
- Click Install, enter the required credentials, and complete the installation.
7. Testing and Launch
How do I test that everything is working correctly?
Create sample tickets in Freshdesk. Verify that:
- Triggers and automations work correctly.
- Ticket forms display as expected.
- Email notifications send and arrive properly.
- Support channels (email, chat, phone) create tickets.
How do I prepare my team for launch?
Train agents on Freshdesk workflows, ticket management, and the self-service portal. Review:
- Roles, permissions, and responsibilities.
- SLA policies and escalation processes.
- Best practices for handling tickets and collaborating.
How do I use a Sandbox to test Freshdesk before going live?
You can create a Sandbox account to test features, workflows, and configurations safely before applying them to your live Freshdesk account.
To set up your Sandbox:
1. Go to Admin > Support Operations > Sandbox.
2. Click Build Sandbox to create a replica of your current configuration.
3. Click Go to Sandbox to start testing. A banner at the top indicates whether you are in the Sandbox or the live account.
To sync changes to your live Freshdesk account:
- After testing, go to Admin > Support Operations > Sandbox in your live account.
- Click Review changes and sync.
- The Sandbox will fetch your tested changes and apply them to your Freshdesk account.
8. Troubleshooting
How can’t I add an agent in Freshdesk?
You may see an error if the email you’re trying to add is already in your contacts.
Follow these steps to resolve it:
- If you see “Email has already been taken. View User”, click View User.
- You will be redirected to the Contact Profile page.
- Click Convert to Agent.
- In the dialog, select the type of agent (e.g., Collaborator, Admin, or Agent).
- Click Convert to add the user as an agent.
What should I do if my support emails aren’t converting to tickets?
If tickets don’t appear in Freshdesk:
- Turn on email forwarding in your mailbox settings.
- Verify the Freshworks forwarding address matches the one in your Admin Center.
- Check that your DKIM and SPF records are set up correctly.
- Send a test email and review Email Logs for any delivery errors.
Why can’t I connect my Freshchat?
Check these common causes:
- Account visibility: Ensure Freshchat appears in the integration list. Accounts must be in the same organization.
- Sign-up vs. connect: Click Sign Up to create a new account or Connect to log in to an existing one.
- API key: Update authorization if your API key has changed.
- Freshsales integration: Use the one-click connection for linked Freshchat accounts.
- Widgets: Ensure widgets are assigned to the correct brand or website.
How do I reset an agent’s password?
Go to Admin > Team > Agents, select the agent, and click Send Activation Email (or Reset Password if supported). The agent must use the email to set their password.