SolarWinds Service Desk Data Migration Checklist
The success of a smooth SolarWinds Service Desk data movement depends on a reliable migration service. Elevate your service desk migration process with a detailed checklist designed for SolarWinds users.
The Migration Wizard can’t shift to SolarWinds Service Desk such data:
- Custom fields for contacts and organizations
- CC in tickets
- Closed at dates of tickets
BEFORE YOU SET UP THE MIGRATION
Follow the checklist below to make sure your SolarWinds Service Desk data replication will be successful.
Note: In Demo and Full Data Migrations, the process of importing the source data goes the same way. If you have some nuances in the test Demo, the same will happen in the Full Migration.
To ensure everything migrated accurately, download the Demo reports for migrated, failed, and skipped records. If you have any questions, contact our support team for assistance.
1. BUILD A MIGRATION PROJECT PLAN
There isn't a one-size-fits-all approach to data migration. However, the Help Desk Migration team has thousands of migrations under our belts, so there are three proven ways:
- Automated data migration or DIY migration
- Custom data migration
- Automated or custom data migration + Delta migration
If you need help in planning and executing your service desk migration, contact us and we’ll help you to build your migration project.
2. KEEP YOUR TEAM UPDATED
Ensure your support team is aware of data transfer to SolarWinds Service Desk. Engage them in the preparation process and delegate some responsibilities, e.g., checking duplicates, testing the mapping, etc.
3. PREPARE SOLARWINDS FOR MIGRATION
Now prepare your SolarWinds Service Desk account for the data migration. Follow the following steps:
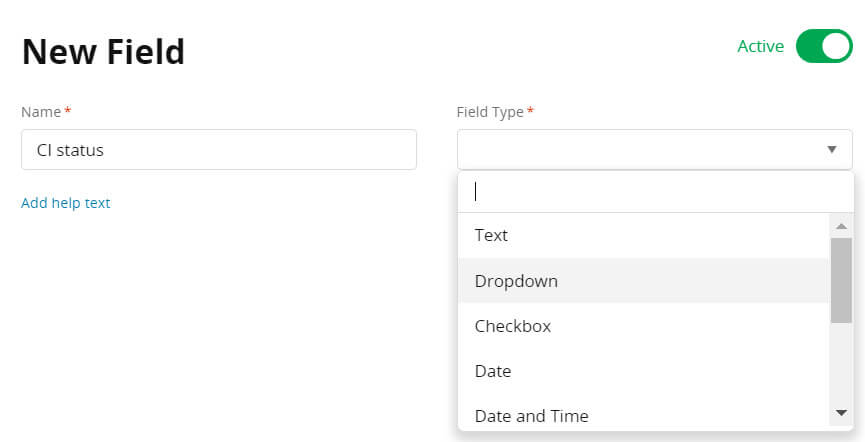
1. Create corresponding custom fields. Your custom fields on SolarWinds should match the types in your current system. Here's a simple guide on how to do it:
Go to the Custom Fields index page > Add+ > fill in the name > choose a field type. Then select either Global or Service Catalog > click Save.

2. Add agents. Set up user profiles in SolarWinds Service Desk for a proper ticket assignment. Follow these steps:
Navigate to Settings > Users & Groups > Users. Then, fill in the name, title, site, department, reports, and role for each agent/technician.
3. Set up groups. If you have groups in your source platform, you need to add the groups in your SolarWinds account. Here’s how to do so:
Open Settings > Users & Groups > Groups > Add+. Provide a name and a description. Choose a user the group reports to. Then, click Create group.
4. CONSIDER MIGRATION PECULIARITIES
Before the Full Data Migration to SolarWinds, you should know that:
- Created at dates of comments migrate in the body of the corresponding comment.
- All ticket dates (created_at, updated_at) will be set as the migration completion date.
- The articles might not look the same as on the source. For instance, the article title might blend with the text without a space. This is due to SolarWinds Service Desk automatically removing HTML tags.
5. CUSTOMIZE YOUR MIGRATION
Adjust your SolarWinds Service Desk data import using ready-made options, including:
| Adding tags to migrated tickets | Sort out source tickets from the existing ones on a SolarWinds instance by adding an extra tag. |
| Migrating inline images as attachments | Migration Wizard doesn't transfer inline images to SolarWinds Service Desk by default. You can keep them by importing as attachments. |
| Skipping attachments | The data transfer tool moves attachments automatically, but you can skip them—either to save storage or to speed up your migration. |
| A Demo with custom data—handpicked tickets | Simply insert 20 selected ticket IDs you want to migrate for the test. |
Help Desk Migration team can customize your SolarWinds migration to meetatch your specific business requirements. Here is a shortlist of the most popular customizations:
- Filter data based on various criteria (created at dates, tags, custom fields, groups, organizations, assignees).
- Adjust the default migration process (e.g., treat change and problem objects as tickets, migrate ticket events as private notes, include information related to inactive users).
- Add extra details (e.g., tagging tickets, including legacy ticket ID in the subject) to preserve the context of historical data.
YOU’RE ALMOST READY
1. CHECK ALLOWED DOMAINS
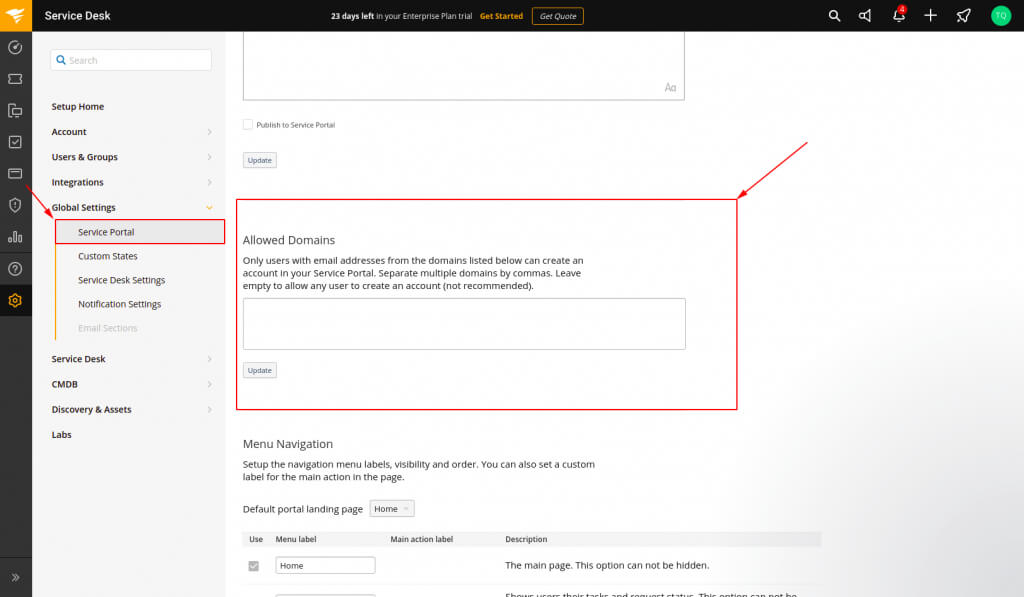
Check if the Allowed Domains field is empty. This way, you can whitelist our migration service and let our Migration Wizard run a SolarWinds data movement.
Go to Setup > Global Setting > Service Portal > Allowed Domains. Check if the field is empty.

2. FIND ACCESS CREDENTIALS
When starting a Demo Migration, you need access credentials for your source platform and SolarWinds Service Desk. The access credentials for your current help desk or service desk may vary, so follow the instructions on the Migration Wizard on the connect source platform step.
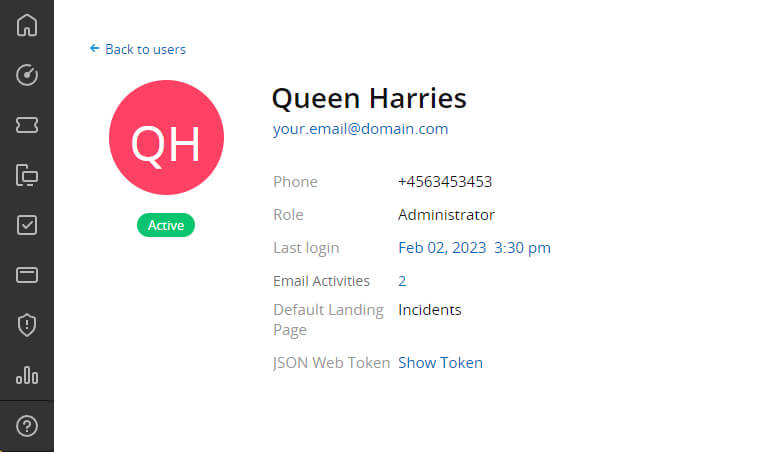
To connect SolarWinds Service Desk with Migration Wizard, find your API Token: Setup > Users & Groups > click your Name > Action > Generate JSON Web Token.

3. RUN A FREE DEMO TO TEST THE MIGRATION SERVICE
Before you jump into the Full Data Migration, set up a Free Demo. This trial data transfer allows you to move 20 random incidents and 20 solutions from your old platform to SolarWinds Service Desk. Here's how to start:
- Sign in or sign up to the Migration Wizard.
- Connect your source and SolarWinds Service Desk.
- Select the data you want to import.
- Match your users and groups.
- Map incidents and solutions.
- Choose any of the automation options.
- Begin your Free Demo Migration to see how your data will be transferred.
AFTER THE DEMO MIGRATION
1. CHECK THE DEMO RESULTS IN SOLARWINDS SERVICE DESK
After your Free Demo Migration finishes, check the migrated records in SolarWinds Service Desk. You'll see a table with four columns:
- all available records
- migrated records
- failed records
- skipped records
Download reports on migrated, failed, and skipped records. Verify how that small batch of source data has moved. Remember, the way data migrated during the test Migration so it will be transferred in the Full Data Migration.
What to look at while checking migrated records?
- All comments moved, and the comment authors should be the same
- Tickets assigned to the right users
- All custom field values imported
- Customers and companies migrated accurately
- Attachments moved with the labels
- Categories correctly assigned (in Knowledge Base migration)
For more details, watch a detailed video guide on checking the results of a Demo Migration.
2. CONSIDER A CUSTOMIZED DEMO
Choose up to 20 tickets and 20 KB articles for a Demo with custom data. If you have some more specific requirements, contact our support team, and we'll set up a Custom Demo for you.
DURING THE FULL DATA MIGRATION PROCESS
1. CHOOSE MIGRATION FLOW TYPE
If you need to use either your source or target platform, consider the following options:
- Use a Source platform during Full Data Migration. Thus, you will need to run a Delta migration to import updated or new data. Delta migration is only available in a Signature support package.
- Work with SolarWinds Service Desk.
While the Full Data Migration is in progress, you can occasionally monitor its status or await our team's updates.
2. DON’T MAKE ANY LAST-MINUTE CHANGES
Hold off on making last-minute changes to your data just before the Full Data Migration. Doing so can complicate the process. Instead, audit the source records for duplicates or unnecessary entries before the transfer.
3. START FULL DATA MIGRATION
You can start your Full Data Migration only when:
- You have chosen a Support package—either to get basic customer service or you need additional options like data re-migration, Delta Migration, or Interval Migration.
- Your payment is confirmed. It's best to pay ahead, especially if you have a specific date for your data import.
- Take your time to go through the "Migration Notes" on the left sidebar. That way, you will check up if all preparations are done properly.
AFTER THE DATA MIGRATION IS DONE
1. CHECK THE RESULTS
Right after the Full Data Migration, thoroughly check the replicated records on your SolarWinds account. You've got five days to review before your data transfer is archived. The time may be extended, depending on your selected support package.
By default, SolarWinds Service Desk reflects all the tickets in the Incidents index table. To view them, go to your Dashboard > Service Desk > Incidents. You'll see the table title, which is "All Incidents," at the top left. You can filter them by State, Priority, Category, Assignee, etc.

If something appears missing, check if search filters are set up accurately for all tickets and specific time. If the problem continues, reach out to our support team.
2. SET UP SOLARWINDS SERVICE DESK
- Update internal links for the Knowledge Base manually.
- Activate all communication channels.
- If you used your Source platform during migration, re-forward emails to SolarWinds. If you switched to SolarWinds during migration, no further action is needed.