Intercom Implementation and Setup Guide
Intercom is a powerful customer communication platform that connects teams with customers through Messenger, automation, and Fin AI Agent. Whether you’re setting it up for customer support, sales, or marketing, this guide will walk you through every step — from your first login to launching a fully customized experience.
1. Getting Started & Account Setup
How do I sign up for Intercom?
Signing up for Intercom takes just a few minutes.
- Go to the Intercom pricing page.
- Select your plan and click Start a free trial.
- Enter your business email address to begin your 14-day free trial — no credit card required.
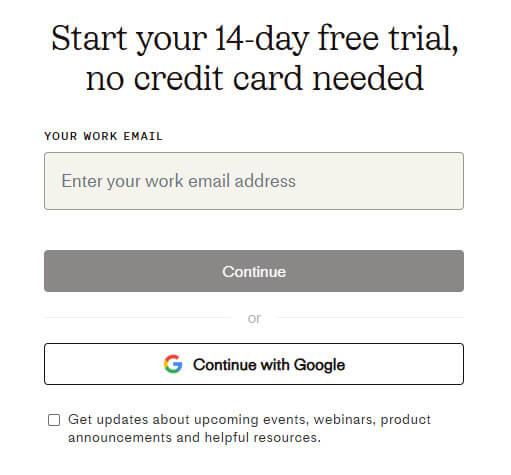
Once your trial starts, you can begin setting up Intercom right away.
After your trial ends:
When the 14 days are up, choose the plan you want to continue with. You can also include or remove any add-ons at checkout.
How do I set up a primary workspace?
Click the settings gear icon in the primary navigation menu. You’ll land on the Settings Home.
Change your workspace timezone:
- Go to Settings > Workspace > General.
- Select your local timezone from the dropdown menu.
- Refresh the page to apply your changes.
Manage workspace languages:
To update your default language or add support for multiple languages:
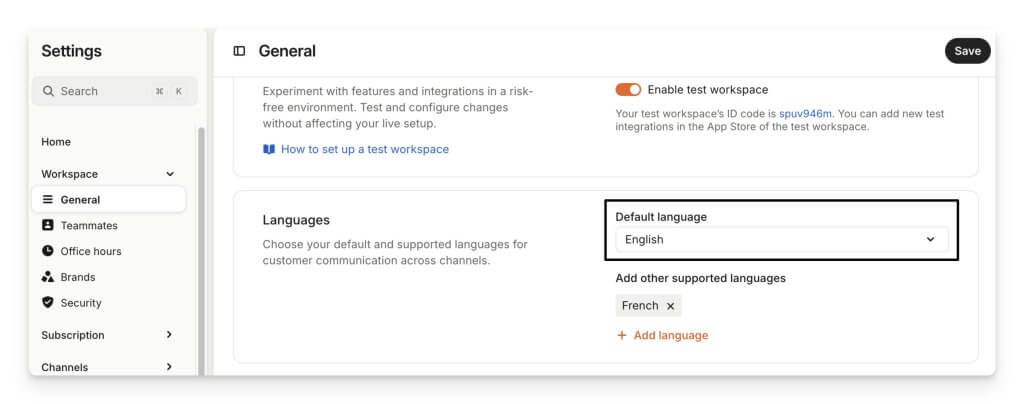
- Go to Settings > Workspace > General.
- Choose a default language from the dropdown, or click Add language to include additional options.
Edit your workspace name:
- Navigate to Settings > Workspace > General.
- Update the workspace name and click Save.
Find your workspace ID (App ID):
Your workspace ID appears as app_id in your code snippets, including the JavaScript used to install Messenger.
- Go to Settings > Workspace > General.
- Look under 'Workspace name & 'time zone' to find your unique workspace ID.

How can I create additional workspaces?
If you want a separate workspace, note that each workspace requires its own paid subscription.
To create a new workspace:
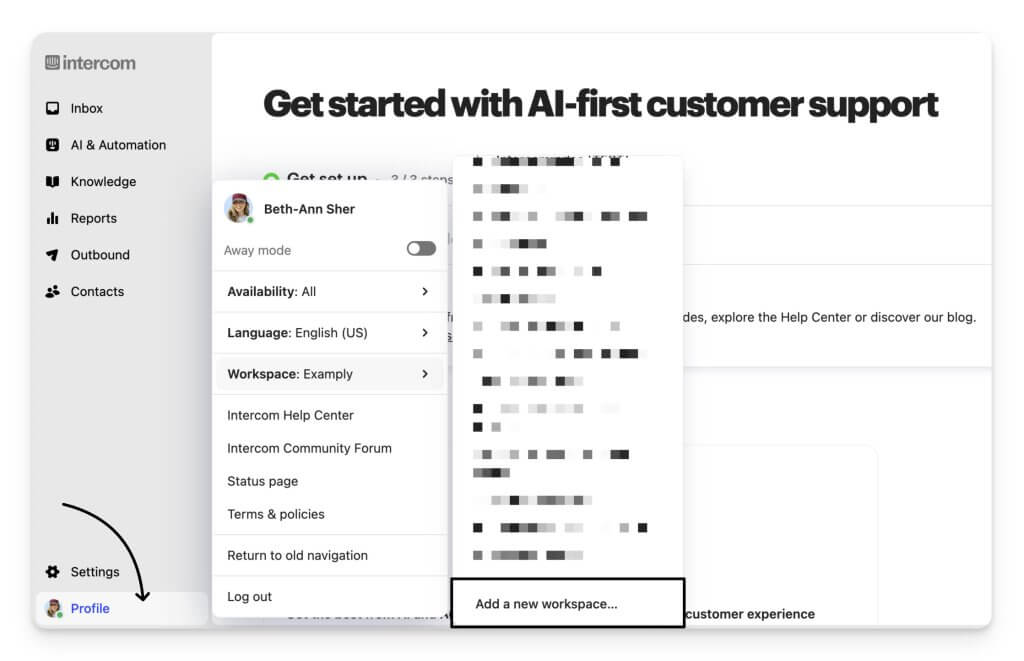
- Click your avatar in the bottom left corner.
- Hover over your current workspace’s name to open the pop-out menu.
- At the bottom of the Search for a workspace menu, click Add a new workspace.
How do I manage multiple brands?
With Intercom, you can deliver a tailored, on-brand experience for each of your unique brands from a single workspace.
Access brands:
Go to Settings > Workspace > Brands. You’ll see your default brand, which is named after your workspace. From here, you can create new brands to represent each customer-facing identity. Brands you create connect to multi-brand Messenger, multi-brand email, and multiple Help Centers.
Edit default brand:
Your default brand uses your workspace name. To update it, go to Settings > Workspace > General.
Create a new brand:
- Click New brand.
- Brand name: Give your brand a name visible to customers.
- Brand icon: Upload an icon for email notifications. Use PNG or JPG files under 1MB, ideally square (72x72px) with a colored or white background.
- Help Center: Select the Help Center to connect to this brand. One Help Center can serve multiple brands. If not needed, leave the Help Center “not live.”
- Default address: Choose the email address this brand will use for notifications and automated emails.
Click Save to add your new brand.
2. Messenger & Chat Setup
How do I set up and customize Messenger in Intercom?
You can fully customize your Messenger to match your brand and support experience.
To get started:
- Go to Settings > Messenger in your workspace.
- Choose between Web and Content settings to define how Messenger appears to customers.

Customize appearance:
- Upload your brand logo and set your brand colors.
- Choose between light and dark mode.
- Update the Messenger Home layout to highlight your Help Center, messages, or announcements.
Configure content:
- Organize spaces such as Messages, Help, News, and Tasks.
- Decide what customers see first when they open Messenger.
Set up conversations:
- Customize your team introduction and response time message.
- Customize how chats start and how your team is introduced to customers.
Manage general settings:
- Define access permissions and supported languages.
- Set up authentication options, including JWT for secure user identification.
When finished:
- Click Save and set live to publish your changes.
- Install the Messenger on your website or app—your custom setup will appear instantly.
How do I connect my email support channel?
You can connect your support email in Intercom to send and receive messages directly from your workspace.
Step 1: Add an email address:
- Go to Settings > Channels > Email > Domains & addresses.
- Click New email address and enter your support email (e.g., support@yourcompany.com).
- If you manage multiple brands, choose which brand this email should be associated with.

Step 2: Set up automatic email forwarding (optional):
Enable Automatically forward emails from this address if you want emails sent to this address to appear in Intercom.
To configure:
- Click Set up automatic forwarding in the email setup flow.
- Copy your workspace email into your email provider’s settings.
- Verify the forwarding setup.
Step 3: Authenticate your domain:
Begin authentication by verifying your email address in Settings > Channels > Email > Domains & addresses.
After verification, add the required CNAME and TXT DNS records:
- Automatically via Entri, or
- Manually through your DNS provider.
Step 4: Configure deliverability notifications:
- Notify teammates of email deliverability issues in Settings > Channels > Email > Email settings > Delivery notifications.
- Click Add a teammate to select additional teammates.
How do I configure the phone as a support channel?
1. Turn on Messenger calls:
- Go to Settings > Channels > Phone and enable Messenger calls.
- If your site uses CSP headers, add intercom-sheets.com to the frame-src directive.
- You can now use Messenger for voice, video, and screen sharing.

2. Add a new phone number:
- Go to Settings > Channels > Phone > Phone calls → + New phone number.
- You’ll need a local address for the region.
- Choose country and number type: Local, Toll-free, or Mobile.
- Complete any regulatory details, then activate your number.
3. Configure phone settings:
After activating, open Phone calls settings to:
- Name the number (internal use).
- Enable inbound/outbound calling.
- Add a welcome greeting.
- Select a routing option: via workflow, team, or workspace.
4. Set up voicemail:
Enable Go to voicemail when unavailable and add a greeting.
Trigger voicemail during:
- Off-hours
- Long queues
- No available teammates
5. Save changes:
Click Save changes to finish.
All numbers appear in Settings > Channels > Phone > Phone calls, where you can edit them at any time.
How do I install and set up Switch?
Switch lets you move customers from phone to chat, reducing hold times and improving response efficiency.
Navigate to Settings > Channels > Switch.
Under the Installation guide, choose one of the two setup methods:
- Call Forwarding: Quick setup, no coding, supported by all phone systems.
- API: Advanced setup that allows data sharing and custom workflows.
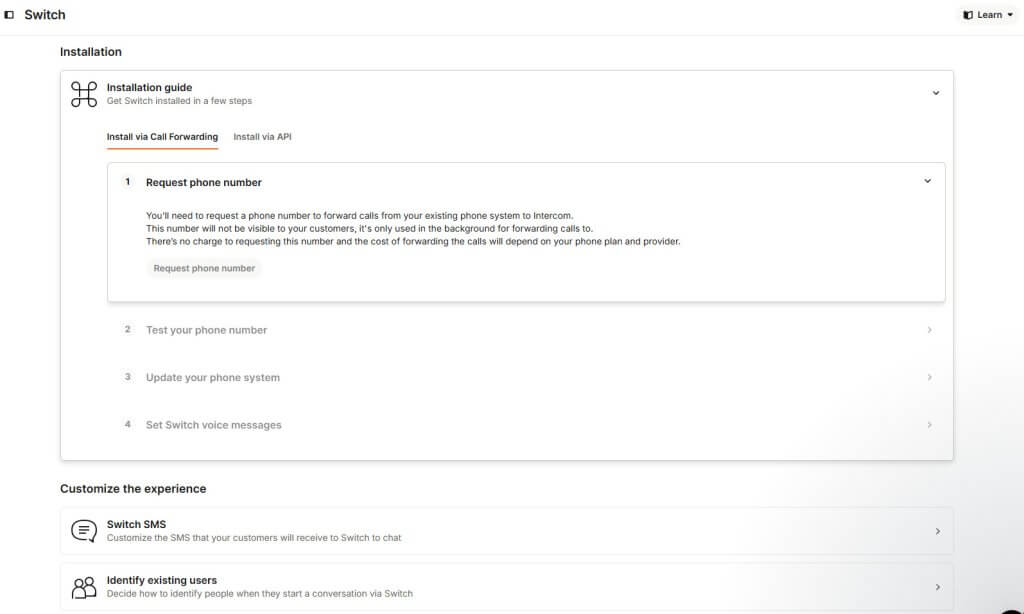
Option 1: Install via Call Forwarding
- Request a phone number: Forward calls from your existing system to Intercom Messenger.
- Test your number: Call it to confirm the setup.
- Update your phone system: Add an IVR option to forward calls to this number.
- Go live: Add a message inviting callers to switch to chat.
Option 2: Install via API
- Get your API token: Copy it from the setup page.
- Send an HTTP POST request: Include customer data (formatted in E.164).
- Test the integration: Ensure calls create conversations in your Intercom Inbox.
3. User Management & Roles
How do I create custom roles to manage permissions?
Custom roles let you assign consistent permissions to teammates, keeping your workspace secure and compliant. They’re reusable, so updating access for multiple people is simple.
Create a new custom role:
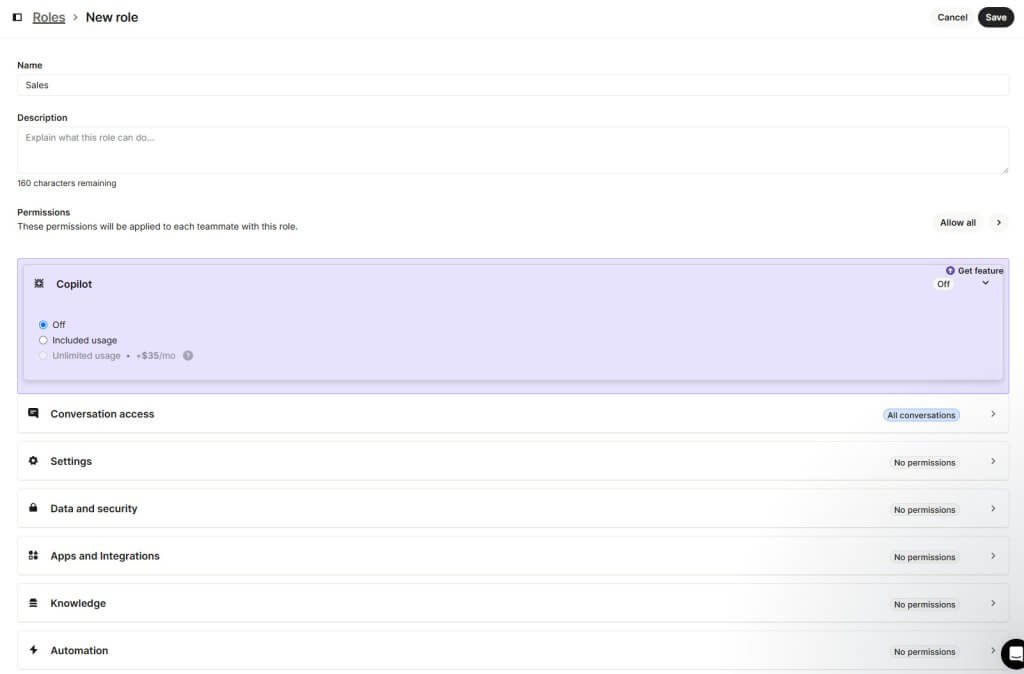
- Go to Settings > Workspace > Teammates > Roles.
- Select the Roles tab and click New role.
- Add a name and description — make it clear what the role allows.
- Choose the permissions this role will have.
- Click Save to create your role.
Assign roles to teammates:
a) To assign a role to one teammate:
- Go to Settings > Workspace > Teammates.
- Hover over the teammate and click Edit.
- Select a role or toggle permissions manually.
- Click Save changes.
b) To assign roles to multiple teammates:
- Check the boxes next to their names.
- Click Edit permissions and select a role from the dropdown.
- Save your changes.
How do I add a teammate to Intercom?
Invite teammates to collaborate in your workspace directly from your Settings. You can add individuals or import a list in bulk.
Add a new teammate
- Go to Settings > Workspace > Teammates.
- Click + Add new → + Add new teammates.
- Enter the email addresses (separated by commas) and click Continue, and set permissions.

Once added, teammates receive an email invitation.
Invite reminders:
- If an invite isn’t accepted within 3 days, you’ll receive an email reminder with options to resend or copy invite links.
- Invitations are tied to specific email addresses and can’t be used with other accounts.
Add teammates in bulk
There are two ways to invite teammates in bulk:
- Paste a list of email addresses directly into the invite field.
- Or select Import teammates from the + Add new dropdown and upload a CSV file with one column of email addresses.
After importing, set each teammate’s permissions and roles:
- Use dropdowns to adjust access by feature.
- Click "Allow all" or "Restrict all" to apply settings quickly.
4. Conversations & Inbox
How do I configure the Intercom inbox?
Get started with these settings:
1. Set office hours and reply times
Manage customer expectations by setting when you’re available and how quickly you reply:
- Go to Settings > Inbox.
- Set default office hours and reply times.
- Customize per team or region for team inboxes.

2. Structure your inbox
Organize conversations for faster handling:
- By channels: email, chat, social, etc.
- By topics: pricing, troubleshooting, product feedback.
- By skill levels: basic, technical support.
- By regions: Asia, Europe, North America, etc.
3. Create inbox views
Filter conversations to focus on what matters:
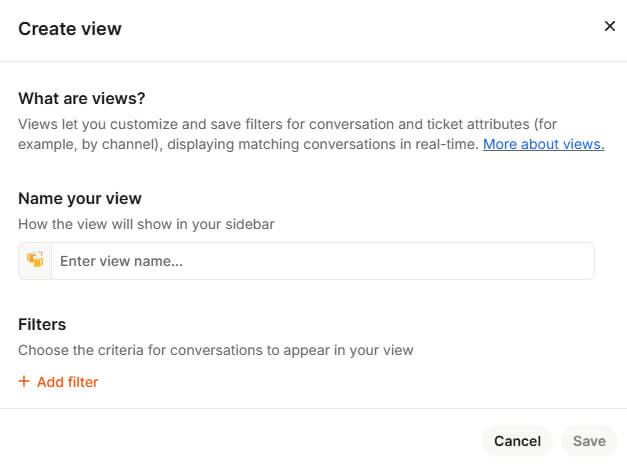
- Click 3 dots > Create view in the sidebar.
- Give your view a name and emoji.
- Add filters (assigned teammate, SLA, tags, Fin involvement, etc.).
- Save and access it from your sidebar.

4. Create custom folders
Keep views and teams organized:
- Click Manage > Edit Sidebar > Create Custom Folder.
- Name your folder and add views, teams, or teammates.
- Rename, unpin, or delete folders as needed.
5. Set up team inboxes
Group conversations for teams:
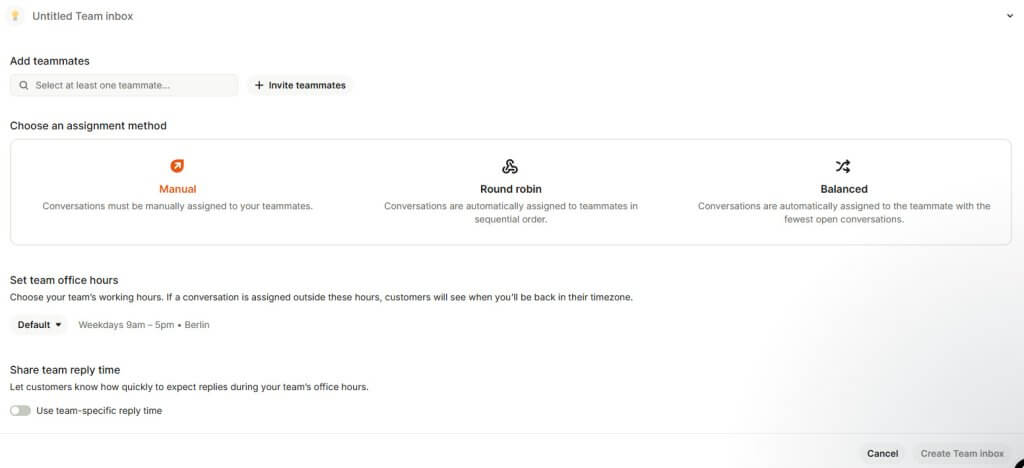
- Go to Settings > Inbox > Team inboxes > New team inbox.
- Add teammates and choose from manual, Round Robin, or Balanced assignment.
- Assign conversations by topic, language, or team function.
How do I set up macros in Intercom?
You can create and manage macros in either the Inbox or your workspace Settings.
From the Inbox:
- Press Ctrl+K or click the action icon in the composer.
- Search for Create new macro.
- You can also open Manage macros to go directly to the macro settings page.
From Settings:
- Go to Settings > Inbox > Macros.
- Click + New macro or select an existing one to edit.
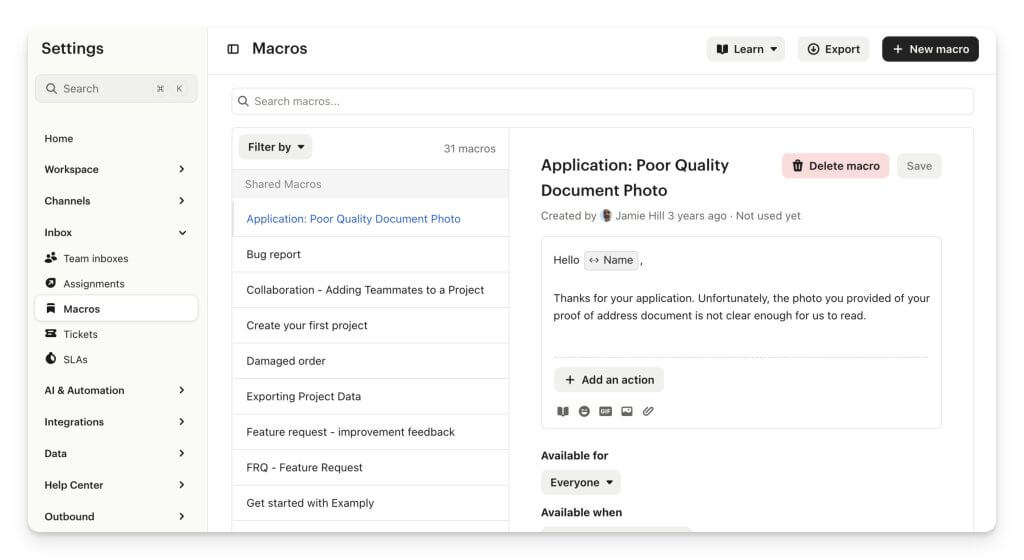
Add details:
- Title: Choose a clear, searchable name.
- Content: Add a message, internal note, or attachment (optional).
- Actions: Click + Add actions to define what the macro should do.
- Availability: Make it visible to everyone, specific teams, or just yourself.
How do I enable SLAs?
You can only create SLAs in the Workflows builder.
To view existing SLAs, go to Settings > Inbox > SLAs — creation isn’t possible from this page.
Here is how to create an SLA in a Workflow:
1. Open the Workflows builder.
2. Choose a trigger, such as:
- Customer opens a new conversation in the Messenger
- A ticket is created
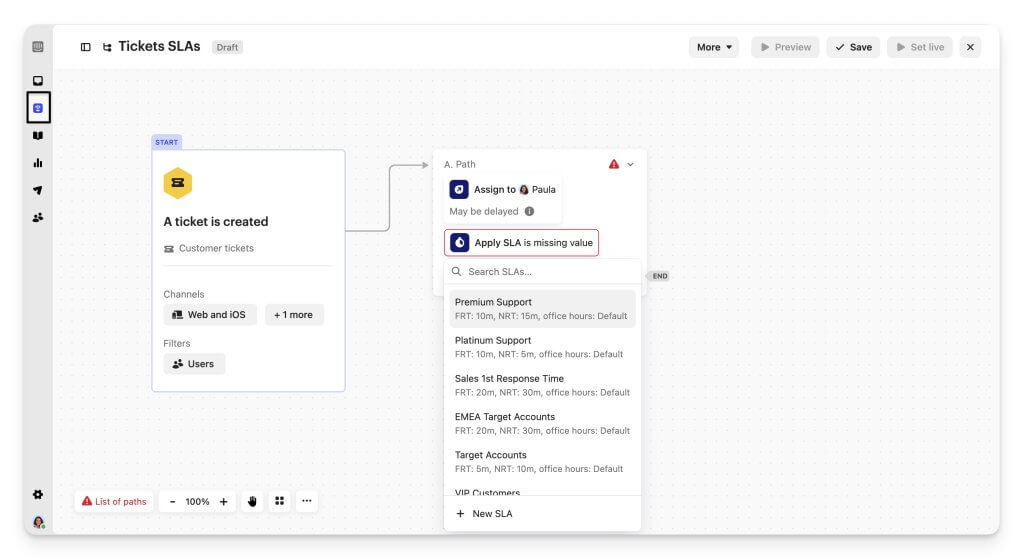
Apply SLA conditions:
- Use conditional branches to set different SLAs based on your rules — for example, faster response targets for high-priority customers.
- Mix And/Or filters for more precise targeting.
Set SLA targets:
In the Apply SLA step, define:
- First Response Time (FRT) – first reply time
- Next Response Time (NRT) – follow-up reply time
- Time to Close (TTC) – time to close
- Time to Resolve (TTR) – for tickets only
SLAs begin with the most recent customer message.
5. Automation & WorkflowsHow do I build rule-based automations in Workflows?
Go to Fin AI Agent > Workflows and click + New workflow.
Start with a template or create one from scratch by selecting a trigger, such as:
- Customer opens a new conversation.
- Customer sends their first or any message.

Set your trigger conditions, for example, only for Pro plan users who spend over $ 500.
In the Workflows builder, click + Add step to define actions like:
- Tag conversation or person
- Assign, snooze, or mark as priority.
- Apply SLA or close the conversation.
- Add notes or trigger API actions.
Actions run top to bottom, so order them carefully.
How do I automatically assign conversations?
You can use Workflows to assign conversations to the right team or teammate automatically.
1. Go to AI & Automation > Workflows and select + New workflow.
2. Choose a trigger, like:
- Customer opens a new conversation.
- Customer sends their first or any message.
3. Set rules to decide who gets each conversation. You can base this on message content, customer details, or wait time.
4. Click Save and close, then activate your Workflow.
Set up default assignments:
If a conversation doesn’t match any Workflow rules, it goes to the default assignee. To change this:
- Go to Settings > Inbox > Assignments > General.
- Update the Default assignee field.
- Default assignment only applies to conversations, not tickets.
- To automatically assign tickets, create a Workflow.
- Conversations started from Help Center articles need a dedicated Workflow for routing.
How do I configure Fin AI Agent?
You can customize Fin’s settings to control how it looks, speaks, and operates. Go to Fin AI Agent > Fin settings to get started.
Then, go to General settings:
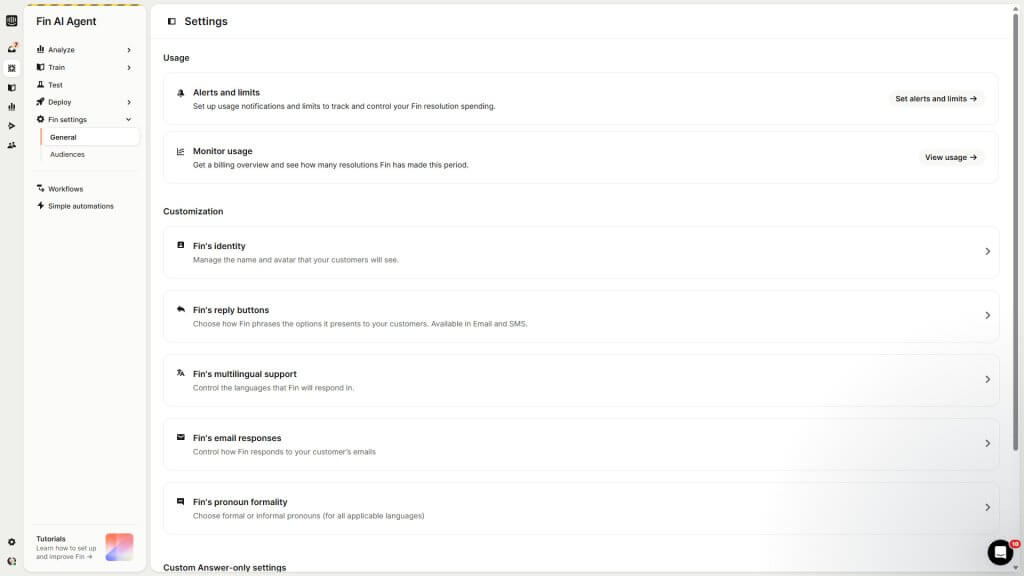
1. Usage:
- Monitor usage: Track the number of resolutions Fin has completed and review your billing overview.
- Alerts and limits: Set notifications or limits to manage your Fin resolution spending.
2. Customization:
- Fin’s identity: Update Fin’s name and avatar shown to customers.
- Reply buttons: Choose how Fin presents options in Email and SMS.
- Multilingual support: Select the languages Fin will respond in.
- Email responses: Control how Fin handles customer emails.
- Pronoun formality: Choose between formal and informal pronouns.
3. Custom Answers:
- Suggest relevant Custom Answers to help resolve issues early.
- Build from conversation history to create new answers automatically.
- Target content and guidance using custom audiences.
After that, create and manage Fin audiences:
Go to Fin settings > Audiences > + New audience to define who sees specific Fin content.
Set targeting rules using:
- Intercom default attributes (like Brand)
- Custom data attributes (CDAs)
- Conversation data attributes (CvDAs)
You can also use tags or segments from Contacts to refine audiences.
6. Help Center
How do I set up and customize Help Center?
Set up your Help Center to match your brand, manage languages, domains, privacy, analytics, and layout — all from one place.
1. General settings
Get started:
- Go to Settings > Help Center.
- Click your Help Center, then select Configure & Style in the top-right corner.
- Open the General or Styling tab to start customizing.
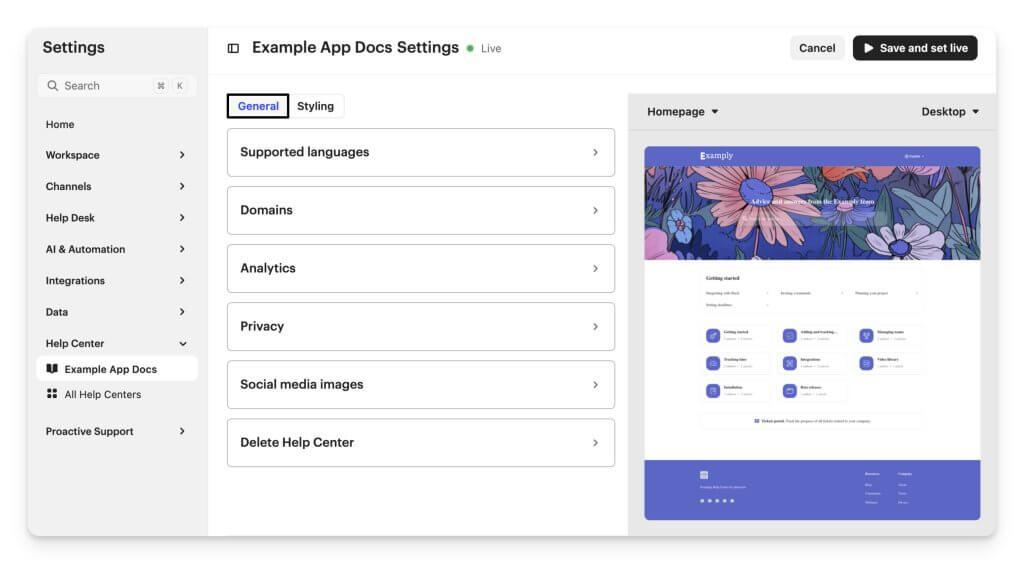
Supported languages:
- Choose your default language.
- Supports multiple languages.
- Messenger language is configured separately.
Domains:
1. Default: Hosted on Intercom domain (e.g., exampleapp.intercom.help).
2. Custom:
- Add a CNAME in your DNS pointing to custom.intercom.help.
- Enter your custom URL in Help Center settings.
- Click Save and set live.
- Disable search engine indexing or keep articles private if needed.
Analytics: Add your GA4 Measurement ID under Analytics to track visitors.
Privacy: Restrict articles to logged-in users by linking to your login page.
Social media images:
- Favicon: 1:1, max 150KB
- Social image: 1.91:1, max 2MB
2. Styling
Go through the Styling settings:
1. Import brand: Automatically apply logo and colors using your top-level domain.
2. Shared elements: Set background color, action color, corner radius, fonts, and toggle show article authors.
3. Header: Add a logo, page title, and up to 3 header links.
4. Hero block: Add a welcome message, background color or image, text color, and search bar layout (short, medium, long).
5. Layout & sections:
- Configure the homepage with Collections, Articles, Content, and Tickets Portal.
- Drag and drop to reorder sections.
- Collections must have published articles in all supported languages to appear.
3. Collection & article pages
Collections:
-
Show or hide content descriptions.
Choose layout and card style: Classic, Visual, or Compact.
Articles: Enable table of contents and display up to 5 related articles.
4. Footer
- Choose template: Simple, Classic, Multi-level.
- Add logo, social links (up to 16), and custom footer links.
- Control the “Powered by Intercom” link via Settings > Channels > Email.
How do I create collections and folders?
Organize your Help Center content with collections and folders to make articles easy to find and navigate.
Create collections
Where to start: Settings > Help Center > New > Collection.
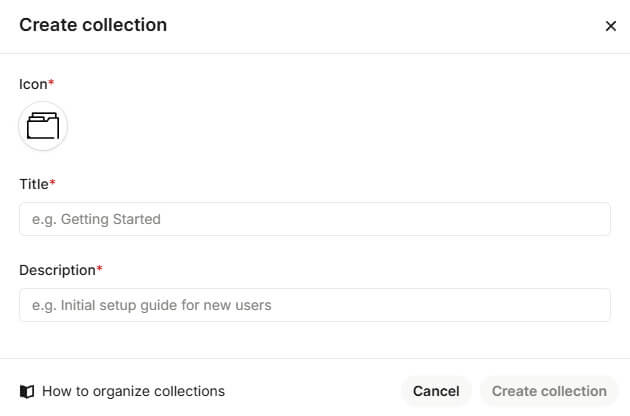
Follow this guide:
- Name your collection and include a brief description to provide context.
- Select an icon from the dropdown or upload a custom JPEG, PNG, or SVG.
- Create nested collections or articles via the ellipsis next to a collection.
- Drag and drop to reorder collections or articles.
- You can create up to three levels of collections.
If you want to rename a collection:
- Click the collection name to edit.
- For multilingual collections, update the default language; other translations must be updated separately.
Add folders in Knowledge Hub
Next, you can create folders inside collections:
- Click New folder in the top-right.
- Add a name and optional emoji.
- You can create subfolders (up to 10 levels), rename or move them, and add content to them.
How can I enable content for Fin and Copilot?
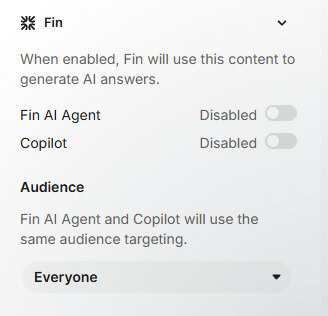
You can give Fin and Copilot access to content. This allows them to generate AI-powered answers for both customers and teammates.
Option 1: Enable content in bulk:
- Go to the Content page in Knowledge.
- Select the items you want to update.
- Click Change AI Copilot state or Change AI Agent state to enable or disable content for Fin or Copilot.
Option 2: Enable individual content items:
- Open the Details panel when creating or editing content in Knowledge.
- Toggle the Fin or Copilot state to enable or disable AI access for that item.
7. Integrations
How do I integrate any third-party app into Intercom?
The Intercom App Store is where you can find public apps built by Intercom or other companies. These apps extend Intercom’s functionality for your team.
Step 1: Access the App Store:
- Go to Settings > App Store.
- Browse the full list of apps.
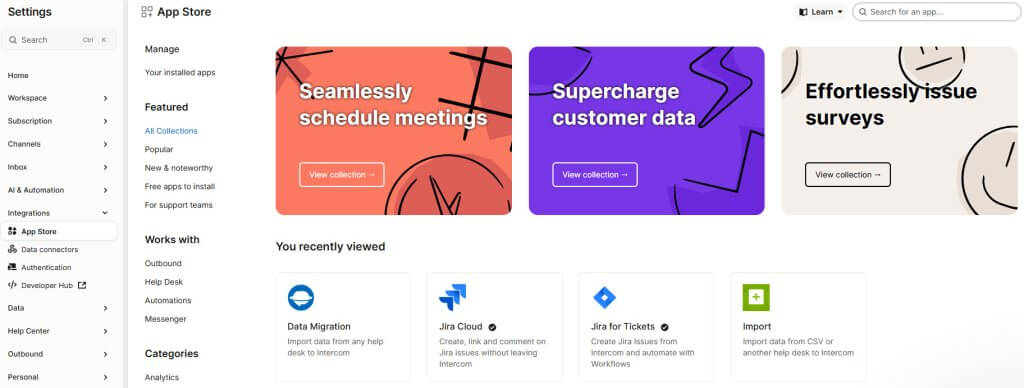
Step 2: Filter or search apps:
- By team: “For sales teams”, “For marketing teams”, “For support admins”, or “For support agents”.
- By category: “Analytics”, “Automation”, “Lead capture”, and more.
- By Intercom product compatibility.
- Or search for a specific app using the search bar.
Step 3: Install an app:
- Click the app you want.
- Follow the short installation instructions.
Once installed, your teammates will be notified automatically, so everyone can start using the new app.
How do I set up data connectors for Workflows and Inbox?
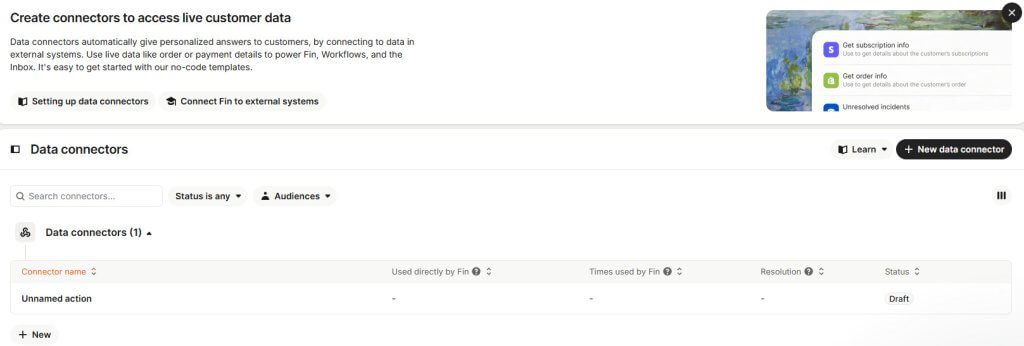
Data connectors link live external data to Intercom without coding. This data powers Fin, Workflows, and Inbox to help customers self-serve.
Create a data connector:
- Go to Settings > Integrations > Data connectors → New data connector.
- Add a name and description.
- Enable Fin to use it directly if needed.
Connect your API:
- Enter the HTTPS URL of your system.
- Choose the request method: GET, POST, PUT, PATCH, DELETE.
- Add HTTP headers or authentication if required.
- Include a request body for POST/PUT requests.
Test and map data:
- Click Test request to verify data.
- Transform fields or map to Intercom objects as needed.
- Restrict which data Fin can access for responses.
Go live: Activate the connector to start using it in Workflows and AI answers.
8. Reporting
How do I create reports in Intercom?
Create a new report:
Click the + icon at the top of the Reports menu to start.
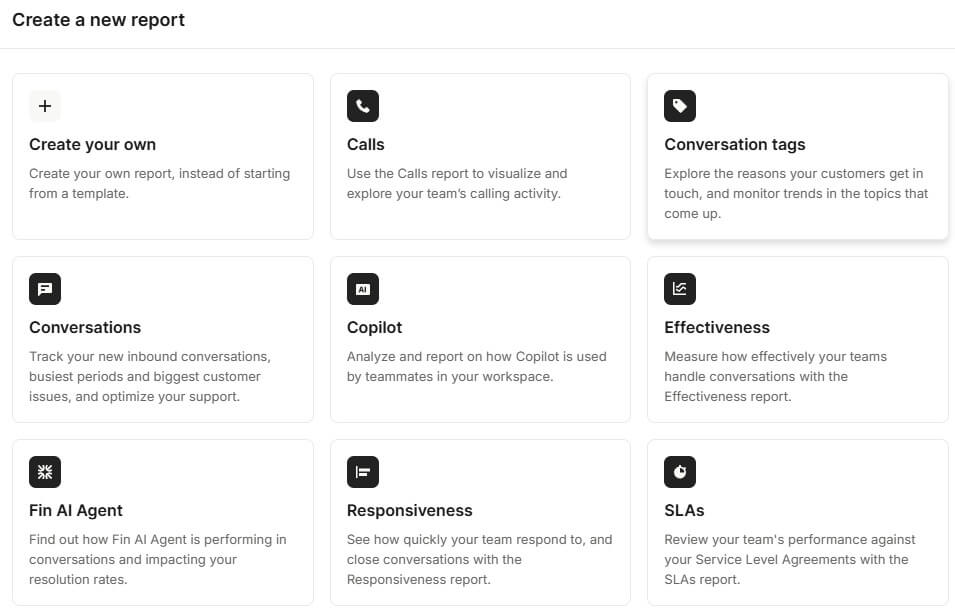
Use a pre-built template:
Choose from 12 report templates, each offering ready-made charts you can customize in minutes:
- Calls
- Conversation tags
- Conversations
- Customer satisfaction
- Effectiveness
- Fin AI Agent
- Copilot
- Responsiveness
- SLAs
- Team inbox performance
- Teammate performance
- Tickets
Click Use this template to preview and tailor it to your needs.
Build a custom report:
- If you’re on the Advanced or Expert plan, you can create custom reports from scratch.
- Select from 100+ chart types or build your own to focus on the data and visuals that matter most.
How do I generate SLA reports?
You can track your team’s SLA performance using the SLAs report or by building a custom report.
Create an SLA report:
- Go to Reports and click + New report.
- Select the SLAs template to get started instantly.
Build a custom SLA report:
On the Advanced or Expert plan, you can create your own SLA report using various SLA metrics and attributes.
9. Testing, Launch & Best Practices
How do I set up a test workspace in Intercom?
A test workspace lets you safely explore Intercom and verify your setup before going live.
How to enable a test workspace:
Step 1: Go to Settings.
Step 2: Navigate to Workspace > General, toggle on Enable test workspace, and click Save.
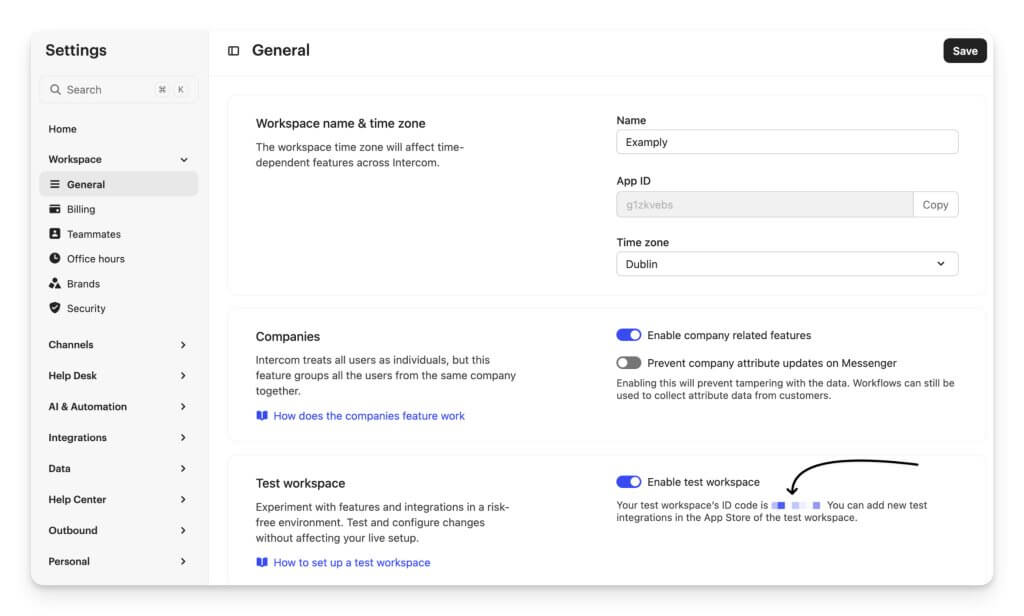
Step 3: A confirmation message appears, and your test workspace ID (App ID) will display under the toggle.
Step 4: Add the Intercom snippet to your non-production environment. Update the app_id field to match the environment your site/app is running in. If using identity verification, get the new API secret for the test workspace.
Step 5: Access your test workspace by hovering over your avatar, selecting Profile, then choosing the [TEST] workspace.
How can I install Intercom in production for a test segment?
You can safely test Intercom in production by limiting visibility to a small internal group.
Show Messenger only to testers:
Set audience rules so the Messenger appears only for:
- Logged-in users with your company email
- Visitors on a specific test page
For internal users:
- Use the rule “email address contains @companydomain.com.”
- Ensure the Messenger is installed for logged-in users and that user data is passed correctly.
- If testing proactive messages, make sure audience rules target only your test segment.
For a test page:
- Target a unique URL (e.g., #intercom-testing) so teammates can test safely without exposing it to customers.
How do I launch Intercom for my customers?
Once testing and QA are complete, you can try a gradual rollout instead of going live for all users at once. This helps your team manage volume and ensures a smooth transition.
1. Start small:
Begin by enabling Intercom for a limited group of users.
2. Roll out by page:
- Launch Intercom for logged-in users on a specific product page to avoid overwhelming your team.
- Set this up by configuring the Messenger to appear only on that page using the “Current page URL” filter.
3. Roll out by segment:
- You can target a specific audience, such as VIP or freemium customers.
- Create a segment under Contacts, then set the Messenger to display only for that group.
4. Roll out by channel:
- If your team uses a support email, start by turning on email forwarding before enabling Messenger.
- This helps agents get comfortable using the Intercom Inbox before handling live chats.
10. Troubleshooting
How do I reset my Intercom password?
If you’ve forgotten your password, follow these steps:
1. Go to the login page for your region:
- US: app.intercom.com
- EU: app.eu.intercom.com
- Australia: app.au.intercom.com
2. Click Forgot your password?
3. Follow the prompts to reset your password and regain access to your workspace.
Why am I locked out of my Intercom account?
If you enter the wrong password too many times, your account will be temporarily locked.
To regain access:
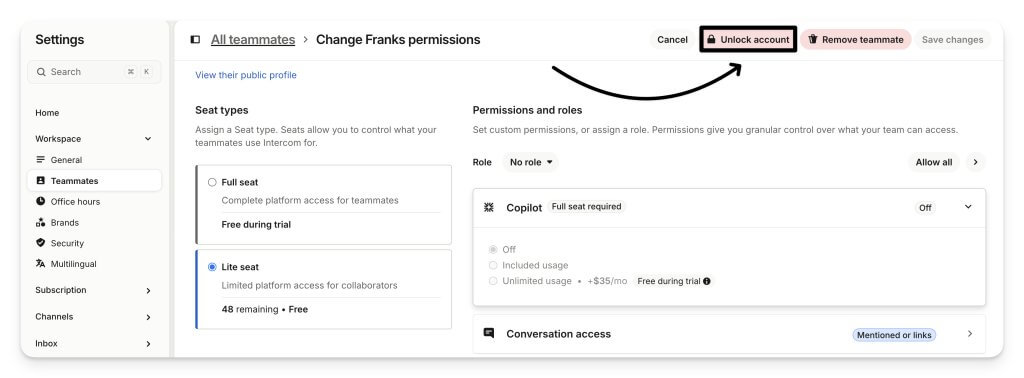
- Ask a teammate with permission to manage other teammates to unlock your account.
- They should check the teammate list for a Locked status next to your name.
- To unlock, they need to edit your teammate's profile and click Unlock account.
What should I do if my teammate sees an "invalid invite link" error?
If your teammate cannot join Intercom:
- Delete old invitation emails: invitation emails can thread together, confusing.
- Send a new invitation: ensure your teammate uses the most recent invitation link.
- Still seeing an error: contact Intercom Support via Messenger and include a screenshot of the error.
What should I do if I encounter a 403 error when opening the Intercom Messenger from a specific subdomain?
If you see a 403 error when opening Intercom Messenger from a subdomain:
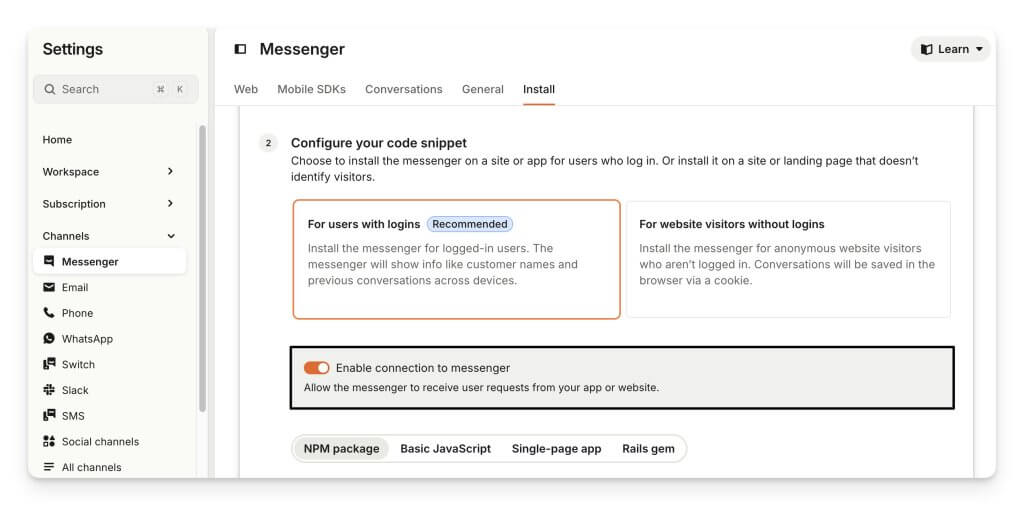
- Go to Settings and check if Enable connection to Messenger is turned on.
- If it’s off, toggle it on.
- Refresh your browser cache and try again.
