Freshservice Implementation and Setup Guide
Freshservice is an intuitive IT service management (ITSM) platform designed to simplify support operations for teams of any size. With easy setup, user-friendly tools, and scalable features, it helps IT teams manage tickets, automate workflows, and deliver faster, more reliable service.
This guide is designed for anyone setting up Freshservice, from first-time admins to experienced IT teams. Whether you’re configuring your account, setting up the service portal, or onboarding agents, you’ll find clear, step-by-step instructions to launch your Freshservice instance confidently and get your team resolving tickets and supporting users from day one.
1. Getting Started & Account Setup
How to create a Freshservice account and set it up?
- Go to Freshservice and sign up for a trial or subscription.
- Verify your email address and log in.
- Choose a unique domain name for your service desk (e.g., yourcompany.freshservice.com).
Once you’ve completed the sign-up process, the next step is to set up your service desk.
This involves configuring three key components that form the foundation of your Freshservice setup:

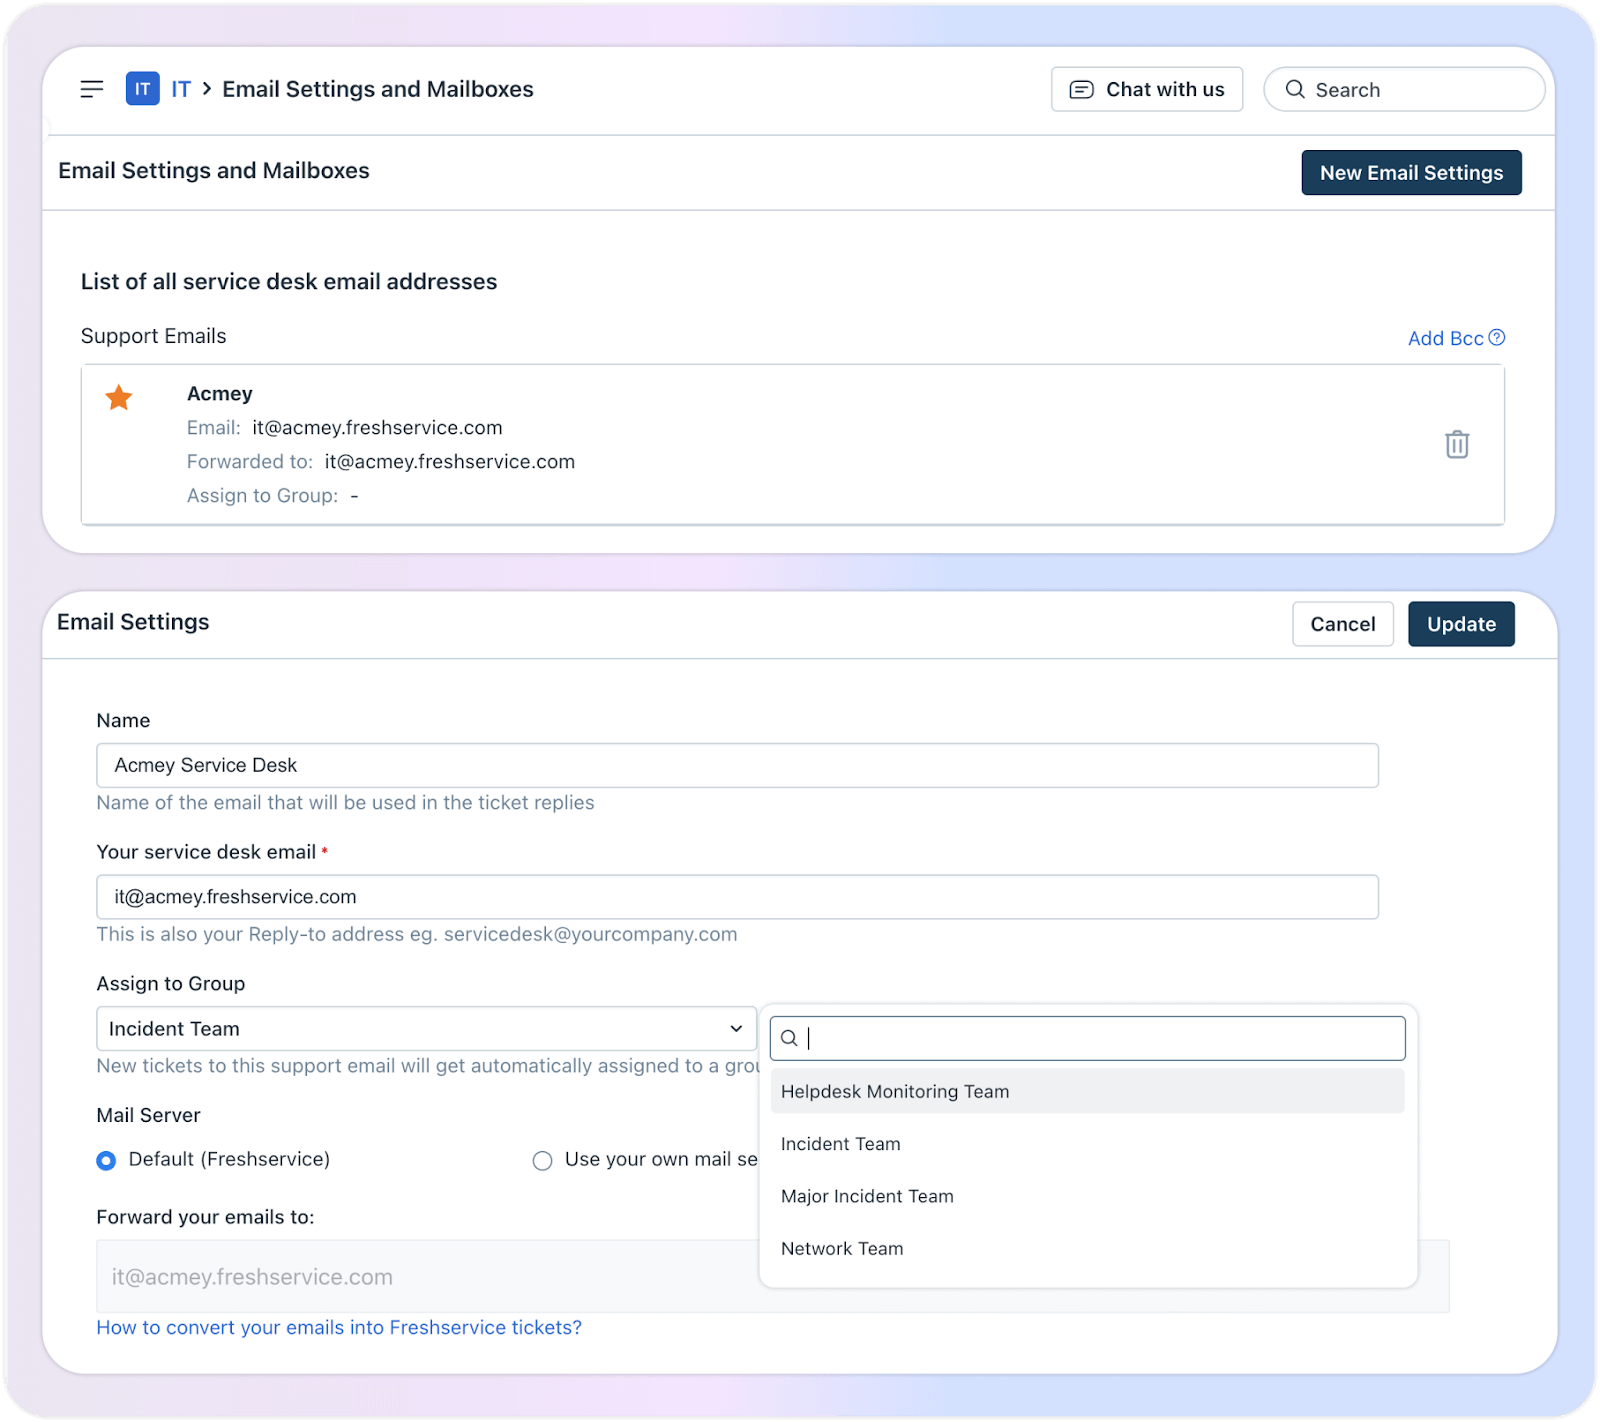
How to set up your primary helpdesk email?
Your helpdesk email address serves as the default contact point for employees to raise requests or submit queries. The company name you provided during sign-up is used to generate this address automatically.
For example, if your company name is Ley, your helpdesk email will be it@ley.freshservice.com.
- After the email is created, ensure to verify it.
- Once verified, this address becomes the main inbox where all IT-related requests and communications will be received.
How to set up your service portal?
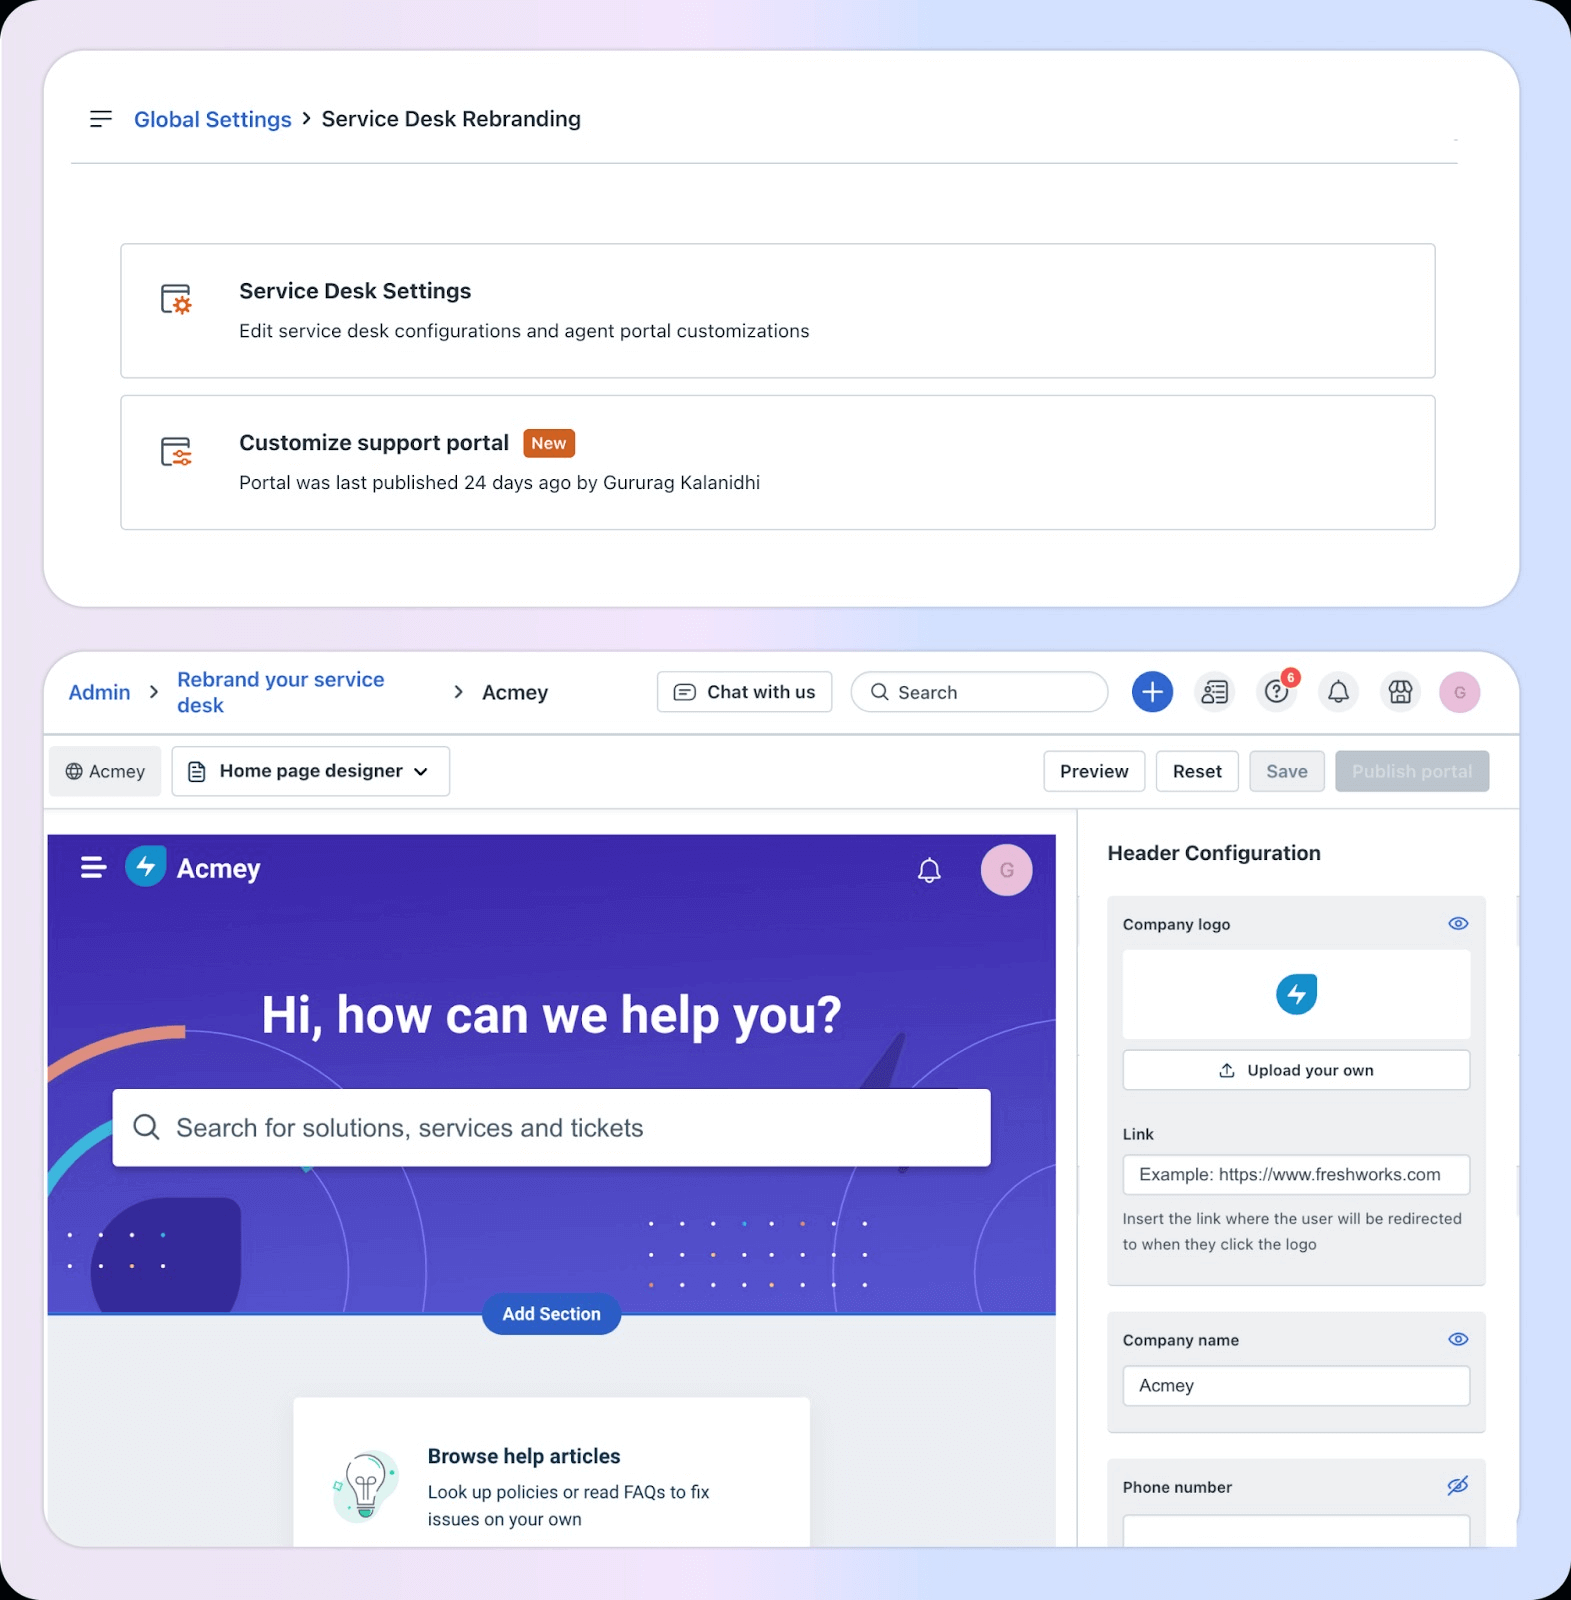
The next step is to customize your service desk to reflect your company’s branding. Here’s how to do it:
- Go to Global Settings → Service Desk Rebranding to align your portal with your brand identity.
- Add your company logo, set a custom service desk name, and adjust the color scheme to match your brand colors.
- Use the dropdown menu to fine-tune the appearance of different service desk pages — including settings for colors, fonts, and more.
Invite Users and Agents
- Add your IT team members as agents.
- Import end users manually or via CSV if needed.
- Assign roles and permissions to each user based on responsibilities.
2. Service Desk Configuration
How to set up business hours?
Business hours define the working schedule of your IT team. They determine how SLAs are calculated and help ensure tickets are prioritized correctly.
How do I access business hours settings?
- Log in as an administrator.
- Navigate to: Admin → Service Management → Service Desk Settings → Business Hours

For multiple workspaces
Global workflows:
- Admin → Global Settings → Service Management → Service Desk Settings → Business Hours
Workspace-level workflows:
- Admin → Workspace Settings → {Workspace Name} → Service Management → Service Desk Settings → Business Hours
What’s the difference between default, global, and workspace business hours?
- Workspace-level hours: Apply to tickets in that specific workspace.
- Global hours: Apply across all workspaces if no workspace rules match.
- Default hours: Used if neither workspace nor global conditions apply.
How do I edit business hours?
- Click Edit next to Default Business Hours.
- Select the correct Timezone (from Service Desk Rebranding).
- Define working hours:
- For 24x7 support, set all hours and days.
- For varying schedules, use Select working days/hours and uncheck non-working days.
How do I account for holidays?
- Add a Yearly Holiday List manually or import a country’s holiday list.
- Holidays are excluded from SLA calculations.
Can I set different business hours for different teams?
Yes. Freshservice allows you to configure multiple business hours for different groups. This is useful for teams working different shifts or in different regions. SLAs can then be calculated individually for each group.
- Click Save to apply your updates.
How to configure Ticket Task Fields in Freshservice?
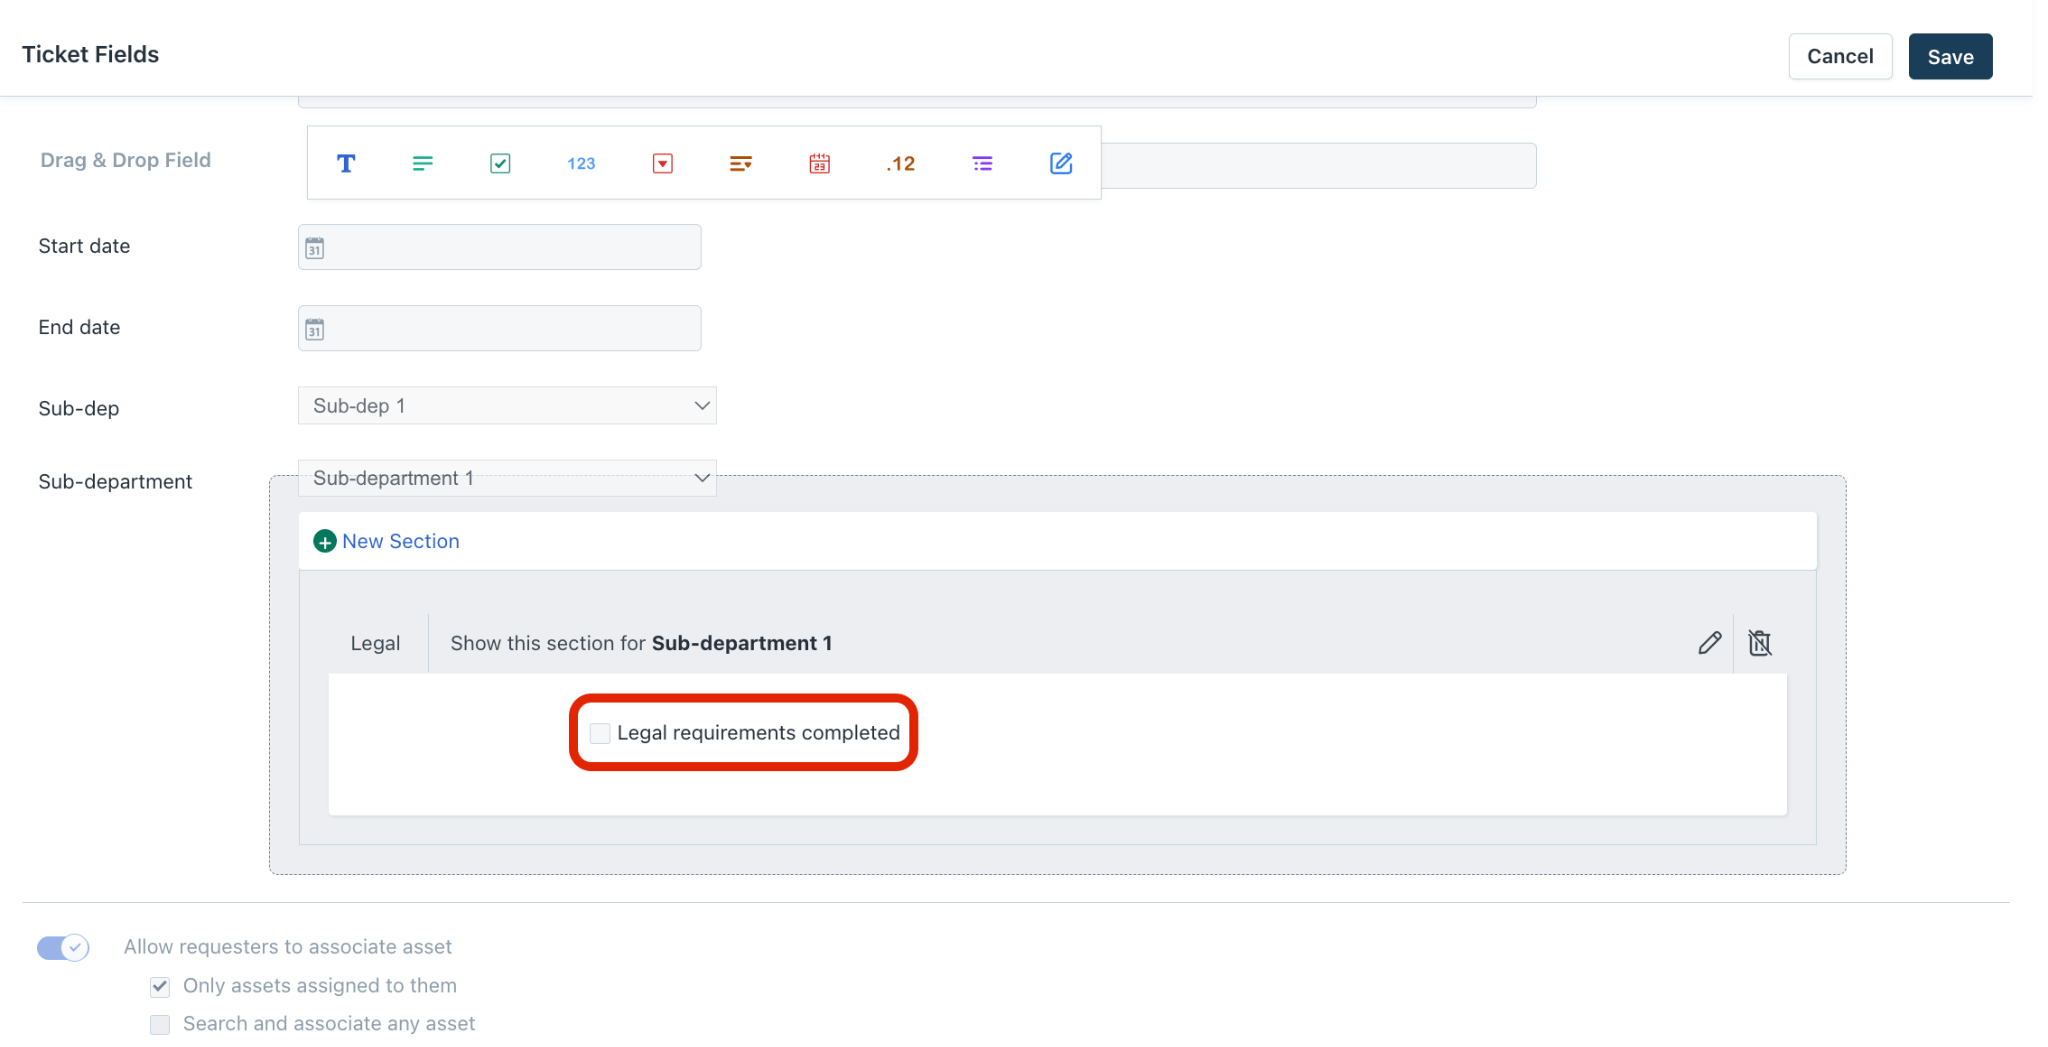
Why configure ticket task fields?
Ticket task fields allow you to capture specific information for each task within a ticket, ensuring your team has all the details needed to resolve issues efficiently.
How do I access ticket task fields?
- Log in as an administrator.
- Navigate to:
Admin → Global Settings → Service Management → Field Manager → Ticket Fields
Note: Ticket task fields can only be managed at the global settings level.
How do I edit existing fields?
1. Click Ticket Task to open the Ticket Task page.
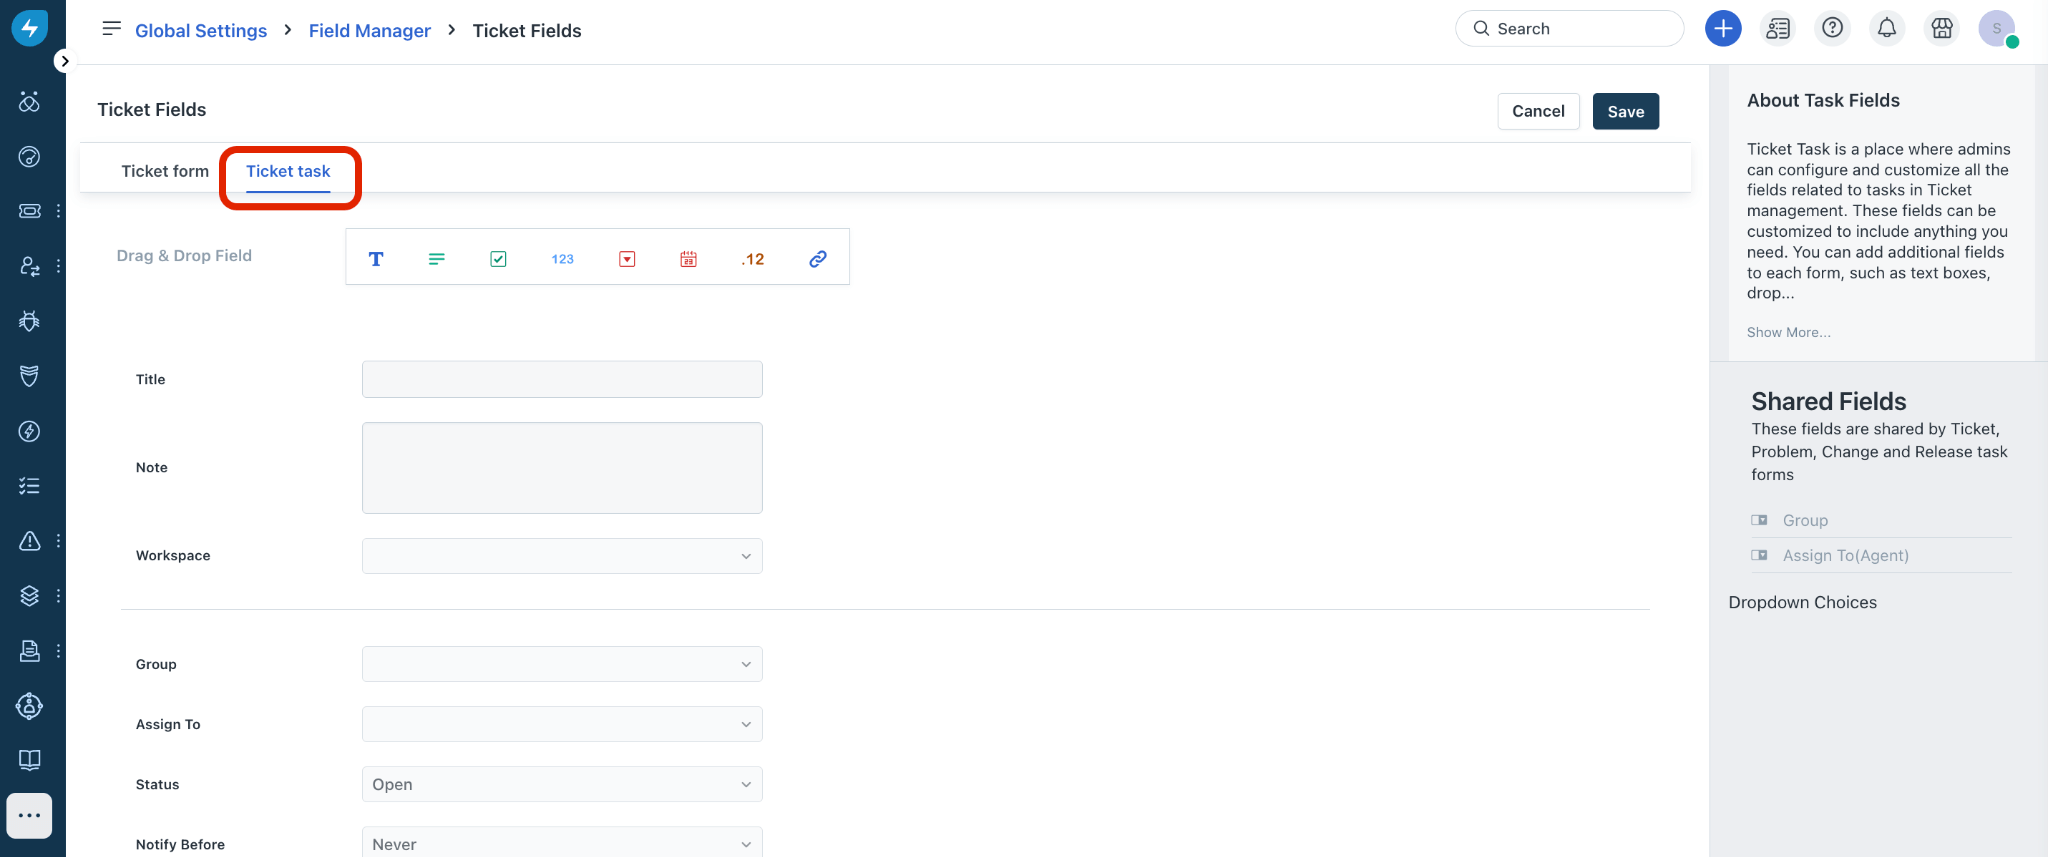
2. Click any default field to view and update its properties.
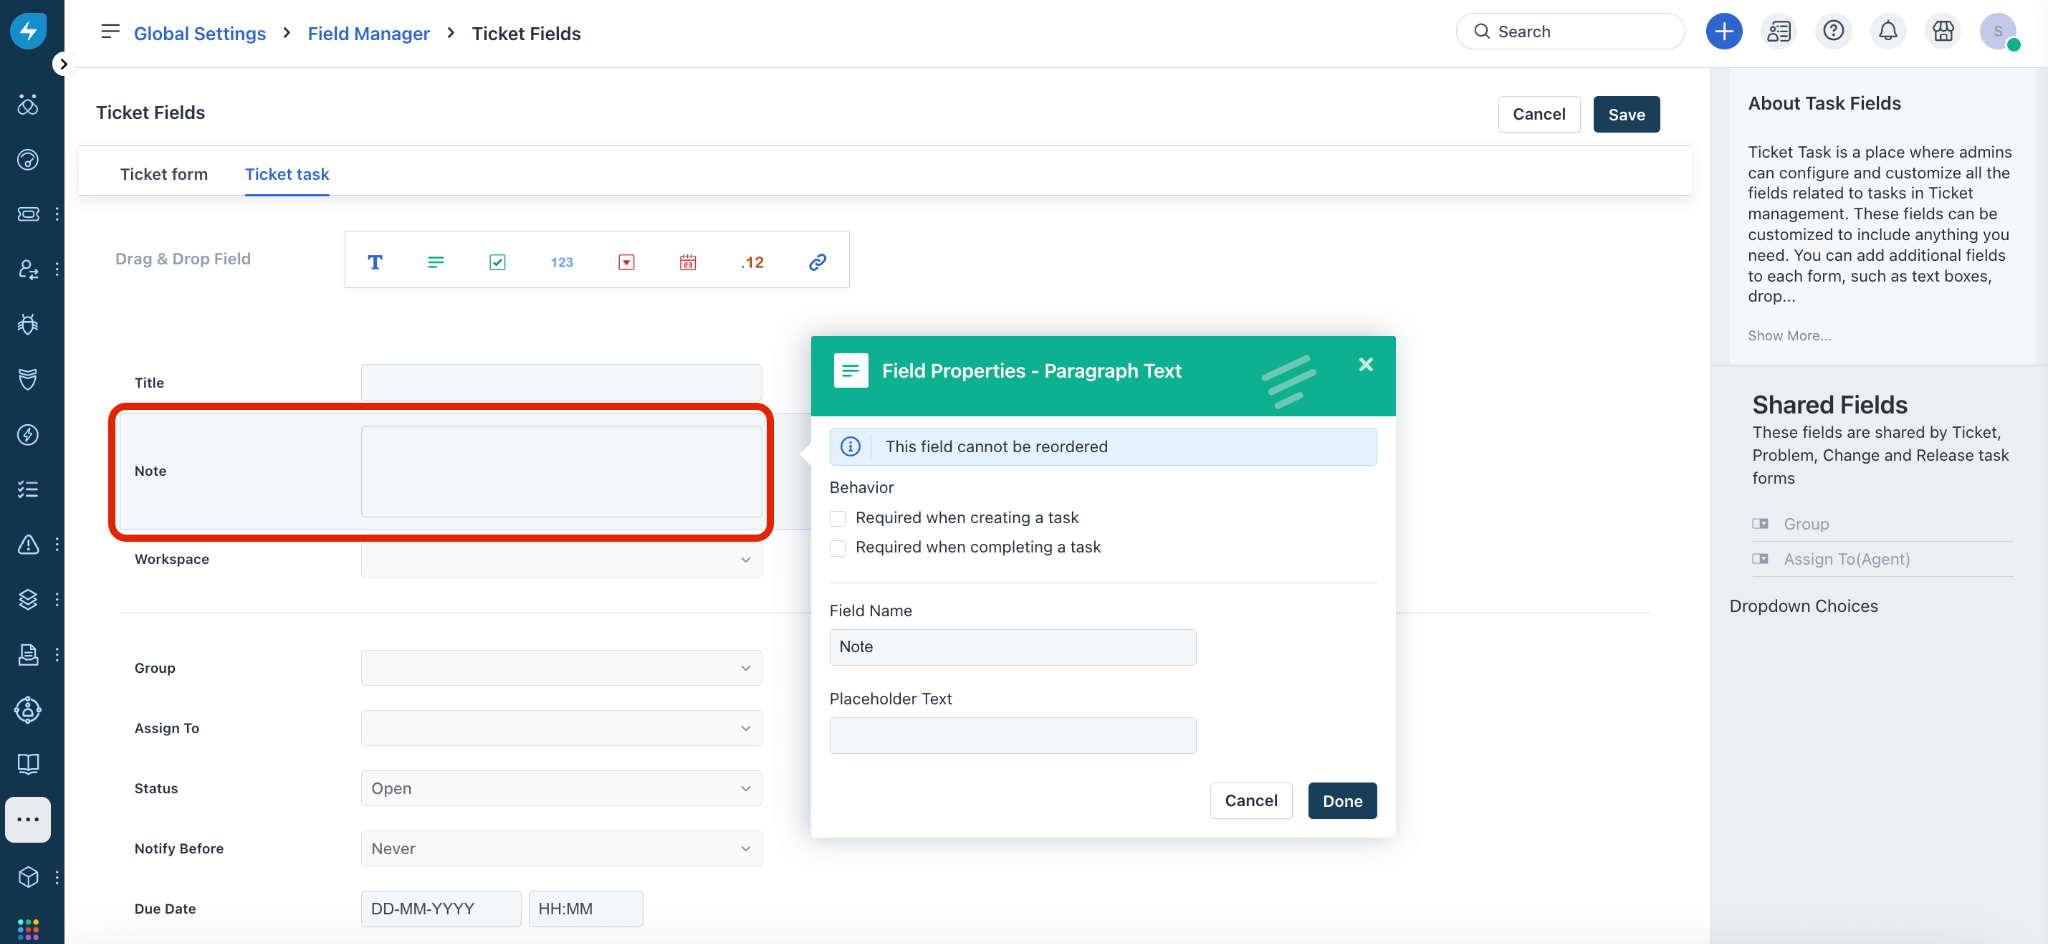
3. Make your changes and click Done.
How do I add a new custom field?
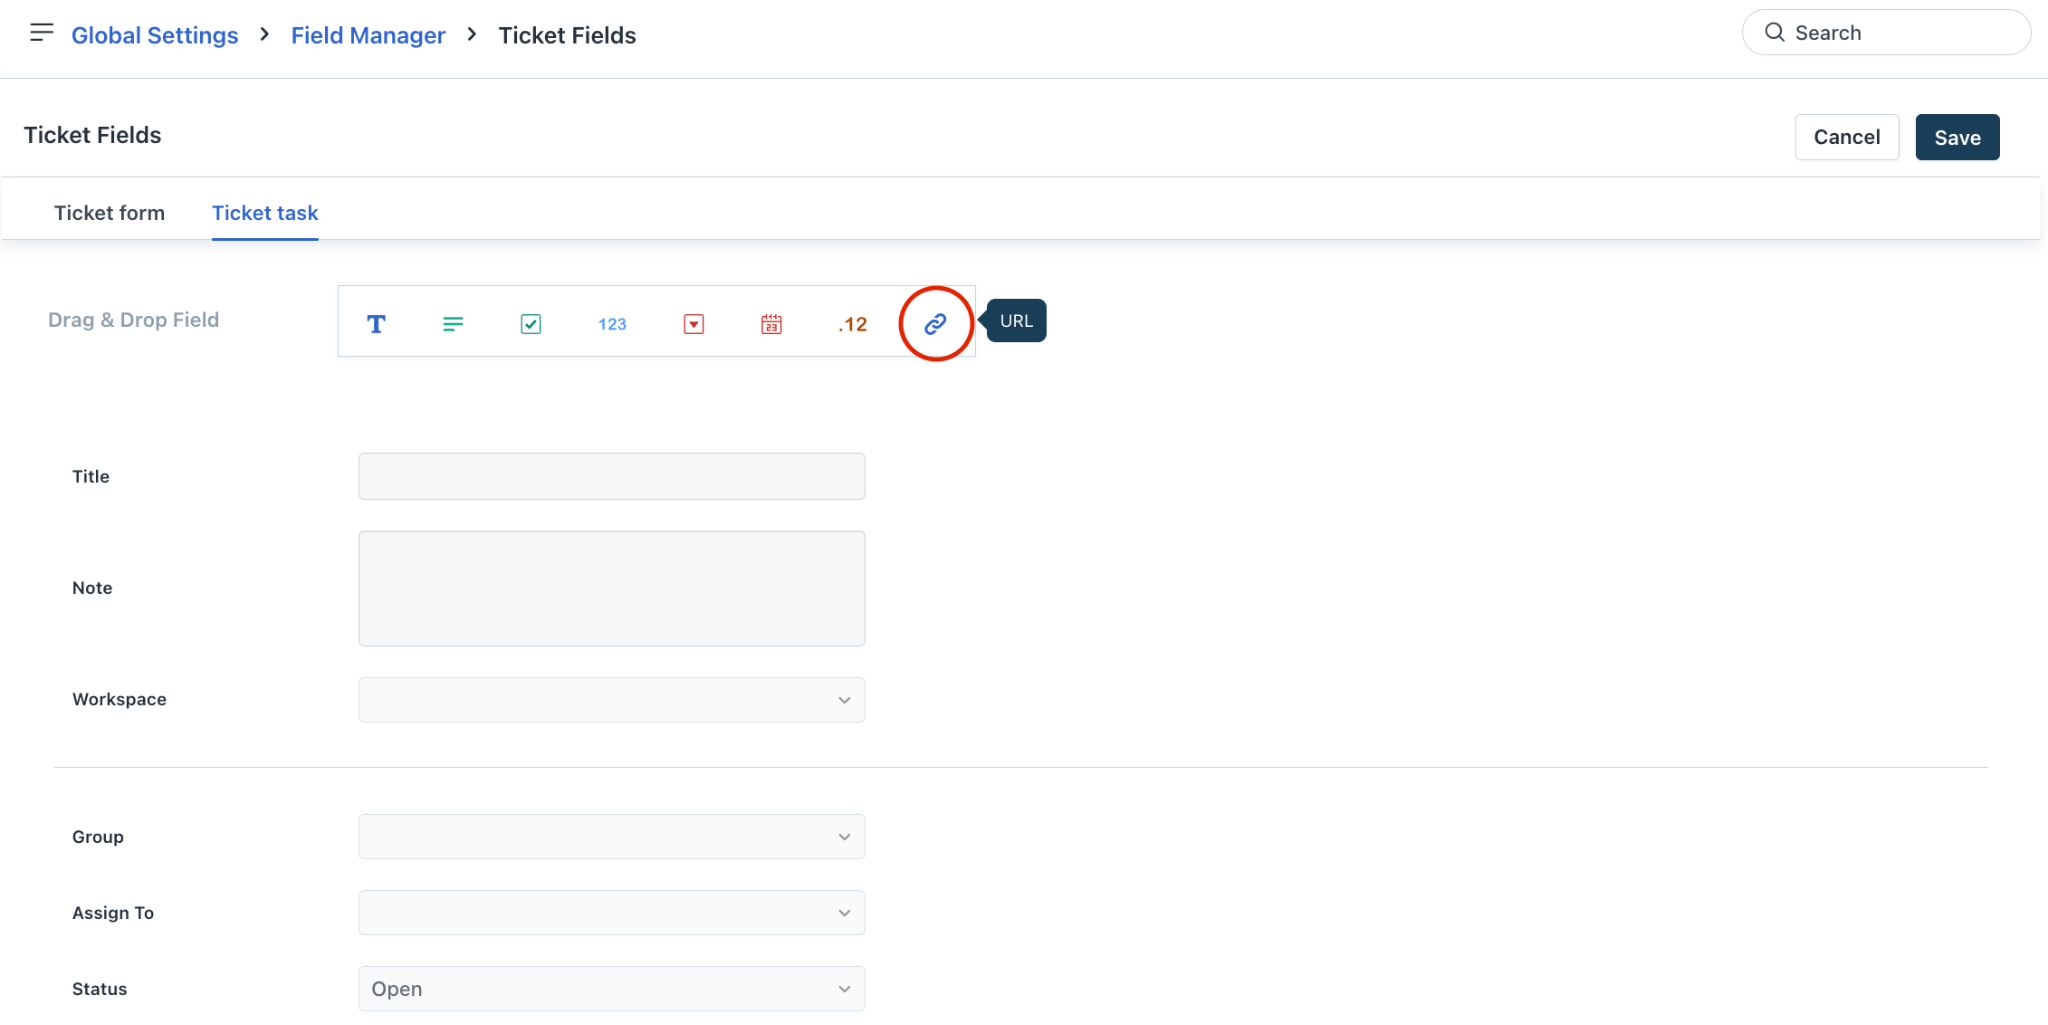
1. Select a field type from the Drag & Drop Field options (e.g., Text, URL, Dropdown).
2. In the Field Properties dialog:
- Enter a Field Name.
- Update any additional properties as needed.
3. Click Done to add the field to the Ticket Task page.
How do I save my changes?
- After editing or adding all fields, click Save to apply your configurations.
3. User Management & Roles
Proper user management is crucial for organizing your IT team and controlling access within Freshservice. This section covers adding agents, departments, and requesters, understanding roles, and managing groups.
How to Add Users: Agents, Departments, and Requesters?
Freshservice distinguishes between different types of users. Here’s how to add them:
Steps to add agents and requesters:
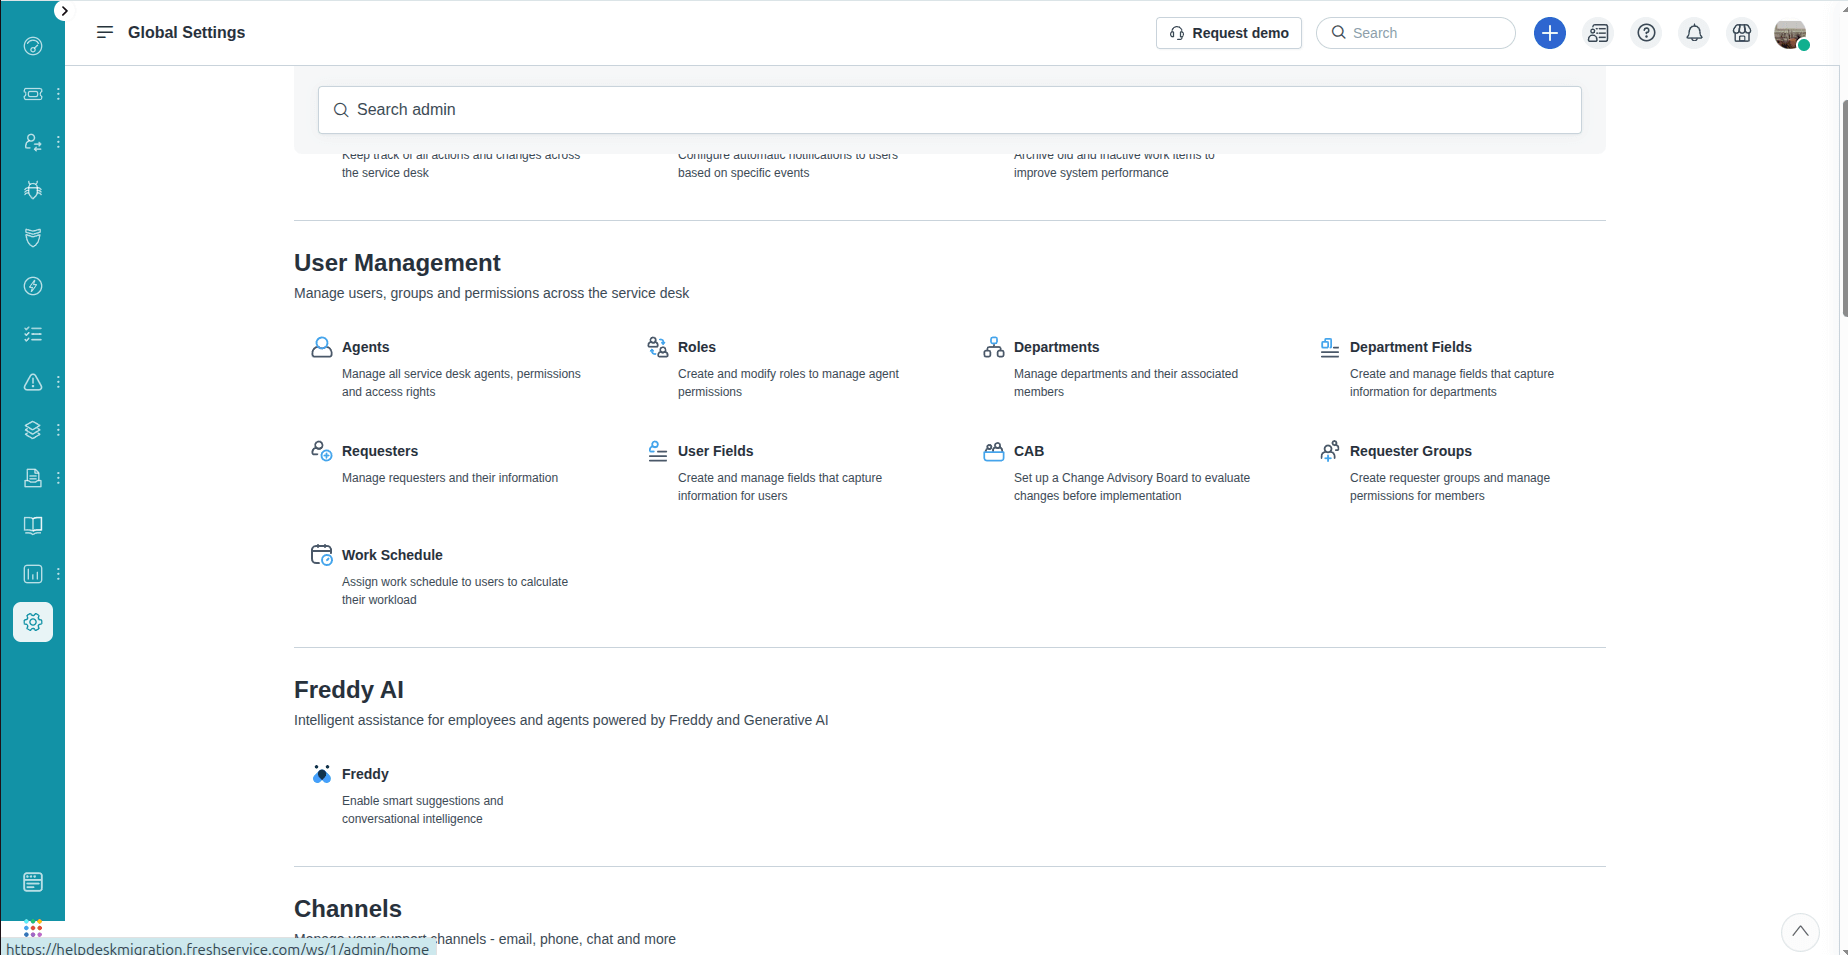
1. Access User Management:
- Go to Admin → Users.
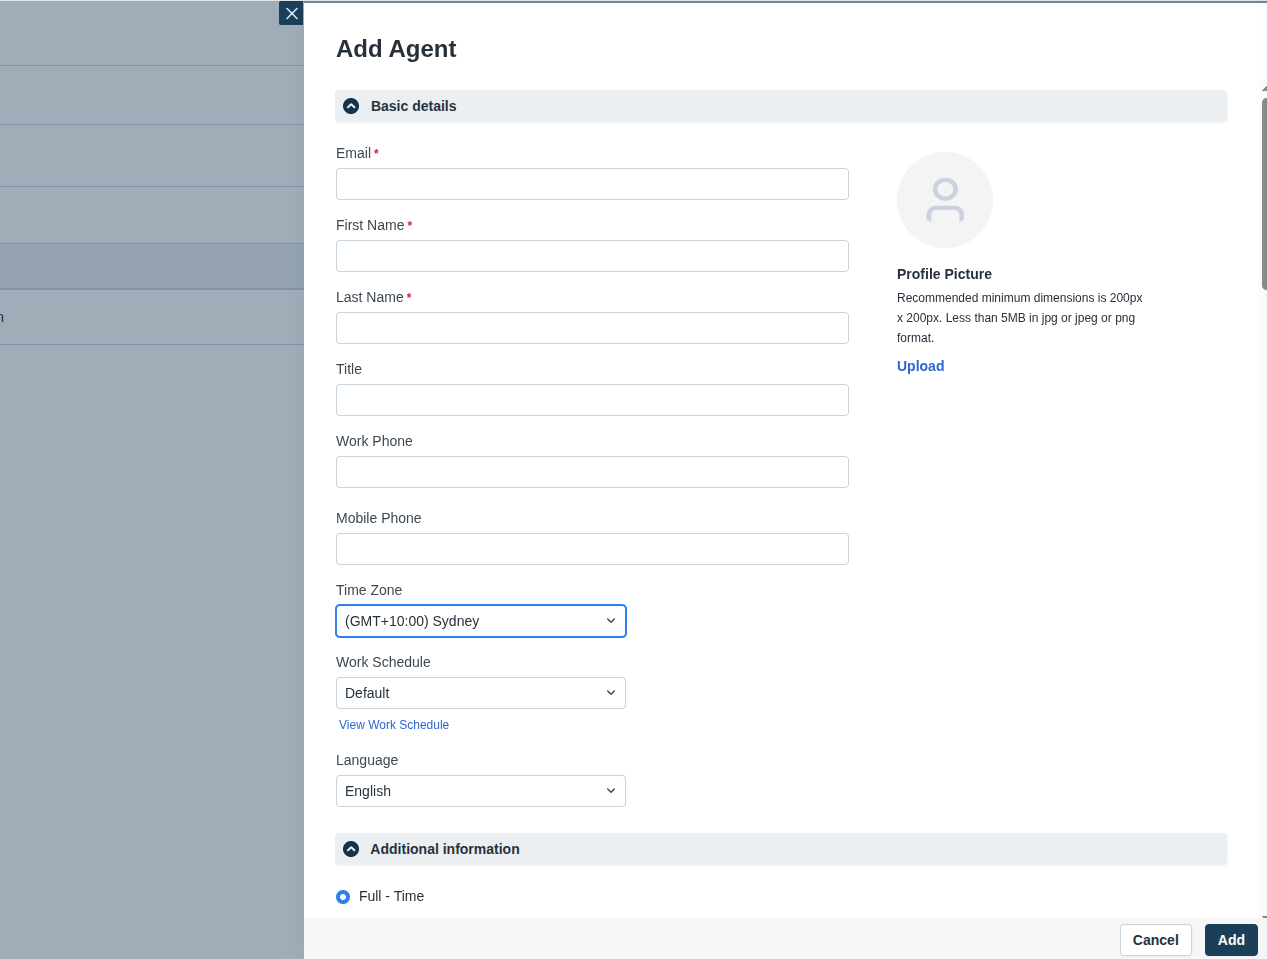
2. Add a New User:
- Click New User.
- Fill in details: Name, Email, Role (Agent / Admin / Requester)
3. Assign Departments (Optional for Agents):
- Example: IT, HR, Finance.
- Agents can be grouped by department to route tickets automatically.
4. Save User:
- Freshservice will send a welcome email to the new user.
Requesters:
- These are end users who submit tickets.
- You can add them manually or allow them to self-register via the portal.
Departments:
- Go to Admin → Departments.
- Click New Department, enter a name, and optionally assign agents.
- Departments help structure ticket assignment and reporting.
How to use Roles and Permissions?
| Role | Access & Permissions |
| Admin | Full access to all features, settings, workflows, and SLA configurations. |
| Agent | Can manage tickets, reply to requesters, and perform actions based on permissions. |
| Requester | Can submit tickets, view ticket status, and access the knowledge base. |
Steps to assign roles:
1. During user creation:
- Choose the appropriate role from the drop-down menu.
2. Modify existing users:
- Go to Users → Select User → Edit Role.
How do I set up user groups?
Groups help organize agents and define responsibilities for specific tasks or categories.
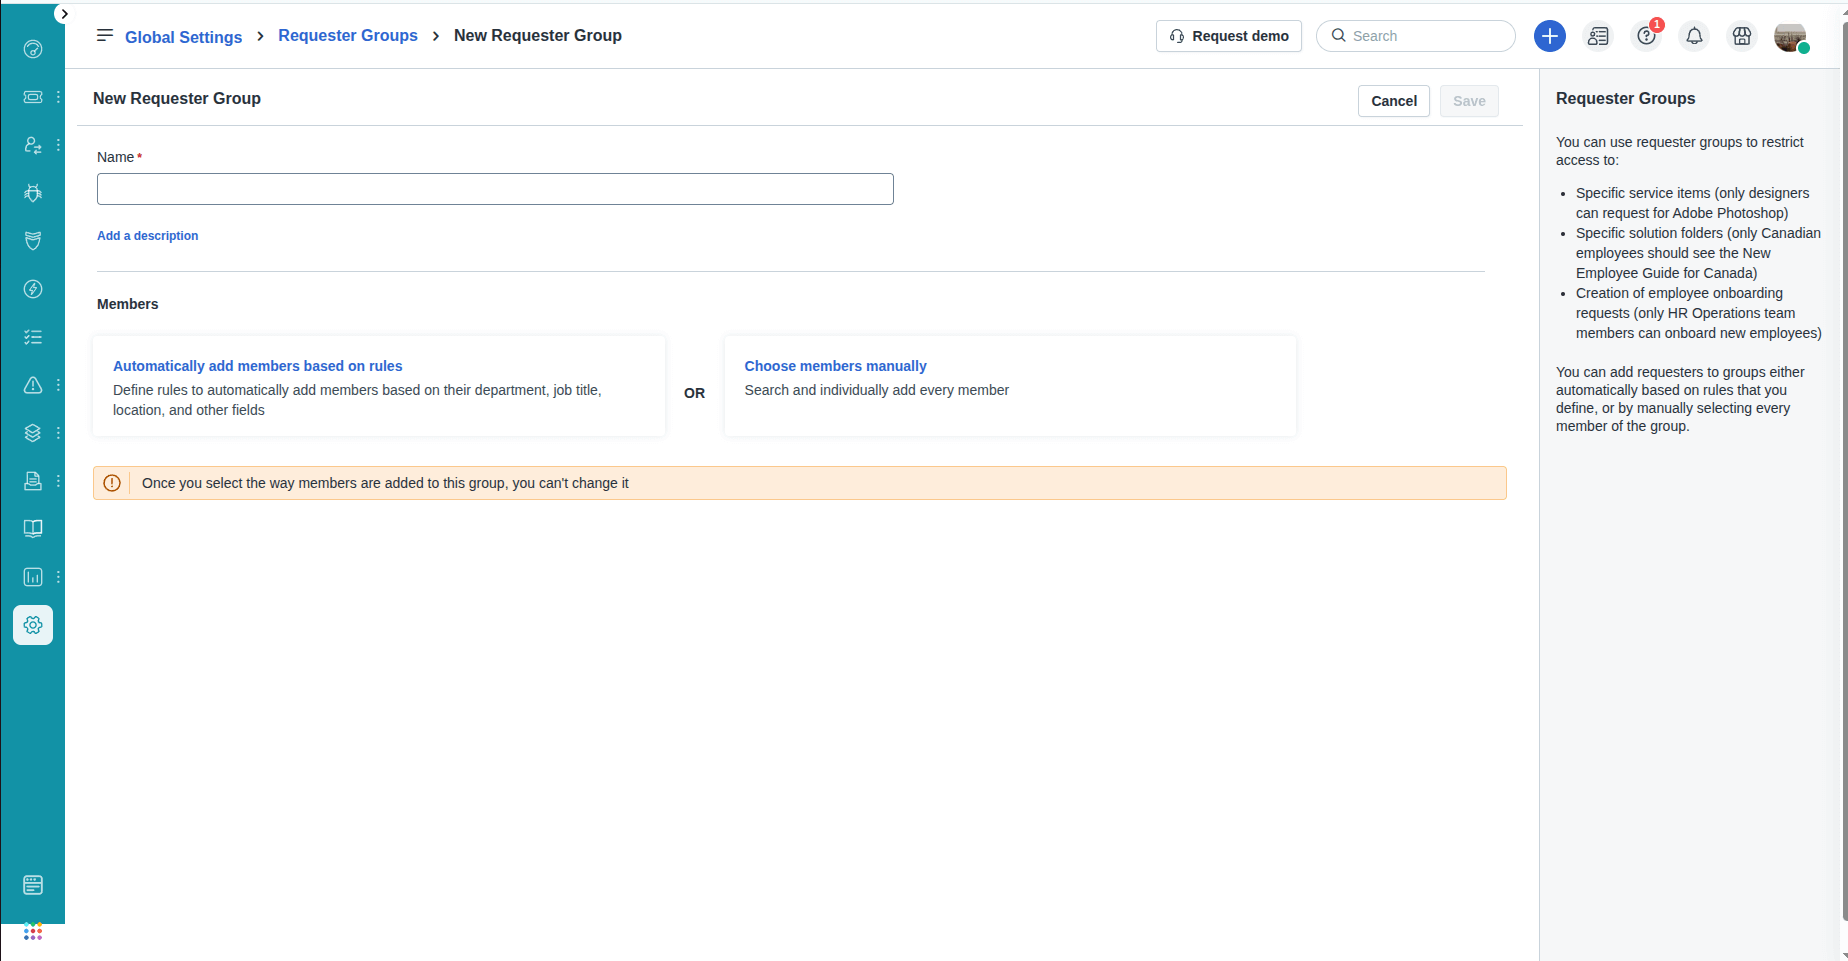
Steps to create a group:
1. Go to Admin → Groups.
2. Click New Group:
- Enter a group name (e.g., “Network Support Team”).
3. Assign Agents:
- Add agents responsible for this group.
4. Assign Responsibilities:
- Example: All network-related tickets are assigned to this group.
5. Configure Ticket Assignment Rules:
- Go to Admin → Workflow Automator to automatically route tickets to groups based on category, priority, or location.
Example Use Case:
- Group Name: Hardware Support
- Agents: Alice, Bob
- Responsibility: All tickets with category “Hardware” or priority “High”
- Benefit: Tickets are immediately routed to the correct team, reducing response time.
4. Service Catalog & Self-Service
A well-structured service catalog and self-service portal streamline request submissions and improve IT team efficiency. This section explains how to create the catalog, customize the portal, and distinguish service requests from incidents.
How to create a Service Catalog in Freshservice for IT requests?
The Service Catalog lists all IT services that users can request, such as hardware, software, or access rights.

1. Access the Service Catalog:
- Go to Admin → Service Catalog.
2. Add a New Service:
- Click New Service.
- Enter the Service Name (e.g., “Laptop Request”).
- Optionally add a Description explaining what the service covers.
3. Define Service Categories:
- Example categories: Hardware, Software, Network, Access Requests.
- This helps users easily navigate the catalog.

4. Set Service Availability:
- Specify who can request this service (all users, certain departments, or groups).
- Add SLA if applicable (e.g., “Laptop requests will be fulfilled within 3 business days”).
5. Add Custom Fields:
- Collect specific information required to fulfill the request, e.g., laptop model, software version.
- Go to Admin → Ticket Fields to create these custom fields
.
6. Publish the Service:
- Click Save & Publish.
- The service will appear on the self-service portal for eligible users.
How to Customize the Freshservice Self-Service Portal?
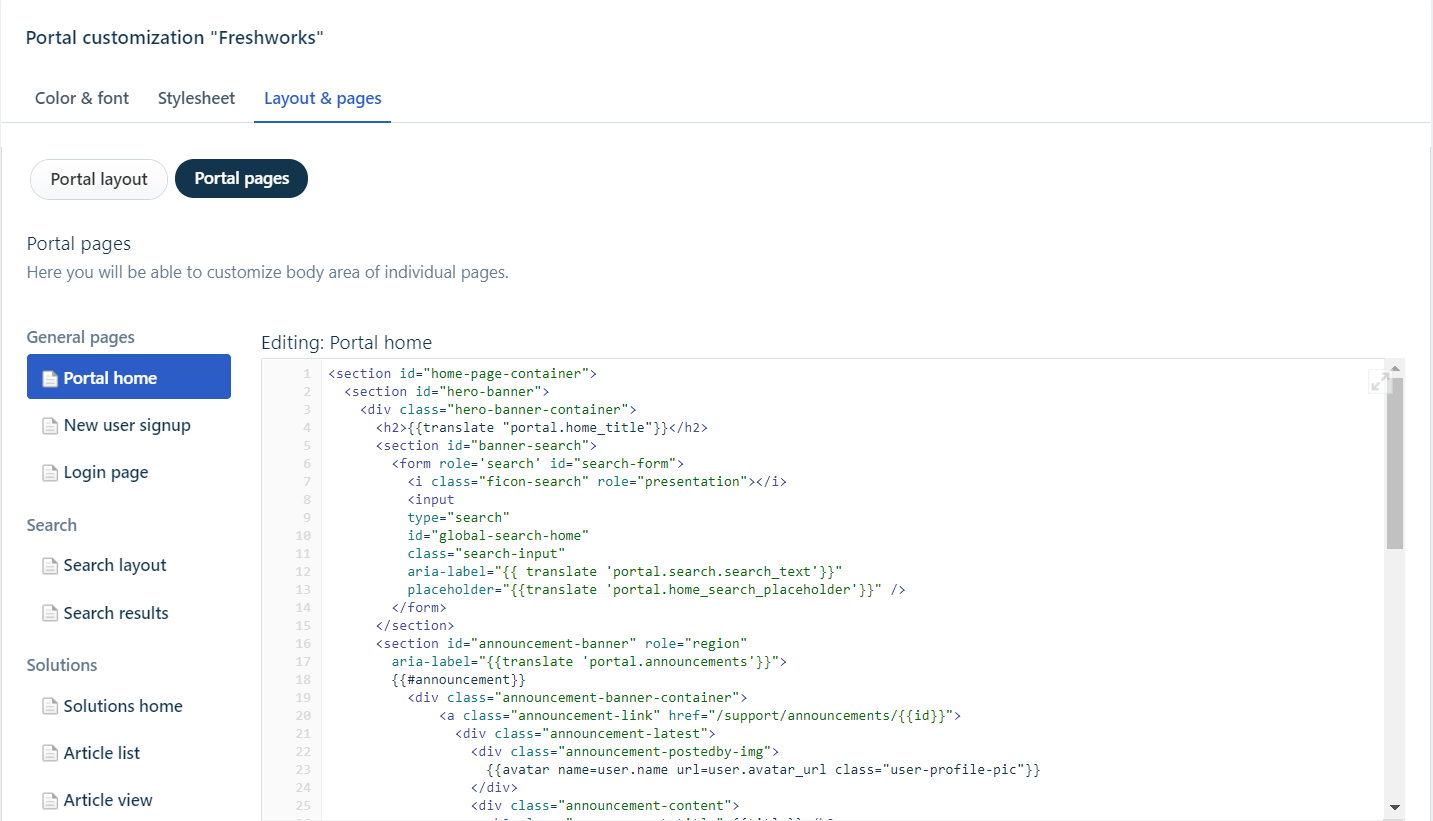
You can fully customize the look and feel of your self-service portal by applying your own CSS.
How to add custom CSS:
1. Go to Admin → Account Settings → Service Desk Rebranding → Customize Support Portal.
- If your account uses multiple workspaces, go to Admin → Global Settings → Account Settings → Service Desk Rebranding → Customize Support Portal.
2. Open the Stylesheet tab.
3. Add your custom CSS to style the portal.
5. Incident, Problem, Change & Release Management
You can create incidents in two main ways: manually (from the Freshservice portal) or automatically (through email, integrations, or automations).
How to create a Ticket / Incident in Freshservice
1. Manual creation from the agent portal
1. Go to your Freshservice dashboard.
Log in as an agent or admin.
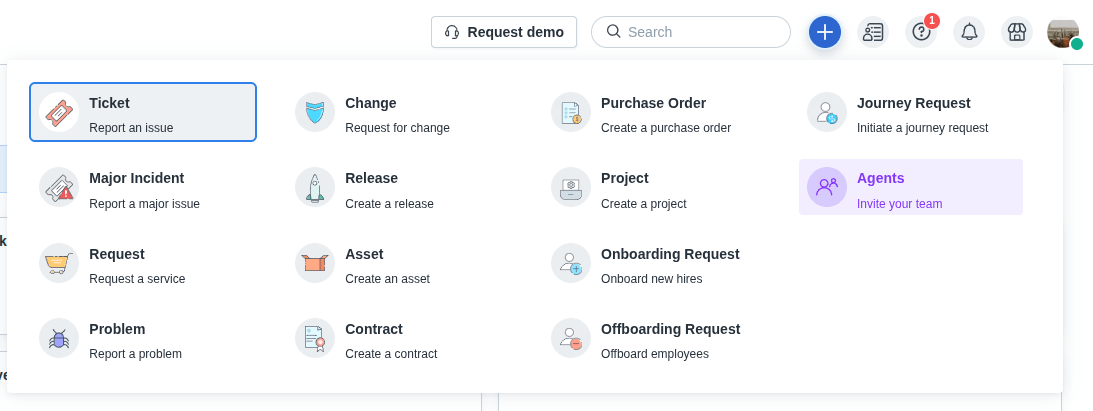
2. Click ‘New’ → ‘New Ticket.’
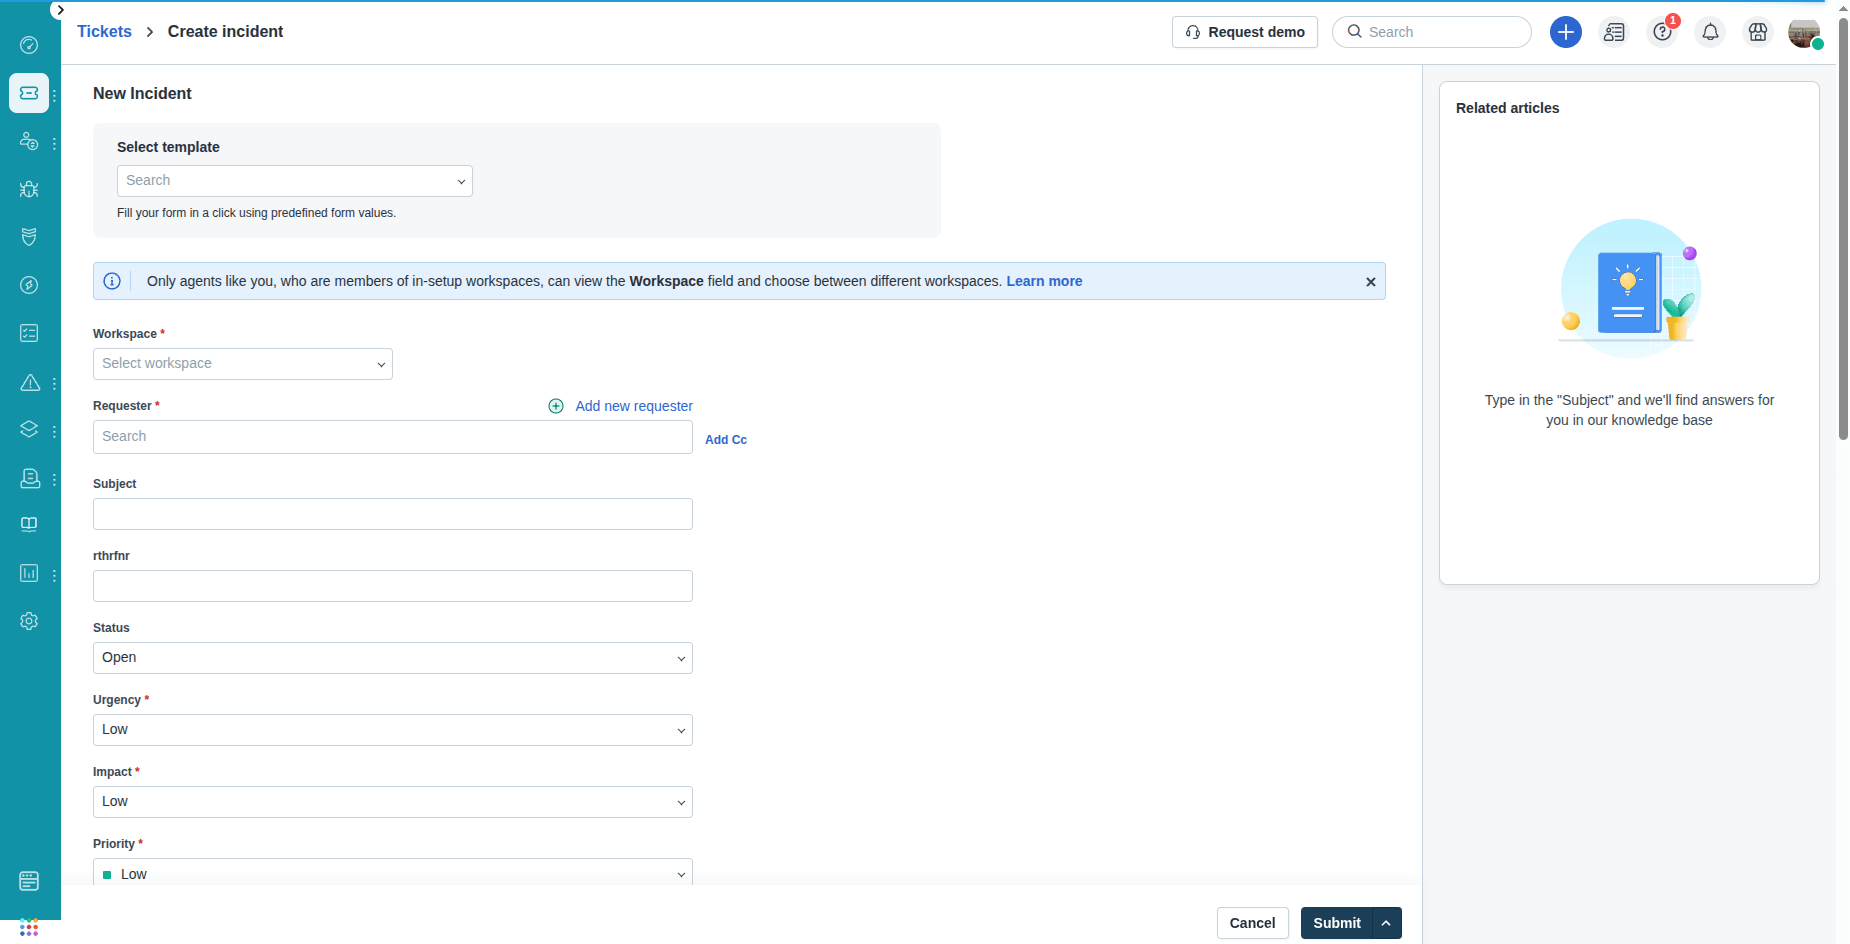
3. Fill in the ticket details:
- Requester: The person who reported the issue.
- Subject: A short title for the incident.
- Description: Details about what went wrong or what’s needed.
- Impact/Urgency: Helps calculate priority automatically (if configured).
- Group/Agent: Assign to the right support group or person.
- Category/Sub-category/Item: Classify the issue.
4. (Optional) Attach files or link related assets (from CMDB).
5. Click ‘Save’ or ‘Save and Close.’
2. Automatic ticket creation
Freshservice automatically creates incidents when:
- Emails are sent to your support address (e.g., support@yourcompany.freshservice.com).
- End-users submit forms via the Service Portal (incident or service request forms).
- Monitoring tools (like SolarWinds, Datadog, etc.) send alerts through integrations or webhooks.
- Automation rules (Workflow Automator or Dispatch’r) trigger new tickets based on certain events.
How to create a Major incident?
Major incidents are high-impact or critical outages that require special handling and visibility.
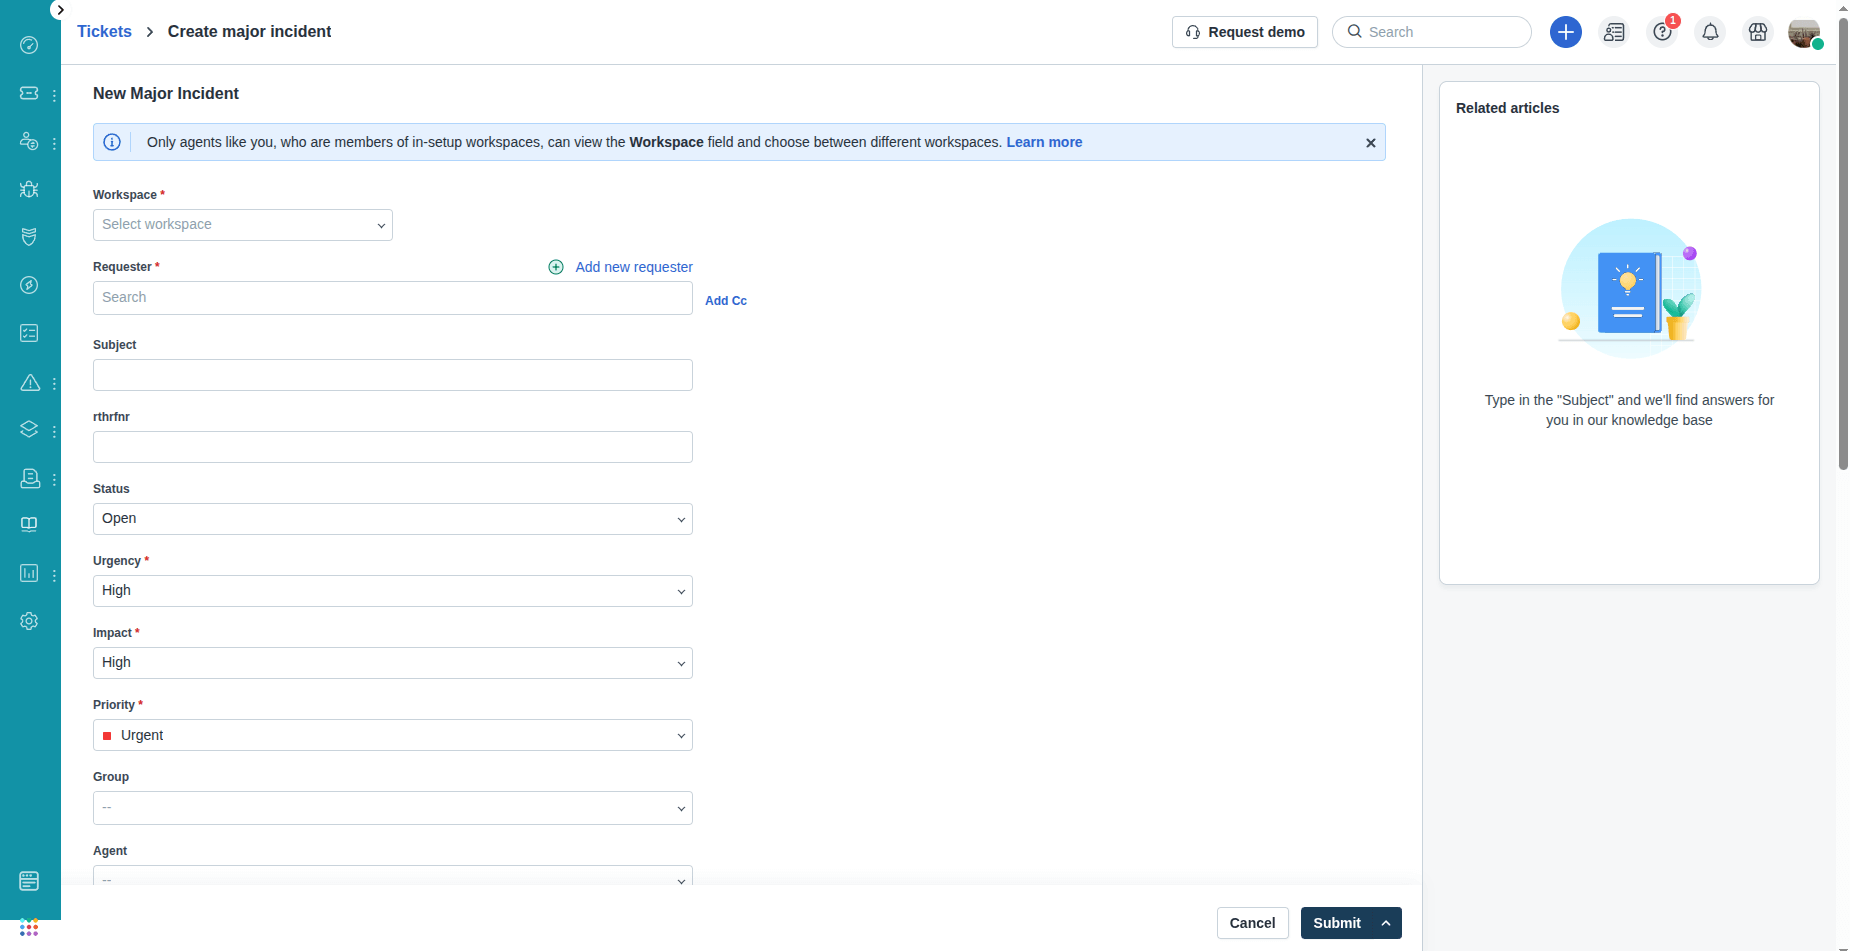
1. Go to Incidents → Major Incidents in the left-hand navigation.
2. Click New Major Incident.
3. Fill in:
- Title, description, impact details
- Assigned group/agent
- Communication plan or status update templates
4. Click Save.
How to Create a Ticket?
- Click New in the top-right corner.
- Select Incident (depending on the request type).
- Fill in the details in the Submit a Ticket form.
- Attach any supporting files if needed.
- Choose one of the following save options:
- Save – Creates the ticket and keeps it open for editing.
- Save and New – Saves the ticket and opens a new blank form to create another one.
- Save and Close – Saves the ticket and immediately marks it as Closed. Use this when documenting incidents that don’t require further action.

How to create a Problem in Freshservice?
Problems represent the underlying causes of incidents. Freshservice allows teams to track, analyze, and resolve them systematically.
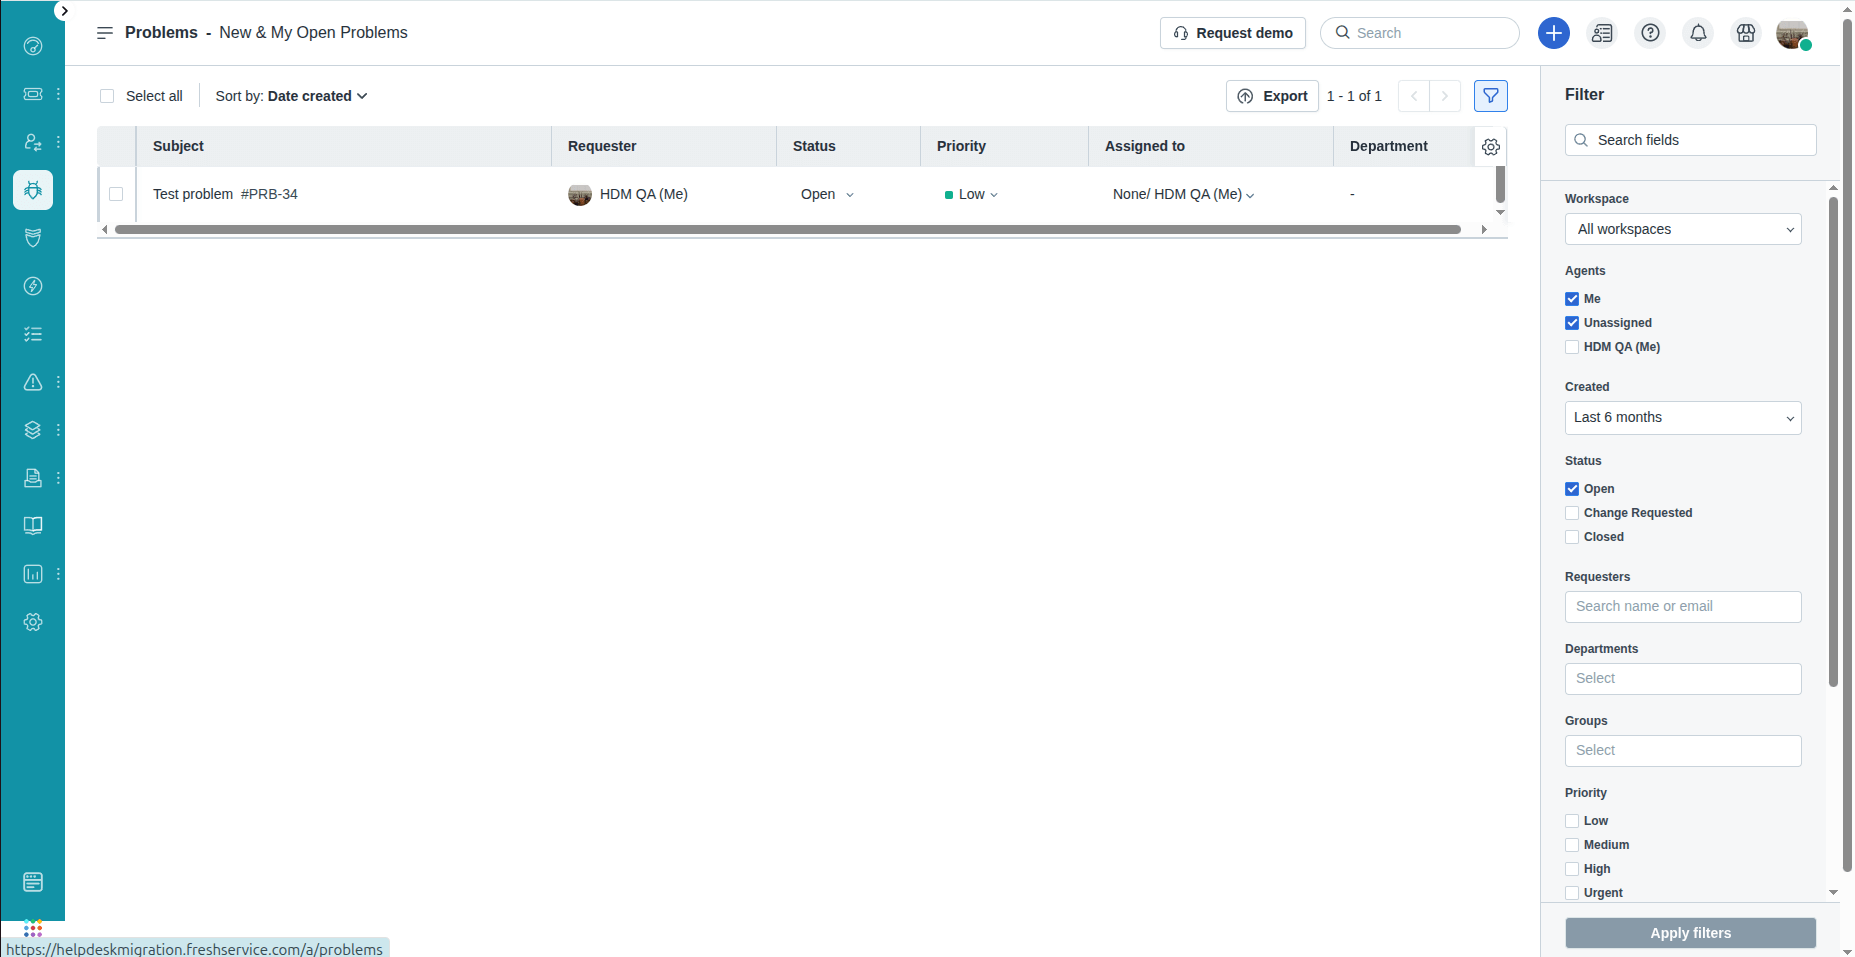
Steps to create problems:
1. Access Problem Management:
Go to Problems → New Problem.
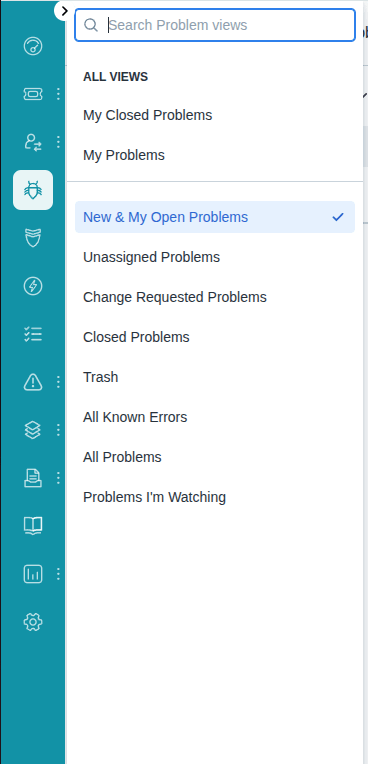
2. Create a Problem Record:
- Provide a Title, Description, and Impact Analysis.
3. Link Incidents to Problems:
- Attach relevant incidents that share the same root cause.
4. Investigate and Assign:
- Assign a problem to a dedicated analyst or group.
- Document investigation steps, findings, and root cause.
5. Implement Workarounds or Solutions:
- Add temporary workarounds or permanent fixes in the problem record.
6. Close the Problem:
- Once resolved, update all linked incidents and notify stakeholders.
Example:
- Multiple users report slow VPN access (incidents). Create a Problem to investigate bandwidth issues and implement a fix.
How to create Change Management Workflows in Freshservice?
To create a change management workflow in Freshservice, use the Workflow Automator to define specific events, conditions, and actions. This allows you to automate processes such as setting the change type based on the requester, assigning tasks when a change is created, or triggering updates on related tickets when a change is closed.
Example: Automatically Assign a Change Type
Navigate to Admin → Automation & Productivity → Automation → Workflow Automator.
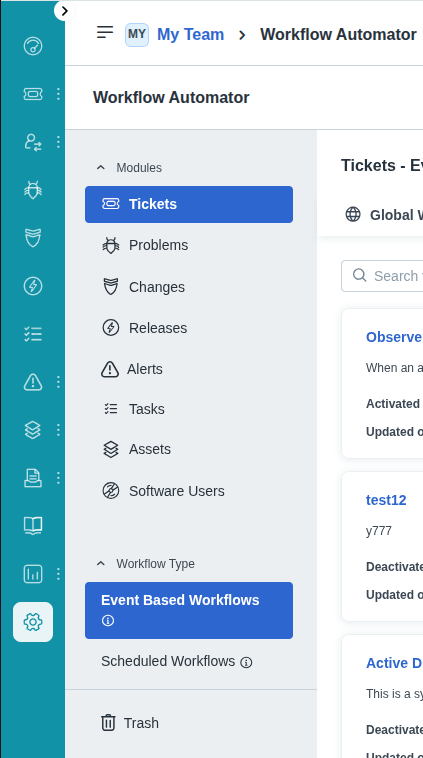
2. Click New Rule and select Event-Based Workflow.
3. Enter a name for the rule and set the event as Change is created.
4. Drag and drop a Condition block, then define the criteria (e.g., requester or specific change fields).
5. Add an Action block, choose Set Change Type as..., and select the appropriate type based on your condition.
6. Click Save and Automate to activate the workflow.
Change Management in Freshservice is used to plan, approve, implement, and review changes to IT systems while minimizing risk and disruption.
1. Access the Change Module
There are two ways, depending on your Freshservice plan/setup:
- From the left navigation menu: Change → New Change
- To configure workflow/behavior: Admin → Service Management → Change Management
(Older UI: Admin → Change Management Settings)
2. Choose the Change Type
Freshservice supports standard ITIL change categories:
| Change Type | Description | Example |
| Standard Change | Pre-approved, low-risk, routine | Adding a new user account, applying a standard software patch |
| Normal Change | Requires assessment and approval | Upgrading server RAM, deploying new application version |
| Emergency Change | Urgent and time-sensitive | Security patch for zero-day vulnerability |
3. Create the Change Request
- Fill in the key fields:
- Title & Description
- Category/Impact/Risk
- Planned Start & End Time
- Affected Services/CI (CMDB Link)
- Implementation & Rollback Plan ← This is important for approvals!
4. Set Approvals & Workflow
Approval routing and activity flow are controlled by:
- Workflow Automator (recommended)
Admin → Workflow Automator → Change Workflows
Here you define:
- Approval steps (e.g., CAB, Manager, Change Owner)
- Status progressions (Planning → Approval → Implementation → Review)
5. Implement, Document & Close
During and after implementation:
- Link related Incidents/Problems/Releases
- Document test results
- Update final notes
- Move to Review, then Close
How to create Release Management in Freshservice?
You can manage Release Management in Freshservice by planning, documenting, and coordinating software or system deployments. Create build and test plans, schedule announcements, and link releases to related changes, incidents, and problems to maintain full traceability.
Use the Releases module to:
- Assign tasks and owners
- Update release details and timelines
- Track effort and progress
- Generate reports to monitor performance and risk
You can further tailor the release process by:
- Adding custom fields with Field Manager
- Adjusting statuses and transitions through the Release Lifecycle or workflow settings
6. Asset Management & CMDB
How to add a new asset/CI type to Freshservice?
1. Sign in to Freshservice using an Account Admin account.
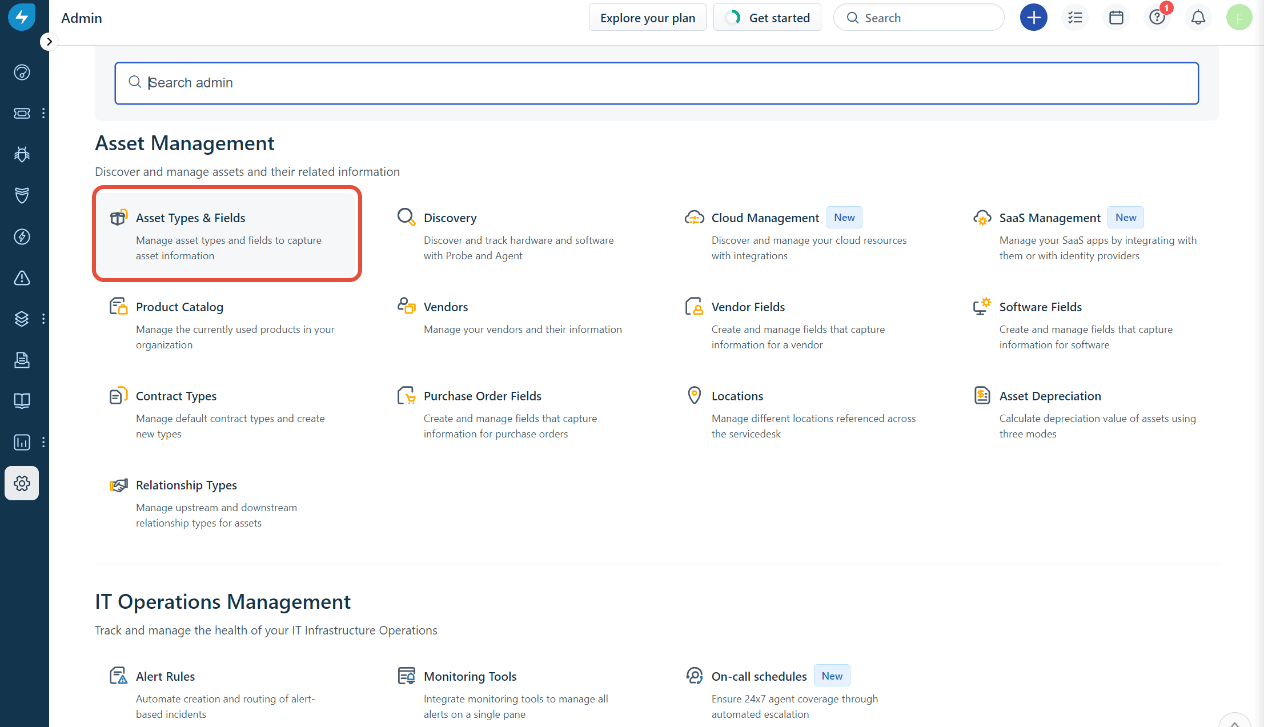
2. Then navigate to:
Admin → Asset Management → Asset Types and Fields.
- If your account includes multiple workspaces, go to:
Admin → Global Settings → Asset Management → Asset Types and Fields.
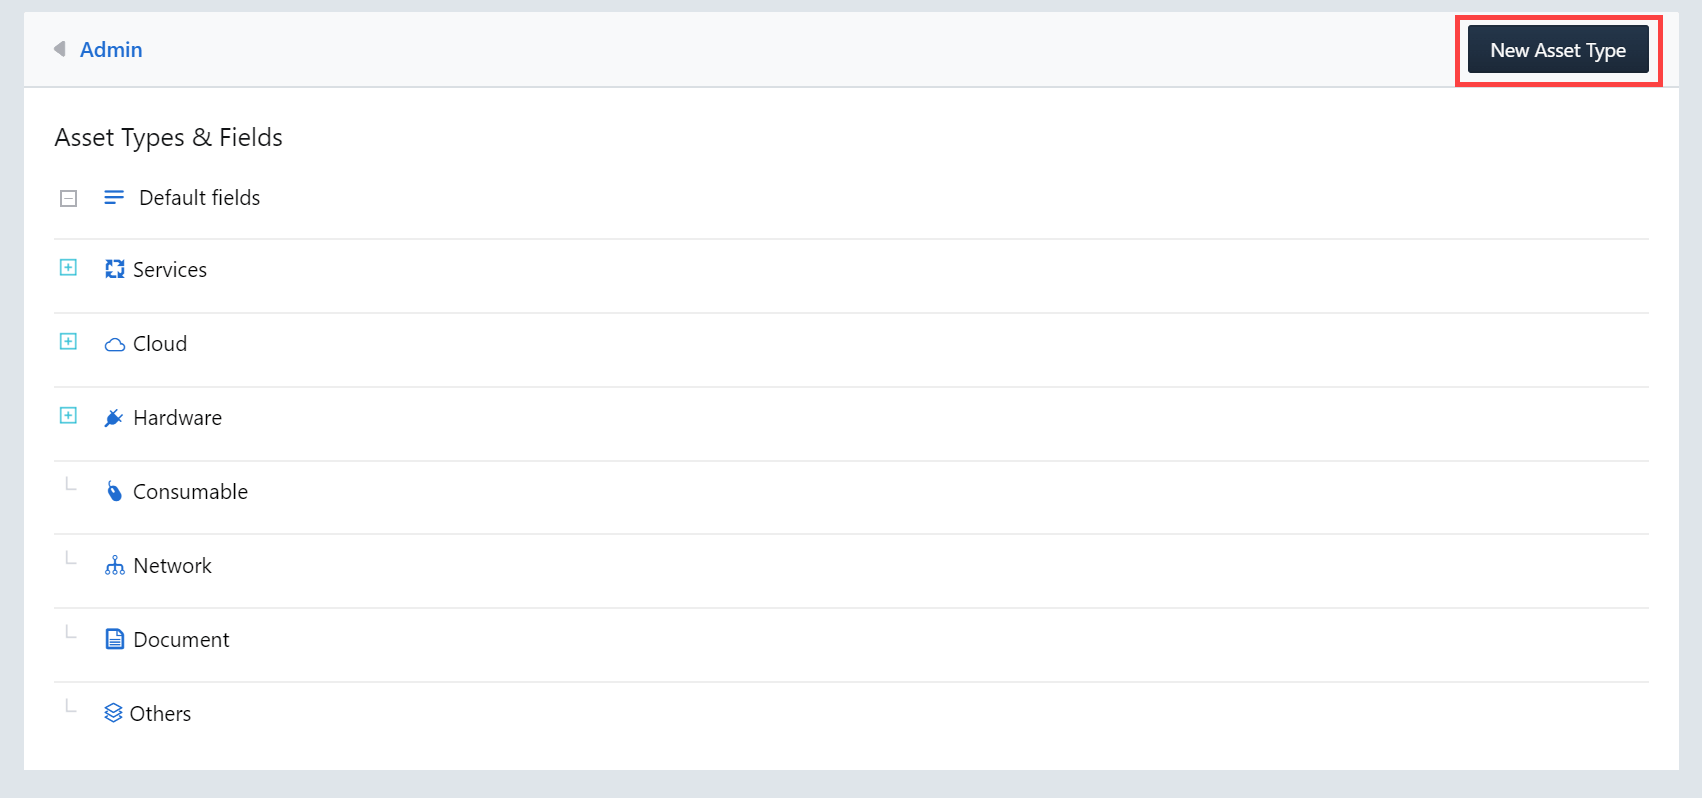
3. Click the New Asset Type button located in the top-right corner of the page.
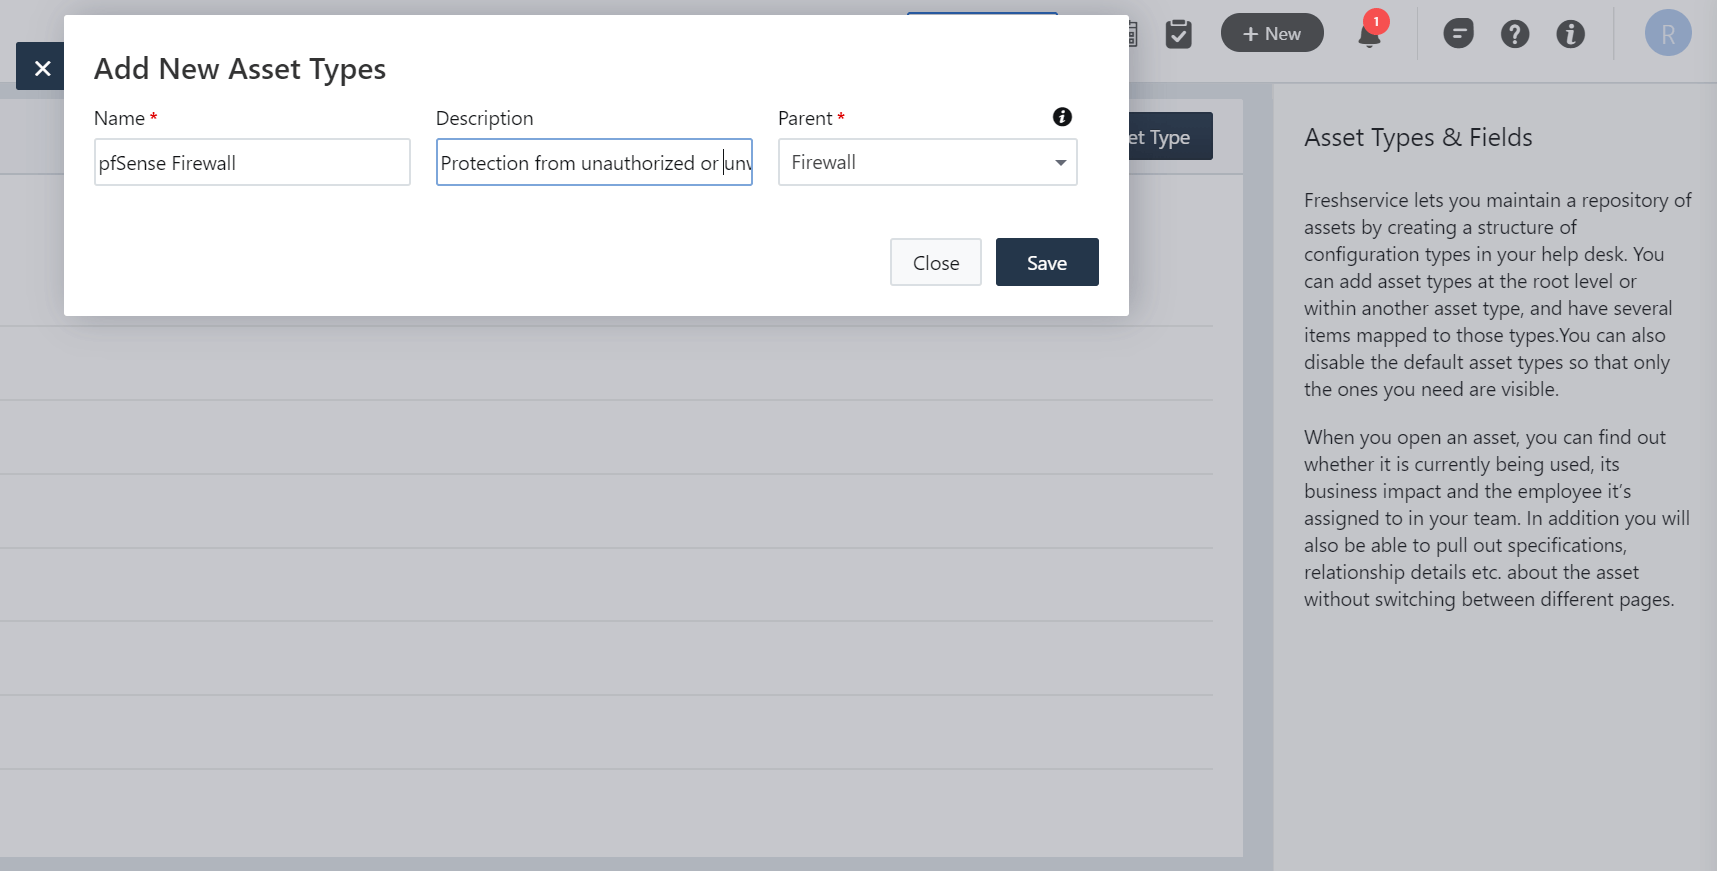
4. Enter a name and description for the asset or configuration item (CI).
5. If applicable, select a parent category to organize it under.
6. Finally, click Save to complete the asset creation.
What are the different types of assets/CI types?
In Freshservice, Assets and Configuration Items (CIs) represent the physical, virtual, or digital components that make up your IT environment. They’re tracked in the Configuration Management Database (CMDB) to help manage and support your IT services efficiently.
Assets
Assets are the tangible or virtual items your organization owns or manages.
Examples:
- Laptops, desktops, and mobile devices
- Network equipment (routers, switches, printers)
- Software licenses or cloud subscriptions
- Virtual machines or servers
You can track details like purchase date, warranty, owner, and status.
Configuration Items (CIs)
CIs are any components that need to be managed to deliver an IT service, and this includes assets, but also other elements like services or documentation.
Examples:
- Applications and databases
- Business services (e.g., “Email Service,” “CRM System”)
- IT infrastructure (servers, networks, storage)
- Relationships between components (e.g., “Server A hosts Application B”)
CIs often include dependencies and relationships to understand how one component affects others.
Asset/CI Types
Asset or CI types categorize these items in the CMDB. Each type defines what information (fields and attributes) is stored.
Common examples:
- Hardware – computers, monitors, printers
- Software – licenses, installations, subscriptions
- Network Devices – routers, switches, firewalls
- Facilities – projectors, UPS systems
- Business Services – HR system, Payroll app
You can customize or create new asset/CI types in Freshservice to fit your organization’s specific needs.
Tip: Regular scans keep your CMDB accurate and provide complete visibility into your IT environment.
7. Automation & Workflows
How do I create SLA Policies?
Service Level Agreements (SLAs) define response and resolution expectations for tickets.
Steps to create SLA policies:
1. Go to Admin → SLA Policies.
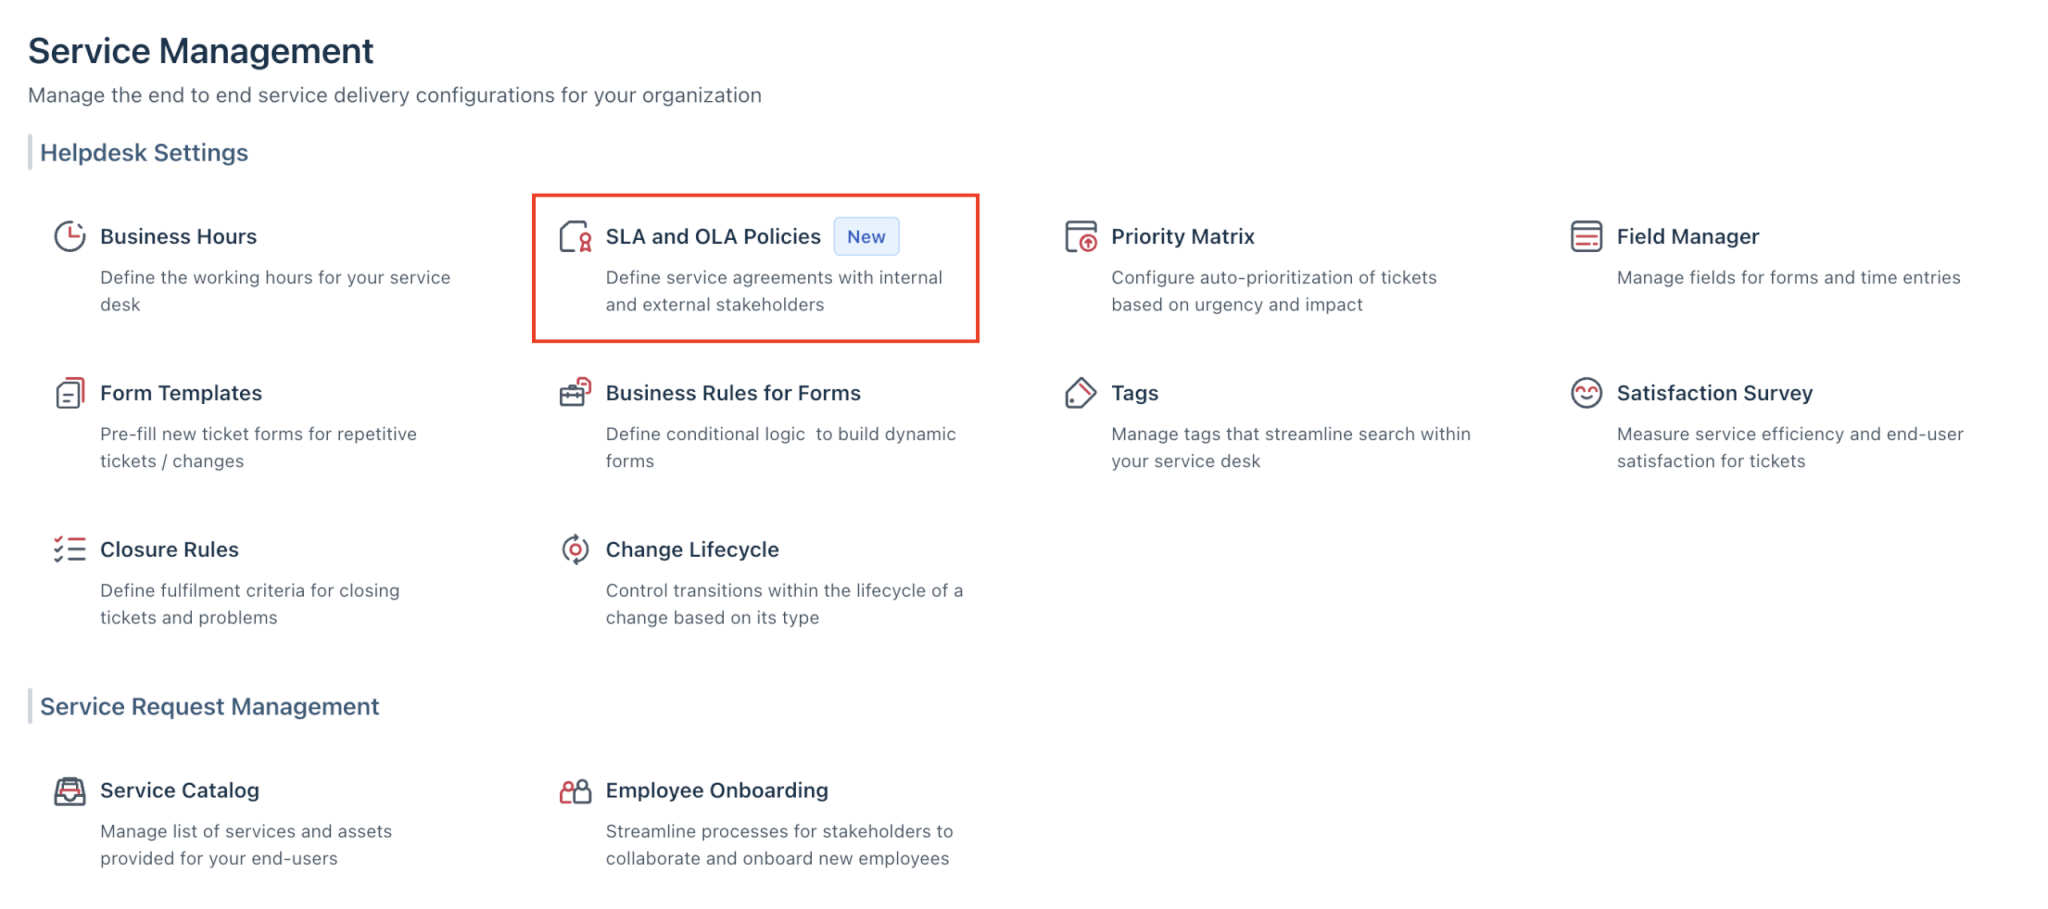
2. Create New SLA:
Click New SLA Policy, name it (e.g., “High Priority Tickets”).
3. Define Conditions:
- Example: If Priority = High, then First Response = 2 hours, Resolution = 8 hours.
4. Assign to Ticket Categories or Groups:
- Example: Apply to IT Support → Hardware Issues.
5. Save and Test:
- Create a test ticket to ensure the SLA triggers correctly.
How do I add Supervisor rules?
Supervisor rules are for automating actions on tickets based on certain conditions. For example, you can escalate tickets, send notifications, or assign tasks automatically.
Steps to Add a Supervisor Rule
1. Log in to Freshservice
- Use an admin account to access configuration settings.
2. Navigate to Supervisor Rules

- Go to Admin → Automation → Supervisor.
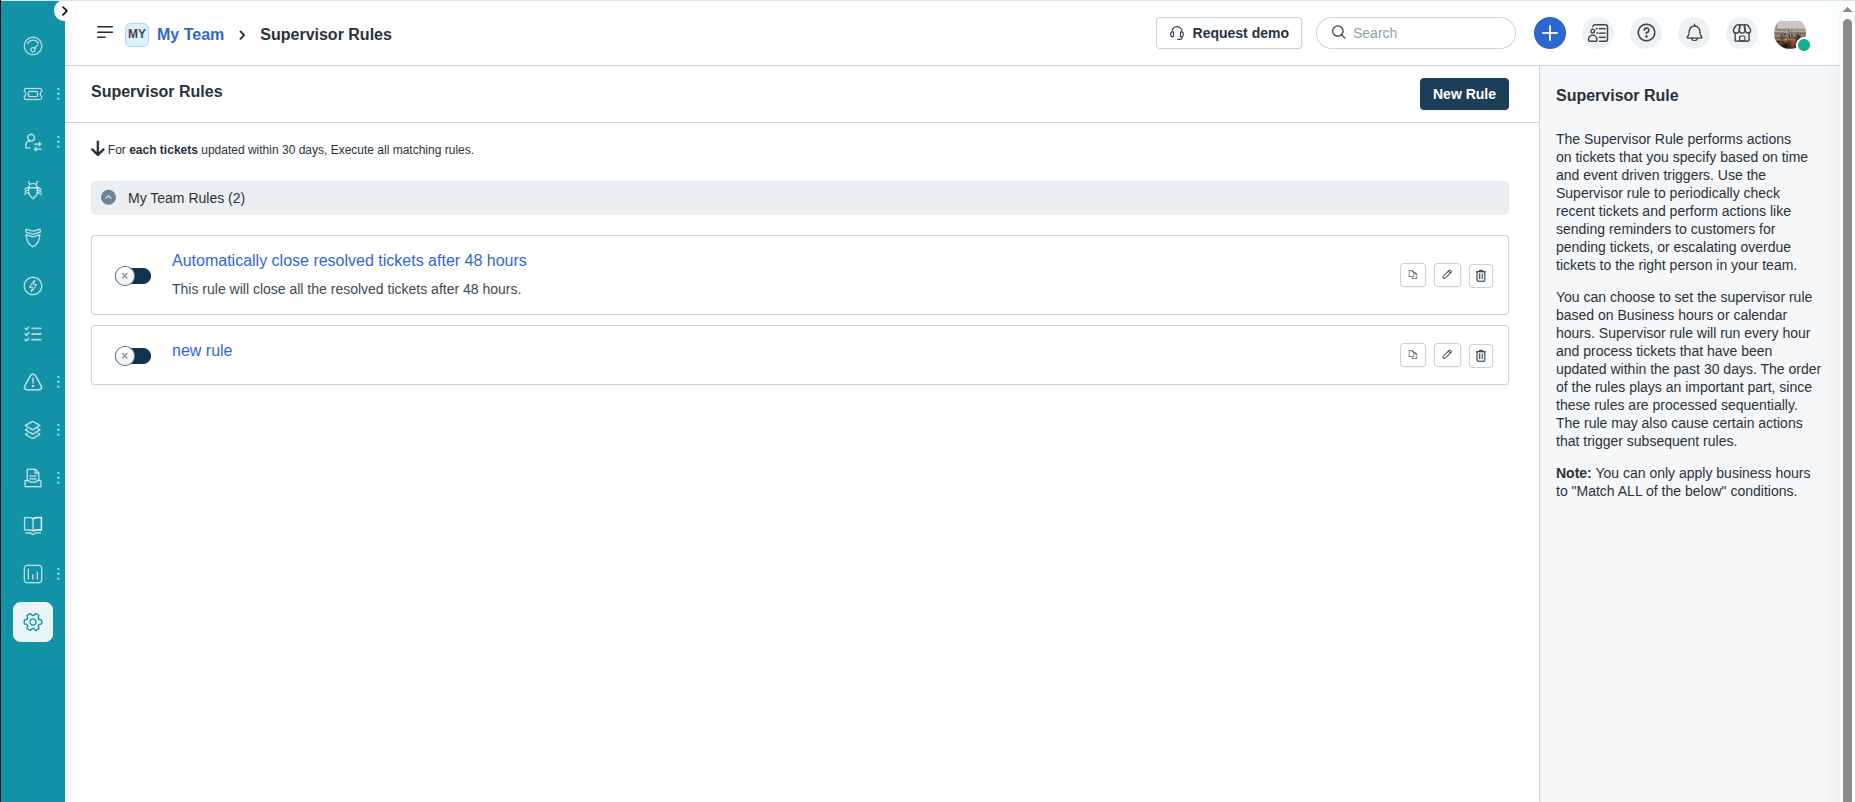
3. Create a New Rule
- Click New Rule or Add Supervisor Rule.
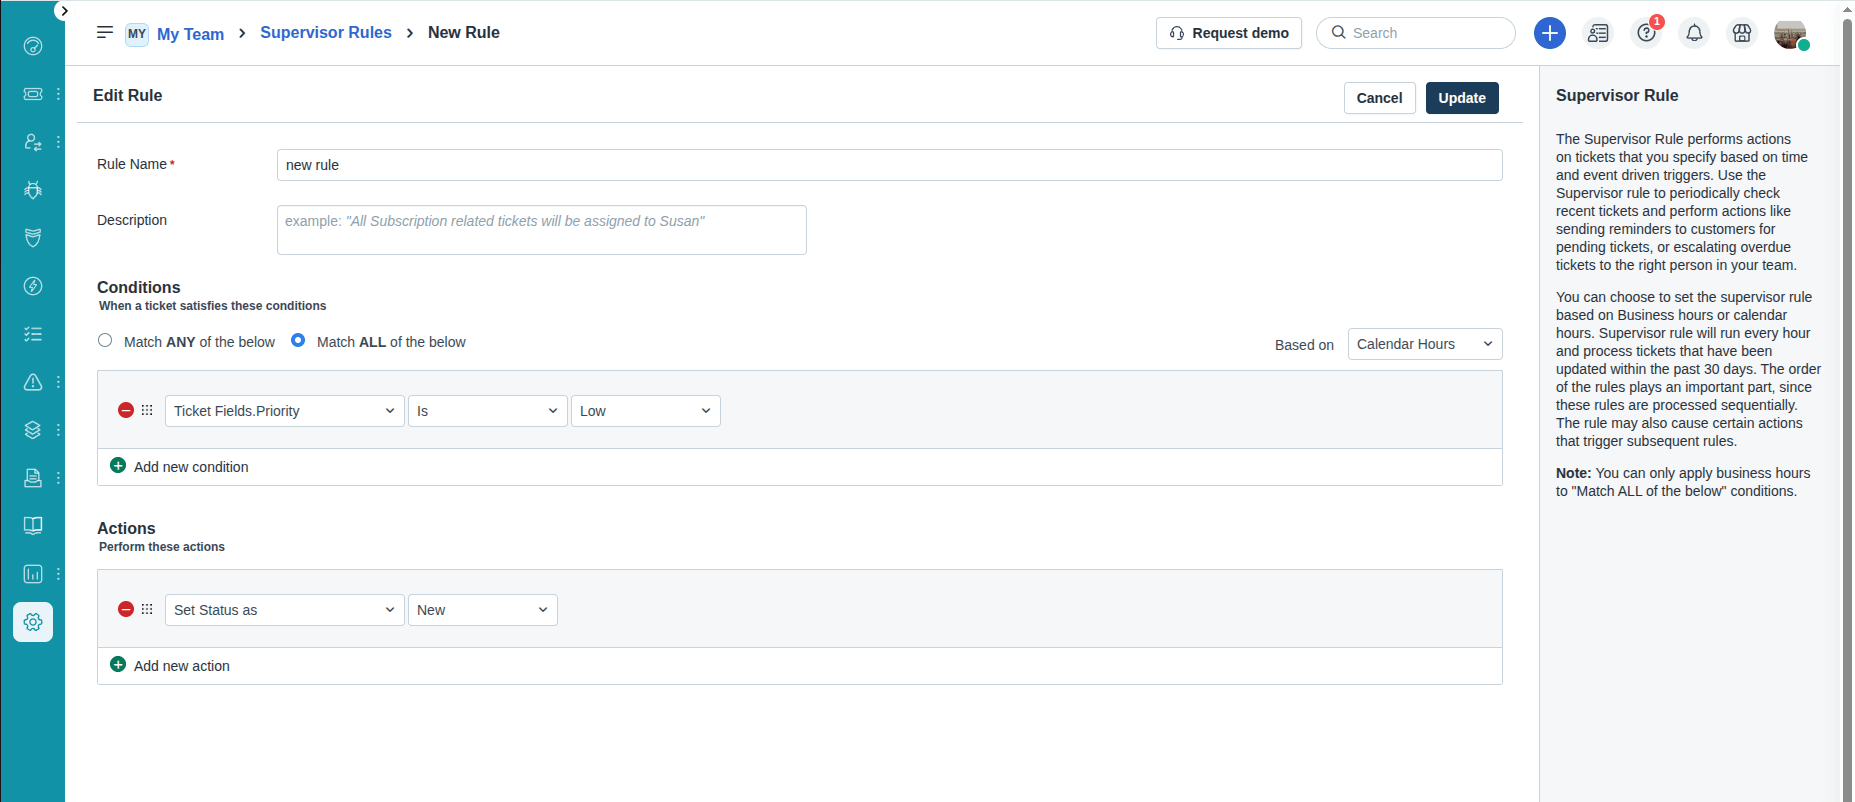
- Give your rule a descriptive name (e.g., “High Priority Escalation”).
4. Define Conditions
Set criteria that trigger the rule, such as:
- Ticket priority (e.g., High or Urgent)
- Status (e.g., Open, Pending)
- Requester type or group
- Custom fields
5. Set Actions
Choose what should happen when the conditions are met:
- Assign to agent or group
- Send email notifications
- Change priority or status
- Add notes or tags
6. Configure Execution Timing
- Decide whether the rule runs immediately, at a scheduled interval, or after a delay.
7. Save and Activate
- Click Save.
- Ensure the rule is enabled.
8. Test the Rule
- Create a test ticket that meets your conditions.
- Confirm that the actions execute correctly.
How do I set up Workflow Automator?
Workflow Automator allows you to automate repetitive tasks and manual processes in Freshservice. Examples include:
- Assigning tickets to the correct agent or team
- Following up on approvals
- Updating ticket properties automatically
You can create workflows using a simple drag-and-drop interface without any coding.
What are the components of a workflow?
A workflow consists of four main components:
- Event – Defines when the workflow should trigger (e.g., ticket is created).
- Condition – Sets the parameters that must be met for the workflow to run (e.g., ticket category is Hardware).
- Action – Specifies what happens when the workflow is triggered and conditions are met (e.g., assign a ticket to a team).
- Reader Node – Reads and references information from custom objects into the workflow.
How do I create a workflow?
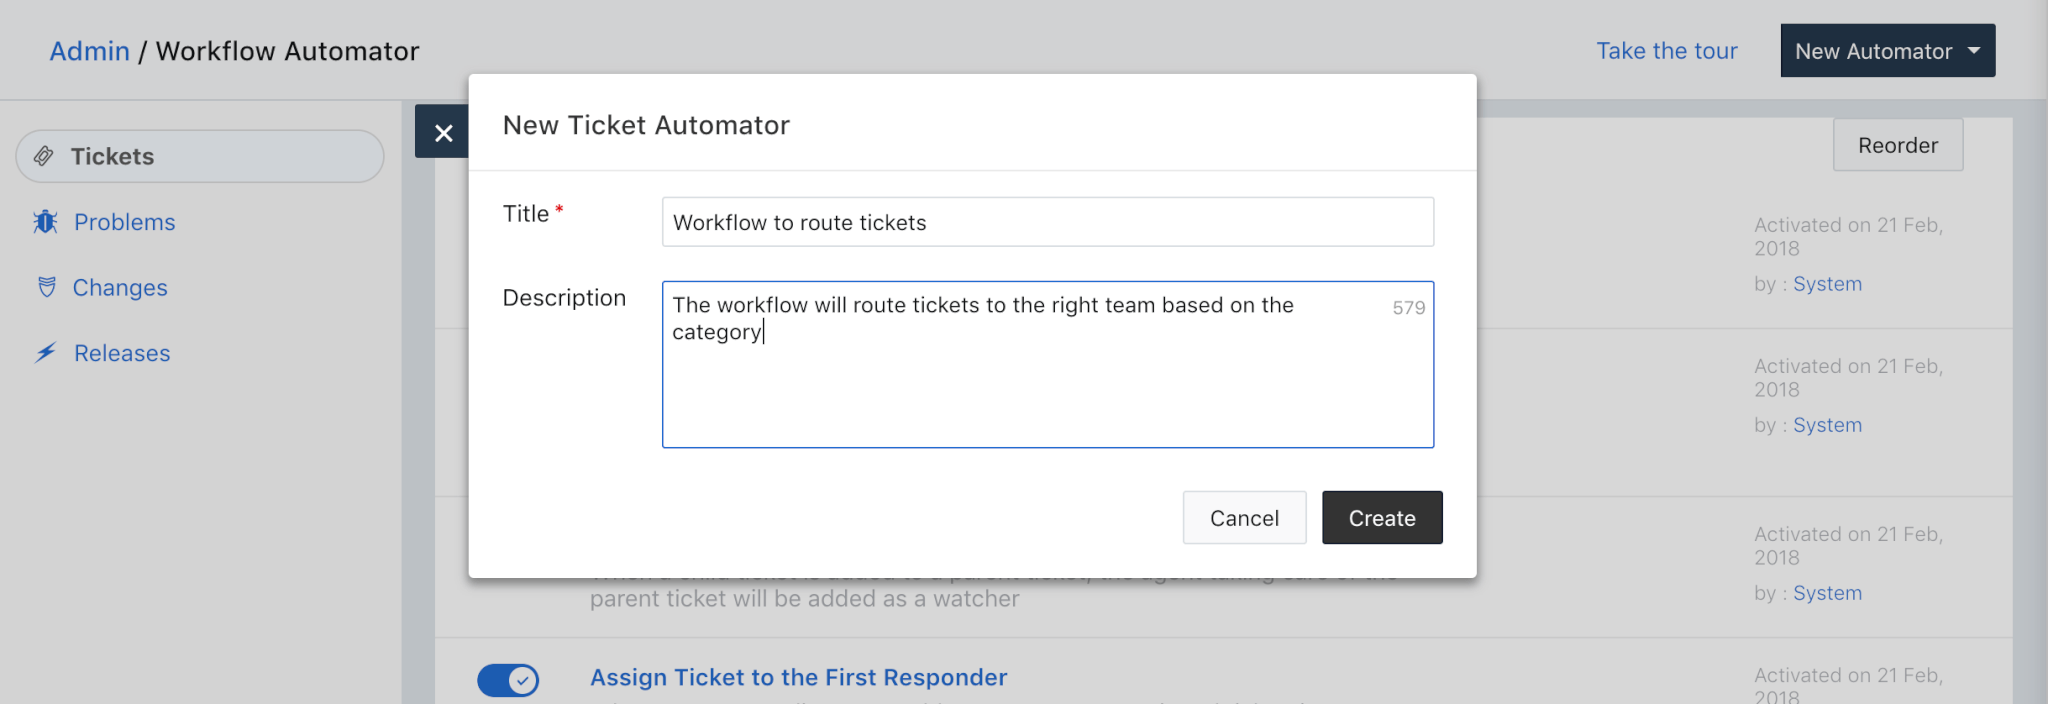
1. Navigate to Admin → Helpdesk Productivity → Workflow Automator.
2. Click New Automator.
3. Choose the module for your workflow (e.g., Ticket).
4. Give your workflow a name and description.
5. Set up an Event:
- Define when the workflow should trigger and click Done.
6. Add a Condition:

- Drag a condition icon next to the event.
- Set parameters (e.g., Category = Hardware) and click Done.
- Add more conditions if needed by clicking Add New Condition.
7. Add an Action:
- Drag an action icon next to the condition.
- Select the action (e.g., Assign to Group → Hardware Team) and click Done.

8. Activate the Workflow:
- Workflows are saved as drafts as you build them.
- When ready, click Activate to enable the workflow.
8. Integrations & Marketplace Apps
How to add integrations in Freshservice?
1. Login and Navigation
- Log in to your Freshservice account.
- Go to: Global Settings → Automation & Productivity → Extensibility → Connector Apps.
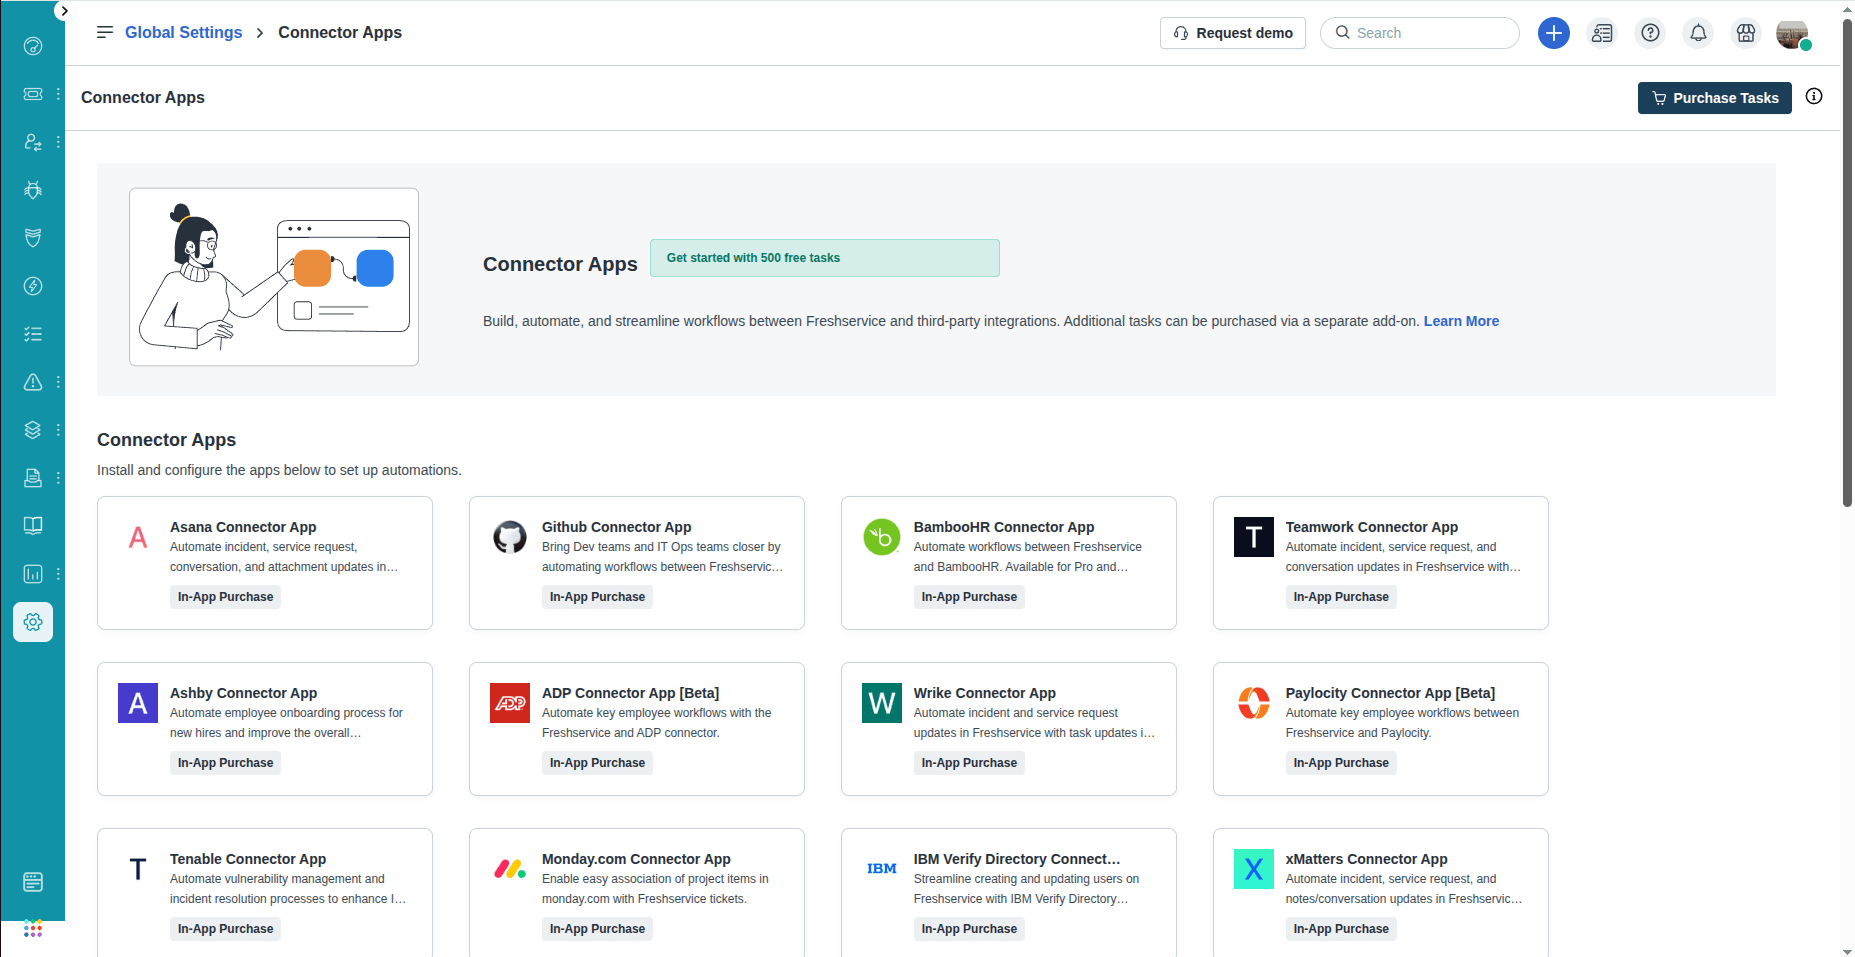
2. Select Integrations
- Click Marketplace.
- Browse or search for the integration you need.
3. Popular Integrations to Start With
- Slack / Microsoft Teams → send ticket notifications directly to team channels.
- Jira → sync tickets with development tasks.
- Monitoring Tools (Nagios, SolarWinds) → auto-create tickets from system alerts.
- Other Marketplace Apps → reporting, automation, asset management, communication tools.

4. Activation and Setup
- Click Install / Configure.
- Enter API keys, tokens, or grant required permissions.
- Ensure the integration is active and test it in a trial mode.
5. Test Functionality
- Create a test ticket or alert.
- Verify that data flows correctly into the integrated app.
6. Train Your Team
- Show agents how to use the integration.
- Make sure everyone receives notifications and updates in real time.
9. Testing, Launch & Best Practices
How to go live with Freshservice?
- Verify all SLA policies, workflows, and automations.
- Ensure user accounts and roles are correctly set up.
- Test ticket creation, notifications, and integrations.
- Confirm portal customization, forms, and service catalog are accurate.
What are the best practices for implementing enterprise ITSM?
- Align Freshservice configuration with ITIL processes.
- Standardize ticket categories, priorities, and workflows.
- Document all automation rules, escalations, and approvals.
- Plan for change management and phased rollout.
How do you train agents and requesters effectively?
- Conduct hands-on sessions for agents covering ticket handling and SLA adherence.
- Provide self-service tutorials for requesters on portal use and submitting requests.
- Share knowledge base articles and FAQs to reduce common queries.
How do you audit Workflows before go-live?
- Review all automation, approval, and escalation rules.
- Check that ticket routing and SLA triggers match business needs.
- Simulate real-world scenarios to identify gaps or bottlenecks.
- Adjust workflows and update documentation before the official launch.
10. Troubleshooting & FAQs
1. Why aren’t email notifications working?
- Check SMTP/email settings.
- Verify notification rules and triggers.
- Confirm valid agent/requester emails.
2. How do I reset an agent’s password?
- Go to Admin > Agents, select the agent, and click Reset Password.
- The agent receives a reset link via email.
3. What are common setup mistakes and how to avoid them?
Common setup mistakes in Freshservice include misconfigured SLAs. Always review priority levels and response or resolution times to ensure they match your requirements. Conflicting workflows or automations should be audited before activation. Also, make sure roles and permissions are set correctly so each agent has the appropriate level of access.
4. Why is the Discovery Agent not syncing assets?
- Check agent installation and network access.
- Verify credentials, firewall settings, and scan schedules.
- Review sync logs for errors.