Freshservice Data Migration Checklist
Shifting between help desks can be a bit of a puzzle, but it all falls into place when you have our comprehensive migration checklist. Introducing our exclusive checklist, tailored specifically for Freshservice migration.
As you start exploring this guide, it's important to remember that our automated migration service can seamlessly transfer all your crucial data to Freshservice, with only a few exceptions.
- inline images
- rules
- automations
- assets
- ticket activity log
- audit log
- macros
- organization custom fields
- problems analysis cause (problems analysis impact, problems analysis symptoms, problems due date, problems attachments, tasks attachments, problems note attachments, change notes attachments)
When it comes to importing inline images, it's a great idea to contact our support team. They'll work with you to develop a tailored data migration solution.
Throughout the Full Data Migration process, you can continue using your current help desk system or rely on Freshservice for providing customer support. Just keep in mind, any new or updated records won't be transferred, but you can import them using the Delta Migration option. Please note that Delta Migration is exclusively available with the Signature support plan.
- When it comes to the migration of tickets and other records, the process remains consistent during both the Demo Migration and the Full Data Migration. So, here's the scoop: If any of your data didn't find its way to the new destination during the Demo Migration, it should not transfer during the Full Data Migration either.
- After the Demo Migration wraps up, it's time to grab those nifty reports for migrated, skipped, and failed records. Give them a thorough scan and ensure that every precious bit has made its way to the new destination smoothly and successfully. And if anything seems a tad fuzzy or bewildering, don't you fret! Just tap into the boundless wisdom of our support team, and they'll swoop in to save the day.
- Due to the restrictions in Freshservice, you can't migrate the users with Admin roles along with their tickets. If you want to migrate the tickets of an Admin user or associate this user's data, you will need to convert the Admin to an agent. By doing so, all the data will be imported successfully. Once the migration is completed, you can revert the role of this user back to Admin.
- When creating a Freshservice ticket, a description is required. To ensure a smooth data import, our Migration Wizard automatically adds the ticket subject to the description field. After the ticket is created, the comments from the source platform are imported; and the last customer's comment may appear duplicated. That way, the chronological order of comments is maintained.
- When importing your Knowledge base into Freshservice, its dates will change from the original ones to the dates of data migration itself.
BEFORE YOU SET UP THE DATA MIGRATION
1. CHOOSE A DATE FOR MIGRATION
It's important to grant your team enough time for preparation. Encourage your agents to become acquainted with Freshservice or to concentrate on resolving existing tickets as efficiently as possible. When scheduling, aim for a day with the least help desk-related work.
2. SPEAK TO YOUR TEAM
It's important to brief your agents about Freshservice import or consider delegating particular tasks, like accelerating the review of Full Data Migration results.
3. PREPARE FRESHSERVICE FOR THE DATA TRANSFER
To find your data after migration, simply replicate the same custom fields you have on your source platform.
To create custom fields on Freshservice, go to Admin → under General Settings click Form Fields → choose the field type → fill in the required details → click Save.
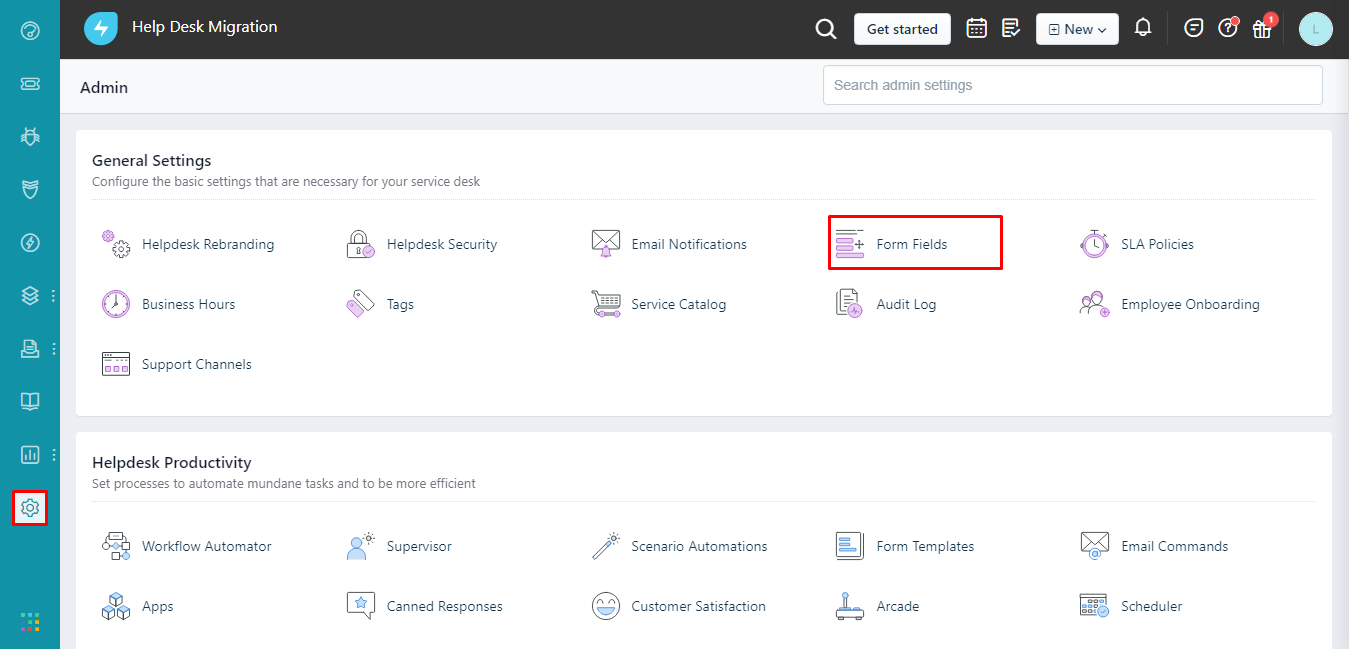
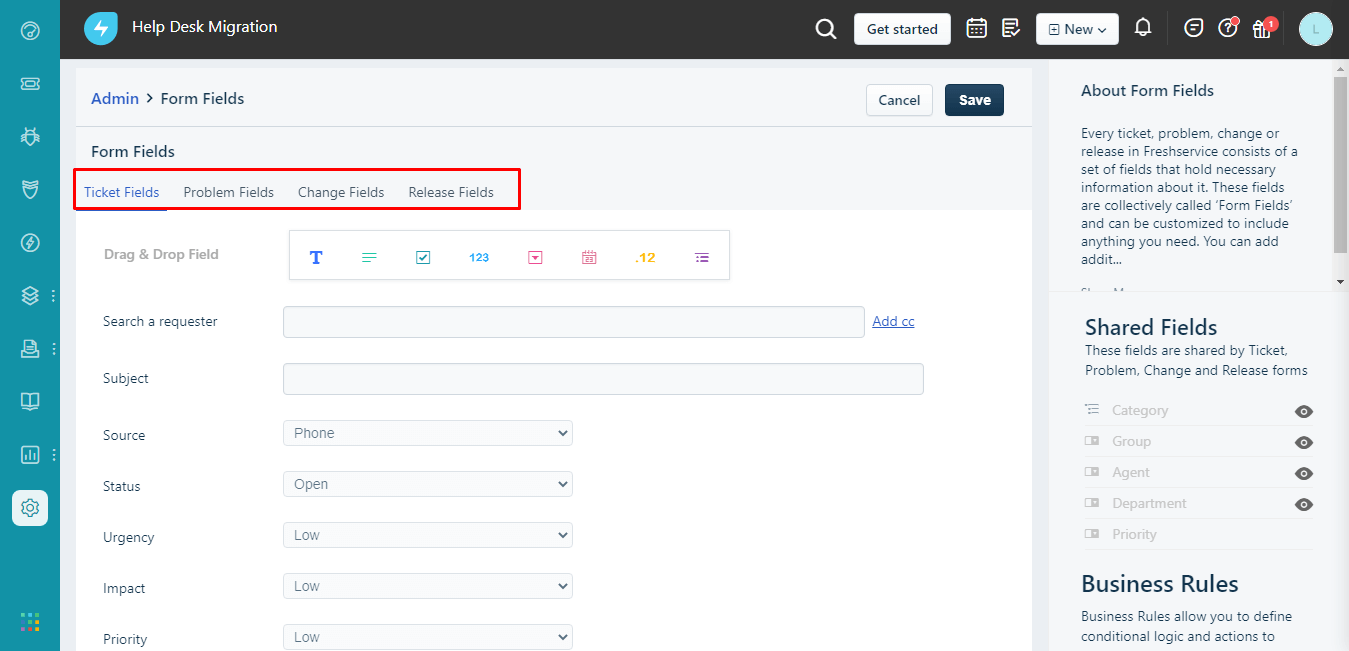
To speed up the Full Data Migration process, reach out to Freshservice and request a temporary API limit increase.
4. WHAT CUSTOMIZATIONS ARE AVAILABLE
If you have any specific requirements for Freshservice data import, contact our support team. The availability of customizations depends heavily on your source platform. Our automated data migration offers options like:
- Data filtering by different criteria (creation date, tags, custom fields, groups, organizations, assignees, etc.)
- Change of the default migration process (migration of change and problem objects as tickets, migration of ticket events as private notes, migration of the information related to inactive users, Closed At date of the ticket into the 1st private comment in a ticket, inline images as ticket attachments)
- Adding information to the migrated data (marking tickets with extra tags, adding legacy ticket ID to the ticket subject)
- Migrate contact custom fields
HOW TO MIGRATE TO OR FROM THE SELECTED WORKSPACE
The latest update to our Freshservice migration feature offers you even more flexibility and convenience when importing data to or from your Freshservice workspace.
Let's dive into the details. When you wish to import data into one of your Freshservice workspaces, simply navigate to the target platform connection stage and choose your desired workspace from the drop-down menu.
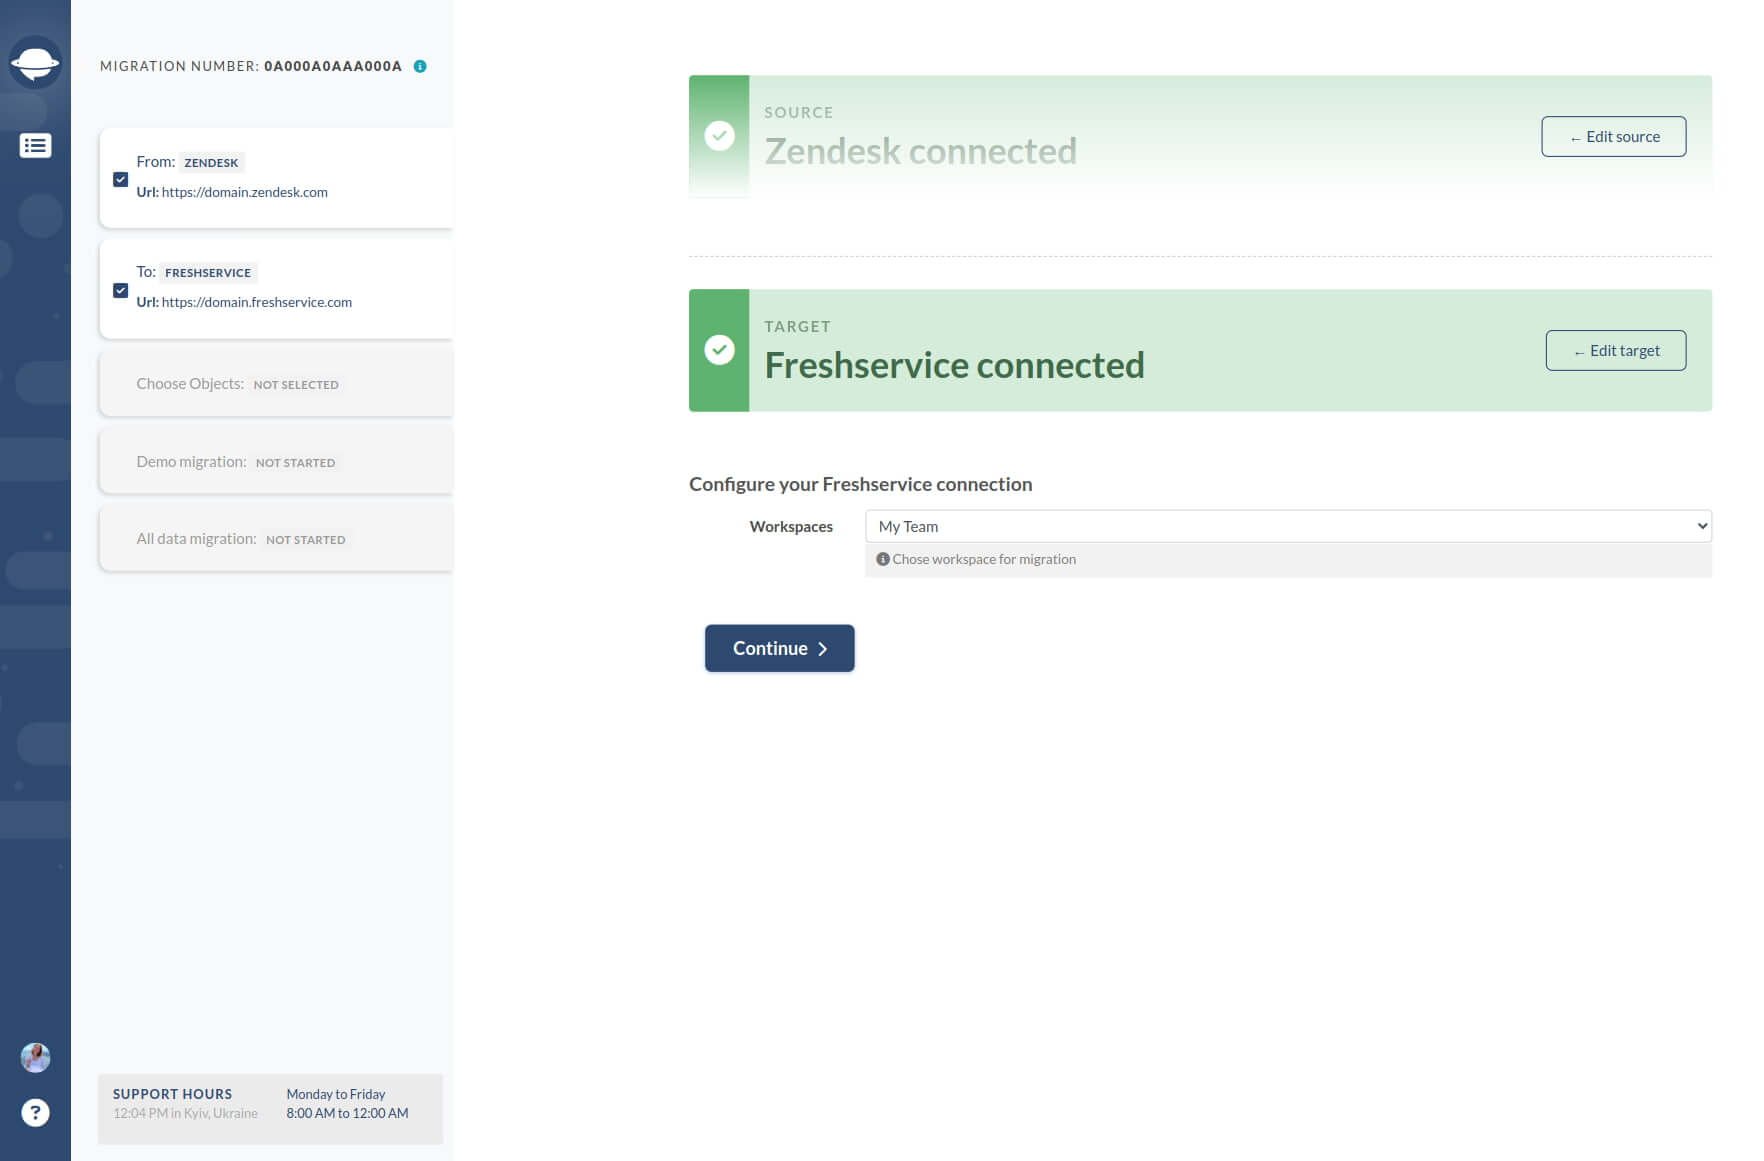
Once you've successfully connected Freshservice and selected the workspace you need, you can proceed to map your data from the source platform to your chosen Freshservice workspace.
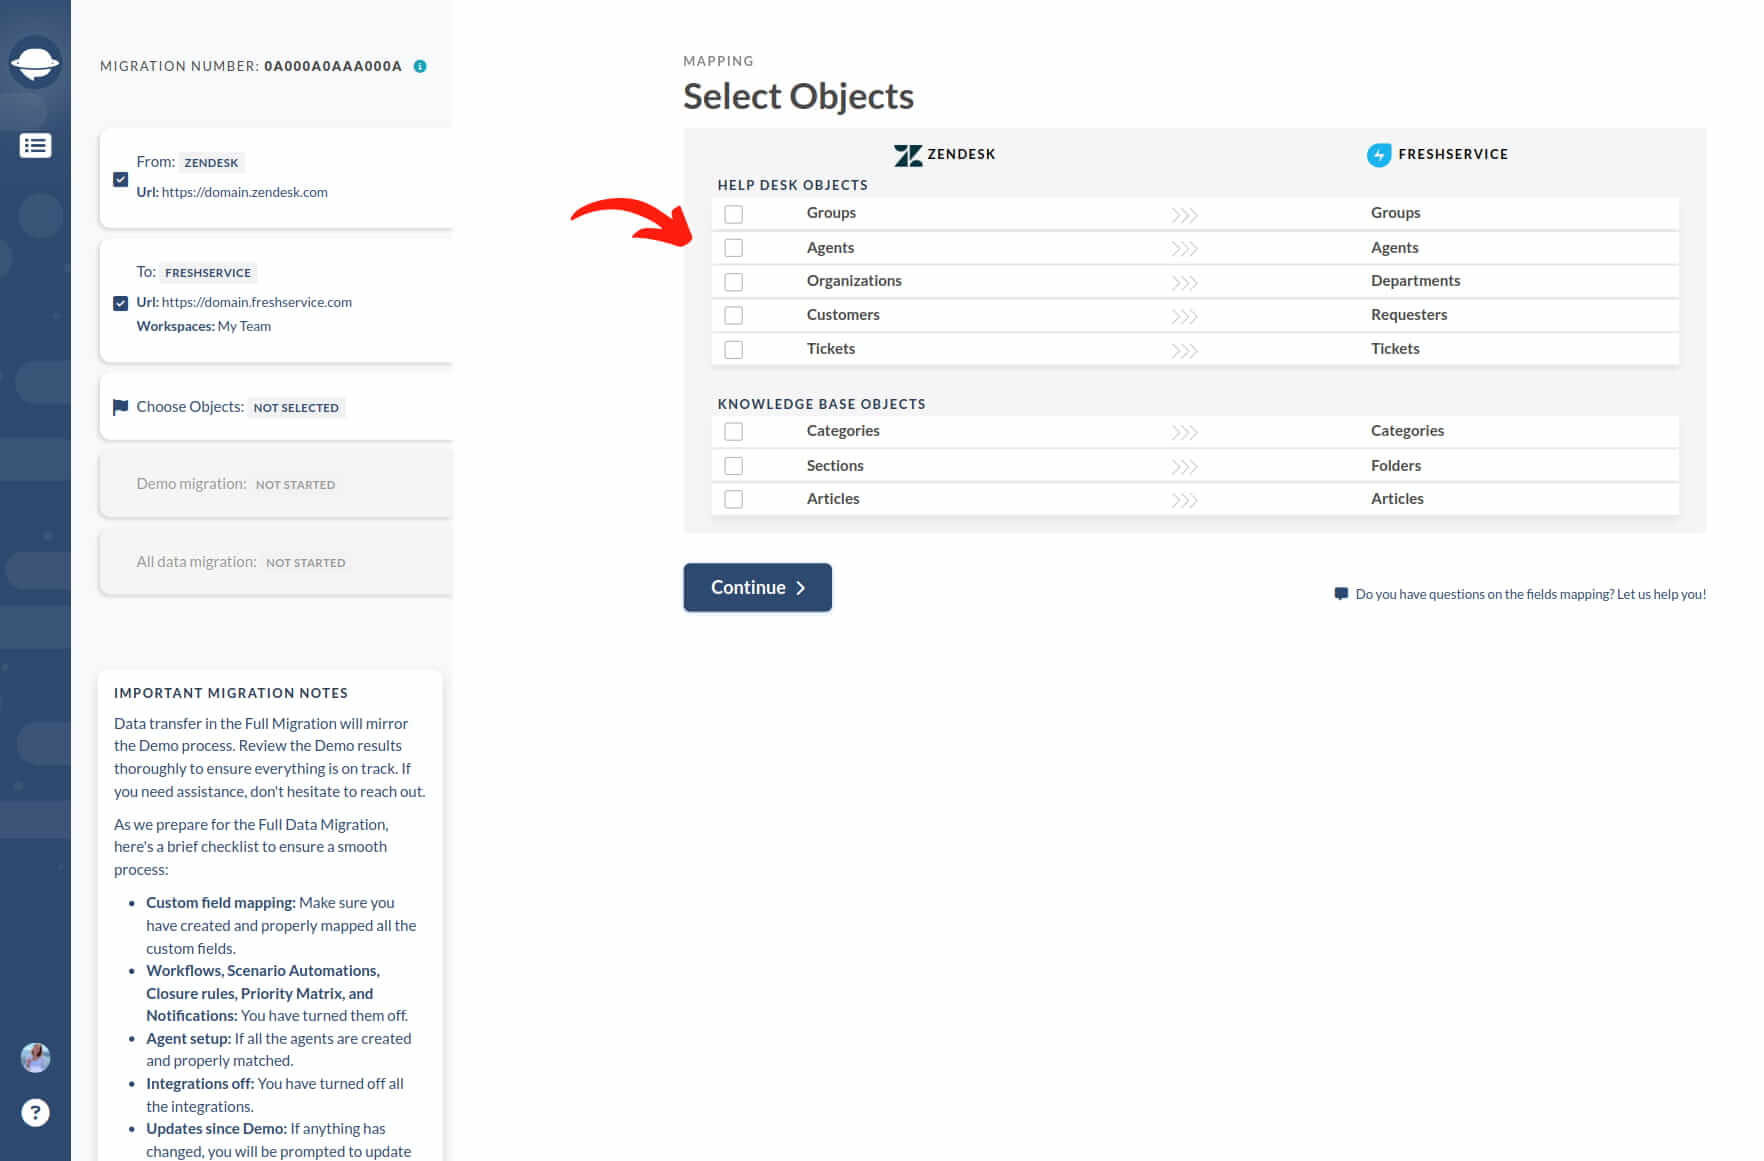
If your migration scenario involves importing data from Freshservice to another helpdesk, fear not. You can easily select the specific workspace you want after connecting your account to our Migration Wizard.
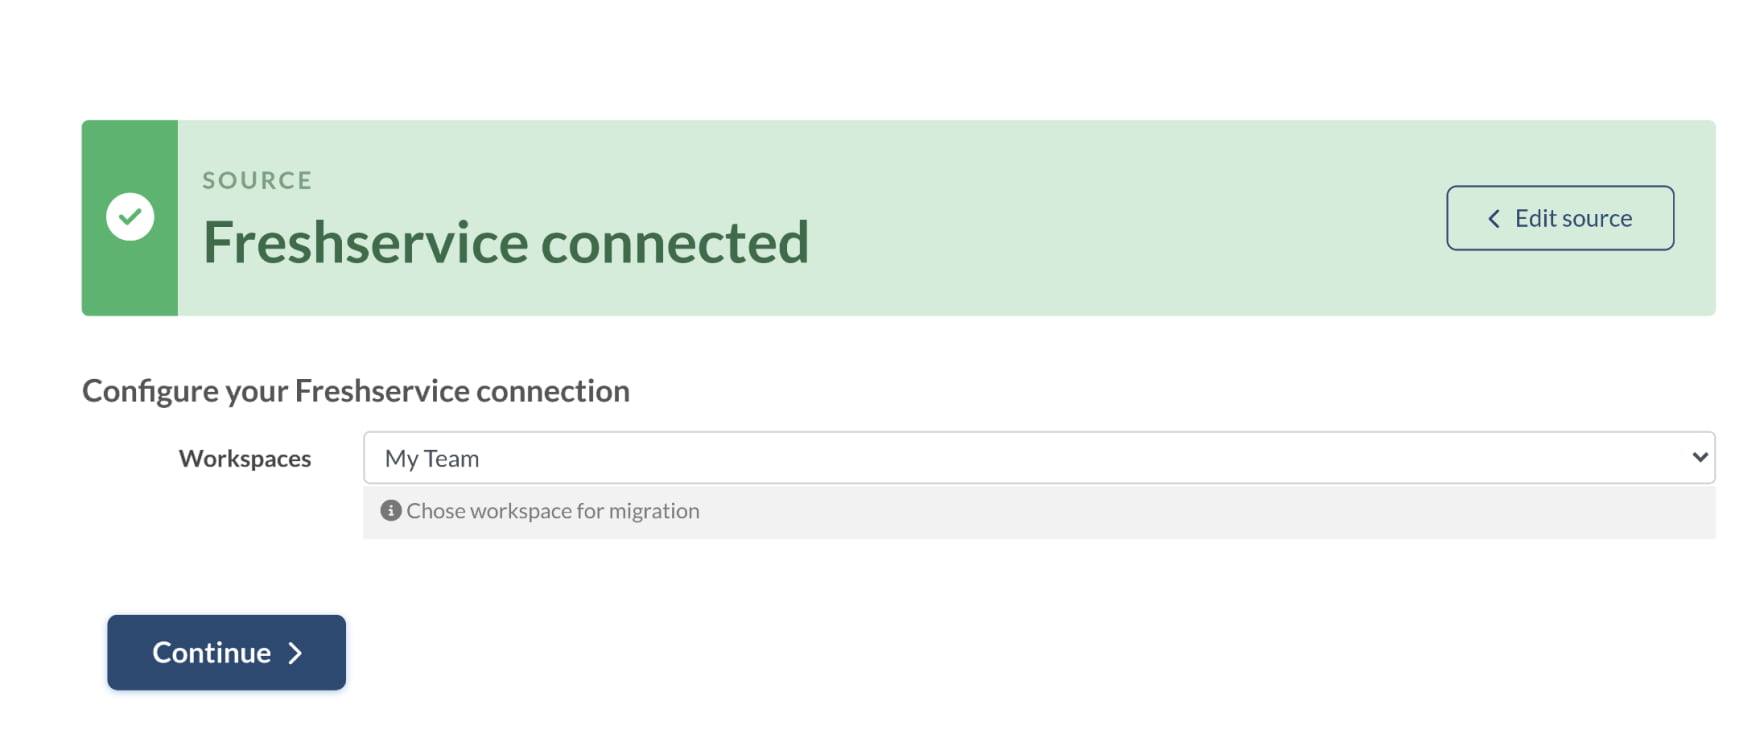
After you've chosen your target platform, it's a breeze to match and map data from your selected workspace to the destination platform.
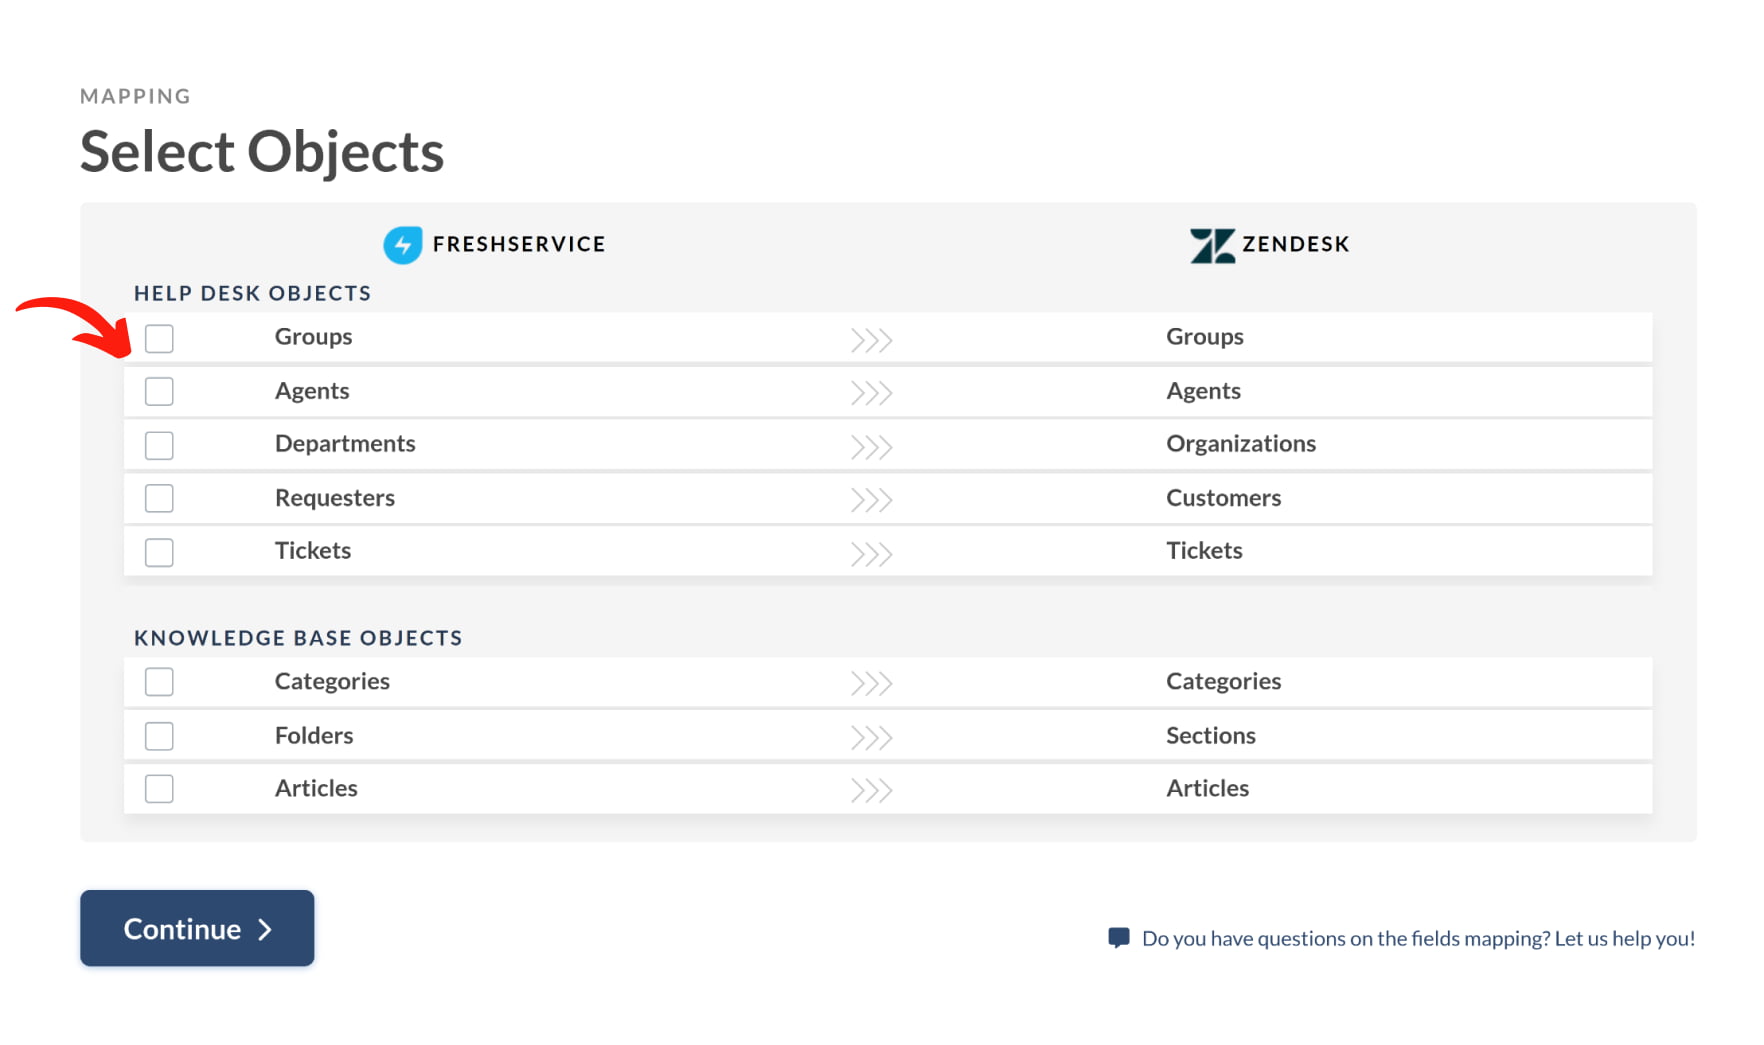
You can select the primary workspace in the Migration Wizard if you don't have any additional workspaces.
YOU’RE ALMOST READY
1. TURN OFF NOTIFICATIONS
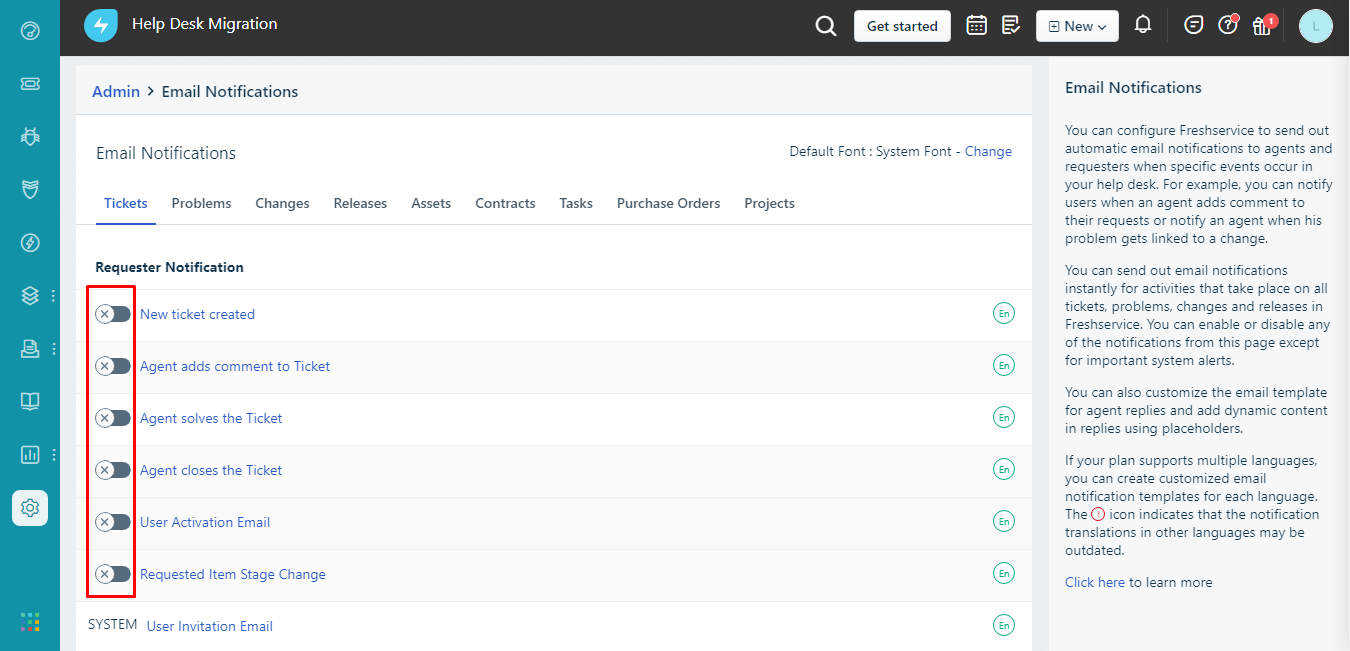
Disable Email Notifications and other triggers, including validation and duplicate rules. That will save you from getting a pile of notifications during the Full Data Migration.
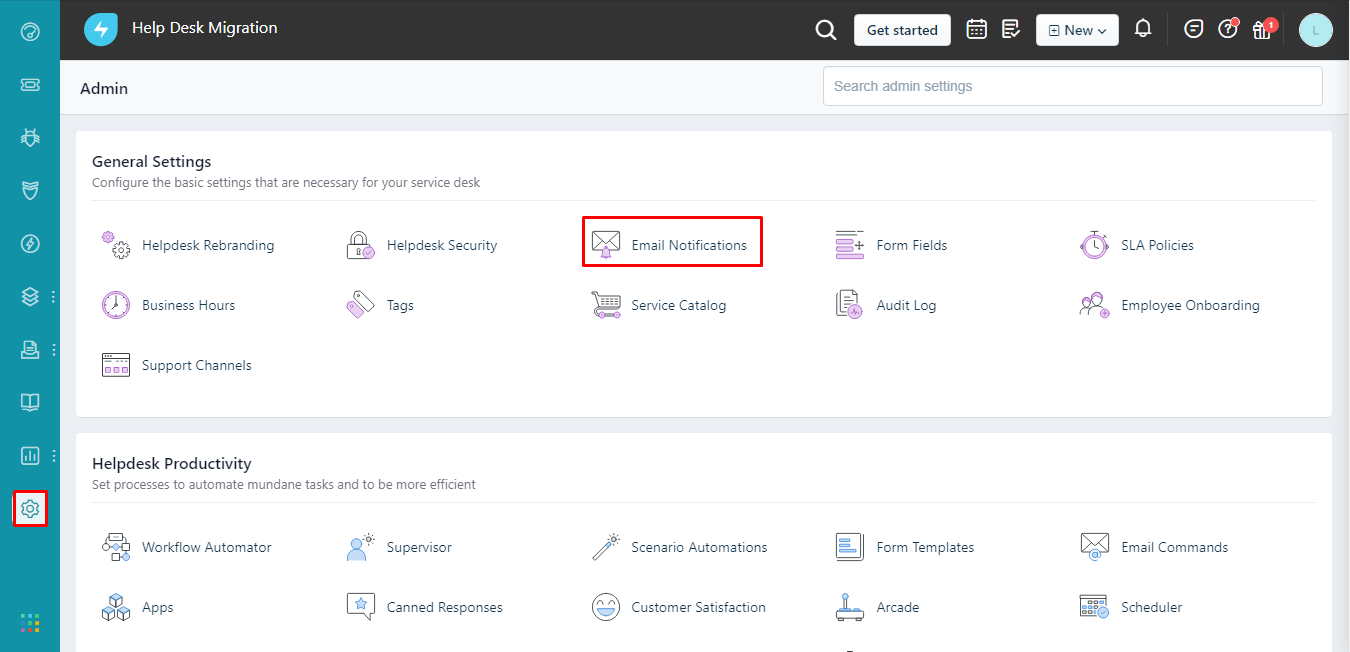
Go to Admin > under General settings, click Email Notifications > go through all tabs and disable email notifications.
2. DISABLE PRIORITY MATRIX
If you have the Priority Matrix enabled during the migration, then Freshservice will set priorities according to it. Therefore, the priority statuses will differ from those in the source help desk. If it’s not a problem for you, then feel free to leave the Matrix enabled.
However, if you want to keep all priorities as they were in the source help desk, then you have to disable the Matrix before starting Demo and Full Data Migration.
Here’s how to do it:
- Open up your Freshservice account.
- Go to Admin > Priority Matrix (under Service Management).
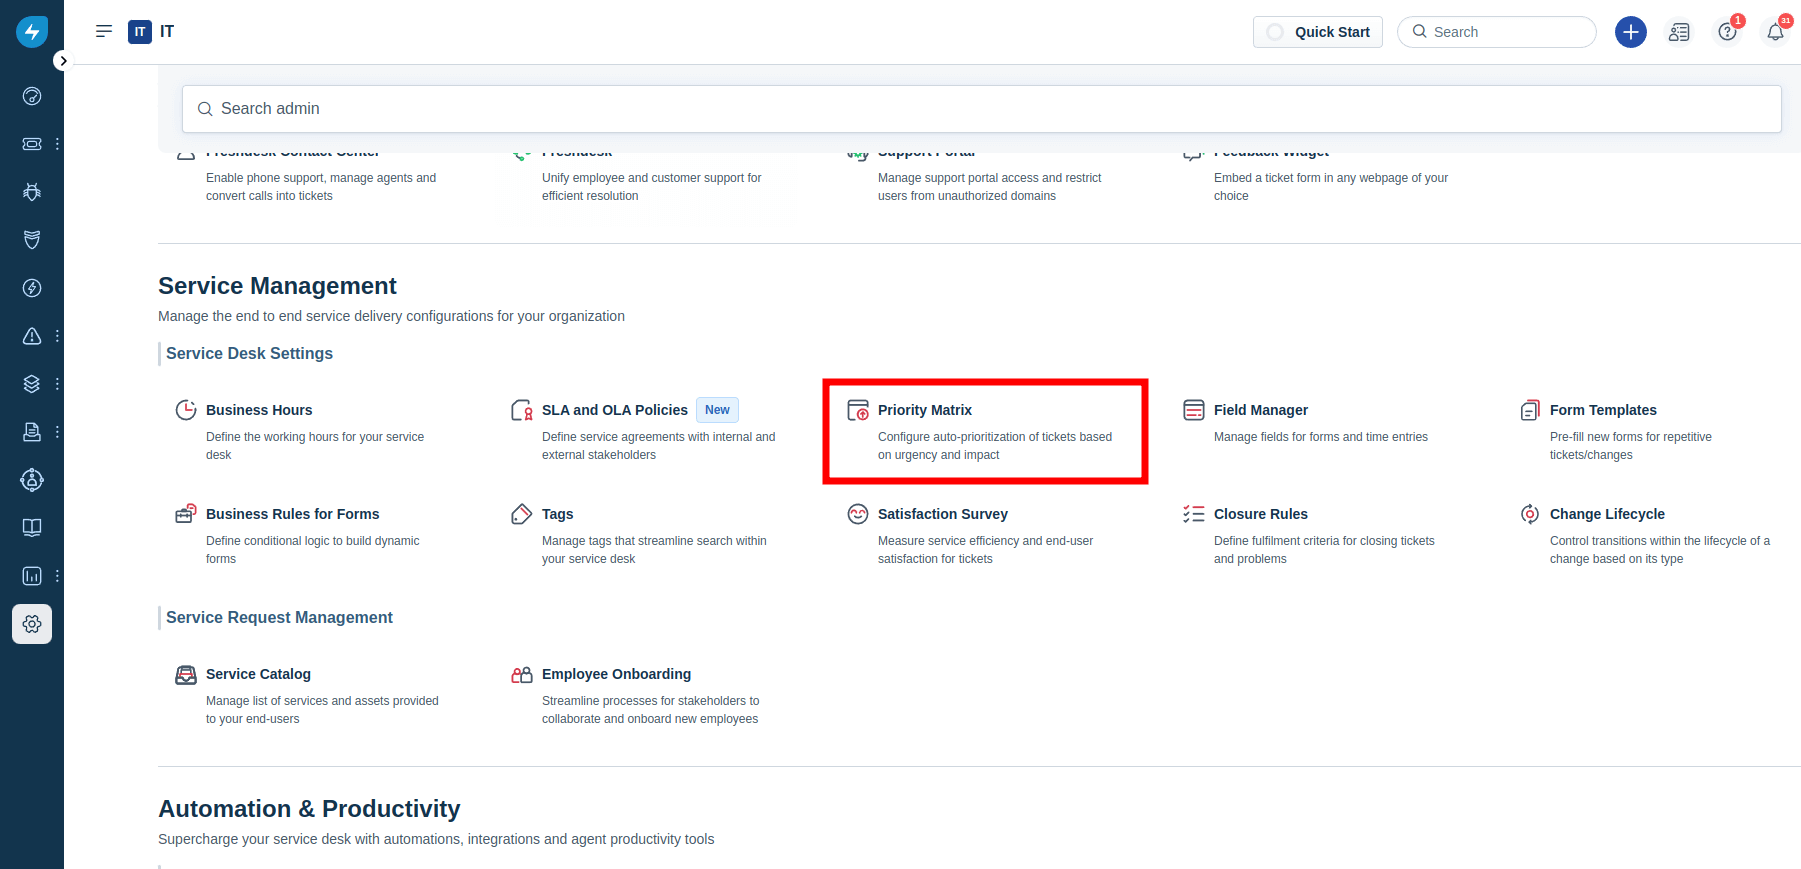
- Toggle OFF the Enable Priority Matrix option.
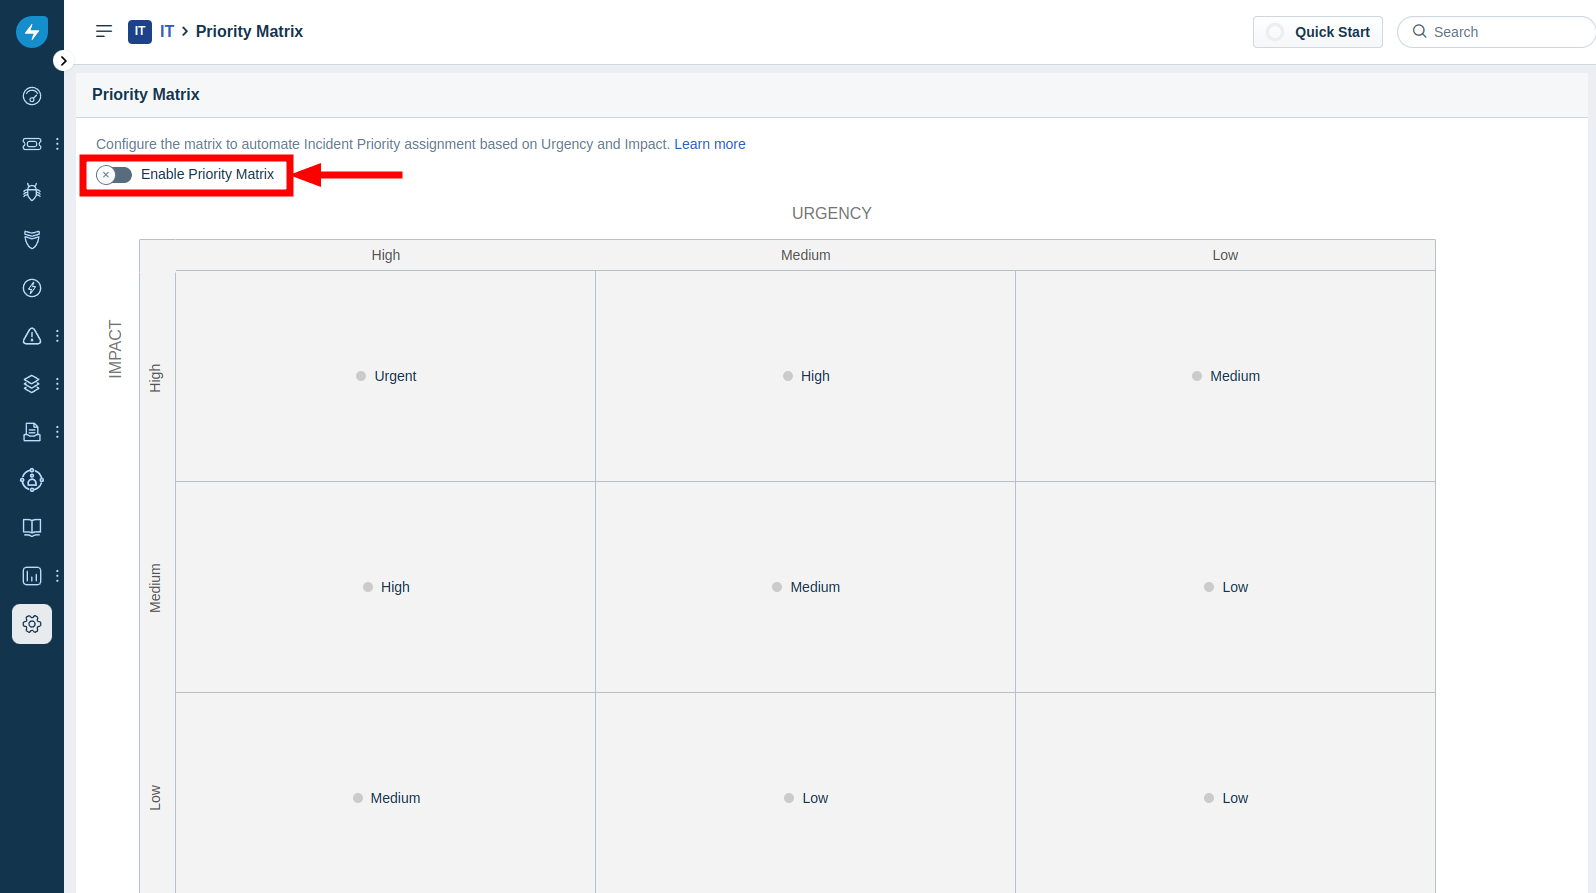
Once the migration is over, you can go back to this menu and re-activate the Priority Matrix.
3. TURN OFF WORKFLOW AUTOMATOR AND SCENARIO AUTOMATIONS
If migrating to Freshservice with active automation, disable all Workflow and Scenario automations beforehand to prevent email notices during ticket import. Here's how to do it:
1. Log in to Freshservice. Hover over the Admin panel in the left sidebar.
2. Go to Automations & Productivity.
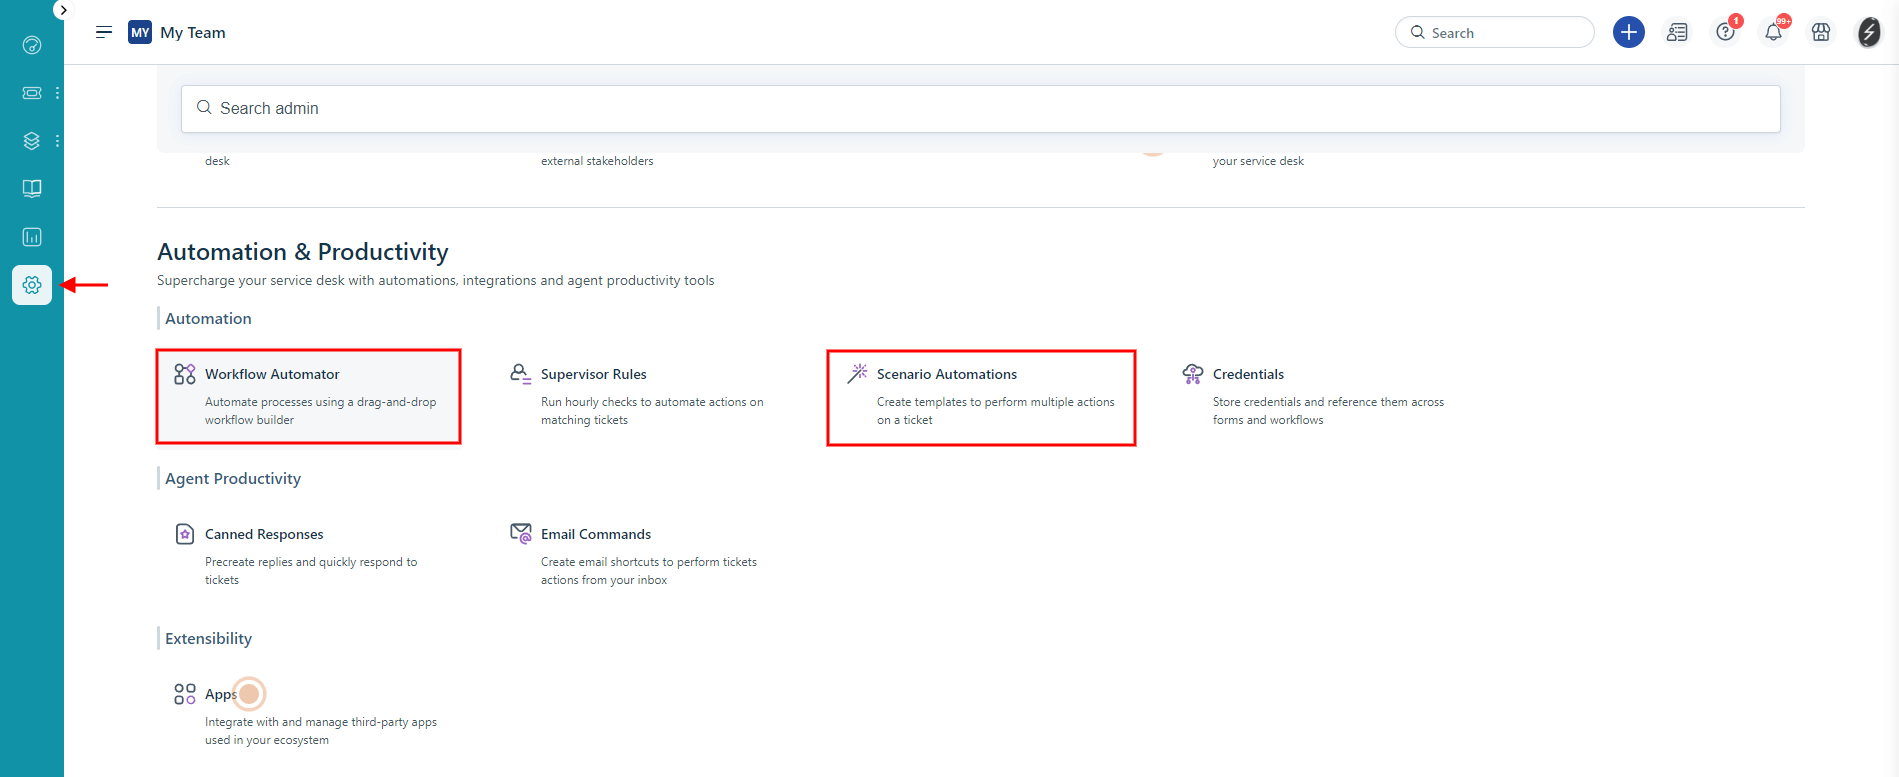
3. Choose Workflow Automator and disable all active automation rules.

4. Open Scenario Automations and document all scenarios and afterward, delete them.

You can keep all scenarios active, but remember that even if you disable Agent Notifications, Freshservice might still send updates during the migration.
Alternatively, you can contact the Freshservice support team and ask to turn off all Requester and Agent notifications.
4. DEACTIVATE CLOSURE RULES
To prevent ticket status changes after Full Data Migration, disable Closure Rules to ensure all mapped data remains unchanged.
1. Go to the Admin panel. Scroll down to Service Management > Service Desk Settings.
2. Click on Closure Rules.

3. Disable all closure rules to prevent unexpected changes in ticket statuses. Click Save.
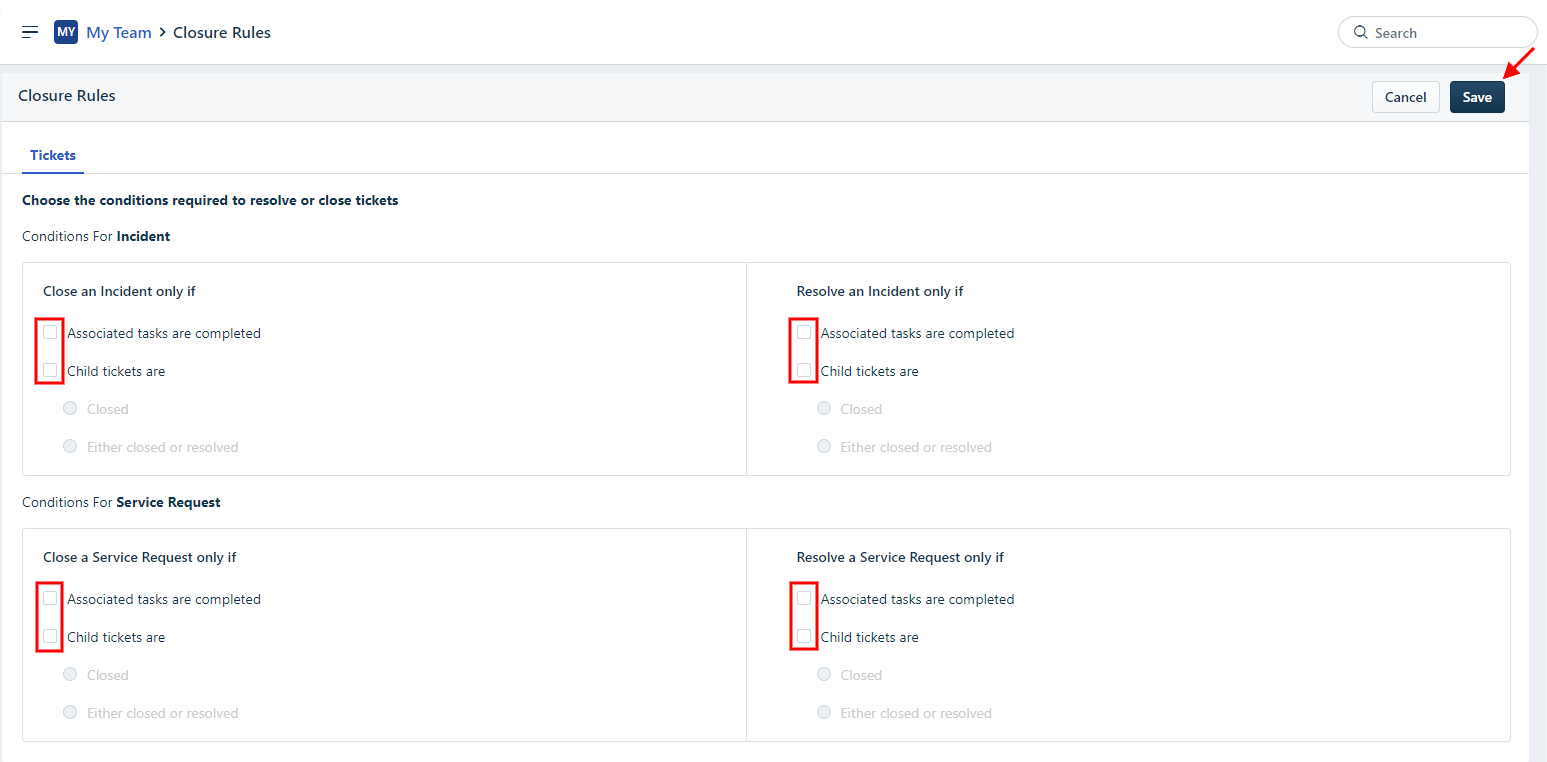
Note: if you have problems, turn off this feature for them too.
5. FIND ACCESS CREDENTIALS
Before starting the Demo Migration, find the required access credentials to the source platform and Freshservice.
To connect Freshservice with Migration Wizard, you need:
- URL: URL of your company's Freshservice account. Example - https://domain.freshservice.com/.
- API Key: Profile icon -> Profile Settings -> Your API Key. If you have a Freshservice account, find how to enable your API key here.
6. RUN THE DEMO MIGRATION
Before setting up the Full Data Migration, try the Free Demo. In brief, Migration Wizard exports 20 random source tickets and 20 knowledge base articles to Freshservice. You can edit your Demo Migration setting and re-run your Demo. Note that you get the same Demo results with the same settings.
- Log in to your Migration Wizard account.
- Connect your source and target systems.
- Pick up the data you want to import.
- Match agents and groups.
- Map tickets and articles fields.
- Choose automated options.
- Set up your Free Demo Migration.
AFTER THE DEMO MIGRATION
1. CHECK THE RESULT IN FRESHSERVICE
After completing your Free Demo Migration, it's crucial to inspect every report and verify the results. While reviewing the migrated data, pay special attention to the following:
- all comments have been migrated, and that the authors of the comments remain the same
- the tickets are correctly assigned to the appropriate agents
- all the custom fields have been migrated
- the customers and companies have been migrated correctly
- download attachments from your target platform and check if they have been imported correctly
If you need more detailed information, read this guide exclusive to Freshservice.
2. TURN ON YOUR NOTIFICATIONS, TRIGGERS, AUTOMATIONS
Enable all previously disabled notifications, priority matrix, workflow, scenario automations, and closure rules using the same guide as for disabling.
BEFORE FULL DATA MIGRATION
1. CHOOSE YOUR MIGRATION OPTION
Throughout Freshservice data migration, you can work on your source help desk. Just remember, records created or updated during Full Data Migration won't show up in Freshservice. To move all new and updated customer data, consider using Delta Migration.
The Migration Wizard operates in the cloud, so there's no need to keep the tab open. You can periodically check the Full Data Migration page or wait for a message from our team.
2. RUN FULL DATA MIGRATION
Our automated data migration service moves each record individually. Depending on your help desk data volume, the migration process can take anywhere from 20 minutes to a few days.
You can start your Full Data Migration as soon as your payment is confirmed. To minimize delays, consider making the transaction in advance or scheduling the data migration.
AFTER THE FRESHSERVICE IMPORT IS DONE
1. REVIEW EVERY DETAIL
Now that the Full Data Migration is finished, it's time to ensure that everything has been imported correctly. Remember, you have a five-day or ten-day window to review the results. The time for inspecting results depends on your support package plan. After this period, your data migration will be archived.
If you're having trouble finding specific records, be sure your search filters are set to include all tickets and any time period. If the issue persists, don't hesitate to reach out to our support team.
2. GETTING STARTED WITH PLATFORM SETUP
- Enable email notifications
- Switch on the Priority Matrix
- Turn on Workflow, Scenario Automations, and Closure Rules
- Update your Knowledge Base links and enjoy your customer service platform.