osTicket Data Migration Checklist
Data migration takes more than simply migrating help desk records from one help desk to another. That's why our team put up a migration checklist, specifically for osTicket migration.
Before we go into the details, note that Migration Wizard doesn't transfer such records to osTicket:
- Organizations
- Inline images
- Knowledge base
- Tags
- CC in Tickets
If you think about moving the records anyway, request a Custom Data Migration.
BEFORE YOU SET UP THE MIGRATION
Note: All tickets and related data migrate the same way, whether it is the Demo Migration or Full Data Migration. If some ticket data did not migrate or/and was incorrectly transferred during the Free Demo, it wouldn’t be moved during the Full Migration.
Ensure that you download the reports on migrated/failed/skipped records. Then compare the Demo results with the source data.
1. CHOOSE YOUR MIGRATION DATE
While selecting a date for osTicket import, give your agents enough time to prepare for the migration. Your agents can use that time to get used to osTicket before the Full Data Migration.
2. SPEAK TO YOUR TEAM
Let your agents know about data import to osTicket. That would help them to close old tickets. Delegate some responsibilities. Your agents can inspecting the Full Data Migration results. And set a reminder a day before migration. It can be an email or a calendar event.
3. PREPARE OSTICKET FOR THE TRANSFER
Add the same custom fields as you have on the source platform. This way, you can quickly locate the needed records after the migration.
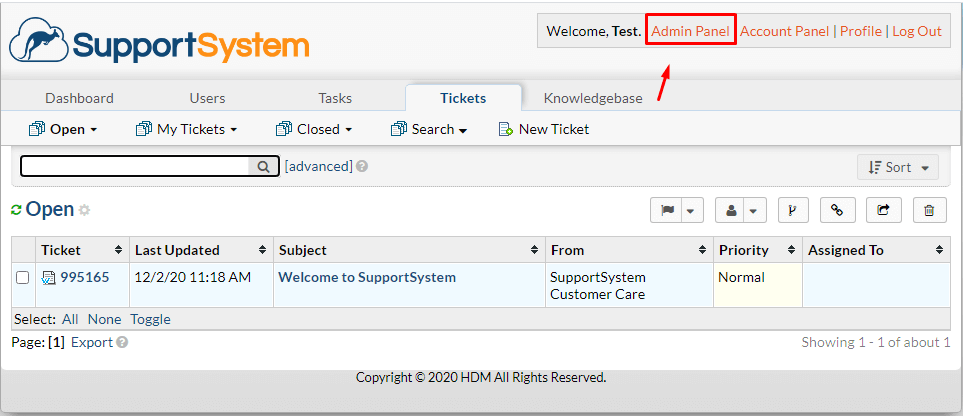
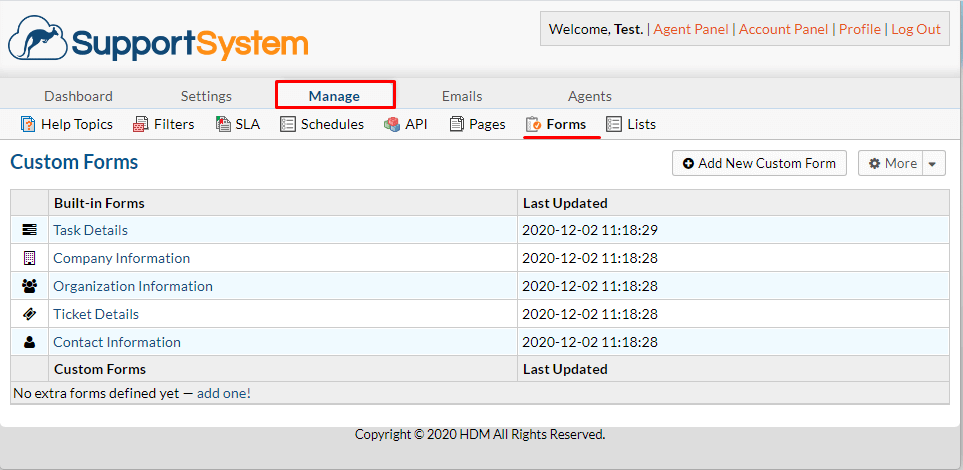
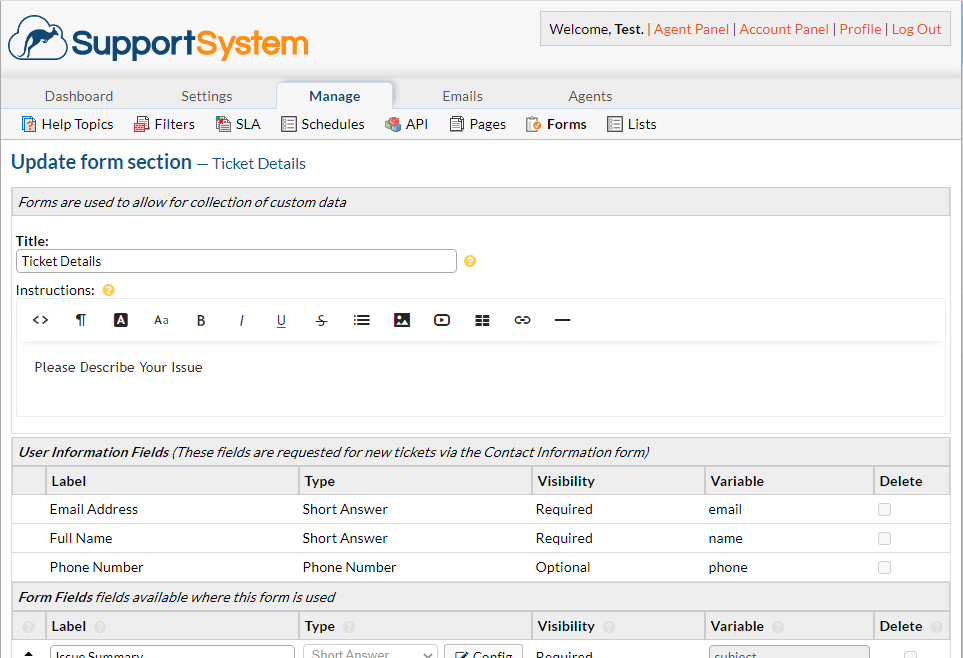
Go to Admin Panel from Agent Panel > select the Manage tab > click on Forms > Ticket or Task Details > create the needed custom forms > Save.


4. CONSIDER OSTICKET SPECIFICATIONS
Before the osTicket transfer, you should know that:
- Enable remote access to the MySQL data server. This way, our Migration Wizard can establish a connection between the tool and your database.
- CC users do not migrate to osTicket. However, our team can import the emails of CC users into a custom field instead.
5. CONTACT HDM TEAM
If you have any specific requirements for data migration, contact our support team. Among popular customizations you can find:
- migration inline images as ticket attachments
- importing email addresses of CC users into the custom field
- adding a tag to all migrated tickets
- migrating the original Source ticket ID into the subject of the ticket
YOU’RE ALMOST READY
1. TURN OFF NOTIFICATIONS
Switch off notifications to avoid receiving tons of emails during the migration.
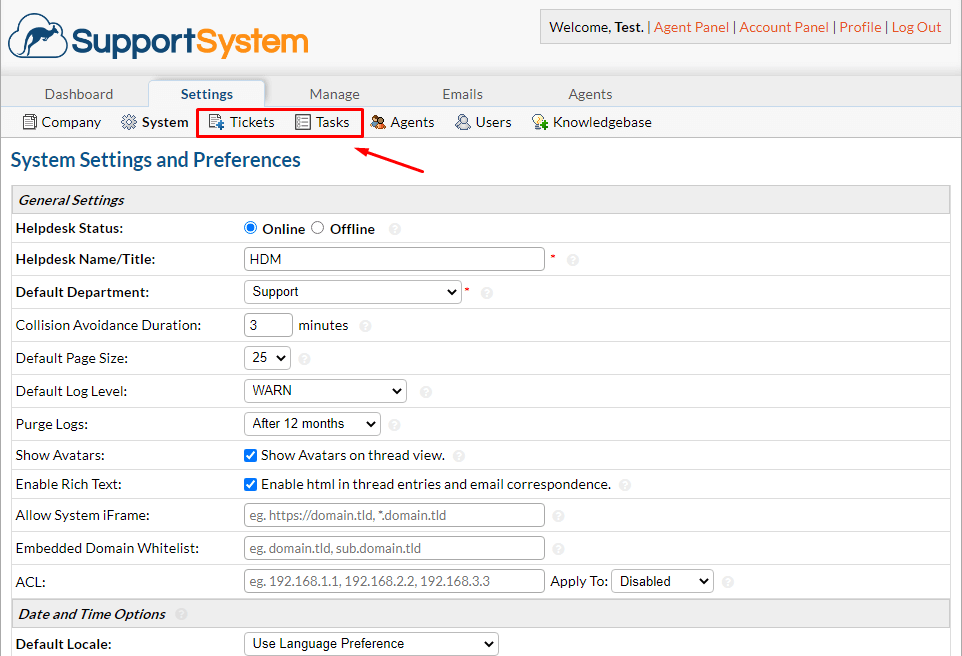
Go to Admin Panel from the Agent Panel > click on the Tickets button > Alerts and Notices > go through all alerts and disable them > Save Changes.


2. FIND ACCESS CREDENTIALS
When launching your Free Demo, you need to find all required access credentials to the source platform and osTicket. Besides, you should have admin rights for your source and target platforms.
To connect osTicket with Migration Wizard, you need:
- Host: The hostname of the server your osTicket database is hosted on.
- Port: The port number of your osTicket database.
- Database: The name of the database your osTicket data is stored in.
- Username: The username used in your Helpdesk install to log into the database server.
- Password: The password to access the database server.
3. RUN THE DEMO MIGRATION
Launch your Free Demo to see how Migration Wizard transfers 20 random tickets and whether you need some adjustments or customizations to a default migration flow. You can edit your settings and re-run Demos as many times as you require. Note that if you run Demos with the same settings, the results will also be the same. Go through this mini-guide:
- Log in to your Migration Wizard account.
- Connect your source and target solutions.
- Pick up the data you want to import.
- Match agents and groups.
- Map tickets.
- Choose the available automated options.
- Start your Free Demo Migration.
AFTER THE DEMO MIGRATION
1. CHECK THE RESULTS IN OSTICKET
Free Demo finished, you should check the results and download reports. As you inspect the migrated records, pay attention to:
- all comments got migrated and if the authors of the comments are the same
- the tickets are assigned to the correct agents
- all the custom fields and attachments got migrated (download the attachments from your destination platform to check if they were imported correctly)
For more information, read the detailed guide on how to check the results of demo migration.
2. REQUEST A CUSTOM DEMO
Depending on your Source platform, you can run a Custom Demo by yourself: just hand-pick specific tickets and fill in their IDs. Or contact our team for setting up Custom Demo for you.
BEFORE FULL DATA MIGRATION
1. CHOOSE YOUR MIGRATION FLOW
While the Full Data Migration is in progress, you can use the source or target platform. Yet Migration Wizard doesn't import any source data created or updated during the migration. To fix this, you can import that records in the Delta Migration and avoid any duplicates.
Delta Migration is offered in Signature support plan.
Your Full Data Migration runs in cloud, you can check the progress any time you need or expect an email notification about the completed migration.
2. START FULL DATA MIGRATION
Your Full Data Migration only starts after:
- The payment has been confirmed. Make a payment if you have an ideal time in mind. Or schedule the osTicket import to set it up based on that timing.
- You've agreed to the provided checklist. Inspect each point, and check the corresponding box.
AFTER THE IMPORT IS DONE
1. EXAMINE EVERYTHING
Once the Full Data Migration has finished, inspect if everything transferred correctly. Ensure that migrated records are readable and in place. You have five or ten days to check the results until your migration gets archived.
If you can't find any data check if you've set up the correct filters for all tickets. If the problem remains, reach out to our support team.
2. SET UP YOUR NEW PLATFORM
- Enable all the notifications you previously had to turn off
- Redirect email forwarding
- Set necessary settings
