Kayako Data Migration Checklist
Data migration brings complexity, effort and expenses. How can you migrate your data over to Kayako with little to no effort? Check this detailed migration checklist, of course.
Note that Migration Wizard doesn't transfer on default migration such entities to Kayako as:
- Inline images
- CC users
If you still want to move the records listed below, contact our team. Our migration experts will come up with a solution.
BEFORE YOU SET UP THE MIGRATION
When you start preparing to your Kayako migration, check out the following:
Note: Tickets and related data are transferred the same way in the Demo Migration and the Full Data Migration. If some customer records weren’t migrated during the Demo Migration, they won’t be imported during the Full Data Migration.
Download every report on migrated, failed, and skipped records after Demo Migration. Then check how your customer data migrated.
1. CHOOSE A DATE FOR MIGRATON
Select a suitable time and date for Kayako data import to give your team enough time to prepare for the migration.
2. SPEAK TO YOUR TEAM
Tell your agents about data import to Kayako. This way, they have enough time to get used to a new solution. Share certain responsibilities if the process requires that. Your employees can help you filter data or exam the results after the Full Data MigrationSend a reminder about data migration.
3. PREPARE KAYAKO FOR THE MIGRATION
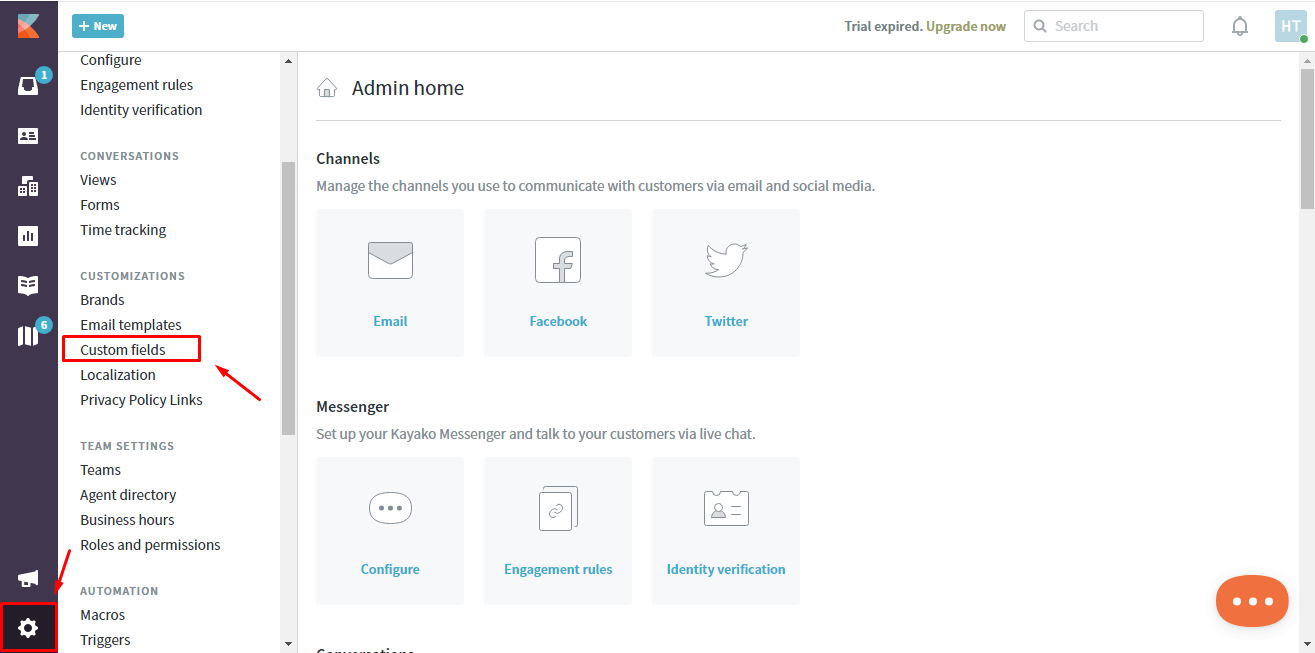
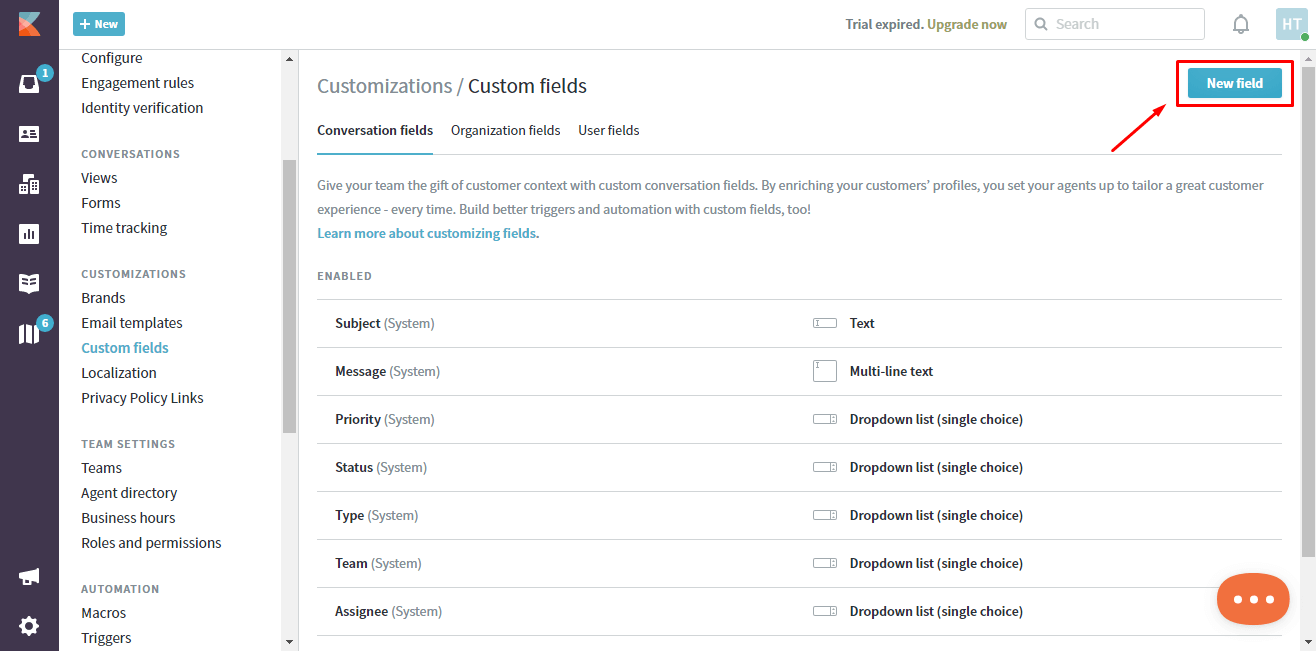
1. Create custom fields.
The right custom fields can help you locate all records after data migration. Besides, they should correspond to your ones on a source platform.
To create custom fields: go to the Agent area > Administration > click Custom fields under Customization > New field.


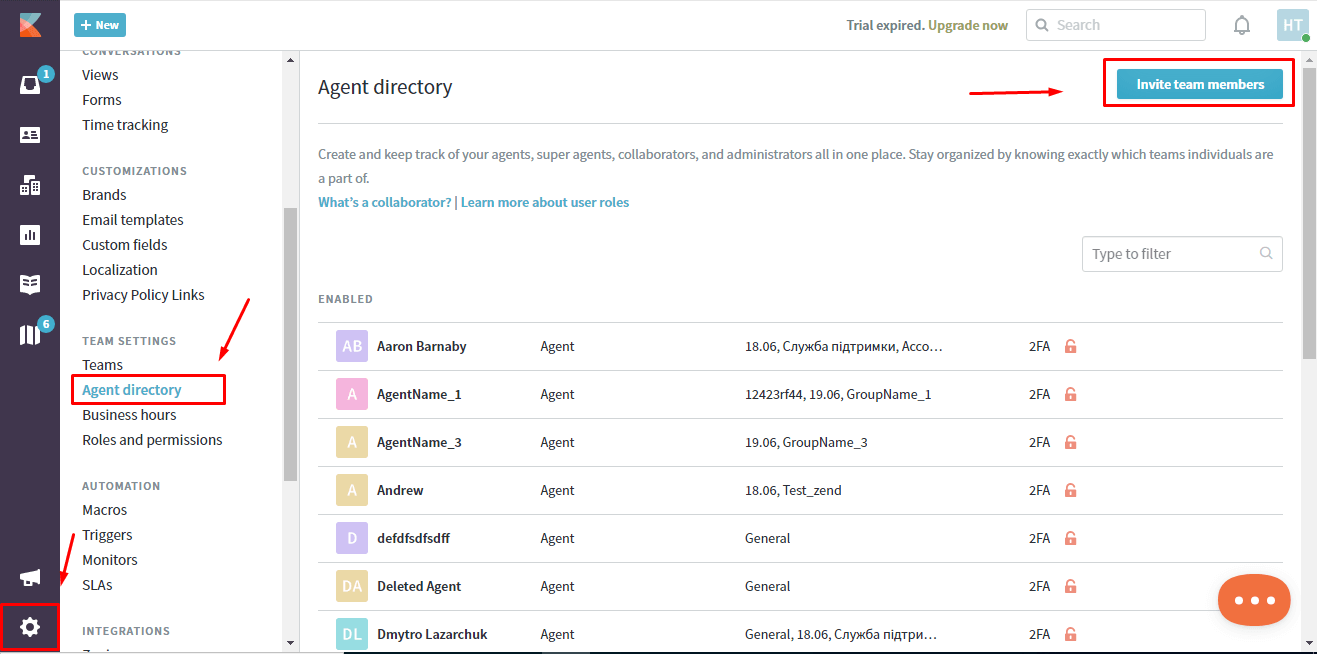
2. Add agents.
Before migration, you need to have at least one agent on Kayako. There are two options:
- Add missing agent profiles in Migration Wizard while matching agents. Choose one agent or all of them.
- Create agents in Kayako. Note that agents’ profiles should contain the same email as the source platform.
Go from the Agent area to Administration > click Agent Directory under Team settings > Invite Team Member.

4. CONSIDER KAYAKO PECULIARITIES
Before the Full Data Migration to Kayako you should know:
- There are agents and collaborators in Kayako. Only agents can communicate with customers, while collaborators can only communicate internally with customers.
- You should confirm your agent's activation via email.
- When migrating Knowledge Base content, allow potentially unsafe HTML in Help Center articles in the admin panel. Kayako blocks the outsource links to provide safety for its users, so if you want all of your links to work, make sure not to skip this step.
- Our tool can't migrate cases of deactivated agents.
- If you migrate from Kayako Classic to Kayako and want your users to access the Help Center via the same URL, do not switch to DNS (Domain Name Service, a.k.a. your Knowledge Base URL) before migrating. Do it afterward to keep all attachments.
- CC users do not migrate. However, you can still migrate emails of CC users into a custom field. Or, opt for customization and migrate CC users over to Kayako.
5. CONSIDER CUSTOMIZATION OPTIONS
If you have any specific requirements for data migration, contact our support team. We offer an option like
- Data filtering by different criteria (creation date, tags, custom fields, groups, organizations, assignees)
- Change of the default migration process (customer custom fields, migration of change and problem objects as tickets, migration of ticket events as private notes, emails of CC users into a custom field, migration of the information related to inactive users)
- Adding information to the migrated data (marking tickets with extra tags, adding legacy ticket ID to the ticket subject)
YOU’RE ALMOST READY
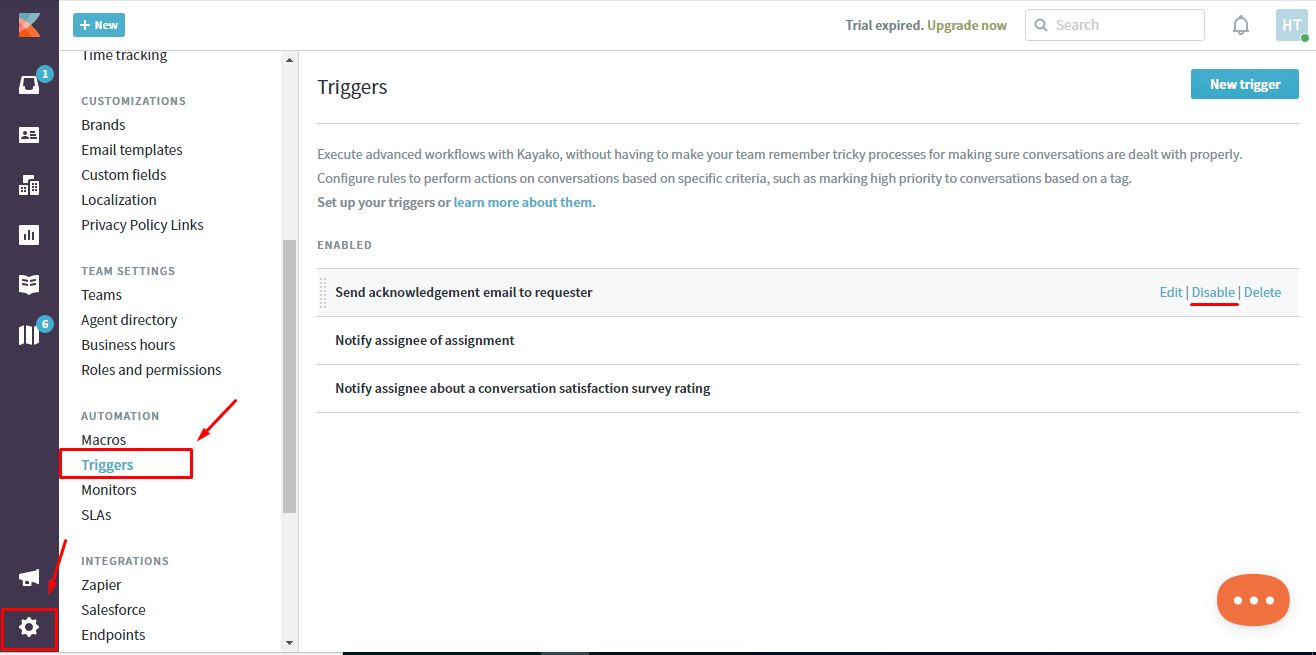
1. TURN OFF NOTIFICATIONS
Switch off Email Notifications, Monitors, and any triggers before starting the migration to avoid data changes.
Go to Administration > Click Triggers under Automation > Disable the needed triggers.

2. FIND ACCESS CREDENTIALS
When running a Demo Migration, you need access credentials to the source platform and Kayako.
To connect Kayako with Migration Wizard, you need:
- URL: URL of your company's Kayako account.
- Email: Email to your Kayako account.
- Password: Password to your Kayako account.
3. RUN A DEMO MIGRATION
Instead of running the Full Data Migration right away, set up a . In short, our tool moves 20 random tickets from your old help desk to Kayako during the trial. Repeat the process as many times as you need.
- Log in to Migration Wizard.
- Connect your source and target platforms.
- Select the data you want to import.
- Match agents and groups.
- Map tickets and articles route.
- Pick up automated options.
- Set up your Free Demo Migration.
AFTER THE DEMO MIGRATION
CHECK THE RESULTS IN KAYAKO
Once your Free Demo finishes, check a table with four columns:
- all available records
- migrated records
- failed records
- skipped records
And download reports to check the migration results. Pay attention to:
- all comments got migrated and if the authors of the comments are the same
- the tickets are assigned to the correct agents
- all the custom fields got migrated, along with attachments and labels
- the customers and companies are migrated correctly
- if you have any skipped records, reach out to our support reps
For more information, read the detailed guide on checking the results of Demo Migration for Kayako.
BEFORE FULL DATA MIGRATION
1. SELECT YOUR MIGRATION FLOW
Keep the process consistent, you should decide on which help desk system you are going to work during data transfer: the current or desired platform.
If you work on the source help desk system, note that records created or updated during the process won't get migrated. In this case, opt for Delta Migration to import them later. The Delta option is available in Signature support plan.
While the Full Data Migration is going on, check out the progress in Migration Wizard anytime or wait for our support reps to contact you.
2. START FULL DATA MIGRATION
Our automated migration service moves each record one by one. That’s why the process might take from 20 minutes to several days depending on the volume of help desk records.
The Full Data Migration starts after
- Your payment is confirmed. It may take some time; that's why make a transaction in advance or schedule data migration.
- You've agreed to the checklist. Click on the corresponding checklist with a mini-guide. Run through all steps and put a tick in a checkbox.
3. DON’T CHANGE ANYTHING
Any changes to source data can fail your migration, or your data import will take more time. Better audit migrated records on Kayako after the data migration.
If you have new tickets coming into your source help desk, you can opt for the Delta Migration to migrate them to Kayako.
AFTER THE IMPORT IS DONE
1. EXAMINE EVERYTHING
Check the results of your Full Data Migration to know if your data migrated correctly. You have five days to study all reports until your Migration would be archived.
If you can't find something, check if you've set up suitable search filters for all tickets and any time. If you still can't find the needed data, drop a line to our migration experts.
2. SET UP A NEW PLATFORM
- Redirect all your incoming support channels to Kayako
- Enable the notifications you previously had to turn off
- Update the internal links in Knowledge Base ( if you migrated one)
- Reforward your emails to the platform