Help Scout Data Migration Checklist
Data migration is a complex process that often requires some effort. To simplify your migration to Help Scout and enhance the process tenfold, we've created a comprehensive data migration checklist.
Note: Migration Wizard cannot automatically import the following types of records into Help Scout:
- Inline images
- CC users (Emails of CC users will be migrated into a custom field instead)
- Contact and organization custom fields
If you still wish to migrate these records, get in touch with our support team for a personalized option.
Additionally, when importing your Knowledge Base into Help Scout, please be aware that the dates will be updated to reflect the date of the data migration, rather than the original dates.
BEFORE YOU SET UP THE MIGRATION
Follow these steps to optimize efficiency without compromising data integrity:
Both the Demo Migration and Full Data Migration processes handle records in the same manner. If any data was not successfully transferred during the Demo Migration, it will not be included in the Full Migration.
Following the Demo Migration, download reports for records that have been successfully migrated, those that failed, and those that were skipped. Then, thoroughly validate that all data has been transferred accurately. If any issues arise, please don't hesitate to reach out to our migration experts.
1. SET A CLEAR TIMELINE
The success of your data migration process hinges on the quantity and quality of your data. It's crucial to allocate ample time for thorough preparation. Choose a day with minimal help-desk-related tasks to ensure a smooth transition.
2. COMMUNICATE WITH YOUR TEAM
Inform your team members about the upcoming data migration to Help Scout. This allows them to acclimate to the new help desk system. Delegate specific responsibilities and send a reminder one day prior to the migration.
3. PREPARE YOUR NEW HELP DESK FOR THE MIGRATION
Follow this guide to prepare Help Scout for seamless data migration:
1. Create mailboxes. To work efficiently in Help Scout, you'll need to manually create mailboxes.
Go to Manage → and select Mailbox from the dropdown menu. Click New Mailbox.


2. Create custom fields. Custom fields are essential for preserving your data structure and enabling quick access after migration.
Click Mailbox then Settings. Choose Custom fields from the dropdown menu. Click New Custom Field.
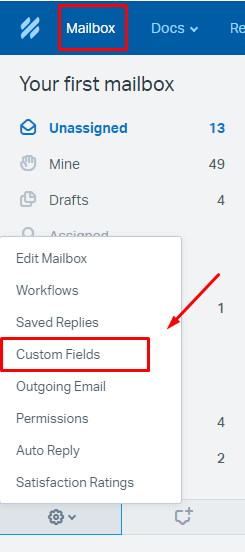
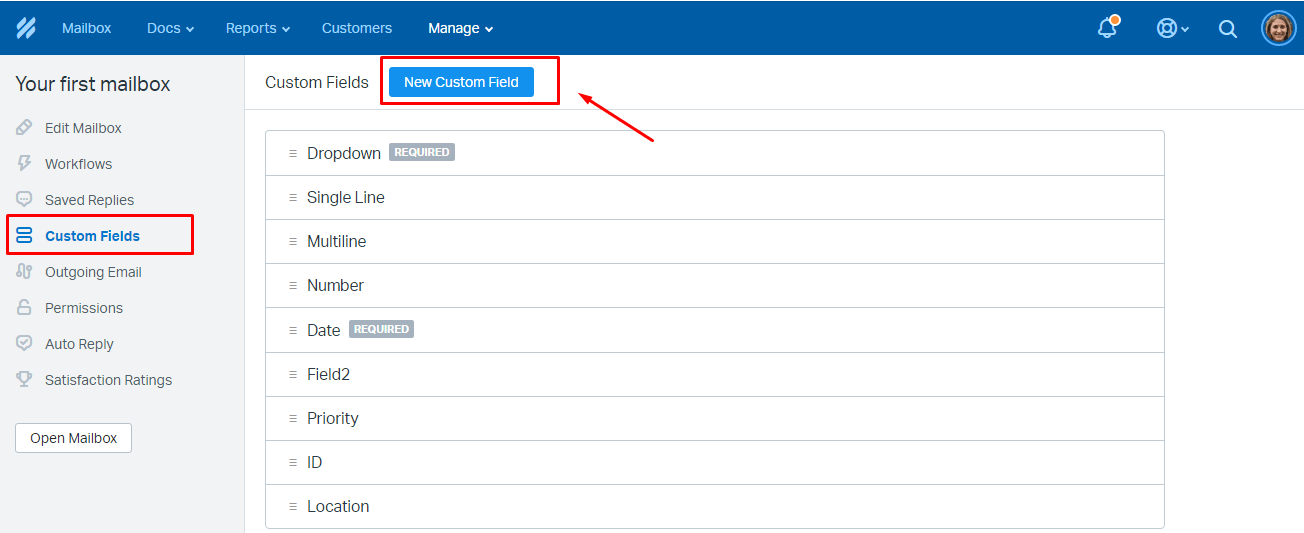
3. Add agents. Create agents on Help Scout with the same emails as your current help desk before migration. Set up at least one agent profile to enable agent matching and the option 'Add the same agents on Help Scout.'
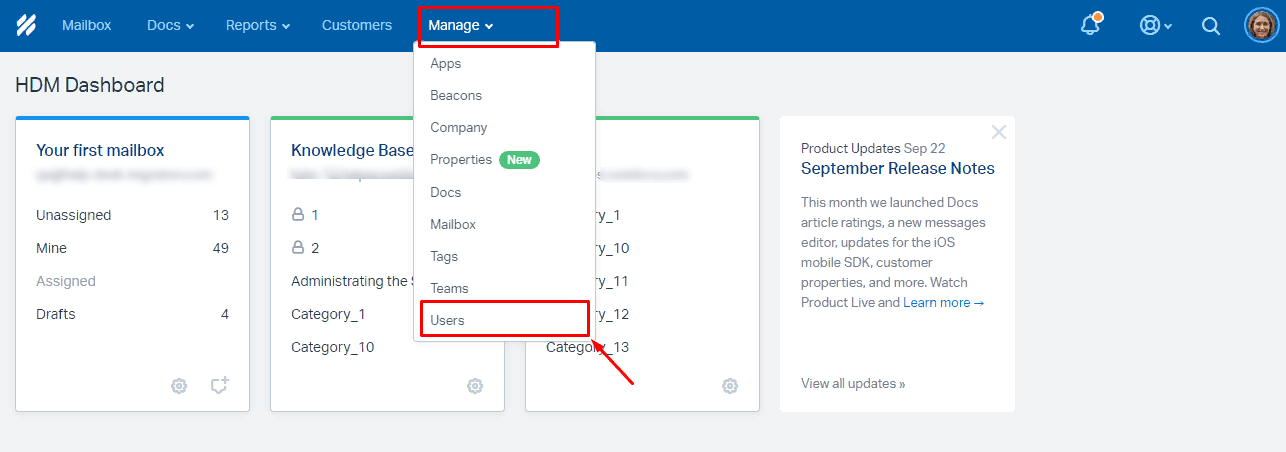
Navigate to Manage and select Users. Click New User.

4. CONSIDER THE LIMITATIONS AND PECULIARITIES
Before proceeding with the Full Data Migration to Help Scout, please take note of the following:
- When transferring your data to Help Scout, select only one mailbox for migration. If you wish to import records into different mailboxes, you will need to configure a separate migration for each mailbox within your Help Scout account. If you're transferring data from Help Scout to another help desk, we can facilitate the migration of multiple mailboxes through a custom data migration. However, for a default migration, you'll need to initiate separate migrations for each mailbox.
- If you plan to migrate Knowledge Base articles, make sure to enable or create Docs in advance.
- Be aware that tickets should not exceed 100 comments on the platform. If you have more than 100 comments, the Migration Wizard will create an additional ticket to accommodate the surplus comments.
- It's essential not to deactivate end-users as we cannot migrate their cases.
- Before initiating the migration, ensure that you have admin rights for both your source platform and Help Scout.
5. POPULAR CUSTOMIZATIONS
Reach out to our team if you have specific requirements for your Help Scout Migration, especially if the available automated options do not meet your needs.
- Migrate Contact custom fields into 'Contact Notes' to preserve the required data.
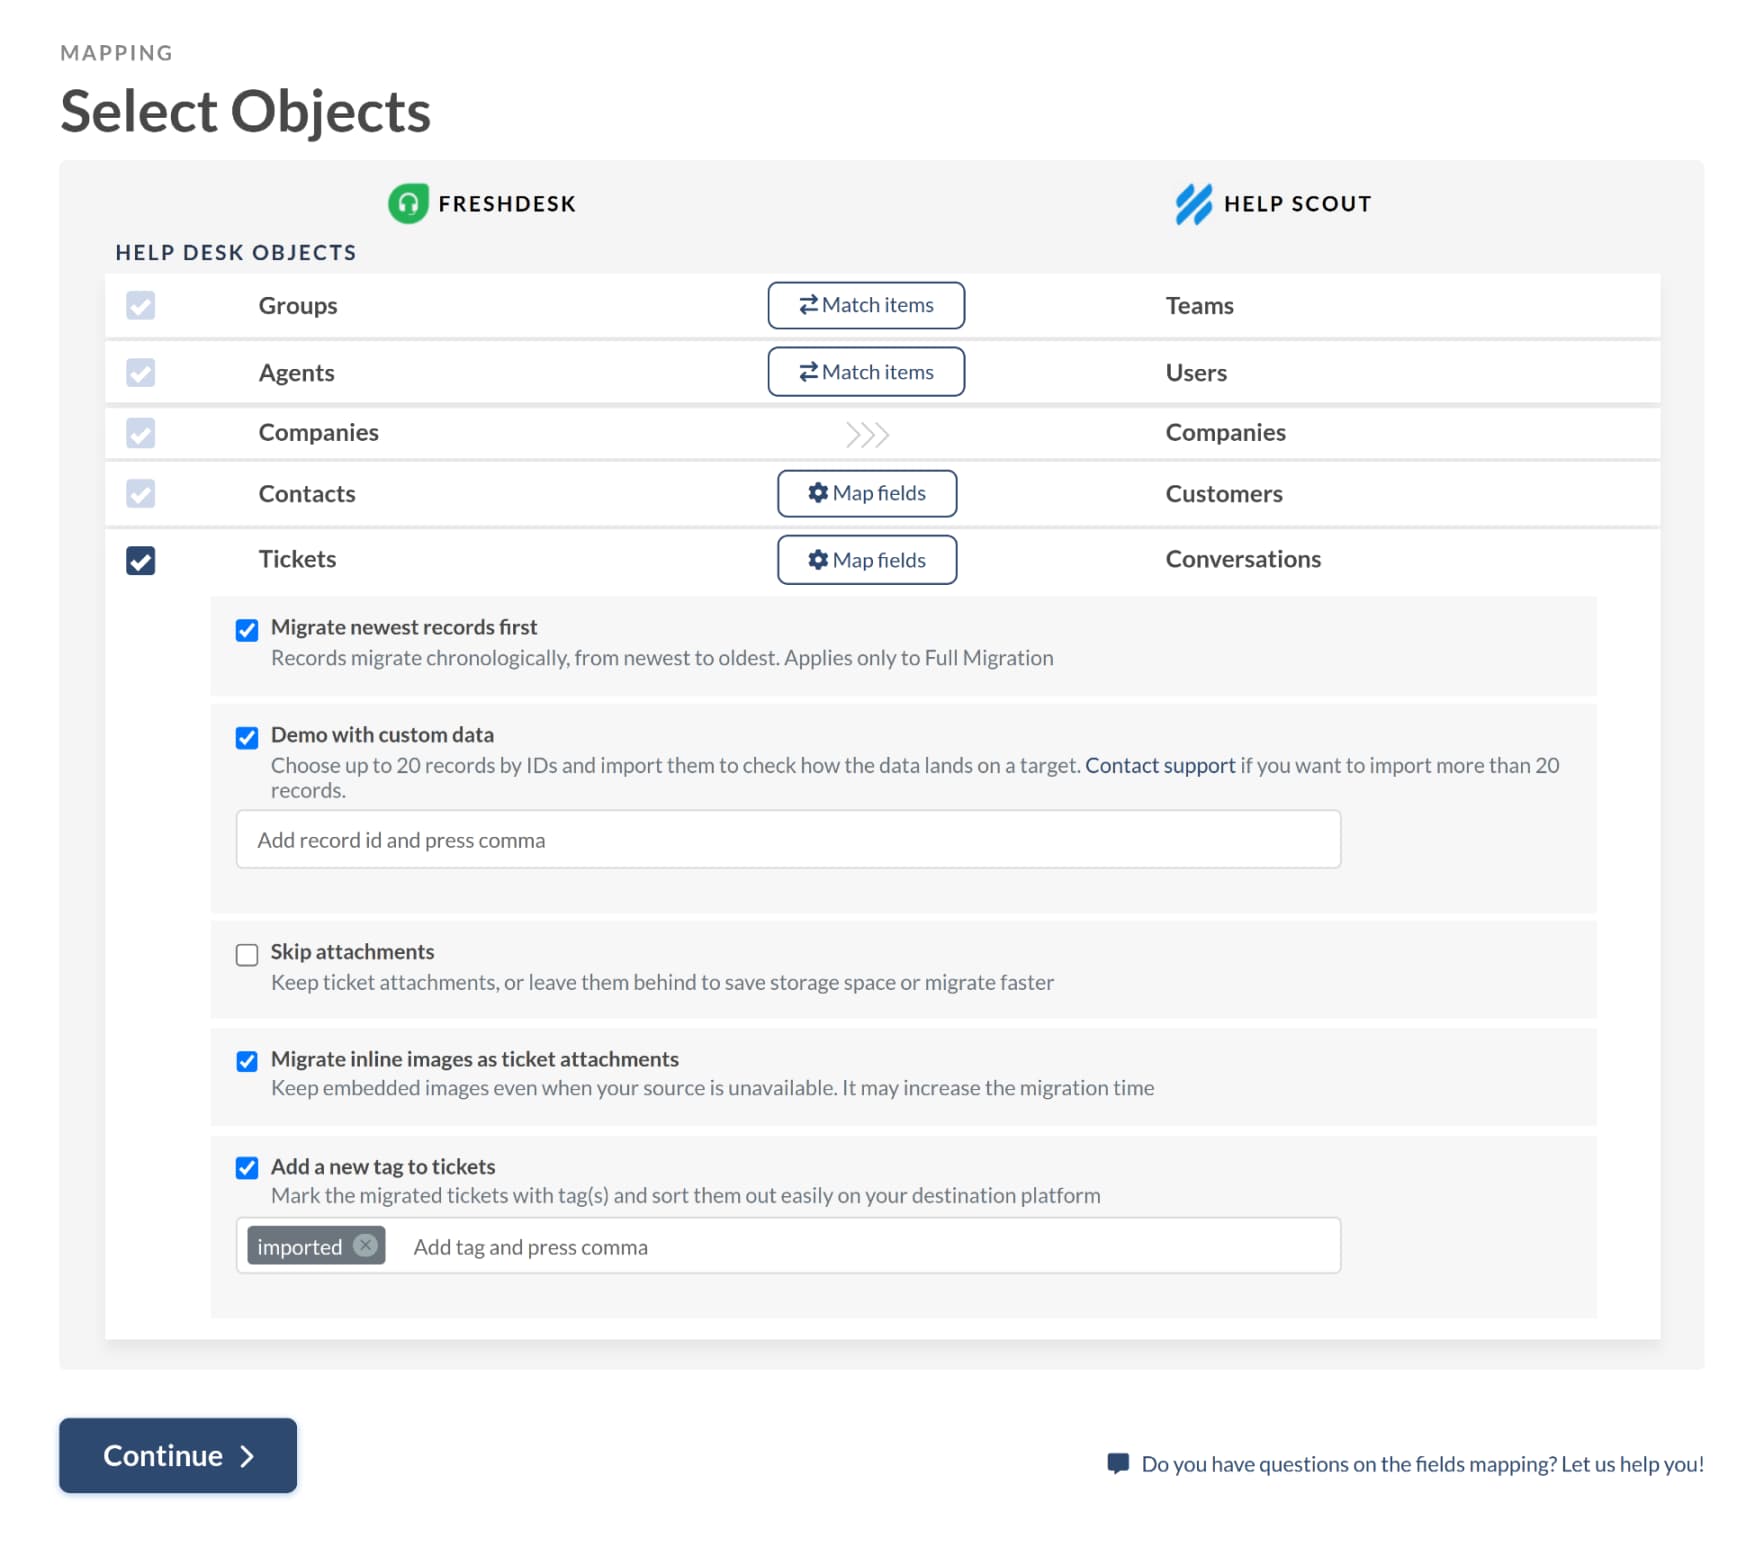
- Migrate inline images as attachments.
- Implement data filtering based on various criteria, such as creation date, tags, custom fields, organizations, and assignees.
YOU’RE ALMOST READY
1. TURN OFF NOTIFICATIONS
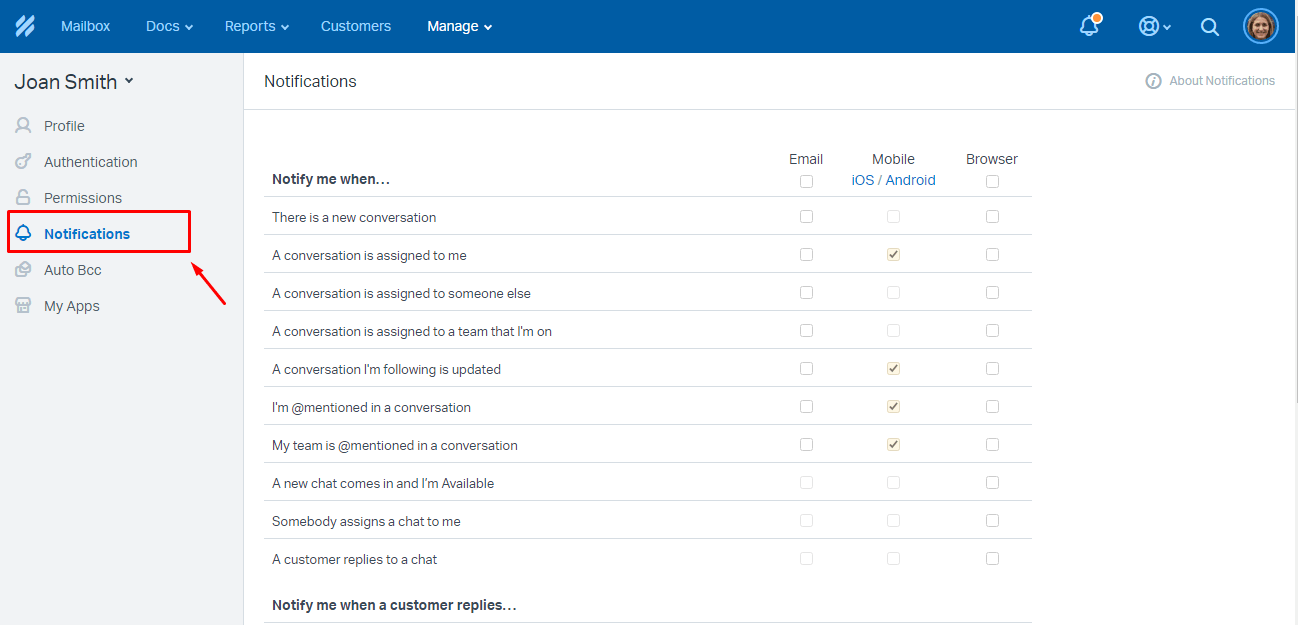
Before migrating, make sure to disable notifications to avoid unwanted interruptions. Here's how:
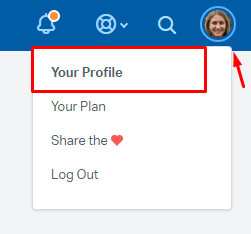
Click on the Profile icon. Go to Your Profile, then naviagte to Notifications. Turn off the needed notifications.
2. FIND ACCESS CREDENTIALS
When running a Demo Migration, you'll require access credentials for both the source platform and Help Scout.
To connect Help Scout with our tool, follow these steps:
- For Docs API: My Profile -> Authentication -> API Keys.
- For OAuth authentication: Sign in with your Help Scout account.
3. START DEMO MIGRATION
Set up a Demo Migration to preview the outcome of a Full Data Migration. The Migration Wizard transfers 20 random tickets and 20 articles from your current platform to Help Scout. You can edit your migration settings and rerun the demo.
Go through the steps below:
- Sign in to your account.
- Connect your source and target solutions.
- Choose the data you to import.
- Match agents and groups.
- Map tickets and articles.
- Configure automated options.
- Start your Free Demo Migration.
AFTER THE DEMO MIGRATION
1. CHECK THE RESULTS OF THE DEMO
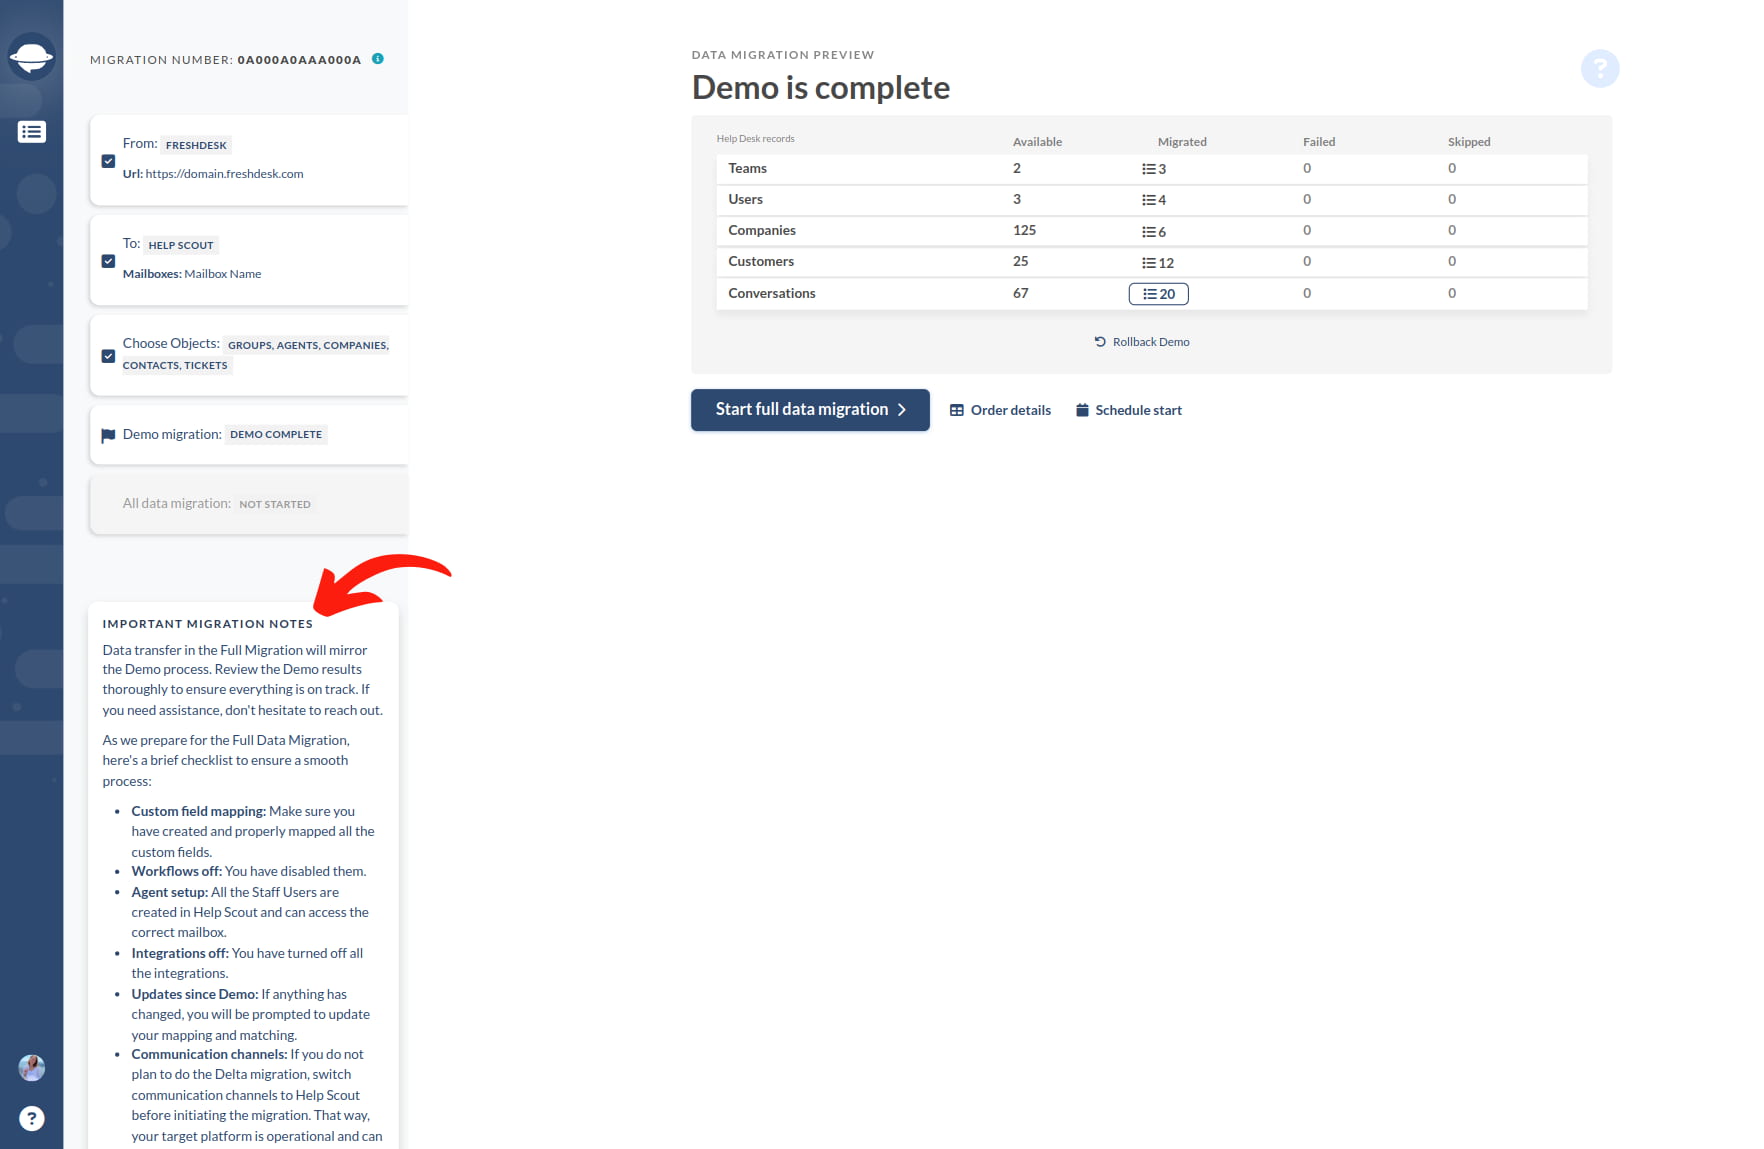
Review the results in a table with four columns:
- all available records
- migrated records
- failed records
- skipped records
Download reports for migrated, failed, and skipped records to verify the results. When checking the migrated records, ensure that:
- Comments are successfully migrated, and authors are correctly preserved
- All tickets are assigned to the appropriate agents
- Custom fields are transferred
- Customers and companies are migrated accurately
- Attachments and labels are preserved
For a more comprehensive guide on checking Help Scout migration results, refer to our detailed guide.
2. RUN A DEMO WITH CUSTOM DATA
You can test our Migration Wizard with a Custom Demo Migration as well. Select 20 tickets by ID, such as those with more replies, attachments, or notes, and initiate your Demo with custom data.
DURING THE MIGRATION PROCESS
1. SELECT MIGRATION OPTIONS
Choose between your source or target help desk during the Full Data Migration. Note that records created or updated during the process won't be migrated when using a source help desk. In such cases, consider a Delta Migration to import them later.
As the Full Data Migration goes in the cloud, you can monitor the progress on a data migration page.
2. START FULL DATA MIGRATION
You can start your Full Data Migration when two conditions are met:
- The payment has been confirmed. Payment has been confirmed, so ensure to make the payment in advance.
- Check migration notes. You have read through the migration notes in the sidebar on the left.
3. FULL MIGRATION RULE
Do not modify settings or delete data. During Full Migration, avoid altering settings or deleting data on the destination platform to prevent migration issues or skipping records.
If you encounter any problems on your current help desk, wait for the data import to finish. Only then should you attempt to resolve issues on your own or contact our support team.
AFTER THE IMPORT IS DONE
1. CHECK EVERYTHING CAREFULLY
Inspect the results of the Full Data Migration within five days or ten days (depending on your Support plan), as your data migration will be archived after that. Enlist the help of your agents to expedite the process. If you encounter any discrepancies or missing records, get in touch with our team.
2. UPDATE YOUR PLATFORM
Re-enable notifications and other settings you had turned off, and update internal links for Knowledge Base articles. Also, re-route your emails to Help Scout.

