Freshdesk Data Migration Checklist
For a seamless Freshdesk data migration, two things are crucial:
- A comprehensive, step-by-step guide that will take you through every stage.
- A secure solution like Help Desk Migration can automate and simplify the process from start to finish.
Migration success starts long before the actual data transfer. Recent research shows that 80% of data migration projects exceed budget and are not completed on time. To ensure an accurate move to Freshdesk, take these key steps:
Stage 1: What should I do before setting up a Freshdesk migration?
1. How do I create a Freshdesk migration strategy?
Follow these steps for a smooth migration:
- Select the optimal time to transfer your data to minimize disruptions.
- Let your team know the migration schedule.
- Decide if you'll keep using your source platform during the transfer.
- Set up Freshdesk with the right fields, macros, and settings in advance.
This makes the migration easier and more organized.
2. How should I prepare my team for Freshdesk migration?
Make sure your team knows what to expect:
- Share the migration timeline.
- Let agents know when to stop using the old system.
- Give them time to get used to Freshdesk.
Also, inform your CEO about the migration status and send a reminder (via email or calendar event) a day before the Full Data Migration.
3. How do I prepare Freshdesk for data migration?
Before migrating data to Freshdesk, ensure your account is properly set up so all fields, agents, and articles transfer smoothly. Follow these steps:
Customize your Freshdesk migration with advanced options.
- Migrate tags, attachments, and inline images as attachments.
- Transfer custom fields (ensure they exist in Freshdesk)
- Import knowledge base articles (Freshdesk Help Center must be active)
- Map agents and groups, or assign tickets to a default agent
- Apply filters to migrate only relevant data
- Skip system events or emails for a cleaner import
- Run a Delta migration to transfer only new or updated records later
How do I create custom fields in Freshdesk?
You have two options:
Option 1: Create custom fields manually in Freshdesk
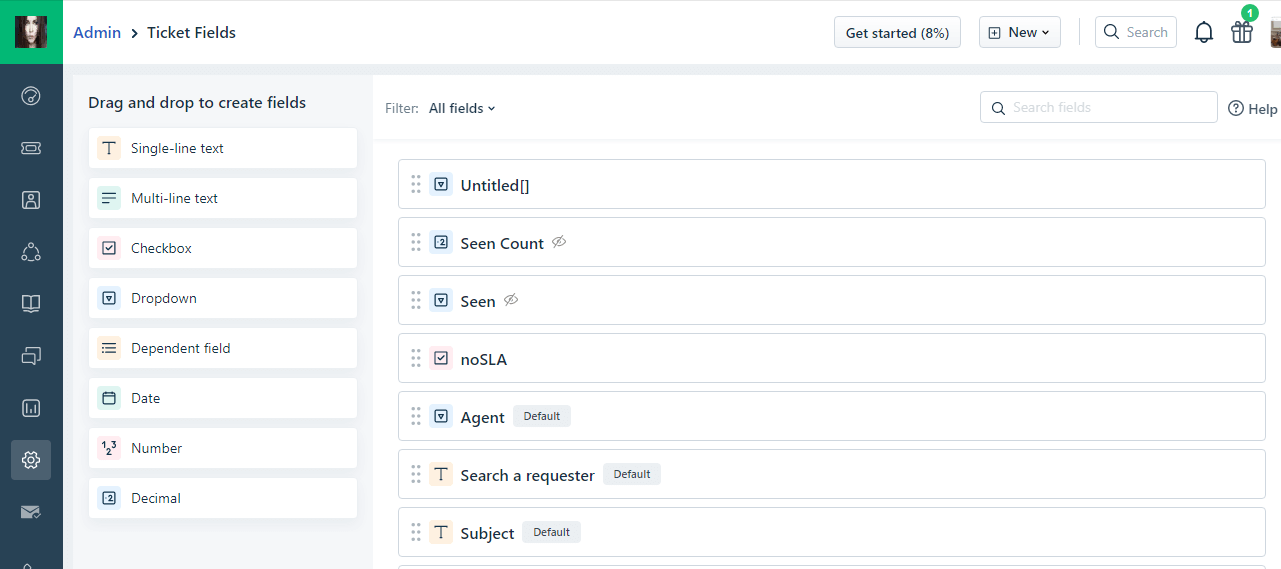
To add custom fields in Freshdesk, go to Admin > Workflows > Ticket Fields.
- Drag and drop a field type (such as text, dropdown, or checkbox) onto the ticket form.
- Customize the field by setting its label, placeholder, and other options, then save it.
You can also create custom fields for contacts, accounts, and other modules within their respective sections in the Admin settings.
Option 2: Create Custom Fields Using the Migration Wizard
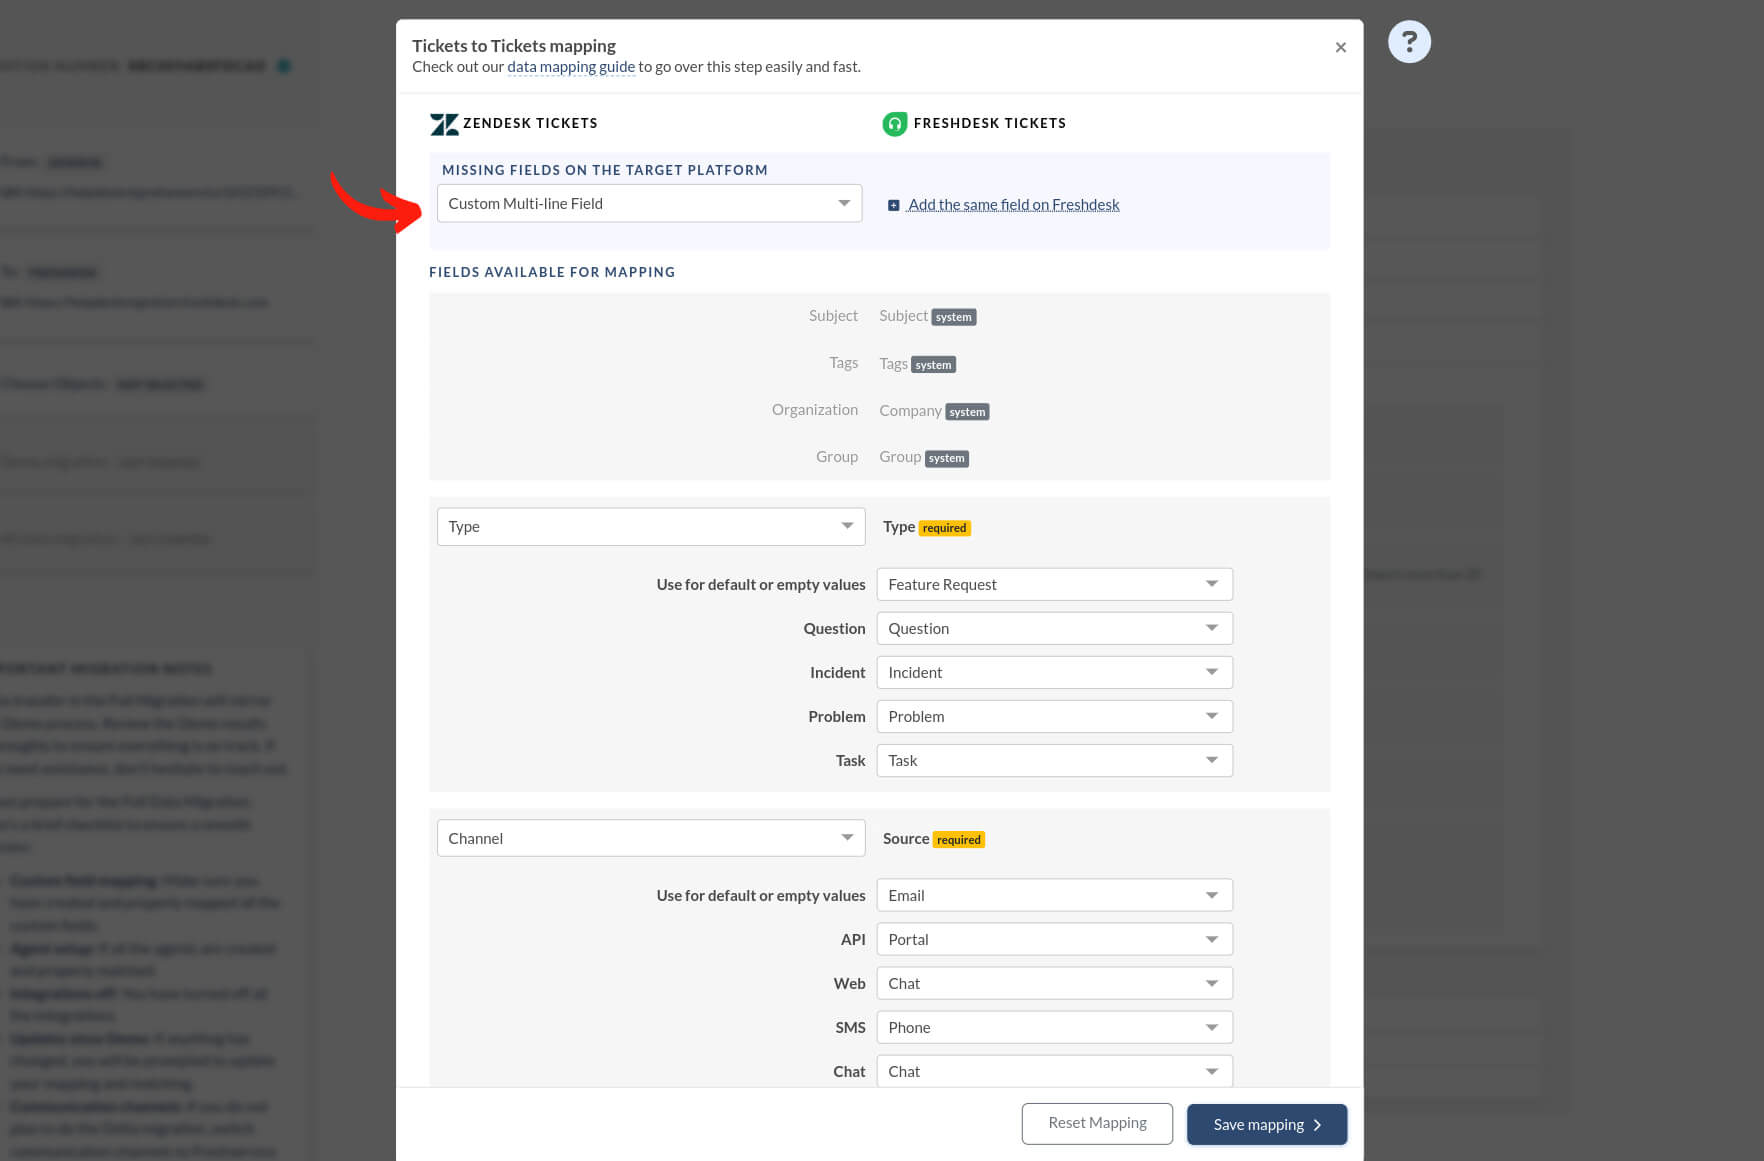
- While mapping fields, choose the source field.
- Click Add the same field in Freshdesk.
- Wait a few seconds for the field to be created.
- Once the field appears, map its values accordingly.
Assign a default value to each dropdown required field.
Verify agents and groups
Ensure you create all agents and groups in Freshdesk and match them correctly with those from your source platform.
What should I know about agent profiles during data migration?
The Migration Wizard sets up agent profiles using the available seats in your Freshdesk account.
- If you have unassigned, inactive, or deleted agents:
- Do I need to activate the help center before importing articles?
→ Set a default agent during mapping. This way, all tickets will be linked to an agent correctly.
Yes. If you want to import Knowledge Base articles, the help center must be active.
Only the account owner can do this:
- Go to Guide → Settings in the sidebar.
- Click Activate.
Can I filter my help desk data before migration?
Yes, with Help Desk Migration, you can adjust data filtering to save your time and ensure the relevance of transferred records.
It should be noted that API filtering can reduce the price, but that different platforms have different filtering capabilities
After the Demo Migration, you can add filters to choose which tickets to move.
- By Date: Migrate tickets created or updated within a specific date range.
- By Ticket Status: Filter tickets by status, such as open, closed, or pending.
- By Agent: Select tickets assigned to specific agents or teams.
- By Brand: Filter tickets based on the associated brand (for multi-brand setups).
Filters can be combined using AND/OR logic and grouped for more precise selection.
4. What limitations should I know before migrating to Freshdesk?
- Agents Matching: You can create agents using the migration tool unless you're working with a Customer Service Suite account—in that case, you need to create agents manually. Agents are created with full rights but without any group assignments. During the ticket migration, the tool checks whether each agent-assignee belongs to the appropriate group and adds agents to groups based on ticket assignments and group mapping. When Freshdesk is the target account, you can match both Agents and Account Administrators (including occasional ones). When Freshdesk is the source account, all agent types are available for matching.
- Contacts Migration: If a contact exists in both source and destination accounts, they are matched by email. In this case, custom fields of contacts are not updated. Contacts will be updated with their associated migrated companies. If contact and company exist in the target but aren’t linked: The tool will link them based on the ticket data.
- Companies Migration: If companies exist in both the source and destination accounts, you match them by name. You don’t update their custom fields during the migration, but you do add contacts to the matched companies as part of the process.
- Tickets Migration: If the source platform doesn't provide a proper ticket description, we use the message body instead. Since Freshdesk doesn't support agents as the author of a ticket description, we add the actual description as the first comment. Additionally, when Freshdesk is the target platform, we migrate the ticket subject into the description field.
- Soft-deleted contacts: Tickets associated with soft-deleted contacts are migrated into the Spam folder. To ensure proper migration, these contacts must be manually reactivated or permanently deleted in advance.
- Archived tickets: You can migrate archived tickets if the ID of the last archived ticket is provided.
- Comments: All comments migrate as private notes or public notes (not replies).
- Source options: API, Email, Portal, Phone, Chat, Feedback Widget, WhatsApp
- Ticket requester: If the requester is a contact in the source, but an Agent in Freshdesk: (The agent will appear as the ticket requester.) f the requester is a Collaborator: (A new contact is created with +collaborator in the email (e.g., test+collaborator@gmail.com)).
- Portals: By default articles migrate from a single default portal. If you need to migrate multiple portals, the process must be customized.
5. How to improve migration to FreshDesk with additional pre-built options
To improve your migration to Freshdesk, you can take advantage of the additional pre-built options offered by the Help Desk Migration service. These features help streamline the process, reduce manual work, and ensure your data is accurately and cleanly transferred.
- Automated Data Mapping. The service automatically maps standard fields such as subject, status, and priority, minimizing setup time. You can review and adjust these mappings as needed.
- Custom Field Matching. Match custom fields from your source platform to Freshdesk's custom fields to ensure all relevant data (order numbers or issue types).
- Pre-built Ticket Filters. Filter tickets by date, status, agent, tags, or custom values to migrate only the data you need. This helps you skip outdated, spam, or unnecessary records.
- Agent and Team Mapping. Map agents and groups from your old system to Freshdesk. This keeps ticket ownership and assignments consistent after the migration.
- Knowledge Base Migration. Transfer your help center content—including articles, folders, and categories—into Freshdesk’s solutions section, preserving structure and formatting.
- Inline Images as attachments. Migrate files and formatting along with the tickets to keep all ticket content intact and readable.
- Delta Migration. After the full migration, run a delta migration to transfer only new or updated data. This is helpful if you're testing or switching platforms in stages.
- Duplication Prevention. The system checks for duplicate contact and companies during migration to ensure data remains clean and organized.
- Free Demo Migration. Preview a sample of your migrated data in Freshdesk before running the full migration.
These pre-built options help streamline your Freshdesk migration, making it faster, more reliable, and aligned with your support workflows.
6. Can I customize my Freshdesk data migration?
Yes. You can fully customize your Freshdesk migration using both built-in options and advanced settings. This lets you control how your data is transferred and ensures it meets your specific business needs.
1. What customization options are available?
Use these built-in features in the Migration Wizard:
- Add tags to migrated tickets to identify migrated data in Freshdesk. Great if you’re migrating to an instance that already has tickets.
- Skip attachments to migrate data faster. Attachments can be heavy. If you think you don’t need them further on, consider skipping them.
- Migrate call recordings as ticket attachments to keep them in Freshdesk. (currently supported for importing from Zendesk only)
- Migrate content translations to keep the language versions of the Knowledge Base articles.
- One-time Demo with custom data transfer, specific tickets, and article IDs.
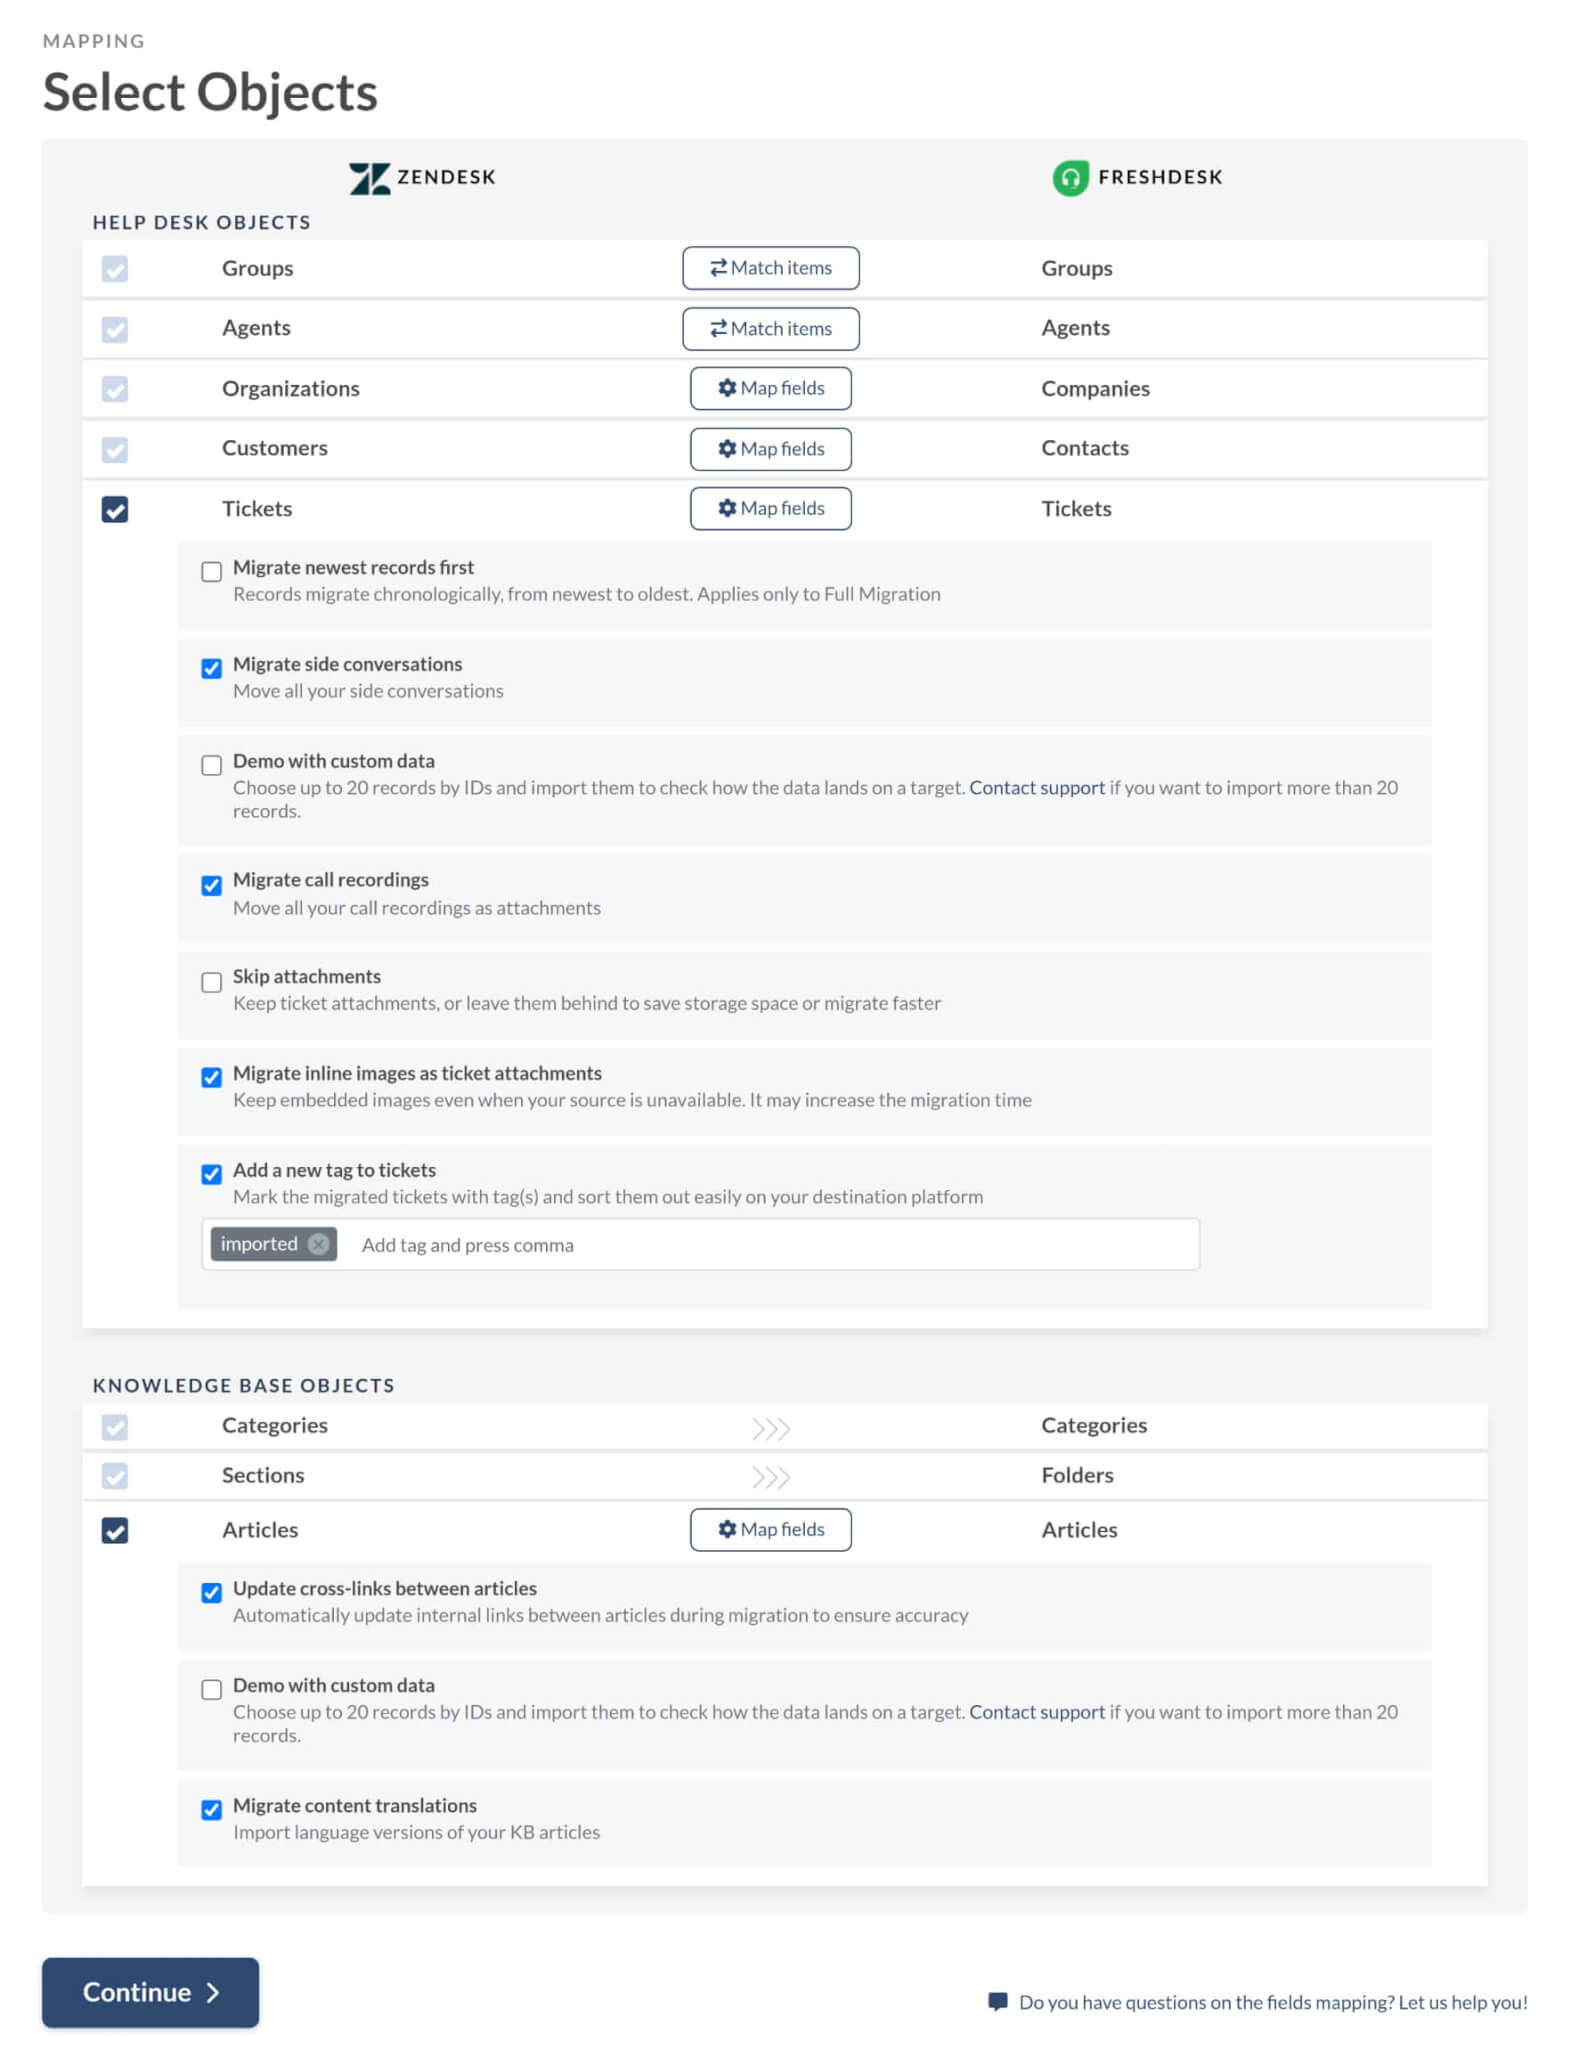
- Migrating inline images as ticket attachments
- Assigning tickets to a group only, not to an agent (can be applied only to tickets with "Open" status)
- Migrating additional phone numbers or emails for contacts
- Migrating the Source ticket ID into the subject of the ticket
- Changing the default migration process (migration of change and problem objects as tickets, migration of ticket events as private notes, migration of the information related to inactive users)
Need some specific custom work? Then contact our support team to discuss your needs and get a full-on custom migration.
2. What advanced customizations can I request?
Our team can customize your migration to fit your needs:
- Filter data by tags, dates, fields, groups, and more.
- Modify default settings, such as converting change or problem objects into tickets.
- Enhance migrated records by adding original ticket IDs or extra tags.
Stage 2: What should I do just before starting the Demo Migration to Freshdesk?
Take a few quick steps before launching the Demo Migration to avoid errors or unexpected changes.
Should I turn off Freshdesk automations before migration?
Yes, it's recommended to turn off Freshdesk automations before migration to prevent triggering actions (such as emails, ticket updates, or assignments) on imported data.
Why turn them off?
- Prevents sending notifications to customers or agents about old tickets
- Avoids unintended ticket changes during the import
- Ensures a clean, controlled migration
How to disable automations in Freshdesk?
1. Ticket Creation Automations
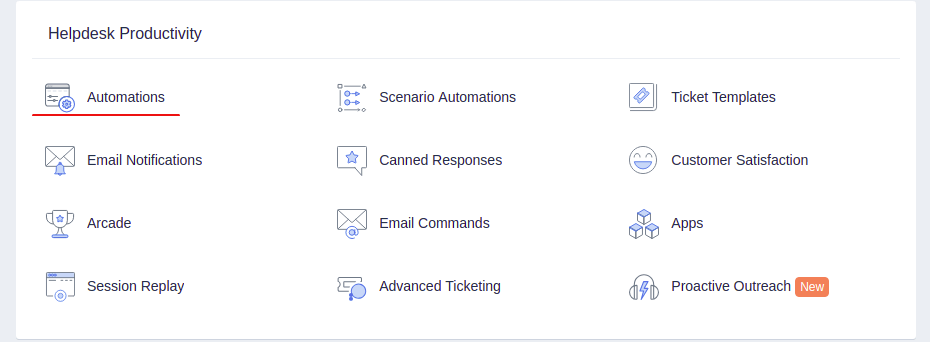
- Go to Admin > Workflows > Automations > Ticket Creation
- Disable or uncheck rules that trigger on new tickets

2. Time-Triggered Automations
- Go to Admin > Workflows > Automations > Time Triggers
- Pause or disable any rules that act on open/pending tickets
3. Scenario Automations
- Go to Admin > Workflows > Scenario Automations
- Temporarily disable any bulk actions if they might be triggered during migration.
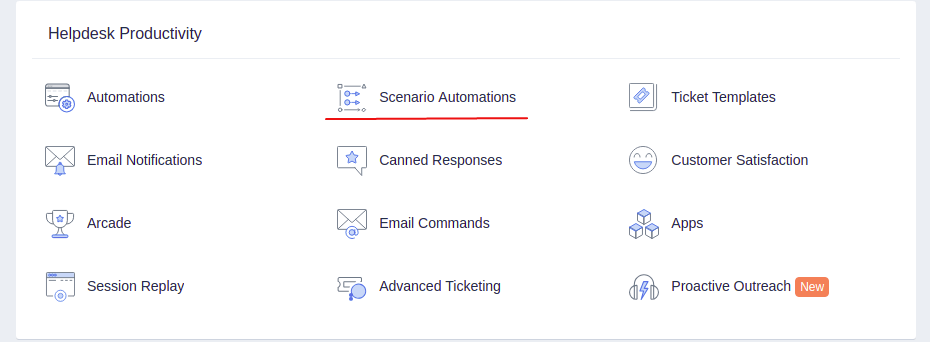
Document all scenarios and afterward, delete them.

Once your migration is complete and verified, you can re-enable these automations.
Should I disable parent-child ticketing?
Freshdesk’s Parent-Child Ticketing (available in Estate and Forest plans) can cause migration errors. That’s because all "Task" type tickets require the Parent-Child relation field. If this field is missing, the Migration Wizard won’t migrate the ticket.
1. Login as an Administrator and navigate to the Admin section.
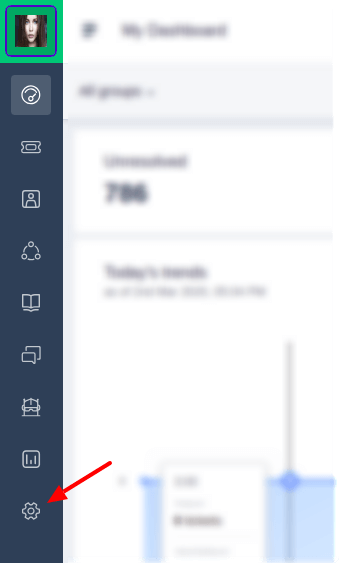
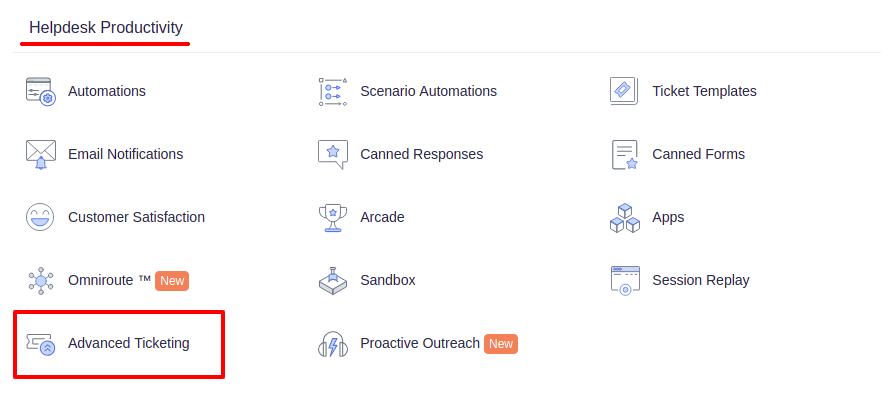
2. Scroll down to the Helpdesk productivity and click Advanced ticketing.
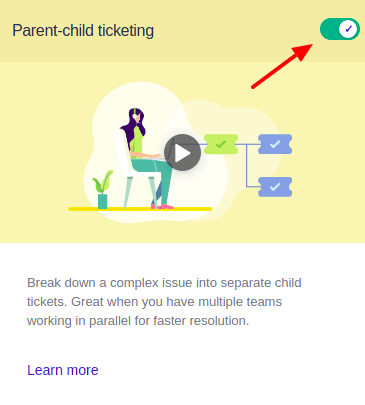
3. Toggle off Parent-child ticketing in the upper right.
4. Confirm the action by clicking Disable.
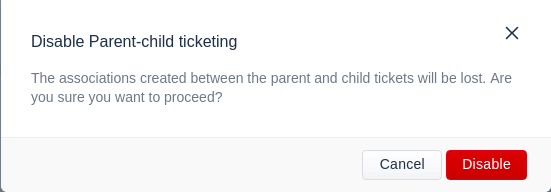
5. You'll receive a notification confirming the feature's disablement, allowing you to proceed with data migration.

If you can’t disable automations, select “Add a tag to migrated tickets” during data mapping in the Migration Wizard.
Then go to Freshdesk and update your automation rules to exclude tickets with that tag. This way, you prevent existing workflows from affecting migrated tickets.
2. What access credentials do I need to set up the migration?
To connect Freshdesk with our tool, you need:
- URL: URL of your company's Freshdesk account. Format - https://domain.freshdesk.com/
- API Key: Go to Profile icon -> Profile Settings -> Your API Key
3. How do I run a Free Demo Migration to Freshdesk?
Initiate a Demo Migration to test out the possible outcome of the Full Data Migration. During this data transfer, our tool moves 20 random tickets from your current helpdesk to Freshdesk. You can run it as many times as you need. Go through the steps below:
- Sign in to your Migration Wizard.
- Connect your source and target solutions.
- Choose the data you want to import.
- Map tickets and articles.
- Pick up automated options.
- Start your Free Demo Migration.
A Free Demo Migration helps you test the setup before the full migration. It transfers 20 random tickets and 20 help center articles (if available).
Does the Demo Migration work the same as the Full Migration?
Yes, the Migration Wizard processes Demo and Full Migrations the same way.
If any ticket data is missing or incorrect during the Demo, the same issue will likely occur in the Full Migration.
How to check:
- Download the Demo Migration reports
- Review the migrated, failed, and skipped records
- Contact support if you notice any issues before starting the Full Migration
Download the Demo reports for migrated/failed/skipped records and check if everything migrated correctly. If any issues appear, contact our support team.
Stage 3. What should I check after the Demo Migration to Freshdesk
After completing your Free Demo Migration, check the results in Freshdesk to confirm that everything transferred properly. The Demo Migration process is identical to the Full Migration. It uses the same logic and configuration, but on a smaller sample (usually 20 tickets and 20 articles).
- You can review the results in the Migration Wizard dashboard. The dashboard shows migrated, failed, and skipped records.
- You can download migration reports. Reports provide detailed information on what was migrated, skipped, or failed.
You should verify in Freshdesk:
- Comments and notes with correct authors
- Ticket assignment to correct agents
- Custom fields, contacts, and companies
- Attachments, tags, and inline images (if selected during setup)
- Help Center articles in the correct folders/categories (if the Freshdesk Knowledge Base module is active)
Stage 4: What should I know while running a Full Data Migration to Freshdesk?
Before the Full Data Migration to Freshdesk, check the following:
- Freshdesk considers inactive or deleted contacts as Spam. Double-check if you have such.
- Base64 inline images in Knowledge Base articles will migrate into attachments.
- Create the required custom Contact and Company.
- Ensure you have admin rights to your accounts in the source platform and Freshdesk.
- Only the requester can create the first comment in Freshdesk. If an agent makes the first comment on the source platform, it will be attributed to the requester during migration, changing the author in the description. To prevent this issue, our tool duplicates the ticket subject into the description and transfers the first comment to the first public note.
When migrating data to platforms where notifications, triggers, and automations activate during import, it’s crucial to disable these settings beforehand. Failing to do so can make using the target account during migration difficult or even impossible. We recommend performing the migration using the source account first, followed by a Delta migration (available with the Signature support plan). This approach helps ensure a smoother transition without interruptions caused by unintended triggers or notifications in the destination account.
It’s best to avoid updating migrated tickets in the target account before completing the Delta migration. Because any changes made before the Delta may be overwritten or lost during the process.
If updates were made prematurely, don’t worry — we can still perform the Delta migration without deleting duplicates. In other words, even if some adjustments slipped through, there’s a way to work around it.
Keep these in mind:
- Track progress on the Full Migration dashboard.
- We will notify you when the migration is complete.
- Freshdesk migration usually processes about 2,000 tickets per hour.
- To speed it up, ask Freshdesk and your source tool to increase API limits, and notify us before you start.
Can you make changes during Full Migration?
If you're still working in the source system and planning a delta migration, you can continue submitting and handling tickets as usual. If you've already switched to the target, ticket processing can continue there as well. Please note that settings, fields, agents, and groups should remain unchanged during this phase.
How do you start a Full Data Migration to Freshdesk?
Make sure you:
- Confirm your payment.
- Approve the pre-migration checklist on the right sidebar.
After that, the Migration Wizard will start transferring records in the cloud—you don’t need to keep your browser open. You can track progress on the Full Migration page or wait for our notification.
Migrations typically take between 20 minutes and several days, depending on your data size.
Final Stage: What should I check after the Full Freshdesk Data Migration?
After completing your Full Freshdesk Data Migration, review your data carefully to ensure everything is transferred correctly:
- Check that all tickets, contacts, and conversations appear as expected.
- Verify that custom fields, tags, and attachments are in place.
- Confirm that agent profiles and permissions are correctly assigned.
- Test your workflows and automations to ensure they work properly.
- Look for any missing or duplicated records and note any issues.
Finally, notify your team that the migration is complete and ready for use.
1. What should I do after the Full Data Migration is complete?
Congratulations on completing the Full Data Migration! The first thing to do is check the migration results to ensure everything is transferred correctly.
2. Why can’t I see all the tickets in Freshdesk, and how do I view them?
By default, Freshdesk doesn’t display all tickets automatically.
To view them, go to Tickets > Filters > Apply the needed filters. You can choose to view the tickets by Date, Agents, Groups, and so on.
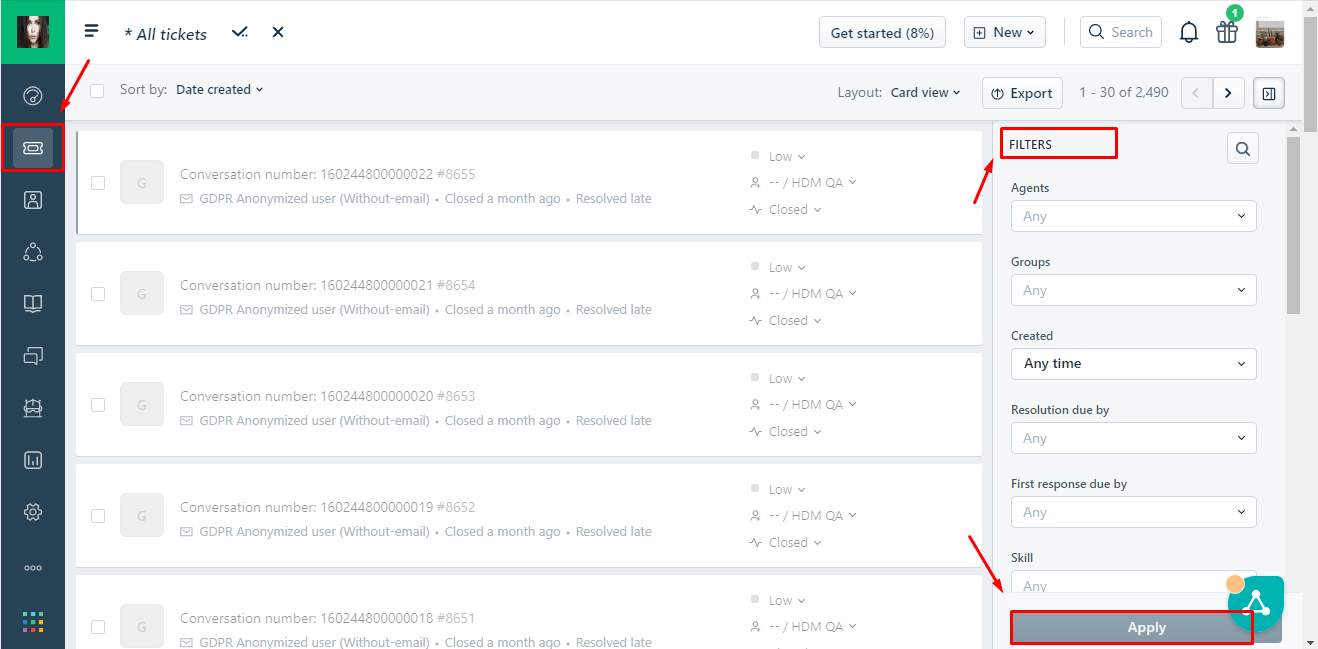
If you can’t locate something, check if search filters are set for all tickets at any time. Later, if you haven’t solved the problem, write to our support reps.
3. How can I update my links?
As the Full Data Migration is completed, set up your Freshdesk account:
- Update the Knowledge Base links and enjoy your new help desk.
- Ensure to update your articles in the Knowledge Base by paying special attention to attachments. Due to certain peculiarities of the platform (Base64 encoding), at some point, you'll need to reupload the images in articles, because as soon as your source help desk expires, the images in the Knowledge Base will disappear.
Have questions or need us to review your setup? Contact us — we're here to help.


