General Questions
How to migrate only closed tickets?
The migration of closed tickets is not available in an automated migration. However, you can reach out to our Support Team, and we'll explore the option of transferring exclusively closed tickets through a custom migration process tailored to your specific needs.
Can I migrate tickets without contacts?
Unfortunately, migrating tickets without contacts is not possible. To maintain all relationships between records, including tickets, agents, contacts, groups, etc., you must migrate all objects. Our migration service ensures that everything is transferred in the same order as it was on your legacy help desk, allowing your agents to work with accurate records.
Why do contacts matter?
Contacts are crucial because they serve as connection points between all records. Some platforms, like Freshdesk, Freshservice, and Kayako, do not allow complete removal of data, especially users (agents and contacts), as they are essential for maintaining data integrity.
For example, in Freshdesk, when a contact is deleted, it's not completely removed but marked as "DELETED." If that deleted contact submits a new request, their email may be treated as spam or sent to the trash folder.
Importing Contacts beforehand
If you've imported contacts beforehand and want to skip them during migration, unfortunately, it's not possible. The API does not allow excluding contacts from migration, and the Migration Wizard needs to check for duplicates by migrating all data to compare information.
Filtering option
Depending on your current help desk platform we can apply certain filters to migrate a specific set of data. Also, if you need to reassign tickets between agents, please inform us in advance. For instance, we can reassign the tickets from those agents that will no longer be existent in the target platform to the available ones as you need. Otherwise, they will be assigned to a default agent.
Will migrated tickets keep their ID numbers?
No, migrated tickets will not retain their original ID numbers; they will be assigned new IDs.
Each help desk platform has its own method of assigning ticket IDs. For example, Zendesk IDs typically consist of five digits, while Help Scout IDs have four. Our migration tool adheres to the settings of the target help desk to ensure the accurate transfer of your data.
However, if you wish to retain the original ticket IDs from your source platform for future reference, you can follow these steps:
- Create a custom text field in your target help desk.
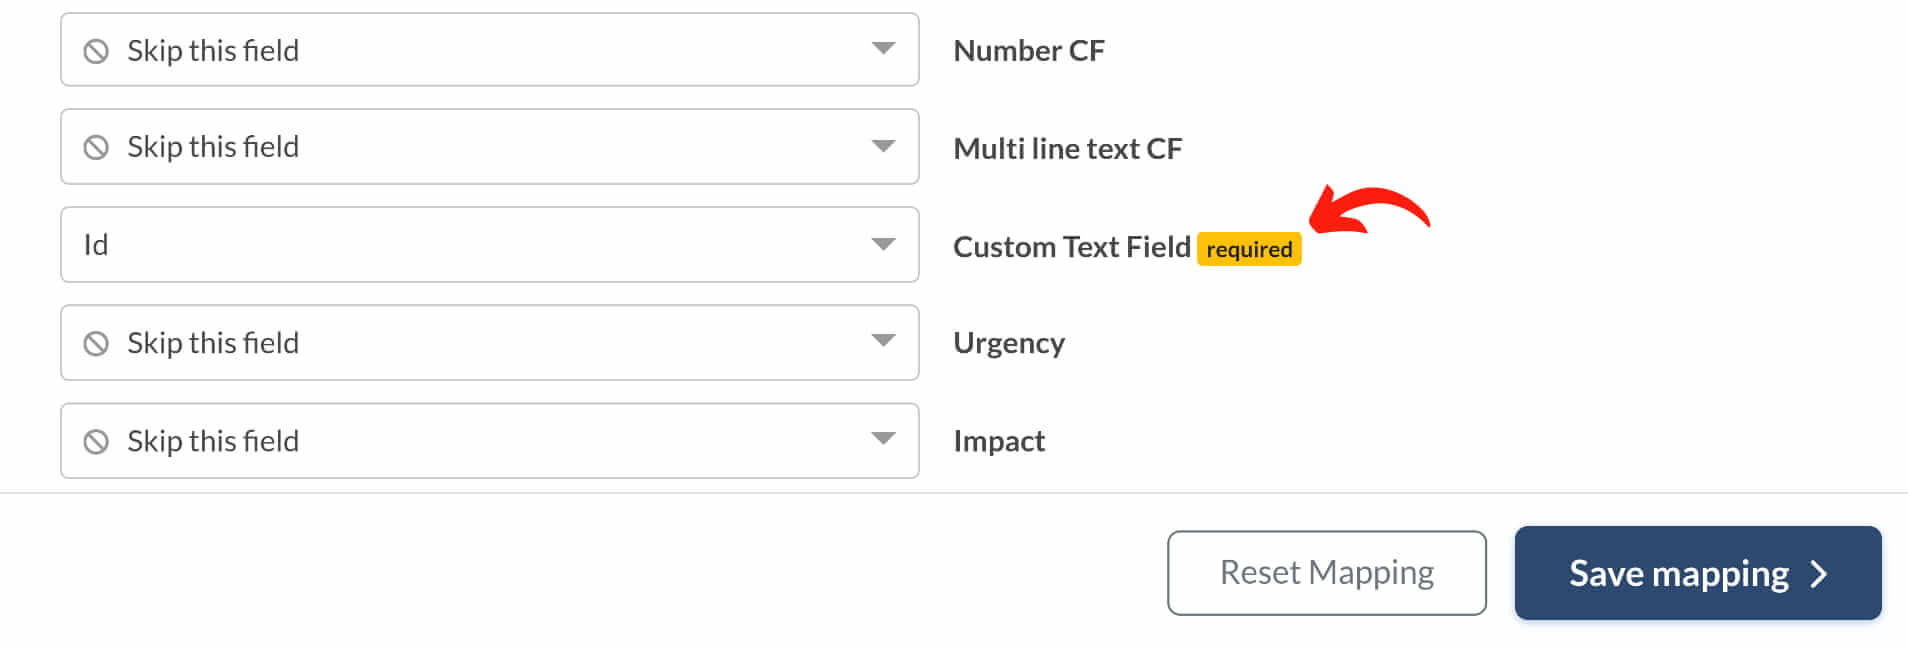
- During the ticket field mapping process, locate the "ID" option from the drop-down menu and map it to your custom text field.
Note:
- If you do not see the "ID" option, it's likely that the custom field in your target help desk is not a text field, which is why the Migration Wizard offers different options.
- After mapping the custom text field, click "Save mapping" and proceed with your migration.
Will the ticket ID order be preserved after the migration?
No, the order of ticket IDs will not be preserved after the Full Data Migration. The order of tickets depends on the source platform, and the Migration Wizard transfers tickets either from old to new or from new to old, depending on the platform.
Refer to the table below for the ticket order of various platforms:
| Platform name | Ticket order |
| ConnectWise | from old to new |
| CSV | from new to old |
| Deskpro | from old to new |
| Dixa | from new to old |
| eDesk | from old to new |
| Freshdesk | from old to new |
| Freshservice | from new to old |
| Front | from old to new |
| Gmail | from new to old |
| Gorgias | from new to old |
| Groove | from new to old |
| HappyFox | from new to old |
| Help Scout | from old to new |
| HelpDesk | from old to new |
| HelpShift | from old to new |
| HelpSpot | from old to new |
| HubSpot Service Hub | from old to new |
| Intercom | from old to new |
| Jira Service Management | from new to old |
| JitBit Helpdesk | from new to old |
| Kayako | from new to old |
| Kayako Classic | from old to new |
| Kustomer | from old to new |
| Lansweeper | from old to new |
| Live Chat | from old to new |
| LiveAgent | from old to new |
| ManageEngine | from old to new |
| OracleCloud | from old to new |
| osTicket | from old to new |
| OTRS | from old to new |
| Outlook | from new to old |
| Re:amaze | from new to old |
| Salesforce Service Cloud | from new to old |
| SolarWinds Service Desk | from new to old |
| ServiceDeskPlus | from old to new |
| ServiceNow | from old to new |
| SherpaDesk | from old to new |
| SmarterTrack | from new to old |
| Spiceworks | from old to new |
| Spiceworks Cloud | from old to new |
| SupportBee | from old to new |
| TeamSupport | from new to old |
| Teamwork Desk | from old to new |
| TOPdesk | from old to new |
| Zendesk | from old to new |
| Zoho Desk | from old to new |
| Zoho Mail | from old to new |
Our tech team may be able to change the ticket order for some platforms. Contact our support representatives for more details regarding your source platform.
How unassigned tickets migrate?
During data migration, unassigned tickets from the source help desk are automatically assigned to a default agent in the target help desk. This process is facilitated by dynamic data mapping, which allows customers to customize ticket field mapping according to their preferences.
The main reasons for automatically assigning unassigned tickets to a default agent include:
- Dynamic Data Mapping: Customers have the flexibility to adjust ticket field mapping as needed. However, to ensure accuracy and maintain relationships between records, unassigned tickets are linked to a default agent.
- Platform Limitations: In most help desks, it's not possible to create a ticket without assigning it to an agent. Therefore, the data migration process requires assigning unassigned tickets to proceed smoothly.

Before the data migration, customers can specify which agent will serve as the "default" one. Informing us beforehand allows us to configure the correct settings accordingly.
If you prefer to migrate unassigned tickets as they are without assigning them to a default agent, you have the option to request customization for your data migration. We can tailor the migration process to meet your unique requirements and transfer unassigned tickets accordingly.
Platforms that support migrating unassigned tickets or unresolved/unclosed tickets as unassigned include:
- Zendesk
- Freshdesk
- Jira Service Management
- Gorgias
- DeskPro
Note that custom data migration is a paid option, and you can inquire about the pricing details with our support team.
Can I migrate CC in tickets?
Yes, you can migrate CC recipients in tickets during the data migration process. Here are some details about the process:
What is CC?
CC, or Carbon Copy, is a way to send copies of an email or ticket to additional recipients who may need to be informed or kept in the loop about the conversation. It's commonly used to ensure that relevant parties are aware of the communication, without requiring them to take any specific action or respond. Such copies often contain essential information, which can not be lost. So if you decide to transfer to another help desk, you can take CC with you.
As of now, we fully support migrating CC data for the following platforms:
- Zendesk
- Freshdesk
- Freshservice
- Deskpro
- Front
- Supportpal
- CSV
Peculiarities
- The process of CC migration is complex and requires significant effort.
- Additional support for exporting CC data is available for Help Scout, FreeScout, Jira Service Management, Salesforce Service Cloud, Outlook, and Vivantio.
- Customized migration options are offered for Gmail, HappyFox, HelpDesk, HubSpot, Kayako (including import), Manage Engine, and Teamwork Desk.
How the process works
- Set up the migration by selecting the source and target platforms and providing credentials.
- Choose the objects you want to migrate and proceed to mapping.
- Complete a demo migration to preview the process.
- Proceed with the Full Data Migration.
- Our Migration Wizard will handle mapping CC fields for you during the Full Data Migration.
How can I map Ticket Statuses?
Mapping ticket statuses is an important step in the data migration process to ensure that the statuses from the source platform align correctly with those in the target platform. Below is a sample mapping of ticket statuses for various platforms:
| Zendesk | Open | On-hold | Solved | Closed |
| Intercom | Active | Snoozed | - | Closed |
| Freshdesk | Open | Pending | Resolved | Closed |
| Freshservice | Open | Pending | Resolved | Closed |
| Kayako | Open | Pending | Completed | Closed |
| Groove | Unread, Opened | Pending | - | Closed |
| Gorgias | Active | Pending | - | Closed |
| HappyFox | New, Open | On-hold | Solved | Closed |
| LiveAgent | New, Open | Answered, Chatting, Calling | Postponed | Resolved |
| Help Scout | Active | Pending | - | Closed |
How to download data mapping?
After completing your Demo or Full Migration, you can download and review your data mapping. This file contains all saved mapping configurations between your Source and Target.
How to download the mappings.xlsx file?
After migration is complete, you'll receive a summary of the migrated records. Click "Download Reports".
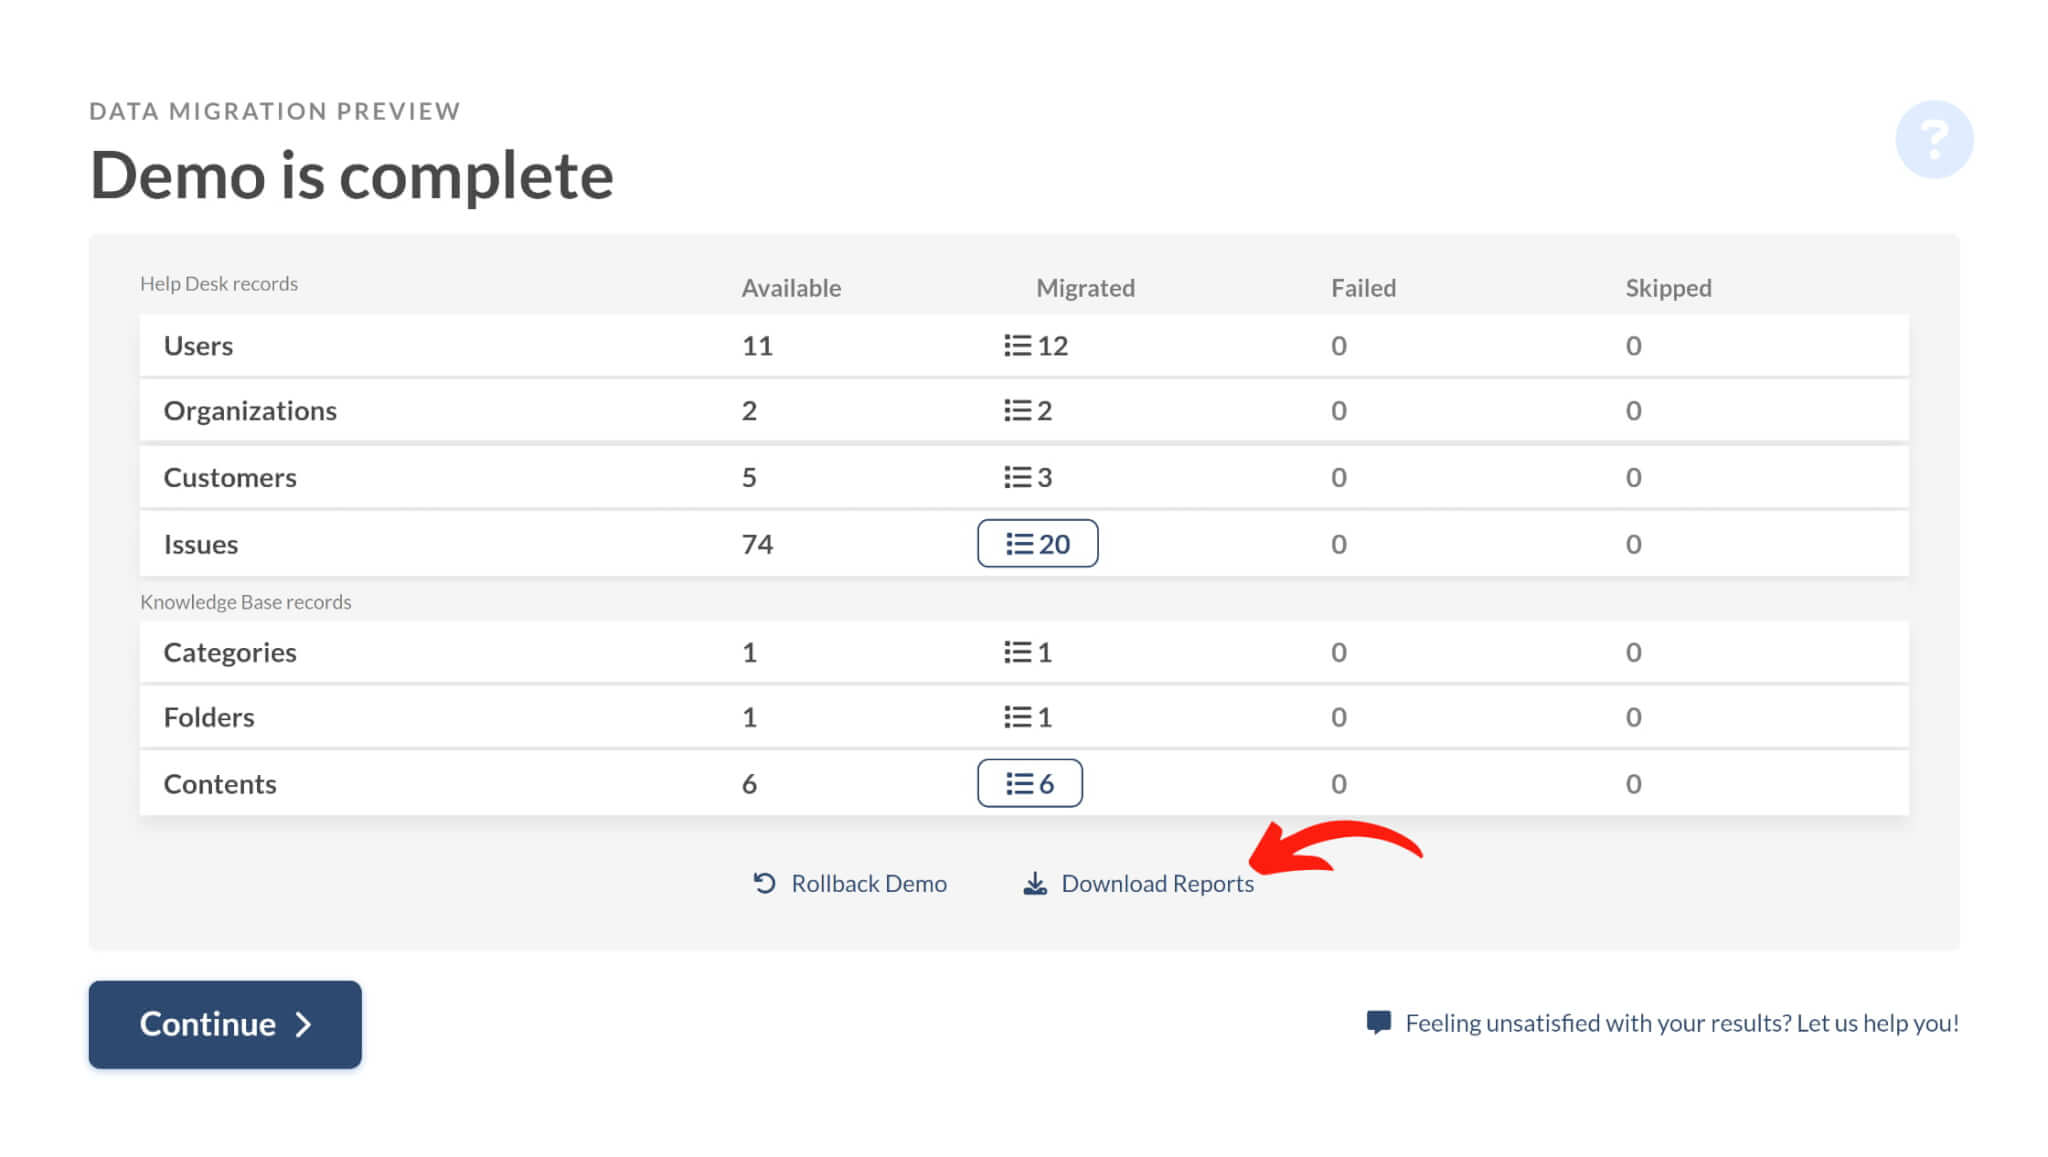
The archive will be downloaded to your device. Extract it to access the mappings.xlsx file. Open the file in any spreadsheet program (e.g., Microsoft Excel, Google Sheets, or LibreOffice Calc).

The file organizes mappings by entity type (e.g., ticket, contact, article) across separate sheets, including both default and custom fields.
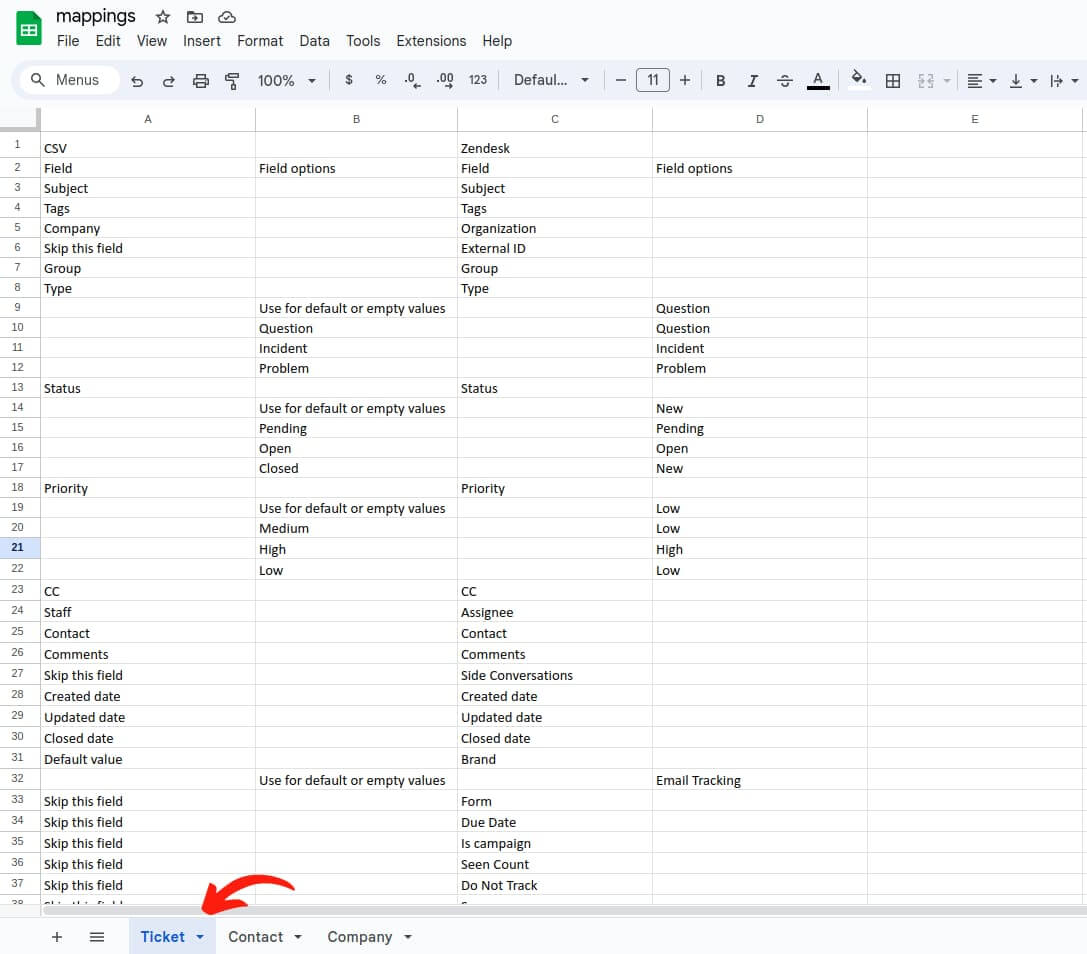
Use this file to review how the entity fields were mapped.
How the agents are migrated?
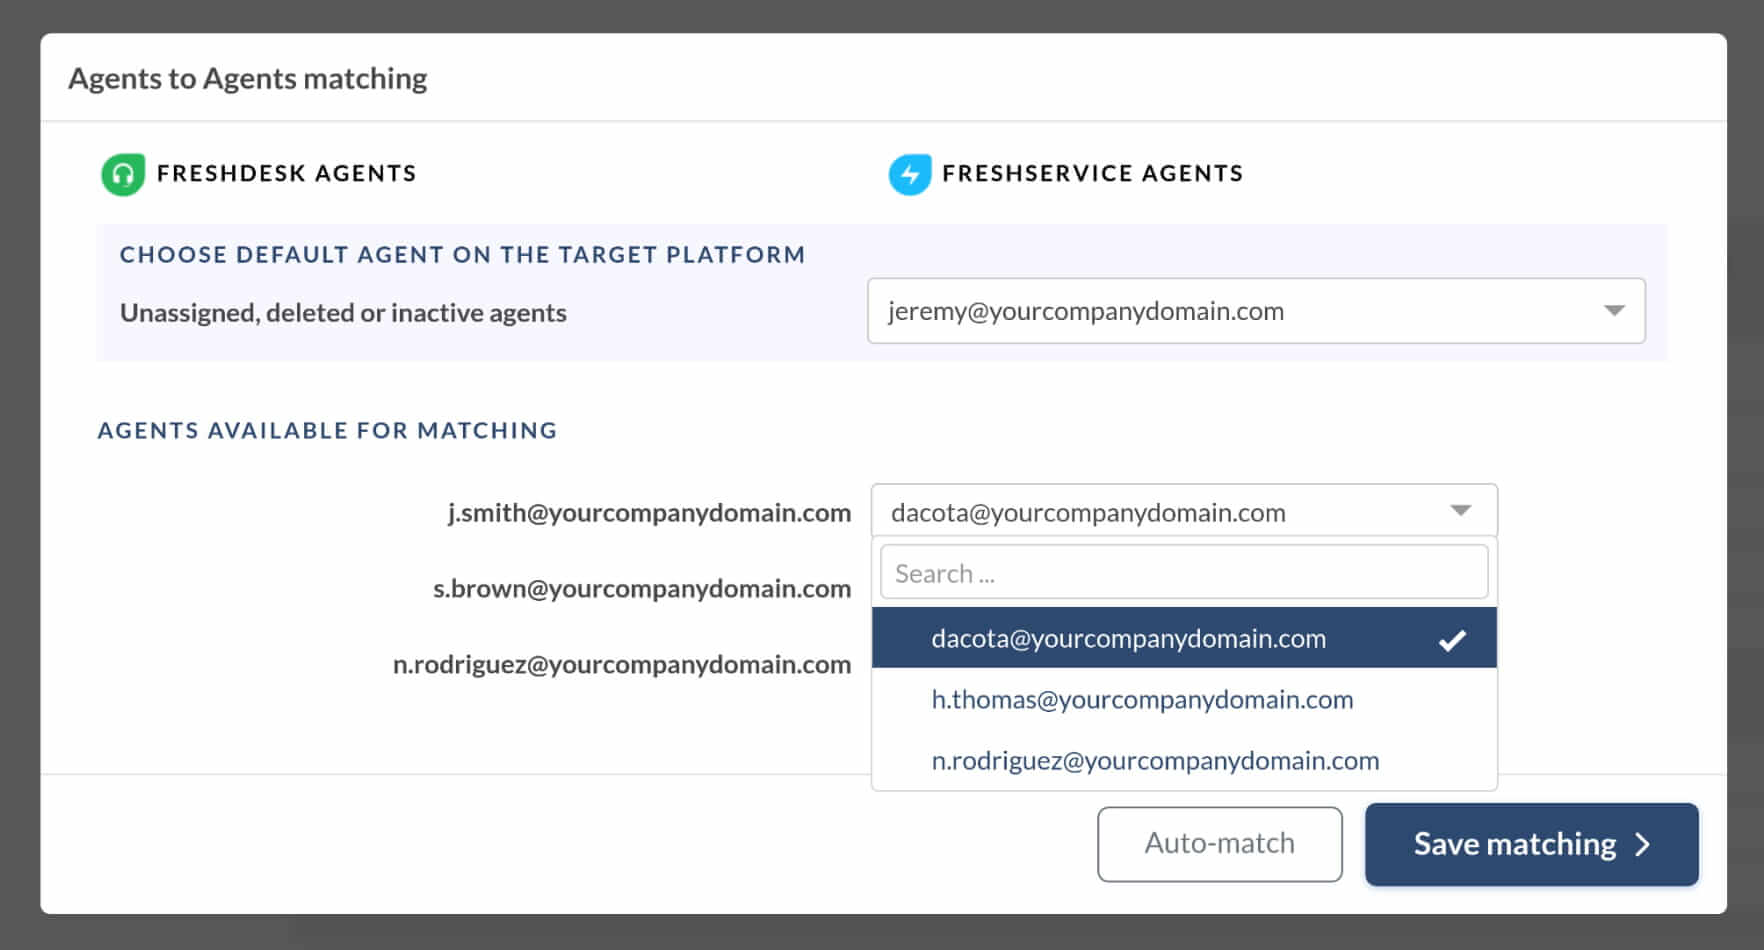
Agent migration with Help Desk Migration service involves matching agents from the source platform to agents on the target platform. Using it, you can easily re-assign tickets between agents. For instance, if you had a retired agent on the source help desk, you can choose which target agent to assign their tickets to.
How Group Matching Works
Click the "Match items" button next to Groups.
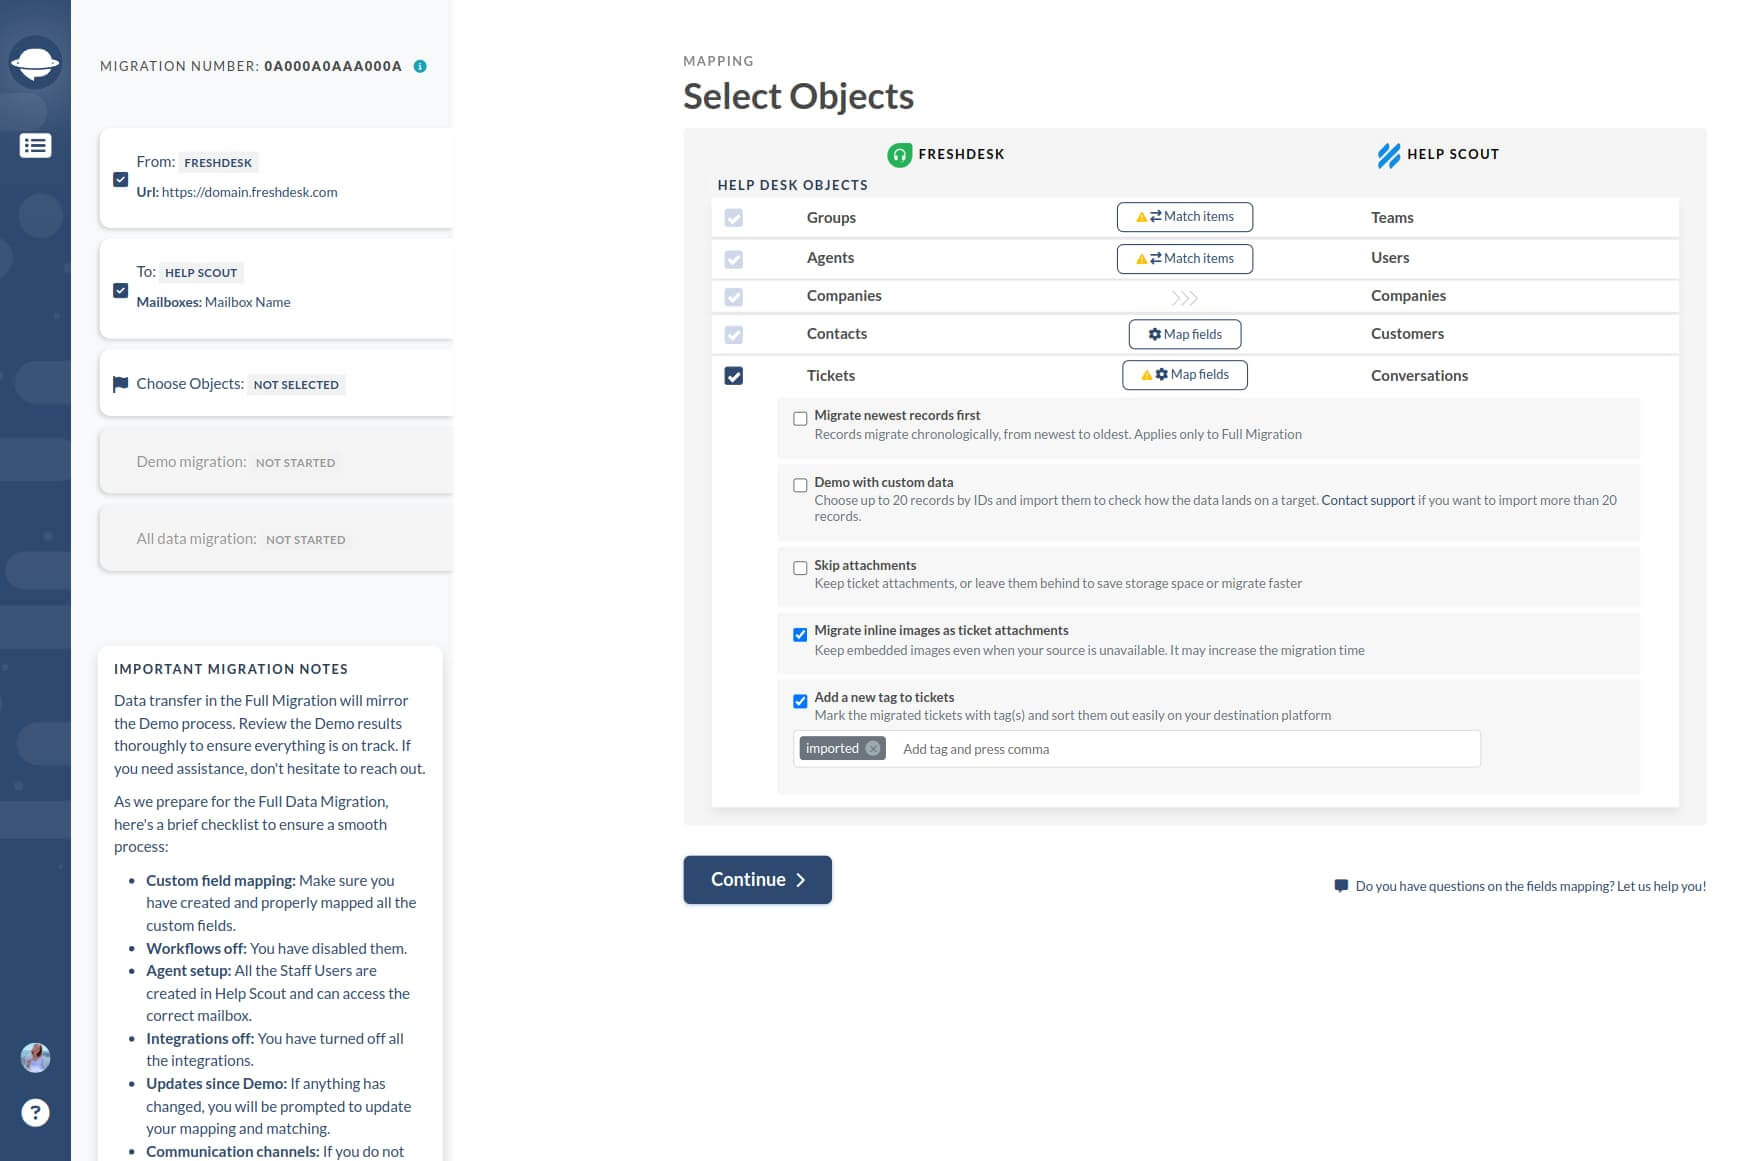
You will see a list of all groups accessible on the source help desk. If you already have some groups on the target instance, you can choose them from the drop-down menu.
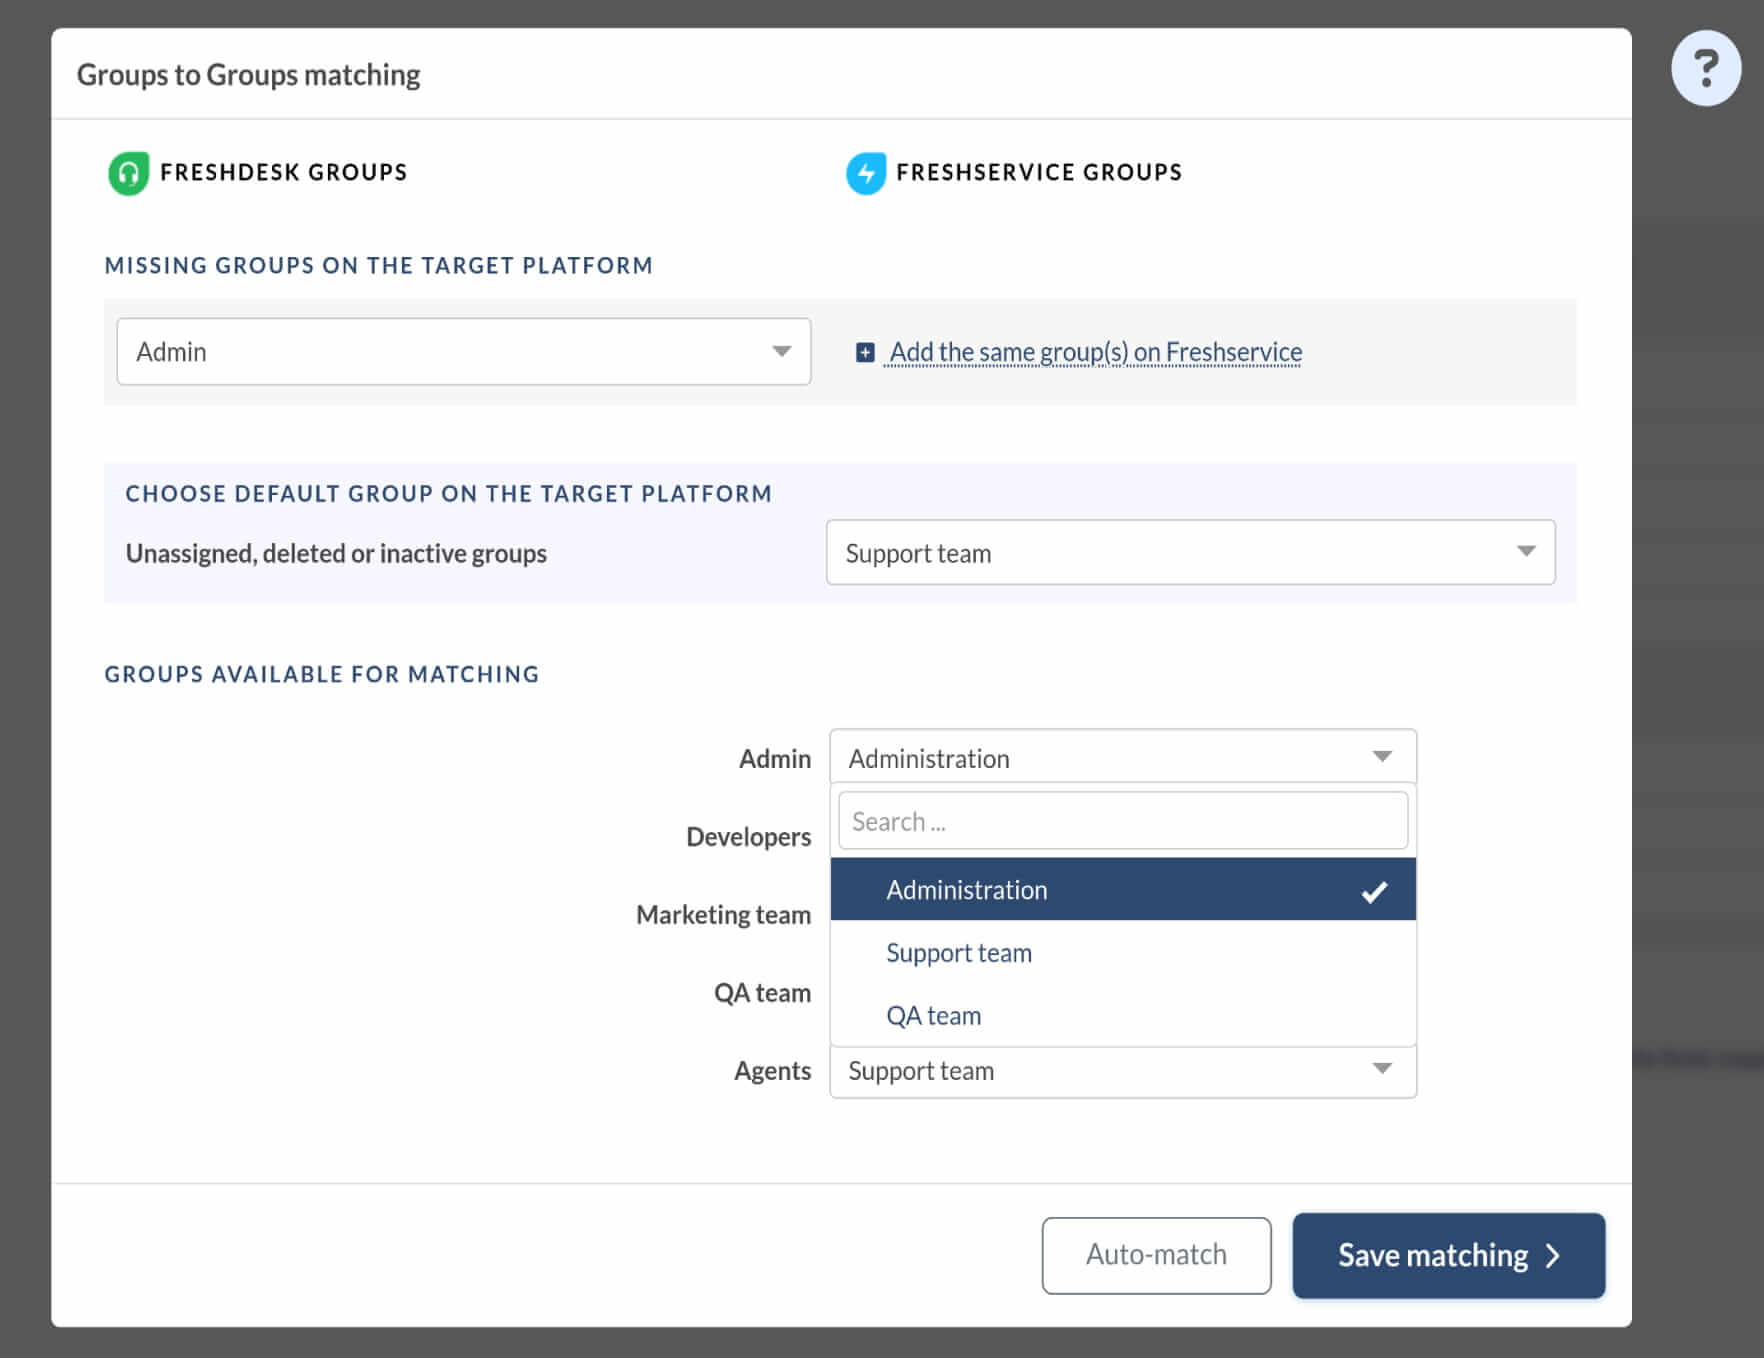
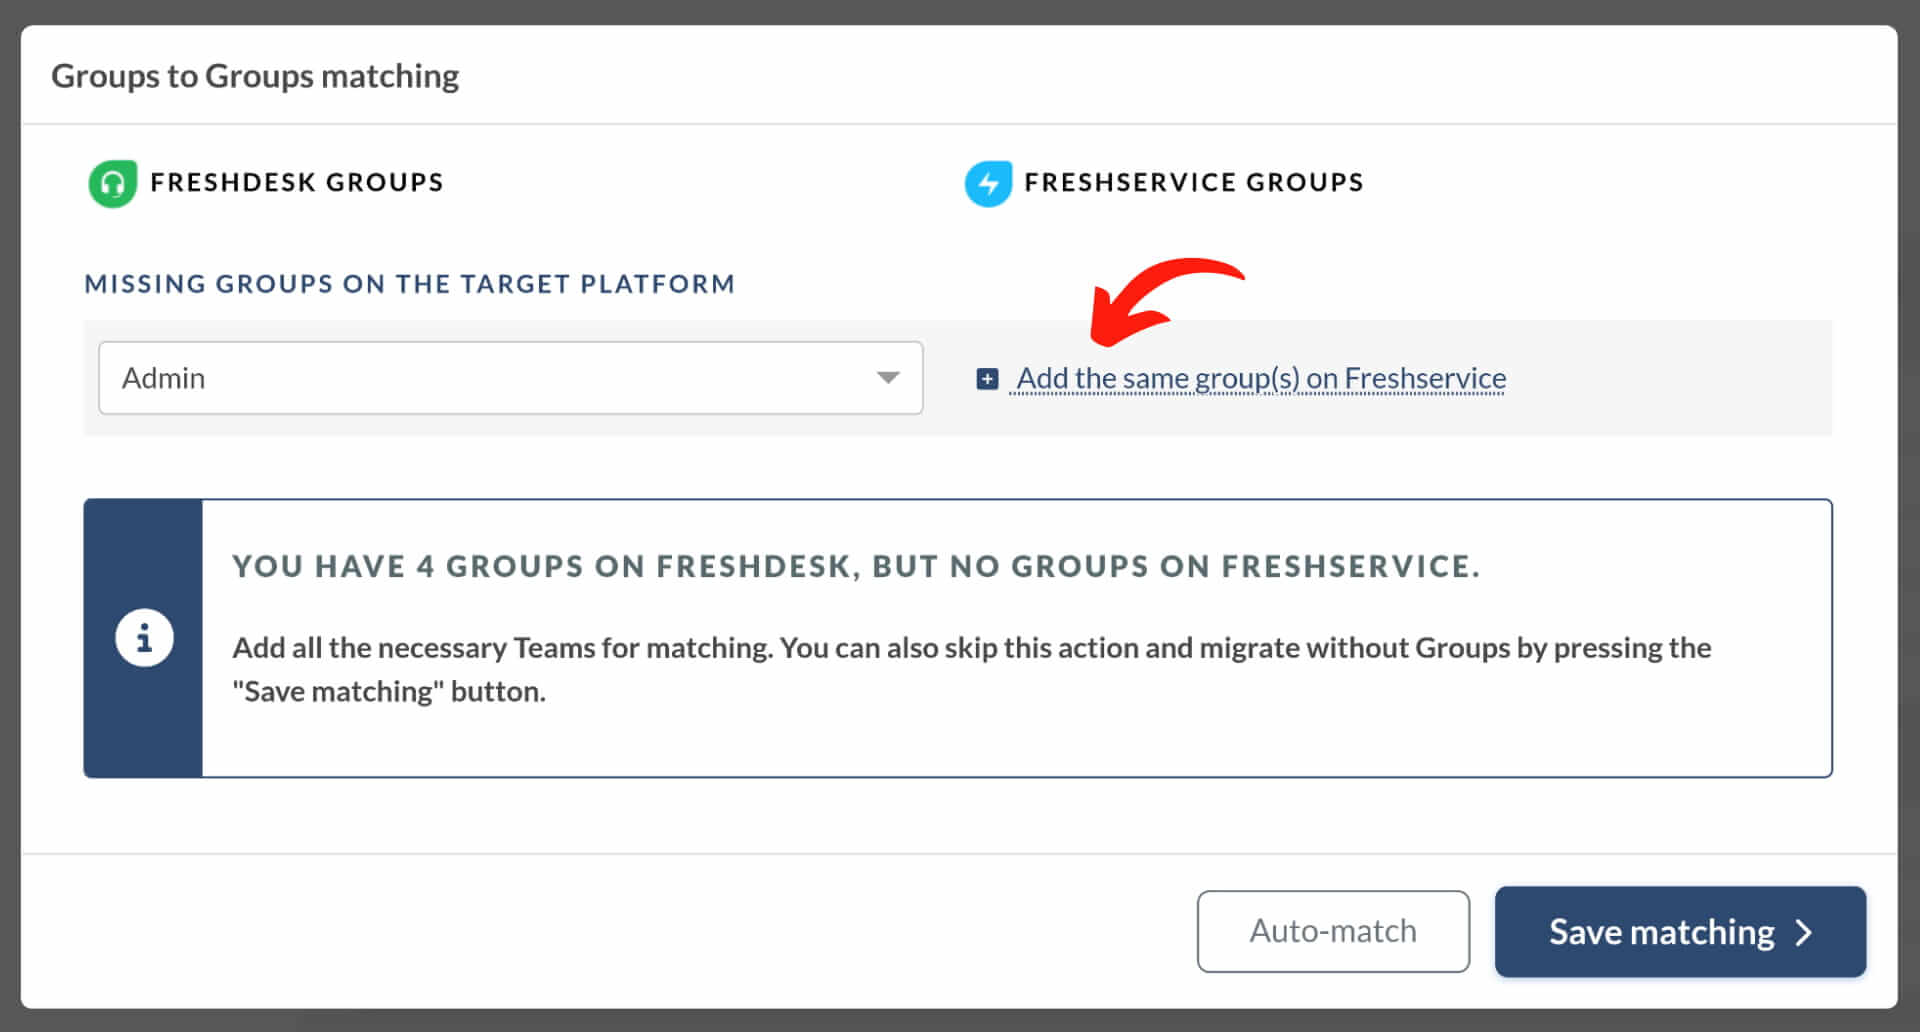
At the top of the form, there's a "Add the same group on {target}." Use it to create any missing groups without leaving the Migration Wizard.
Just like with agents, not all help desk systems allow creating groups via the API. If you don't see the "Add the same group on {target}" option, then you need to create the groups manually.
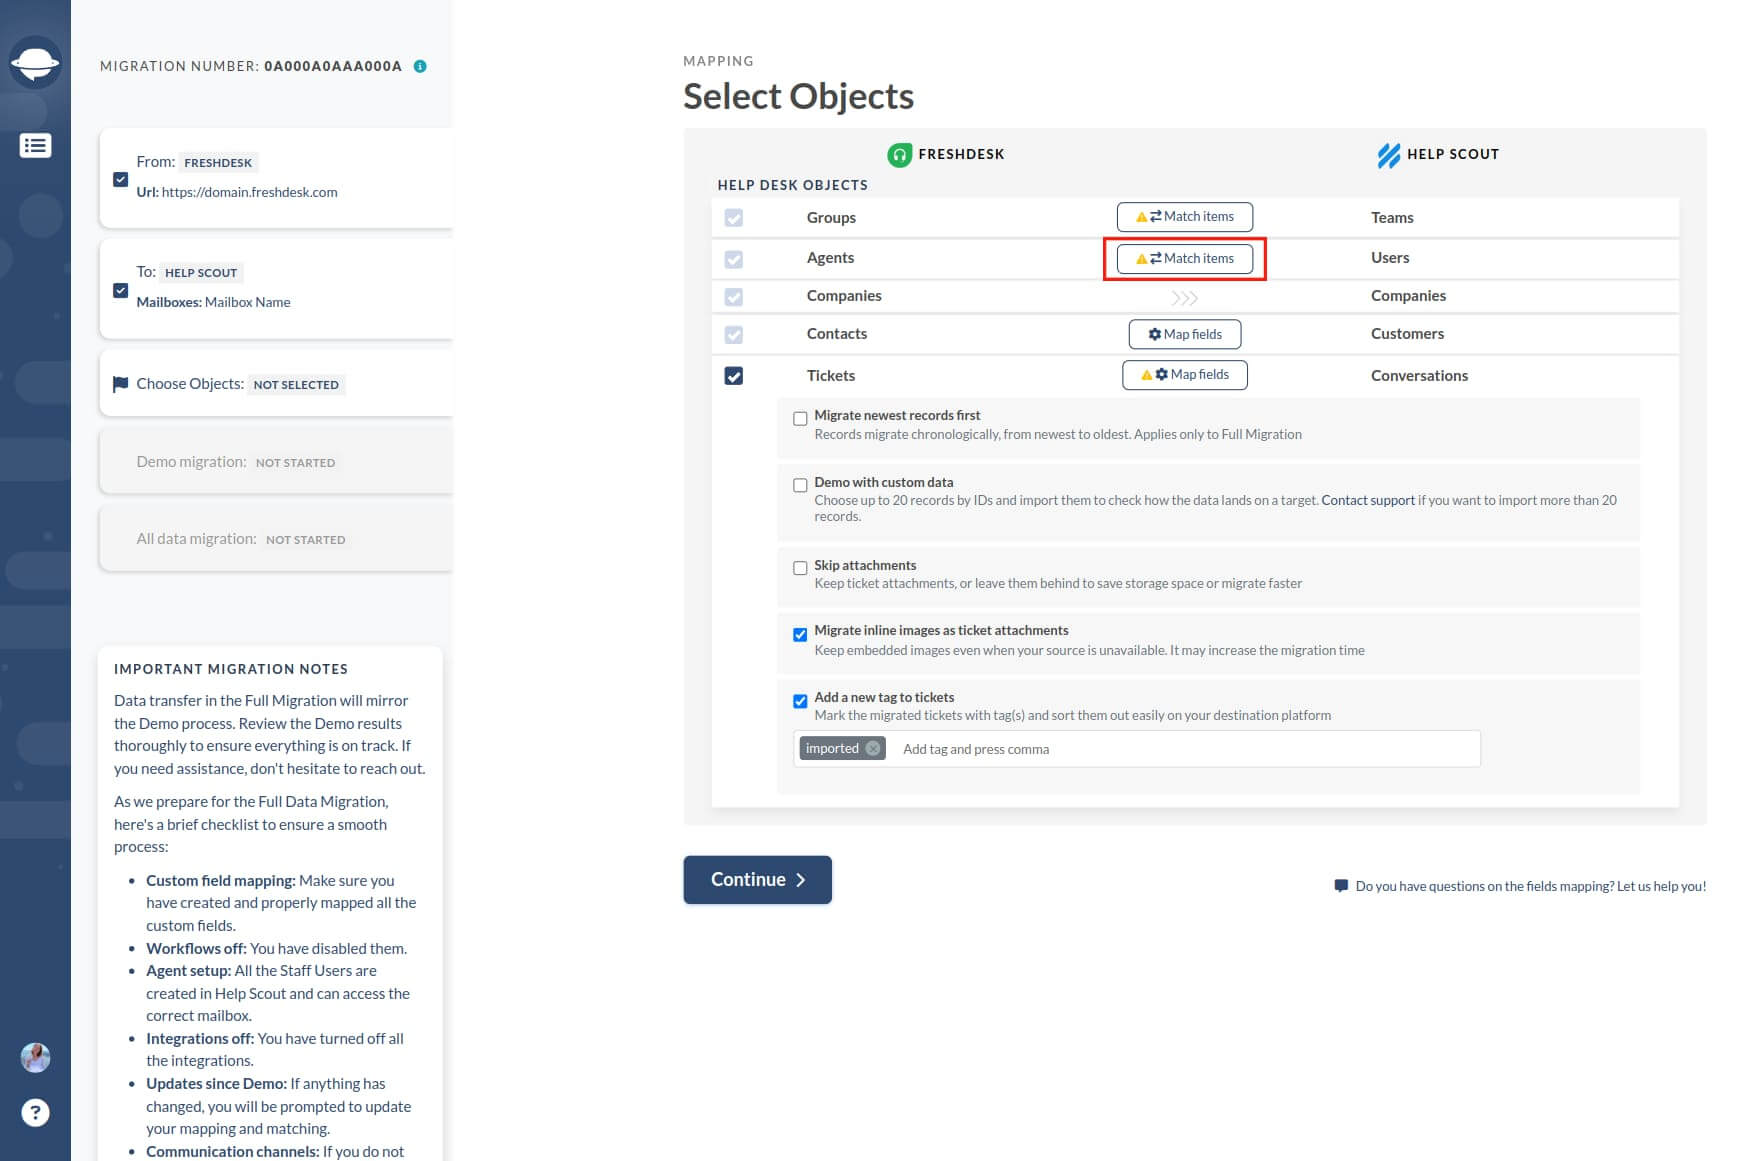
How Agent Matching Works
On the mapping page, you will see the "Match items" button next to Agents.
Then, the scenario could go one of the two ways. If the target help desk already has some agent profiles created, you will be able to map their emails by clicking on the drop-down menu.
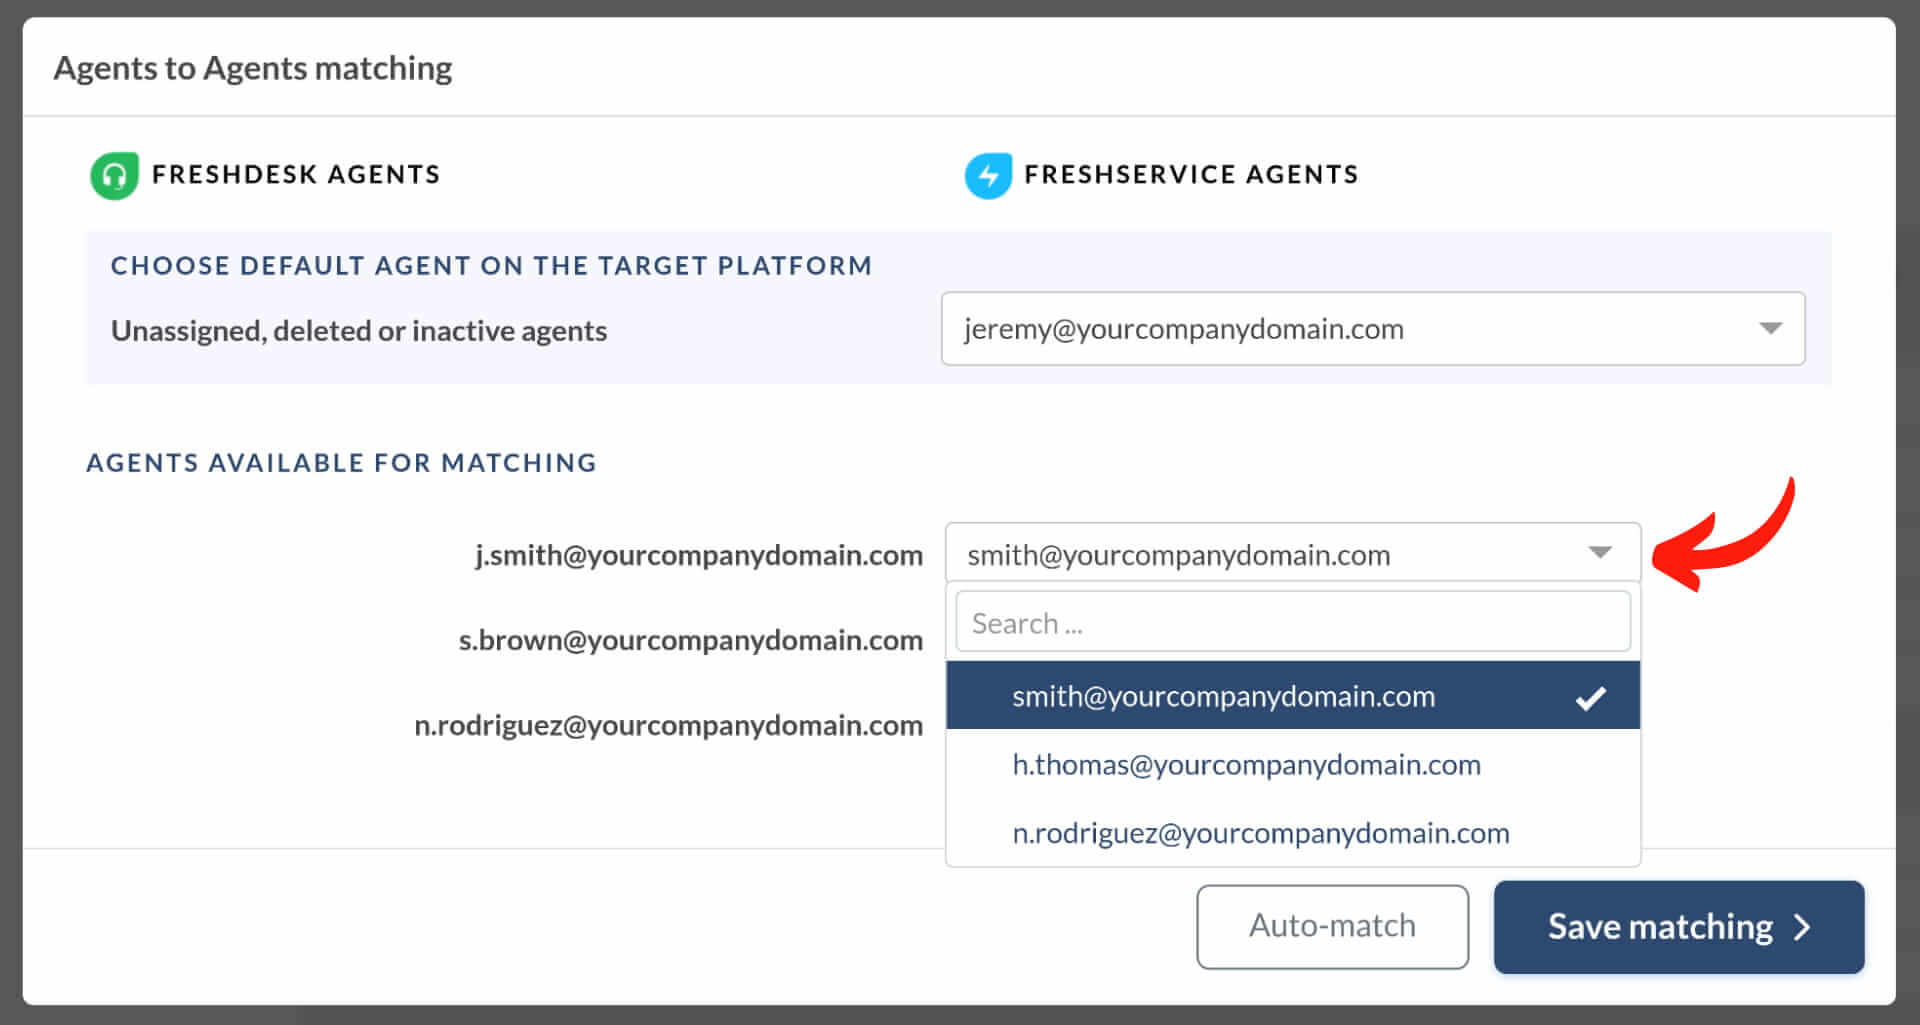
You can easily add agents on the target platform without leaving the Migration Wizard. At the top of the form, pick the email to create on the target help desk, then click the "Add the same staff on {target}." Wait for a few moments while the tool is creating the user.
Some help desk platforms do not allow creating agents via API. If you don't see the "Add the same staff on {target}" , then you have to create agent profiles on the target help desk manually.
Do you migrate internal links?
When migrating links to Knowledge Base articles, note that they won't update automatically. For instance, moving from Zendesk to Freshdesk keeps links directing users to Zendesk. This happens because each platform handles internal links differently, making it impossible to predict the new IDs during migration.
We recommend conducting a thorough link audit and manually updating URLs to avoid potential disruptions. While this may cause inconvenience, it's crucial to prioritize caution with internal links. Rest assured, we're committed to addressing this challenge in future updates.
How to migrate tags to a non-tag based help desk?
Our Help Desk Migration Service enables you to migrate tags, even if your new target system doesn't support this feature.
The best method involves creating custom text fields and mapping them with the corresponding tags.
What is the Archived status of migration?
Your data is securely stored for either 3, 5 or 10 days, based on your chosen support package, as per our Terms of Service and Service Level Agreement.
To request the deletion of your data, please email contact@help-desk-migration.com.
Once the storage period ends or upon receiving your deletion request, your migration status will be updated to "Archived," and all associated data will be permanently removed from our system.
Please note that no further modifications can be made after the migration is archived.

How to use Two-Factor Authentication and User Activity Monitoring in Migration Wizard?
To bolster the security of your data within the Migration Wizard, Help Desk Migration has introduced two new protective features: Two-Factor Authentication (2FA) and User Activity Monitoring.
Two-Factor Authentication
Enable 2FA by following these steps:
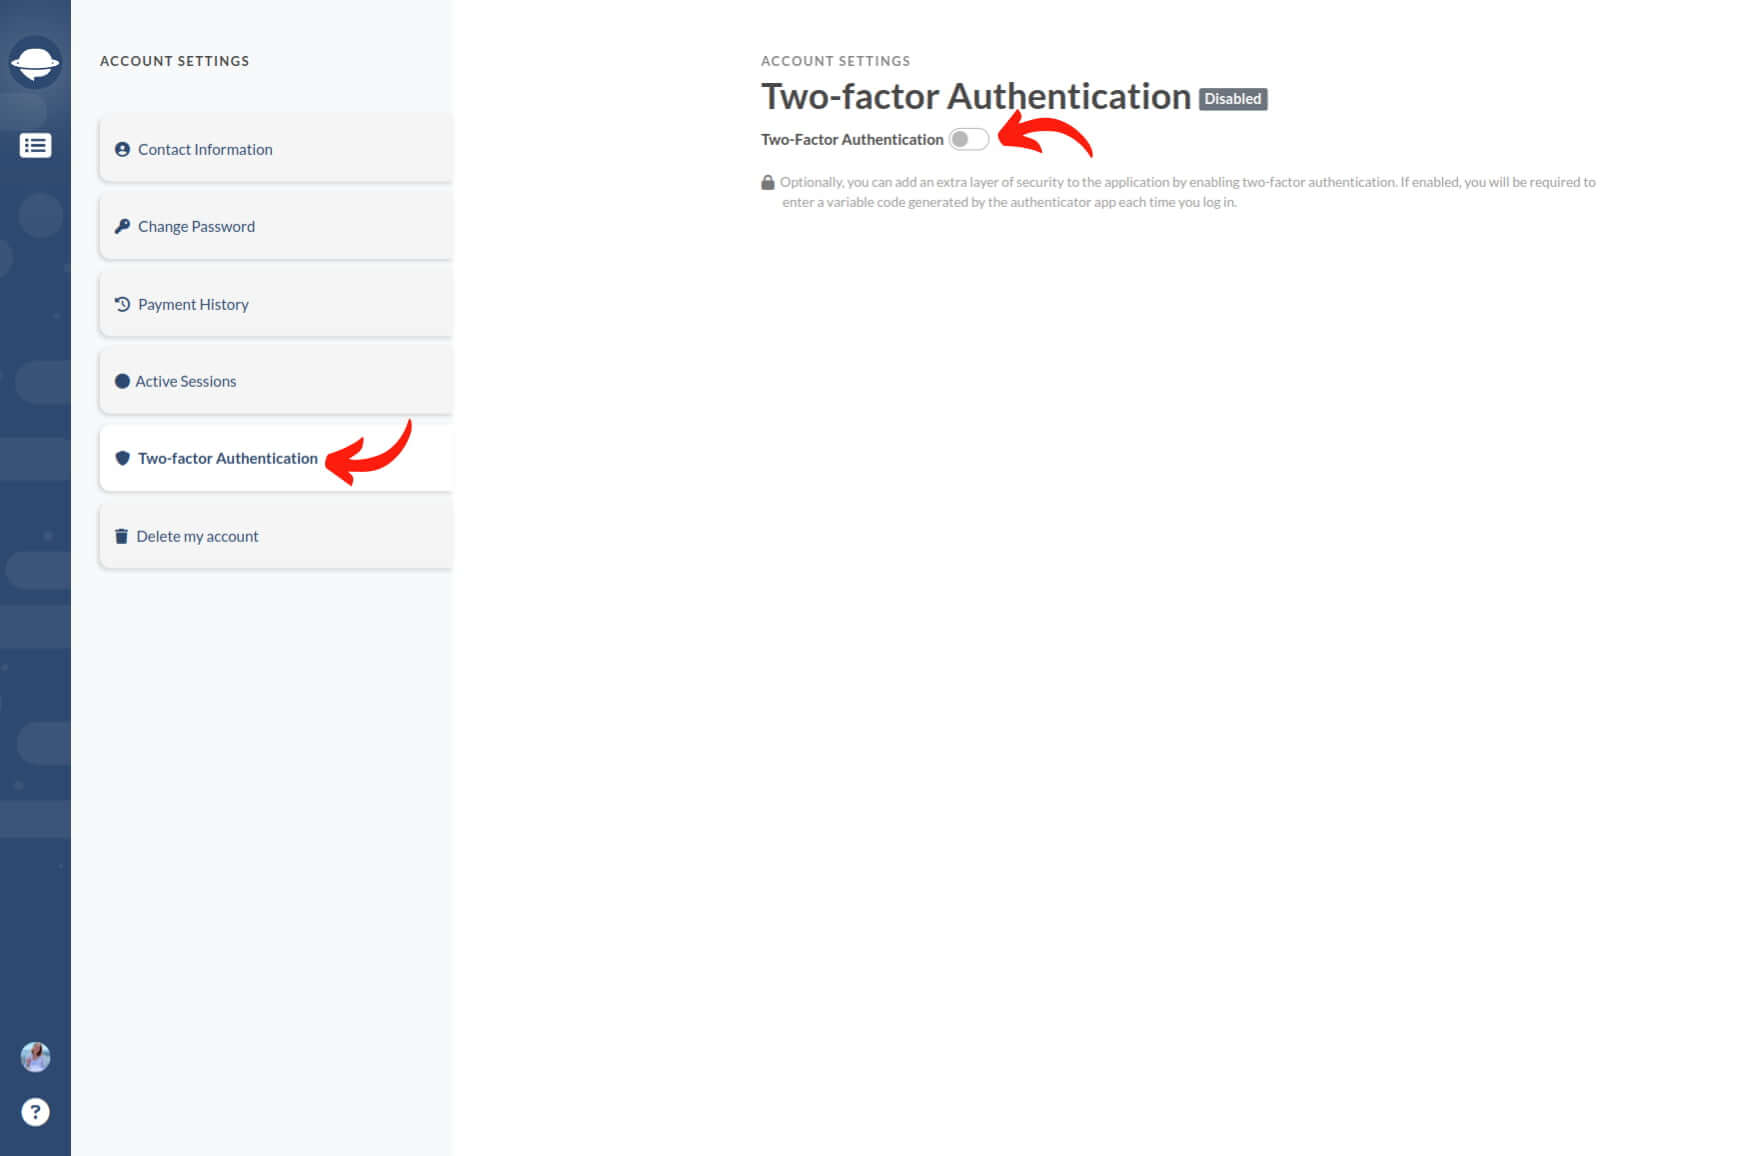
1. Navigate to Account Settings > Two Factor Authentication and toggle the switch.
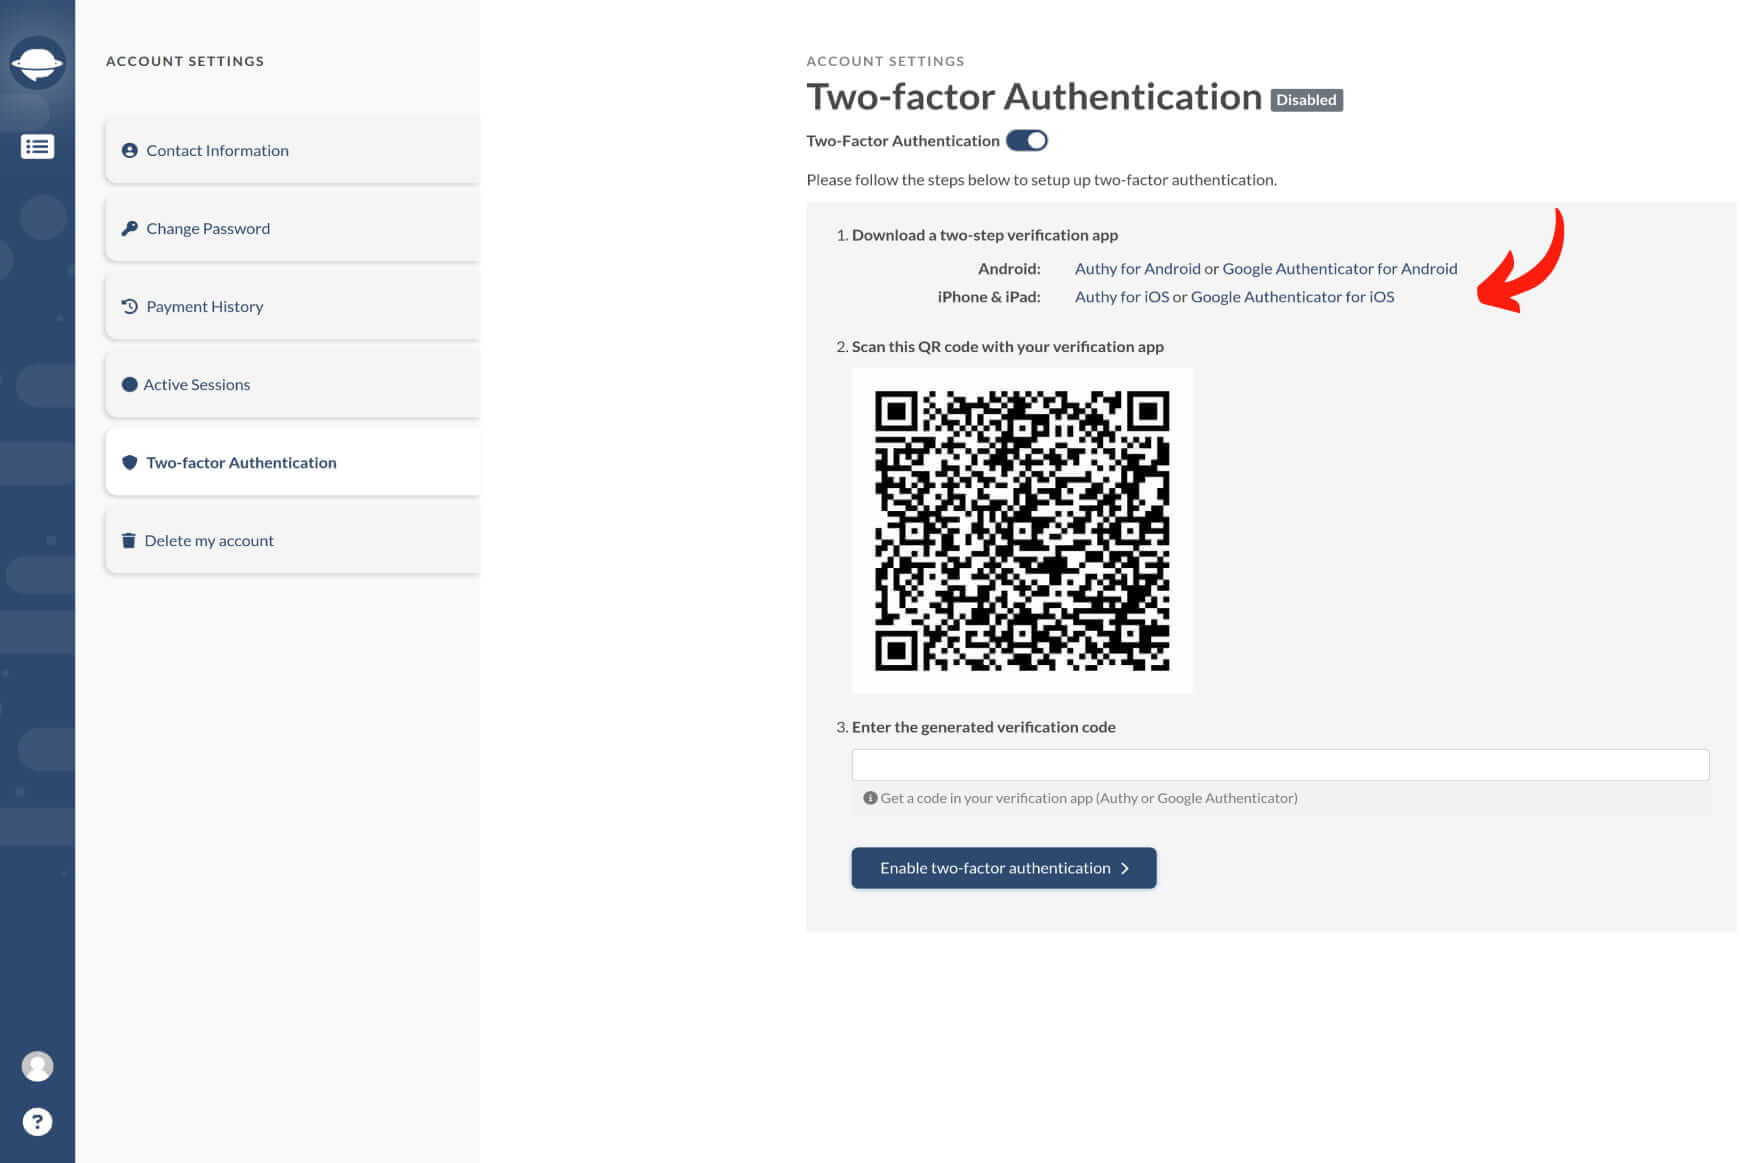
2. Download a 2FA verification application (e.g., Twilio Authy or Google Authenticator.)
3. Scan the QR code displayed on-screen using the verification app.
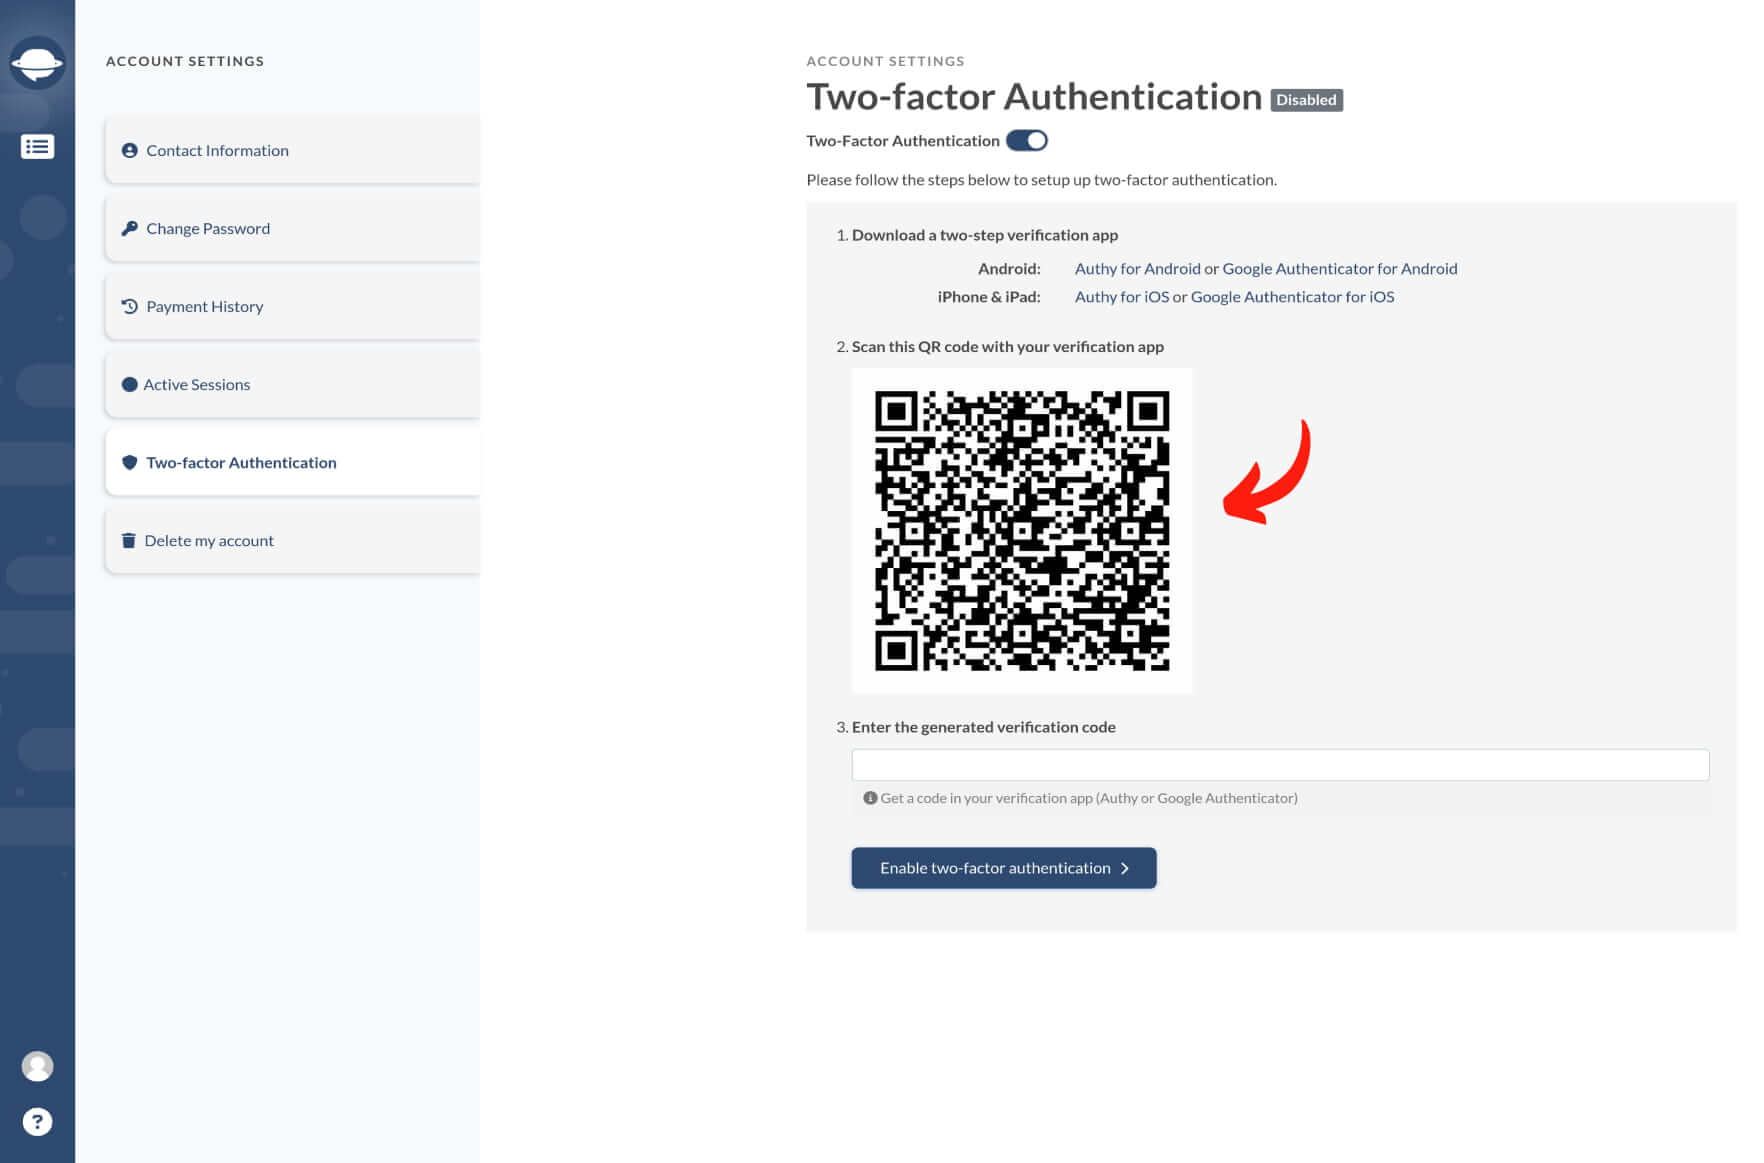
4. Enter the verification code from the app.
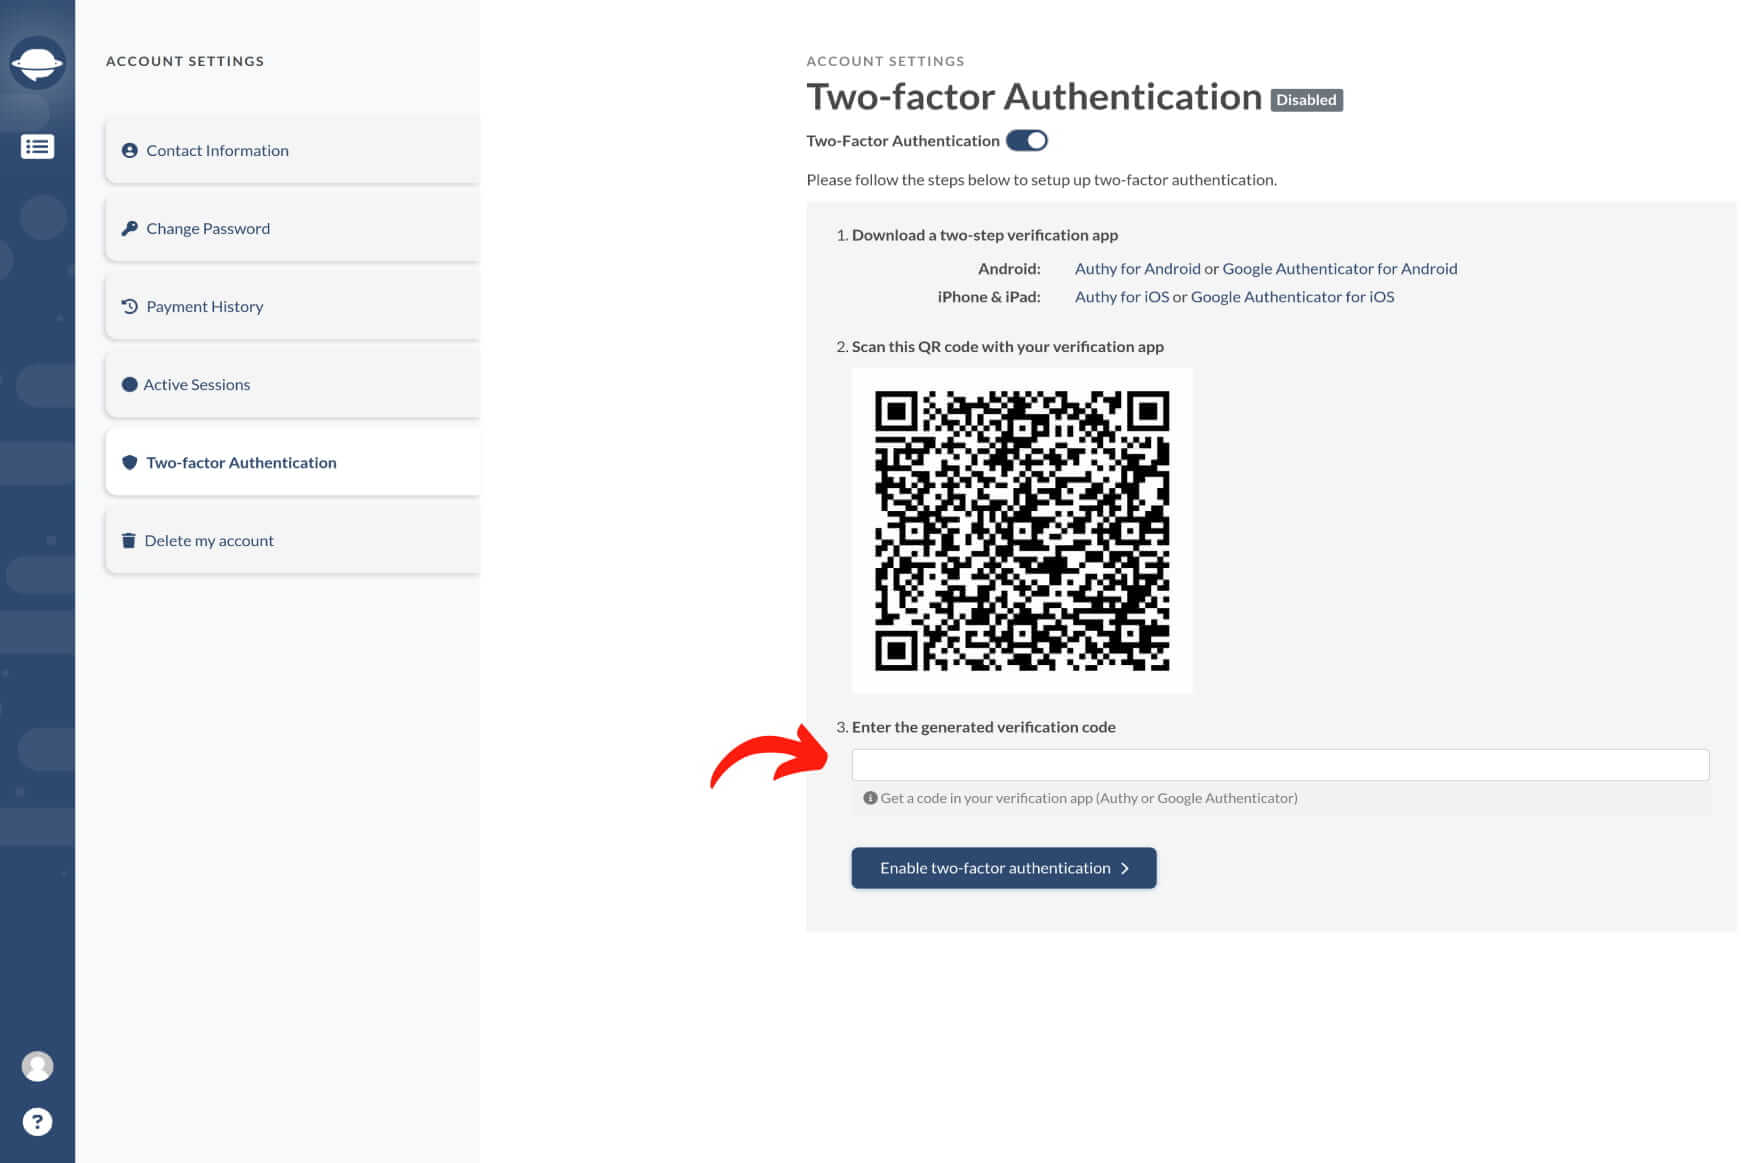
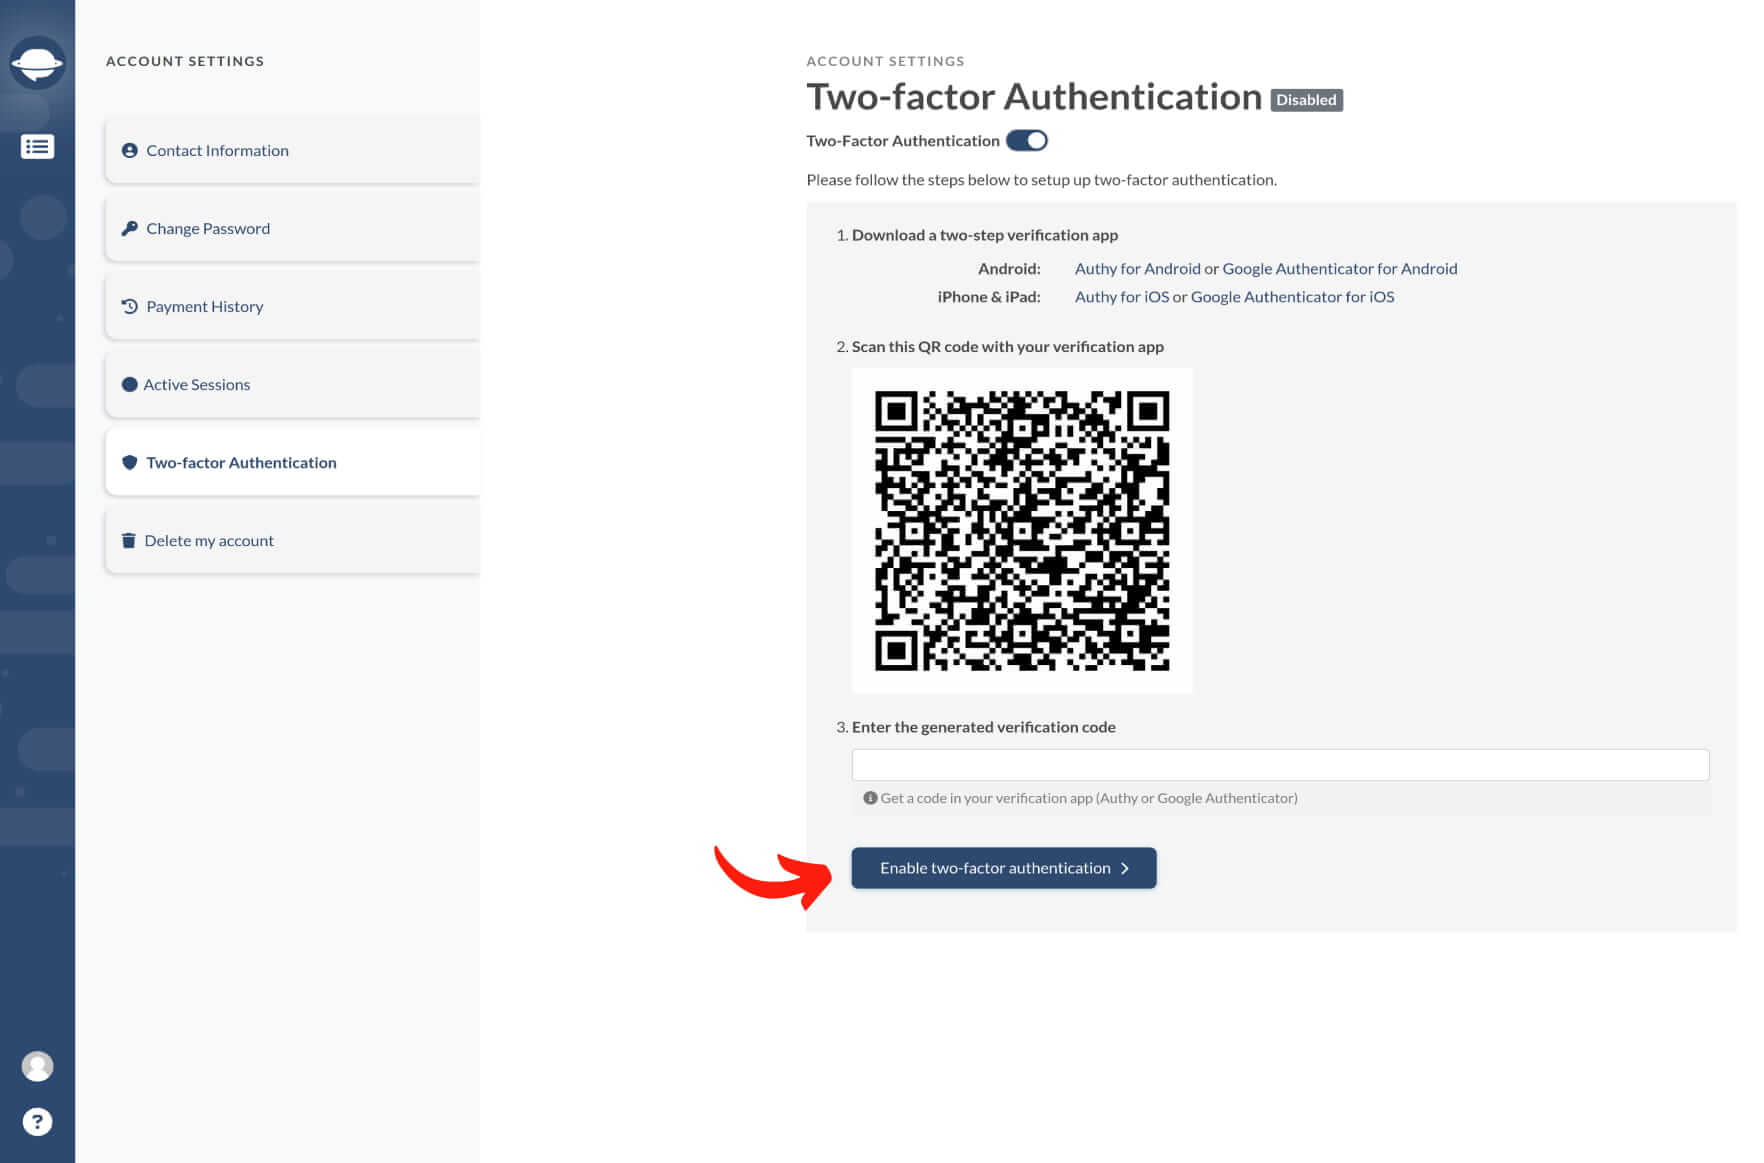
5. Click Enable Two-Factor Authentication.
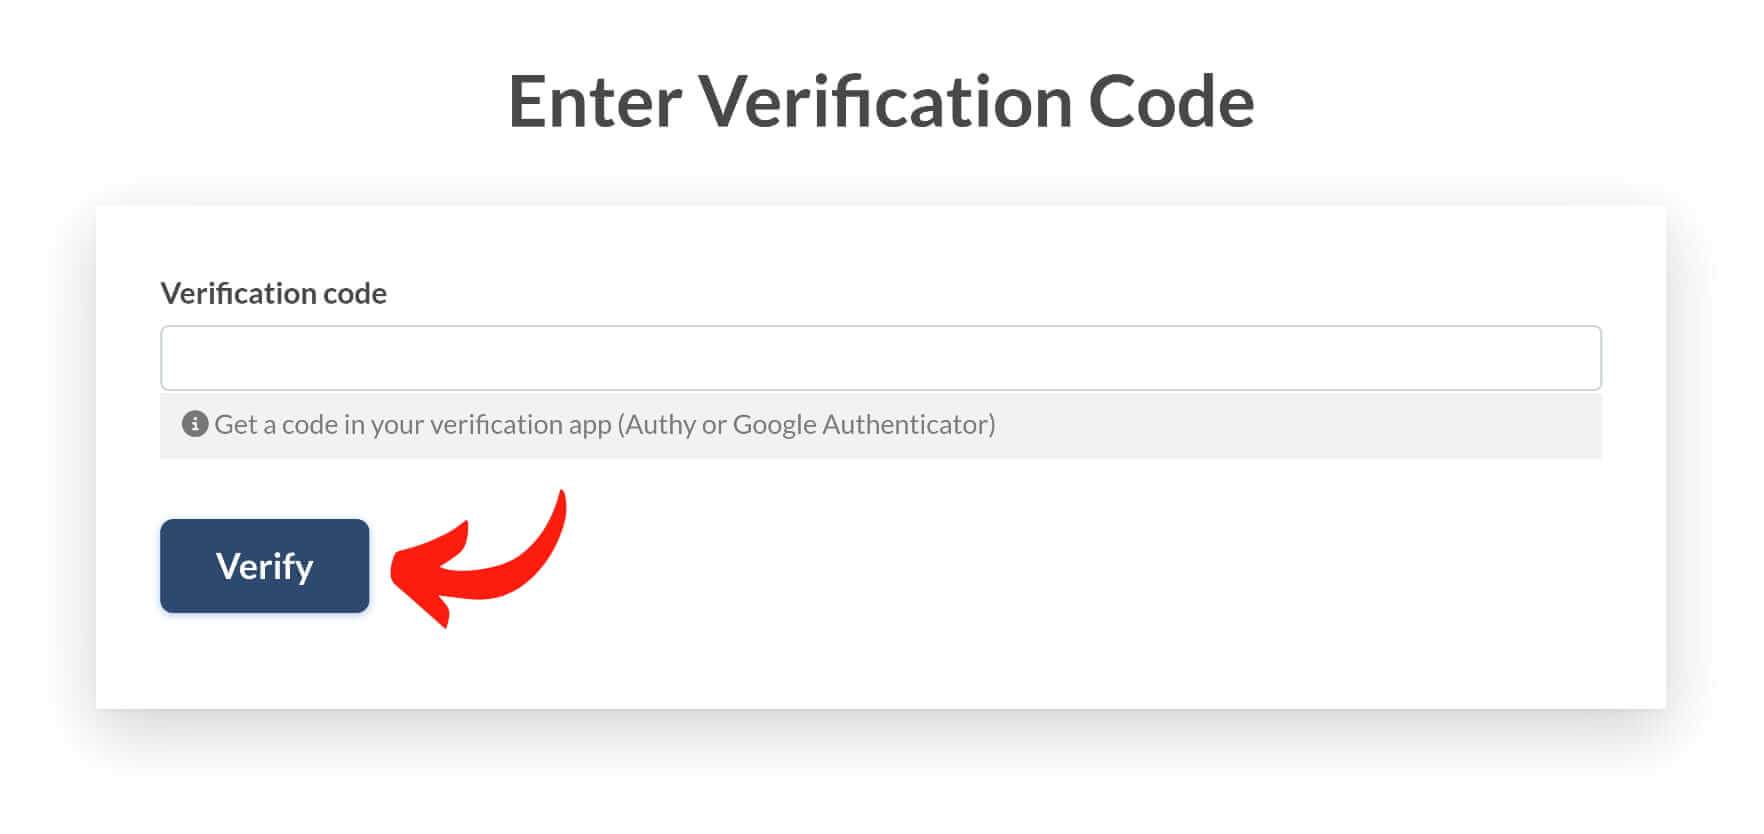
After you have enabled the two-factor authentication, you’ll have to type in the verification code each time you log into your Migration Wizard account.
2FA offers an additional layer of protection for your data. Even if your password is compromised or you lose your phone, your records remain secure. The likelihood of someone accessing your second-factor authentication information is minimal, ensuring the ongoing safety of your data.
The monitoring of user activity sessions
Monitor the user activity sessions by following these steps:
1. Navigate to Account Settings > Active Sessions.
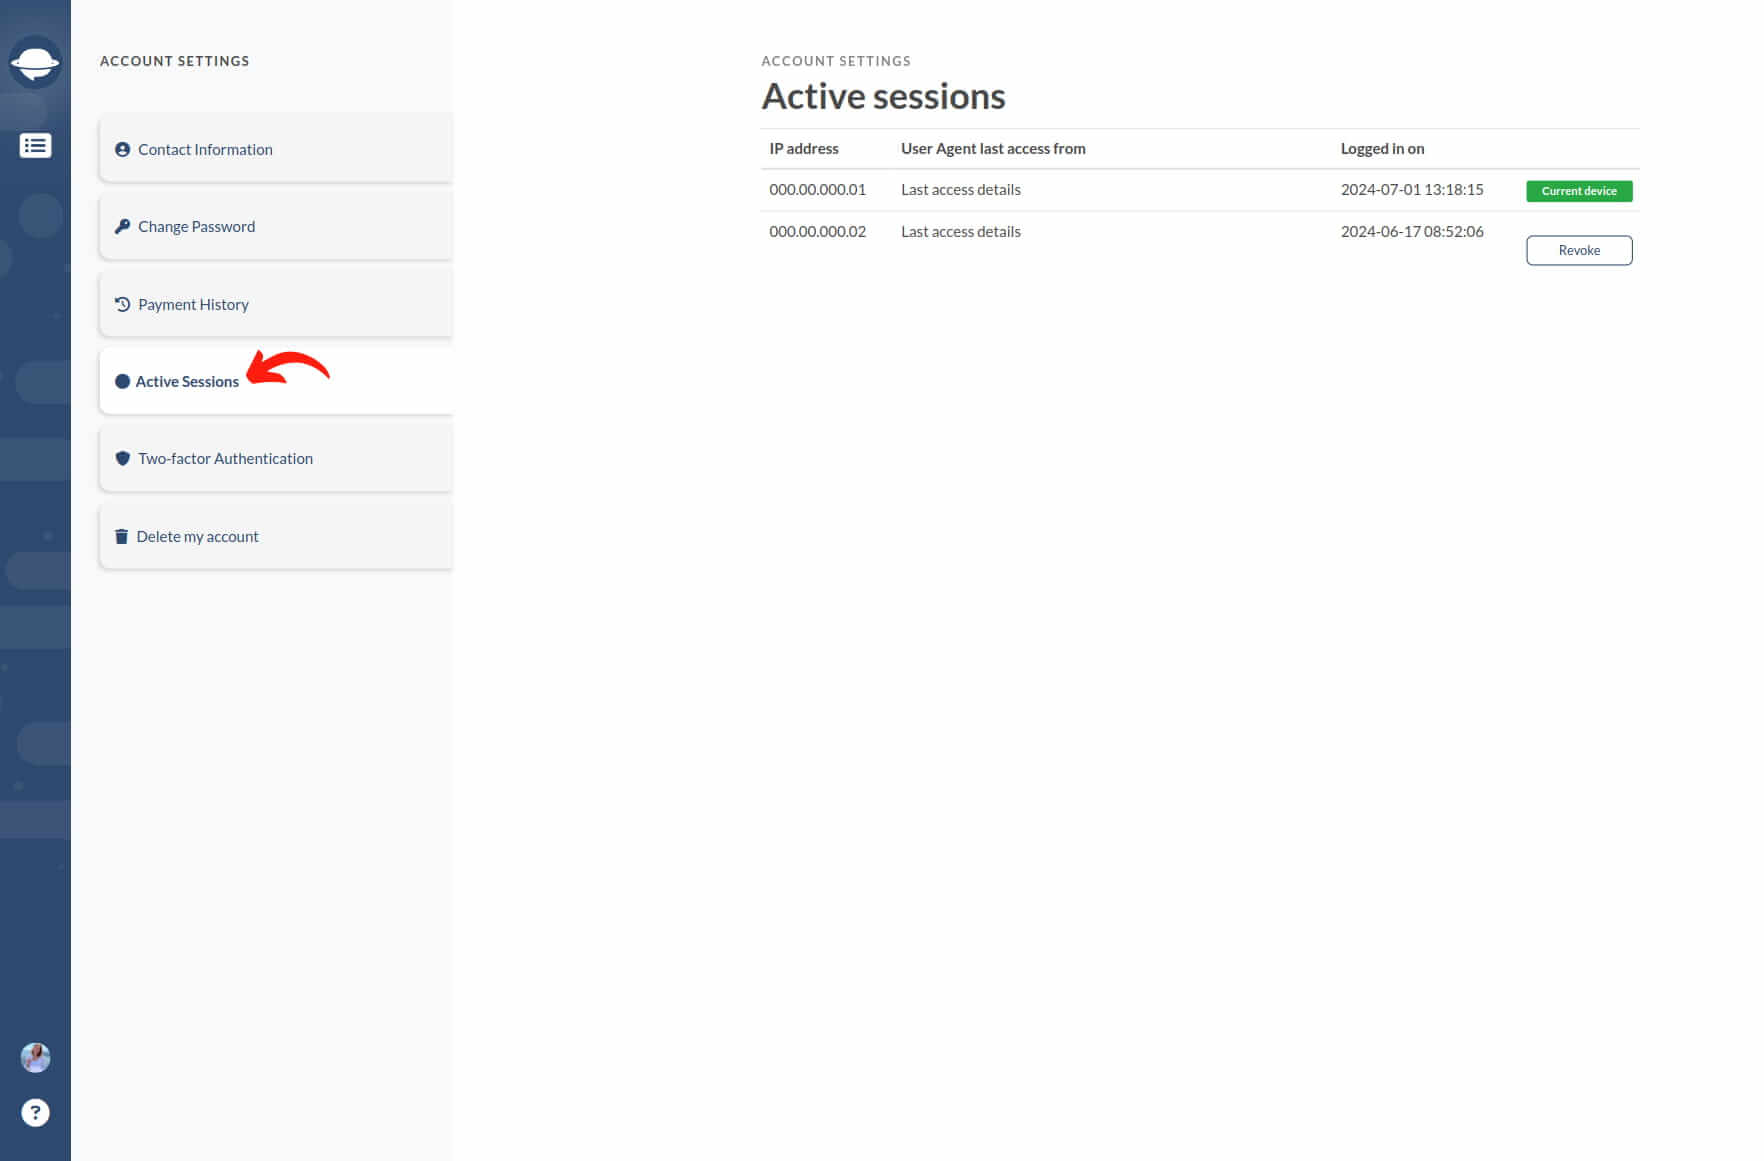
2. Review session details including IP address, browser, and login time.
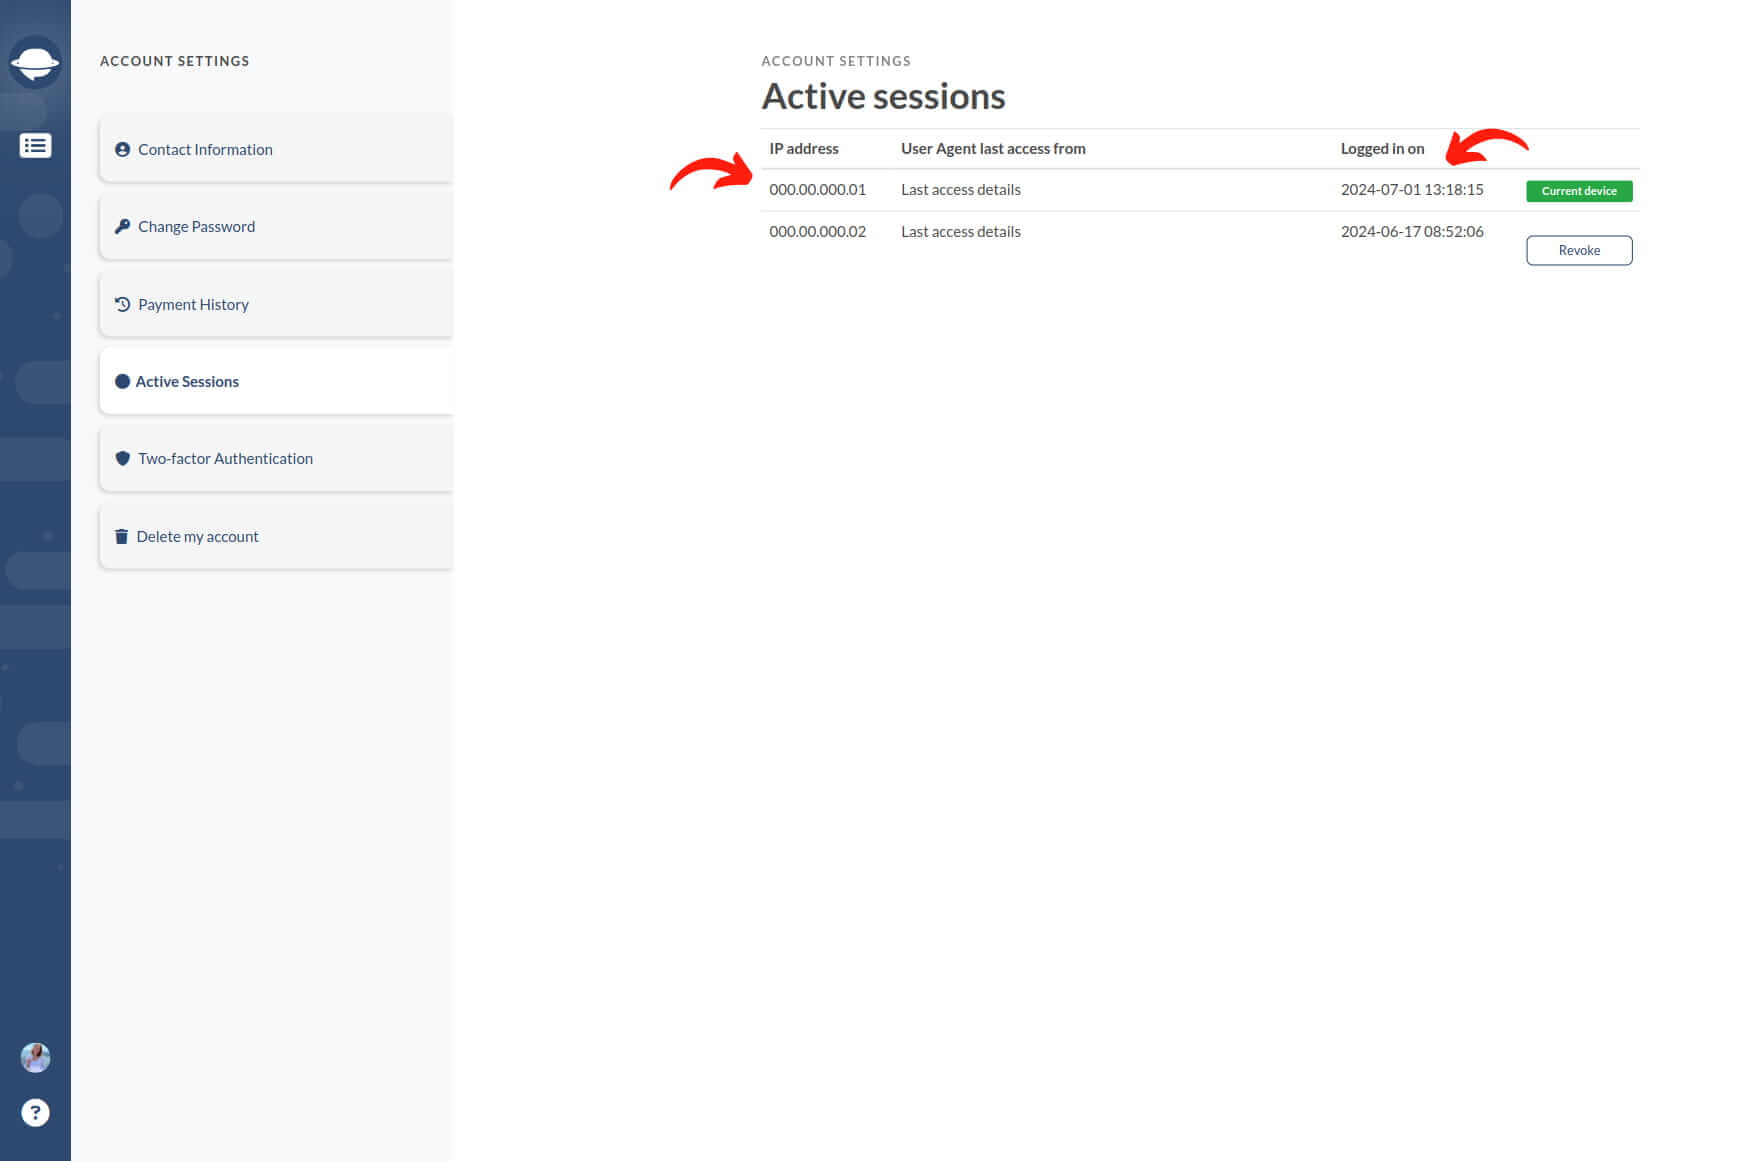
3. Optionally, revoke any session by clicking the “Revoke” button.
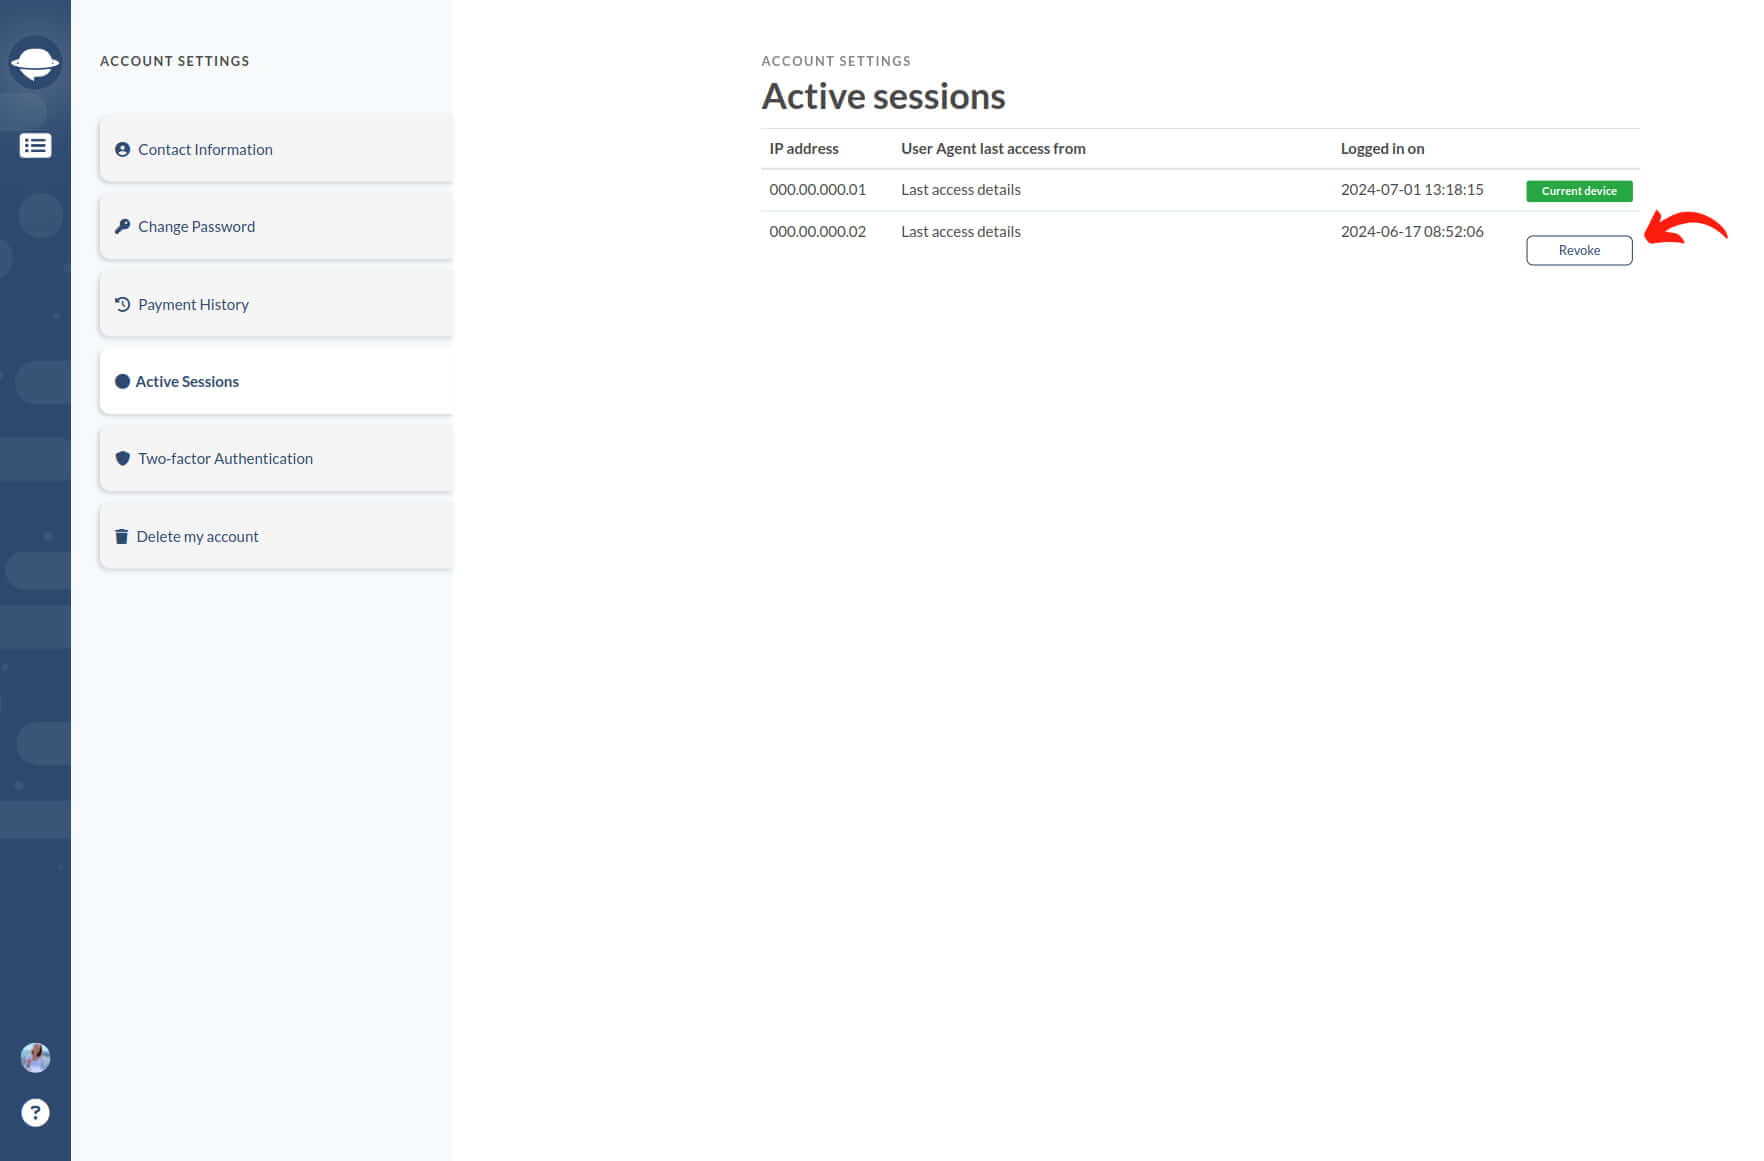
This feature not only allows tracking of active sessions but also enables session revocation for added security.
Why disable automations before migration?
It's strongly recommended to disable automations on your new platform before migration to avoid unexpected changes to migrated tickets, such as status alterations or reassignments.
If disabling automations isn't possible, consider the following workaround:
a) Request support to apply a tag to all migrated tickets.
b) Use the "Add a new tag to the migrated tickets" option if available in the pre-built automation list on the mapping settings.
Then, establish specific rules for automations and notifications to avoid triggering them for tickets with the added tag. This approach allows for data migration while keeping automations enabled.
How long does data migration take?
Predicting the exact duration of your data migration is complex due to various factors impacting speed.
The migration involves two main steps: reading and writing. Reading retrieves records from the source help desk, while writing transfers them to the target help desk.
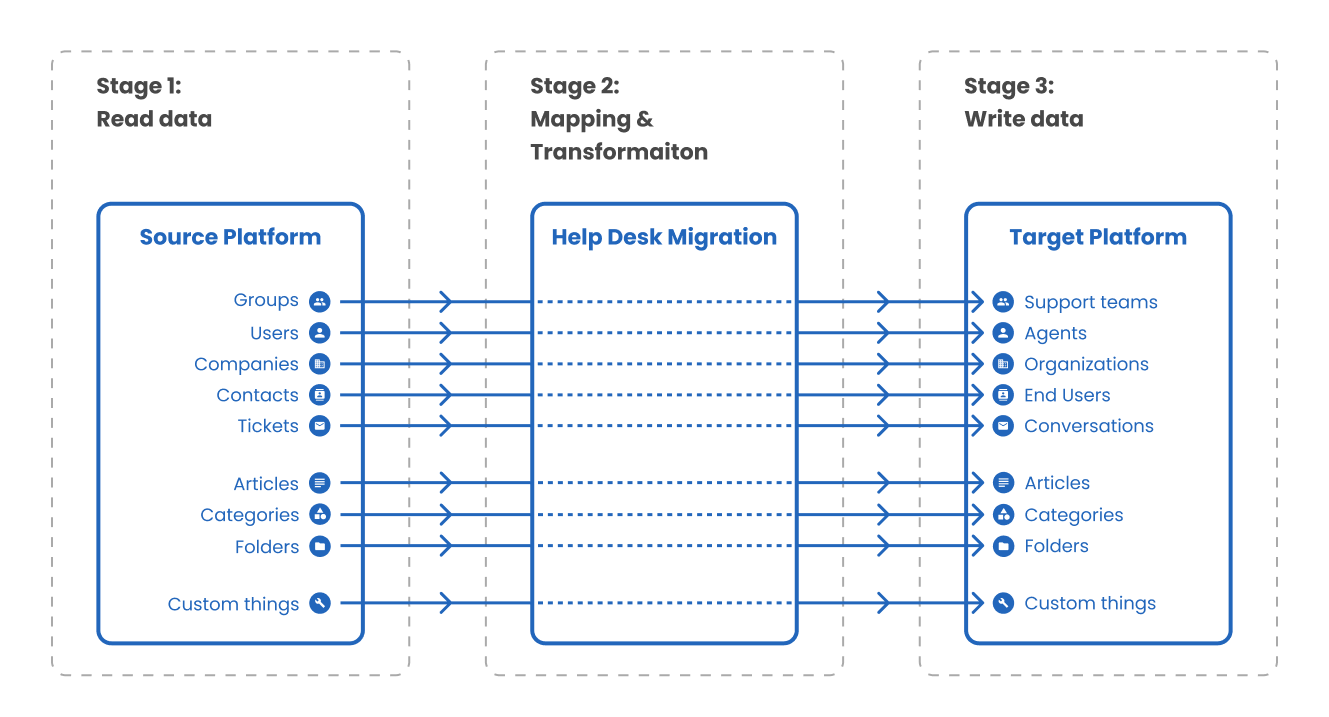
Factors affecting migration time include:
The duration required to complete each step is contingent upon various factors, including:
- Record Volume: The more records, the longer the migration.
- Attachments: Large or numerous attachments can extend retrieval.
- API Limits: Source and target help desks impose limits on requests.
- API Architecture: Some platforms require multiple requests per record.
Here's how each aspect relates to your migration process
Records: The quantity of records impacts migration time. More records mean longer durations, although high API limits can mitigate this.
Attachments: Attachment presence and size influence migration time, with larger or numerous attachments extending the process. Estimating accurately is challenging without prior knowledge of attachment quantity.
API Limits and Specifications: API limits determine the maximum requests allowed within a timeframe, varying by platform and subscription tier. Understanding API architecture nuances is vital for optimizing migration strategies.
In this hypothetical scenario, let's consider migrating from Zendesk to Freshdesk. Below is a summary of each API's functionality and the corresponding number of calls needed for effective data migration:
| Reading data | Writing data | ||
|---|---|---|---|
| Zendesk entities | API calls used | Freshdesk entities | API calls used |
| Groups |
Count - 1 call Fetch - 1 call per 100 groups |
Groups |
Search - 1 call per 100 groups Create - 1 call per group |
| Staff |
Count - 1 call Fetch - 1 call per 100 staff members + 1 call to get relations for each staff. |
Staff |
Search - 1 call per 100 staff members Create - 1 request to check if there’s a contact with the same email as the agent has. If there isn’t, then 1 request to create a contact + 1 request to update is as agent |
| Companies |
Count - 1 call Fetch - 1 call per 100 companies |
Companies |
Search - 1 call per 100 companies Create - 1 call per company |
| Contacts |
Count - 1 call Fetch 1 call per 100 contacts |
Contacts |
Search - 1 request per 100 contacts. If the same Zendesk contact is found on Freshdesk then +1 call to assign it to a company. If not, then we create a contact. Create - 1 request per contact |
| Tickets |
Count - 1 call Fetch - 1 call per 100 tickets + 1 call for each ticket to assign the relations |
Tickets | Create - 1 call per ticket + 1 call per reply |
| Knowledge base articles |
Count - 1 call Fetch - 1 call per 100 articles + additional requests to retrieve attachments |
Knowledge base articles | Create - 1 call per article |
| Categories |
Count - 1 call Fetch - 1 call per 100 category |
Categories |
Search - 1 call per 100 categories Create - 1 call per category |
| Folders |
Count - 1 call Fetch - 1 call per 100 folder |
Folders |
Search - 1 call per 100 folders Create - 1 call per folder |
| Count - getting the total amount of records | Search - means that Migration Wizard checks records for duplicates before creating new ones. Only true if you already have records in the target help desk. | ||
| Fetch - retrieving records. | Create - creating a record in the target help desk. | ||
Target Help Desk Considerations:
- Empty Target Help Desk: Migrating to a clean target help desk usually takes less time.
- Existing Data: If your target help desk already has tickets, contacts, or other data, the Migration Wizard will allocate additional time to verify and prevent duplication.
What you can do to fix it?
- Request API Limit Increase: Contact the new platform provider to request a temporary increase in API limits. This can speed up the migration process significantly. Make sure to address this well in advance of the migration date to prevent delays.
- Calculate Migration Duration: Gather information about API limits for both the source and target help desks. This will help you estimate the time needed for the migration process accurately.
How to speed up the Full Data Migration?
Full Data Migration is a comprehensive process that cannot be completed swiftly; it requires careful consideration due to the substantial volume of data involved.
Over time, as you utilize your current help desk platform, your data accumulates significantly. Therefore, when transitioning to a new help desk, the goal is to preserve all data comprehensively, not just individual records.
The duration of Full Data Migration can vary significantly, ranging from a few hours to up to a week. However, migration speed depends on various factors, including:
- The number and size of attachments.
- API limits on both source and target platforms.
- API specifications.
- Characteristics of your target help desk.
- The processing speed of data by server infrastructure.
To speed up Full Data Migration, several strategies can be employed. For example, consider migrating open and closed tickets separately or excluding historical data. However, such measures may offer only marginal improvements, and you may still experience wait times during the migration process.
A highly recommended step is to increase API limits on both source and target platforms. Contact the support teams of both solutions well in advance of migration to request temporary increases in API limits.
Additionally, you can opt for an automated approach by selecting the "Skip attachments" option. This simplifies the migration process by focusing solely on transferring core customer data, which can be selected during the Demo Migration at the "Select Object" step.
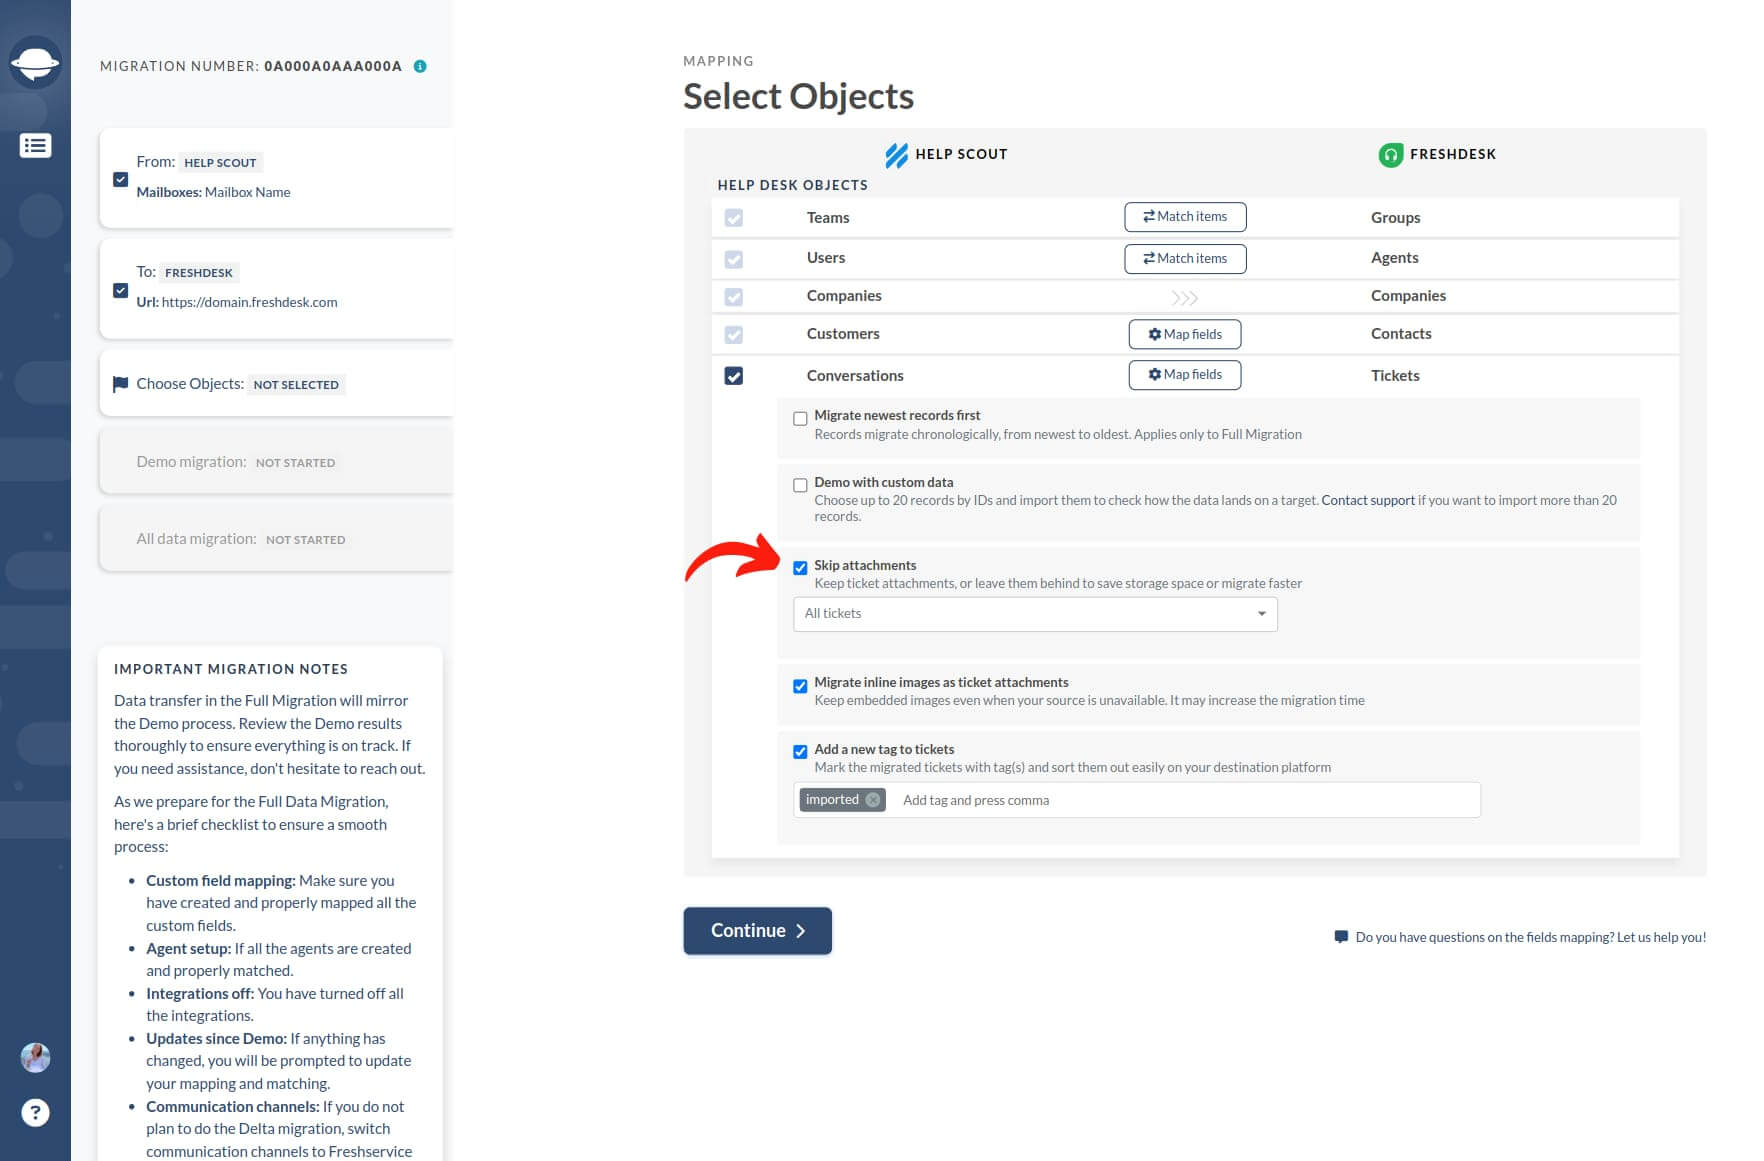
The automated option is available if your source platform is: Zendesk, Freshdesk, Freshservice, Jira Service Management, Help Scout, Gorgias, Zoho Desk, Reamaze, Intercom, Kayako, ServiceNow, or HubSpot Service Hub. Other platforms are also supported.
How to clean up data prior to migration?
Cleaning up your data prior to migration is a crucial step to enhance the efficiency and reduce the cost of the process. The volume of data in your source help desk directly impacts processing time and overall migration expenses.
What to do before the data cleanup?
1. Identify Unnecessary Data:
- Review all records and exclude data not essential for migration. Our data transfer tool automatically excludes spam-marked tickets, but ensure to manually remove any bypassed spam tickets.
- Consider removing historical data not utilized for an extended period.
- Eliminate ticket duplicates to prevent migration failures.
2. Validate data integrity: Verify the validity of information, especially within older entries. Delete or update outdated or irrelevant details.
3. Complete missing data: Ensure all ticket fields contain necessary information, especially mandatory fields on certain platforms.
4. Backup your data: Maintain a backup to guard against accidental loss and ensure important records can be restored if needed.
Platform-Specific Recommendations for Data Deletion
Deleting data in Zendesk
- Ensure all open tickets associated with a user are resolved, closed, and archived before attempting to delete their account.
- Deleting a user's account is permanent and cannot be undone. It's crucial to remember that this action is permanent and cannot be undone.
Deleting data in Freshdesk
- Permanent deletion of a contact's account is not possible unless using Freshdesk Mint.
- Deleted contacts are moved to the "Deleted contacts" folder but remain within the system.
- Tickets originating from a deleted contact will be directed to the Spam folder.
- Deleting agents converts their accounts into contacts, and any assigned tickets become unassigned.
Deleting data in Help Scout
- Deleting agents results in their assigned tickets becoming unassigned.
- Workflows created by deleted agents will be deactivated.
- Deleted users' comments will still be displayed on their behalf within the source platform, but after migration, they will be attributed to the default user in the target platform.
Deleting data in Kayako
- When deleting a user, all associated conversations, notes, and other linked data are permanently removed from the help desk.
- Deleted users cannot be searched for within Kayako after deletion.
- Deleting data in Kayako is irreversible, so carefully evaluate the need for data before proceeding with deletion.
By following these platform-specific recommendations, you can effectively manage data deletion and ensure a smooth transfer during the migration process.
Transfer data from a self-hosted or on-prem ticketing system
Help Desk Migration service offers assistance with exporting data from self-hosted or on-premise ticketing systems. To facilitate this process, follow these steps:
Whitelist the IP address: Ensure that the IP address 18.198.164.195 is whitelisted to allow access to your system.
Open ports 80 and 443: These ports need to be open to enable communication with the Migration Wizard.
MySQL Database Setup: If you're migrating from MySQL, refer to the guide on setting up MySQL export and whitelisting the IP address for detailed instructions..
By completing these steps, the Migration Wizard will seamlessly fetch and migrate your data.
Can I close the browser window after the migration has started?
Yes, you can. Both Demo and Full data migrations are performed in the cloud, eliminating the need to keep your browser window open.
The duration of your transition may vary based on the volume of records being moved. Rest assured, you'll receive an email notification upon completion of the migration process.
Can I make changes during migration?
Once Full Data Migration begins, it's best to avoid making alterations. Avoid making changes or deletions during the import process. Editing or deleting records while the migration is underway can lead to disruptions and potentially irreversible consequences.
If you need to refine your records, we recommend doing so either before or after the import process.
Can I use my help desk systems during data migration?
During the data migration process, you can continue using both your source and target platforms. However, considerations vary depending on which platform your team primarily works with during the transfer.
Using the Target platform:
If you opt to use the target platform while data is being transferred, be aware that certain help desk systems may require temporarily disabling triggers and notifications. This approach has its pros and cons:
Pros: Reduced influx of messages during data migration.
Cons: Ensure that your workflow operates smoothly without triggers and notifications for the duration of the migration.
Using the Source platform:
If you choose to continue using your source platform during the migration, follow these steps:
- Verify the results of the Full Data Migration.
- Shift all incoming messages and communication channels (calls, chats, emails) to the target platform.
- Initiate a Delta migration.
- Transfer to using your target platform exclusively.
What is Delta migration?
Delta migration involves the transfer of updated and newly created tickets to the target platform. This process eliminates duplicate records, as our service automatically detects and handles new and updated data.
When and why do you need Delta migration?
Delta migration becomes necessary when using the source platform during migration. It ensures that updated and newly created tickets during the data migration process are seamlessly switched over to the target platform. Our Signature support package offers this specialized option for a smooth transition.
What happens if a customer replies to an open ticket during migration?
Help Desk Migration does not capture client replies or forward them to the target help desk during migration. Our service does not check for new data while the migration is ongoing.
Here are possible scenarios:
- Target platform is active: If the new system is active and the client replies after the ticket has been imported, their response will go to the new help desk.
- Source system in use: If the ticket has not yet been imported and the old system is active, the reply will remain in the old system. However, the data migration service will not include it in the import.
- Target platform in use: If the ticket has not yet been imported and you're using the new help desk, the customer's reply will create a new ticket in the new system.
To mitigate such situations, we recommend scheduling the migration during periods of lowest support load.
Where will a response for a migrated ticket go?
After completing the data migration, you may wonder where responses to migrated tickets will be directed. There are two primary scenarios:
- Reply to the Migrated Ticket: The response may be directed back to the original ticket that was migrated to the new platform.
- Creation of a New Ticket: Alternatively, the reply could result in the creation of a new ticket.
To offer a comprehensive understanding, we conducted tests using Email and the Self-Service Portal to reply to migrated tickets across various popular platforms. Here's what we discovered:
| Email reply | Portal reply | |
|
Zendesk |
Into new ticket | Into migrated ticket |
|
Freshservice |
Into new ticket |
Into migrated ticket |
|
Freshdesk |
Into new ticket |
Into migrated ticket |
|
Kayako |
Into new ticket |
Into migrated ticket |
|
Gorgias |
Into new ticket |
- |
|
Jira Service Management |
Into new task (type Email request) |
- |
|
Teamwork Desk |
Into new ticket |
Into migrated ticket |
|
Reamaze |
Into migrated ticket |
Self-Service Portal allows to view help articles only |
|
Zoho Desk |
Into new ticket |
Into migrated ticket |
|
Help Scout |
Into new ticket |
- |
If you encounter a '-' (dash) sign, it indicates that we were unable to conduct tests for replies due to specific platform constraints.
Do you delete data from the source platform?
No, the Migration Wizard does not delete any data from the source platform. The migration service is designed not to modify data in any way. Instead, it follows a structured process:
- Read Source: The Migration Wizard reads the data from the source database without making any changes to the original records.
- Make a Copy: It then creates a copy of the records to be migrated to the target platform. This copy is used for the migration process.
- Import to Target: The copied records are imported into the target platform, ensuring that the original data on the source platform remains unchanged.
- No Deletion or Modification: At no point does the Migration Wizard delete or modify any data on the source platform. The original records are retained and accessible on the source platform even after migration.
You can access your data on the old platform at any time without any concerns.
Back up your help desk data
For those managing help desk data migration, a reliable source data backup is essential. The migration process requires tailored preparations based on your source and target help desk systems. Implementing a source help desk data backup provides an extra layer of security to your policy.
In our ongoing dedication to meeting customer needs, the Help Desk Migration team is proud to introduce a new option aimed at simplifying the backup process for your help desk data.
What Is a data backup?
Data backup is the process of creating a duplicate copy of your source data, usually in JSON format. Your help desk data serves as the foundation of your customer service operations, and preserving it post-transition to new help desk software is crucial. This ensures compliance with security protocols and meets legal obligations specific to your industry or company location. Thus, maintaining a comprehensive help desk data backup is indispensable for teams of all sizes.
How does source data backup work?
Once the help desk data migration is finalized, the source help desk data backup becomes available for download. It's essential to understand that the backup files provided will be in JSON format.
Why help desk data backup in JSON?
Here are a couple of reasons why the completed data backup in JSON format:
- JSON accommodates large data sizes, ensuring you receive a comprehensive copy of your source data.
- SON's flexibility enables seamless integration with APIs, facilitating scalability and interoperability with various systems.
- SON's structure supports hierarchical and relational data, preserving the integrity and organization of your help desk information.
- JSON is particularly well-suited for managing large and intricate databases, ensuring efficient backup and retrieval processes.
Why do companies decide to back up help desk data?
These days companies handle vast amounts of information, from personal data to FAQs and support tickets. The potential loss of such data poses a significant risk to customer support operations, underscoring the importance of robust data security and backup strategies.
Data security is paramount for maintaining business continuity, and one critical aspect of this is backing up help desk data. Companies undertake this practice to mitigate various risks, including data corruption, software glitches, hardware failures, human errors, and other unforeseen events. By implementing data backups, they ensure the availability of a comprehensive copy of their current help desk data, ready for restoration in the event of data loss.
Backing up help desk data is particularly crucial when preparing for migration processes or system updates. It serves as a vital initial step, allowing companies to capture and synchronize a point-in-time snapshot, providing them with the ability to revert data to its previous state when necessary.
What are the benefits of source data backup?
Source data backup offers several compelling advantages:
- By regularly backing up your source data, you instill confidence in your company's ability to safeguard critical information, reassuring both customers and stakeholders.
- With a comprehensive backup system in place, you can access customer data at any time, facilitating seamless operations and responsive customer support.
- Source data backup helps ensure that your business remains compliant with relevant regulations and standards, mitigating the risk of non-compliance penalties.
- Backup solutions act as a safety net, guarding against inadvertent errors or data mishandling by your team members, thus preserving data integrity.
- In the event of data loss or corruption, a robust backup strategy enables swift restoration to its original state, minimizing downtime and operational disruptions.
- Proactive data backup practices can give your company a competitive edge by demonstrating reliability and preparedness, fostering trust among customers and outperforming competitors.
- Prior to migrating from a source platform, backing up data allows for the creation of comprehensive archives, ensuring continuity of information and minimizing transition risks.
- By retaining historical customer data through backups, businesses gain valuable insights into customer preferences, behaviors, and concerns, facilitating informed decision-making and targeted marketing strategies.
Being proactive in preparing for data migration is crucial for ensuring business continuity and customer satisfaction. Stay informed about new backup options and updates by following our product news, as we continuously strive to provide cutting-edge solutions for your data management needs.
Partnering with Help Desk Migration Service
If you're a help desk vendor, we invite you to collaborate with us as an authorized data migration service provider, benefiting from exclusive migration conditions for your potential customers.
For implementation specialists, partnering with us presents a fantastic opportunity to broaden your service offerings and effectively cater to a diverse range of clients through Help Desk Migration.
To explore partnership opportunities or discuss collaboration further, please fill out the form. Alternatively, feel free to reach out to us directly via email at contact@help-desk-migration.com.
We look forward to the possibility of working together and delivering exceptional migration solutions to our mutual clients.
Limitations of Zendesk to Freshdesk Migration
Here’s a summary of what Help Desk Migration is not capable of importing to Freshdesk:
- if the size of the attachment per note/reply or a solution article is greater than 15MB, then none of the attachments will be migrated;
- spam tickets on Zendesk;
- channel configurations, Macros, Triggers, Email notifications, Canned responses and Integration configurations;
- tags in contacts or tickets that are longer than 32 characters will be trimmed;
- deleted contacts on Zendesk and the tickets associated with them;
- article Comments on Zendesk;
- unsupported languages (if multilingual support is enabled in Zendesk);
- if multilingual support is enabled in Zendesk, all article translations can be migrated to Freshdesk using the Migrate Content Translations option;
- we do not support reporting metrics for tickets exported from Zendesk. We recommend documenting your Zendesk reporting numbers to avoid any issues with the old data and use Freshdesk reporting for all your new tickets.