Teamwork Desk Data Migration Checklist
Data migration can indeed pose challenges and consume valuable time. To enhance your planning, we've compiled a Teamwork Desk migration checklist.
Acknowledgment: The Migration Wizard, in its default workflow, does not import the following records to Teamwork Desk:
- Organizations
- Groups
- Inline Images
- ‘Created at’ Dates for Tickets
- Comments’ Authors
- CC in Tickets
- The knowledge base tags and attachments
However, it's worth noting that these data types can be imported through a Custom Migration. Please don't hesitate to contact our support team to discuss the specifics of your tailored migration.
BEFORE YOU SET UP THE MIGRATION
Tickets and related records migrate in a similar manner during both the Demo Migration and Full Data Migration phases. It's important to note that if certain customer records weren't transferred during the Free Demo, they will not be exported during the Full Data Migration.
To ensure a successful migration, we recommend the following steps:
- After the Demo Migration, be sure to download all reports for migrated, skipped, and failed records.
- Thoroughly review these reports by comparing them to your source and target data.
These steps will help you identify any discrepancies and ensure a smooth and accurate data migration process. If you have any further questions or need additional assistance, please don't hesitate to reach out.
1. CHOOSE A DATE FOR MIGRATION
Choose a date for your Teamwork Desk import that allows ample time for preparation and takes into account the specifications of both the source and target platforms. Many companies opt for a day with a lighter workload or initiate the migration towards the end of a workday.
2. KEEP TO YOUR TEAM UPDATED
Ensure your team is well-informed throughout the migration process. Notify your agents about the upcoming data import to Teamwork Desk, allowing them sufficient time to familiarize themselves with the new help desk system. Additionally, consider delegating responsibilities, such as inspecting the migration results following the Full Data Migration. You can also set a reminder for the day before the migration.
3. PREPARE TEAMWORK DESK FOR THE IMPORT
1. Create agents.
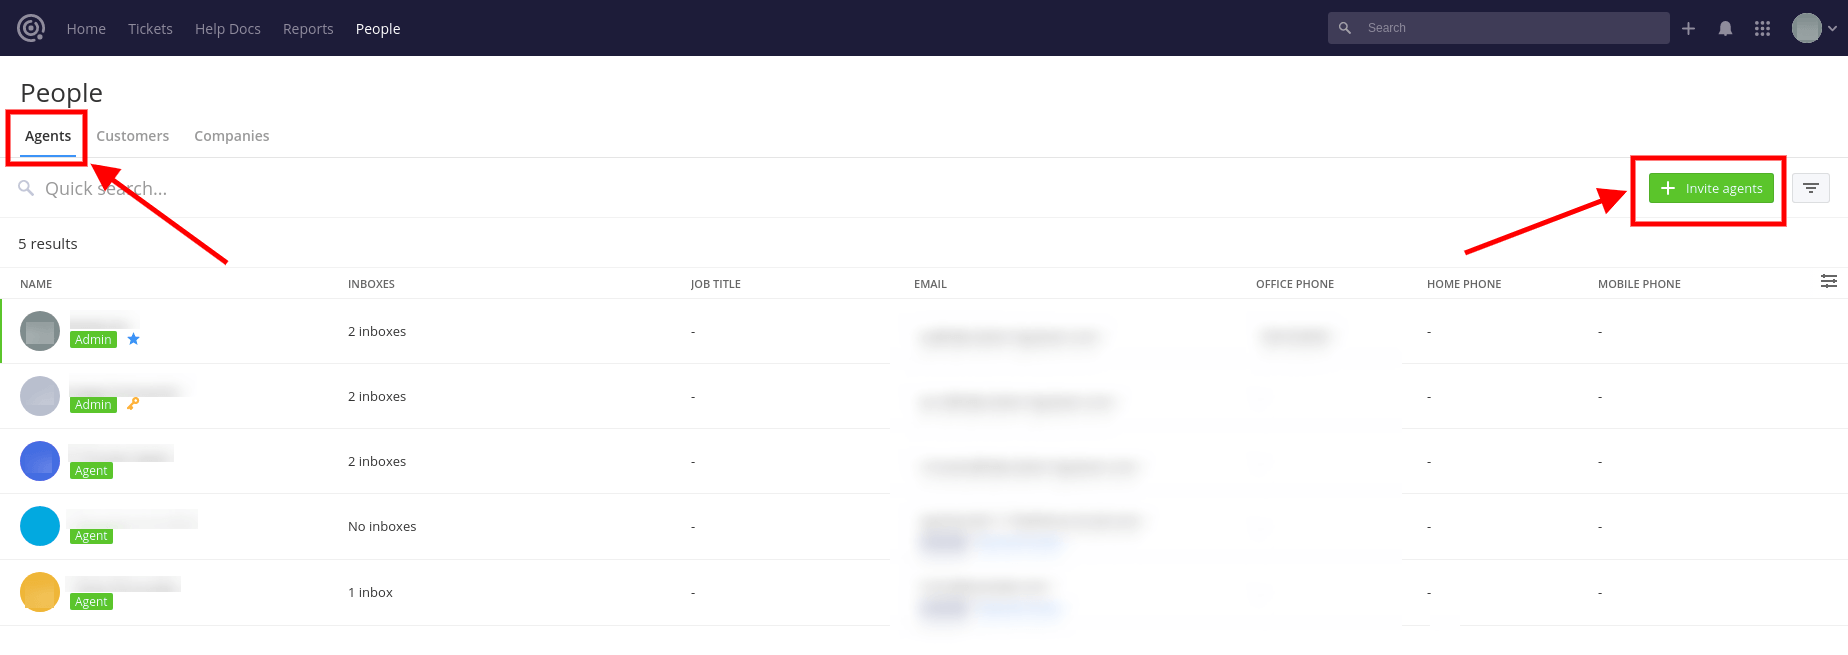
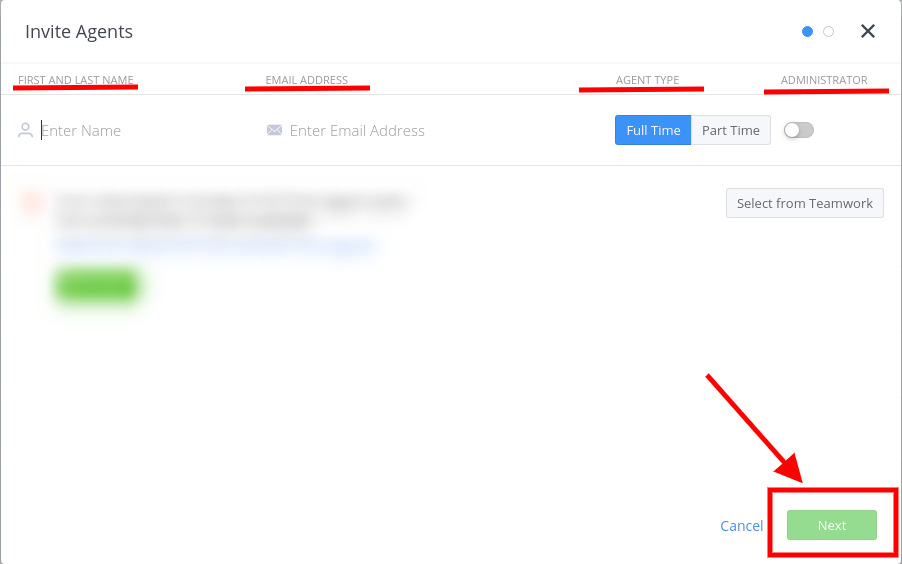
To create agents in Teamwork Desk: Log in > People > Agents > Invite Agents > fill in the first and last name, email address, and agent type > Next > select the Inboxes > click Send.

- do not deactivate users before the migration process, as our tool won't transfer their tickets
- your agents should accept an invitation from you to become active
- the agent email on a target platform should correspond to the ones on a source platform
- you can also turn agents into administrations
These notes provide key considerations for a seamless migration process. If you have any further questions or need additional information, please feel free to ask.
2. Create custom fields.
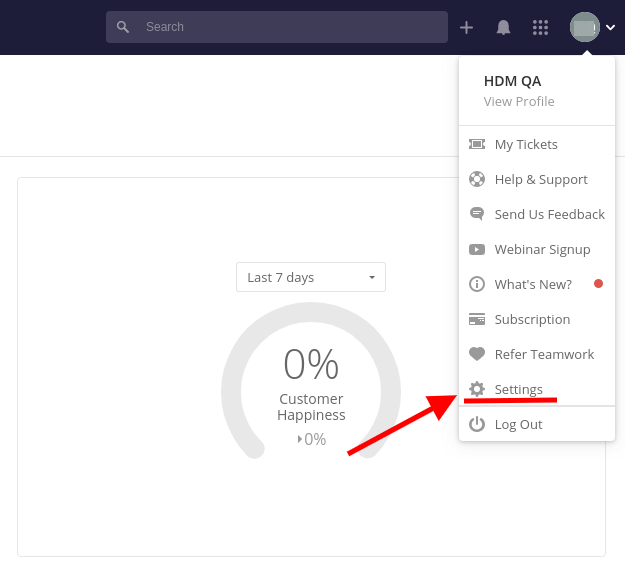
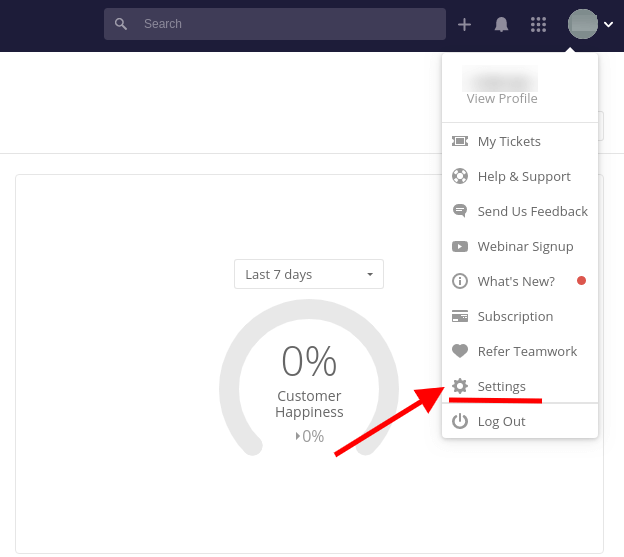
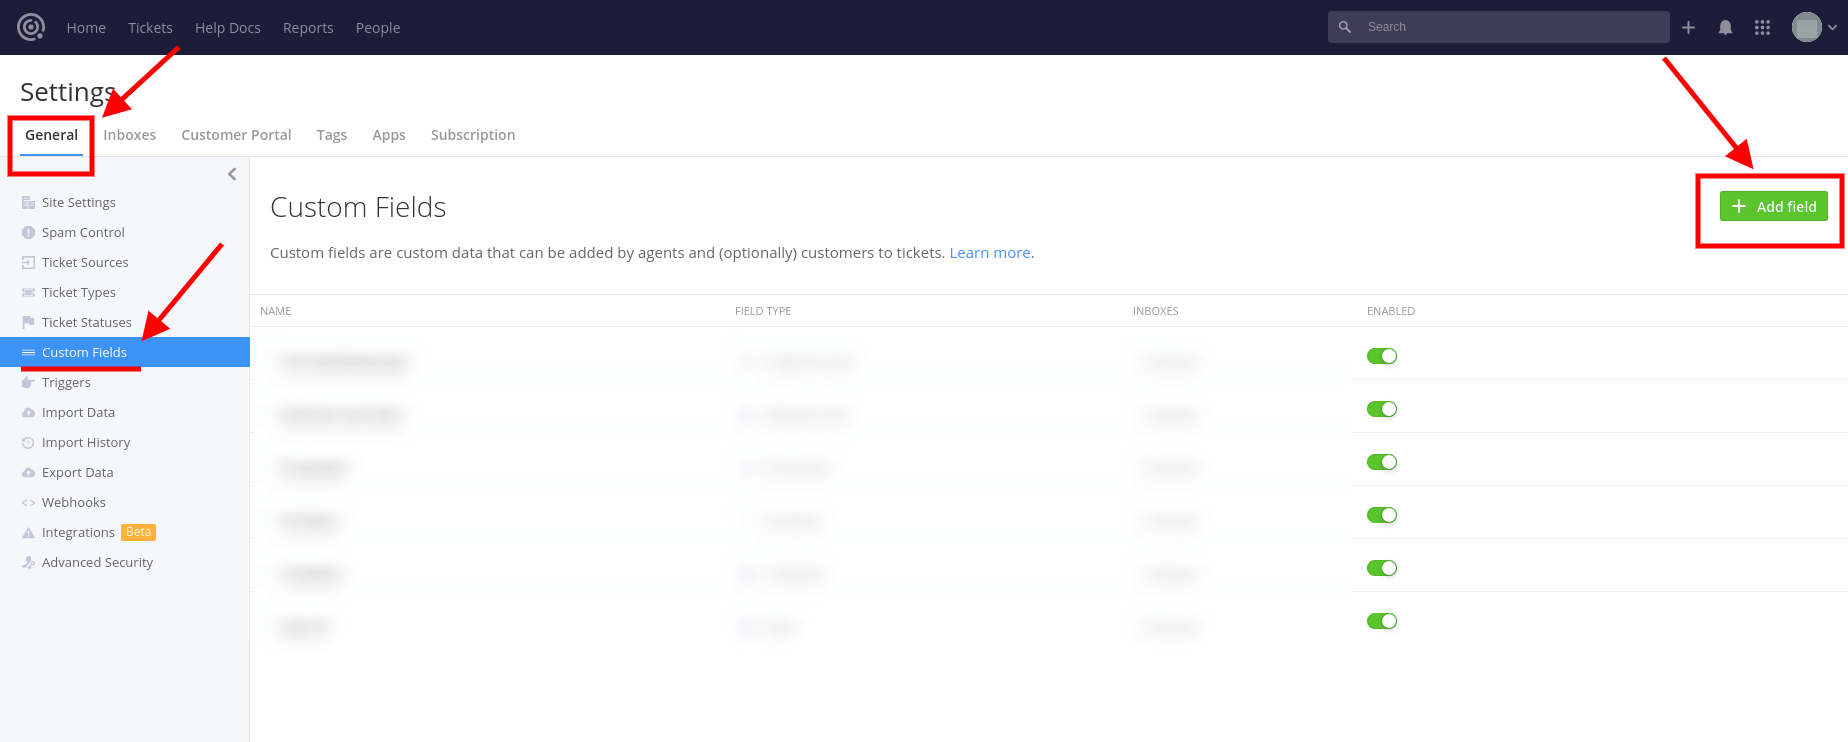
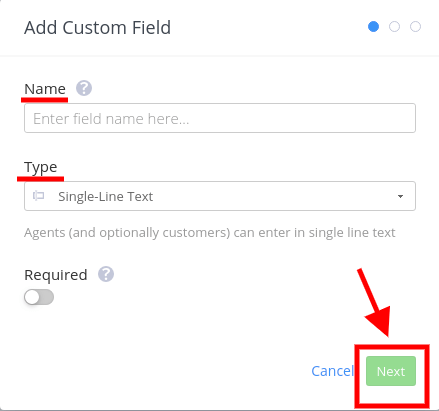
To create custom fields in Teamwork Desk: click on your profile’s icon > Settings > General > Custom Fields > + Add Field > type in the custom field’s name and field type > Next > pick the inbox instances > Save.
Note: you can apply the created custom field to all future inbox instances.
3. Single inbox migration.
By default, all records are transferred into a single inbox. If you require the source data to be distributed across different inboxes, it is necessary to set up separate migrations for each respective inbox. This ensures that your data is organized according to your specific requirements.
4. CONSIDER CUSTOMIZATION OPTIONS
Feel free to get in touch with us if you have any specific requirements for your Teamwork Desk migration. We're here to accommodate your needs, and you can request customizations such as:
- Data filtering based on various criteria (creation date, tags, custom fields, organizations, assignees).
- Modifications to the default migration process (including the migration of change and problem objects as tickets, ticket events as private notes, and inline images as attachments, among other adjustments).
- Enhancements to the migrated data, such as adding extra tags to tickets or incorporating 'created at' dates and 'comments' authors' information within comment bodies.
Note: The availability of automated options may vary depending on your source platform. Your unique migration requirements are important to us, and we're here to help you tailor the process to your specific needs. Don't hesitate to reach out to discuss your migration goals further.
YOU’RE ALMOST READY
1. TURN OFF NOTIFICATIONS
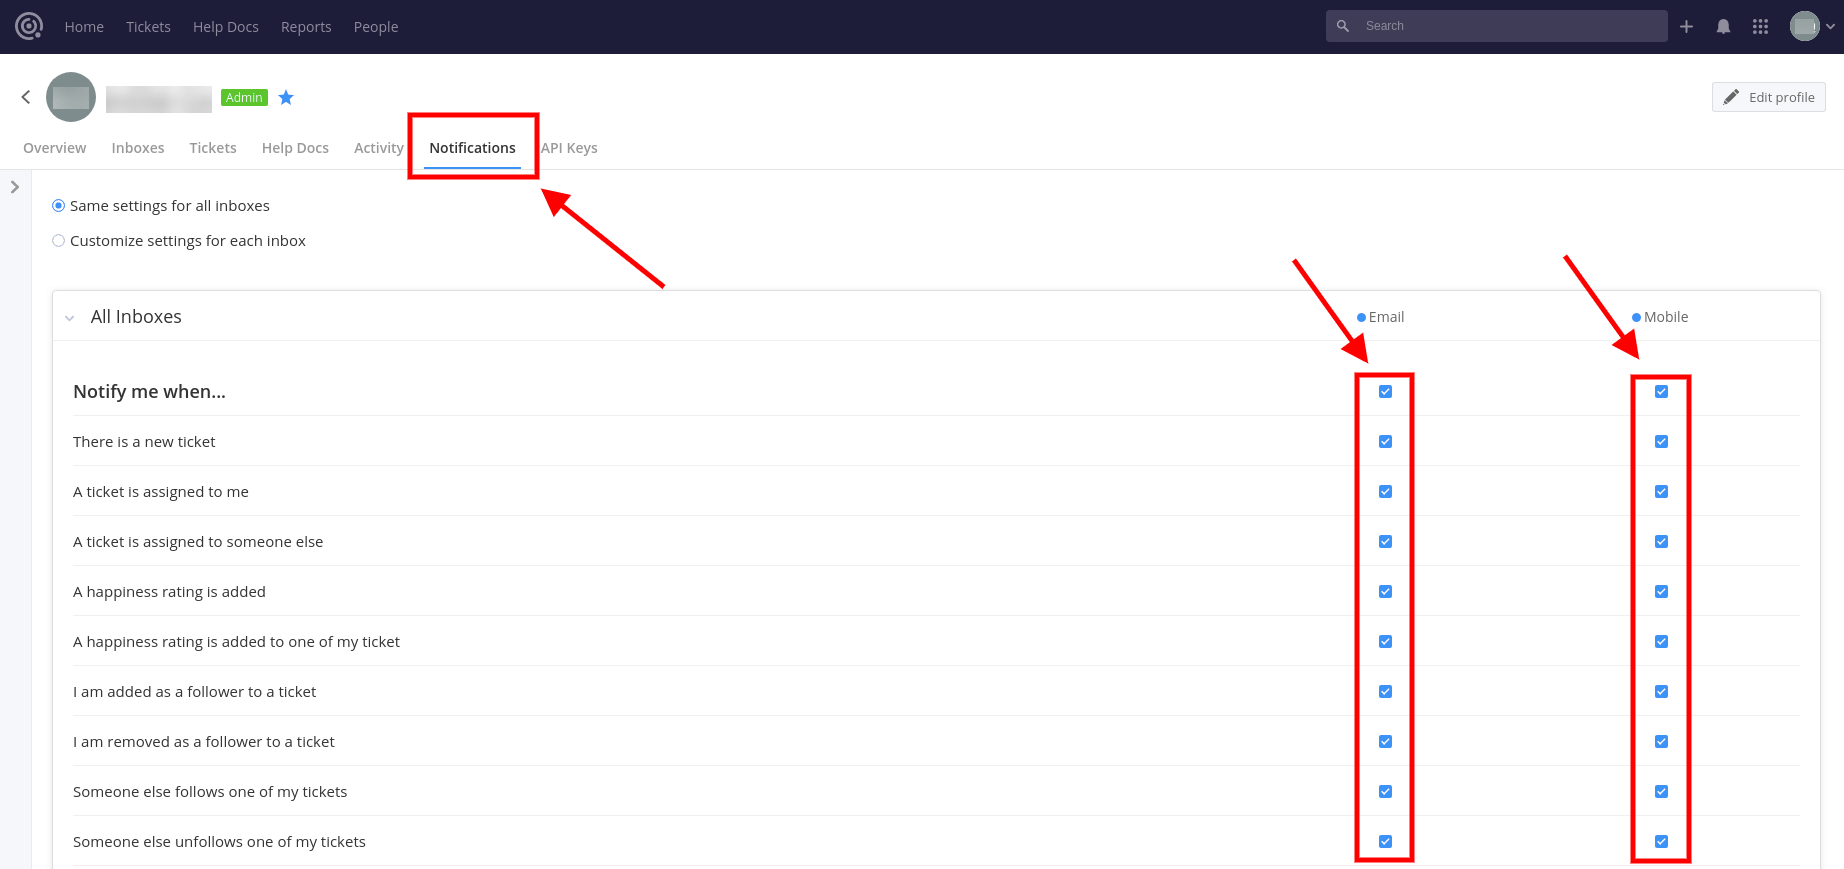
To prevent your end-users and admins from receiving unnecessary emails, you can disable notifications in Teamwork Desk:
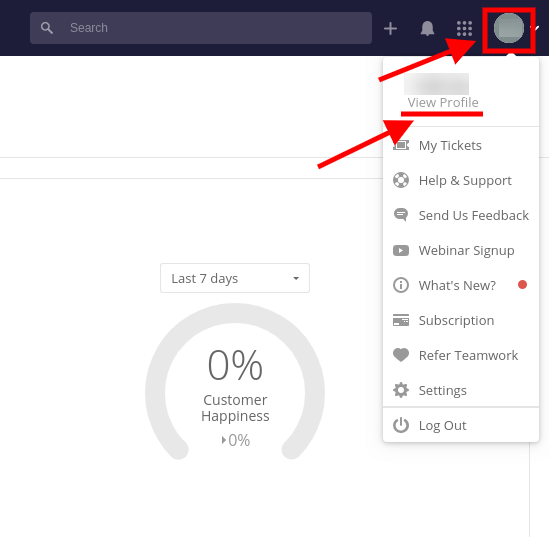
Click on your profile icon > View Profile > Notifications > disable all active notifications > Save.
2. DISABLE TRIGGERS
To disable automatic triggers in Teamwork Desk:
Log in > click your profile icon > Settings > Inboxes section > pick the required inbox > Triggers > turn off all triggers.
Note:
- Make sure you're logged in with an Admin account.
- Disabling triggers can only be done within your Teamwork Desk account, not through a Dashboard.
- Remember to turn off triggers in all relevant inboxes where you want to disable them.
3. FIND ACCESS CREDENTIALS
When configuring your Demo Migration, you will require admin access credentials for both the source platform and Teamwork Desk. To establish a connection between Teamwork Desk and the Migration Wizard, follow these steps:
- URL: Provide the URL of your company's Teamwork Desk account.
- OAuth authentication: Log in using your Teamwork Desk account credentials to authenticate the connection.
4. RUN DEMO MIGRATION
Make the most of the Free Demo Migration to transfer a sample of your data and evaluate how it appears on Teamwork Desk. This allows you to determine whether you need to tailor the default migration process to align with your business requirements. Here's a step-by-step guide:
- Sign In: Log in to your Migration Wizard account.
- Connect Source and Target: Establish connections between your source and target solutions. Provide the necessary credentials and configurations for both platforms.
- Select Data: Choose the specific data you want to import during the demo migration.
- Match Agents: Ensure that agents from your source platform are correctly matched with their counterparts in Teamwork Desk.
- Map Fields: Map fields for tickets and articles to ensure data consistency and accuracy during migration.
- Automated Options: Select any available automated options that suit your migration needs.
- Demo Migration: Initiate your Free Demo Migration to transfer the selected sample data to Teamwork Desk.
This comprehensive process allows you to preview how your records will appear in Teamwork Desk and assess whether any adjustments to the migration process are necessary to meet your business requirements. If you encounter any challenges or require further guidance, feel free to reach out for assistance.
AFTER THE DEMO MIGRATION
1. CHECK THE RESULTS IN TEAMWORK DESK
After completing your Free Demo Migration, it's crucial to review the results and obtain reports on migrated, failed, and skipped records. During this inspection, pay close attention to the following aspects:
- Comments: Ensure that all comments associated with your records have been successfully migrated.
- Ticket Assignments: Verify that tickets have been assigned to the correct agents according to your source platform.
- Customers, Companies, and Custom Fields: Confirm that customer and company information, as well as any custom fields, have migrated accurately.
- Attachments: Check the integrity of migrated attachments. To do this, download them from your destination platform to verify that they were transferred correctly.
It's essential to perform this meticulous review to guarantee the accuracy and completeness of your data migration. For more detailed guidance on conducting a thorough review of your Free Demo Migration results, consult our comprehensive guide. If you encounter any issues or require further assistance, please don't hesitate to reach out for support.
2. REQUEST A CUSTOM DEMO
If the self-made custom demo with ticket import by ID didn't provide sufficient testing for your needs, consider requesting a Custom Demo. Please don't hesitate to reach out to our team to discuss all your specific requirements and explore how we can tailor the demo to better suit your testing needs. We're here to assist you in every way possible.
BEFORE THE FULL DATA MIGRATION
1. CHOOSE THE MIGRATION WAY
During the Full Data Migration process, you have the flexibility to continue working with your source and target help desk systems. However, it's important to note that any records created or updated during this migration process won't be automatically migrated.
To address this, you can perform a Delta Migration after the main data import is completed. This allows you to import any records created or updated during the Full Data Migration, ensuring that your data remains up-to-date.
While the Full Data Migration is in progress, you can monitor its progress in the Migration Wizard at any time. Alternatively, you can await contact from our team for updates and assistance.
Please be aware that the Delta Migration feature is available in the Signature support plan, so you may need to consider your plan's coverage when planning your migration process. If you have any questions or need further information, feel free to reach out for clarification or support.
2. LAUNCH THE FULL DATA MIGRATION
During the Full Data Migration, the Migration Wizard imports records individually. The duration of the data migration process can vary significantly depending on the volume of your records. It could range from approximately 20 minutes for smaller datasets to several days for larger ones.
It's important to note that the Full Data Migration commences once your payment is confirmed. Given that this process may take some time, we recommend making the transaction in advance or scheduling the data migration accordingly. Additionally, ensure that you have thoroughly completed all the steps outlined in the pre-migration checklist and checked off each item.
Taking these precautions will help facilitate a smooth and efficient data migration process. If you have any further questions or require assistance, please don't hesitate to reach out.
AFTER THE IMPORT IS DONE
1. EXAMINE EVERYTHING
Once the Full Data Migration is completed, it's important to promptly review the results within your Teamwork Desk account. You have a five-day window to inspect the results before the Migration Wizard archives your migration.
During this review period, please ensure that you have search filters set to include all tickets and cover all time periods. If you encounter any issues or can't find specific data, don't hesitate to reach out to our migration experts for assistance.
Your prompt review and communication are essential to addressing any potential concerns and ensuring the success of your migration. We're here to help, so feel free to get in touch with any questions or issues you may encounter.
2. SET UP A NEW PLATFORM
To ensure a successful transition to Teamwork Desk, follow these essential steps:
Enable disabled notifications and triggers
- Review your notification and trigger settings in Teamwork Desk.
- Ensure that any previously disabled notifications and triggers are re-enabled as needed to keep your workflow intact.
Update the Knowledge Base links
- Review your Knowledge Base content and update any outdated or broken links.
- Verify that all links within your Knowledge Base articles point to the correct resources or pages.
Set the necessary settings
- Review and configure all the settings within your Teamwork Desk account to align with your specific requirements.
- Adjust ticket routing, categorization, and other settings to optimize your support workflow.
Configure email forwarding
- Set up email forwarding to Teamwork Desk by accessing your profile icon, navigating to Settings, selecting the desired inbox, and configuring the forwarding email address.
- Ensure that emails sent to this address are properly routed to your Teamwork Desk account.
To configure email forwarding to Teamwork Desk, please follow these steps:
Go to your profile icon > Settings > Inboxes > choose a needed Inbox > Email Settings > set up the necessary modifications with the forwarding email address.
