Salesforce Data Migration Checklist
Let’s face it: Salesforce data migration is a complex process. However, it doesn't mean your Salesforce Service Cloud migration can't be seamless.
To help you out with data migration, we've prepared a detailed Salesforce migration guide exclusive to Service Cloud.
Important: Migration Wizard can't import the following records to Salesforce Service Cloud
- CC users
- Groups (there are no groups at all in Salesforce Service Cloud)
- Ticket tags
If you still want to migrate the entities above, request a Custom data migration, and our team will come up with a solution.
BEFORE YOU SET UP THE MIGRATION
Note: Tickets and related records move the same way during the Demo Migration and Full Migration. If some data didn’t transfer during the Free Demo, it won’t migrate during Full Migration.
Once Demo Migration is complete, download reports for migrated/skipped/failed records and check if everything migrated properly. In case of any issues, reach out to our support team.
1. CHOOSE THE PERFECT TIME
Pick up the day with the smallest amount of help-desk-related work.
Given that you are using the Help Desk Migration service, which allows for continuous operation of both your current and new help desk platforms without downtime, the timing of the data migration can be planned with a focus on minimizing disruptions and ensuring a smooth transition for your team and customers. Here are refined strategies for choosing the perfect timing in this scenario:
Scenario 1: Using the Current Help Desk During Migration
-
Non-Peak Hours for Initial Migration Kick-off:
Timing: Start the migration process during non-peak hours, such as late at night or early in the morning, when support requests are typically lower.
Reason: This ensures that any initial setup or minor hiccups have minimal impact on ongoing support activities.
-
Minimal Change Window:
Timing: Schedule a “minimal change window” where significant updates or changes to tickets are discouraged.
Reason: This reduces the risk of data inconsistencies between the old and new systems, ensuring a cleaner migration process.
-
Monitor and Adjust:
Timing: Continuously monitor the migration progress and be prepared to make adjustments outside of peak support hours.
Reason: This proactive approach allows for quick resolution of any issues that may arise, maintaining smooth operations.
Scenario 2: Using the New Help Desk During Migration
-
Gradual Team Transition:
Timing: Gradually transition support team members to start using the new help desk during their shifts over a few days or a week.
Reason: This allows the team to adapt to the new system while still having access to the old one, ensuring continuity of service.
-
Final Data Synchronization During Low Activity:
Timing: Schedule the final synchronization of data during a period of low activity to ensure the latest updates are captured without affecting active support.
Reason: This ensures that the new system is fully up-to-date and ready for full use with minimal impact on service levels.
-
Post-Migration Follow-Up:
Timing: Plan for a follow-up period immediately after the migration during which extra support is available to handle any issues.
Reason: This ensures any post-migration issues are quickly addressed, maintaining service quality.
Additional Timing Considerations for Both Scenarios
-
Demo Testing and Dry Run:
Timing: Conduct a test Demo and dry run of the migration process during a controlled, low-activity period.
Reason: This helps identify any potential issues and allows for refinement of the migration plan without impacting live operations.
-
Communicate a Detailed Timeline:
Timing: Provide a detailed migration timeline to your support team well in advance.
Reason: Clear communication ensures that everyone knows what to expect and when, facilitating better coordination and preparedness.
-
Customer Notifications:
Timing: Inform customers about the migration schedule and any potential impacts (if any) during the low activity period prior to the actual migration.
Reason: Transparency with customers helps manage their expectations and maintains trust in your support services.
2. INFORM YOUR TEAM
Notify your agents about Salesforce data import. This way, they have enough time a) to learn how to work with a new help desk and b) to start closing tickets. Also, delegate certain responsibilities if needed. And set a reminder a day before Salesforce importing.
3. PREPARE SALESFORCE SERVICE CLOUD FOR THE MIGRATION
1. Create corresponding custom fields
Set up custom fields in Salesforce Service Cloud. This way, you can locate all data effortlessly after migration.
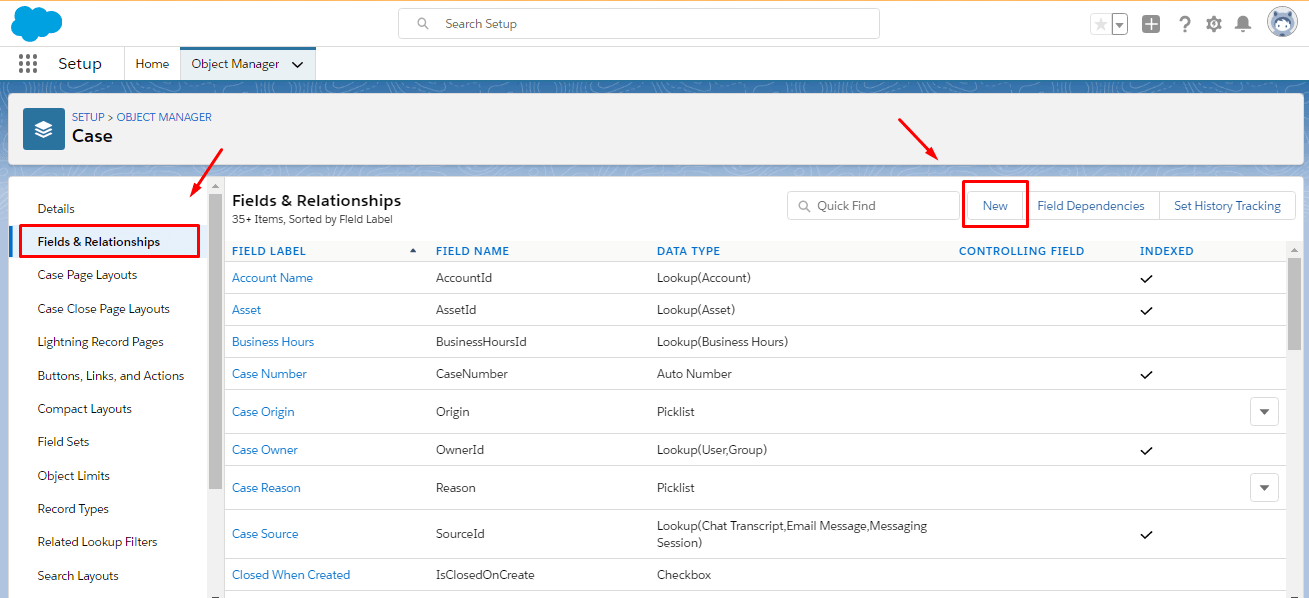
To create custom fields for cases, do the following:
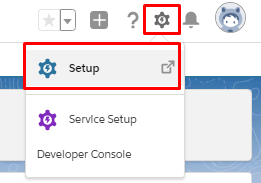
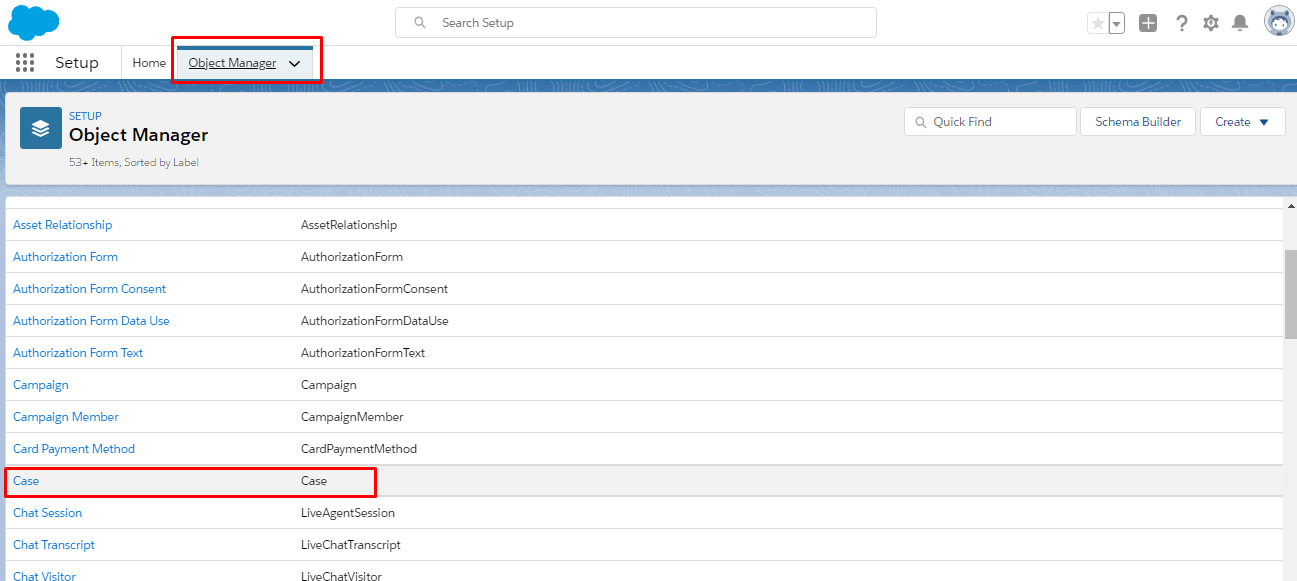
Click on Setup > Object Manager > find Case in the list > Fields > Relationships > New.
2. Add agents.
Сreate all the necessary users in Service before data migrating. All agents must have:
- permission to modify all data
- the same email as in your current platform
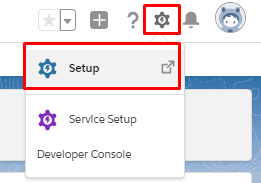
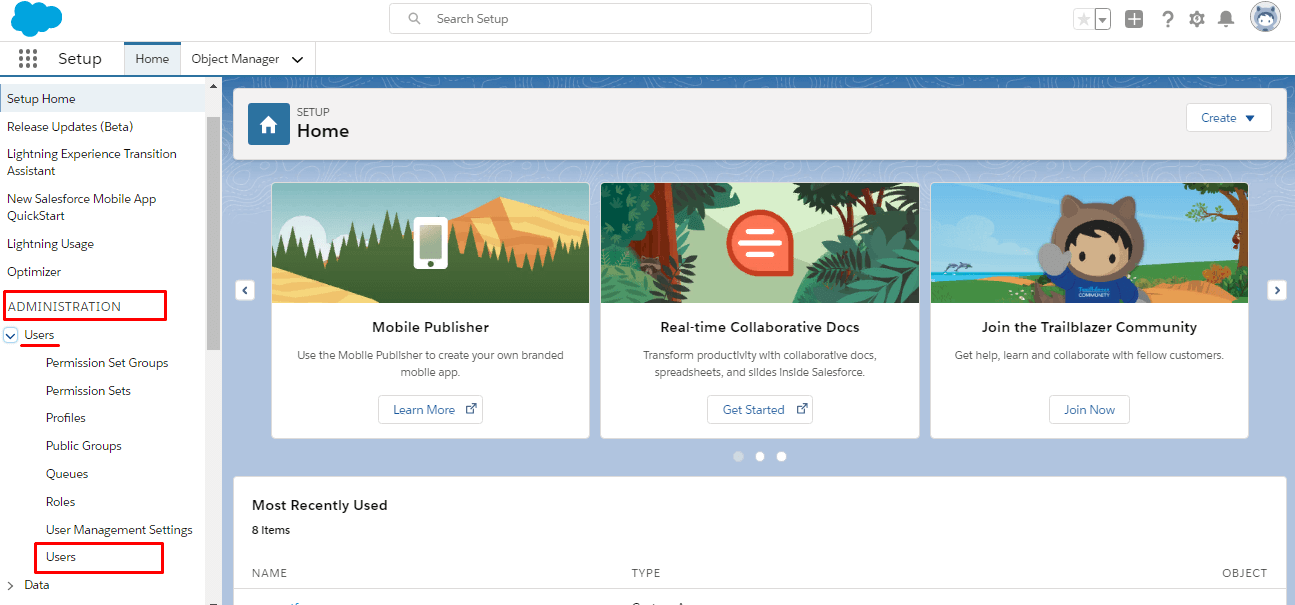
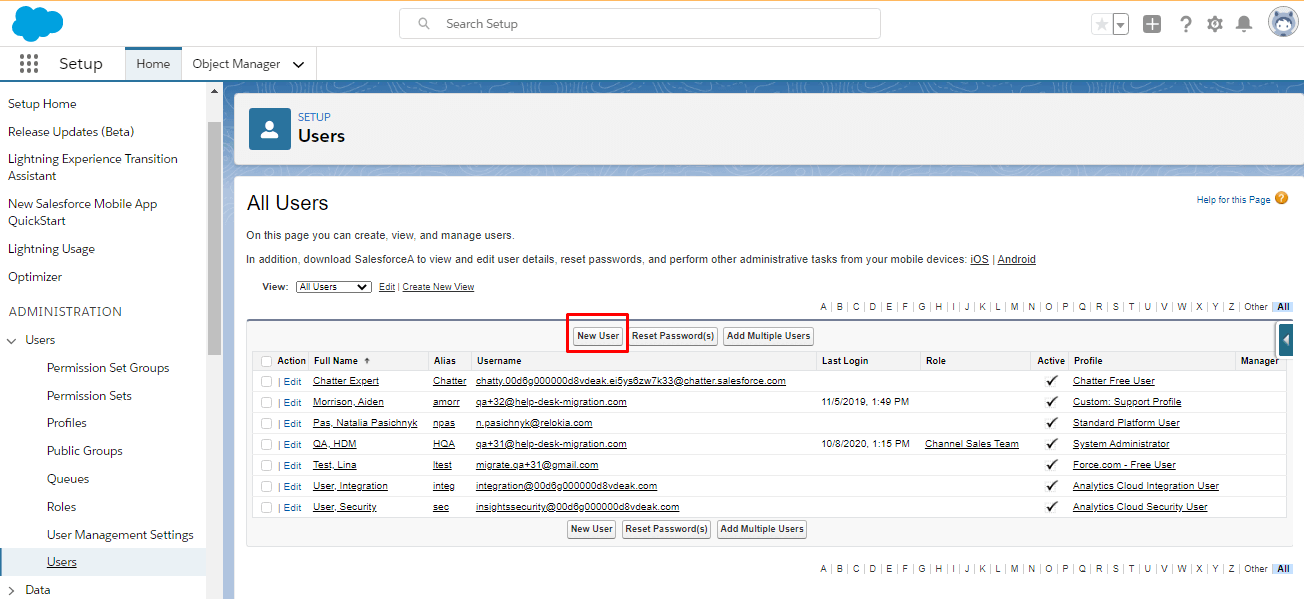
To add users, go to Setup > Administration > Users > Users > New User.
3. Create the corresponding categories and sections on the knowledge base.
If you decide to move your source knowledge base to Salesforce Service Cloud, you need to:
- switch on the knowledge base for the user with the System Administrator rights
- enable the knowledge base in Salesforce
- create Category Groups prior to the migration
To do so, read a detailed guide.
Ensure you have admin rights to both your accounts in the source platform and Salesforce Service Cloud before running the data migration. If you want to speed up the Full Data Migration, send a request to the Salesforce team so they temporarily increase your API limits before Salesforce data migration.
4. CONSIDER SALESFORCE SERVICE CLOUD MIGRATION FLOW PECULARITIES
Before the Full Data Migration to Salesforce Service Cloud, consider that:
- Migration Wizard can migrate the creation date of chatters.
- Salesforce Service Cloud has a limitation for the number of attachments stored for free. If you exceed your limit in Salesforce, you will need to pay extra to keep more attachments. Or use the pre-built for Salesforce custom option to Skip all attachments.
- To migrate 'Created at', 'Last Modified at', 'Closed at', and Creator ID, enable User Interface settings.
- Do not deactivate end-users because Migration Wizard won't migrate their cases.
5. ADJUST YOUR MIGRATION WORKFLOW WITH POPULAR CUSTOMIZATIONS
Check out the list of popular customizations for the Salesforce migration.
- Data filtering by different criteria (creation date, tags, custom fields, groups, organizations, assignees)
- Change of the default migration process (migration of change and problem objects as tickets, migration of ticket events as private notes, migration of the information related to inactive users, name of Group into the custom ticket text field)
- Add information to the migrated data (marking tickets with extra tags, adding legacy ticket ID to the ticket subject)
- Import inline images as ticket attachments
- Transfer CC users into the multiline custom ticket text field
- Import account and contact custom fields
- Migrate descriptions as descriptions
- Move CC as collaborators
Drop a line to our team if you have any specific requirements for Salesforce data migration.
YOU’RE ALMOST READY
1. DISABLE NOTIFICATIONS
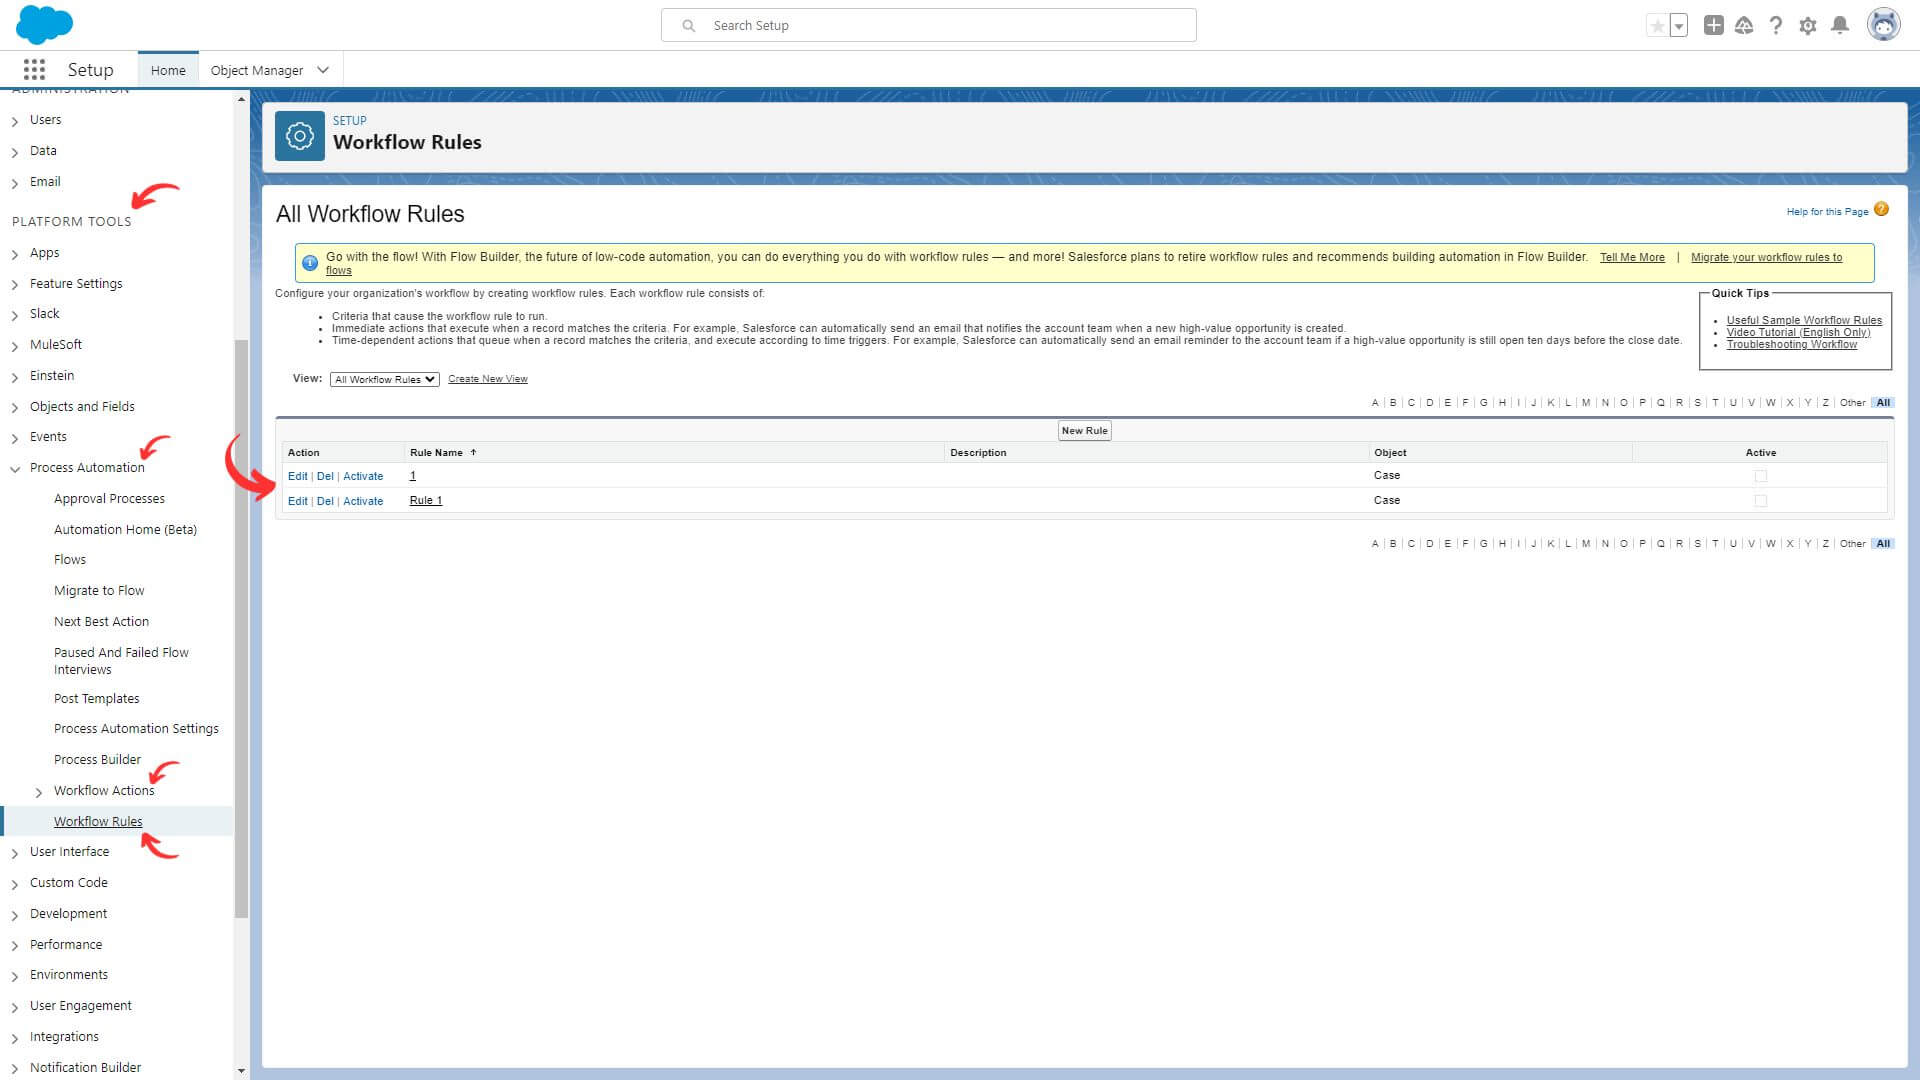
Turn off Notifications, Triggers, Validation Rules, and Workflow before starting the Salesforce migration to omit unwanted notifications.
Go to Setup > PLATFORM TOOLS > Process Automation > Workflow Actions > Workflow rules > disable all rules.
2. TURN OFF PHONE DUPLICATION
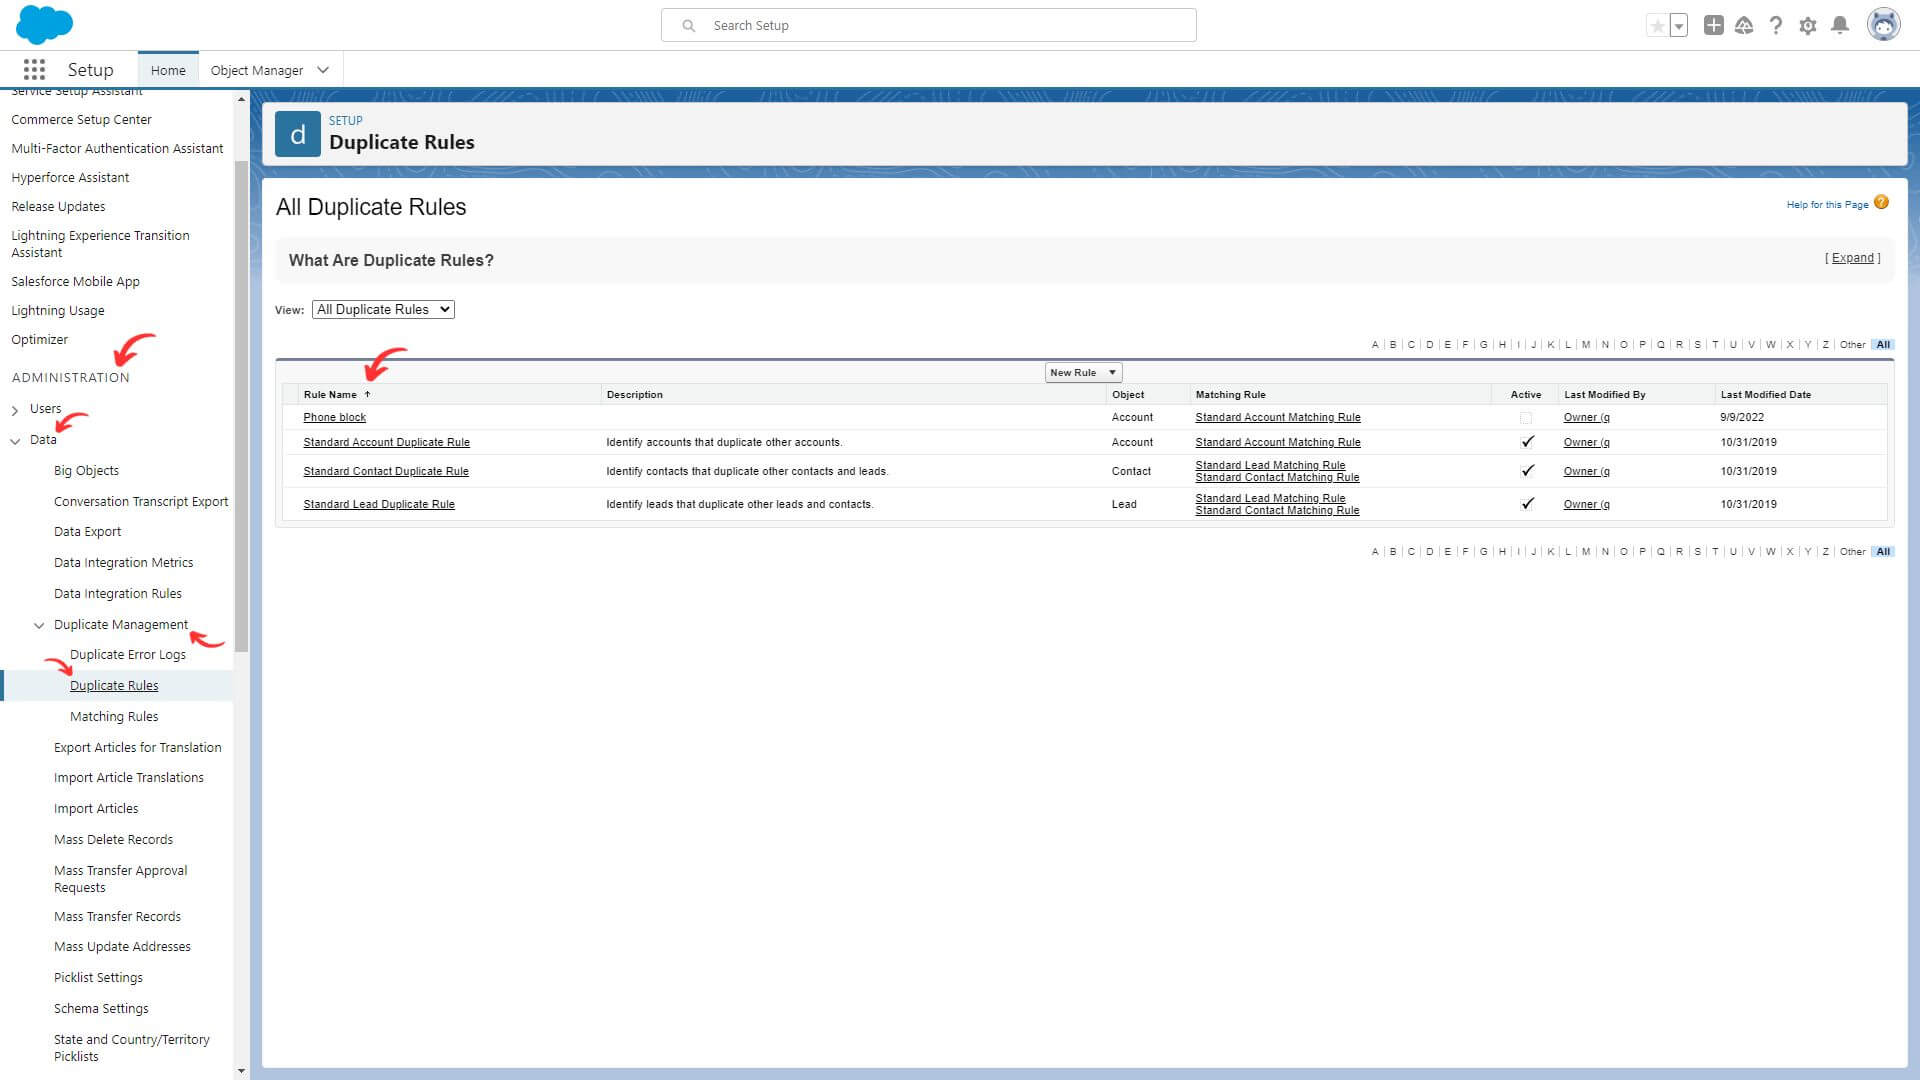
Disable the phone duplication rule to avoid data migration failure.
To turn it off, go to Setup > Administration > Data > Duplicate management > Duplicate rules > open the Phone Duplication rule > Deactivate.
3. RUN THE DEMO MIGRATION
Set up the first so you can check the default data transfer flow and see a portion of data on your desired help desk. In Demo, Migration Wizard transfers 20 random tickets from your current help desk to Salesforce. Also, you can edit settings and restart your Demo.
Note that if you run several Demos with the same parameters, the results would be the same in each case.
- Sign up or sign in to Migration Wizard.
- Connect your source and target platforms.
- Choose the data you want to import.
- Data mapping.
- Data mapping for tickets and knowledge base articles.
- Pick up automated options.
- Set your Free Demo Migration.
Note: Check if you’re migrating into production, not a sandbox.
AFTER THE DEMO MIGRATION
CHECK THE RESULTS IN SALESFORCE SERVICE CLOUD
Check a table with four columns:
- all available records
- migrated records
- failed records
- skipped records
And download reports on migrated, failed, and skipped records. Pay attention to the following:
- if all comments got migrated, and if the authors of the comments are the same
- if the tickets are assigned to the correct agents
- if all the custom fields got migrated along with the necessary attachments
- if the customers and companies are migrated correctly
For more information, read the detailed guide on checking the results of Demo Migration in Salesforce Service Cloud.
BEFORE THE MIGRATION PROCESS
1. CHOOSE YOUR MIGRATION WORKFLOW
If you need to work with one of your help desks during the Full Data Migration, you can run your support service on the source or target platform.
If you choose to continue working with a source help desk system, pay attention that records created or updated during the process won't get migrated. In this case, opt for the Delta Migration to import them later.
While the Full Data Migration is running, you can check out the progress in our tool anytime you want. Or wait for our team to contact you.
Note: The option of Delta Migration is offered only in the Signature support offering.
2. START FULL DATA MIGRATION
The Migration Wizard transfers each record one by one. Depending on the number of entities on your source platform, the process might take 20 minutes to several days.
Salesforce data migration begins when your payment is confirmed. It may take some time; that's why make a transaction in advance or schedule data migration.
And you've done and agreed to the checklist. Click on the corresponding checklist with a mini-guide. Run through all the steps and put a tick in a checkbox.
3. DON’T CHANGE ANYTHING
Any alteration can make your migration fail, or your data transfer will take more time. If you noticed broken or unnecessary data on the source help desk, let it go through. Better audit migrated records on Salesforce Service Cloud after the data migration.
AFTER THE IMPORT IS DONE
1. EXAMINE EVERYTHING
As soon as the Full Data Migration is complete, study if your data migrated correctly. You have five days to check the results until Migration Wizard archives your data migration.
If you can’t find something, check if your search filters are set for all tickets at any time. If the issue remains, drop a line to our migration experts.
2. SET UP A NEW PLATFORM
- Enable Salesforce notifications you previously turned off and other necessary settings.
- Connect support links and update internal ones in Knowledge Base articles.
- Re-forward your emails to Salesforce Service Cloud.

