Freshservice Migration Guides
How to disable email notifications in Freshservice?
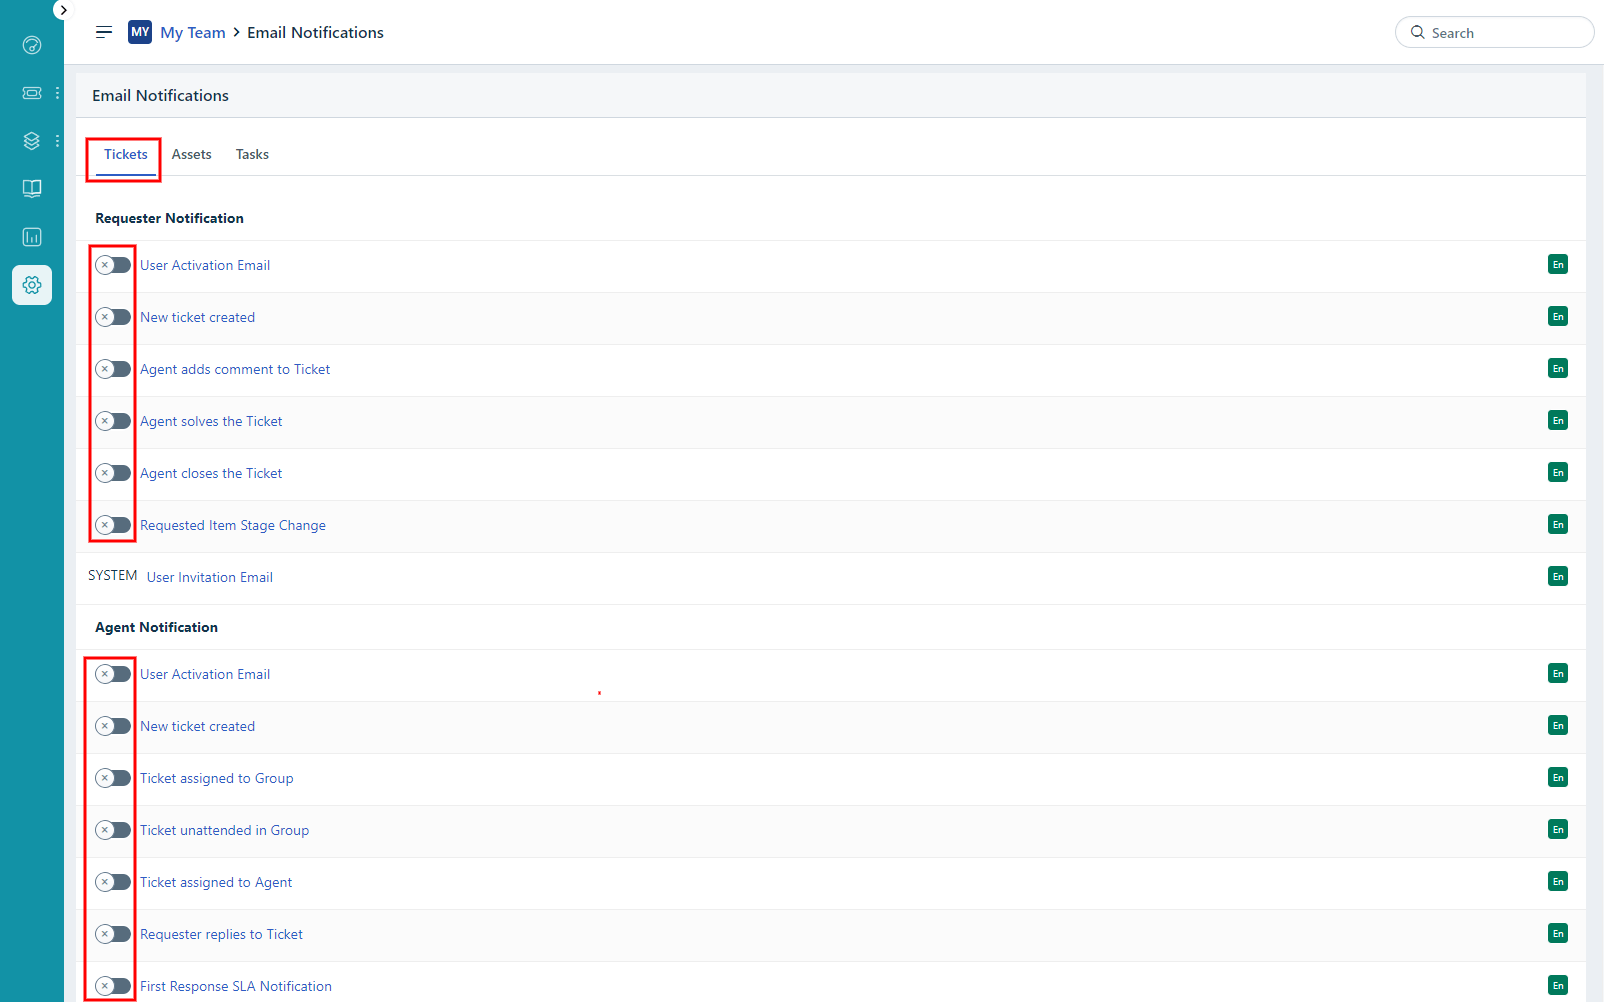
When configuring your email workflow in Freshservice, you can enable automatic notifications so that your customers are notified that their ticket was created, agents are notified about new comments, etc. When migrating to Freshservice, you should disable all email notifications so neither your customers nor agents get emails while the tickets are being imported to Freshservice.
Here's how you do it:
1. Log into your Freshservice.
2. Then go to the Admin panel in the left sidebar.
3. Choose Email Notifications under Account Settings.

4. Turn off all email notifications for tickets.
How to create custom filtering reports in Freshservice?
To export Freshservice tickets with specific filters, you’ll create a custom report. This is essential if you want to transfer tickets based on criteria like status or date. Our team can't use advanced custom filters due to API limitations in Freshservice.
Follow these steps to create a custom report:
1. Go to your Freshservice account.
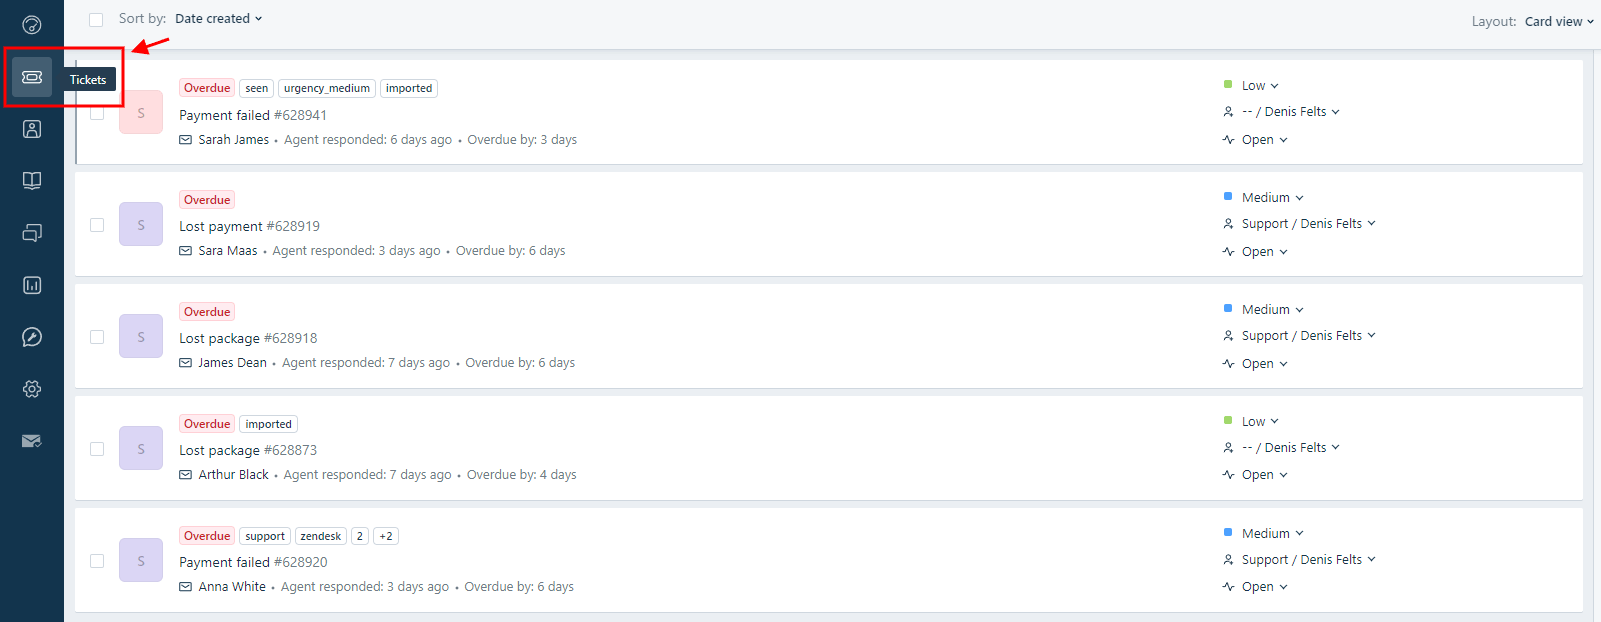
2. Select “Tickets” in the left navigation.
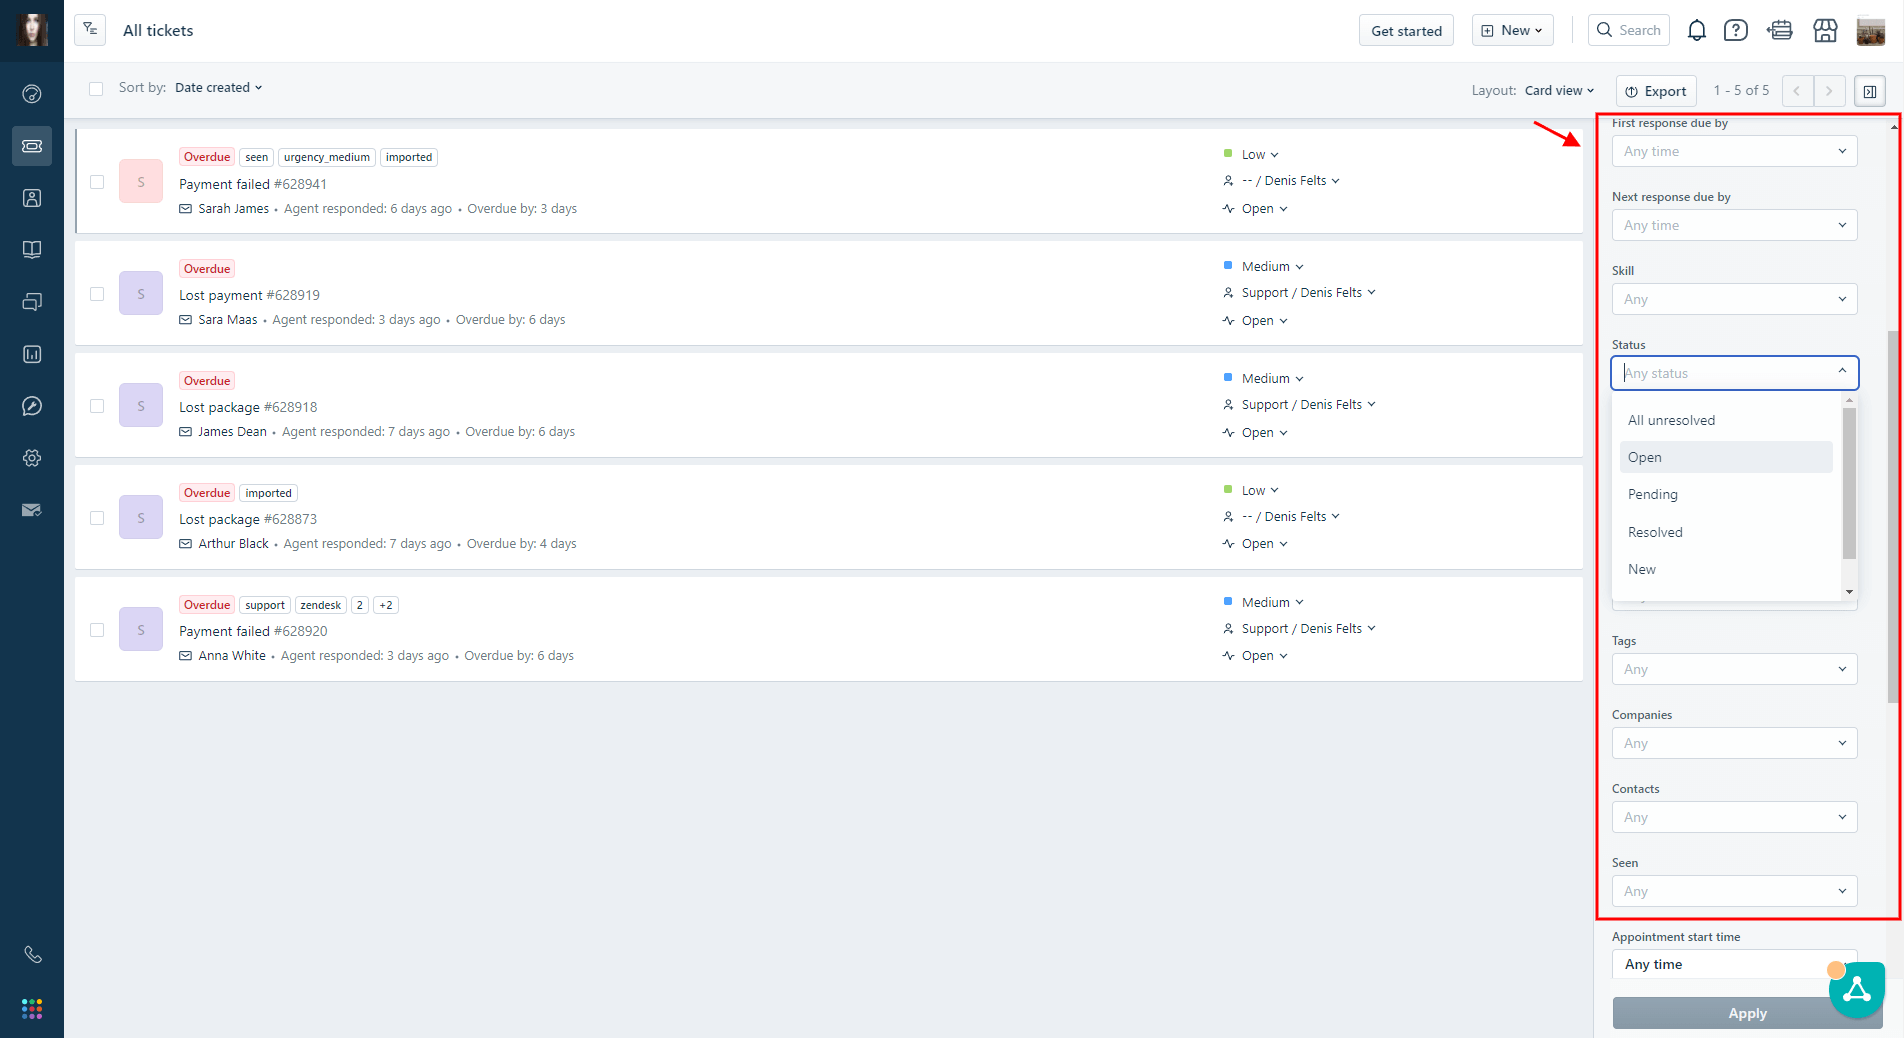
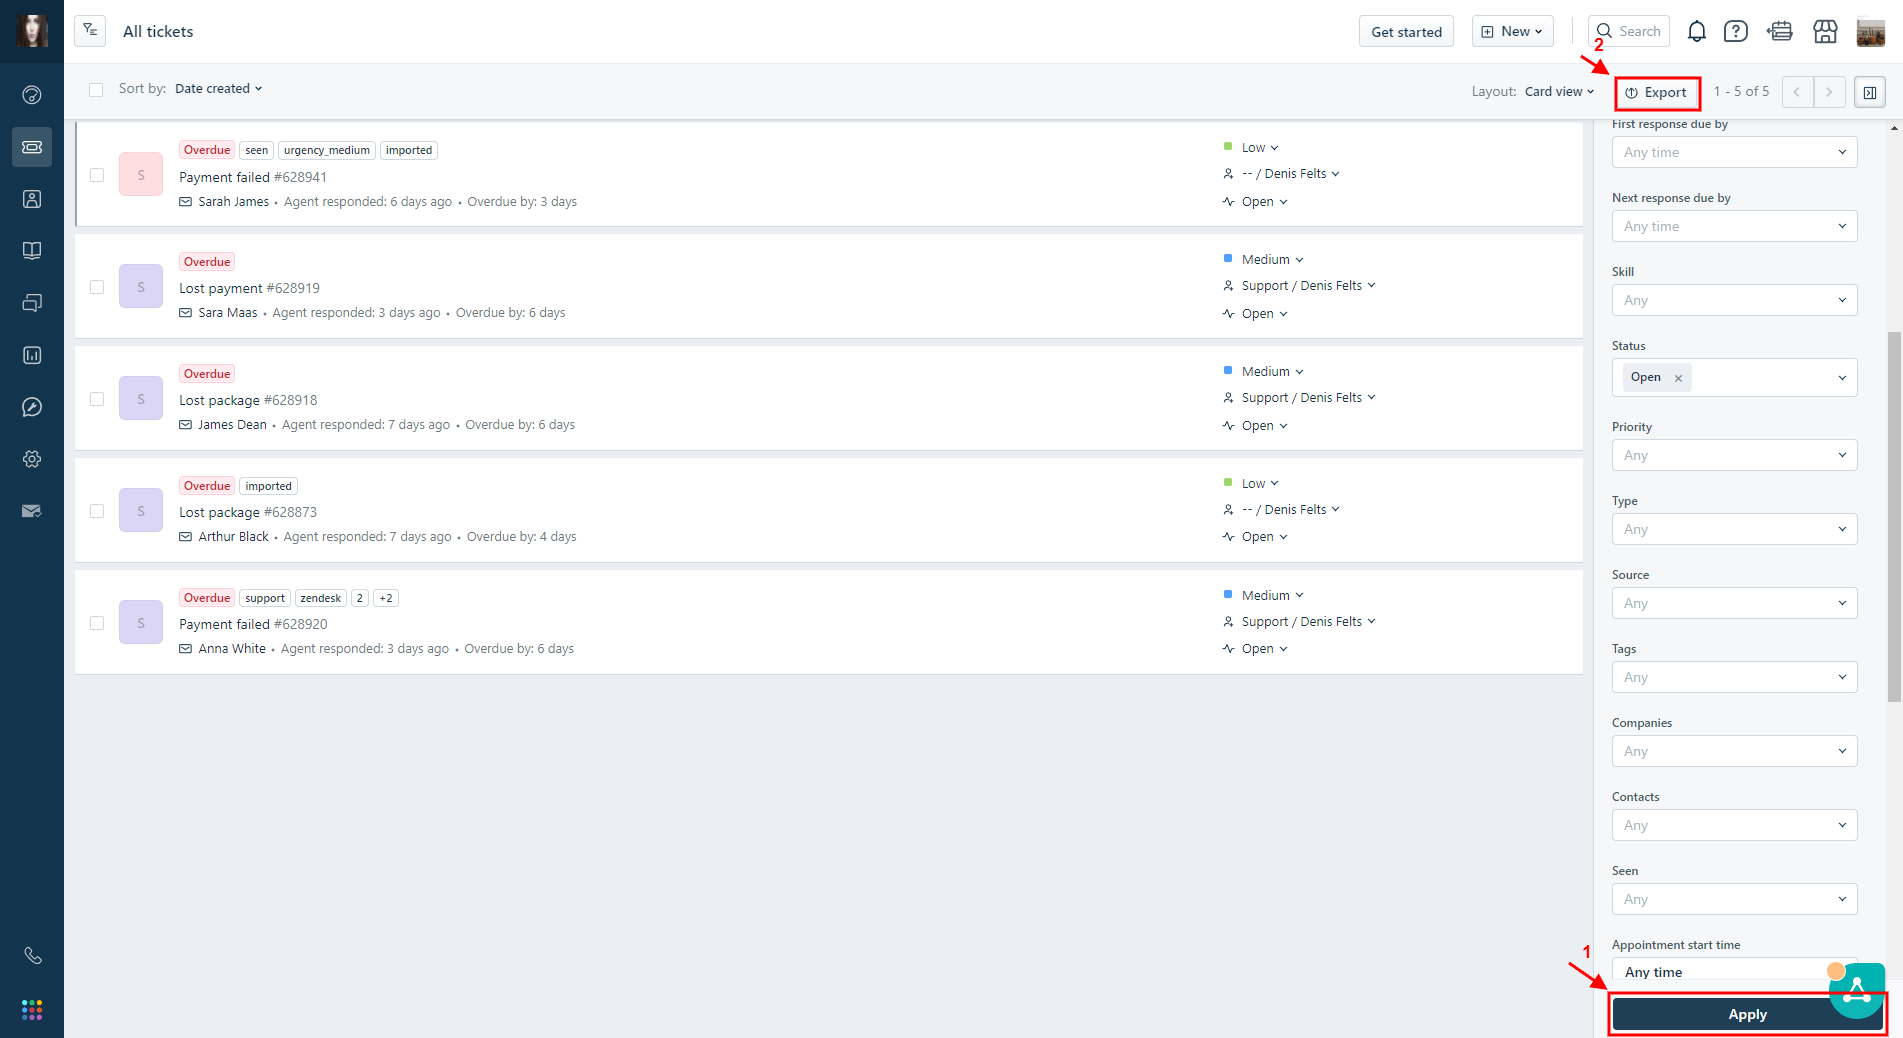
3. On the right-hand side, navigate to the "Filters" menu, choose the desired parameter you want to use as a filter, and then click “Apply.”
4. After applying the filter, hit the "Export" button.
5. In the export menu, choose "CSV."
6. Select the ticket fields you need, like "Ticket ID" and your filter criteria.
7. Click "Export," and the file will be sent to your email.
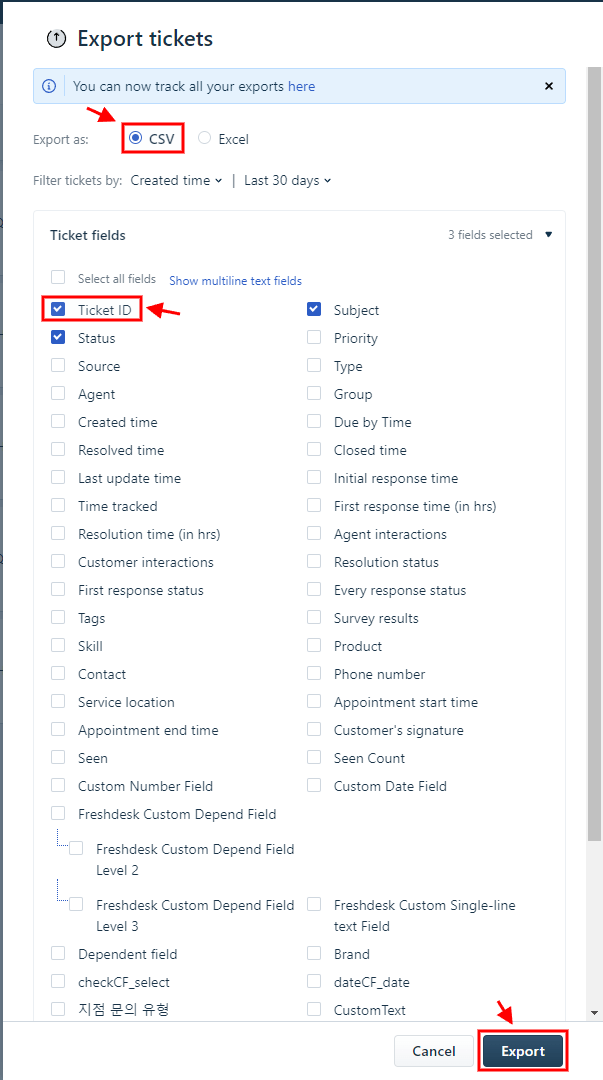
8. Forward the exported CSV file to our migration experts.
Following this step, our team will handle the ticket filtering process. If you have any questions, don't hesitate to contact our support team.
How to enable API key permission in new Freshservice accounts?
In new Freshservice accounts, the API key is not visible by default in the agent profile settings, even for the account owner.
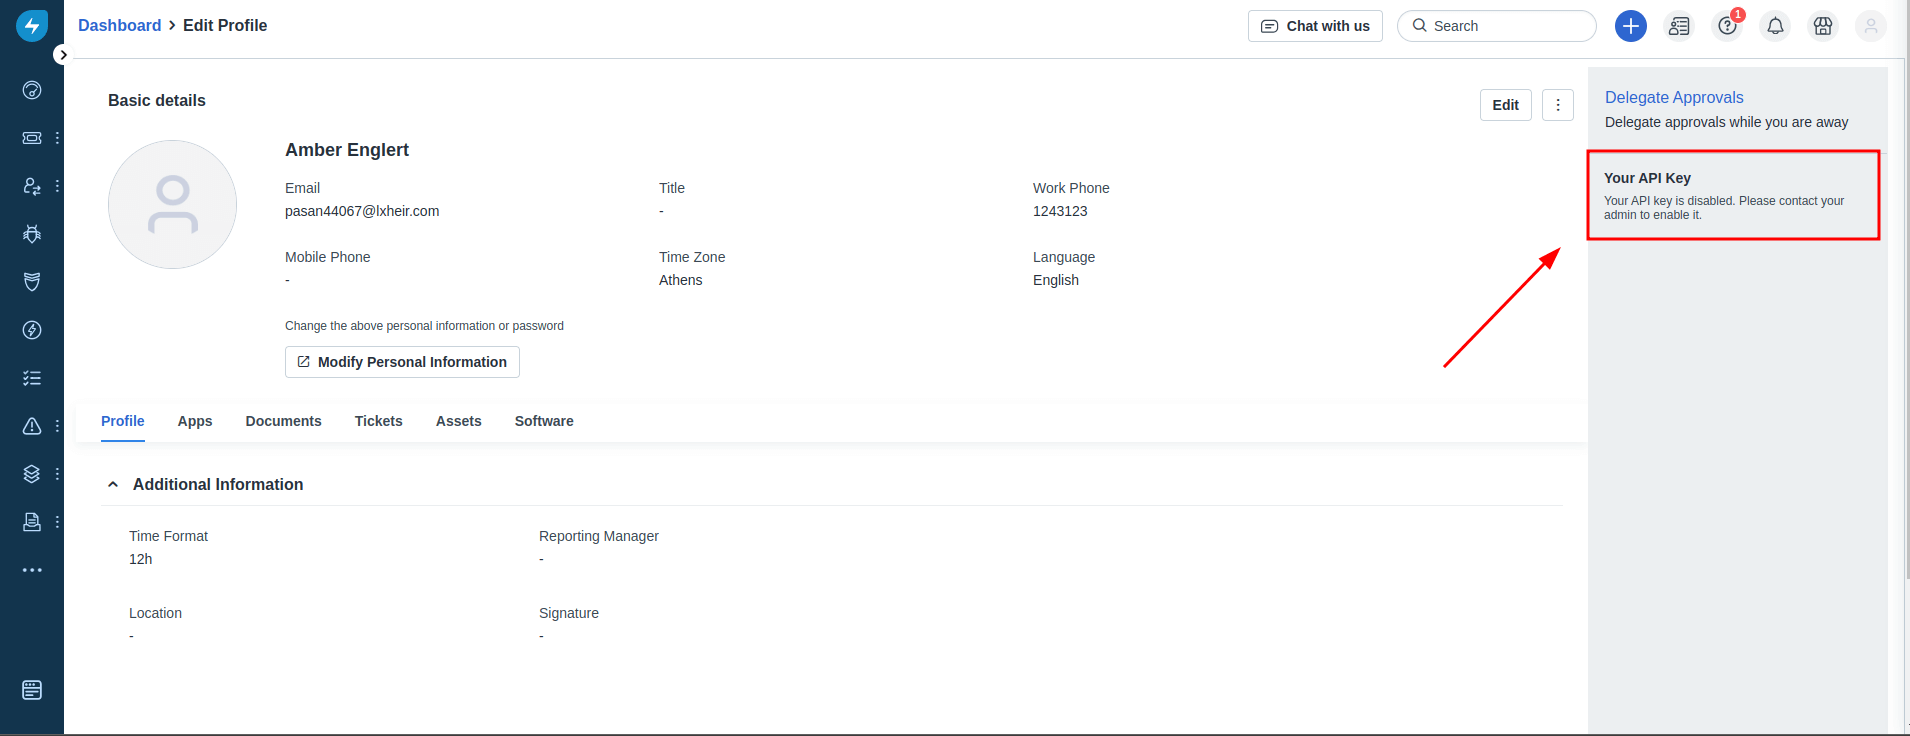
To enable it:
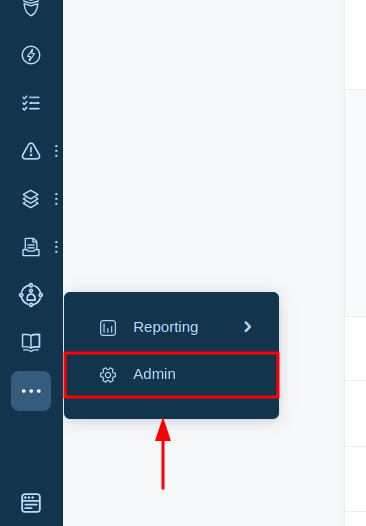
1. Go to Admin > Users.
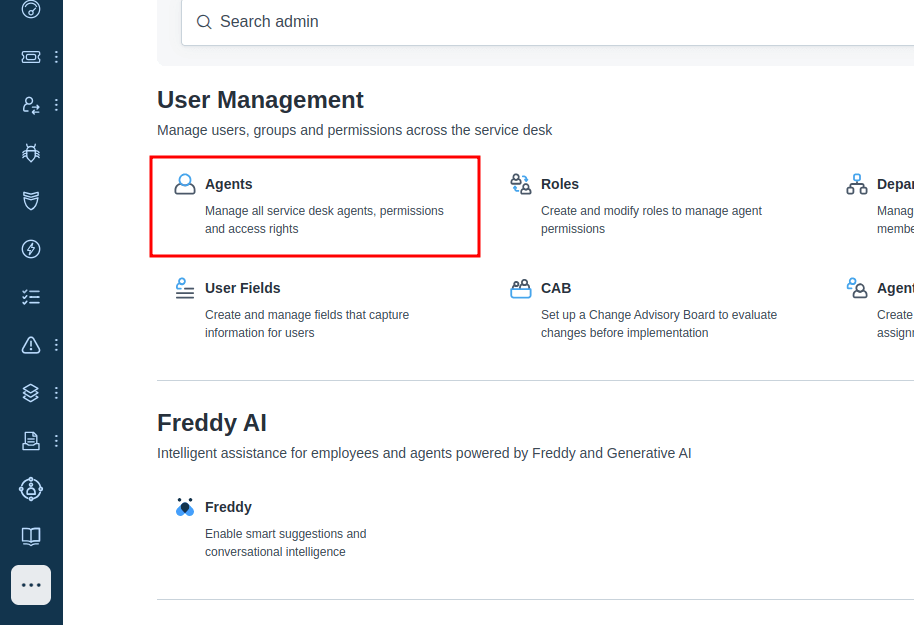
2. Click on the agent’s name to open their settings.
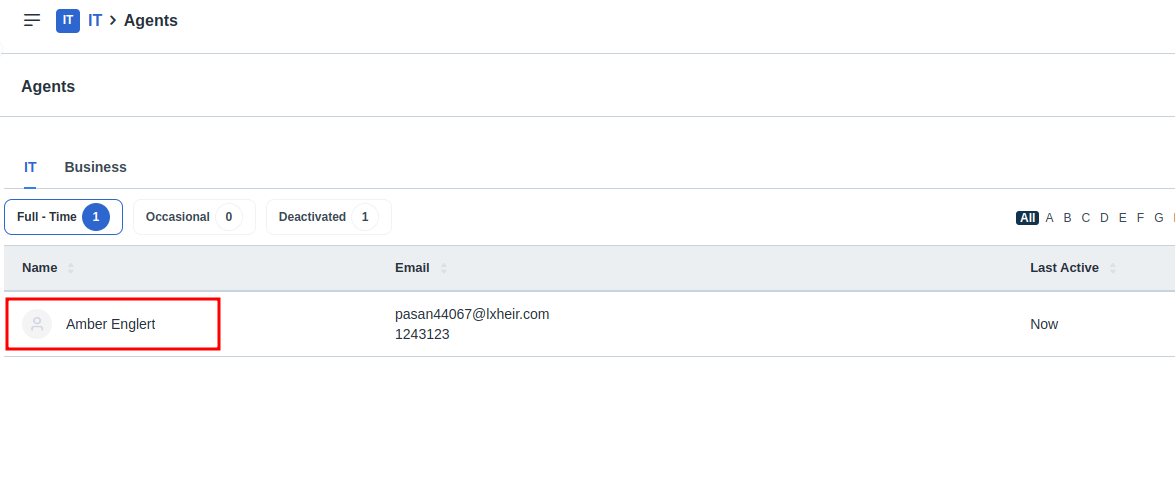
3. Enable the "API Key Access" permission for that user.
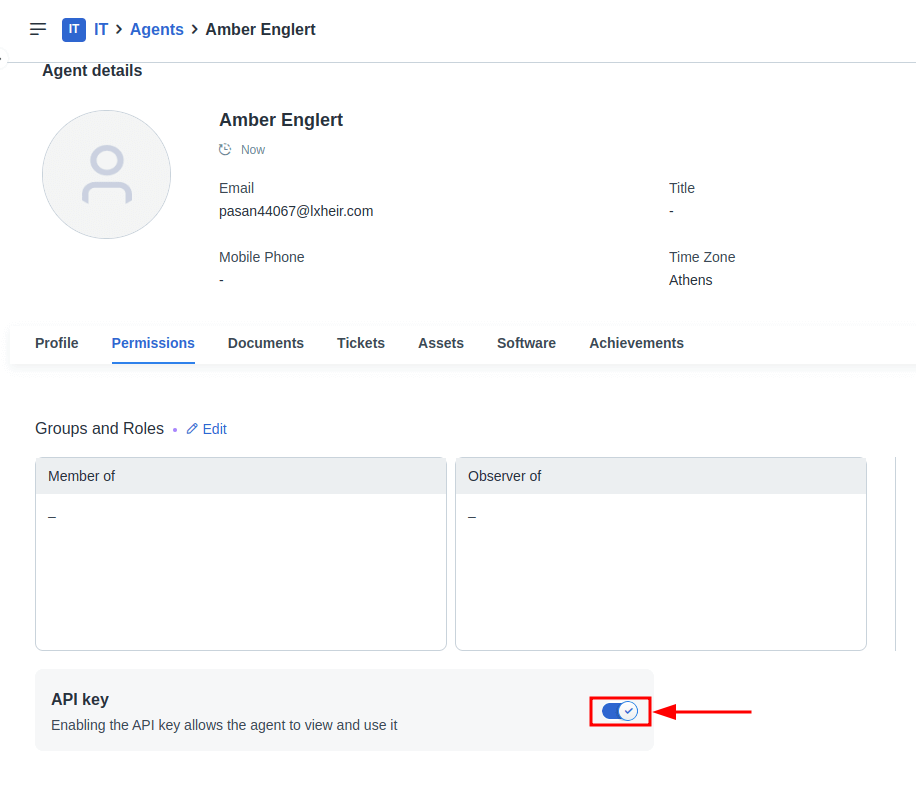
Once enabled, the agent can go to Profile Settings, where the API key will now be visible.
How to get the Freshservice API key?
Since Freshdesk and Freshservice have similar user interfaces, the path to finding the API key on both platforms is identical.
1. Click on your profile picture in the top right corner of the screen:

2. Go to Profile settings:

3. There, you will find your API key:

4. Copy the API key and continue your migration.
Why disable Workflow, Scenario Automations, Closure Rules, and Change Lifecycle in Freshservice?
When migrating to Freshervice, you need to deactivate settings such as Change Lifecycle, Closure Rules, Workflow Automator, and Scenario Automations. This way, your support reps won’t receive unnecessary notifications during the migration process.
How to Turn off Workflow Automator and Scenario Automations?
Freshservice has Workflow Automator (previously Observer) and Scenario Automations that help streamline mundane tasks and increase productivity.
However, if you're migrating to Freshservice, which already has active automation rules, the service desk will send email notices to your clients and agents during ticket import. You can avoid that by disabling all Workflow and Scenario automations before starting the migration.
Here's how to do it:
1. Log in to Freshservice.
2. Hover over the Admin panel in the left sidebar.
3. Go to Automations & Productivity.
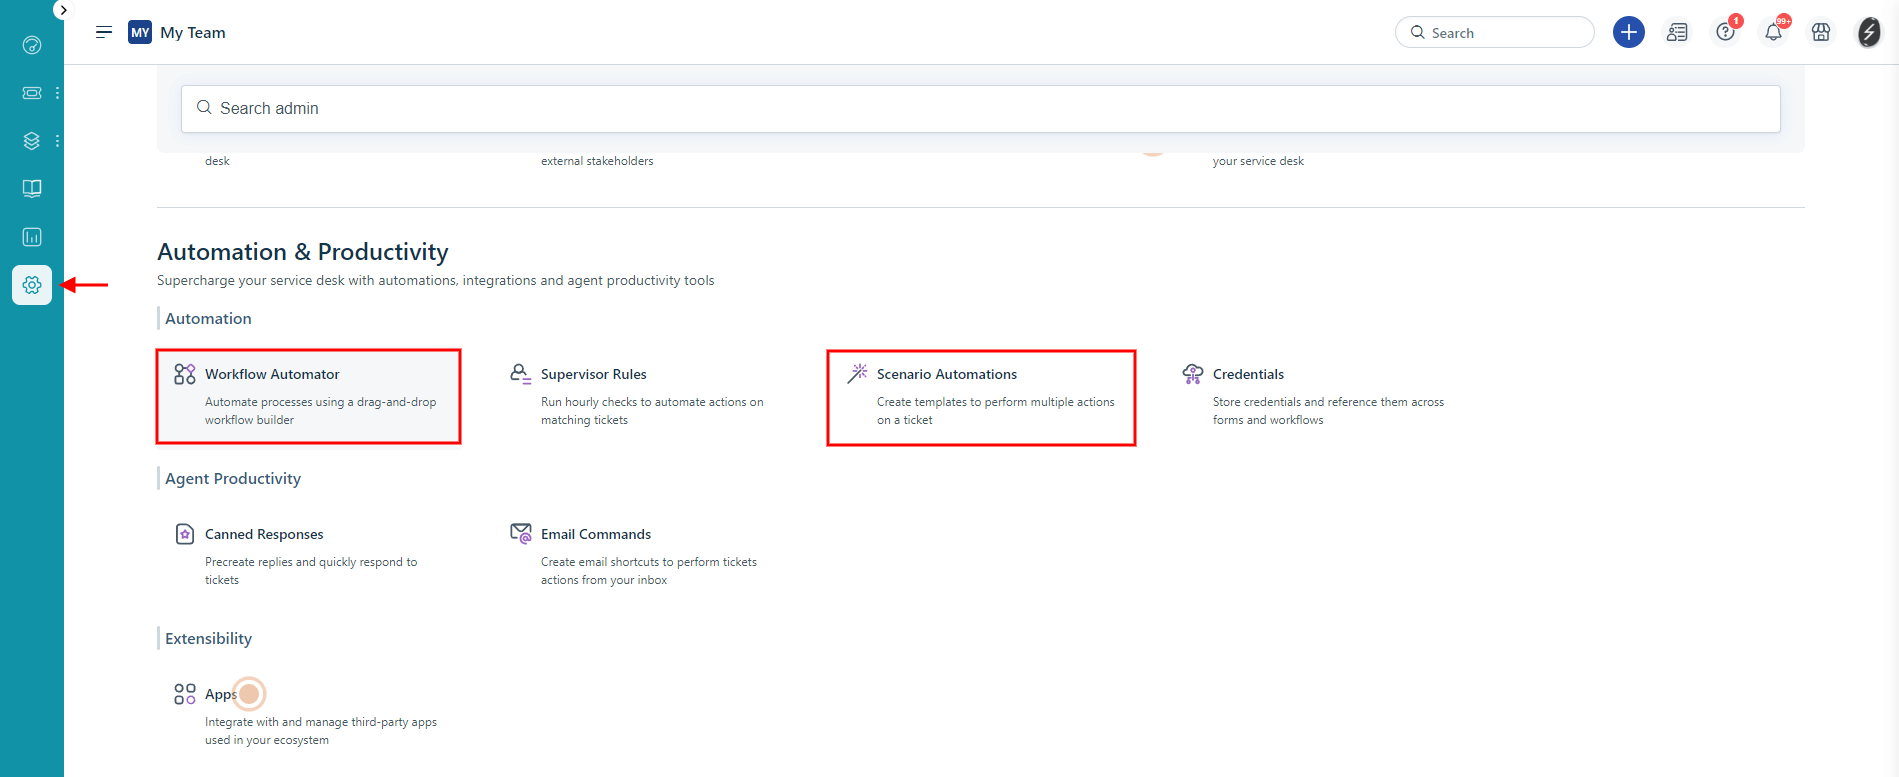
4. Choose Workflow Automator and disable all active automation rules.

5. Open Scenario Automations and document all scenarios and afterward, delete them.

You can keep all scenarios active, but remember that even if you disable Agent Notifications, Freshservice might still send updates during the migration.
Alternatively, you can contact the Freshservice support team and ask to turn off all Requester and Agent notifications.
How to Deactivate Closure Rules?
Additionally, if you don’t want your tickets to change status after the Full Data Migration, take the time to disable Closure Rules. This way, you can rest assured that everything that you’ve mapped will remain the same. To do so:
1. Go to the Admin panel.
2. Scroll down to Service Management > Service Desk Settings.
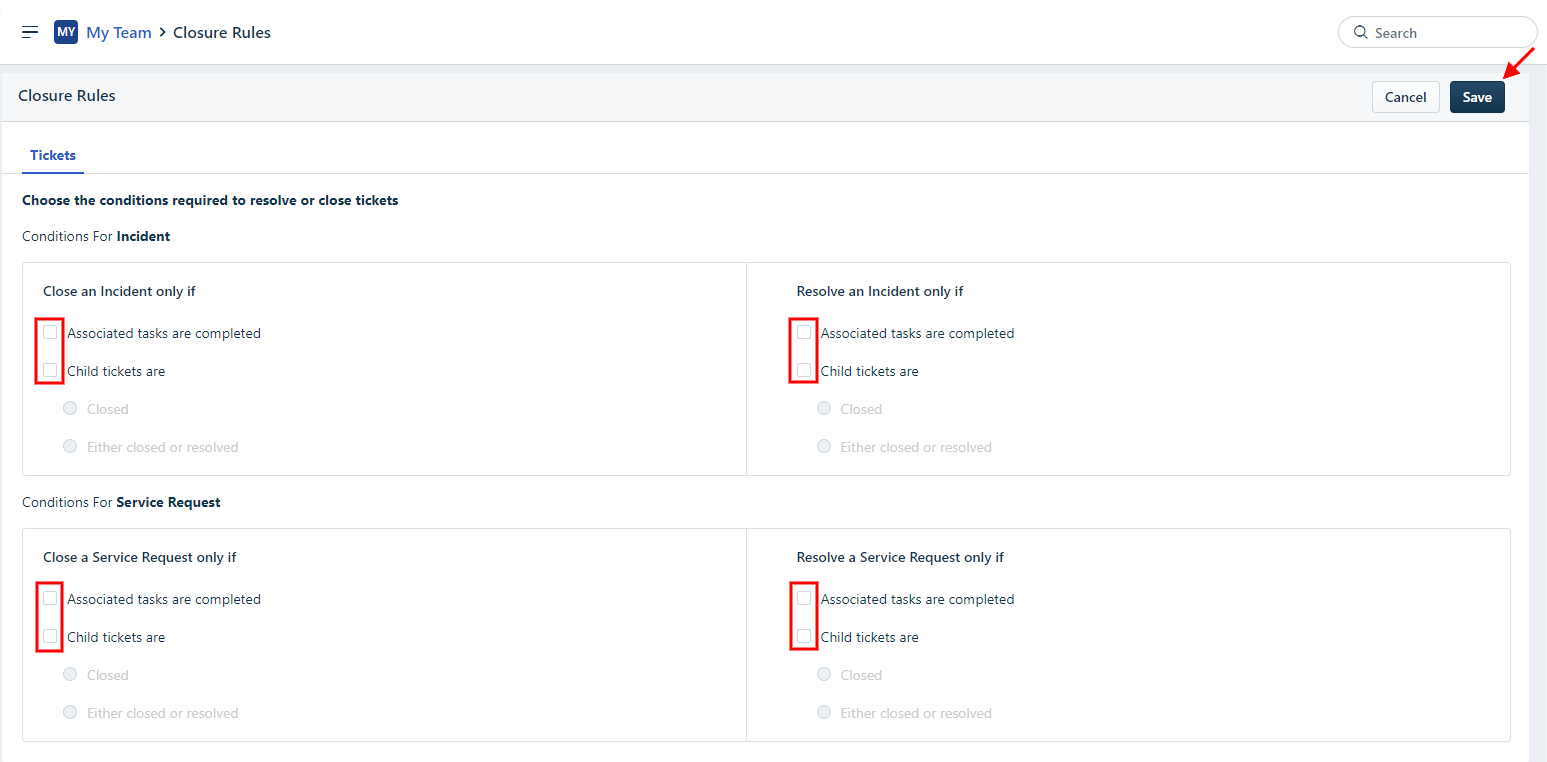
3. Click on Closure Rules.

4. Disable all the Closure Rules to prevent unexpected changes in ticket statuses.
5. Click Save.
How to Switch off Change Lifecycle?
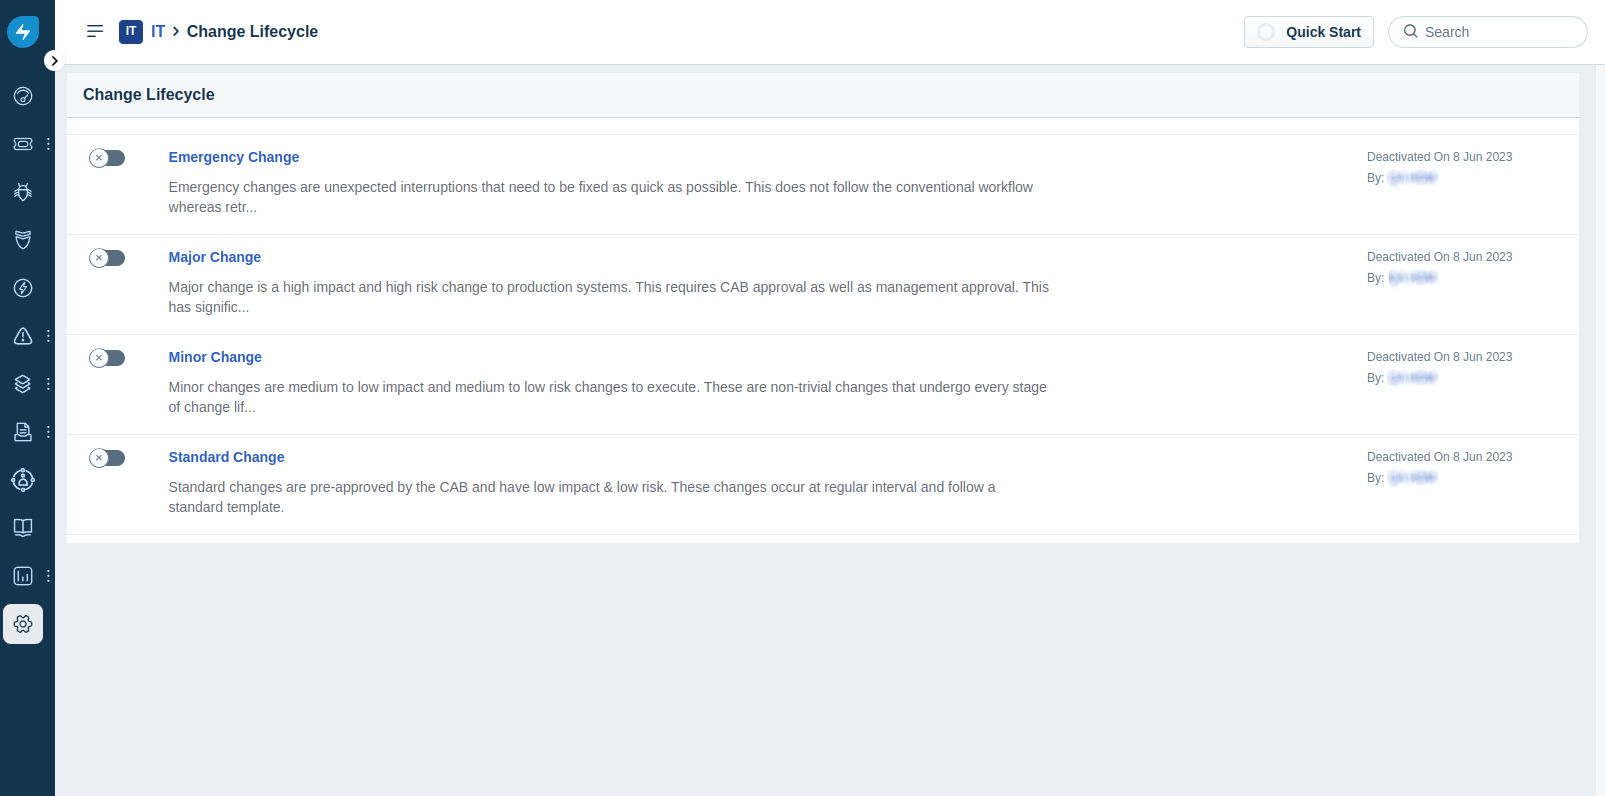
To ensure a smooth migration process for the Change category, it's essential to disable the Minor Change type. This prevents any errors or issues during the migration process. Here's how you can do it:
1. Open the Admin panel.
2. Go to Service Management > Service Desk Settings.
3. Select Change Lifecycle.
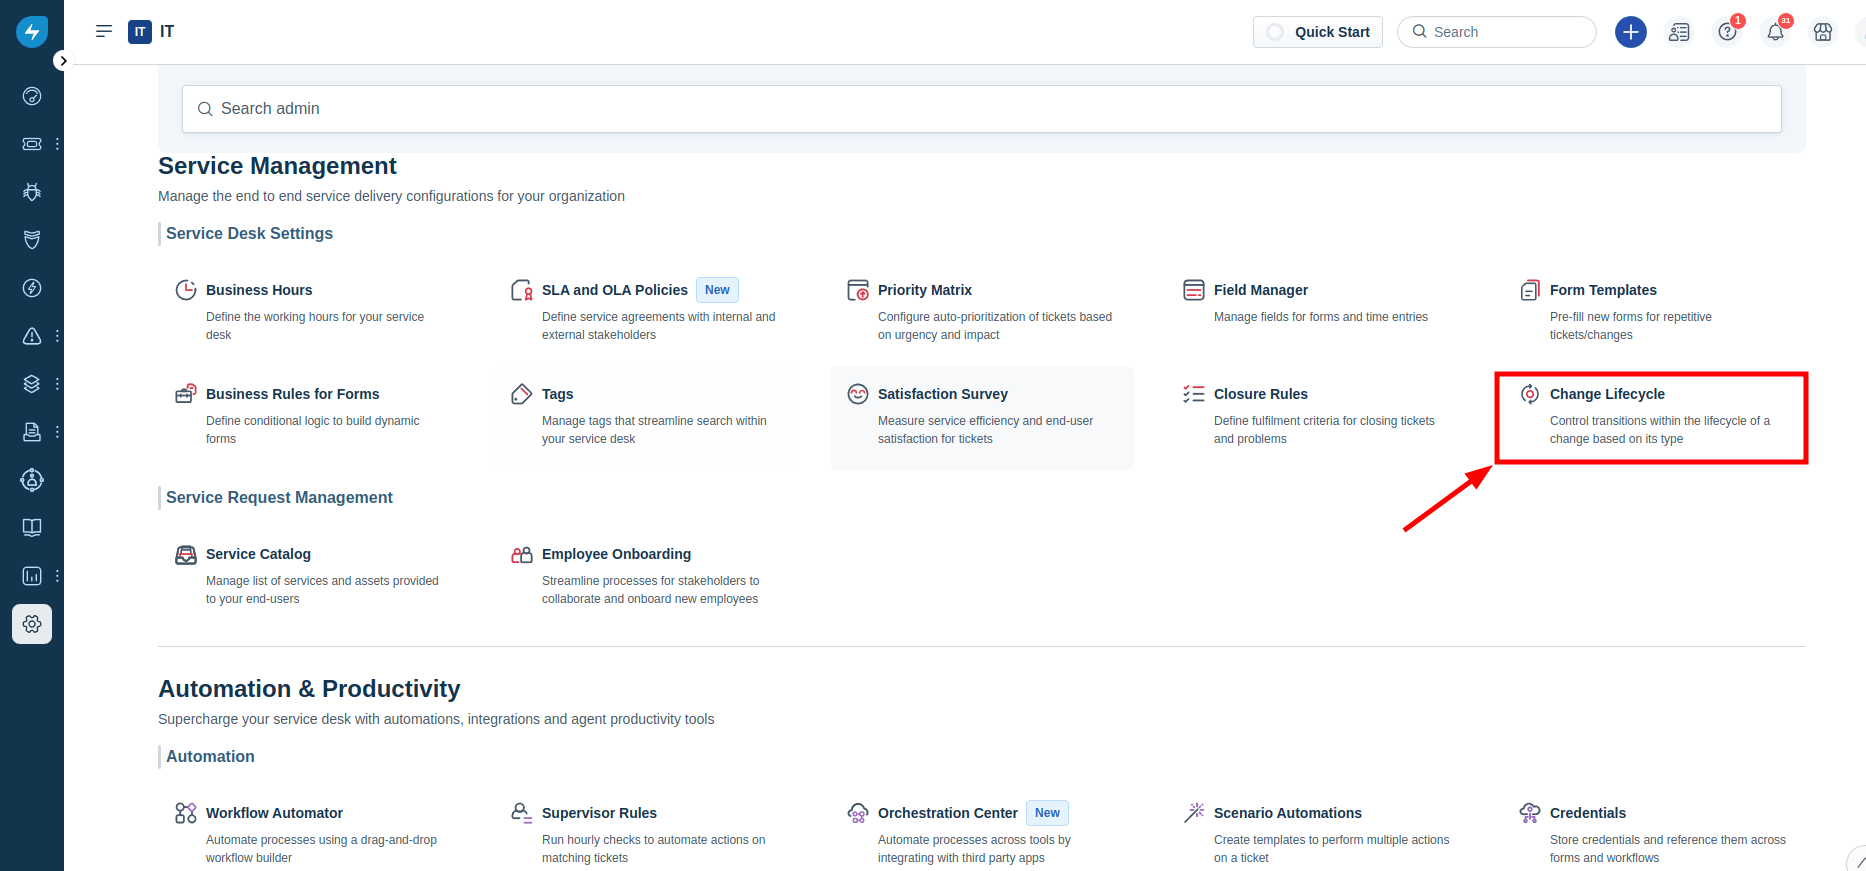
4. Disable the Minor Change type to make the migration process of your Change go smoothly.
What is the Freshservice Priority Matrix, and why do you need to disable it?
The Priority Matrix is a feature of Freshservice that automatically assigns a priority to an issue. It helps eliminate the human factor when prioritizing tickets.
Practicality aside, this feature can affect the outcome of your migration.
If you have the Priority Matrix enabled during the migration, Freshservice will set priorities according to it. Therefore, the priority statuses will differ from those in the source help desk. If this is not a problem for you, feel free to leave the Matrix enabled.
However, if you want to keep all priorities as they were in the source help desk, then you have to disable the Matrix before starting the Demo and Full Data Migration.
Here’s how to do it:
- Open up your Freshservice account.
- Go to Admin > Priority Matrix (under Service Management).
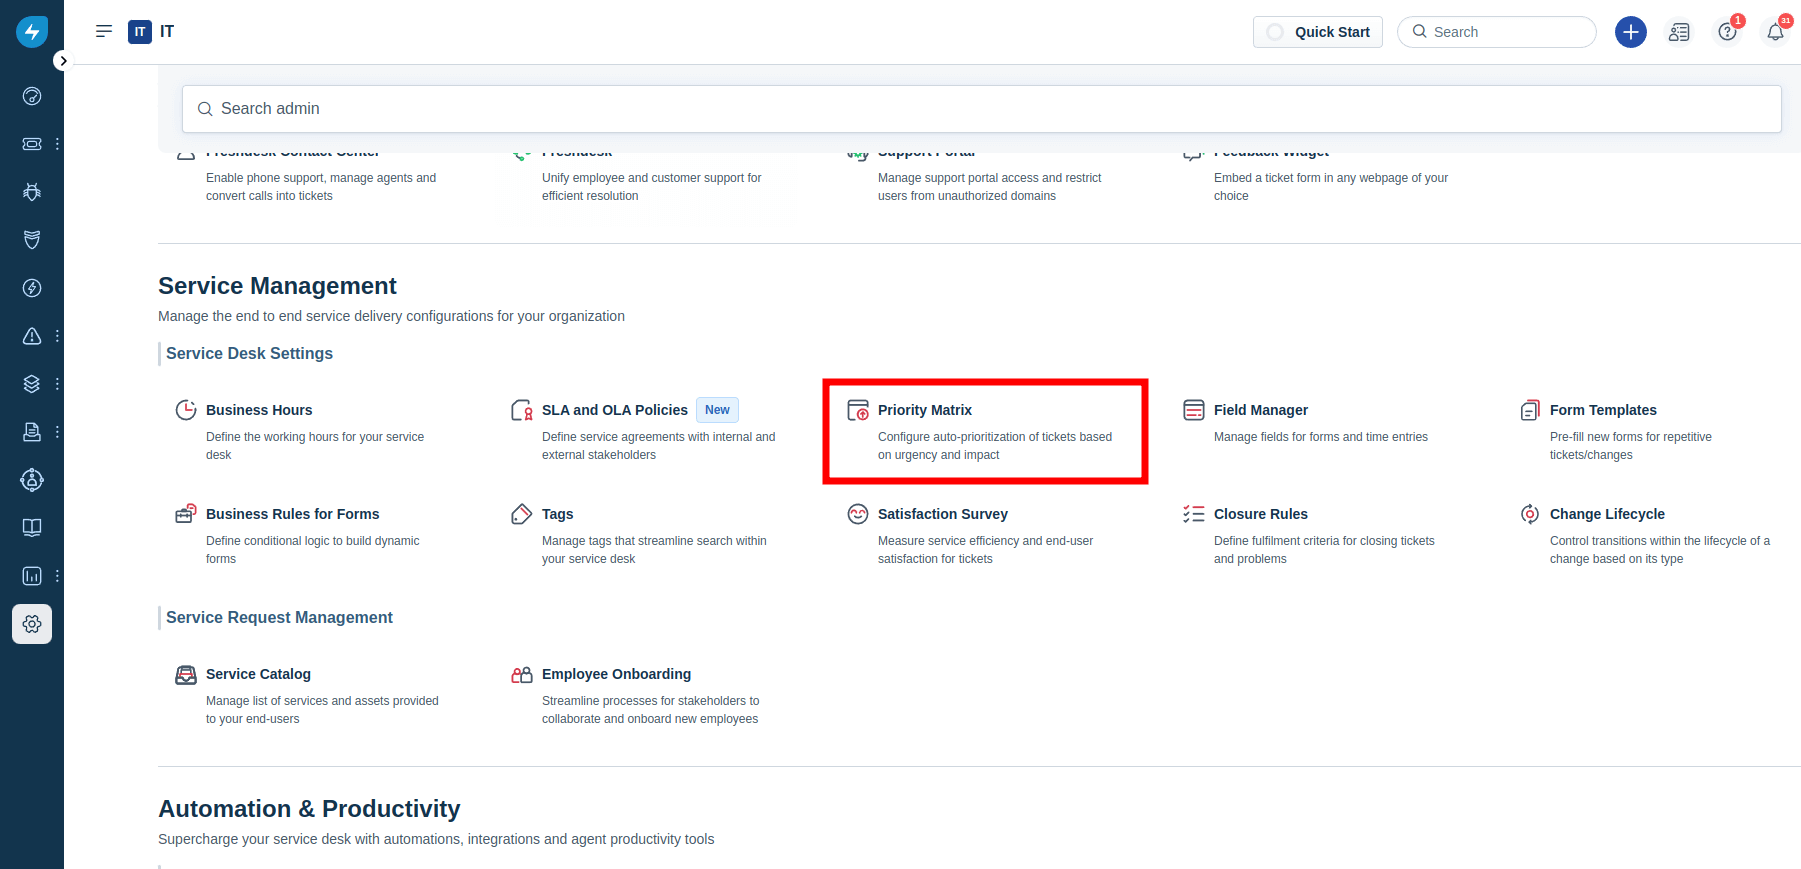
- Toggle OFF the Enable Priority Matrix option.
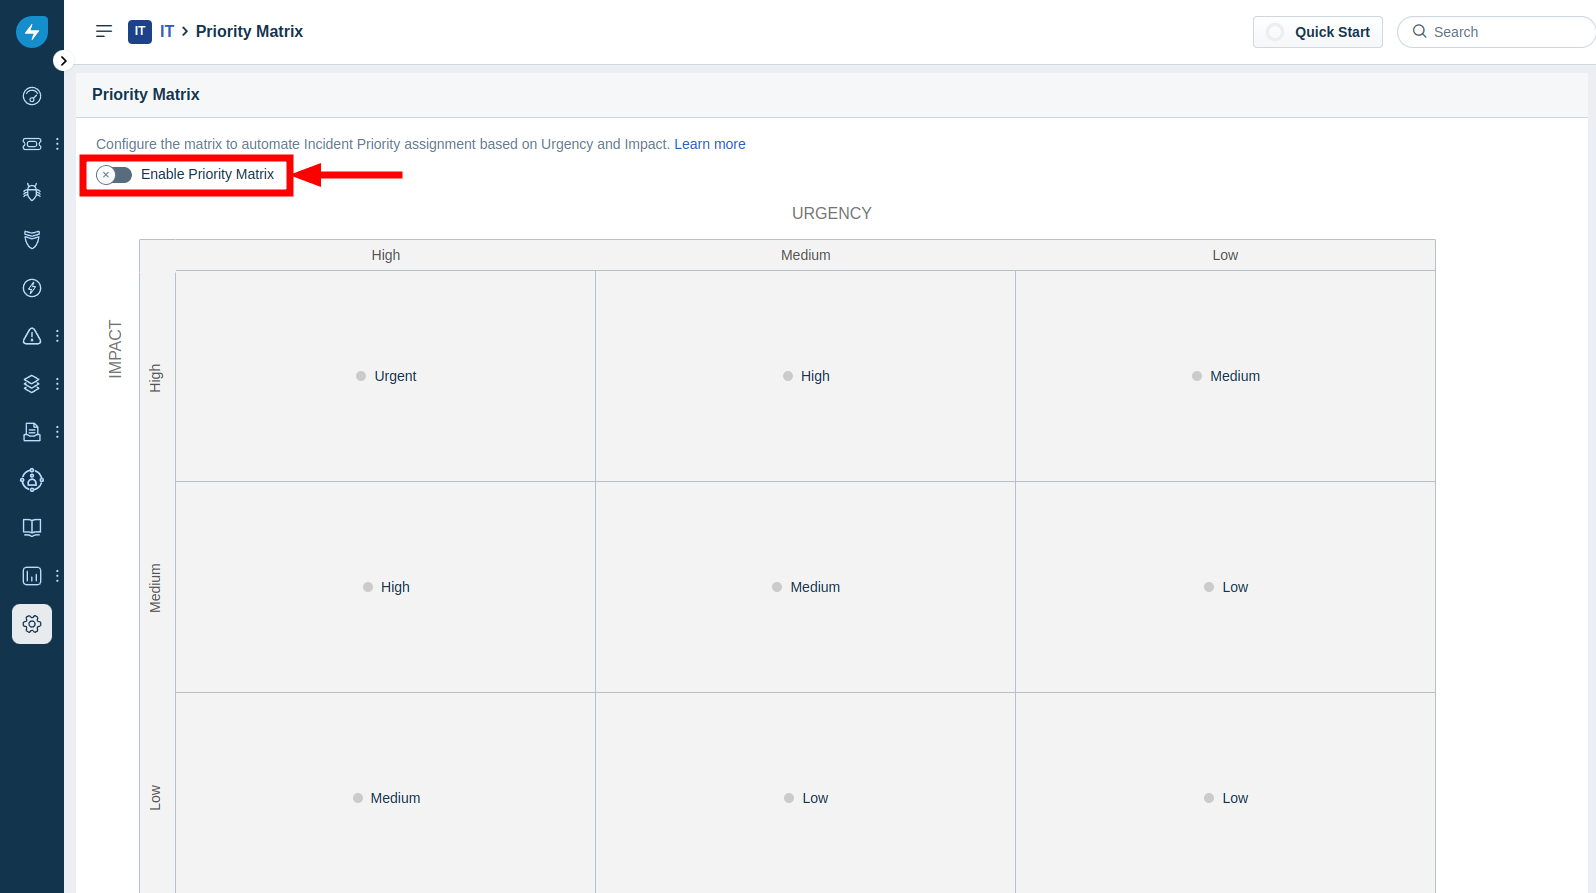
Once the migration is over, you can return to this menu and re-activate the Priority Matrix.
How to check the result of Demo Migration in Freshservice?
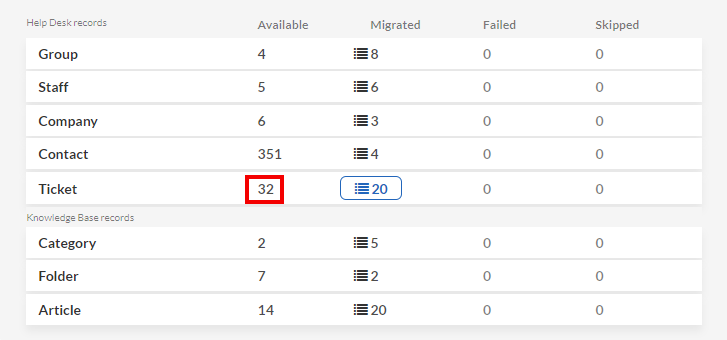
Once the Demo Migration to Freshservice is completed, you will see a table summary with several migrated records, including the migrated, skipped, and failed record reports. These reports contain the record IDs in the source platform and the new IDs in Freshservice.
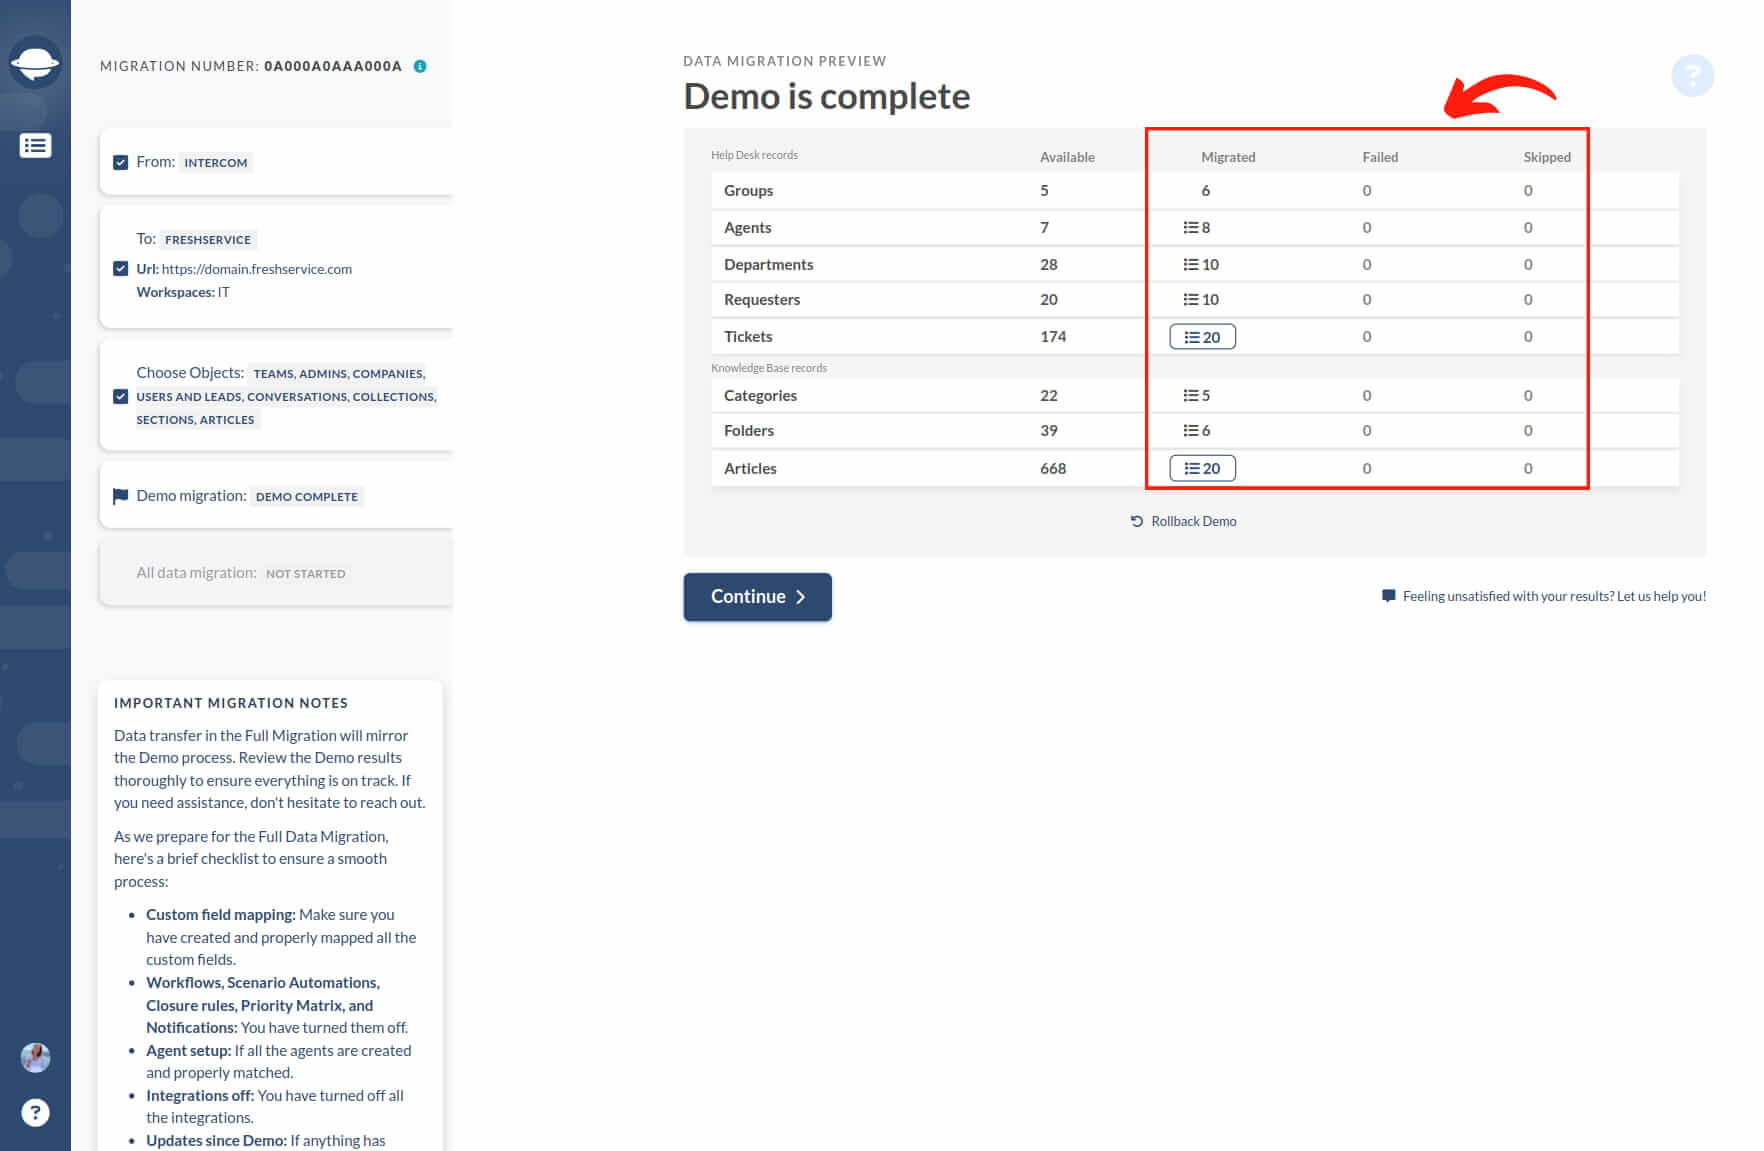
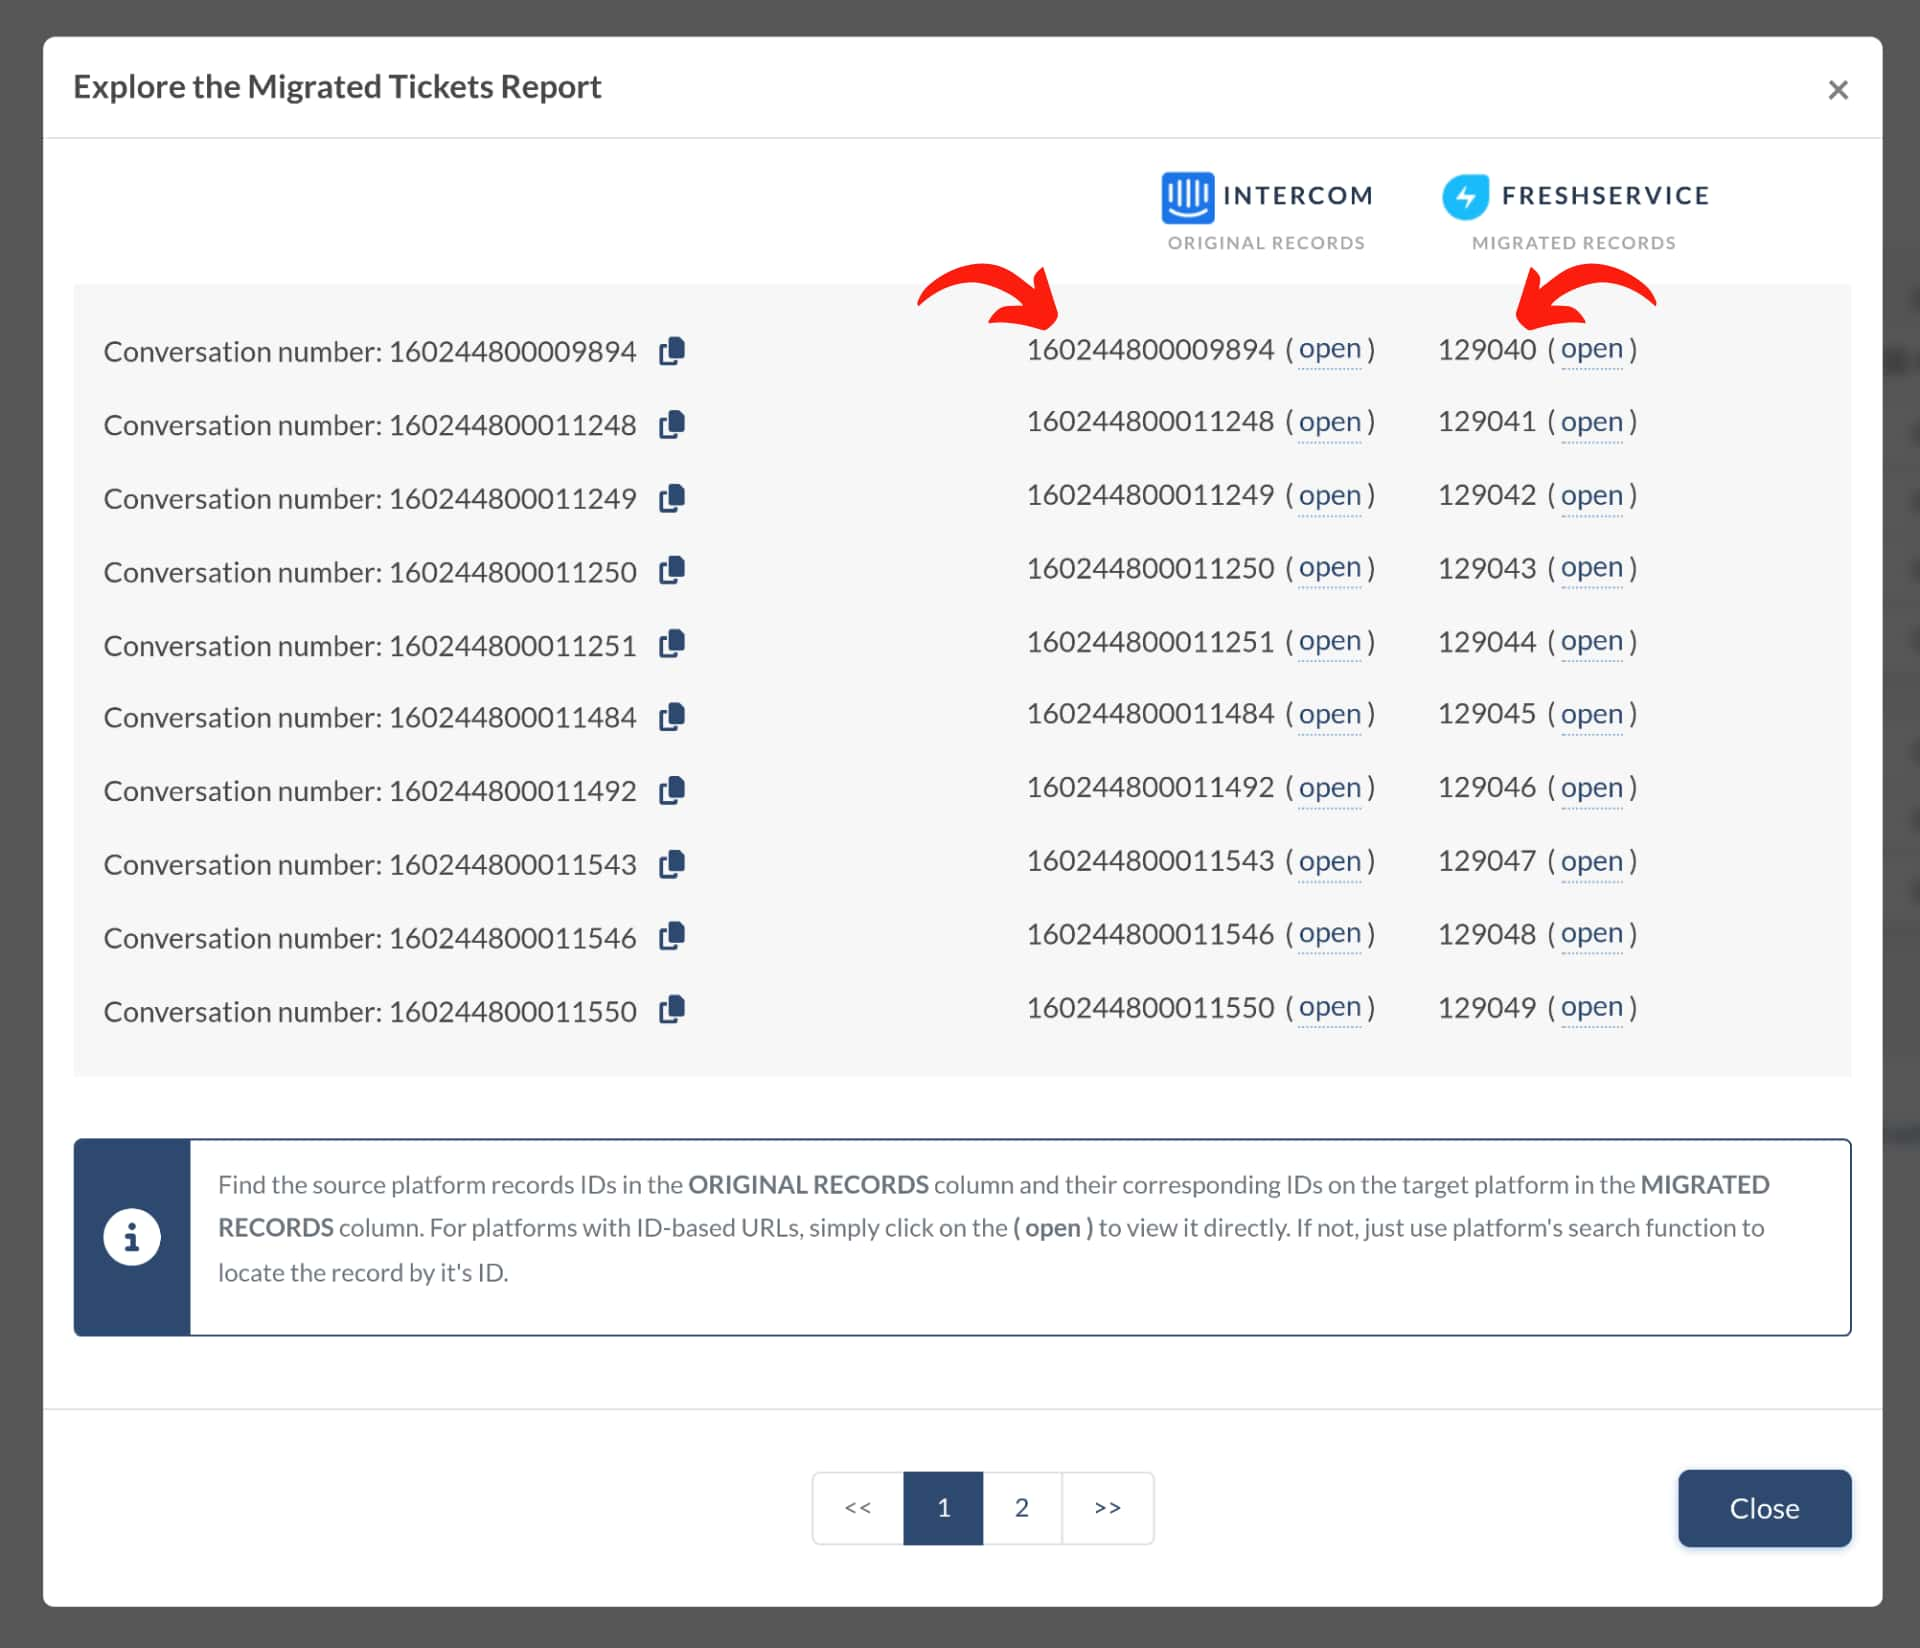
Click the button to open a list of record IDs to locate and check every migrated entity. The report looks like this:
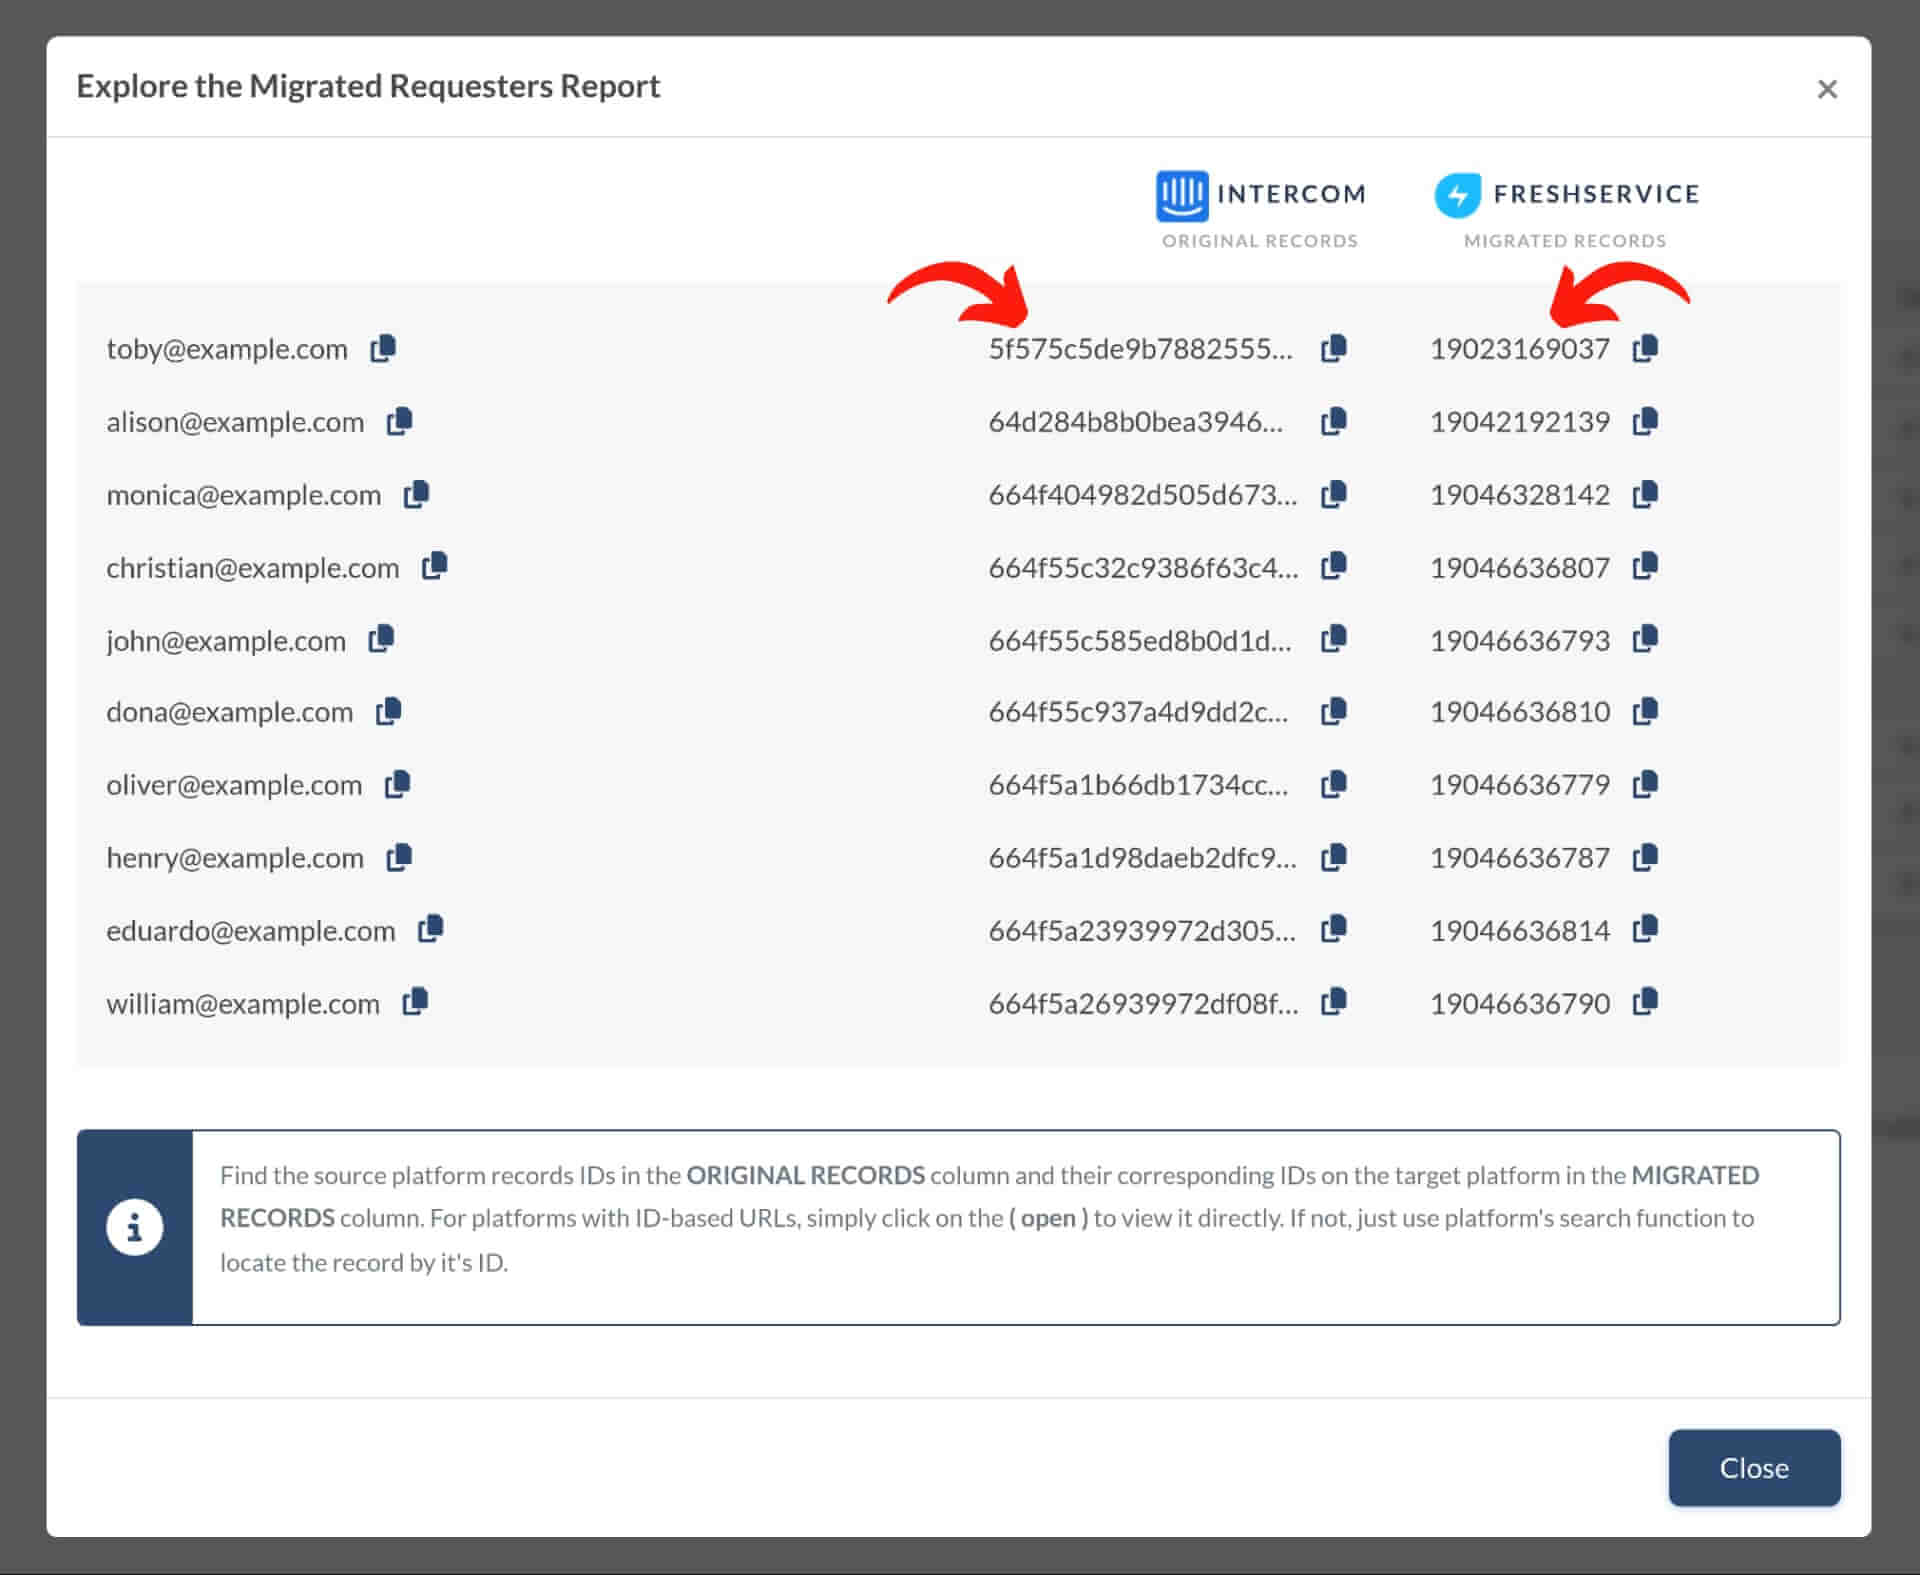
Tickets and other records similarly move to a target platform during the Demo Migration and Full Data Migration. So, if some data weren’t migrated during the Demo Migration, it won’t be transferred during the Full Data Migration, either.
That’s why you need to check if the Type, Source, Status, Priority, Custom Fields, Requester, Agent, and Tags migrated correctly. Then, repeat the same process for Knowledge Base articles. If everything migrated correctly, initiate the Full Data Migration.
How to calculate contacts in Freshservice?
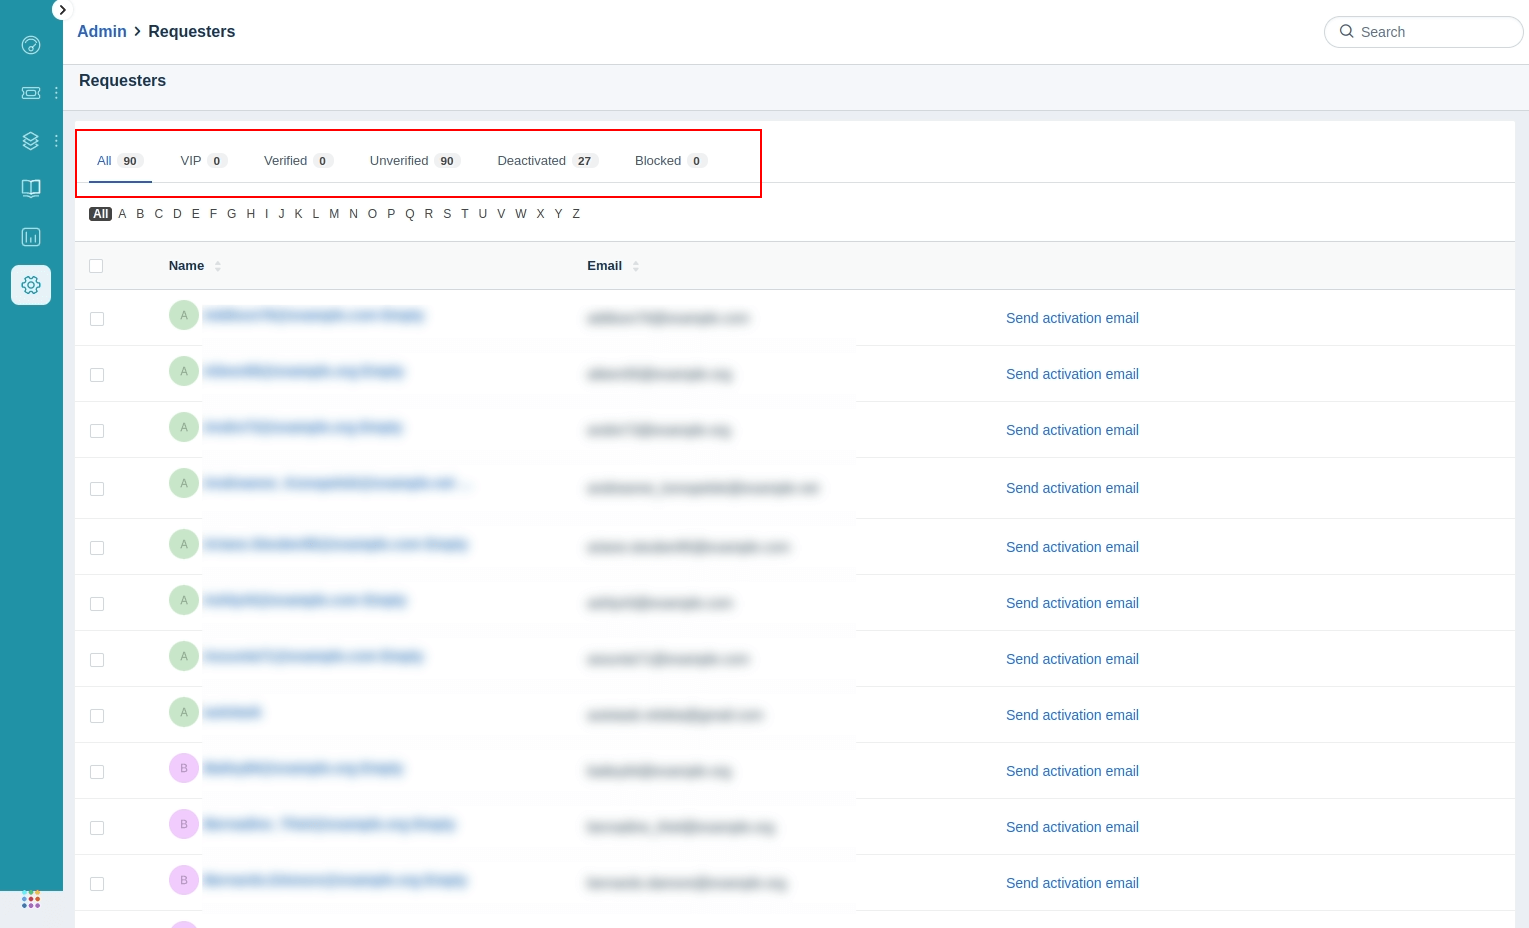
Freshservice automatically calculates the number of all your contacts (requesters) and breaks them down into groups, such as Verified, Unverified, Deactivated, and Blocked.
1. Open the Admin settings on the sidebar.

2. Choose Requesters in the User Management section.
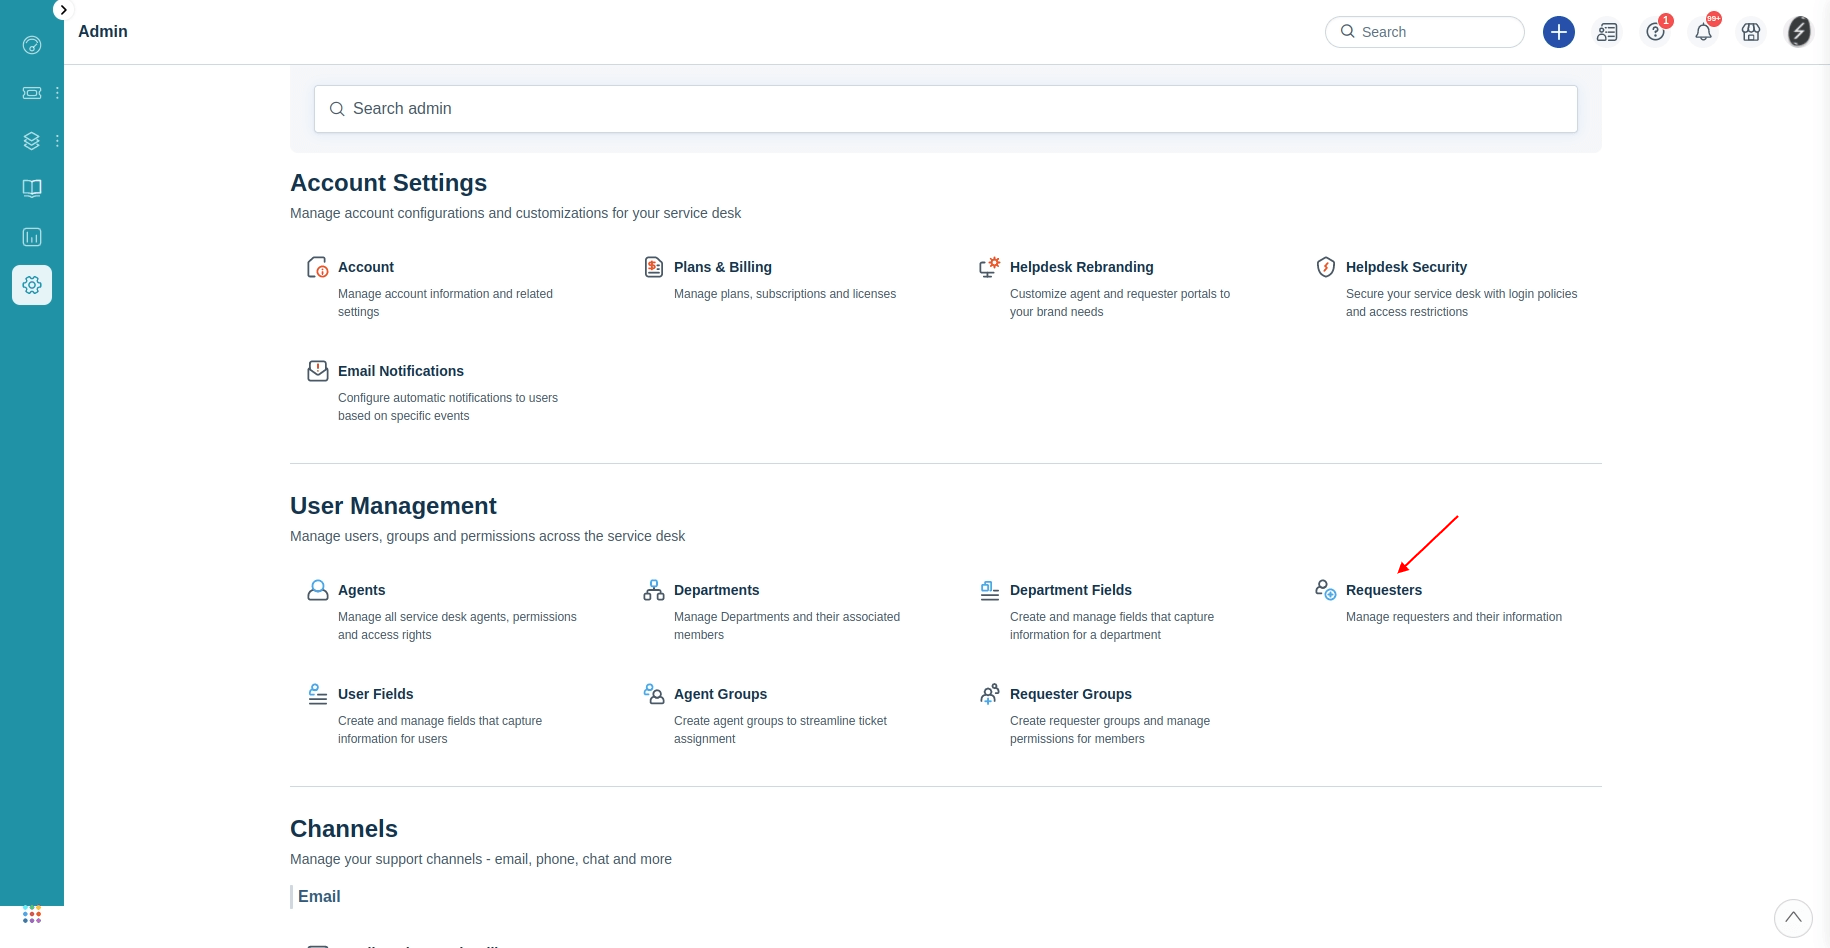
3. Check the number of contacts next to each contact group. You can sort contacts by name and email.
How to calculate the number of tickets in Freshservice?
You can calculate the number of Tickets in Freshservice by using filters.
- Go to the Tickets tab
- In the menu Created select Any time
- Then choose All Tickets.
- Find the number of your Tickets.

Note: you can quickly calculate the number of your Tickets and estimate the cost of the data transfer during our Free Demo Migration.
How to calculate knowledge base articles in Freshservice?
To calculate specific lists of Freshservice articles, such as all articles, drafts, and published articles, follow these steps:
1. Open the Solutions tab on the sidebar.
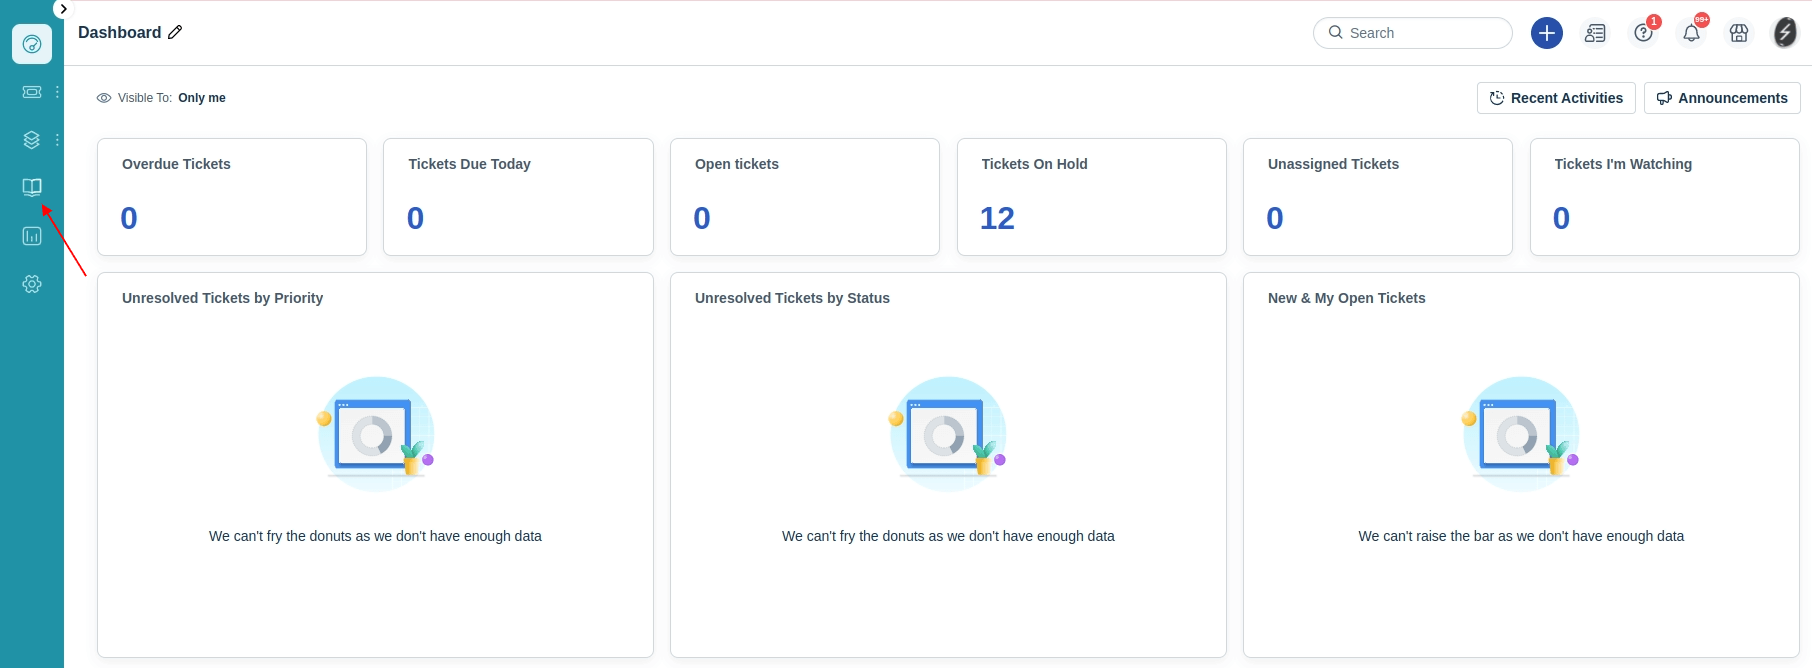
2. Check the number of all articles in brackets next to All articles. Click All articles to filter out your drafts or published articles and check their number in brackets.


How to find the Ticket View ID in Freshservice?
- Choose the necessary View in the drop-down menu.
- Copy the last digits in the URL.

How to create a Custom View in Freshservice?
When migrating from Freshservice, you can decide which tickets to migrate by using filters and creating the Custom view in Freshservice.
Note that the Custom view ID field is required. Without the View ID, you cannot continue the migration.
Here's how to create a custom view:
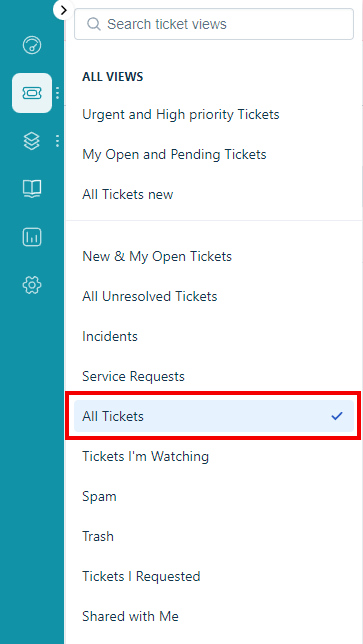
1. Log in to your Freshservice and go to the Ticket List tab.
2. Open the menu with all views and choose All Tickets:
3. Go over to the filter and specify your requirements. For instance, to migrate tickets from 6 months ago, scroll down to the Created drop-down menu and choose the appropriate option:

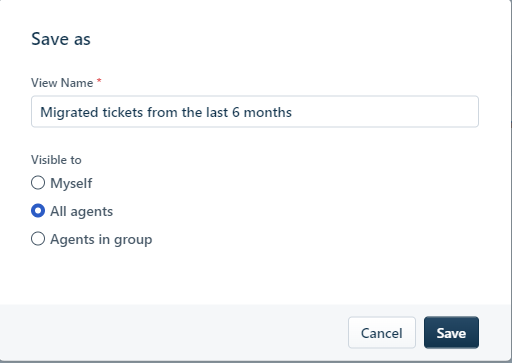
4. When done, go back to the top of the page and click Save as:

5. Name and save the view:
6. Check the total number of tickets in the view:

7. Copy the View ID from the address bar and run the Free Demo Migration. When the Demo is complete, make sure that the Migration Wizard shows the same amount of all tickets as in your Freshservice:
How to filter tickets in Freshservice?
To filter tickets using views in Freshservice, follow these steps:
- Navigate to the Tickets tab to open the Ticket View page.
- Choose either the classic List or Kanban view.
- Use the filters on the right-hand side to select any conditions you want to apply to your view.
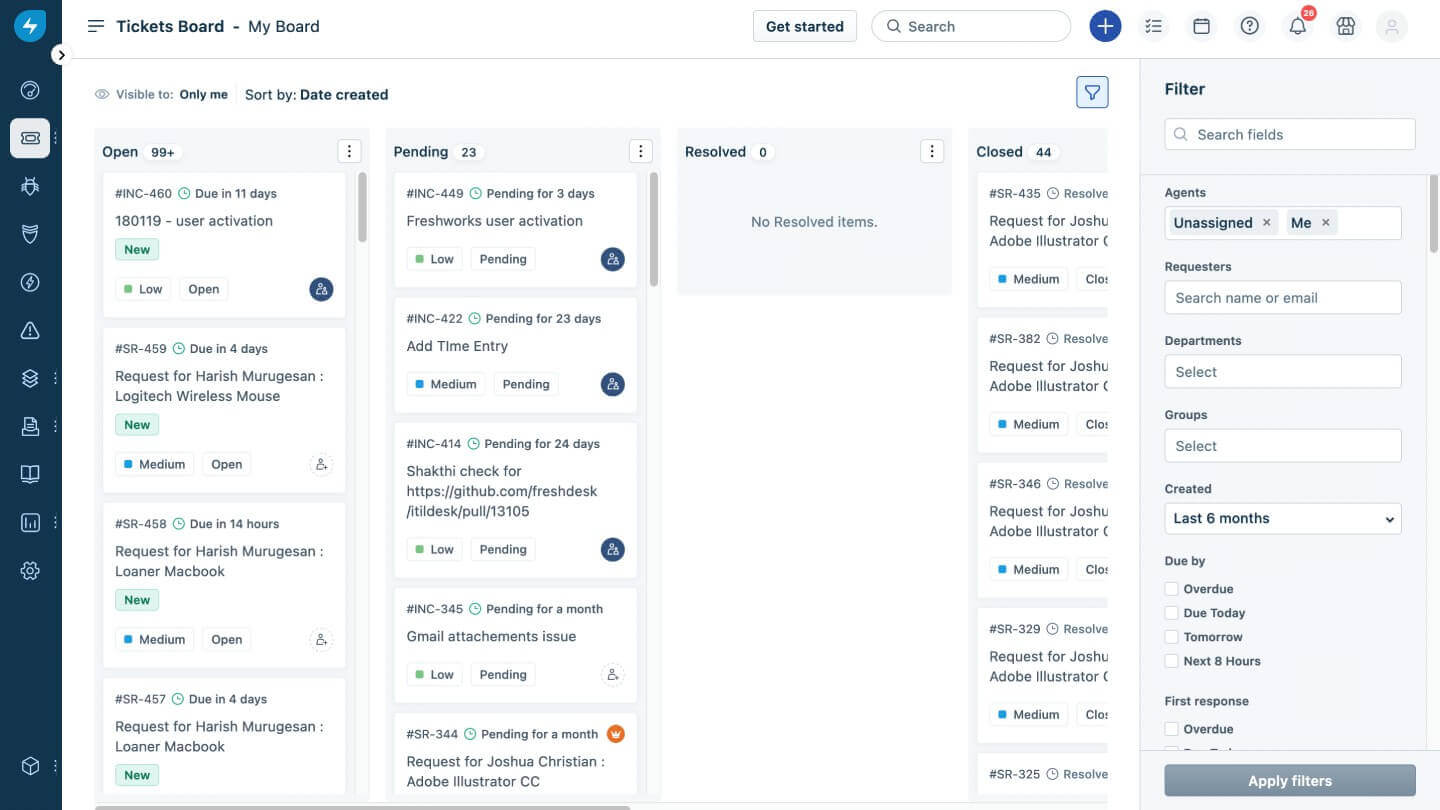
Kanban view. Source: Freshdesk
- Hover next to the name of the view (marked with a checkmark) and a 'Save as' button will appear next to it.
- Click on the 'Save as' button to open a pop-up dialog.
- Enter a name for the view you just created.
- Optionally, choose whether to share it with other agents by selecting “All Agents” or “Agents in the group” from the list.
- Click on the Save button to finish saving your view.
Note: Only an 'Account admin' or 'Admin' can create visible views to all agents.