Jira Service Management Data Migration Checklist
Data migration can be challenging, but we've made it easier for you. We've created a comprehensive data migration checklist exclusive to Jira Service Management. Dive in and simplify your migration process!
Before diving into the details, pay attention that our tool can't migrate such records as:
- CC users (migrate CC users into a custom field instead)
- Groups
- Inline images
If you still want to import the above data, request a customized migration. Contact our team to discuss the details.
BEFORE YOU SET UP THE MIGRATION
Run through the steps given above to prepare for Jira Service Management import:
Note: During the Demo Migration and Full Data Migration, the tickets and related data move similarly. If some data won’t be migrated during the Demo Migration, it will not migrate during the Full Data Migration.
Once the Demo Migration is done, download reports for migrated/skipped/failed records and check if everything migrated as you expected. If something isn’t clear, contact our support team.
1. DECIDE ON A DATE
You need enough time to thoroughly prepare for the transfer (by starting to close tickets and filter your data, for instance). So, choose the day with the smallest amount of help desk related work.
2. INFORM YOUR TEAM
Inform your agents about Jira Service Management migration first so they can start closing tickets before the data transfer date. This will give them enough time to get used to a new platform.
3. PREPARE JIRA SERVICE MANAGEMENT FOR THE IMPORT
Before setting up a data migration itself, run through the following steps:
1. Set up users manually
Before data migration, you need to add all users to the required project on Jira Service Management, and their emails should be visible to everyone. Read a detailed article on how to add users to Jira Service Management first.
2. Create matching custom fields
This will help you quickly find the needed data after the Full Data Migration.
You can create them while mapping ticket fields in Migration Wizard. Choose the needed field value and press Add the same field on Jira Service Management at the top. To migrate contacts, enable the Public sign-up settings. For a detailed guide, read it.
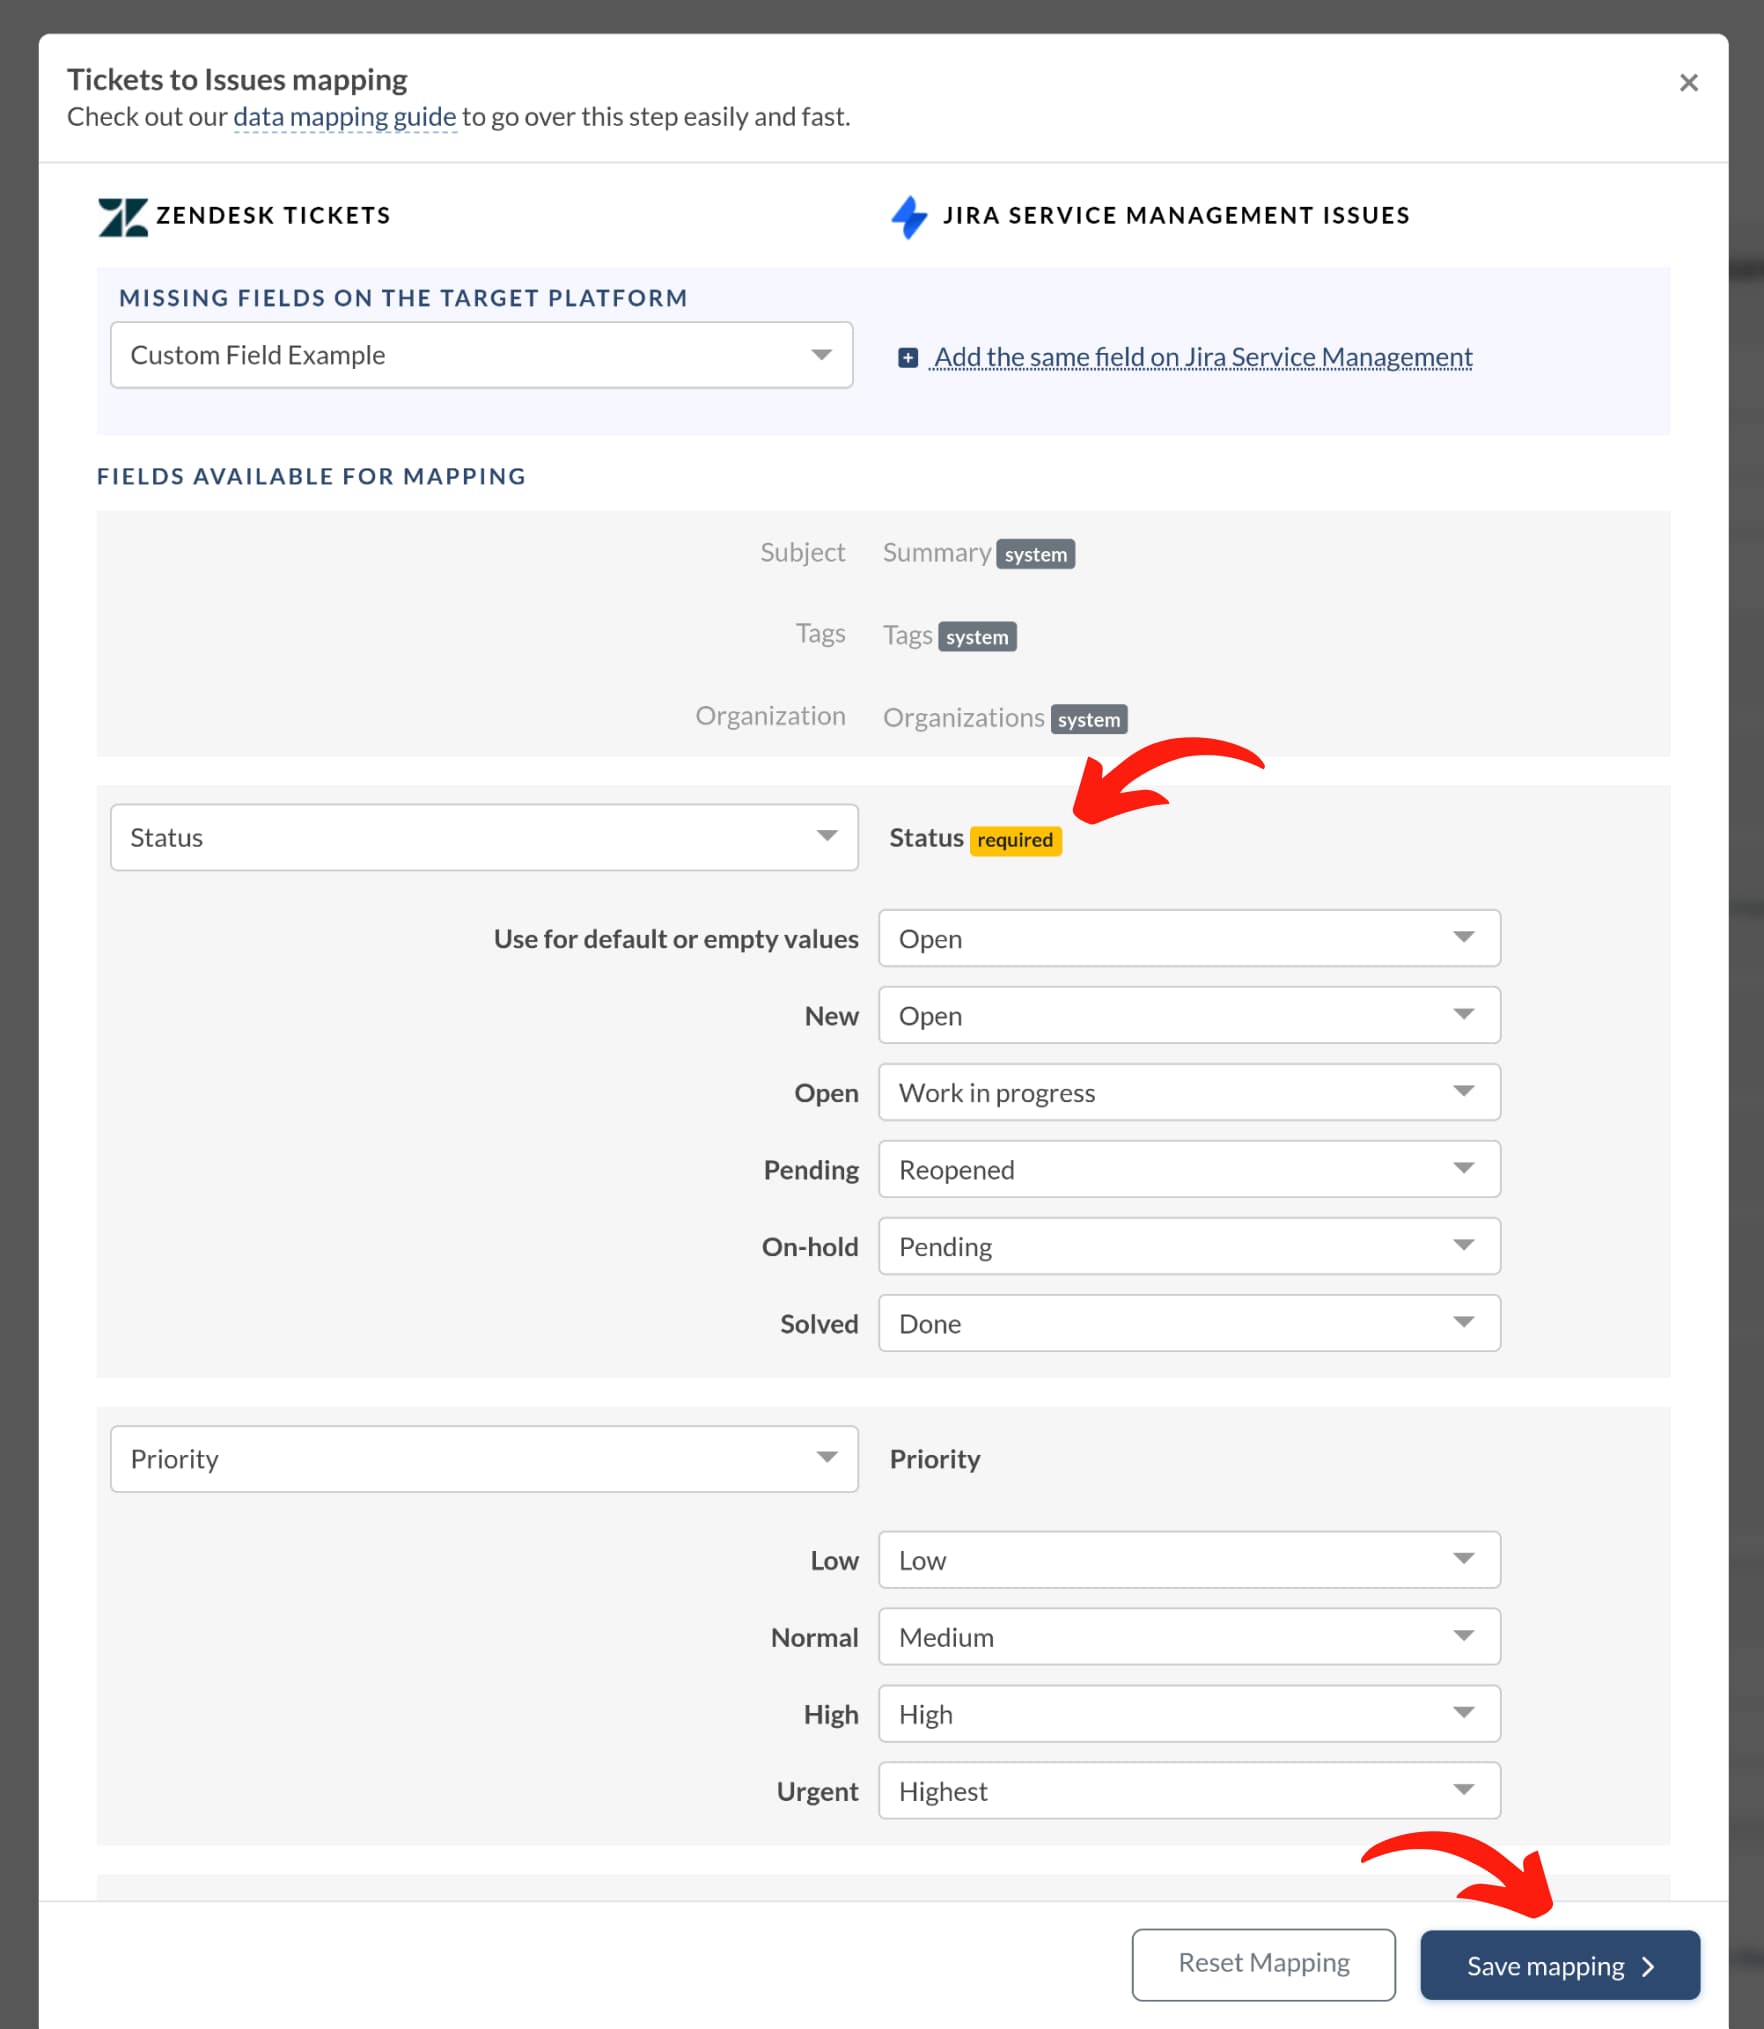
If you still want to create custom fields, follow the given steps:
Go to Settings > Issues > Fields (Custom fields) > Create custom fields.
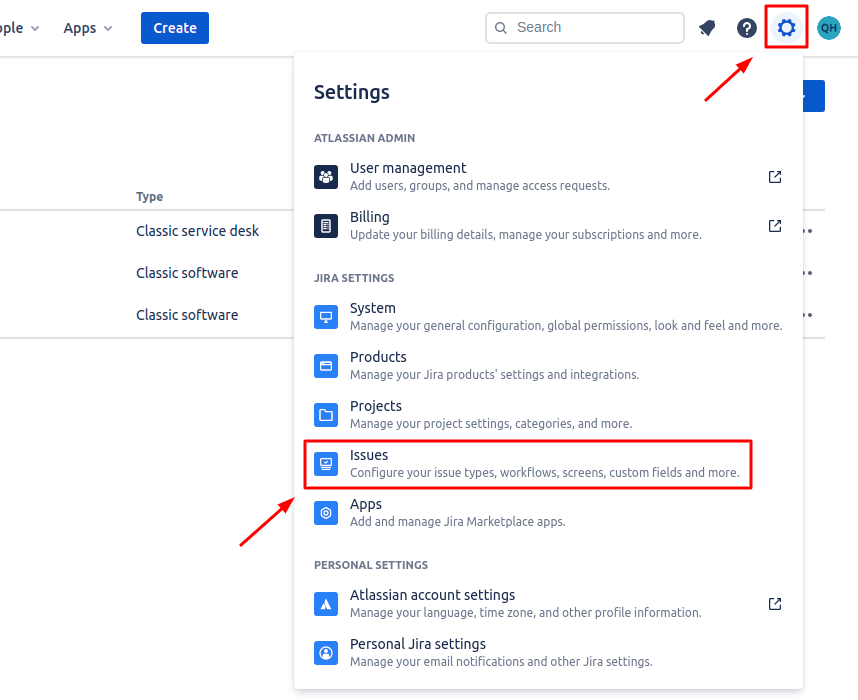
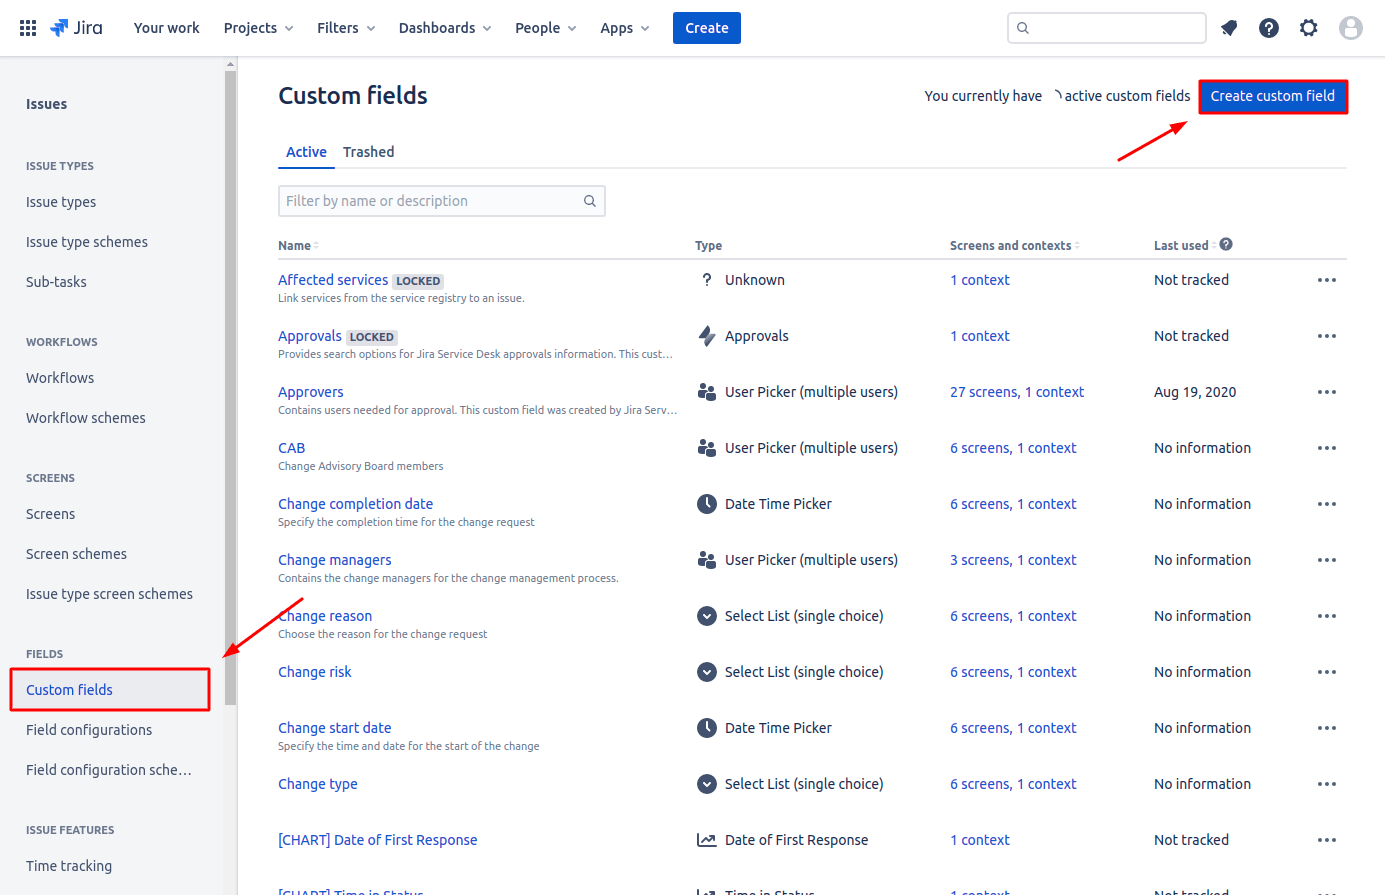
- Set the Resolution field on the mapping; otherwise, all the migrated cases will be unresolved.
- You can map the Status field to the Status and Resolution fields twice.
- Add custom fields to the correct project screen in Jira Service Management.
3. Increase the size limit of attachments
To successfully import all attachments to Jira Service Management, make sure to adjust the size limits accordingly.
4. Enable the Public sign-up settings for contact migration
To migrate your contacts, you'll need to enable the Public sign-up settings. For step-by-step instructions, refer to our detailed guide or watch our easy-to-follow video tutorial.
5. Verify admin rights before data migration
Before starting your data migration, ensure you have admin rights for the Source and Jira Service Management. This access is essential for a smooth and successful migration process.
6. Disable email notifications
To disable email notifications in Jira Service Management, follow these steps:
Go to Jira Service Management project > Project Settings.
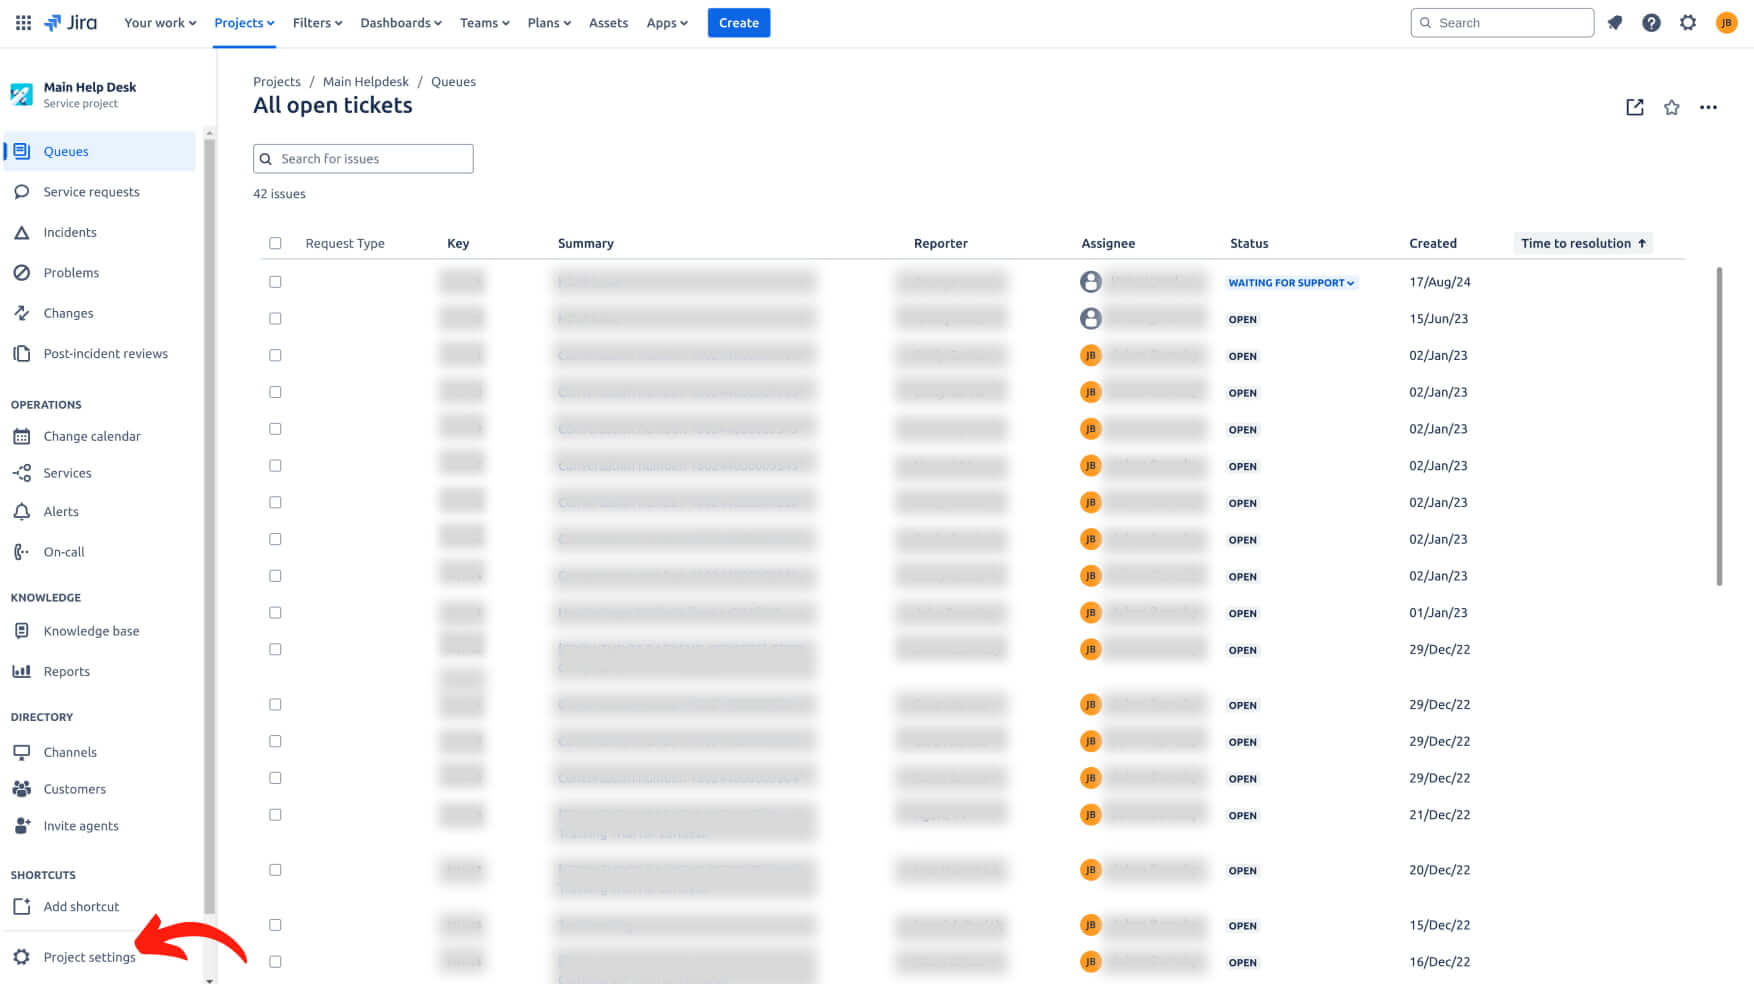
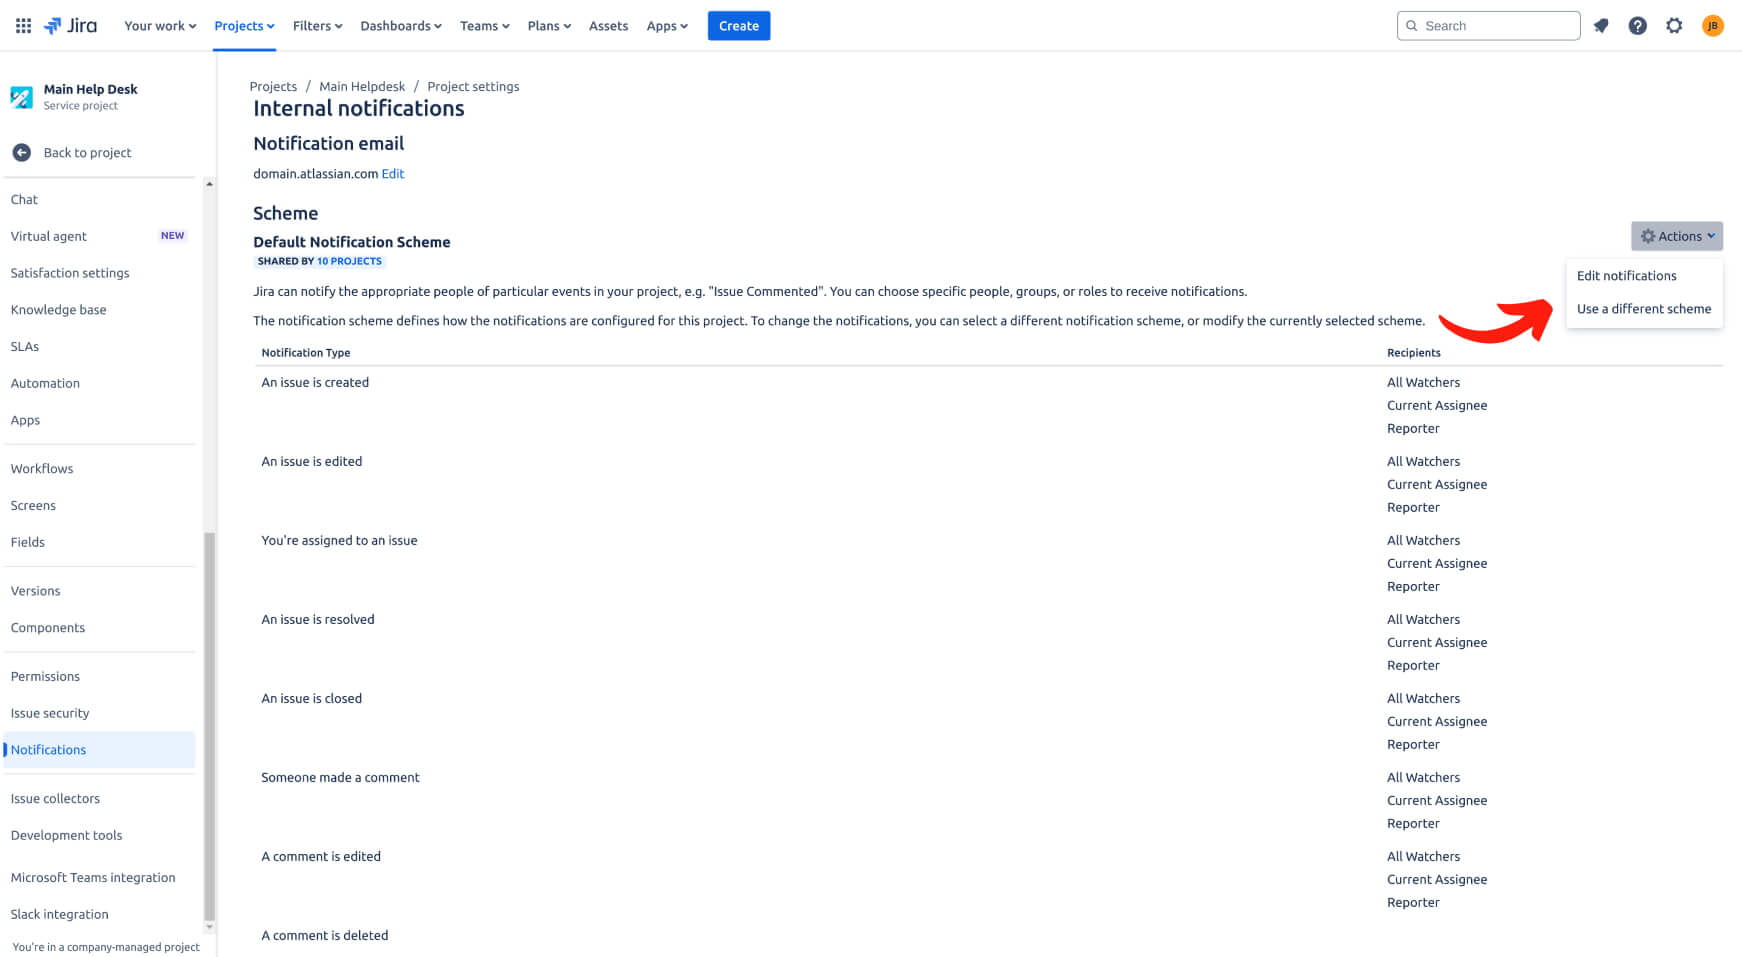
Scroll down and click on “Notifications.” You will see the Notification Scheme linked to your project. Click “Actions”, then select “Edit Notifications.”
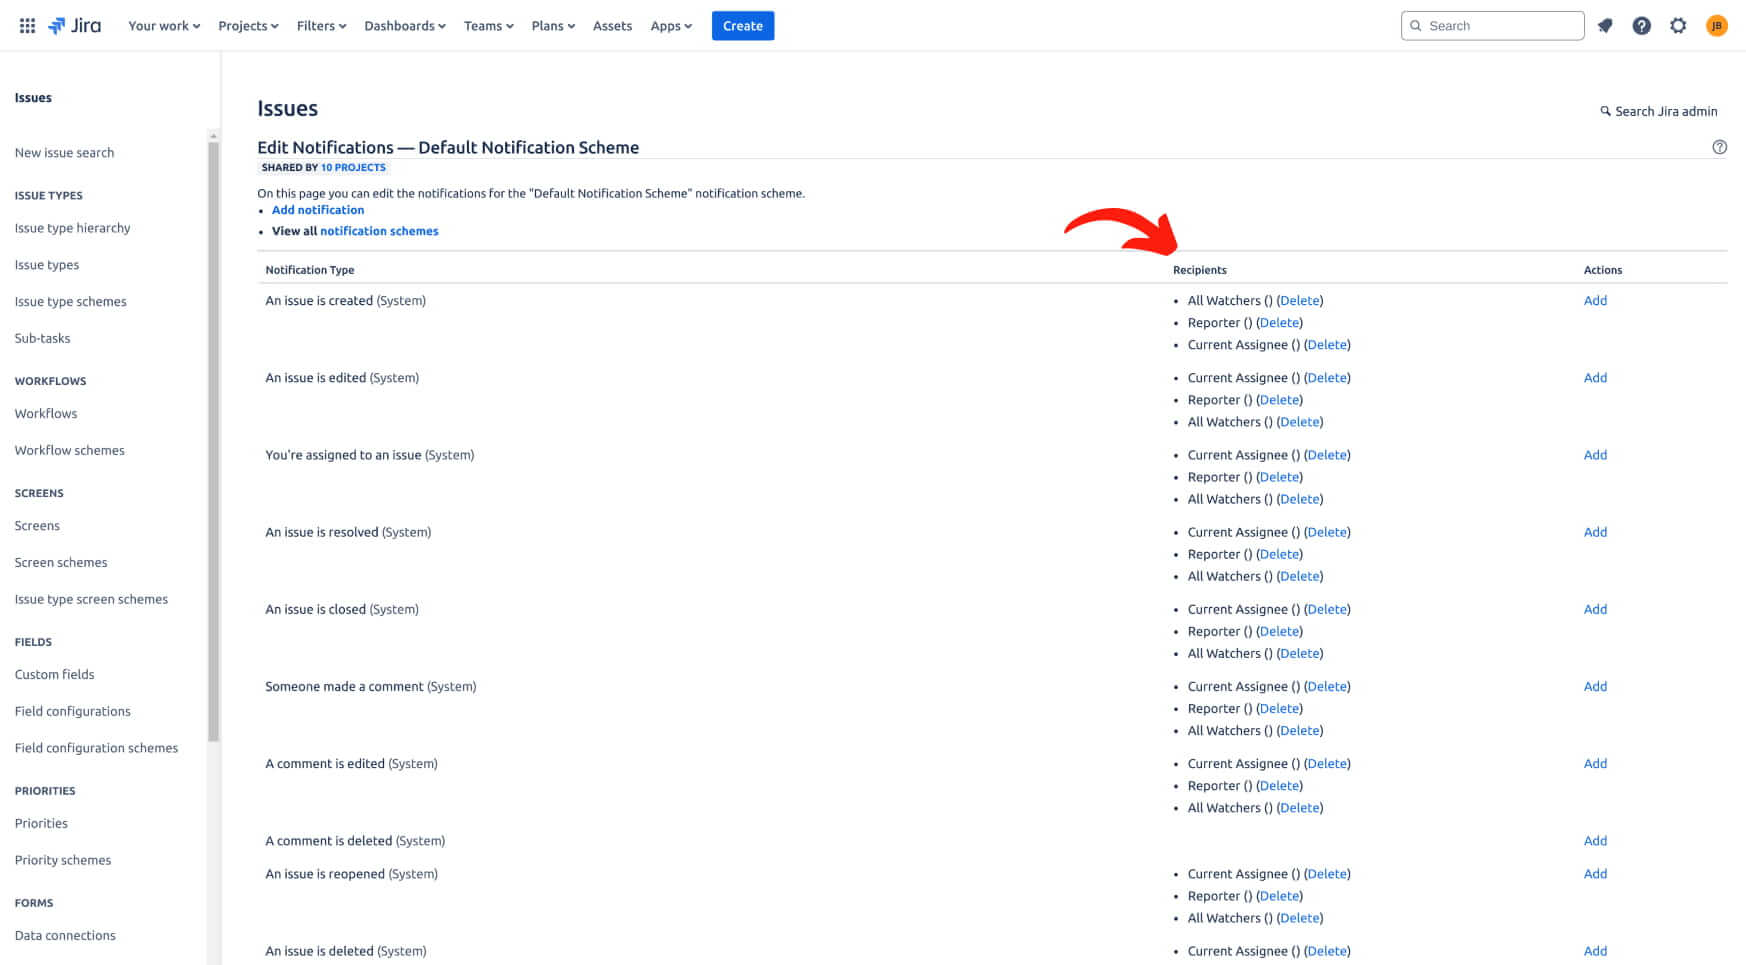
For each event, remove the recipient types (e.g., All Watchers, Reporter) to turn off notifications. The notifications remain configured, but no one will receive them. After removing recipients for all necessary events, save your changes.
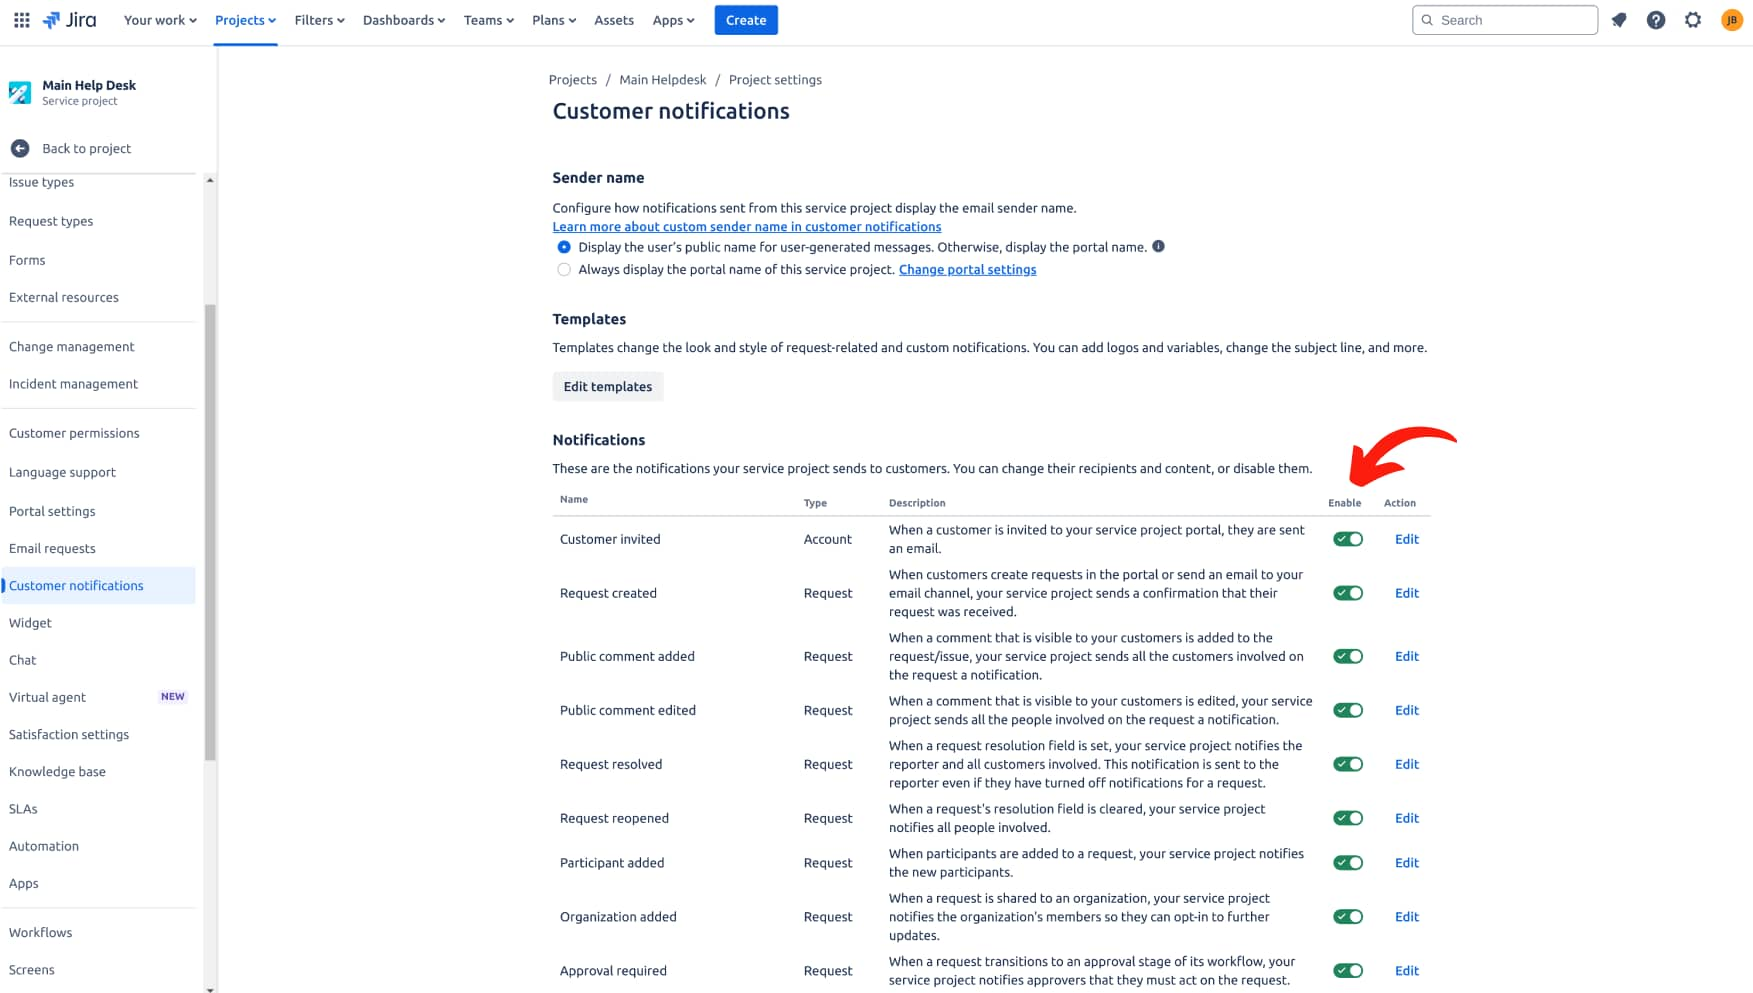
To disable Customer notifications in Jira Service Management, follow these steps:
Navigate to Jira Service Management project > Project Settings.

Scroll down and select "Customer notifications". For each rule, turn off "Enable."
To temporarily disable all outgoing emails in Jira Service Management through Global settings:
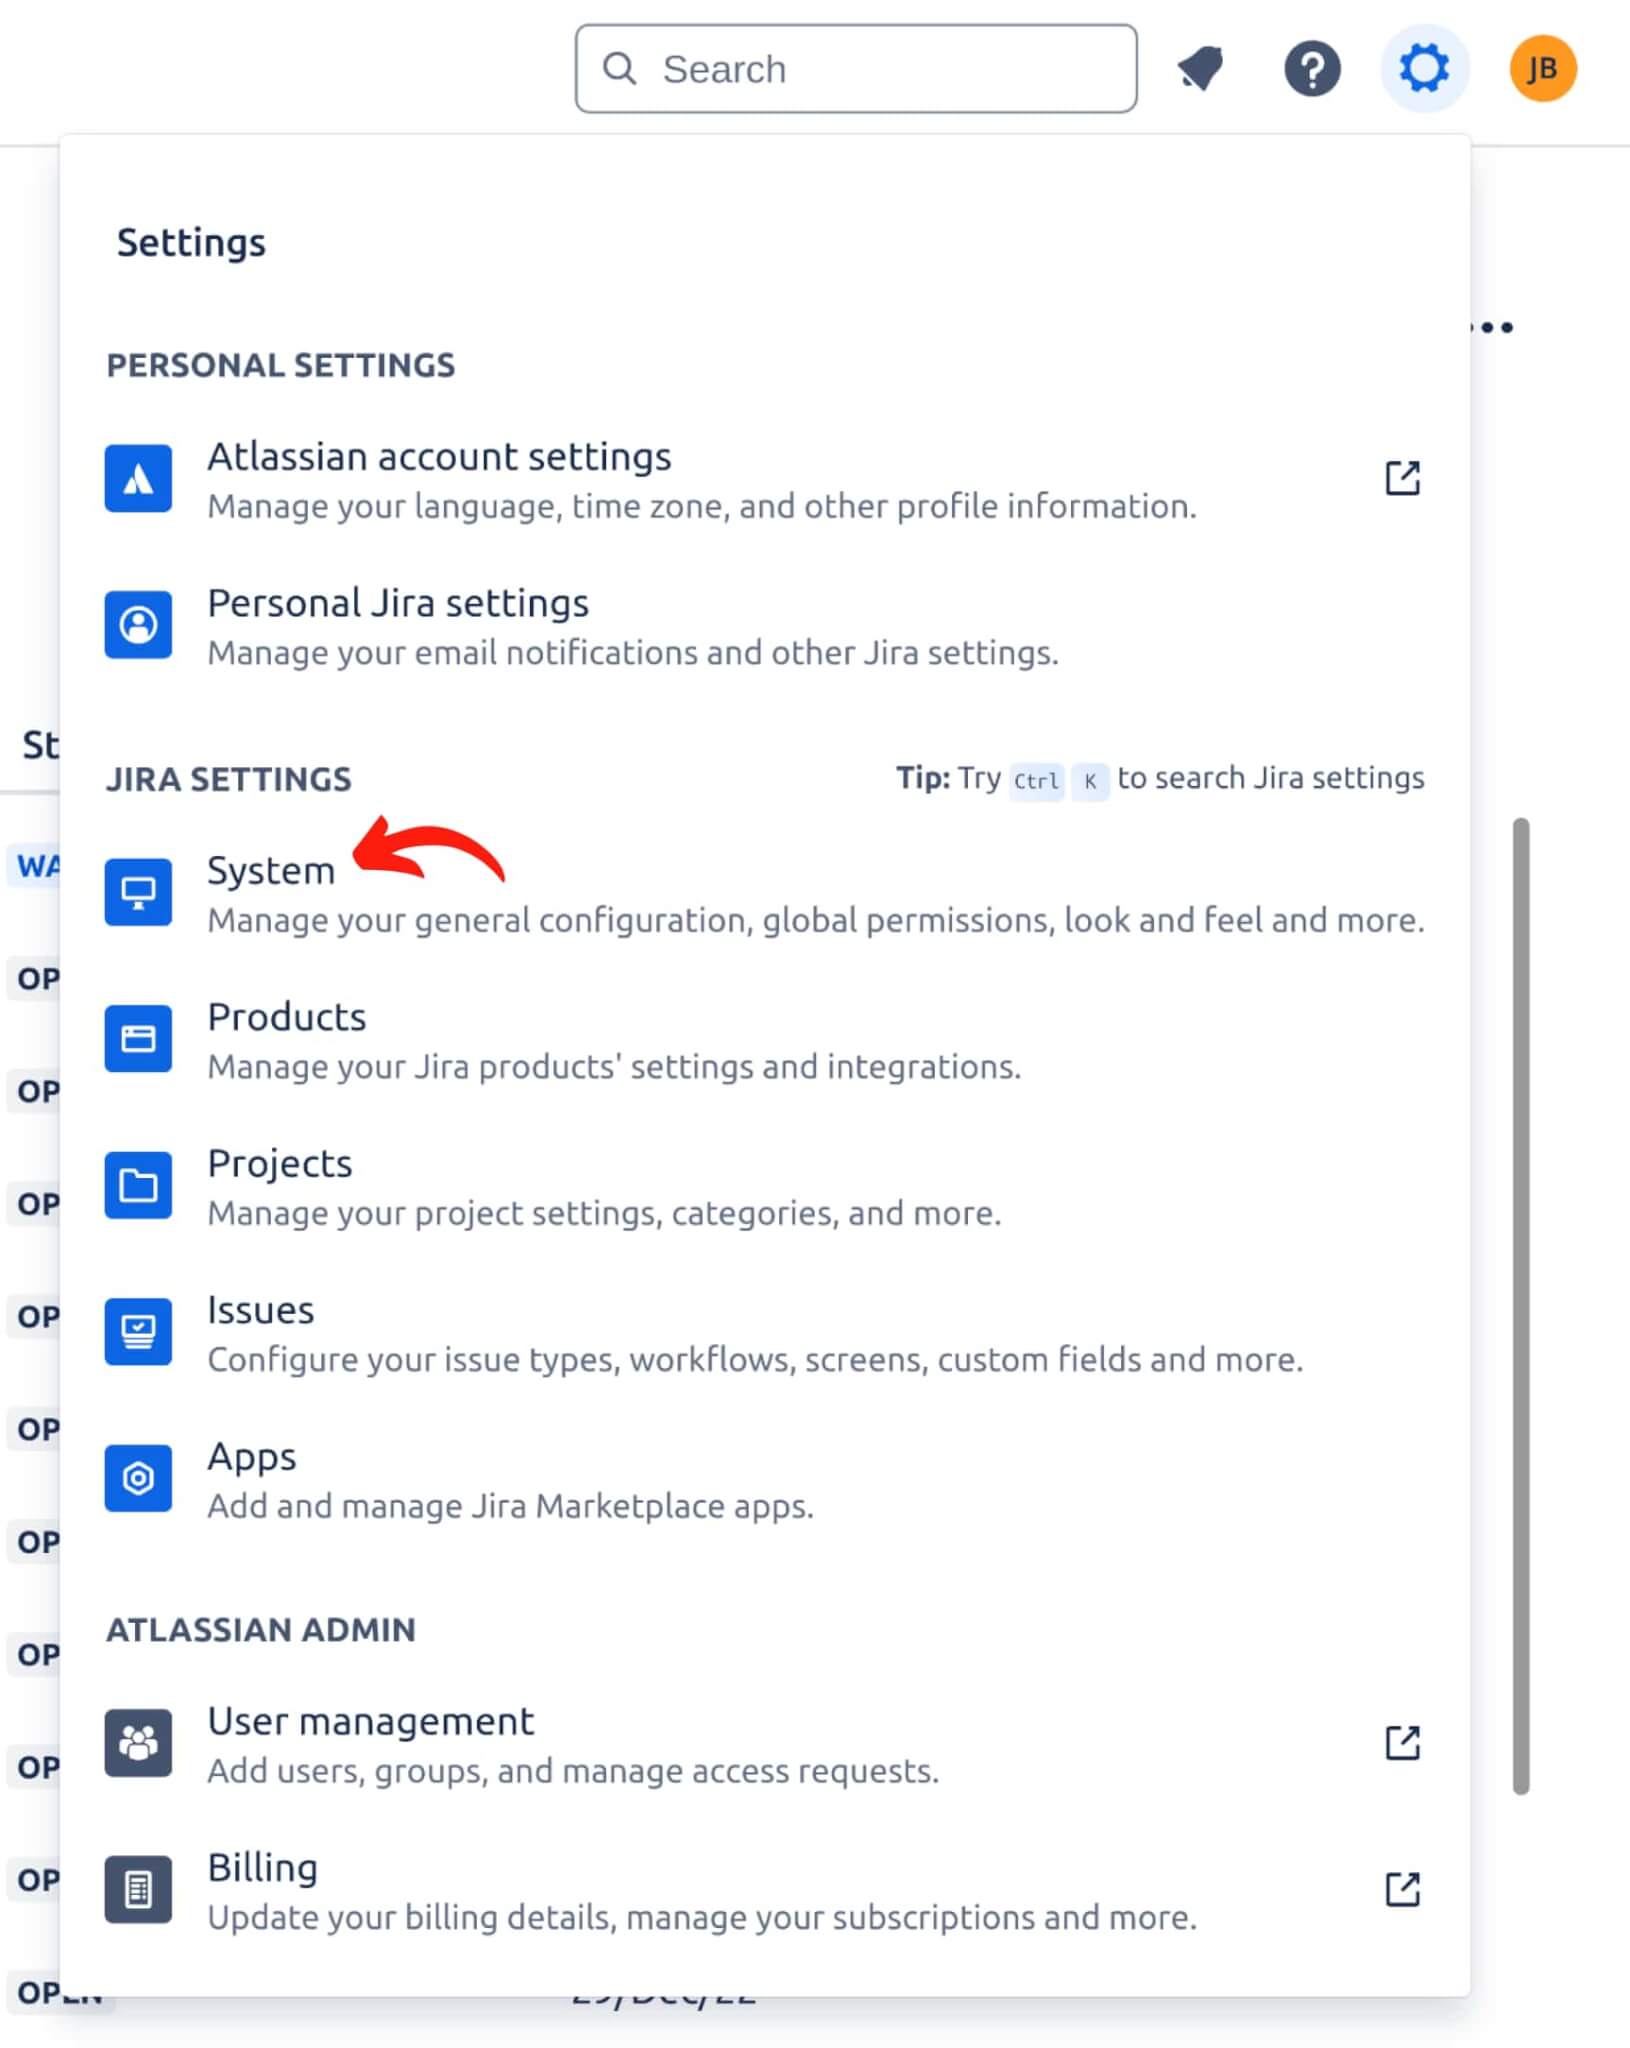
Go to the Jira Service Management administration dashboard. Click the gear icon (⚙️) in the upper-right corner to open the settings menu. From the dropdown menu, select System" to access system settings.
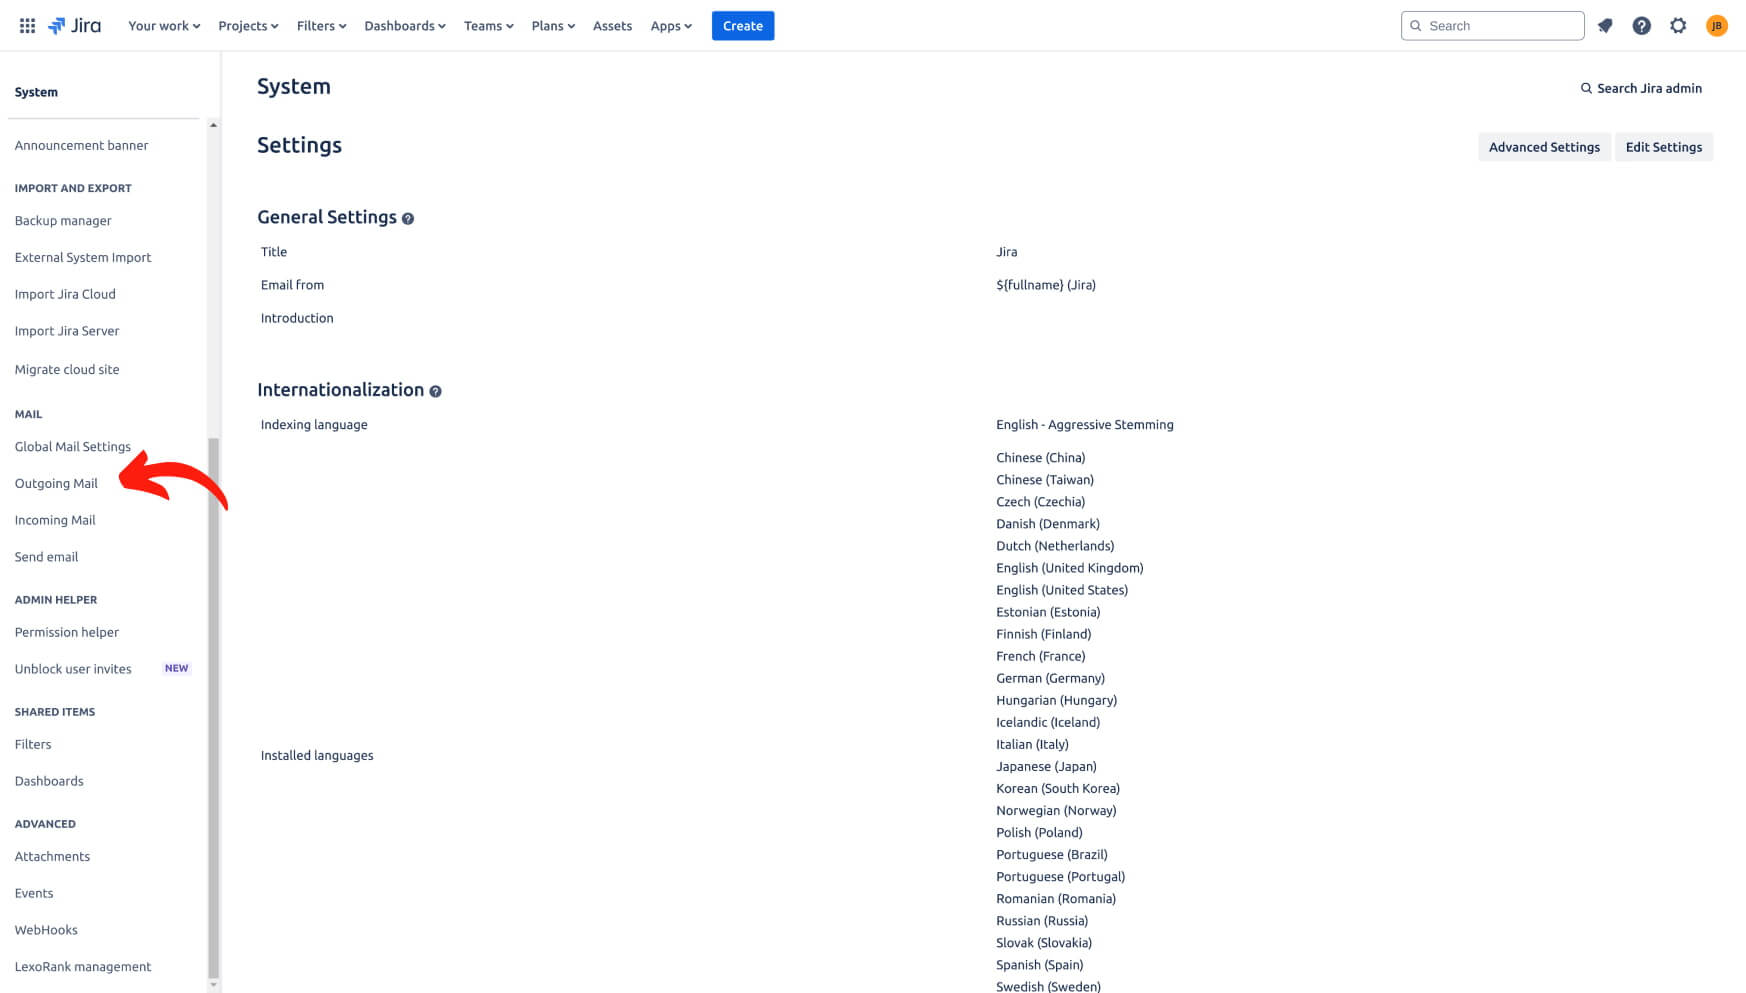
On the left-hand sidebar, scroll down to "Outgoing Mail" and click to access global email settings.
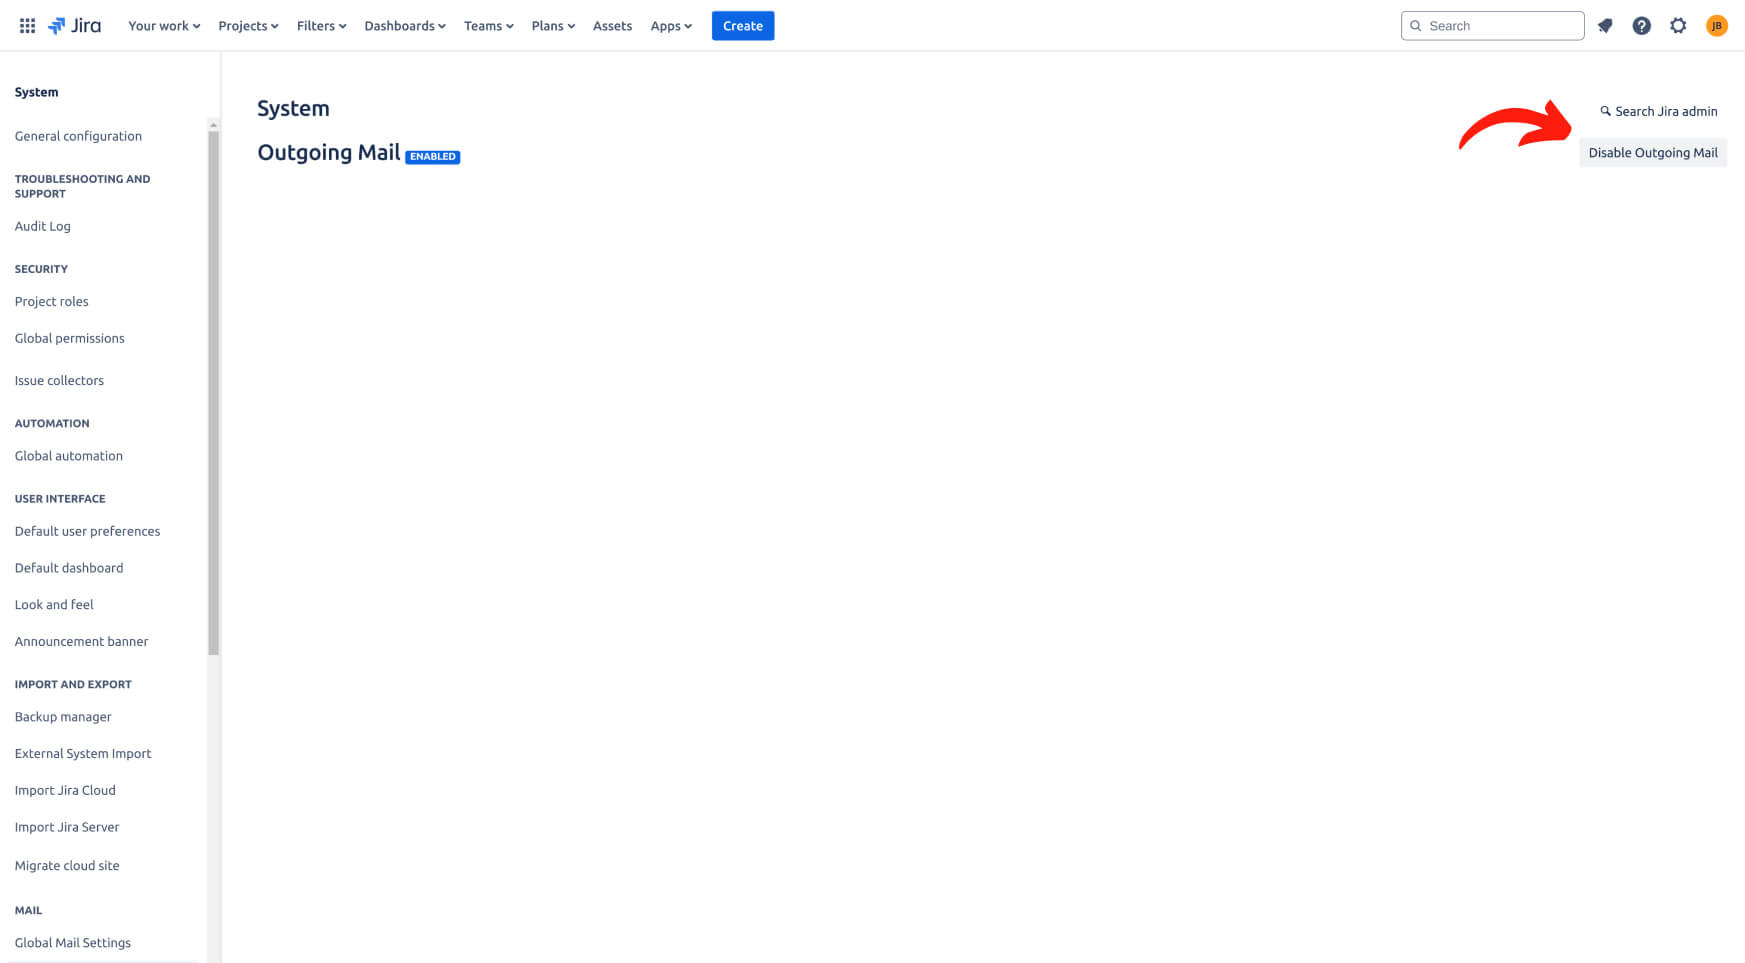
Click the "Disable Outgoing Mail" button. If a confirmation dialog appears, confirm the action. Once disabled, the status will change to "Disabled," indicating that no emails will be sent from Jira Service Management until this setting is re-enabled.
7. Disable automations
To disable all active automations in Jira Service Management, follow these steps:
Navigate to the project where you want to disable the automations. Click "Project settings," located in the lower-left corner.

In the project settings menu, select "Automation." You'll see a list of all automation rules associated with the project. Identify the rules that are currently active. For each active automation rule, toggle the status from "Enabled" to "Disabled." Confirm or save changes if prompted to ensure the automation rules are disabled.
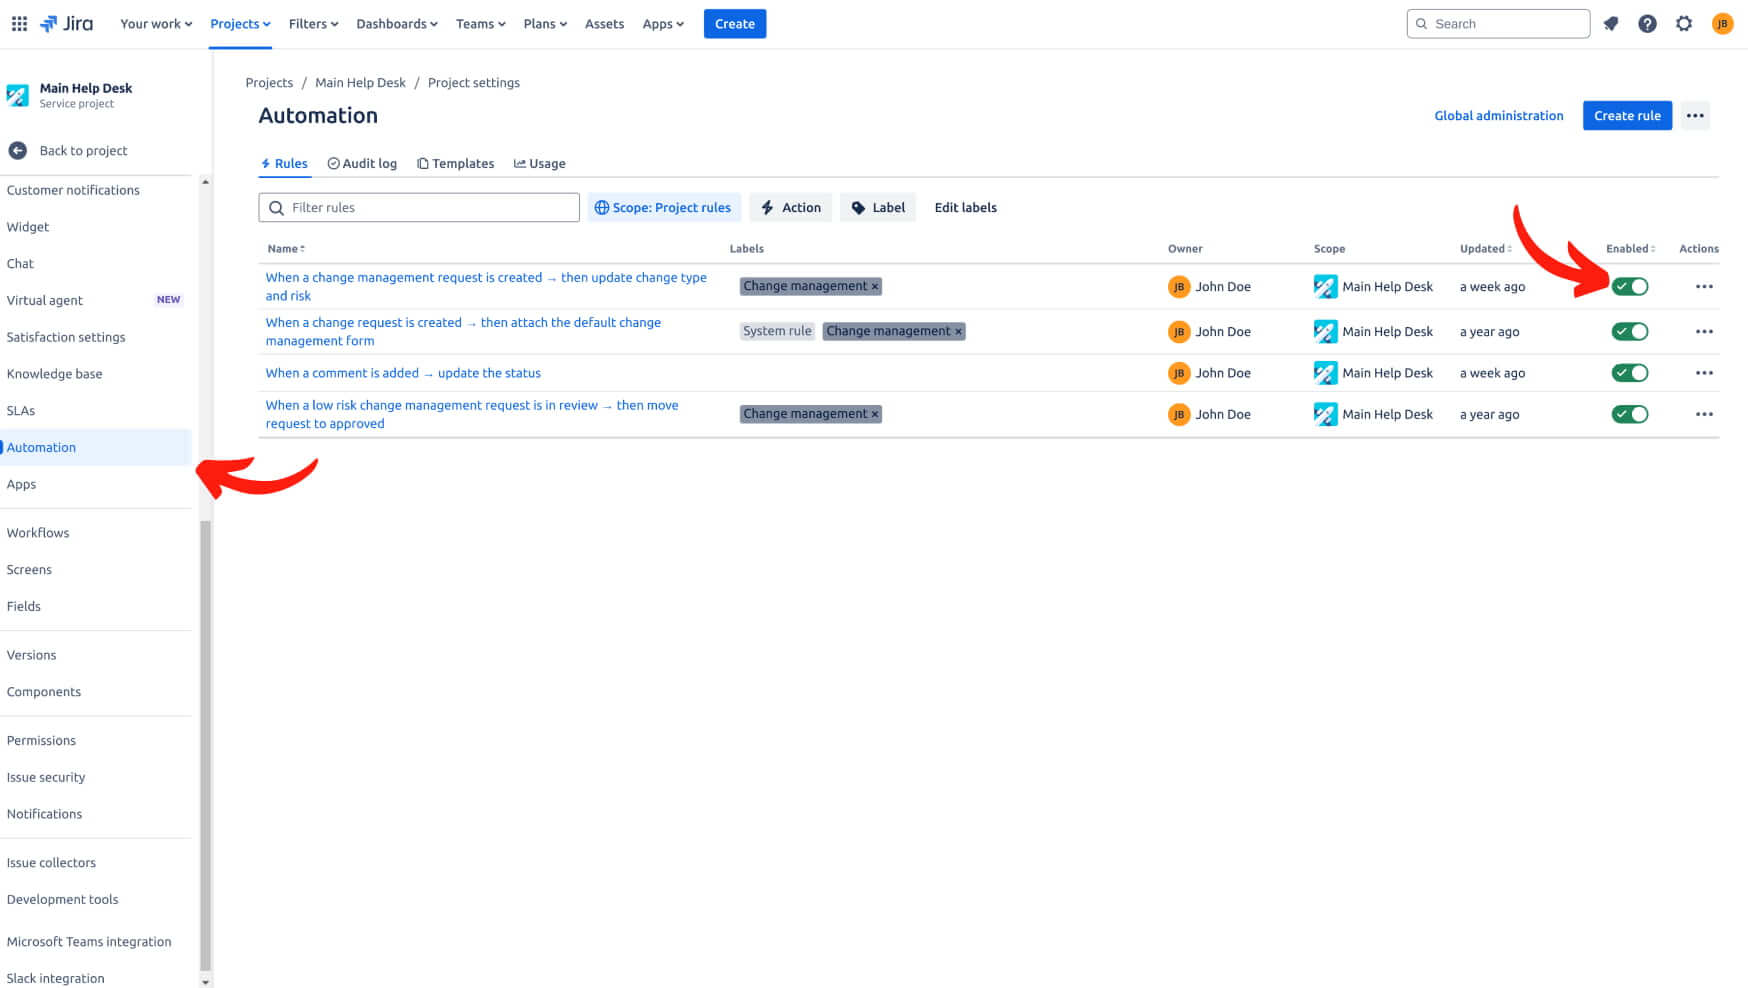
Repeat this process for all active rules and review the list to verify that no rules remain enabled.
4. CONSIDER THE PECULIARITIES AND LIMITATIONS
When migrating to Jira Service Management, consider the following peculiarities:
- There are two types of projects in Jira – Classic and Next-gen. Our tool only migrates to Classic projects. If you want to import data to a Next-gen project, check out a guide with a video.
- By default, you can only set one issue type per migration applied to all issues. If you want to transfer multiple issue types, dive your data migration into parts. Then migrate tickets of every ticket type separately.
- You can move organizations to Jira Service Management by default, but they won't link to tickets.
- Jira’s API doesn't support the import of custom fields for organizational entities directly. However, there's a workaround. However, you can migrate organizations in a separate data migration via CSV file. Jira will then automatically update the custom field data for the existing companies. For the companies not currently in the system, Jira will populate the custom fields with the data from your imported CSV file.

- Do not deactivate end-users because our tool won't migrate their cases.
- If a contact has a private email in Jira SM, our tool automatically creates a new contact; Migration Wizard adds +1 to the original email address.
- If a contact is deleted in Jira Service Management, the Migration Wizards creates a new contact by adding +1 to the original email. Notice that Jira Service Management reserves the original email for 30 days after deletion. During this period, our tool cannot set up a contact with the same email address.
5. SEE IF YOU NEED CUSTOMIZATION
When migrating to Jira Service Management, you can apply some ready-made customizations:
- Add a tag to the migrated tickets
- Skip attachments
- Migrate ticket side conversations
- Migrate newest records first
- Migrate call recordings (if only Zendesk is a source platform)
- Demo with custom data
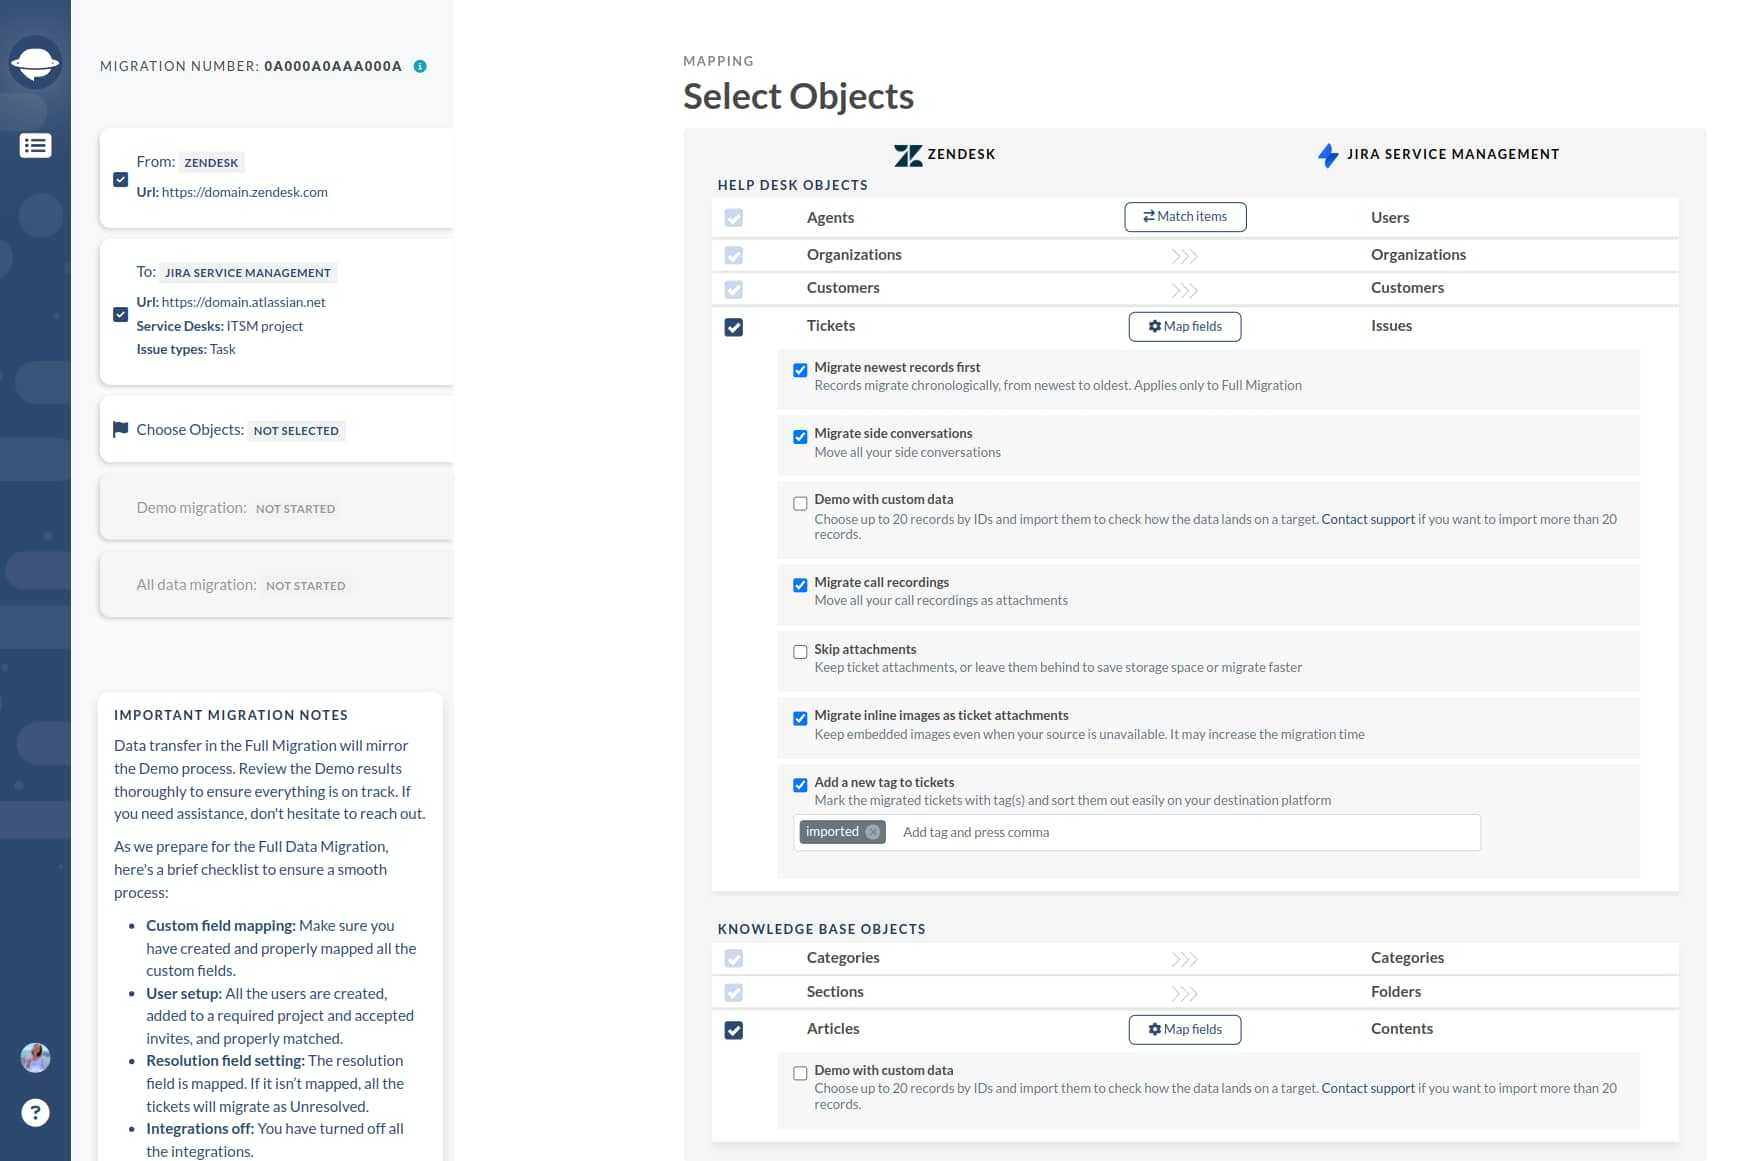
When migrating to Jira Service Management, you can add tags to identify the migrated data. You can also migrate inline images as attachments. Note that this option can take longer to migrate data.
Besides, you can migrate call recording if your source help desk is Zendesk. Or skip attachments to speed up data migration. Finally, to test our Migration Wizard with a specific data set, choose Demo with custom data for both tickets and articles.
If you want to adjust your records transfer, request a Custom data migration. The popular customizations list includes:
- Migrate inline images
- Data filtering by different criteria (creation date, tags, custom fields, groups, organizations, assignees) migrate into different projects
- Change of the default migration process (migration of change and problem objects as tickets, migration of ticket events as private notes, migration of the information related to inactive users)
- Migration of the information from the integrations (migration of linked Jira task ID or URL)
- Adding information to the migrated data (marking tickets with extra tags, adding legacy ticket ID to the ticket subject)
YOU’RE ALMOST READY
1. FIND ACCESS CREDENTIALS
When running a Demo Migration, you need to have access credentials to the source platform and Jira Service Management.
To connect Jira Service Management with our tool, you need:
- URL: URL of your company's Jira Service Management account.
- Username: Go to Icon > Profile; find your Username under the Contact.
- API Token: Go to https://id.atlassian.com/manage/api-tokens > Create API token > press "Create" > Copy the token to the clipboard. Be sure to save the API Token because you can’t see it later.
- Then, choose the project you will import data to or export records from.
2. INITIARE THE DEMO MIGRATION
Run a Demo Migration to test out the possible outcome of the Full Data Migration. During the Free Demo, our tool migrates 20 random tickets and articles from your current solution to Jira Service Management. Run it as many times as you need.
Run through the steps below:
- Sign in to your Migration Wizard or create an account.
- Connect your source and target solutions.
- Pick up a Project to connect Jira Service Management.
- Select the data you want to import.
- Match agents.
- Map tickets and articles route.
- Pick up automated options.
- Run your Free Demo Migration.
AFTER THE DEMO MIGRATION
1. CAREFULLY CHECK THE RESULTS IN JIRA SERVICE MANAGEMENT
After a Free Demo Migration, check out a table with four different columns or records:
- all available records
- migrated records
- failed records
- skipped records
Download reports on migrated, failed, and skipped records to study the results. As you check the migrated data, pay special attention to:
- all comments got migrated, and if the authors of the comments are the same
- the tickets are assigned to the correct agents
- all the custom fields were migrated
- the customers and companies are migrated correctly
- the attachments and labels are migrated (download attachments from your destination platform to see if everything was transferred correctly)
Read an exclusive guide to check Jira Service Management migration results for more detailed information.
2. GET A CUSTOM DEMO
If the Custom Demo hasn’t met your requirements, you can request the Custom Demo. Contact our team beforehand to discuss all the details.
DURING THE FULL DATA MIGRATION
1. CHOOSE YOUR MIGRATION: DEFAULT OR WITH DELTA
If you need to use one of your help desks during the Full Data Migration, consider your options:
- Work with a source help desk during the Full Data Migration. However, the created or updated records won't migrate to Jira Service Management. So, run the Delta Migration so as not to lose that data.
- Continue to run your work on your target help desk.
As the Full Data Migration runs in the cloud, you can:
- Check how your data migration is going in Migration Wizard
- Wait for our support team to reach out to you
2. DON’T MAKE ANY LAST-MINUTE CHANGES
Any alteration can take more time to migrate your data or suspend your migration at all. If you identified duplicated or unnecessary data on the source help desk, let it go through. Better audit migrated records on Jira Service Management after the data migration.
If new tickets are coming into your source help desk, you can opt for the Delta migration to migrate them to Jira Service Management.
3. START FULL DATA MIGRATION
The Migration Wizard imports each record one by one to a chosen project. Depending on your number of entities, the process may take from 20 minutes to a few days.
The Full Data Migration starts if:
- Your payment is confirmed. It may take some time, so make a transaction in advance or schedule data migration.
- You've agreed to the checklist. Press on the corresponding checklist to open a mini-guide of the essential steps you need to take before transfer. Once you have completed all the steps, put a tick in a checkbox.
AFTER THE IMPORT IS DONE
1. CHECK ONCE AGAIN
Your Full Data Migration is completed, so start to study to see if everything migrated correctly. You have five days to check the results until Migration Wizard archives your data migration.
If you can’t locate something, ensure that search filters are set for all tickets and any period. If the problem still remains, drop a line to our support team.
2. UPDATE YOUR NEW PLATFORM
- If you migrated Knowledge Base articles, manually update internal links.
- Turn on all communication channels.
- Re-forward your emails to Jira Service Management.
