Salesforce Service Cloud Migration Guides
How to disable notifications in Salesforce Service Cloud?
Workflow automation rules help to get a lot of mundane, manual work out of the way. However, when you’re migrating to Salesforce Service Cloud you need to delete all workflow rules to prevent the system from sending out automatic email updates during the ticket import.
Note: if you haven’t created any workflow rules yet, you can skip this step.
Here’s how you can disable workflow automation rules:
1. Sign in to your Salesforce account with Admin rights
2. Go to Setup:

3. Under PLATFORM TOOLS find Process Automation and unfold the Workflow Actions tab:

4. Go to Workflow Rules and disable all rules to avoid automatic email updates.
How to migrate Created at, Closed at, Last modified at and Creator ID to Salesforce Service Cloud?
In migrate Created at, Closed at, Last modified at and Creator ID parameters to Salesforce Service Cloud you need to enable the below preferences.
1. Go to Setup:

2. Go to User Interface | User Interface:

3. Check Enable "Set Audit Fields upon Record Creation" and "Update Records with Inactive Owners" User Permissions.
4. Click Save.
Note that migrating from Salesforce Service Cloud you don't need to enable these preferences.
How to enable “Modify All Data” permission for a profile in Salesforce Service Cloud?
Enabling the "Modify All Data" permission in Salesforce Service Cloud is essential for ensuring a smooth data migration process. Follow these steps to grant the necessary permissions
How to check profile license
To check if the profile has a Salesforce license, go to Users; Profiles or type Profiles in Quick Find.

There, you will see all the profiles you have in your Service Cloud and the license of each profile.

How to enable the "Modify all data" permission
Go to Users; Profiles or type Profiles in Quick Find.

Locate the profile you need to change and select Edit.

Once you have the profile open scroll down to Administrative settings (or use Ctrl/Cmd + F to search in the text), find the Modify all data and check the box next to it.
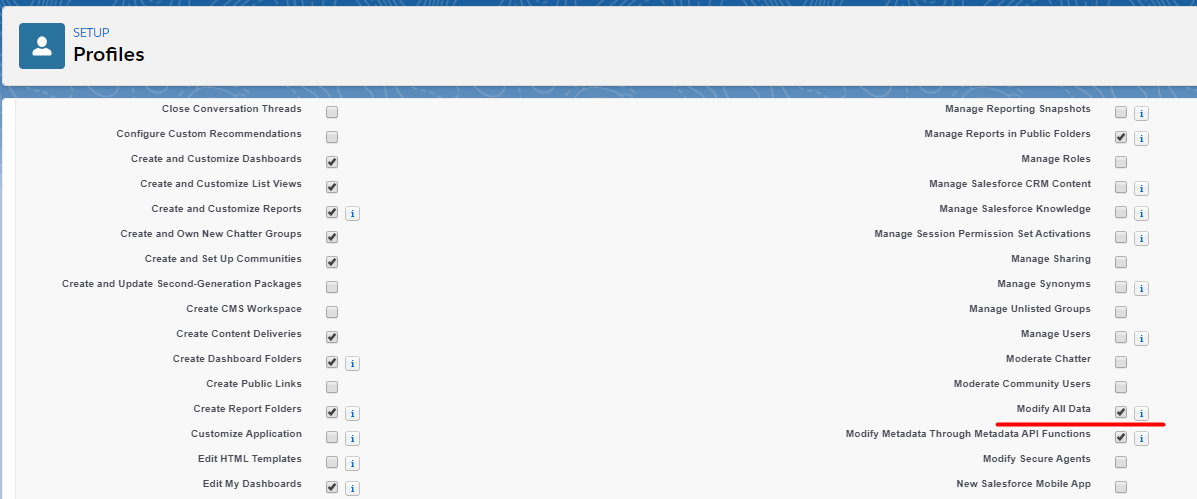
Salesforce will automatically check other necessary permissions. Scroll down to the very bottom of the page and click Save.
Verification steps
After enabling the "Modify All Data" permission for the necessary profiles, ensure that all agents are correctly assigned to these profiles. Follow these steps for verification:
Go to Users > Users to view all users and their assigned profiles.

Review Assignments:
- Verify that each agent involved in the migration process is assigned to a profile with the "Modify All Data" permission.
- Ensure consistency between the assigned profiles and the permissions required for migration.
Adjust Assignments (if necessary):
- If any discrepancies are found, select the user requiring adjustments and click Edit.
- Update the user's profile and license to align with migration requirements.
- Save any changes made.

Additionally, confirm that all agents involved in the migration are marked as ACTIVE in Salesforce.
With agent profiles accurately configured and assigned permissions verified, you're ready to proceed confidently with the .
How to migrate knowledge base articles to Service Cloud Lighting?
With Help Desk Migration service you can import knowledge base articles to Salesforce Service Cloud. However, due to the characteristics of Salesforce and its API, there’s some prep work you need to do:
- You need to switch on the knowledge base for the user with the System Administrator rights
- You need to enable the knowledge base is Salesforce
- Create Category Groups prior to the migration
How to enable the knowledge base for the user with the System Administrator rights
1) Go to your Salesforce account and click Home.
2) Under Administration, choose Users.

3) Select the user with the System Administrator profile and click on Edit.
4) At the right side of the screen, scroll down to Knowledge User and put the tick.
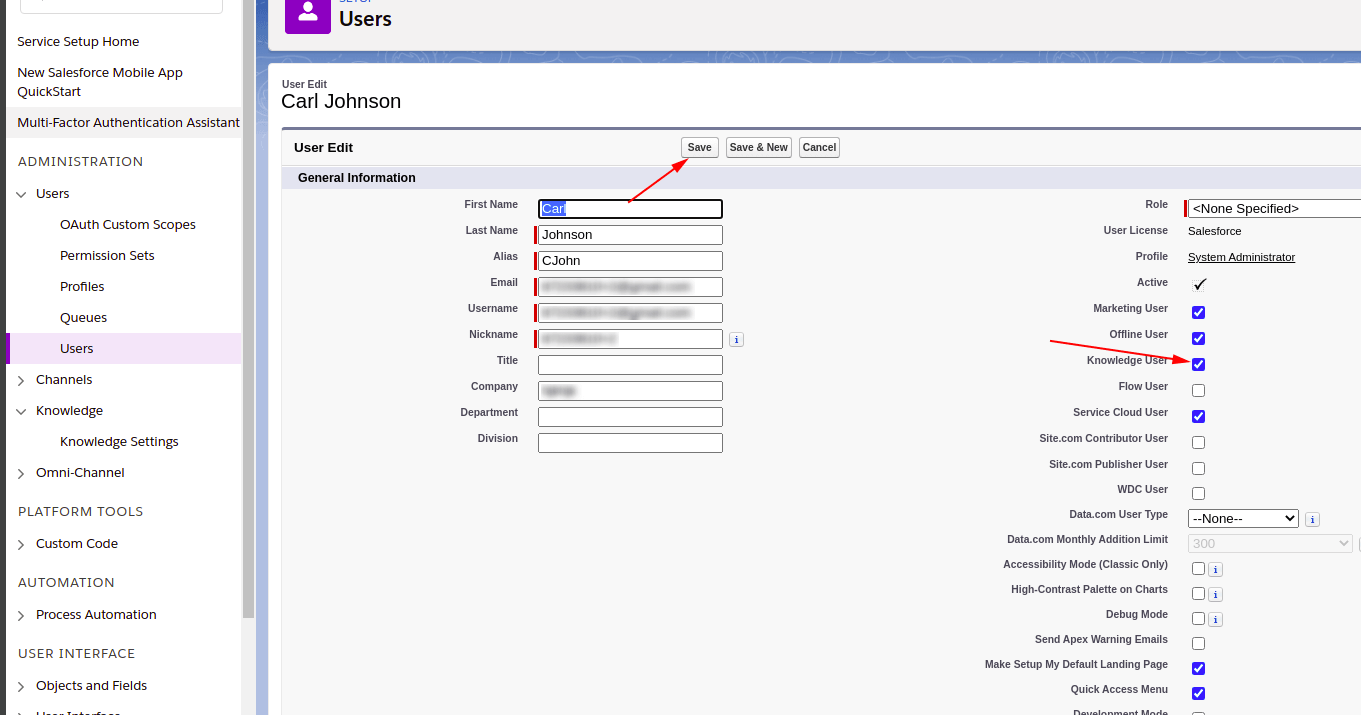
5) Click Save to preserve setting changes.
How to enable the knowledge base in Salesforce
The knowledge base in Salesforce is available in Essential and Unlimited editions with Service Cloud.
Users of Professional, Enterprise, Performance, and Developer Editions can purchase the knowledge base at an additional cost.
1) From Setup, enter Knowledge in Quick find then select Knowledge Settings.

2) Enable Knowledge by selecting Yes and clicking Enable Salesforce Knowledge.
3) Click OK to continue.
4) On the Knowledge Settings page, click Edit.

5) Select Enable Lightning Knowledge and then click Save.

Creating categories in Service Cloud Lightning
1) From Setup, enter Data Category in the Quick Find box, then select Data Category Setup.
2) Click New. Note that by default, you can create a maximum of five category groups and three active category groups.

3) Give your Category Group a name (80 characters max). You may also change the Group Unique Name (the unique name used to identify the category group in SOAP API).

4) Enter a description of the category group if necessary and click Save.
When you have completed all of the steps, go to the and begin setting up your data migration.
Why to disable Phone Duplication rule in Salesforce Service Cloud?
When migrating to Salesforce Service Cloud, it's crucial to disable the phone duplication rule to prevent interference with the migration process.
Duplicate rules in Service Cloud are helpful for alerting users about potential duplicate records while creating or editing a record. However, during migration, these rules can impede progress.
For example, when migrating from Zendesk to Service Cloud, if two end users share a company phone number as their contact reference, Service Cloud may mistakenly identify them as duplicates due to enabled phone duplication rules. This can halt the migration process with an error.
To avoid such issues, it's recommended to temporarily disable the phone duplication rule before initiating the data migration. You can re-enable the rule once the migration is successfully completed.
Steps to Disable Phone Duplication Rule:
1. Navigate to Setup by clicking the gear icon in the top right corner.

2. Proceed to Administration > Data > Duplicate management > Duplicate rules.

3. Locate and open the phone duplication rule (the name may vary).

4. Click on Deactivate to disable the rule temporarily.
By following these steps, you can ensure a smooth migration process without encountering issues related to phone duplication rules.
How to calculate contacts in Salesforce Service Cloud?
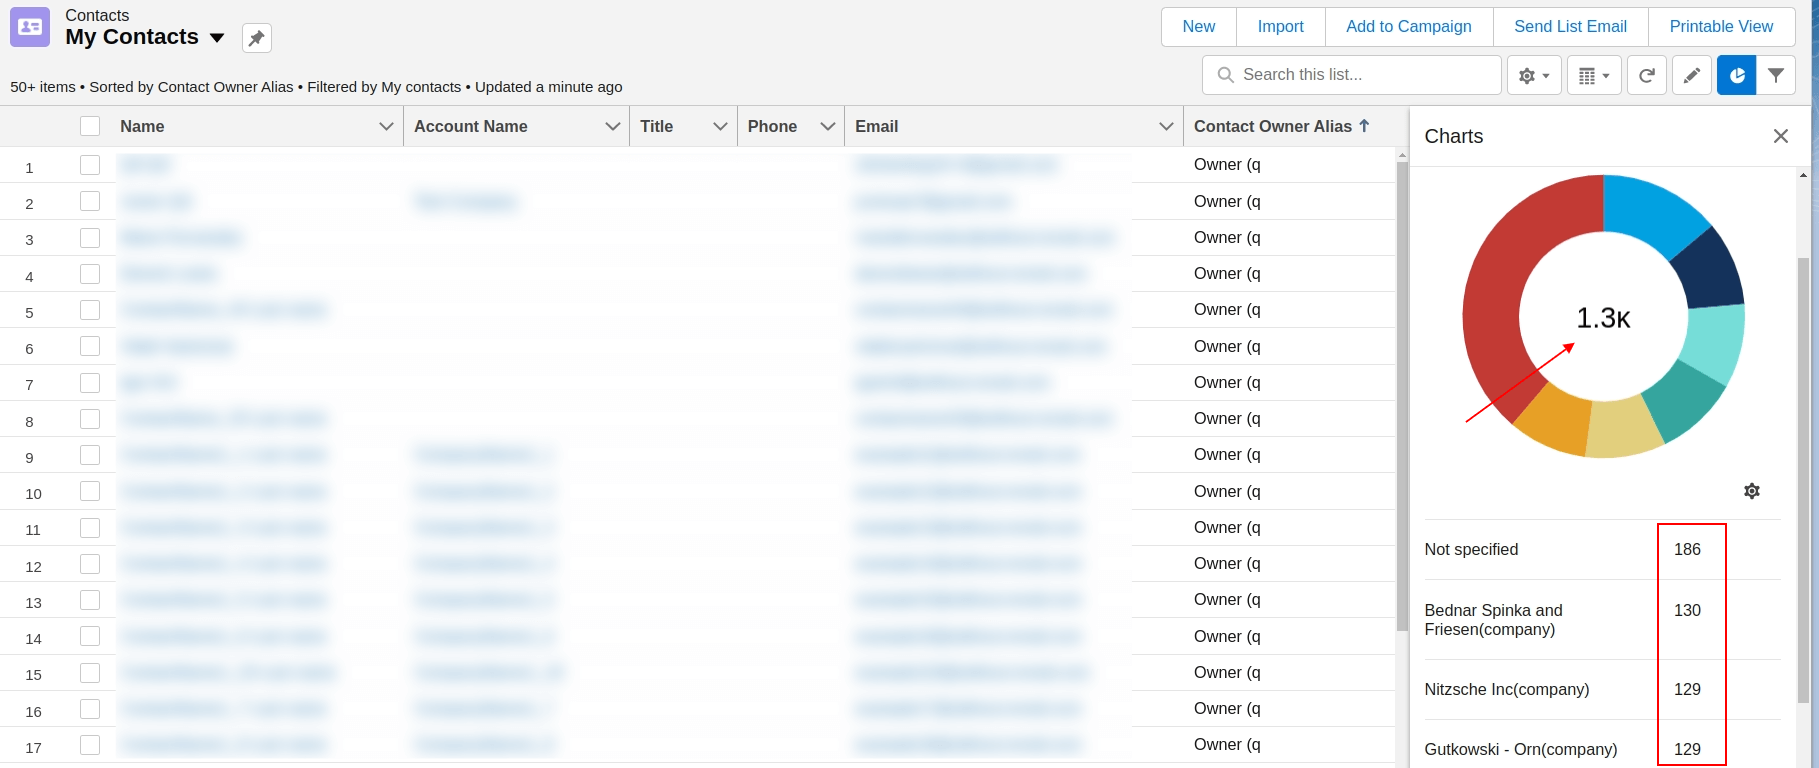
In Salesforce Service Cloud, you can calculate the number of contacts using the Charts functionality. Here’s how it works.
1. Go to Contacts.
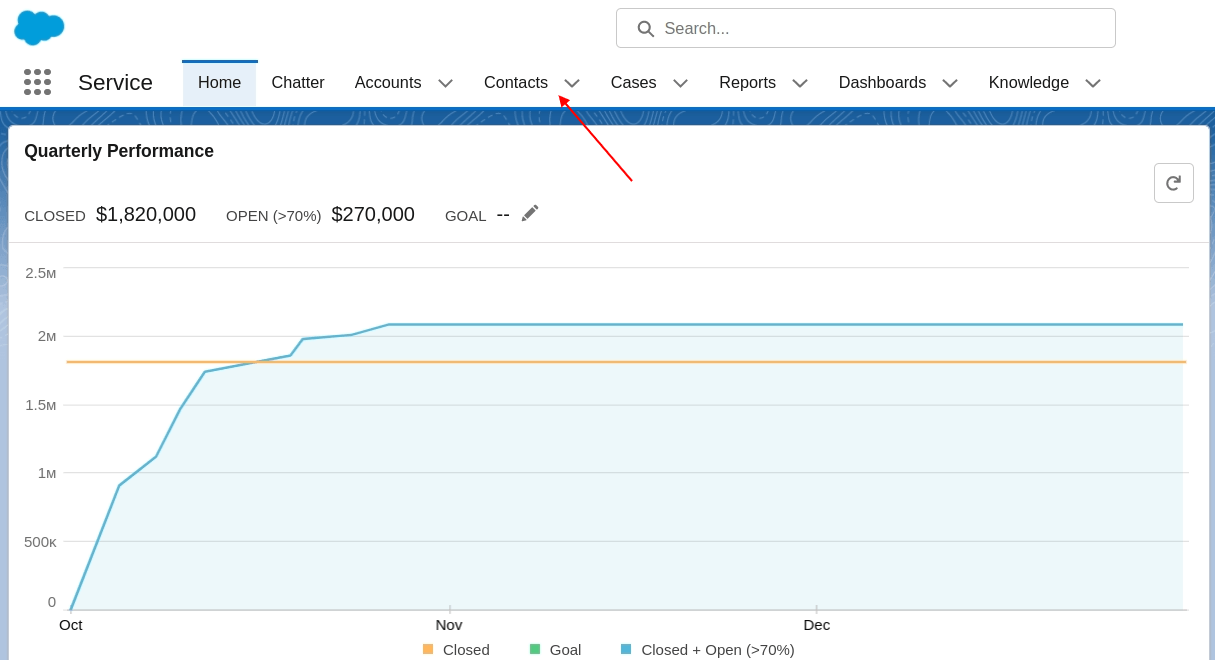
2. Select a contact list from the dropdown.
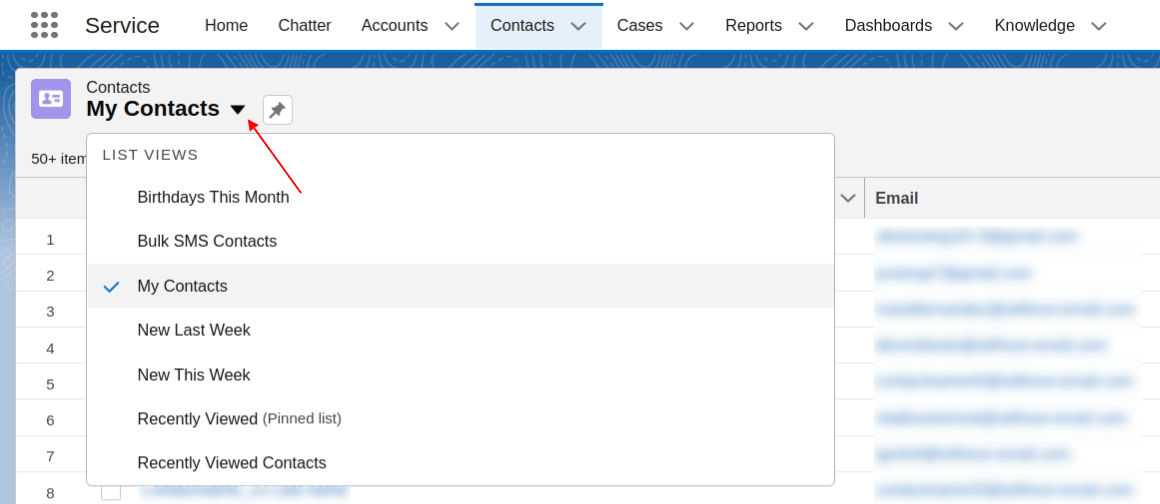
3. Click the Show charts icon on the right.

4. Check the total number of contacts inside the chart and the breakdown by groups beneath the chart.
How to calculate the number of cases in Salesforce Service Cloud?
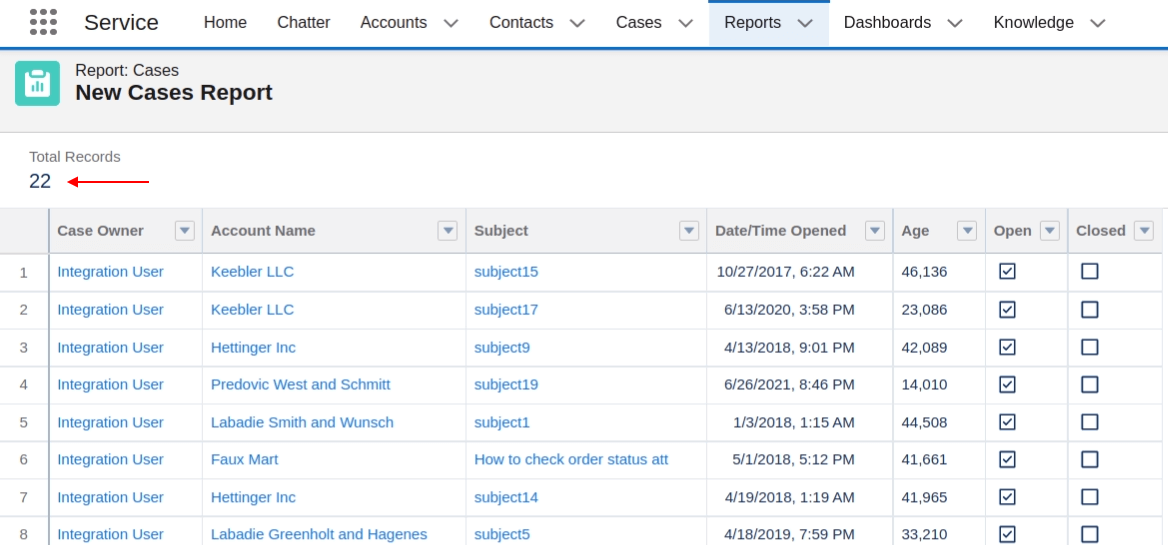
You can get the number of cases in your Salesforce Service Cloud by running the Cases report. To set it up properly, perform the following steps.
1. Go to Reports.
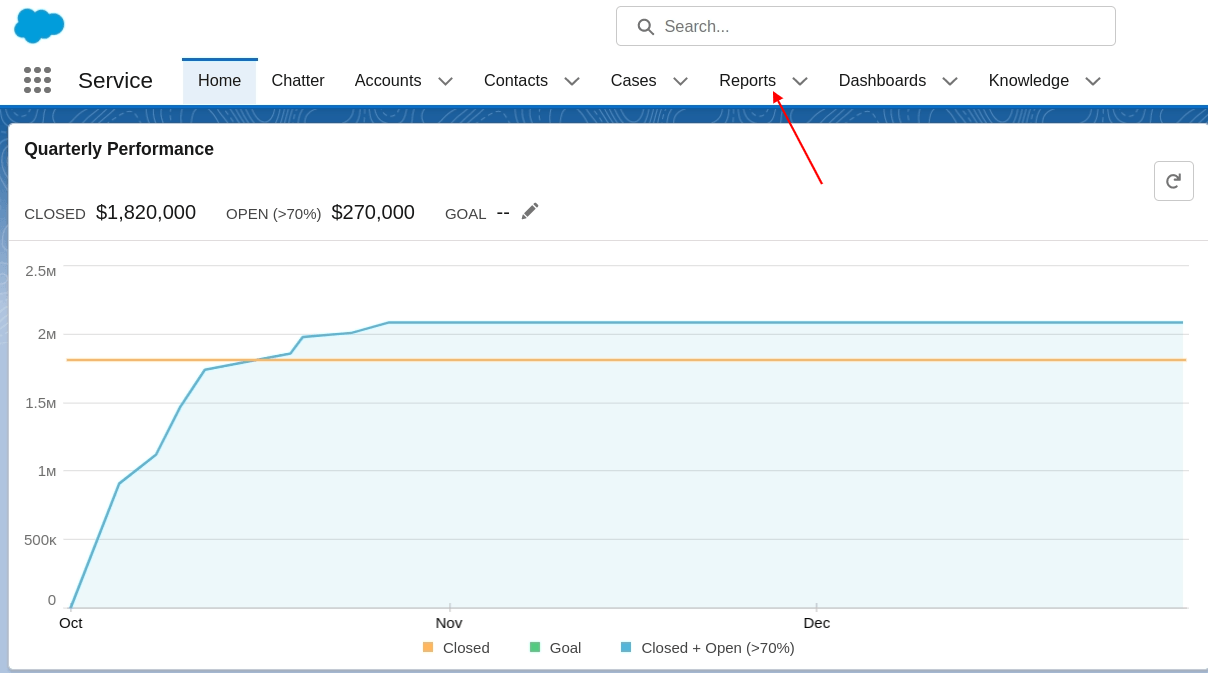
2. Choose the New Report option.

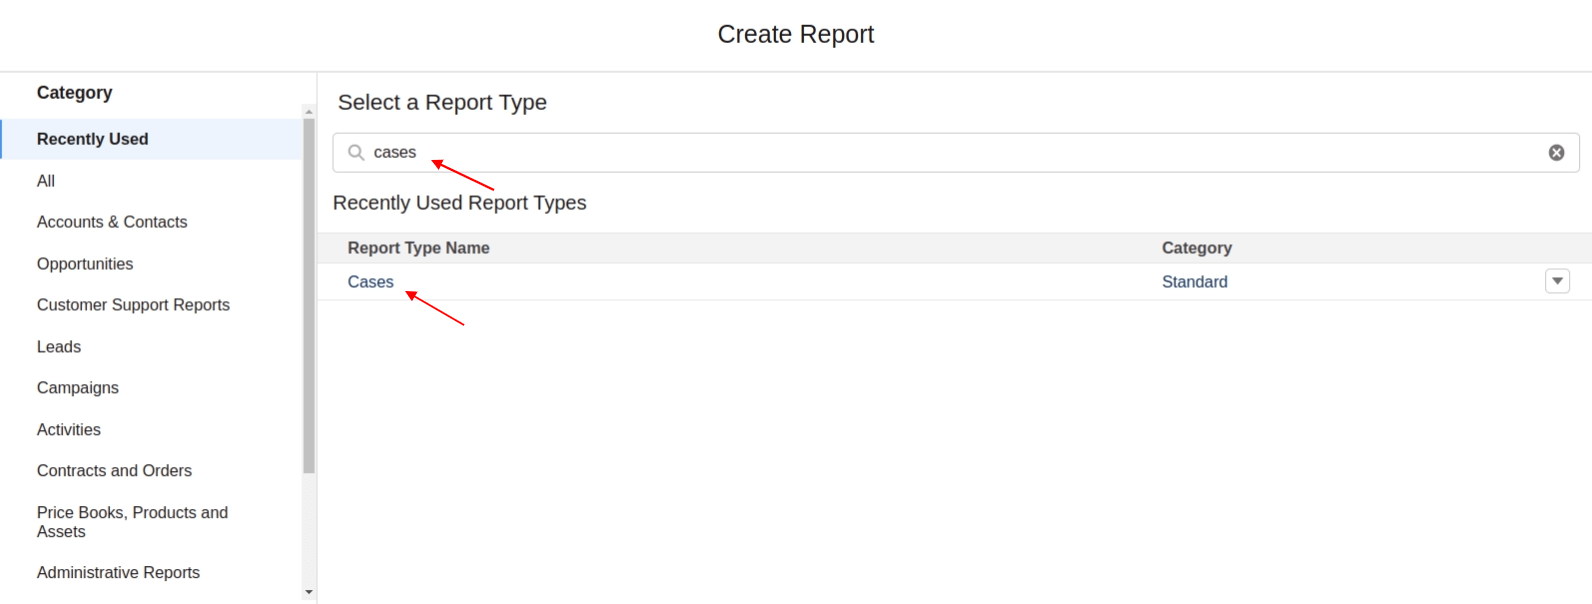
3. Type “cases” in the search bar and select the Cases report.
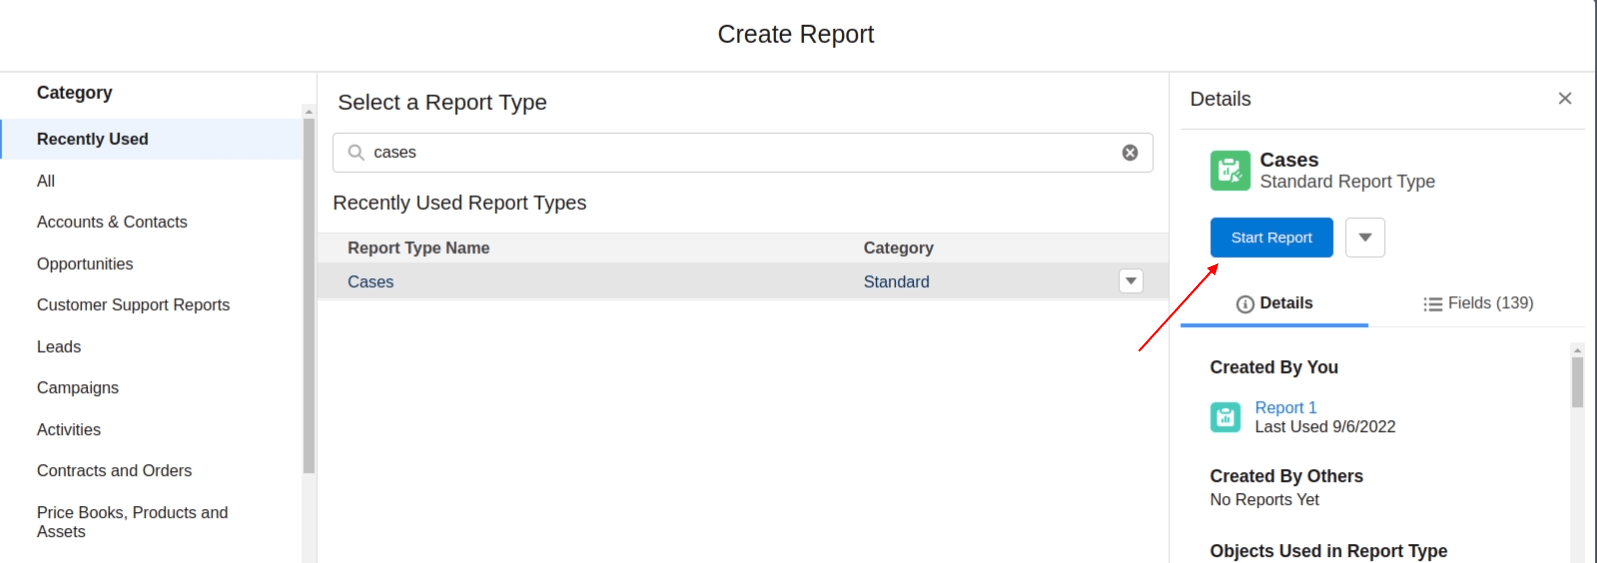
4. Then click Start Report.
5. This page shows you the preview of a limited number of cases. To see all cases, use filters on the left and click Run in the top right corner.

6. You can find the total number of cases above the list on the left.
How to calculate articles in Salesforce Service Cloud?
In Salesforce Service Cloud, you can use views to search for specific lists of articles and figure out their total count. This guide will help you calculate articles in Salesforce Service Cloud with a few clicks.
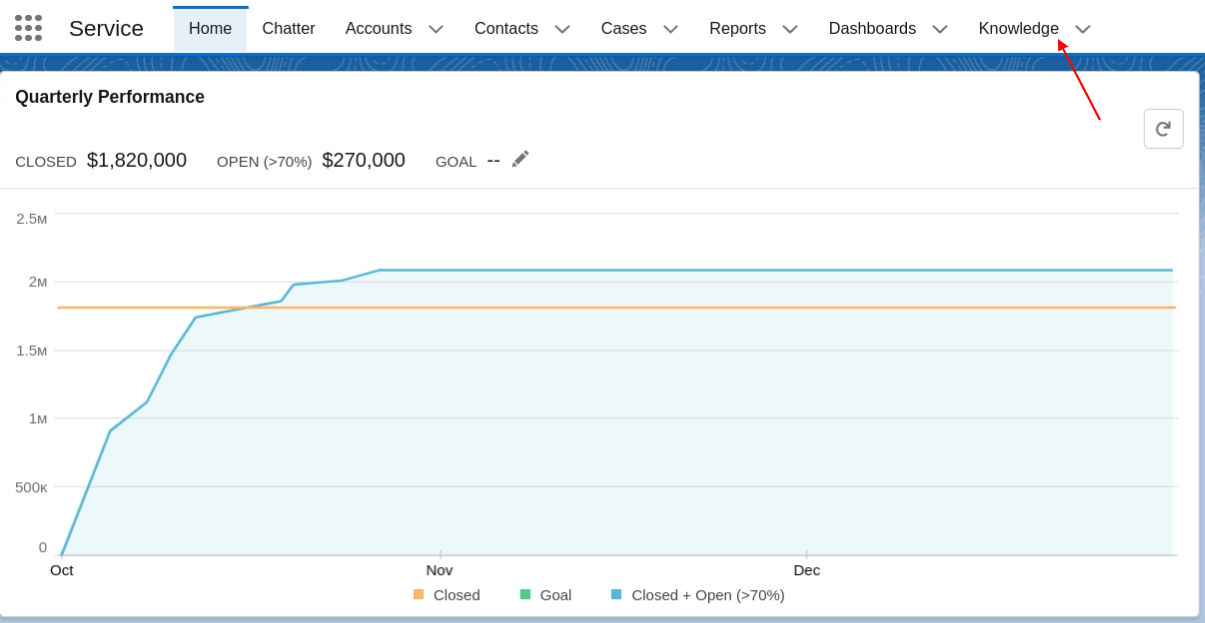
1. Go to the Knowledge tab.
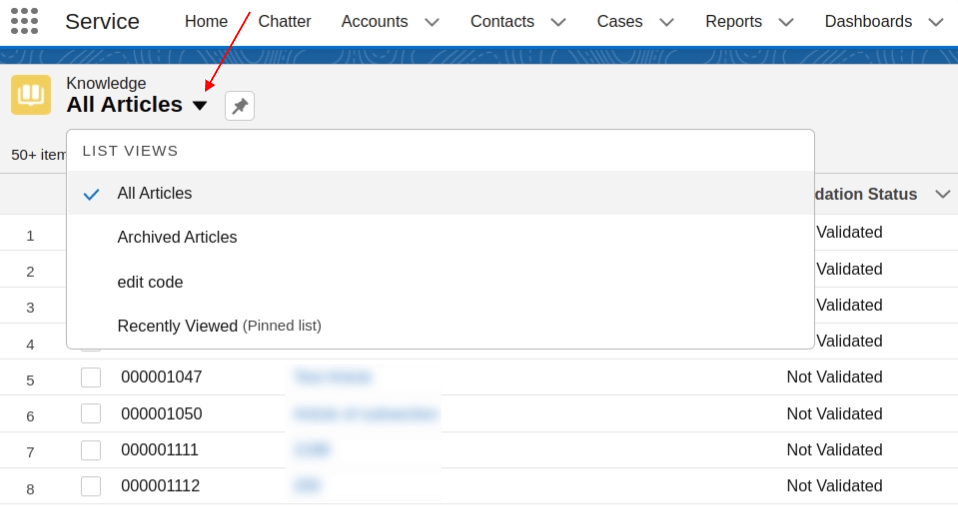
2. Select the list view from the dropdown.
3. To add more views, click the List View Controls icon and select New.
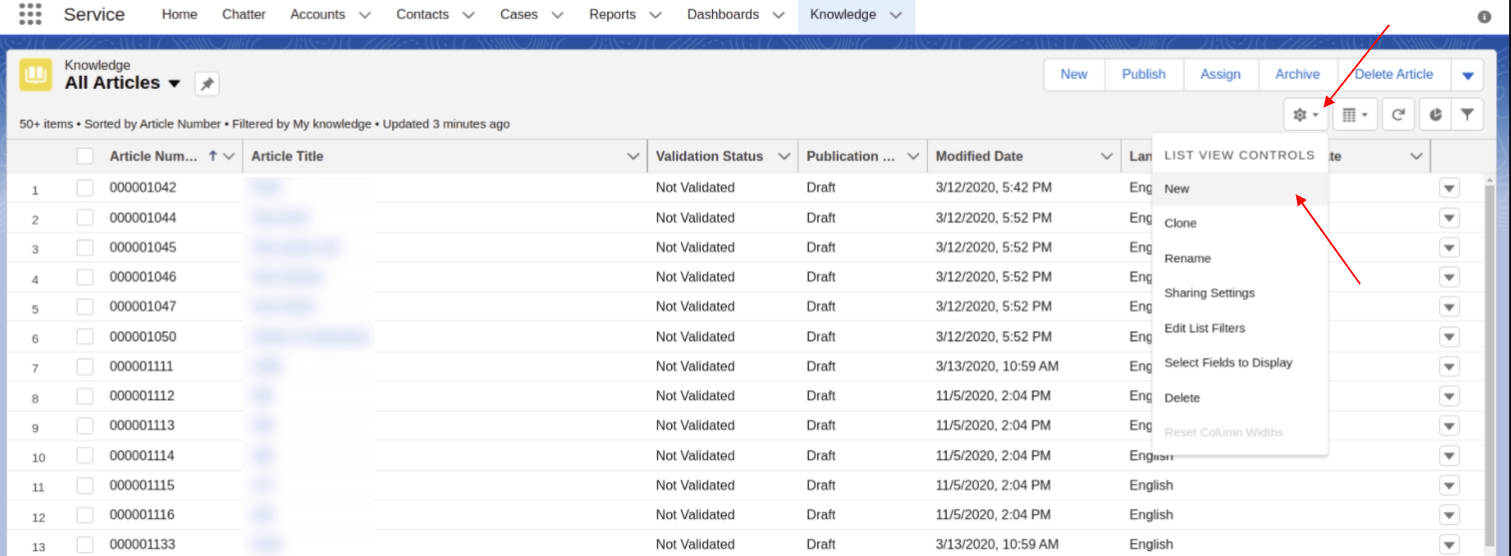
4. Once you select the list view, find the number of filtered articles above the list. If the number of records exceeds 50, you’ll have to scroll down to the end of the list ad check the total number of articles.

How to check the result of Demo Migration in Salesforce Service Cloud?
Once the Demo Migration preview is ready, you will see a table summary of your migrated records. You see reports for the migrated, skipped, and failed records, containing the record IDs in the source platform and the new IDs in Salesforce Service Cloud.
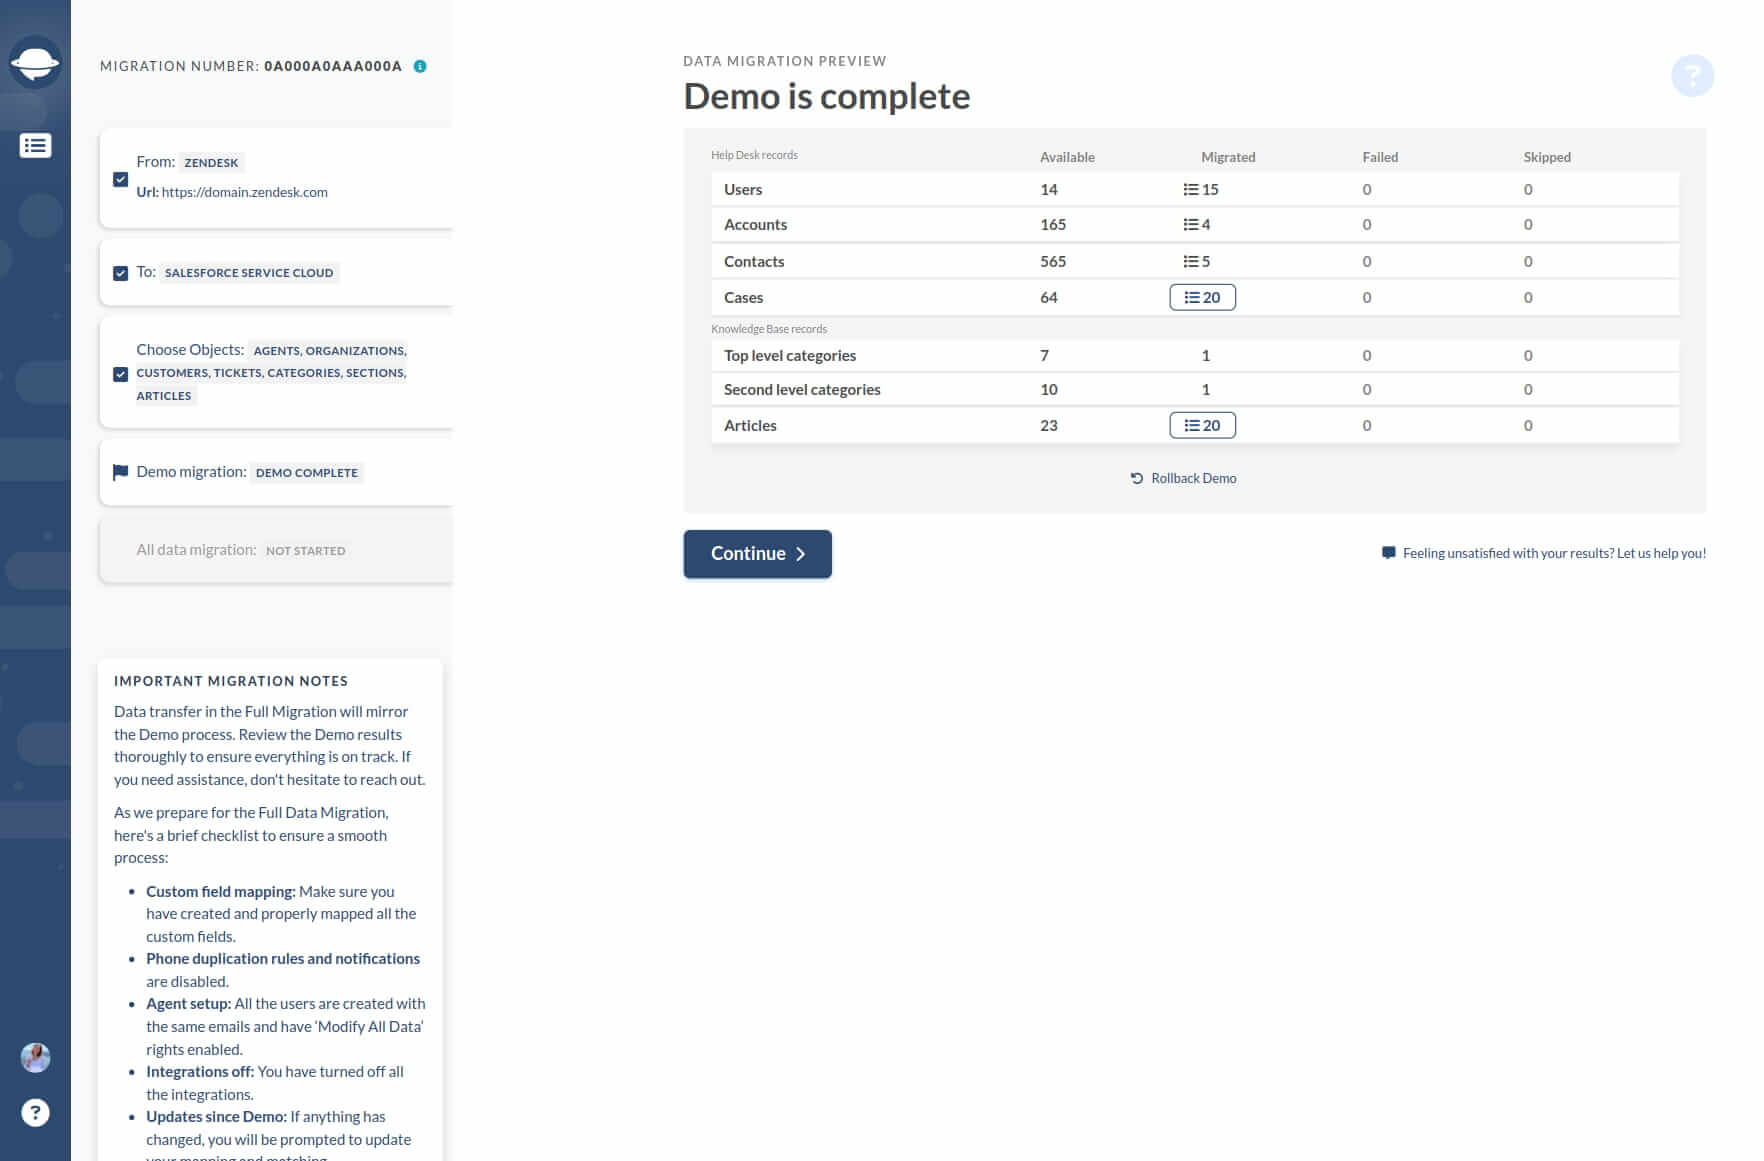
Click the button to see a list of record IDs and check every migrated entity. The report looks like this:
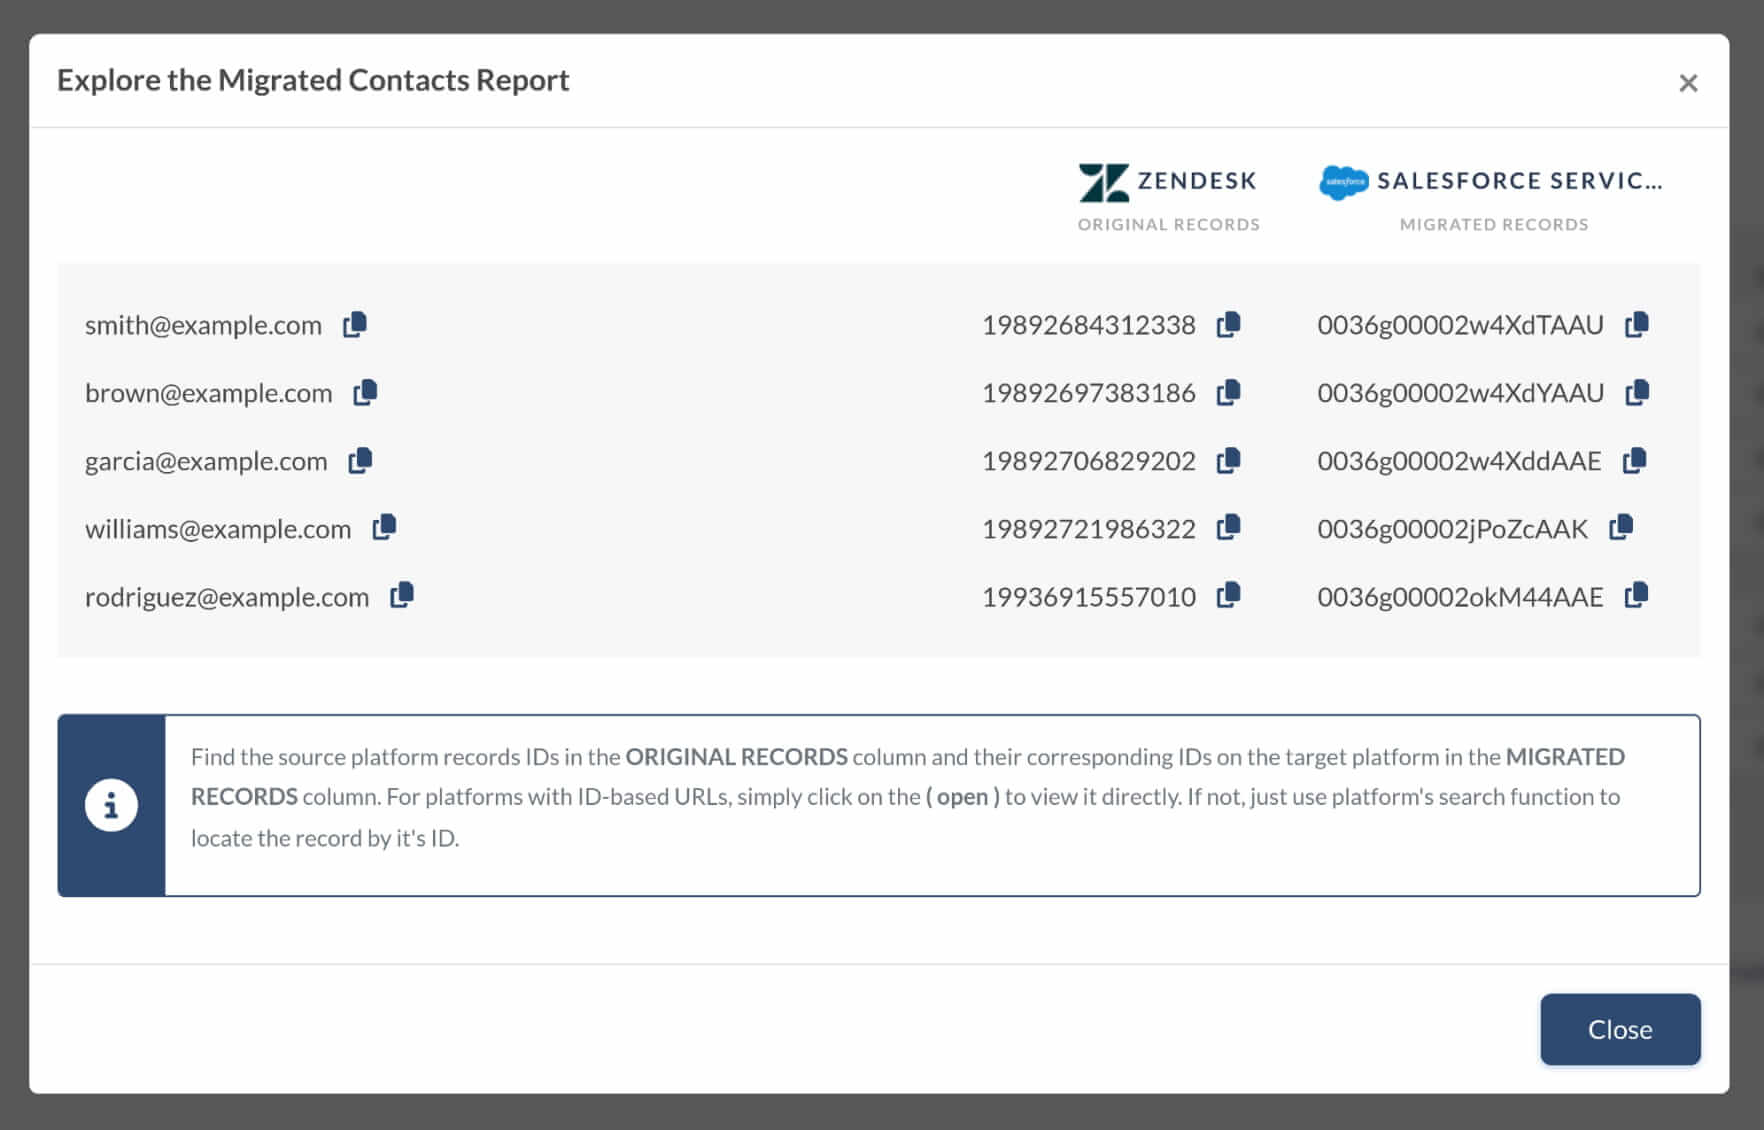
During a Demo Migration and a Full Data Migration, tickets and other records move to a new platform in the same way. As a result, if some data weren't migrated during the Demo Migration, they won't be migrated during the Full Data Migration either.
Go through each ticket and check everything along with Type, Source, Status, Priority, Custom Fields, Requester, Agent, and Attachments.
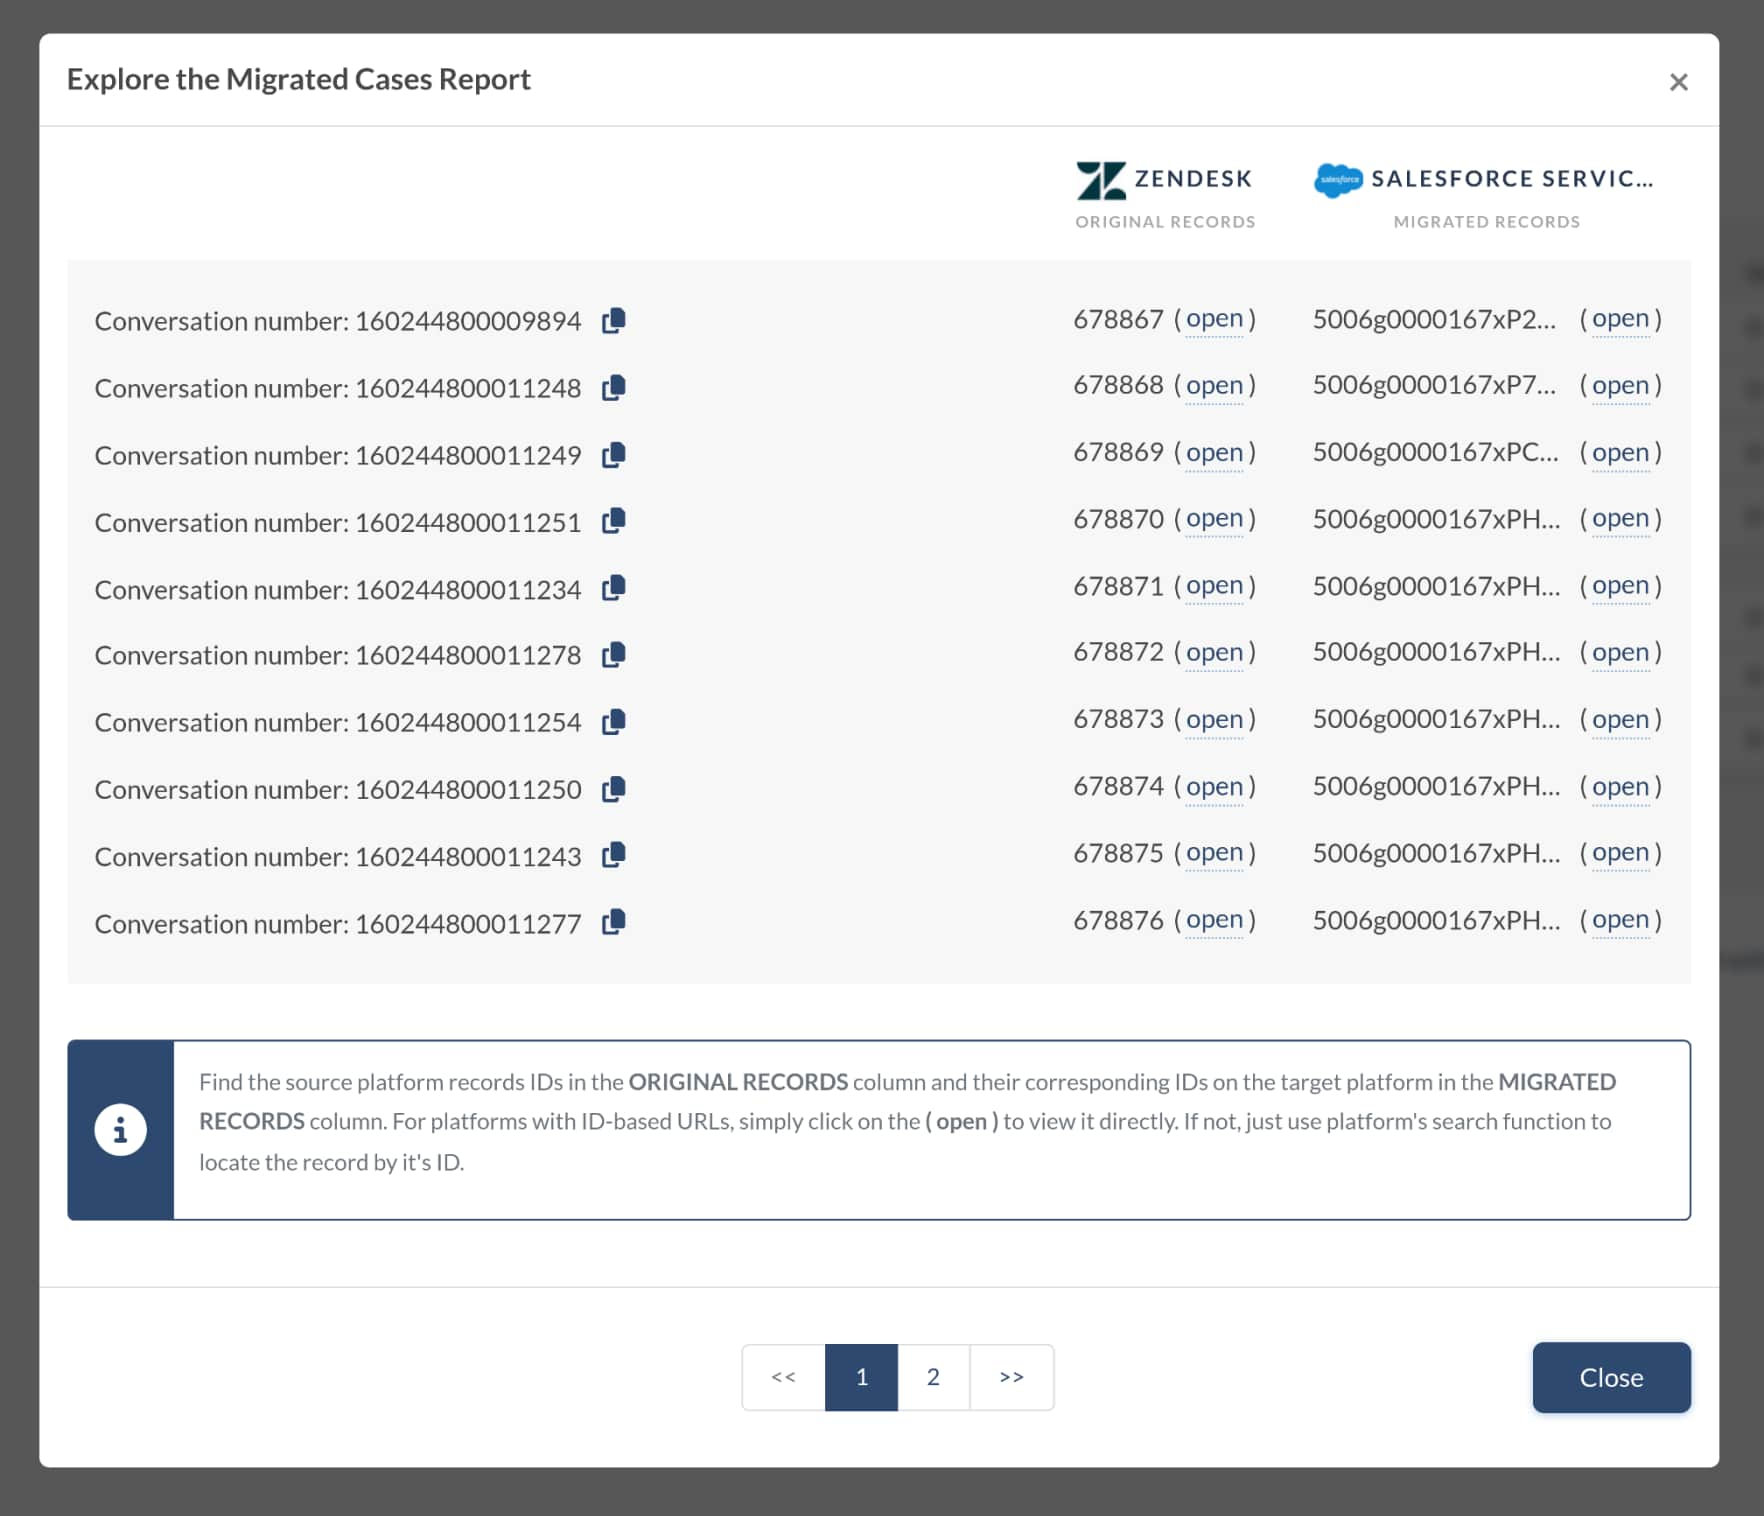
Also, you’ll see similar reports after the Full Data Migration. So, ensure to check the migration results in details again.
How to Increase API limits in Salesforce Service Cloud?
To speed up the migration you can request a temporary increase to your API limit. Please, not that you have to do this before starting the Full Demo Migration.
To send your request, create a case with Salesforce Customer Support and include this text:
I would like to request an increase to the API limit to perform a migration to Salesforce Service Cloud, using the Help Desk Migration tool.
The Organization ID of the production instance I would like to increase the API limit for is 00D90060000aaPg*. The number of calls we would like to obtain for the next two weeks** is 150,000***.
We want to import 200.000**** number of records. Namely, we’re going to transfer Tickets, Agents, Contacts, Company, Groups*****. The batch size that’s going to be used is 200.
* — Here’s how you can find the Organization ID.
** — Salesforce increases API limit for the max of two weeks.
*** — Check the table to calculate the number of API calls.
**** — You can find out the exact total number of records after running the .
***** — List the objects you're going to migrate to Salesforce Service Cloud
Where do I find ticket comments in Salesforce Service Cloud?
To find private notes open the ticket that contains them and click on Related:
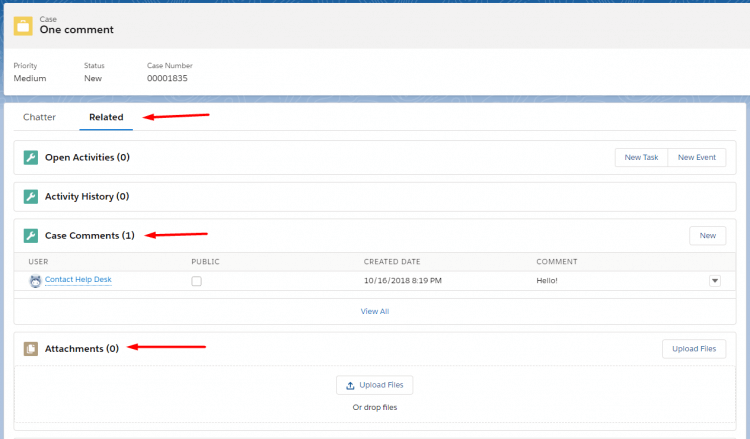
Under Case Comments you will see all private comments.
If the ticket contains an attachment, our service will import it as a private attachment. Also, if the comment exceeds 4000 characters, it will be cut due to the limitations of Salesforce Service Cloud.
Public comments can be found in Chatter;Email.

Case replies are not displayed in Salesforce Lightning after the migration
There’s an issue in Salesforce Lightning with Case Replies. Often, they are not displayed after the migration process. To fix this issue, you need to do a few simple steps:
1. Switch your desk to Salesforce Classic version.
2. Look through all the cases you migrated to your platform. You will need to enter each case and then return to the whole list.
3. Switch back to Salesforce Lightning.
Now, all the replies to the Cases you’ve looked through should be displayed in all cases.
How do I prevent case ownership from changing to a queue during Salesforce migration, import comments correctly, and hide sensitive data from customers?
When migrating to Salesforce, you’ll want to make sure case ownership stays accurate, comments appear in the right place, and sensitive data remains hidden from customers. Here’s how to handle each of these areas.
1. How to prevent case ownership from changing to a queue?
To maintain accurate case ownership, configure case assignment rules in your new Salesforce organization. Instead of sending all cases to a default queue, set rules so cases go only to the right users or queues, following the same criteria as in your old system.
You can also add validation rules to block ownership changes to a queue when they don’t meet certain conditions. Just ensure that these rules don’t conflict with automated processes, such as Email-to-Case.
During the migration, map users carefully. Each source user’s email should match a valid user in your new organization to maintain consistent ownership.
2. How to import comments correctly?
You don’t need to perform any extra setup. Both private and public replies migrate automatically and accurately during Salesforce migration. Private comments appear under Case Comments, and public comments appear under Chatter → Email.
3. How to hide sensitive data from customers?
You can protect sensitive information such as internal notes or private details by combining field-level security, sharing rules, and permissions:
- Field-level security (FLS): In customer-facing profiles and permission sets, uncheck the “Visible” and “Editable” boxes for sensitive fields.
- Sharing rules: Limit record-level access so customers see only the records they need.
- System permissions (if needed): Removing the “Transfer records” permission from certain profiles helps block unauthorized changes to ownership or visibility.
How to approve uninstalled connected apps in Salesforce?
Before connecting Salesforce Service Cloud to the Migration Wizard, make sure the Help Desk Migration app is installed and users have the right permissions.
Starting September 2025, Salesforce restricts access to uninstalled connected apps. This means end users won’t be able to use apps that haven’t been explicitly approved.
Step 1: Approve the uninstalled connected app
1. Go to Setup > Platform Tools > Apps > Connected Apps > Connected Apps OAuth Usage.
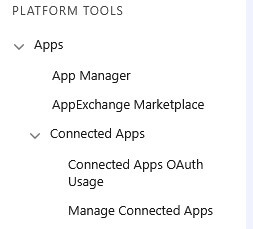
2. Find Help Desk Migration and click Install.

3. When prompted, press Install again to confirm.
Step 2: Manage access after installation
1. In Setup, search for Connected Apps, then select Manage Connected Apps.
2. Click Edit next to Help Desk Migration.

3. Under OAuth Policies, choose how users can access the app:
- All users may self-authorize (default): Any user can approve the app on first access.
- Admin approved users are pre-authorized: Only users with the assigned profile or permission set can access the app.
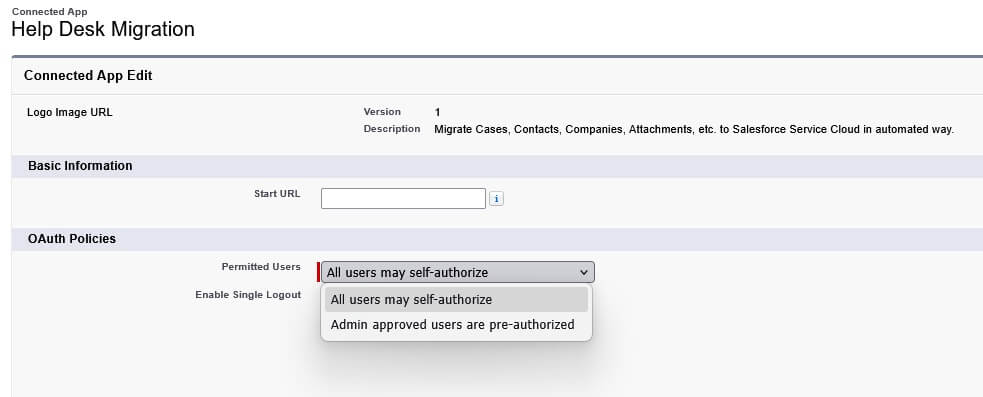
Save your changes to apply access rules.


