Jira Service Management Migration Guides
How to Migrate Classic to Next-Gen project in Jira Service Management?
Jira Service Management introduced Next-Gen projects, but they don't support the direct import of JSON or CSV files. At the moment, Help Desk Migration can only migrate records to Classic projects.
However, if you still wish to migrate to a Next-Gen project using Help Desk Migration, you can follow this workaround: First, import your data to a Classic project, then migrate data between Classic and Next-Gen projects using a free solution from Jira Service Management.
To enable this process, ensure you have the "Make bulk changes" global permission granted by a Jira admin. Here's how:
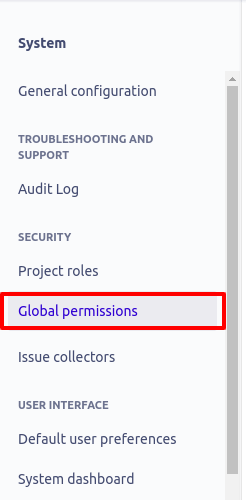
1. Click "Settings" and navigate to "Global Permissions" under the "System" section.
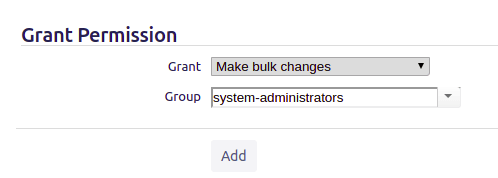
2. Scroll to the bottom of the page, choose "Make bulk changes" permission, and grant it to the necessary user group. Click "Add."
Now, with the required permissions, you can proceed to move migrated issues to the necessary Next-Gen project:
1. Click the Filters and select All issues.

2. Click the Project filter button and choose the project you want to migrate from.

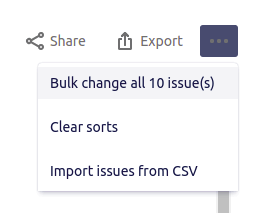
3. Then, in the top-right corner, select more (three-dot sign) and Bulk change all. The system will open the Bulk Operation wizard.
4. Go through the wizard, choose the issues that you want to move and click Next.

5. Click Move Issues and then Next again.

6. The “Select Projects and Issue Types” screen will appear. Here, you have to choose the destination project to move the records there. You’ll also have to pick the type of each issue in the destination project. Click Next when you’re ready.

7. The next step is “Map status for Target Project,” where you need to choose the destination status for each issue from the old project.

8. The last step is reviewing the summary of all the issues prepared for migrating to the next-gen project. When you’re done reviewing, click Confirm.

What to remember when migrating from Classic to Next-Gen projects:
There are a few things to consider when you migrate from Classic to Next-Gen project. They are technically quite different, so keep in mind these peculiarities:
- Active sprints (sprints in progress) won’t migrate to the next-gen projects. However, the issues in the active sprints will move to the backlog of the destination project.
- Epic links between the issues won’t exist in the next-gen project.
- Custom fields must be recreated manually after the migration in your next-gen project.
- Story points estimation will be lost. However, you can still use them in the next-gen project by enabling the Estimation feature.
- The data for your Velocity report won’t be saved, so the report will show that no points were completed before.
- Reporting history will also be lost in the migration process.
- Project and issue keys will change as you move to the new project because they cannot be reused. The links from your old keys will also be redirected when you migrate using the Jira migration wizard.
How to migrate to a Next-gen project in Jira Service Management?
Atlassian introduced next-gen projects (team-managed projects) for Jira and Jira Service Management. These projects aim to simplify the project configuration experience for administrators and end-users.
However, the current functionality of the next-gen projects does not allow importing JSON or CSV files. So, you won't be able to see any next-gen projects while setting up a Demo Migration with us, as they won't be displayed in Migration Wizard.
Therefore, if you do not see a project you would like to migrate in Migration Wizard, there is a high chance that it will be next-gen. You can check the type of the project in the left sidebar:

There’s a workaround if you still want to migrate data to the next-gen project. First, you must create a classic Jira Service Management project. Then, import your data to the classic project. And lastly, migrate data between classic and next-gen project.
How to Create a Classic Project/Company-managed Project
1. In the heading, click on Projects > Create Projects.

2. In the left sidebar, choose Software Development.
3. Then pick up Kanban or Scrum or Bug tracking template.

4. Click on Use Template.

5. Then select a Company-managed project.

6. Fill in the name of the project and click on Create project.

How to Connect Jira Service Management to Migration Wizard?
Whether you’re migrating to or from Jira Service Management, you need to establish a connection between the service desk and our tool. Migration Wizard will ask you to provide the following credentials:
- Company account URL;
- The username for your Jira Service Management account;
- Your Jira Service Management API token (if you have a cloud account) OR the admin password (if you have a self-managed account).
Take a look at this video if you’re migrating from Jira Service Management:
Check out this video if you’re migrating to Jira Service Management:
Can I migrate comments to Jira Service Management?
Yes, you can migrate comments to Jira Service Management.
With the help of the Help Desk Migration service, you can migrate both public and private comments.
Can I Migrate Ticket Statuses to Jira Service Management?
Yes, you can. All you need to do is map them correctly.
How to import Contacts to Jira Service Management?
To migrate contacts to Jira Service Management, you must have the Public Signup setting enabled. If you're using Service Management for customer support, you might already have this setting enabled. However, if you're using Jira Service Management for internal support, follow the instructions below to double-check/enable this setting.
To enable Public Signup, follow this path:
- Log in as a user with the Jira Administrator global permission.
- At the upper right corner, choose Jira settings; Products; Configuration.
- Find the Customer Permissions section and enable the setting.

You or a service desk project administrator can then open a service desk at the project level:
1. Go to Projects and click on the project to which you want to migrate the data.
2. On the left sidebar, choose Project settings > Customer permissions.

3. Select Anyone on the web and click Save.
How to Import CSV to Jira Service Management?
To import your CSV file to Jira Service Management, go to Migration Wizard and start a new migration. Select CSV from the list of data sources. Then, select the data you need to import (you can import tickets or a knowledge base at a time).

Upload your files and click "Continue."

Next, connect your Jira Service Desk. Enter the service desk domain, the email of the user initiating the migration, and their API key or password.

Once connected, select where you want the data to go and the default Issue Type.

Now that the source and data target are connected, you can go on with mapping. Select Tickets, and the Wizard will auto-select other objects. Click the "Match items" and "Map fields" buttons to match agents and ticket fields. Save the settings.

Click "Continue" to start the Free Demo Migration. The Migration Wizard will import a small portion of data so you can see how the migration works. Carefully check the outcome of the test import.

If necessary, re-run the test to make sure the data migrates correctly. When ready, initiate Full Data Migration and import all CSV data to Jira Service Management.
Data You May Upload from a CSV File
With the Help Desk Migration service, you can import service desk and knowledge base data to Jira Service Management.
Service desk:
- Tickets
- Contacts
- Organizations
- Agents (have to be created in the Jira Service Management before the migration)
- Attachments
- Private and public notes (up to 32kb of data)
- Comments
- Creation dates
- Tags
- Custom fields
Knowledge base:
- KB articles and folders (videos in your articles won't be migrated)
- KB attachments
How to merge two or more Jira Service Management instances?
The Help Desk Migration service simplifies consolidating multiple Jira Service Management accounts.
- Ensure that you’re migrating data to a Classic project. Here’s how to create a Classic project in Jira Service Management.
- Create agent profiles in the target Jira Service Management.
1. Connect the source account. Enter the URL, Username, and API token. Click Continue and choose the project you want to migrate.

2. Connect your target Jira Service Management instance. Enter the credentials, choose the project where you want to import data and set the Issue type for all incidents. Click Continue.

3. Choose data to migrate, map ticket fields, and start the Demo. Once it is complete, be sure to check the Demo results. If satisfied, proceed with the Full Data Migration.
How to check the result of Demo Migration in Jira Service Management?
After completing your Demo Migration to Jira Service Management, the Migration Wizard presents a concise report summarizing migrated, skipped, or failed records.

You can also view the types and quantities of entities migrated from your source platform. Click the "View records" button to access a list with clickable IDs.

During both Demo and Full Data Migrations, tickets and related data transfer similarly. Ensure that Type, Source, Status, Priority, Custom Fields, Requester, Agent, and Tags are migrated accurately. Apply the same process for Knowledge Base articles.

Once satisfied with the Demo Migration, initiate the Full Data Migration. Note that tickets migrated during the demo will be automatically removed from Jira Service Management to avoid duplicates.
After the Full Migration, expect similar reports on a larger scale. Repeat the review process accordingly.
How to generate the API token for cloud-hosted Jira Service Management?
You will need an API token to migrate from or to a cloud-hosted version of Jira Service Management. Use your Admin password if you’re migrating from a self-hosted Jira Service Management.
Creating an API token
1. Go to https://id.atlassian.com/manage-profile/security/api-tokens and click Create API token.

2. Give your token a clear and memorable name and click "Create".

3. Copy the token to the clipboard and put it in someplace safe. You won’t be able to view or copy this token again. So make sure you have it saved.

How to use the token
To use the token, open the Migration Wizard and insert the token in the API token field:

Fill out the rest of the fields and proceed to the next step of the migration.
Revoking your API key
Once the migration ends, you can revoke access by clicking the "Revoke" button next to the corresponding API key.

Important: Do not revoke the API token when the migration is in progress. Doing so will stop the data import and export. You'll have to re-authorize and restart the migration from the very beginning.
How to obtain Atlassian Cloud Password?
Two types of passwords can be used to access Atlassian products: Google password and Atlassian Cloud password.
Using your email to create an account, you also create a password that allows signing in to Atlassian, i.e., the Atlassian Cloud password. You can use this password when setting up a migration from/to Jira Service Management.
However, if you sign in to Jira Service Management with your Google account, Atlassian uses the email and password to authenticate your Google account. You don't need to create a separate password to access Jira Service Management. In this case, you cannot set up a migration unless you obtain the Atlassian Cloud Password or use an API token instead.
To obtain your Atlassian Cloud password, follow these steps:
1. Log out of Jira Service Management. Go to the sign-in page and click "Can't log in."

2. Enter the email to your Jira Service Management to request a recovery email.

3. Once you receive the email, click on Reset Password.

4. Create your password.

How to calculate customers in Jira Service Management?
Jira stores your customers in separate projects so that you can count their number within a project.
1. Select your Jira Service Management project from the Projects dropdown menu.

2. Go to Customers from the sidebar menu.

3. Scroll down to the bottom right corner to find the total number of customers.

4. If you have organizations set up, select one from the list to view the number of customers within that organization.

5. In the bottom right corner, you'll see the number of customers associated with the selected organization.

How to calculate tickets in Jira Service Management?
To calculate the number of tickets in Jira Service Management, follow these steps:
1. Click on the search bar at the top right and choose Issues next to the Go to All option.

2. Use the left side filters to narrow your search and find specific tickets.

3. After applying the desired filters, view the number of filtered tickets displayed at the top right corner.

4. You can refine your search by adding project, type, status, or assignee criteria. Click "+More" and select the additional criteria you wish to apply.

How to calculate articles in Jira Service Management?
To calculate the number of articles in Jira Service Management (in Confluence), follow these steps:
1. Use the "Switch to" menu in the top left corner and select "Confluence."

2. Click the search bar at the top right and choose the Advanced search option.

3. Use filters such as space, type, and other criteria to narrow down your search for articles.

4. Once you've applied the desired filters, observe the number of filtered articles displayed beneath the search bar.

How to Migrate Articles to Confluence?
To migrate articles to Confluence using the Migration Wizard, follow these step-by-step instructions:
Step 1: Select the desired source from which you want to migrate articles. Provide the URL and API key corresponding to the source. Then, click the "Continue" button to proceed.

Step 2: Choose Confluence as your target destination. Provide the necessary credentials for Confluence. Click the "Continue" button to proceed.

Step 3: Configure the connection to Confluence by selecting the appropriate settings, such as the space where you want to migrate the articles. Ensure that you choose the correct options to facilitate a seamless migration. Once configured, click the "Continue" button to proceed.

Step 4: Choose the specific knowledge base objects you wish to migrate to Confluence. In this case, select the "Articles" option. The "Categories" and "Folders" options are also selected by default. Click the "Continue" button to move to the next step.

Step 5: Navigate the mapping process to ensure that essential data elements are correctly mapped between the source and target platforms. Make any necessary adjustments and save your mappings. Click the "Continue" button to proceed.

Step 6: Start the Free Demo to preview the migration outcome. Click the "Continue" button to launch the demo migration process.

Step 7: After the demo migration is complete, review the results to ensure that it was successful. Then, explore the migrated articles in Confluence to verify their integrity.

Step 8: If you are satisfied with the Demo migration results, initiate the Full Migration. Click the "Continue" button to start the Full migration process for all your knowledge base articles.
How to add users to a project in Jira Service Management?
To migrate to Jira Service Management, ensure the following:
- User emails in the source help desk and Jira Service Management are an exact match.
- Service desk teams have access to the target project in Jira Service Management.
- All necessary users have permission from the Service Management Team.
- All necessary users in Jira Service Management have activated their accounts.
- You have enough licenses.
- You're configuring a classic project.
To create users in Jira and add them to your project, follow these steps:
How to create users in Jira
1. Go to Settings > User management.

2. In the upper right corner, click Invite users.

3. In the pop-up window, provide up to 10 email addresses of the users you want to migrate. Set their roles and permissions, add them to groups, and customize invitations if needed. Then, click Invite * users.

Each user must accept the invitation sent to their email to activate their profile in Jira. The invitation will expire seven days after it is sent.
How to invite service desk users to projects in Jira
Now that you’ve created all the necessary user profiles, you can invite them to the corresponding Projects. To do this, follow these steps:
1. Go to Settings > Projects to see your existing Jira Projects list.

2. Click on the necessary Project and go to Project settings: People.


3. Click Add people and input the info of the necessary users to invite to them this project. For all Classic Jira Service Management projects, you must choose the Service Desk Team role to enable the users to manage this project.

How to make the email visible
1. Go to https://id.atlassian.com/manage-profile/profile-and-visibility.
2. Scroll to the bottom of the page and locate the Contact section. Select Anyone to make your email publicly visible.

Atlassian will automatically save the changes.
Once the migration is complete, you may change this setting according to your discretion.
How to remove users from Projects
If you've added the wrong user to a Project, you can remove them by following these steps:
1. Go to the necessary Project and choose Project settings in the left sidebar.
2. Go to the People section. Find the user you want to remove from this Project and click Remove next to their name.

How to deactivate users in Jira Service Management
To deactivate users in Jira Service Management, follow these steps:
1. Go to Settings > User Management. Click on the user account you want to deactivate.

2. Switch the Has access on site toggle to deactivate the user. You will receive a notification confirming that the account has been deactivated in the lower-left corner.

By deactivating a user, their account becomes unusable until it's activated again. This action also frees up their license spot, making it available for another user.
How to bulk update request types in Jira Service Management?
Jira Service Management has Request types and Issue types. Issue type is what your team picks up to work on issues internally. When migrating to Jira Service Management, you can choose a default issue type that will be applied to all issues. And during the mapping step, you can set the Request Type for the Issues type you have chosen.
To bulk update request types in Jira Service Management, follow these steps:
1. Go to Jira Service Management and use the required filters to produce a list of issues. You can filter based on various criteria to narrow down the issue list you want to update.

2. Click the "More options" button, then select "Bulk change all N issue(s)." Note that Jira Service Management allows updating up to 1000 issues per one bulk operation.

3. Choose the issues you want to perform the bulk operation on. If there are many issues, scroll to the bottom of the page and click "Next." Select the "Edit issues" operation and click "Next".

4. Find the "Change Request type" option and select the necessary type from the dropdown menu.

5. Select a value for any required fields for this operation. You can also decide whether to send email notifications about this change.

Review your bulk operation and confirm when you are satisfied with the changes.
How to search migrated objects in Jira Service Management?
To search for migrated objects in Jira Service Management, follow these steps:
Step 1. Open Jira Service Management, then the project to which you migrated data.
Step 2. Click on "Filters" and then select "Advanced issue search".

Step 3. Remove any existing commands in the search bar and replace them with the following JQL query: "ImportedId[Number]" = "ticket id." Replace "ticket id" with the ID number of the imported ticket and hit "Search."

Step 4. To search for multiple tickets at once, use the following command: "ImportedId[Number]" in ("ticket id," "ticket id").

How to search customers/organizations in Jira Service Management
Step 1. Log into your Jira Service Management account and open the project where you migrated data.
Step 2. In the left sidebar, navigate to "CHANNELS & PEOPLE > Customers."

Step 3. Use the search bar to find the customer's name or email or the organization's name.

What is “HTTP Error 410: Gone” in Jira Service Management?
HTTP Error 410: Gone in Jira Service Management occurs during data transfer when the Migration Wizard attempts to create tickets in the target platform. This error typically arises due to certain technical configurations within the Data Center application.
Causes of HTTP Error 410: Gone:
- Node Switching: Data Center applications expect API requests to be directed to the same node during data movement. If requests are routed to different nodes, HTTP Error 410: Gone may occur.
- Lack of Sticky Sessions: Sticky sessions, which link a session to the same node, are not employed, and the Data Center application has multiple API nodes. This can result in subsequent API calls being sent to the wrong node.
To address the HTTP Error 410: Gone, the load balancer in the Data Center application must be configured appropriately. Follow these steps:
- Remove Unnecessary Nodes: Remove all dedicated API nodes from the cluster except one, ensuring all API calls are directed to the same node.
- Temporarily Shut Down Nodes: Temporarily shut down API nodes to render them inaccessible.
Following these steps, the load balancer will cease sending new connections to the removed nodes while allowing existing connections to complete. For detailed instructions, refer to the Jira documentation.
How to view articles and attachments in Jira Service Management after the data migration?
To view articles and attachments in Jira Service Management after data migration, you need to migrate your knowledge base articles to Confluence, which seamlessly integrates with Jira Service Management. Here's a step-by-step guide on how to migrate your knowledge base articles to Confluence:
Step 1: Begin by establishing a connection between your source platform and the Migration Wizard. Provide the URL and API key to bridge the gap between your existing platform and the migration process. Click "Continue" to proceed.
Step 2: Select Jira Service Management as the desired destination and input the required credentials to migrate. Click "Continue" to advance further.
Step 3: Choose the appropriate service desk and issue type to ensure a smooth knowledge transfer. Pay attention to detail while making these selections, as they lay the foundation for an optimized knowledge base within Confluence.
Step 4: Selecting Knowledge Base Objects. Navigate the selection process and choose the knowledge base objects to migrate. Tick the "Articles" option, and the accompanying "Categories" and "Folders" options will be automatically selected.
Step 5: Mapping essential fields ensures smooth data transfer by matching and saving the necessary changes.
Step 6: Launch the Demo Migration to witness the initial outcomes of the migration process. Click "Continue" and observe as your articles traverse the migration pathway.
Step 7: Verify the results of the Demo Migration to ensure the fidelity and accuracy of your knowledge base within Confluence. Celebrate the progress you have made.
Step 8: Start Full Migration of your knowledge base content to Confluence. Proceed with payment and witness your articles settling into their new Confluence home.

Once the migration is complete, switch to Confluence to view and inspect your migrated knowledge base articles. You can explore attachments associated with each article by following these steps:
1. Open any article within Confluence.
2. Click the 'Three dots' icon in the upper right corner and choose the 'Attachments' feature from the drop-down list.

3. Carefully examine each attachment, paying attention to creators, creation dates, and comments to ensure a seamless migration.

How to Move Your Knowledge Base to Confluence?
With Help Desk Migration, transferring your knowledge base to Confluence is a breeze. Just make sure you have at least one project in Jira Service Management. Here’s what to do:
Connect your Source to the Migration Wizard. Link your Jira Service Management account.

Select your project and issue type, then move to entity mapping.

Map your knowledge base articles to the right structure.

Set the correct article statuses in Confluence.

Run a free demo to migrate 20 articles and review the results.

Need adjustments? No problem. You can go back, tweak your mapping, and rerun the demo as many times as needed.

Once everything looks good, review our support plans and get a final cost estimate.

Ready to go? Complete your payment, and you can start your full migration whenever it suits you.