Zendesk Migration Guides
How to Connect Zendesk to Migration Wizard?
Help Desk Migration Service uses Zendesk API to perform a data transfer. This way, we automatically bypass automations like triggers and email notifications.
This migration method ensures that your end-users do not receive any unwanted notifications during the data transfer as tickets are created and updated.
Help Desk Migration service allows custom drop-down menus to be migrated to Zendesk. You can map the necessary fields on the Migration Wizard.
Note that during the migration, Zendesk also copies the data from these fields to Tags.
To migrate from or to Zendesk, you will need the following:
- the URL of the company's Zendesk account;
- the email and password you use to log in to Zendesk;
Since we use OAuth for Zendesk migrations, enter the URL to your help desk in the appropriate field. Then click on the Sign in with Zendesk button:
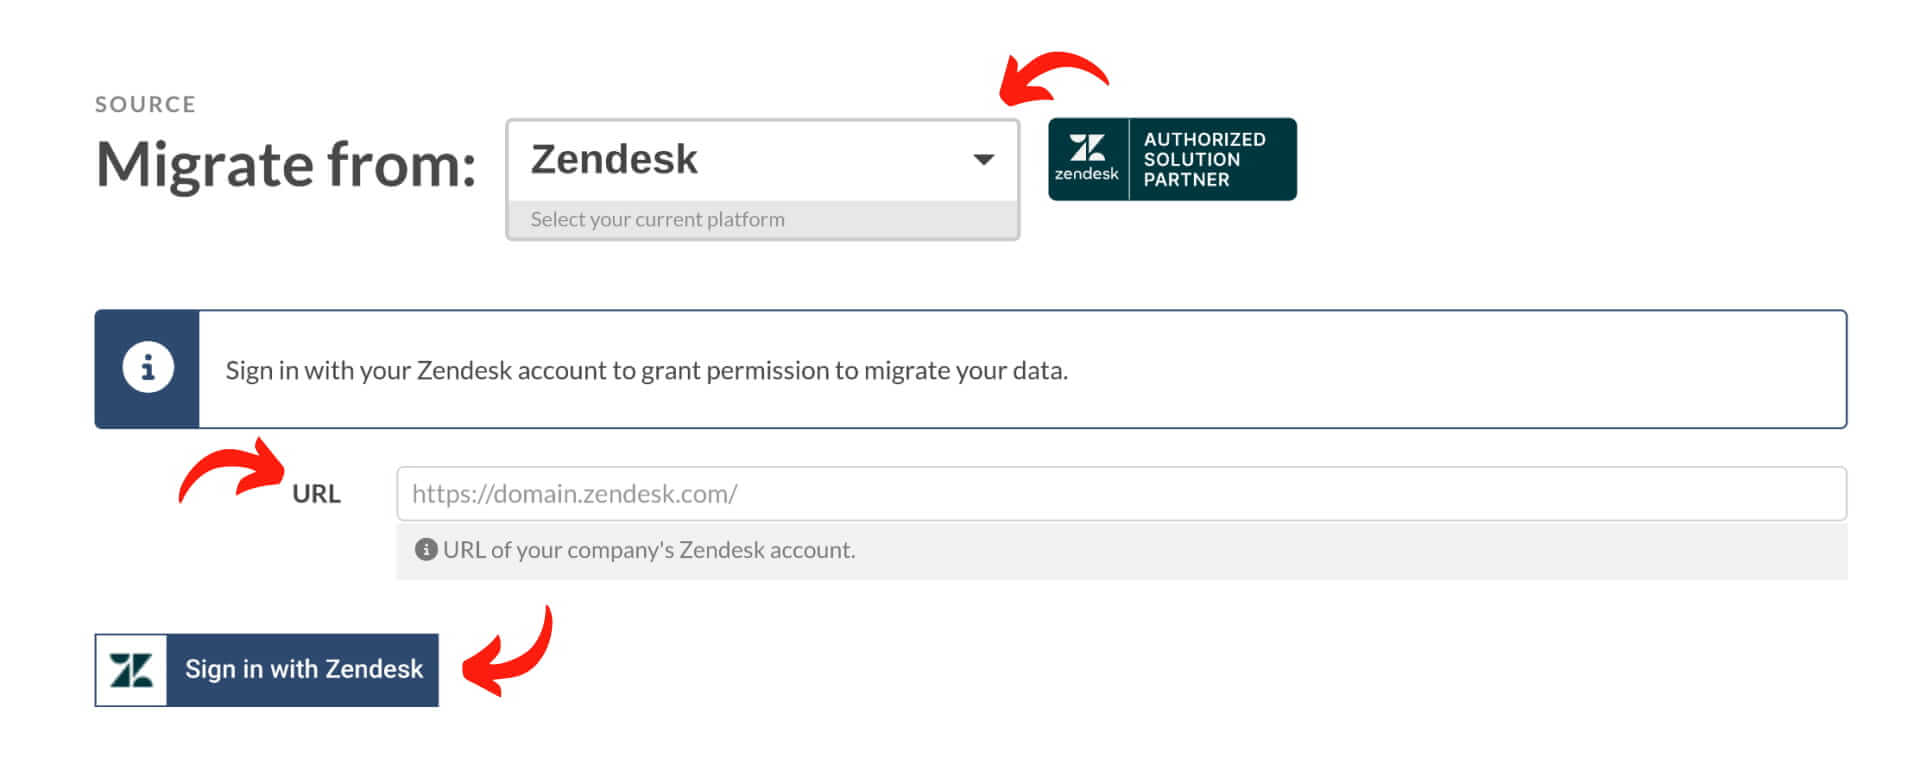
This will redirect you to a new tab with a Zendesk login form. Sign in to your Zendesk normally and continue setting up Demo Migration.
If you’re a Zendesk Guide user and plan on migrating your Knowledge Base with our service, you should remember a few things.
In Zendesk Guide, they enable the creation of a complex Knowledge Base hierarchy for Enterprise plan users. You can create article subsections inside each section up to five such levels. Creating a maximum of 20 subsections with articles in each parent section is also possible.
How can I migrate the knowledge base to Zendesk Guide?
The Help Desk Migration Service allows you to migrate Articles, Folders (in Zendesk, they are called Sections), and Categories from the Knowledge Base (Help Center) of your current help desk to the Zendesk Guide.
The Zendesk Knowledge Base is a separate product called Zendesk Guide. You have to manually activate, prepare, and release it before your clients can use it.
Before you start your migration, make sure you have activated the Knowledge Base (Help Center) so you can transfer your knowledge base content.
How to enable Zendesk Guide in setup mode
1. Sign in to Zendesk as an administrator.
2. Click the Zendesk Products icon in the top bar, then select Guide.
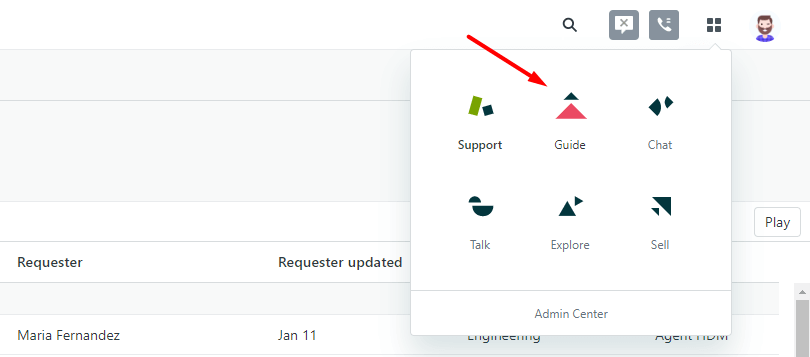
3. On the page that appears, click Build your knowledge base.
Now, you can start migrating your data to Zendesk.
It is also possible to migrate your Knowledge Base separately as a CSV file.
If you can’t see this button in the interface, you or someone in the company have already activated the Zendesk Guide.
Remember your Knowledge Base isn’t visible to your customers until you go live with it. So, once the migration is complete, you can change or add anything before your customers can start using the help center.
How to migrate articles to a specific brand in Zendesk
When importing knowledge base data to Zendesk, you can transfer to or from a specific brand. To do this, use the URL of the particular brand within Zendesk rather than the general Zendesk account URL.
To find that URL, you need to go through the following steps:
1. Open up your Zendesk account.
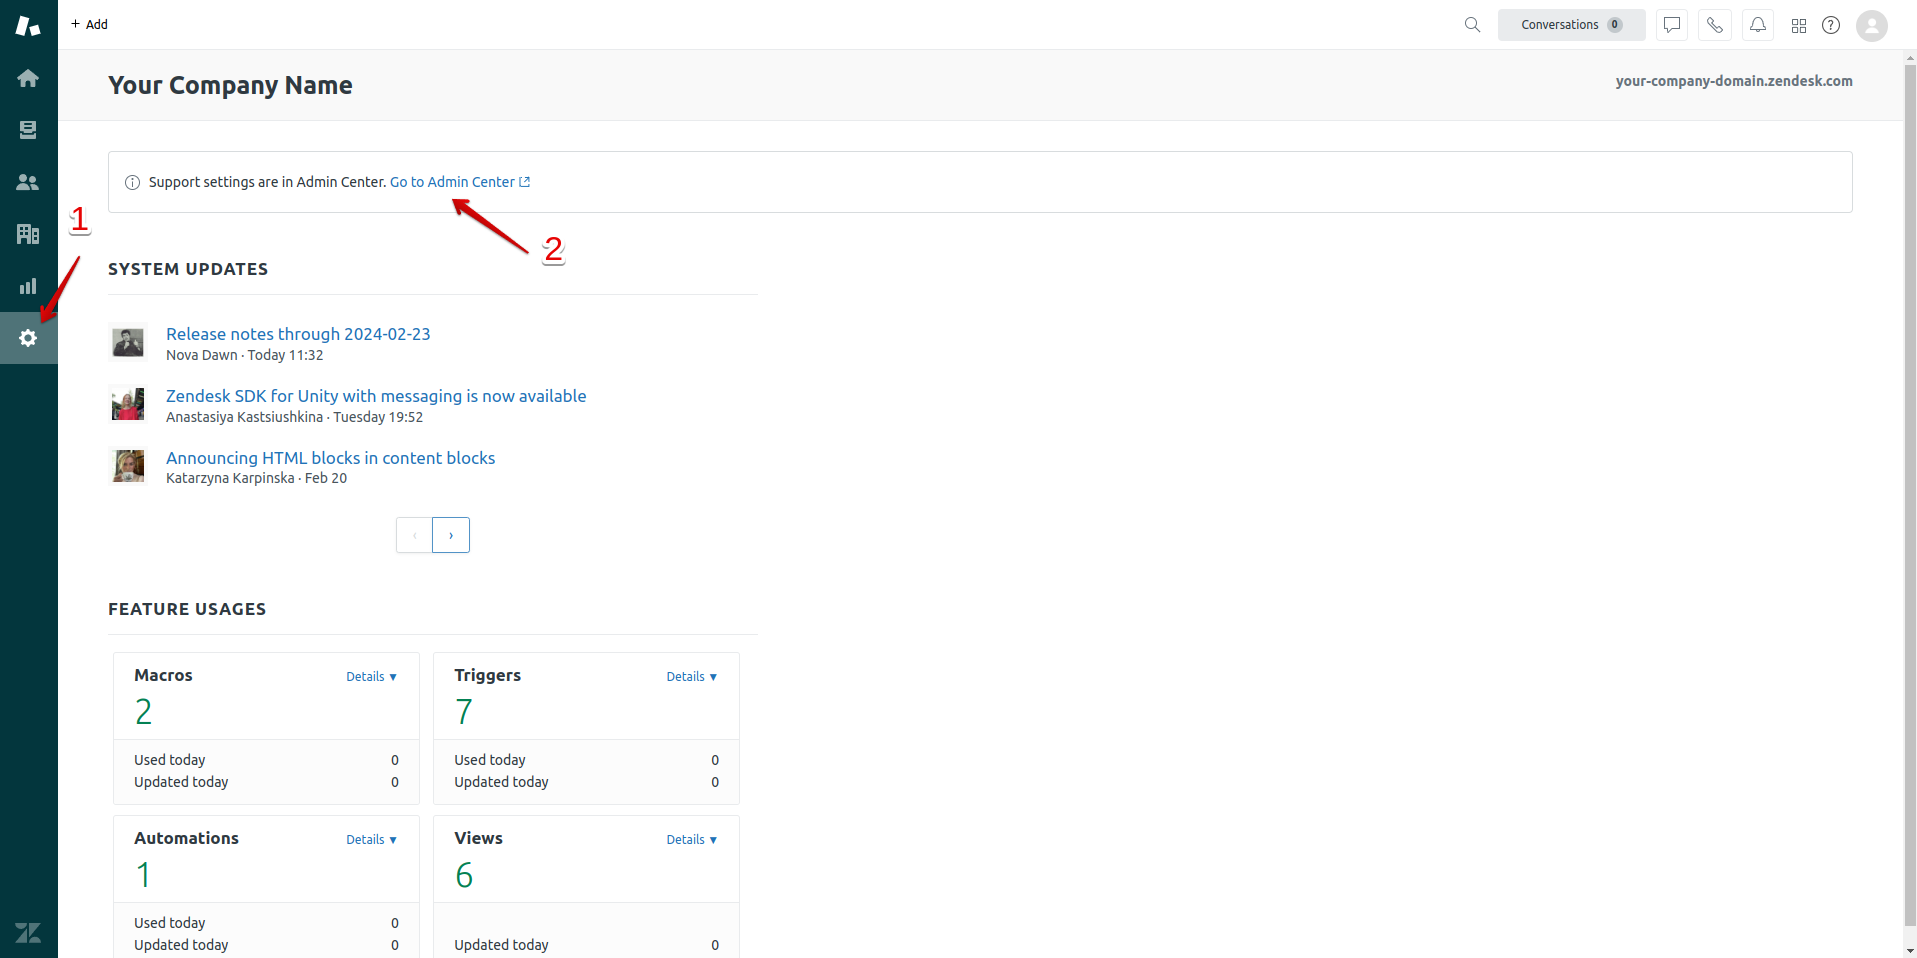
2. Then click on Admin in the left sidebar.
3. Go to Admin Center.
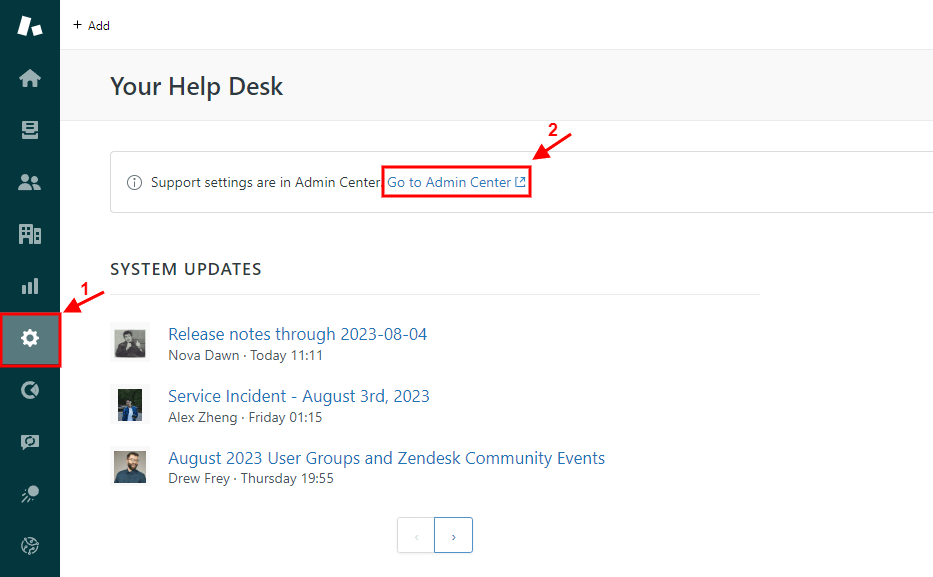
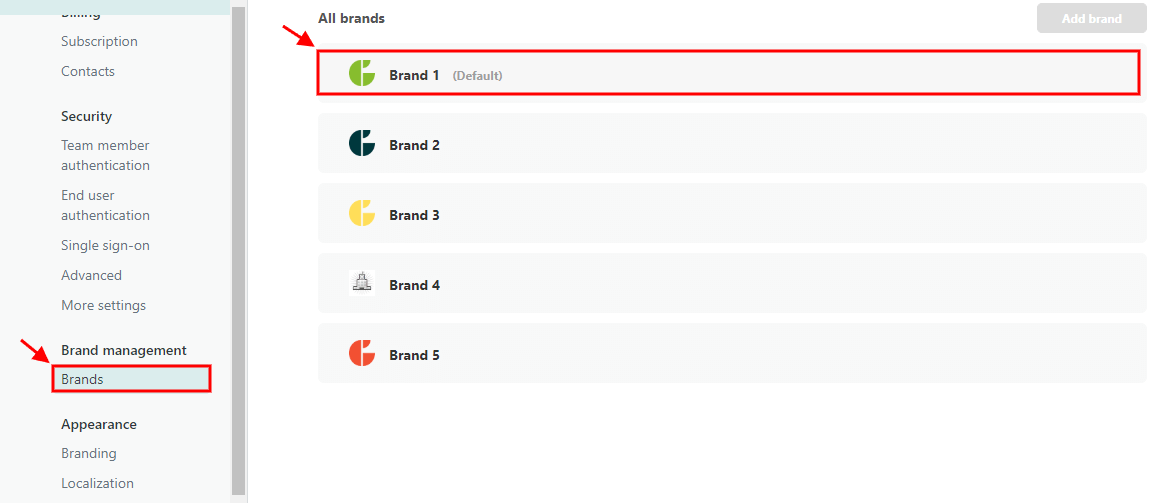
4. Scroll down to Brand Management under Account.
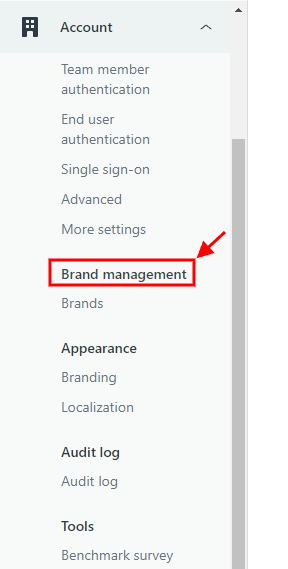
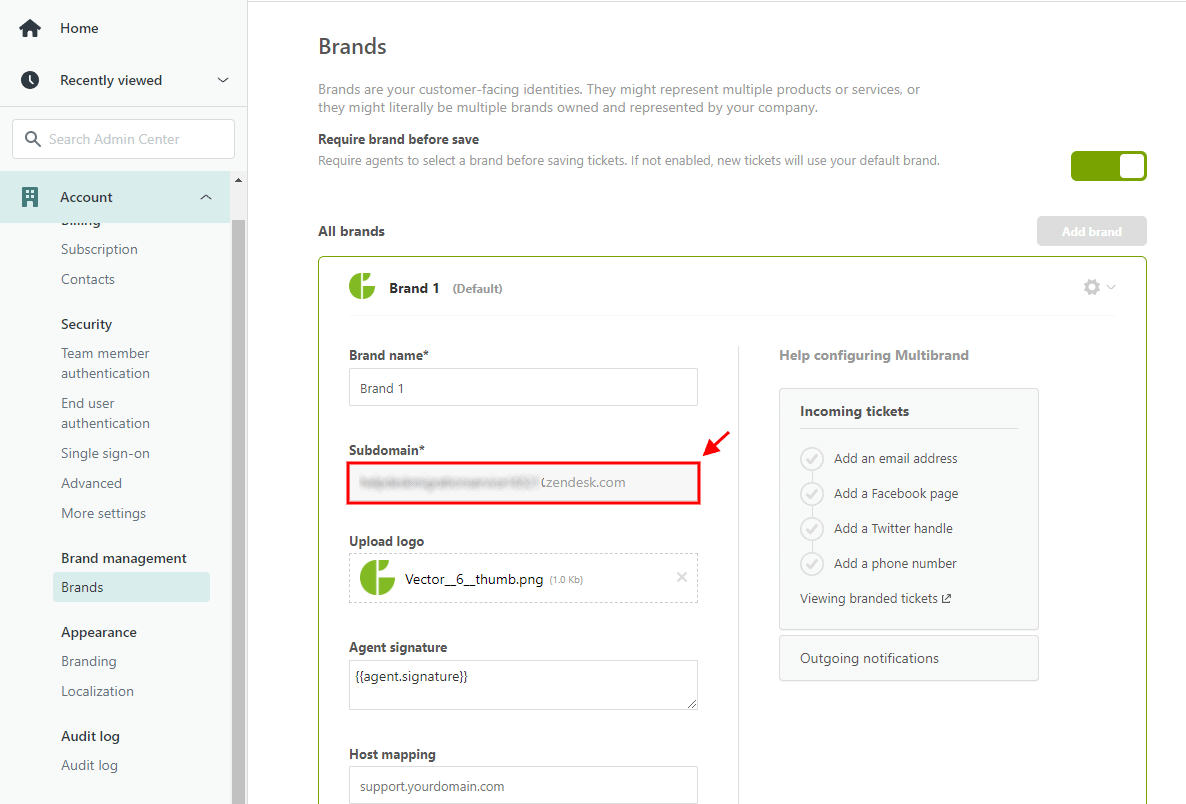
5. Choose Brands and click on the target brand.
6. Copy the Subdomain address and paste it into the Migration Wizard.
How to migrate Zendesk ticket side conversations?
When it comes to migrating your invaluable customer service data from Zendesk, the exciting news is that you can effortlessly transfer ticket-side conversations.
Activating Zendesk ticket side conversations
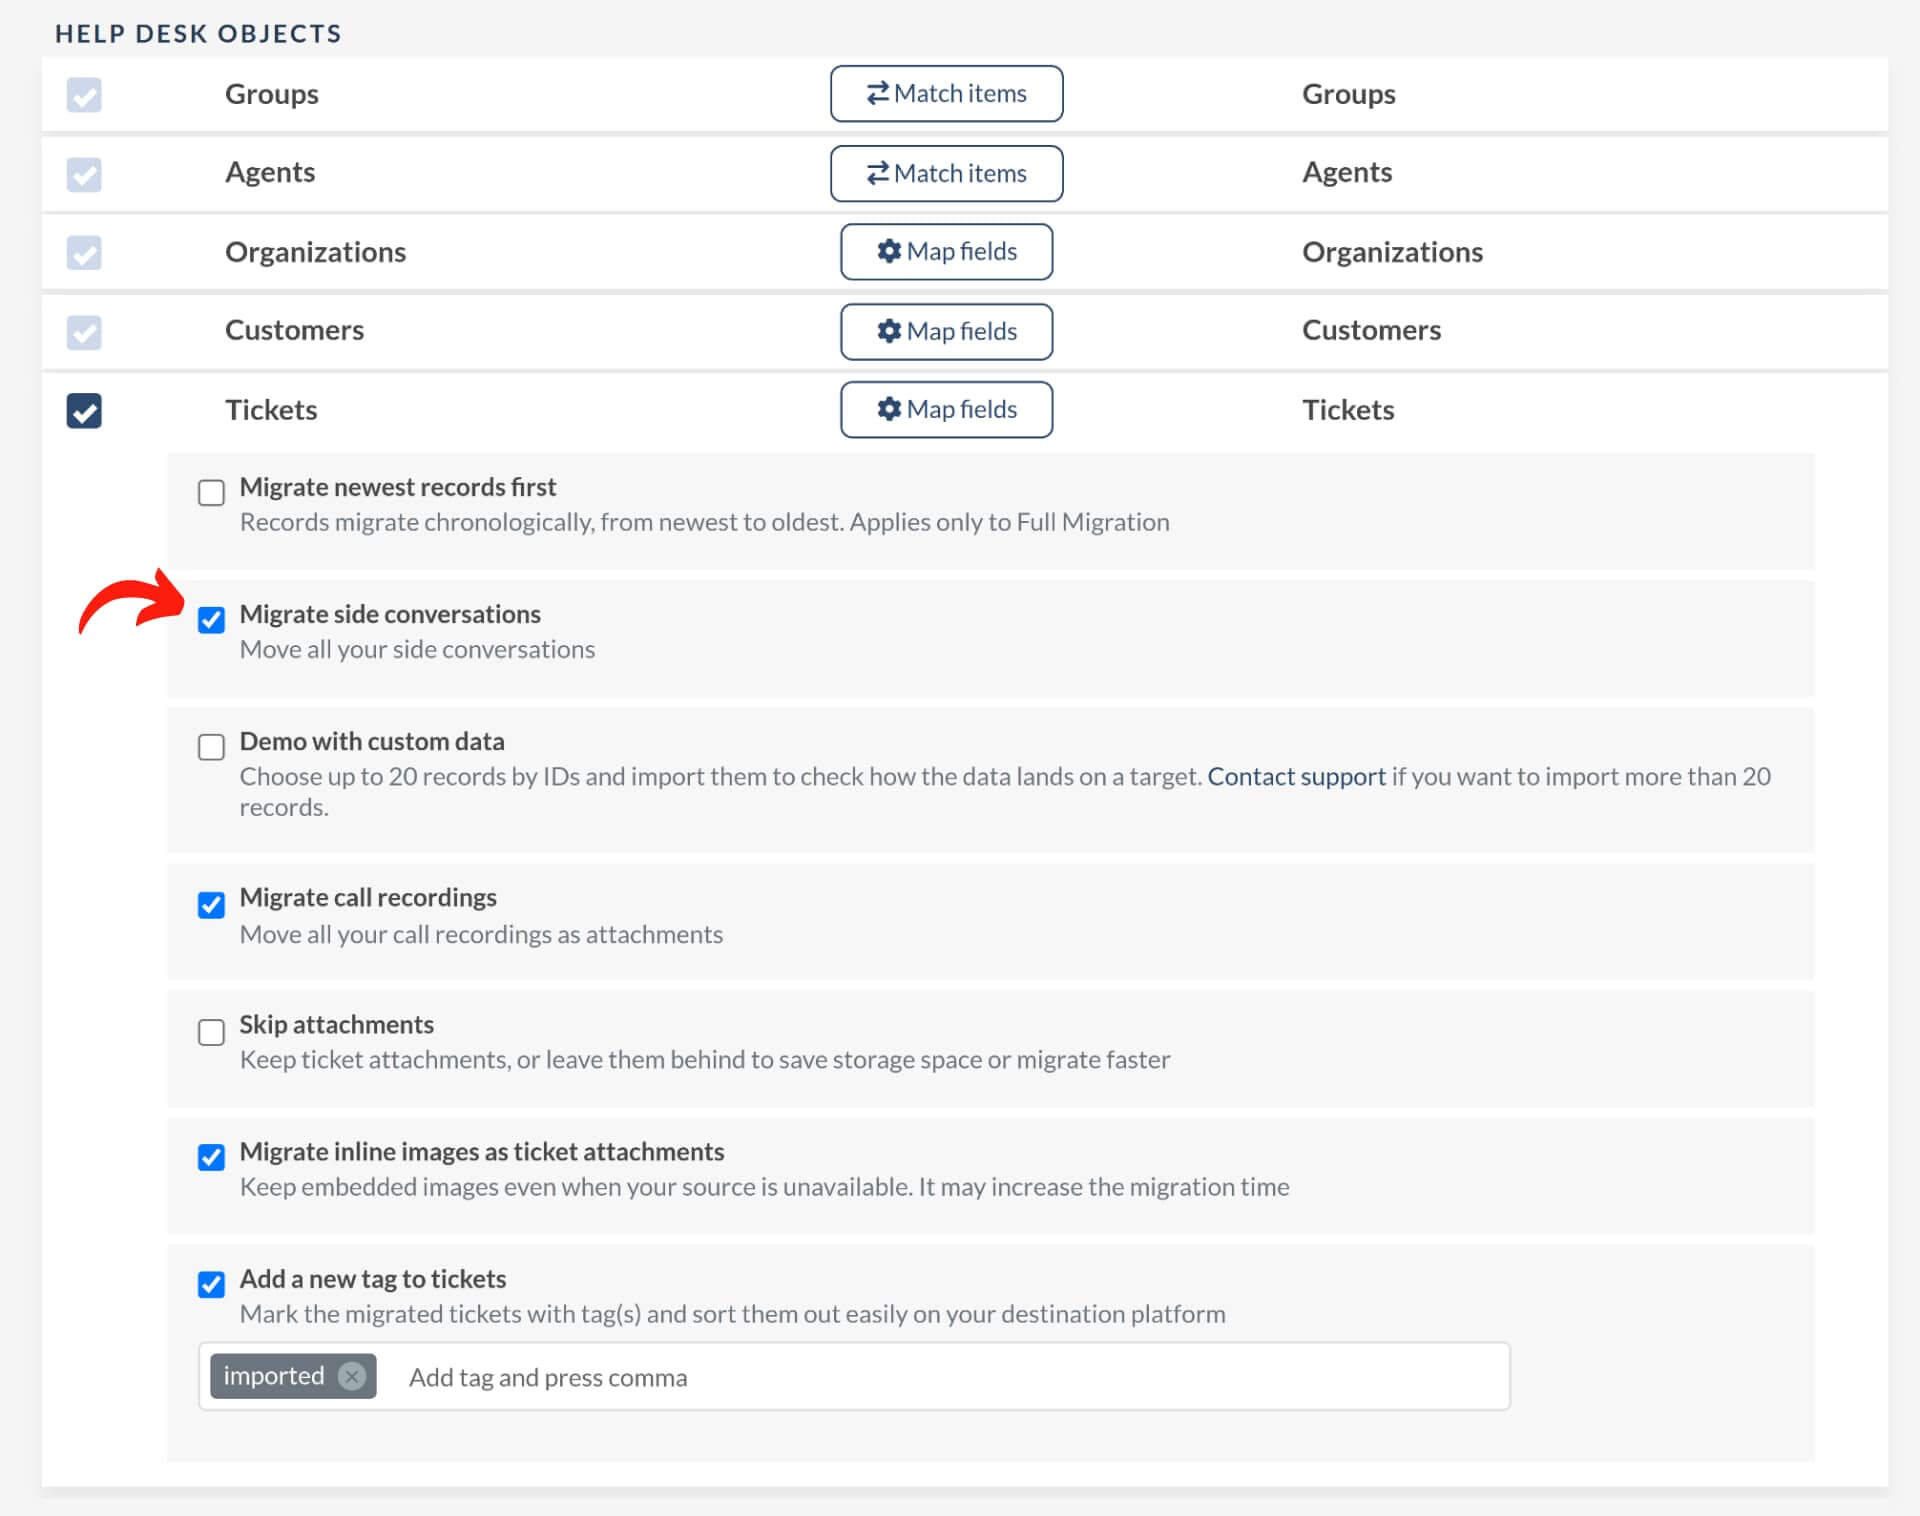
If you're using Zendesk as your customer service platform and want to migrate those side conversations, here's a nifty trick—ensure they're enabled in your Zendesk account. You'll guarantee that these interactions accompany your data to its new home by simply checking the right boxes and activating side conversations.
Scenario 1: Effortlessly switch help desk platforms
You've decided to bid farewell to Zendesk and embrace a new help desk platform. But fear not! Your treasured Zendesk ticket side conversations can seamlessly journey with you. These conversations will be gracefully imported as private comments into your new helpdesk during the migration process.
Scenario 2: Merging Zendesk instances harmoniously
Now, let's envision another captivating scenario—consolidating two Zendesk instances. You might wonder what becomes of your ticket-side conversations during this process. The answer is both simple and magical: your ticket-side conversations will migrate as ticket-side conversations. Data migration with us ensures a smooth transfer, and the side conversations retain their original form.
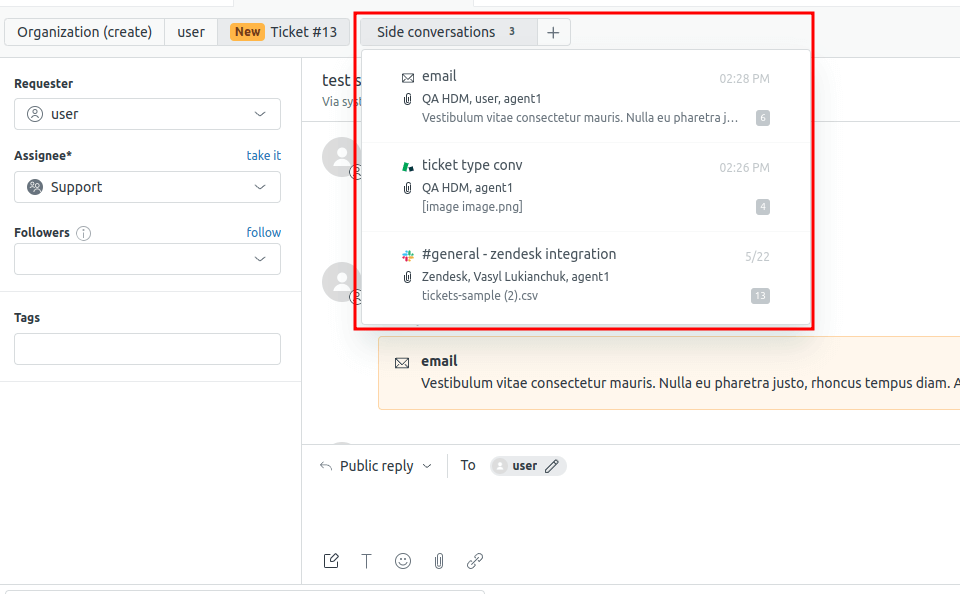
Within customer service data migration, Zendesk ticket-side conversations hold immense value. By activating this feature in your Zendesk account, you can effortlessly transfer these conversations, ensuring their integral role in your customer support ecosystem. Whether you're switching help desk platforms or merging Zendesk instances, these conversations will seamlessly find their way to their new destination, enriching your customer service experience.
How can I migrate tags to Zendesk?
Help Desk Migration migrates Tags to Zendesk by default. Note Zendesk doesn’t support spaces in Tags, so we use dashes (i.e., tag with space => tag-with-space)
Also note that if you have added custom picklist fields to your tickets, Zendesk will automatically create a tag based on the selected picklist value.
I see odd Tags in Zendesk after migration. Is it normal?
Yes, it is normal.
When migrating from other platforms, custom fields of the drop-down type will be transferred to Zendesk as mapped in Migration Wizard and added to Zendesk as tags. This is a default Zendesk behavior and cannot be changed on our side.
How to check the result of Demo Migration in Zendesk?
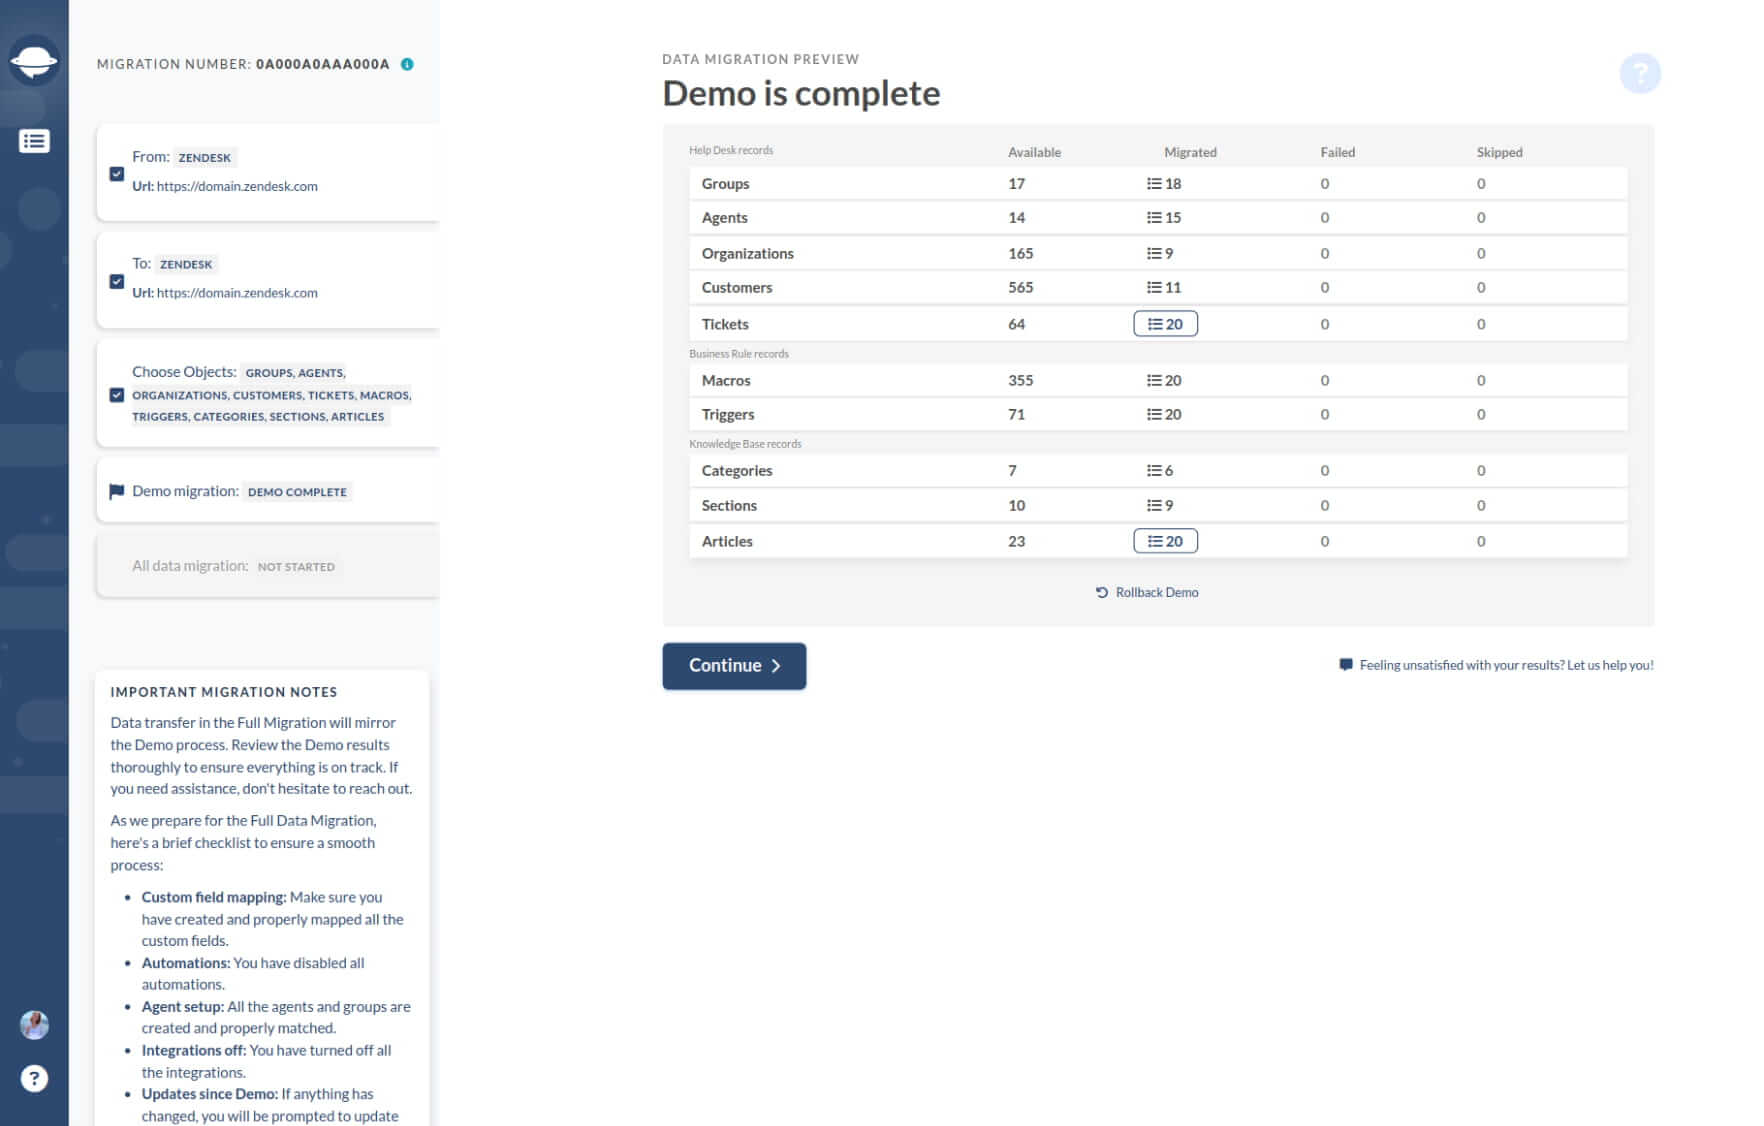
Once the Demo Migration is completed, you’ll see a table with imp entities, including Tickets, Contacts, Organizations, etc. Each record type is accompanied by a report containing the same entities IDs transferred during the migration.
If everything migrated correctly, you only see the migrated record reports. But, if something goes wrong, you can also get reports for failed or skipped records.
To open a report, click the “View records” button next to the needed record type.
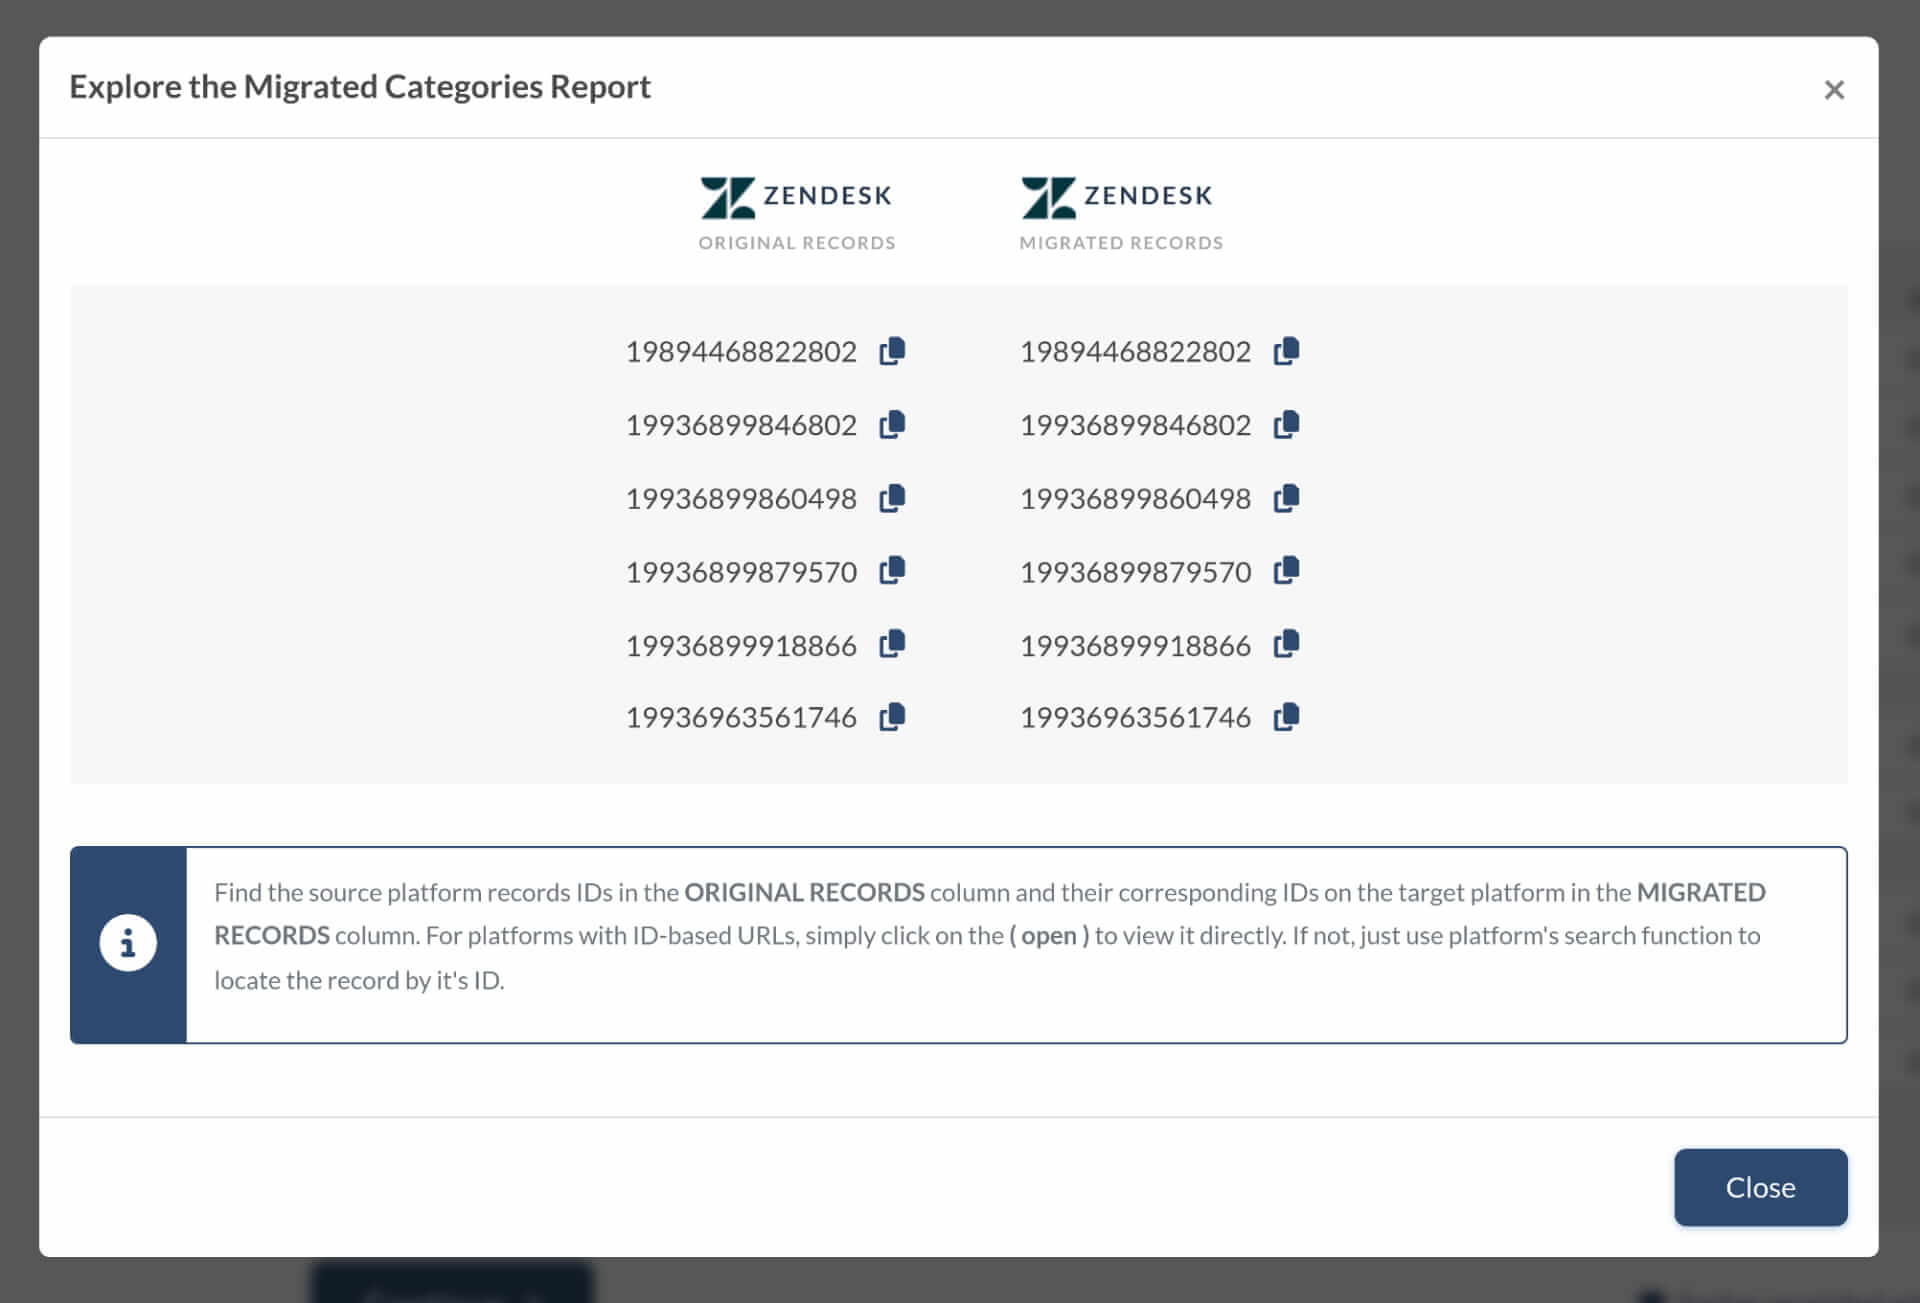
A report includes a list of record IDs in the help desk you’re migrating from and IDs of “new” Tickets in Zendesk. You need to check each record to ensure that your data is migrated correctly. The report looks like this:
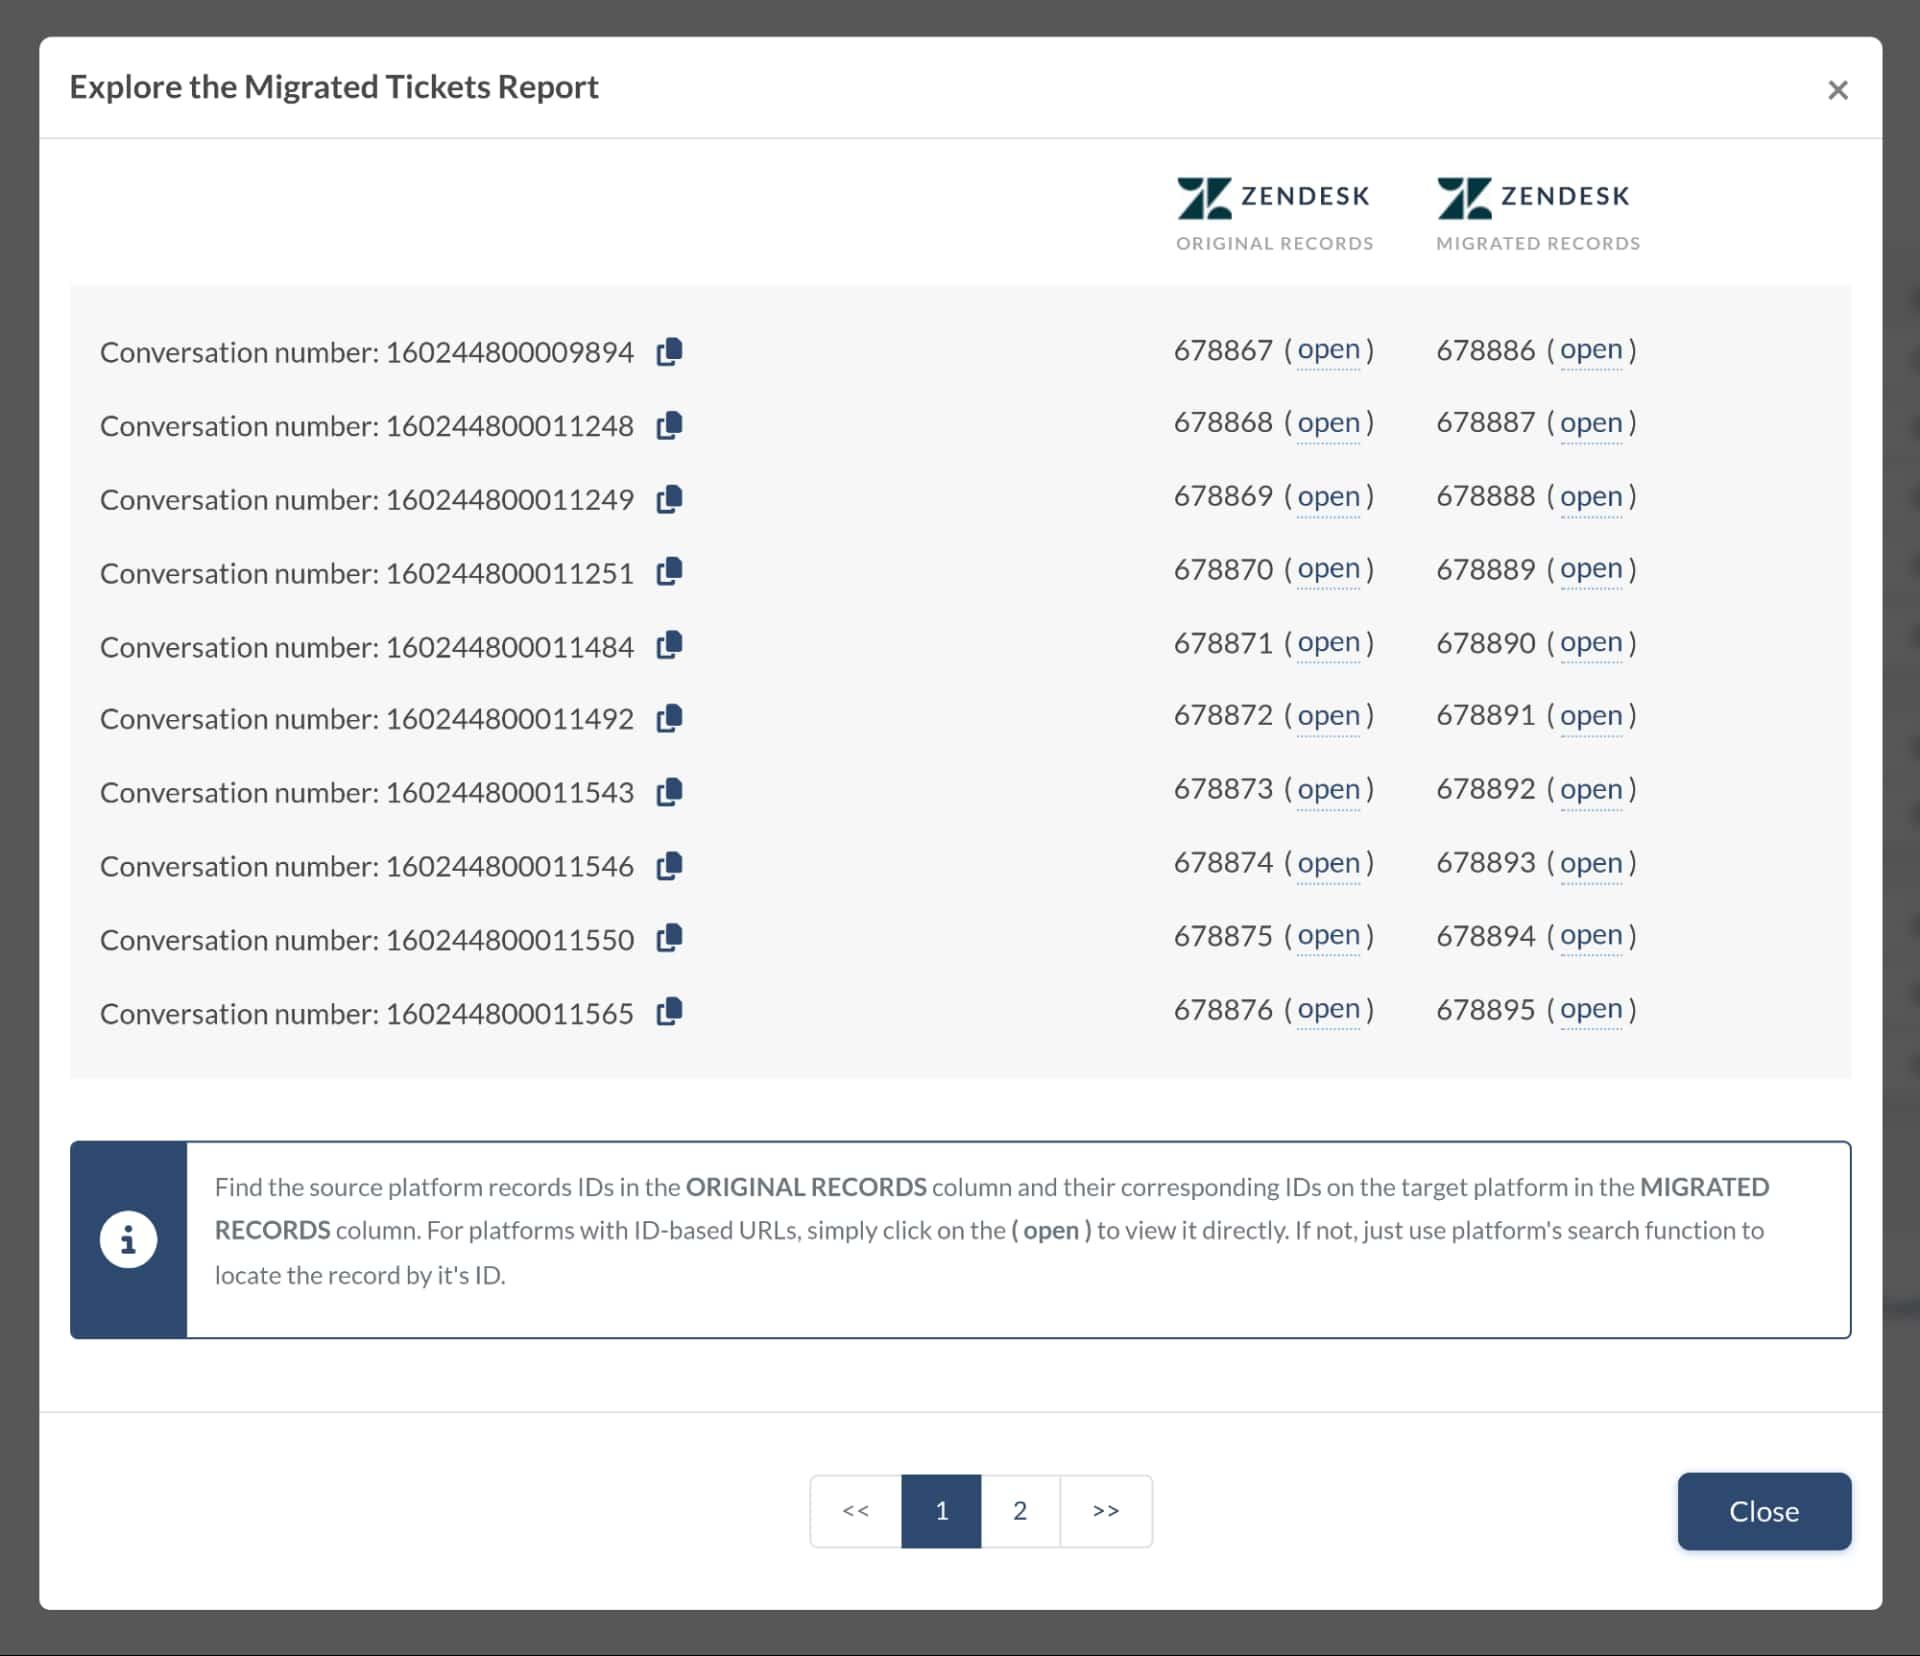
All tickets and related data migrate similarly in the Demo Migration or Full Data Migration. However, if some ticket data did not migrate or/and was incorrectly transferred during the Demo Migration, it will also happen during the Full Data Migration.
So, ensure you check if all tickets migrated correctly, along with their Type, Source, Status, Priority, Custom Fields, Requester, Agent, and Tags.
Plus, if you’re migrating to the Knowledge Base, examine the statuses of articles and their location. Finally, if you’re satisfied with the result of the Demo Migration, initiate the Full Data Migration.
Where Can I Find My Migrated Tickets in Zendesk?
There are a few reasons why you may be unable to see all the imported data in your Zendesk system:
By default, Zendesk does not show all ticket statuses (e.g., Closed). To view all tickets, type * in the search bar and click the Enter key.
Zendesk automatically archives old tickets and marks them as closed. To find closed tickets, you need to create a view in Zendesk.
How to switch off “Validate user phone numbers” in Zendesk?
To turn off the “Validate user phone numbers” feature in Zendesk, follow these steps:
- In your Zendesk account, click the Admin Center icon.
- Navigate to End User Settings > in the sidebar, click People, then select Configuration > End users.
- Find the Validating phone numbers section. If this is turned on, phone numbers added to user profiles must follow the E.164 international numbering format. To turn off validation, simply uncheck the box next to Validating phone numbers.
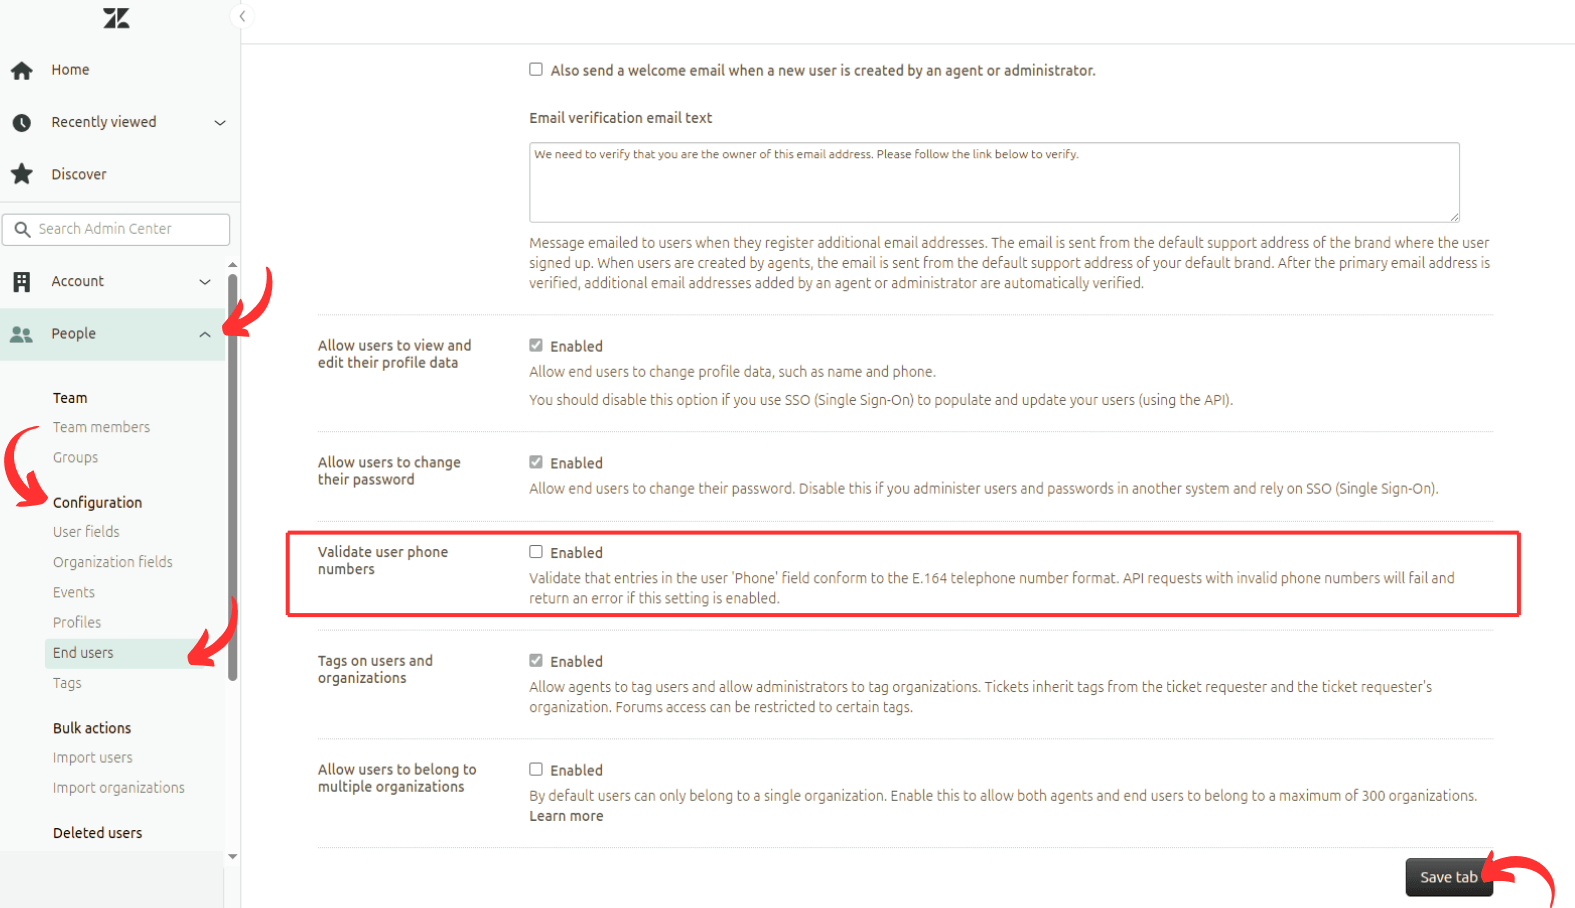
Disabling this feature allows phone numbers in different formats to be saved without validation. Keep in mind, though, that this may affect any integrations or features relying on standardized phone number formats.
How to disable automatic ticket tagging on Zendesk?
Automatic ticket tagging applies to custom ticket fields such as drop-down lists, multi-select, and checkboxes. So when you create a drop-down list, multi-select, or checkbox as a custom ticket field in Zendesk, you must add a tag to each custom field value. If you forget to do this, Zendesk will automatically create corresponding tags.
If you turn on automatic ticket tagging in the Zendesk setting, the software will scan incoming ticket descriptions and add matching tags. As a rule, it searches for words longer than two characters and compares those words to the tags used in your Zendesk instance. The top three matches will be added as tags to the ticket.

To turn on/off automatic ticket tagging, you should be an administrator.
The same process happens when migrate to Zendesk. When you map custom ticket fields as a drop-down list, multi-select, or checkbox in Migration Wizard, Zendesk will automatically add all the associated Tags to all imported tickets. Note: it's a default Zendesk workflow, and our tech team can't change it.
How to deactivate ticket form conditions in Zendesk?
When migrating to or from Zendesk, you must temporarily switch off conditions to ticket forms that require custom fields. This way, ticket custom fields migrate accurately during the Full Data Migration.
Here is how to deactivate conditions to ticket forms in Zendesk:
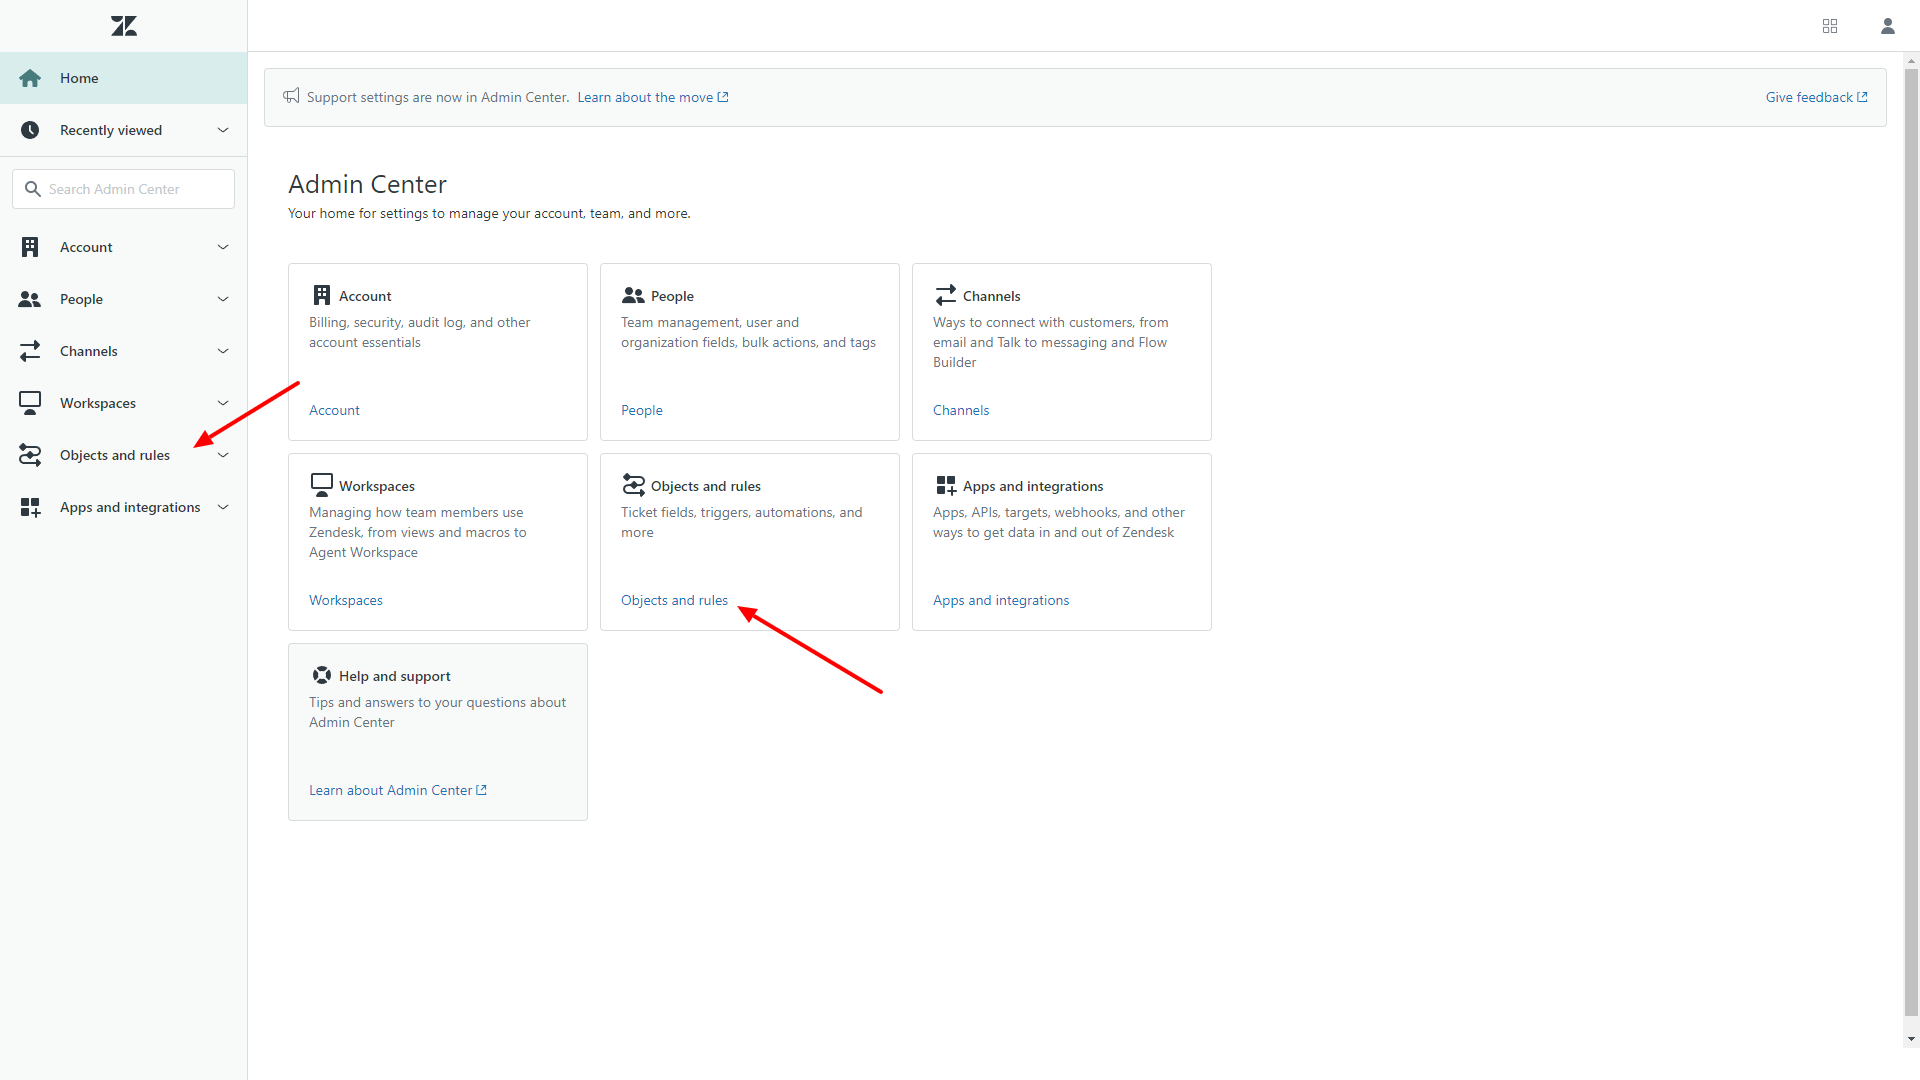
1. Go to Admin Center.
2. In the Admin Center, click on the Objects and Rules icon or pick it up in the sidebar.
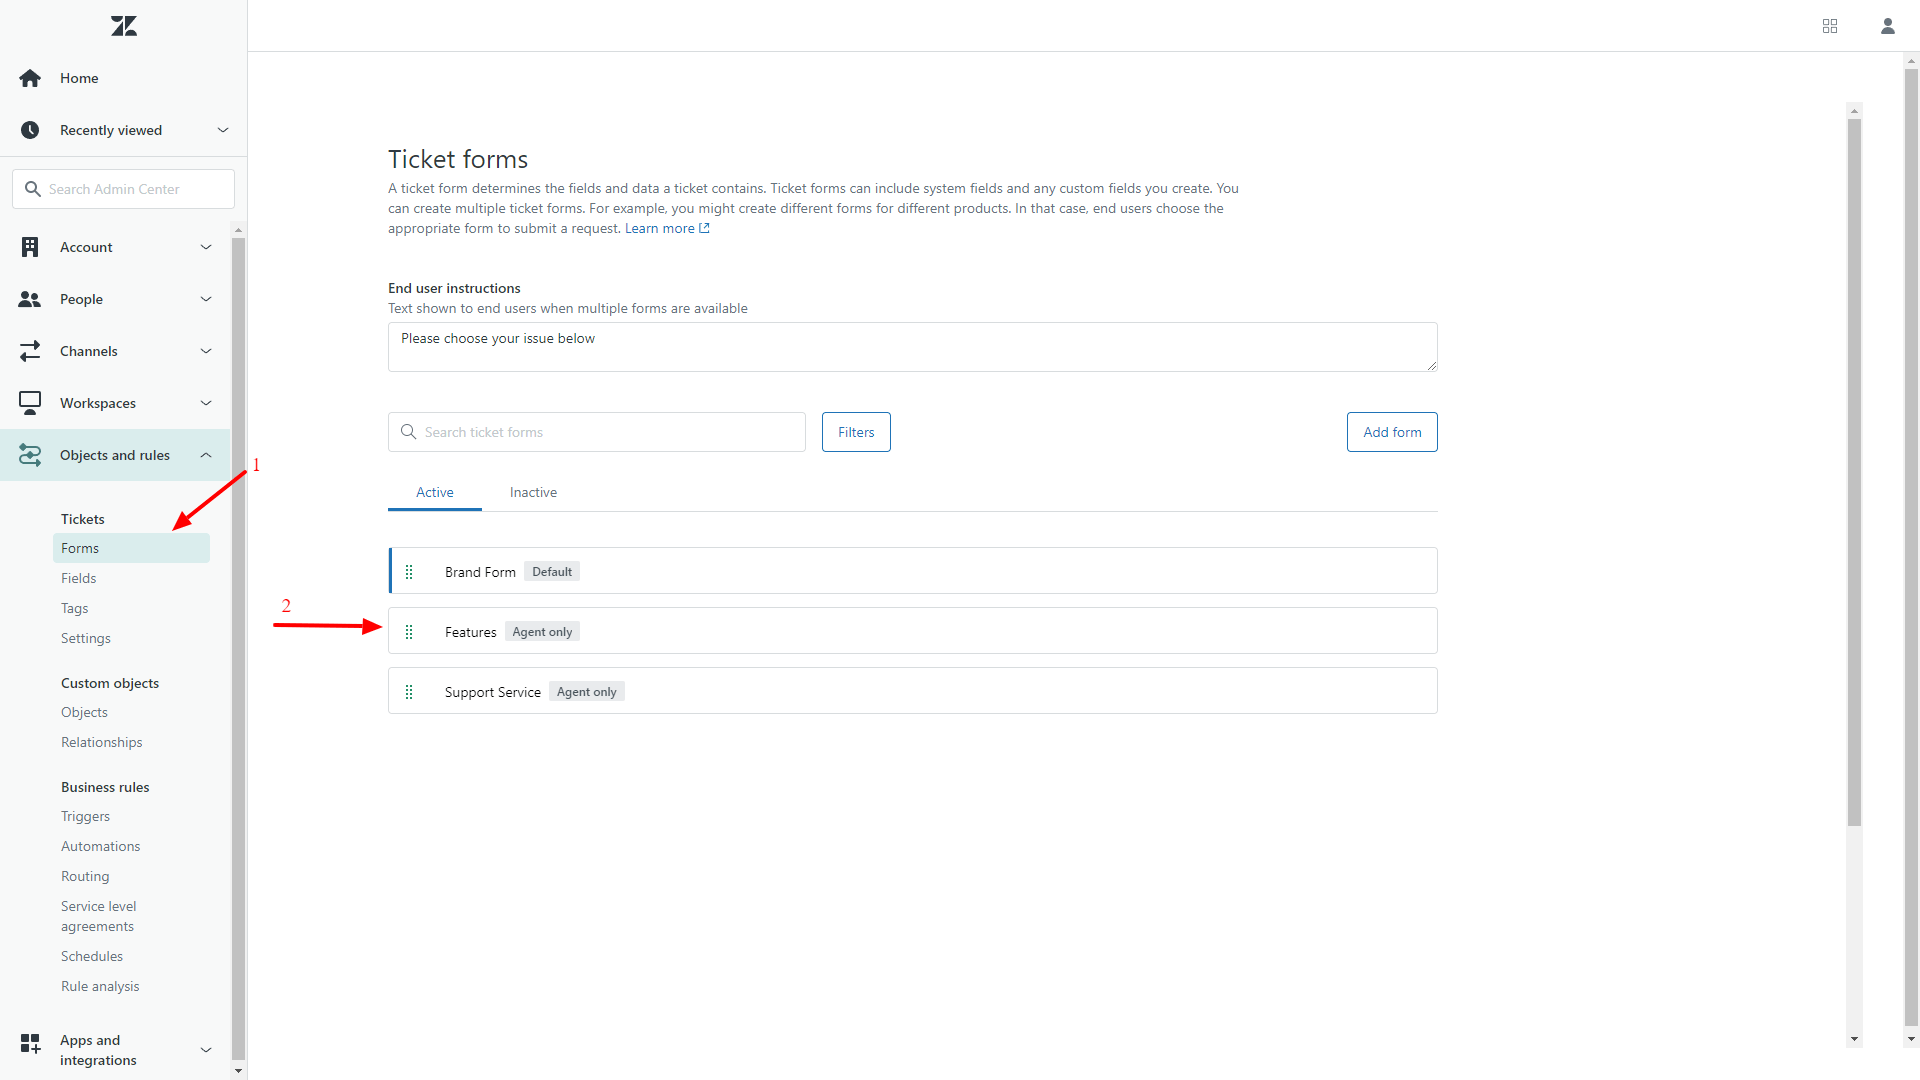
3. Then choose Tickets > Forms.
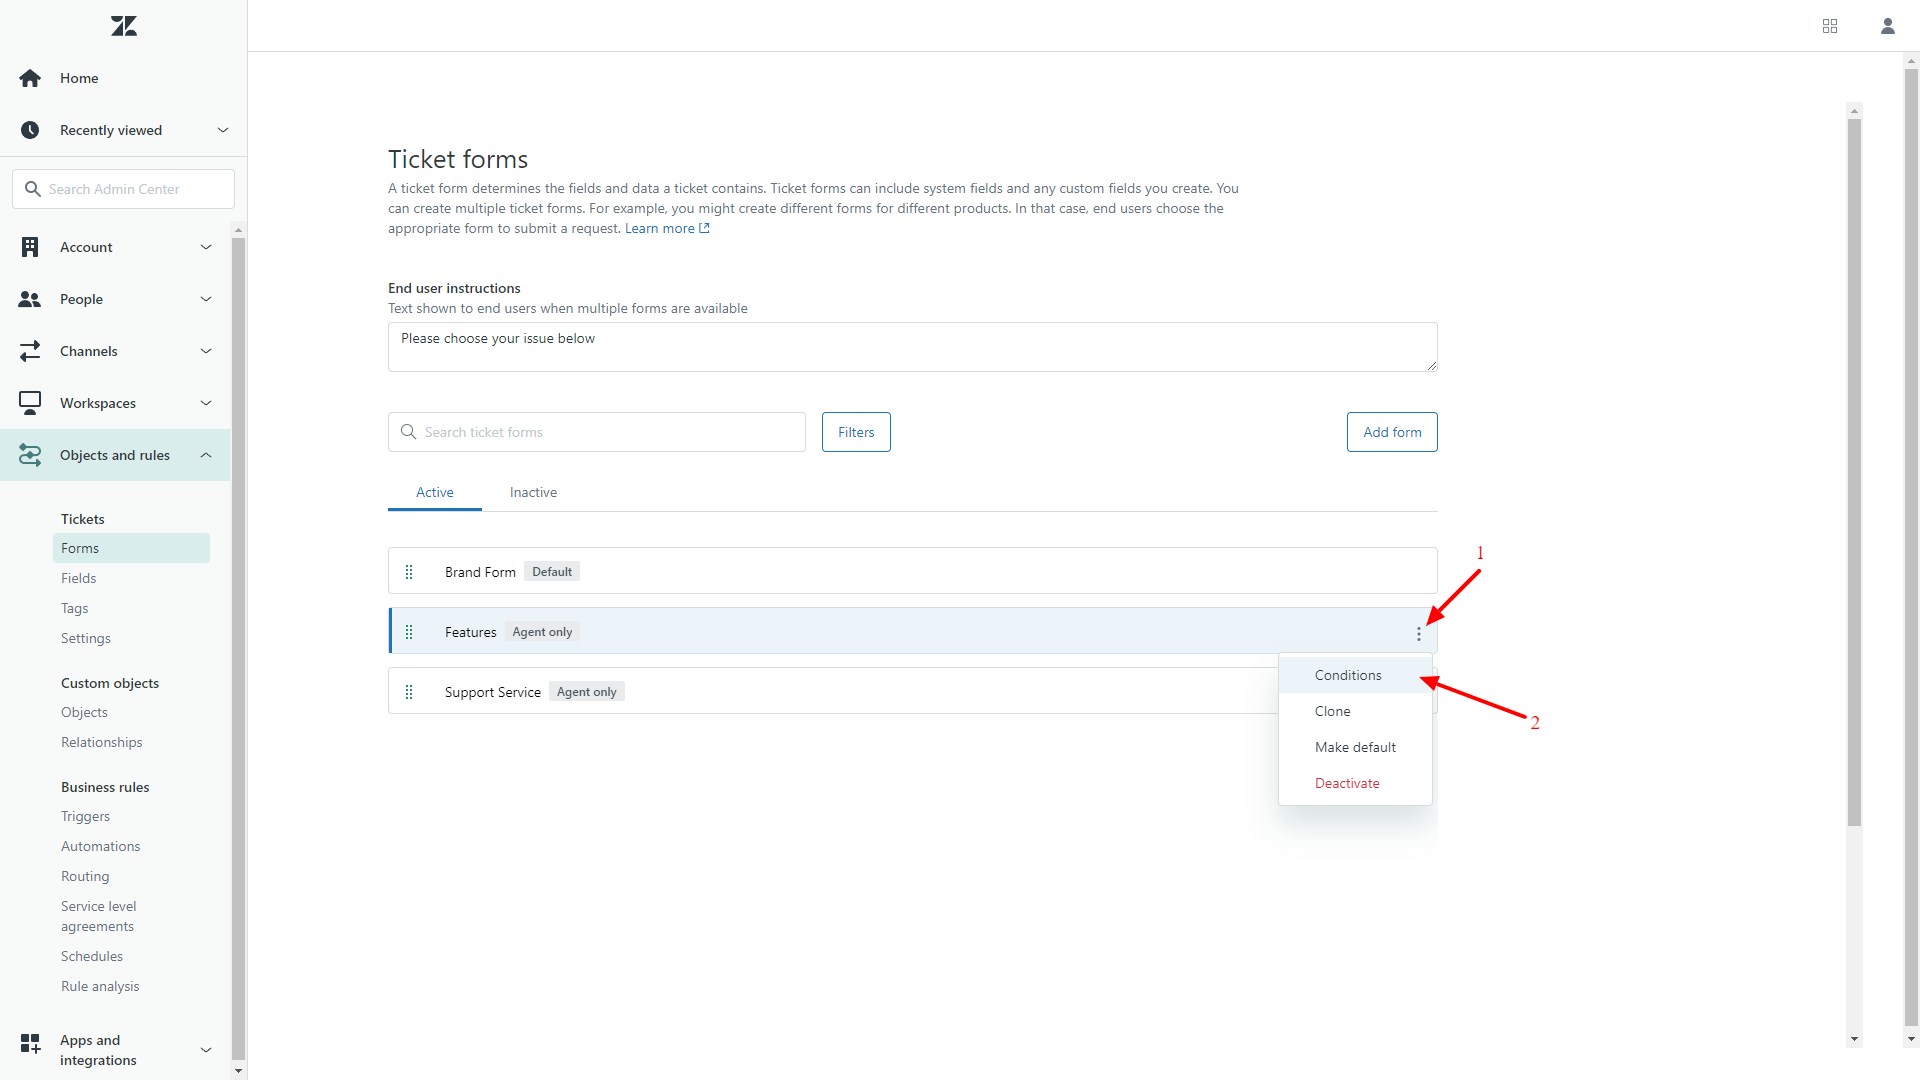
4. Move the cursor to the ticket form and click the option menu on the right.
5. Select Conditions.
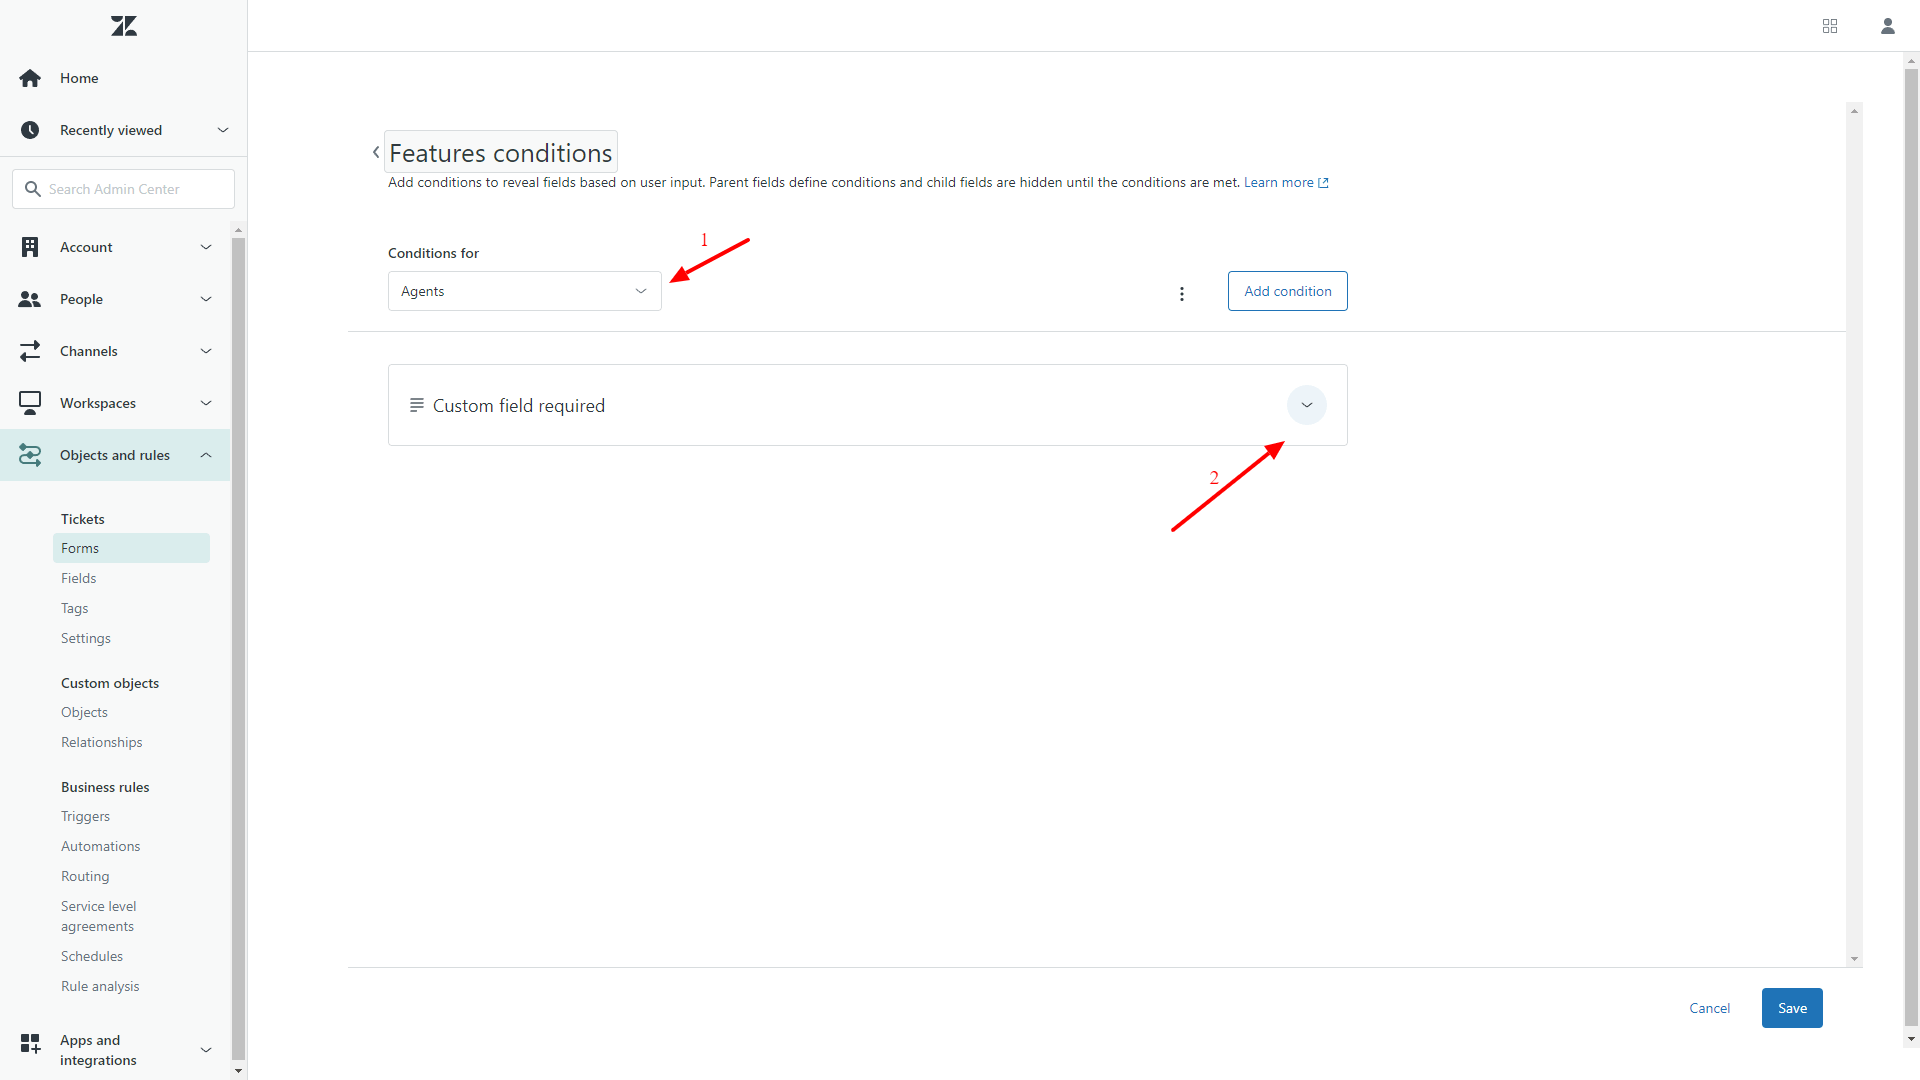
6. Pick up a type of user (Agents or End users) from the Conditions for drop-down list.
7. Click on the expand icon to view the available conditions.
8. Click on a pencil icon to edit a condition.
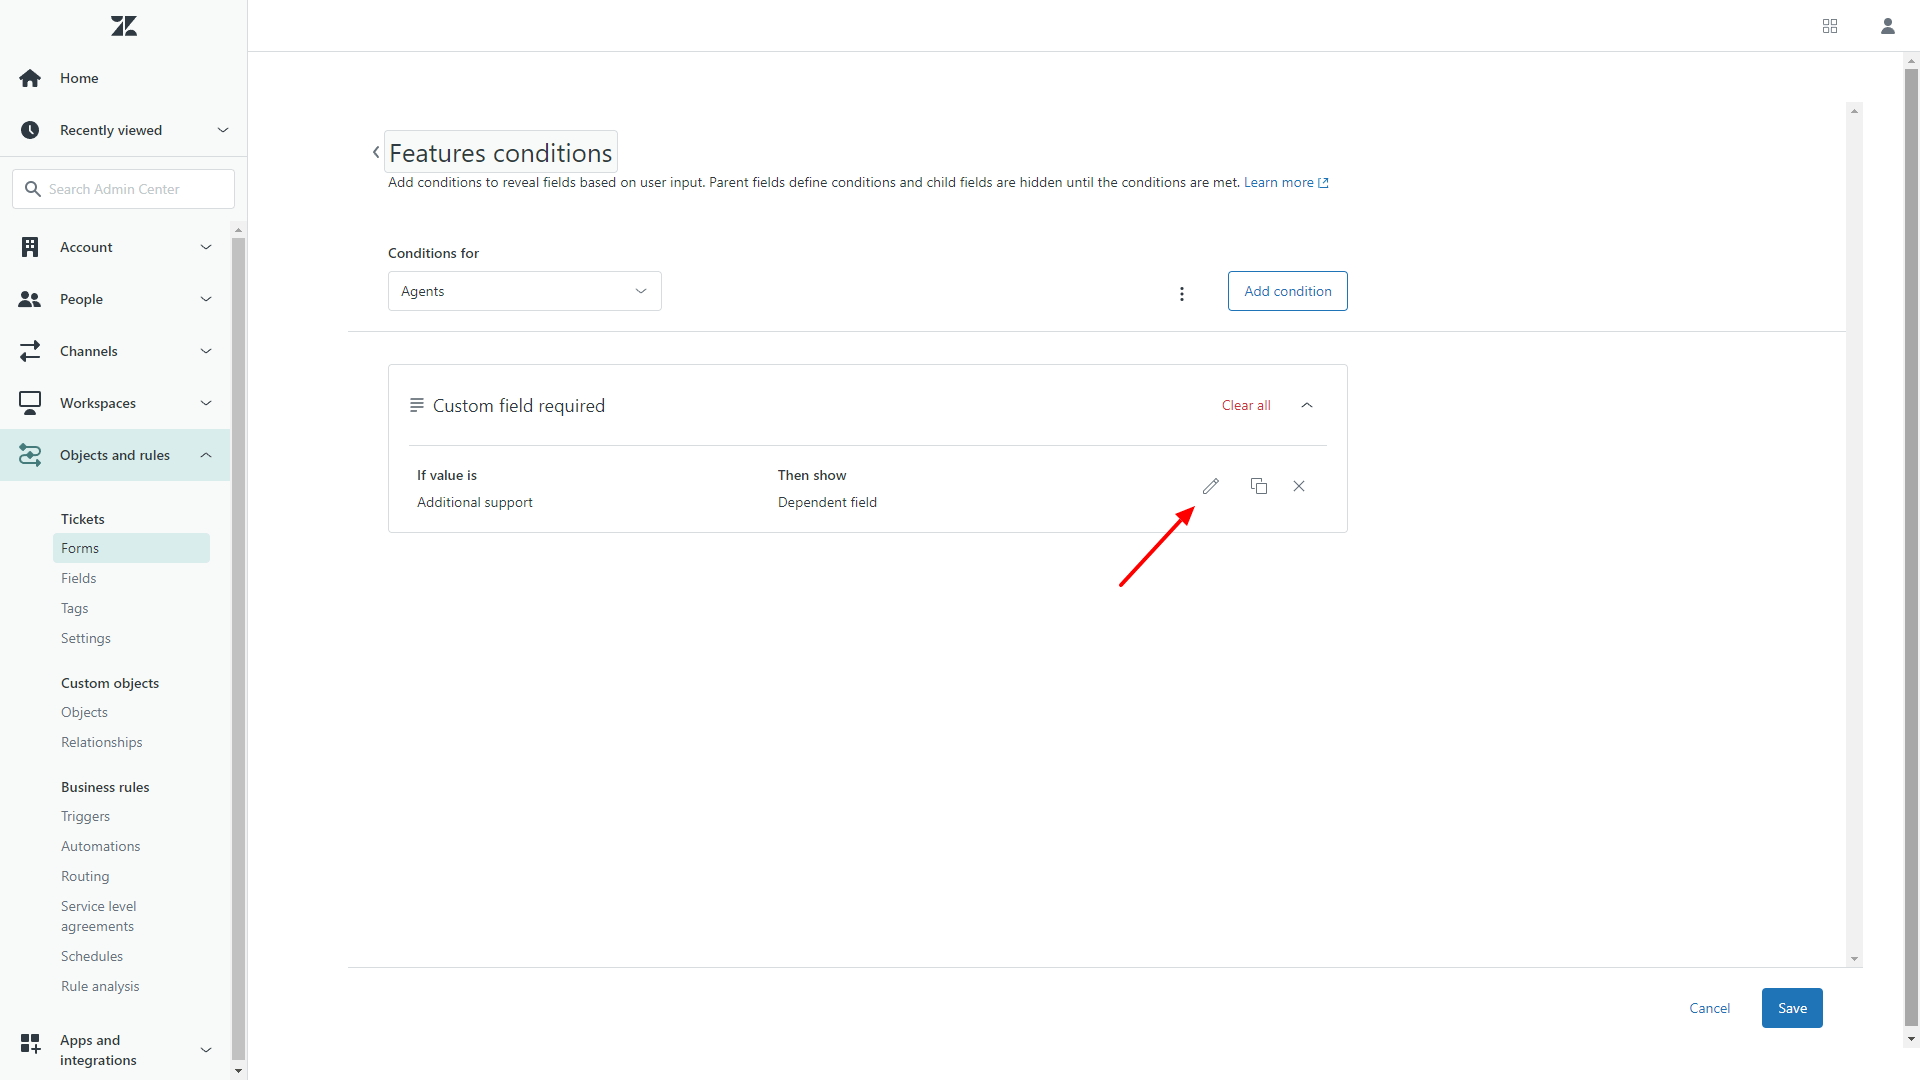
9. Open a drop-down menu in the Required field.
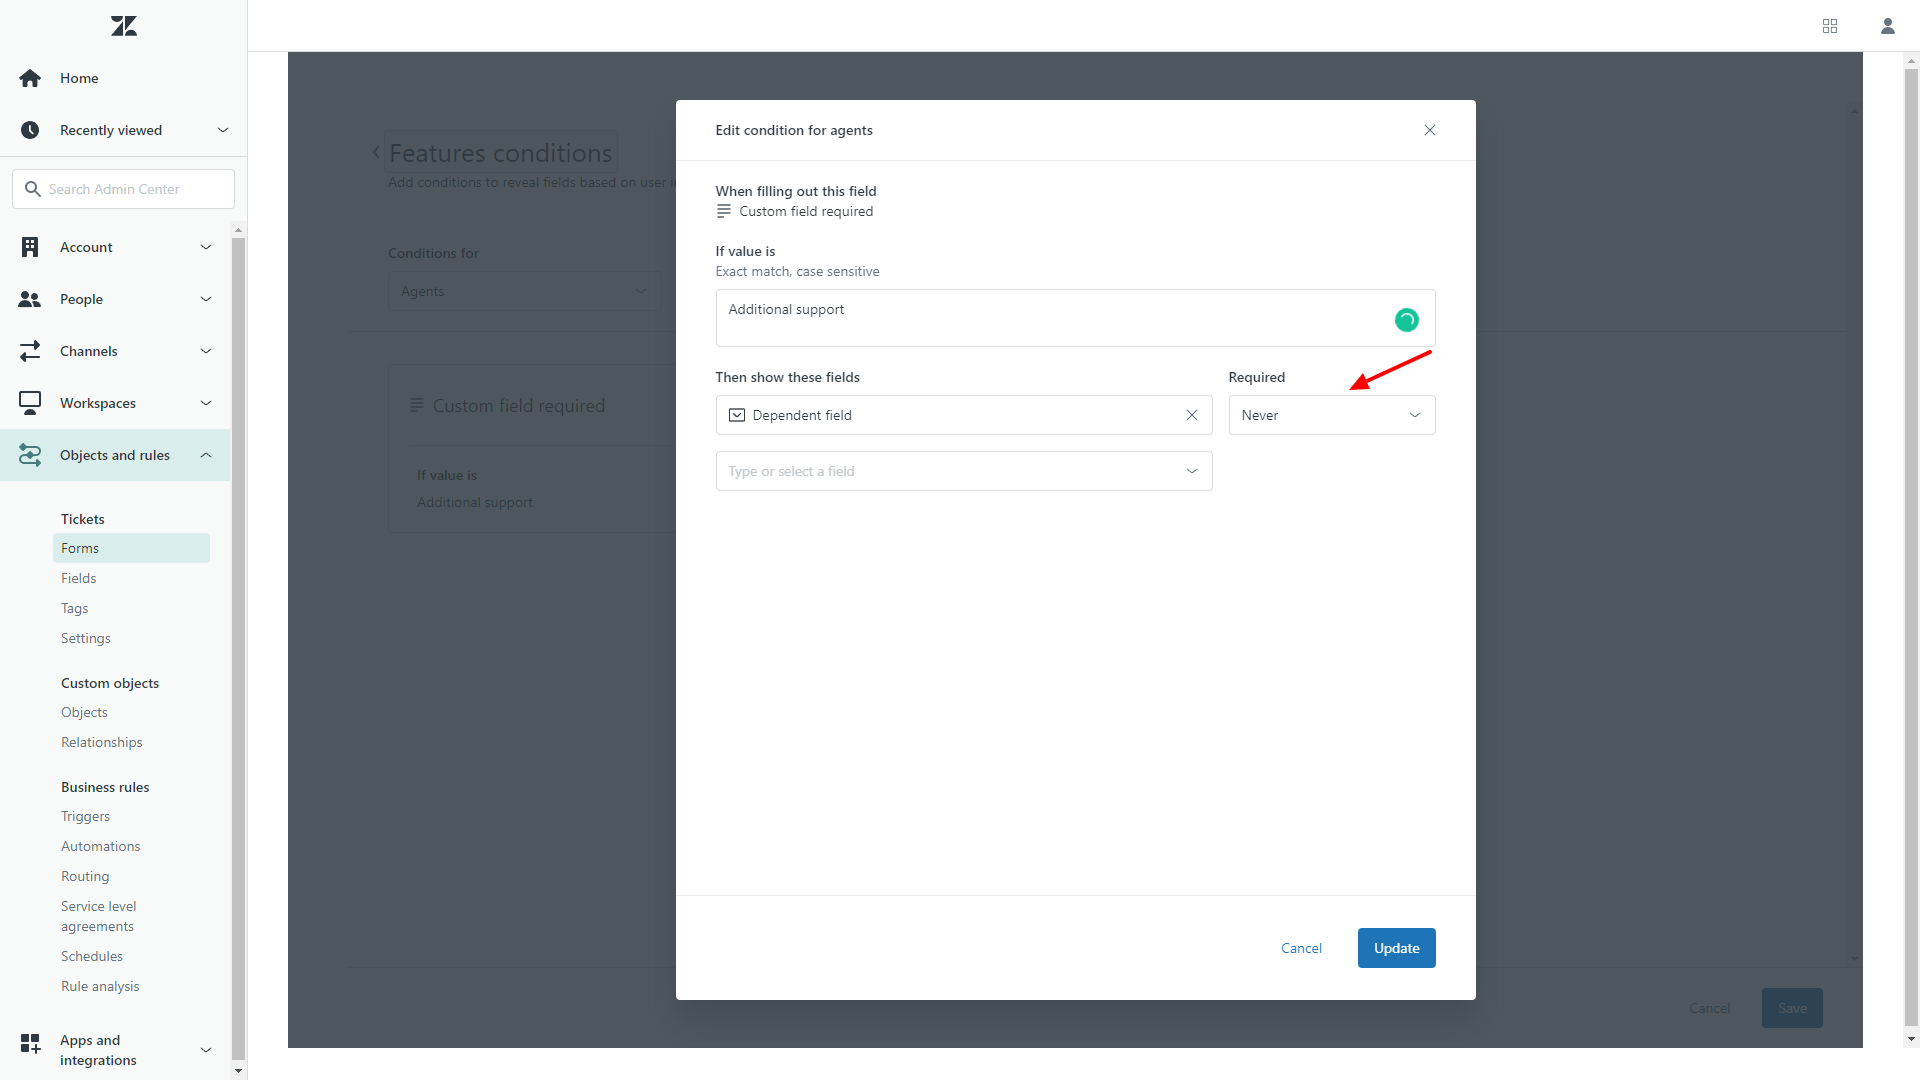
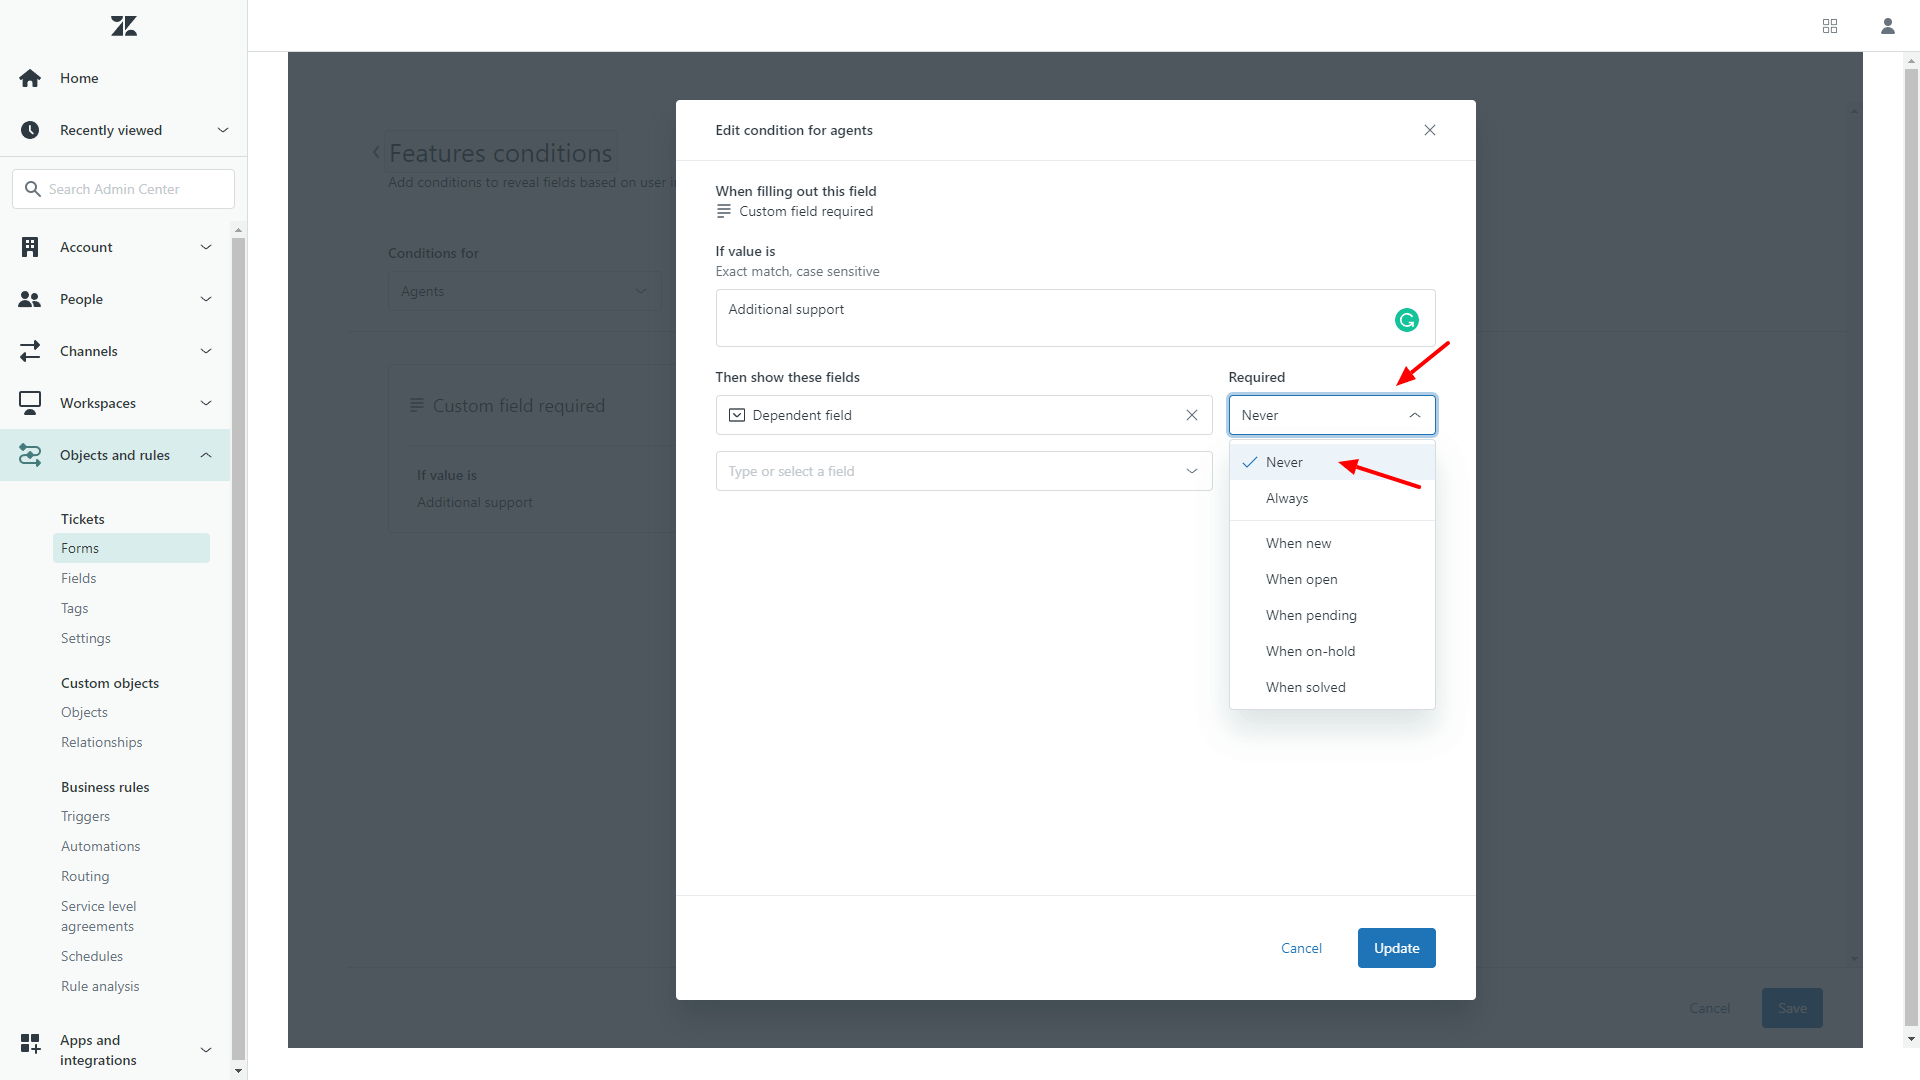
10. Pick up Never for each field.
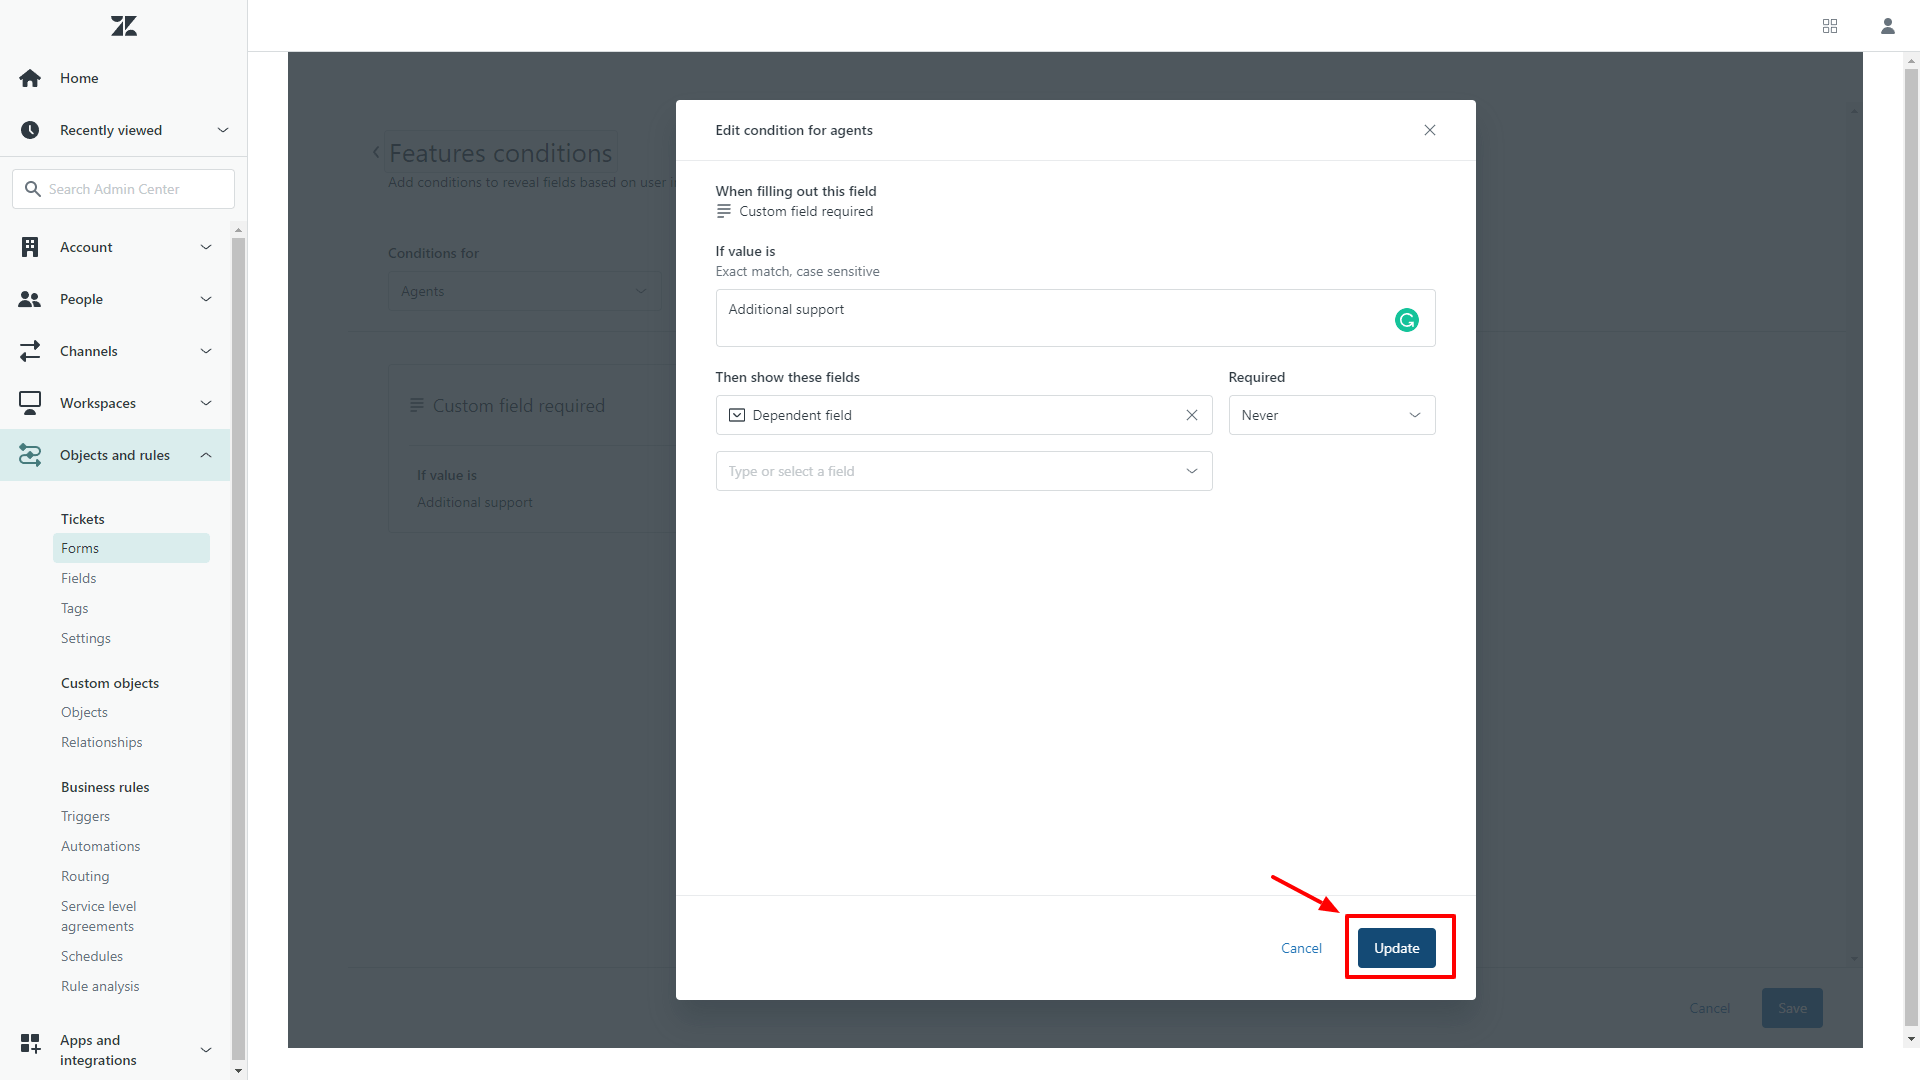
11. Click on Update to save changes.
As soon as your Full Migration is complete, go to ticket forms and switch on the required conditions settings.
Do customers get notifications during the migration to Zendesk?
Zendesk does not send notifications to customers, only to agents. However, for extra assurance, we recommend turning off Zendesk Automation and Triggers before starting the migration.
How to calculate the number of Tickets in Zendesk?
To calculate the number of Tickets in Zendesk, follow this guide:
1. Go to Search and type *. Then hit Search for *.

2. Select Status in the Filter menu and choose all available statuses:
New, Open, Pending, Solved, Closed, Hold

Note: During our free demo migration, you can quickly determine the number of your Conversations and estimate the cost of the data transfer.
Limitations of Light Agents on Zendesk
In Zendesk, light agents are team members who need visibility into support conversations but don’t require full agent permissions. They’re ideal for subject matter experts, managers, or stakeholders who need to stay informed and provide internal input—without directly interacting with customers.
What light agents can do
✅ View tickets—access tickets assigned to their groups or, depending on settings, all tickets in the system.
✅ Leave internal notes—collaborate with agents by adding private comments to tickets.
✅ Create tickets—open tickets on behalf of customers, though the customer won’t see the ticket until a full agent adds a public comment.
✅ Edit certain ticket properties—modify specific fields (depending on permissions), but not after the ticket is created.
✅ Use macros—apply predefined responses to add internal notes efficiently.
✅ View reports—access analytics, dashboards, and reports based on role-based permissions.
✅ View user profiles—look up customer details but with restricted editing capabilities.
✅ Access the Help Center—browse knowledge base articles and community forums based on assigned permissions.
What light agents can’t do
🚫 No public replies—they can’t respond directly to customers via email, chat, or social channels.
🚫 No ticket assignment—they can’t be assigned to tickets or update ticket statuses.
🚫 No workflow modifications—they can’t create or edit macros, triggers, or automations.
🚫 No advanced user management—they can’t assume user identities, edit user profiles, or merge accounts.
🚫 No live chat or messaging—they can’t handle real-time conversations with customers.
🚫 No bulk ticket actions—they can’t update multiple tickets at once.
🚫 No access to restricted reports—while they can view analytics, they can’t edit or manage reports.
🚫 No API access—they can’t use the Mail API to automate ticket creation or notifications.
Light agents ensure that the right people have visibility into customer conversations—without unnecessary access or responsibilities.
Lastly, if you plan to use any of the custom roles during the migration, let us know. Our support team will help you plan the transition as efficiently as possible.
Limitations of Zendesk Migration
Help Desk Migration doesn’t migrate source ticket IDs, as Zendesk sets ticket IDs and cannot be overwritten. You can add custom fields to source tickets with ID’s;
Our service doesn’t migrate password information. Your end-users will have to reset their passwords after the migration is completed.
How to allow display of unsafe content in Zendesk?
By default, Zendesk is configured to block unsafe HTML tags and attributes to ensure your customers can safely browse your knowledge base. This may affect how the browser renders the content, i.e., it may be displayed incorrectly or not.
You can disable this default setting by allowing the display of unsafe content:
1. In Guide, go to Settings>Guide Settings.

2. Find Security and check the Display unsafe content option.

3. Click Update.
Warning: this change allows potentially malicious code to be executed when users open an article in a browser.
Why to set up your time zone in Zendesk?
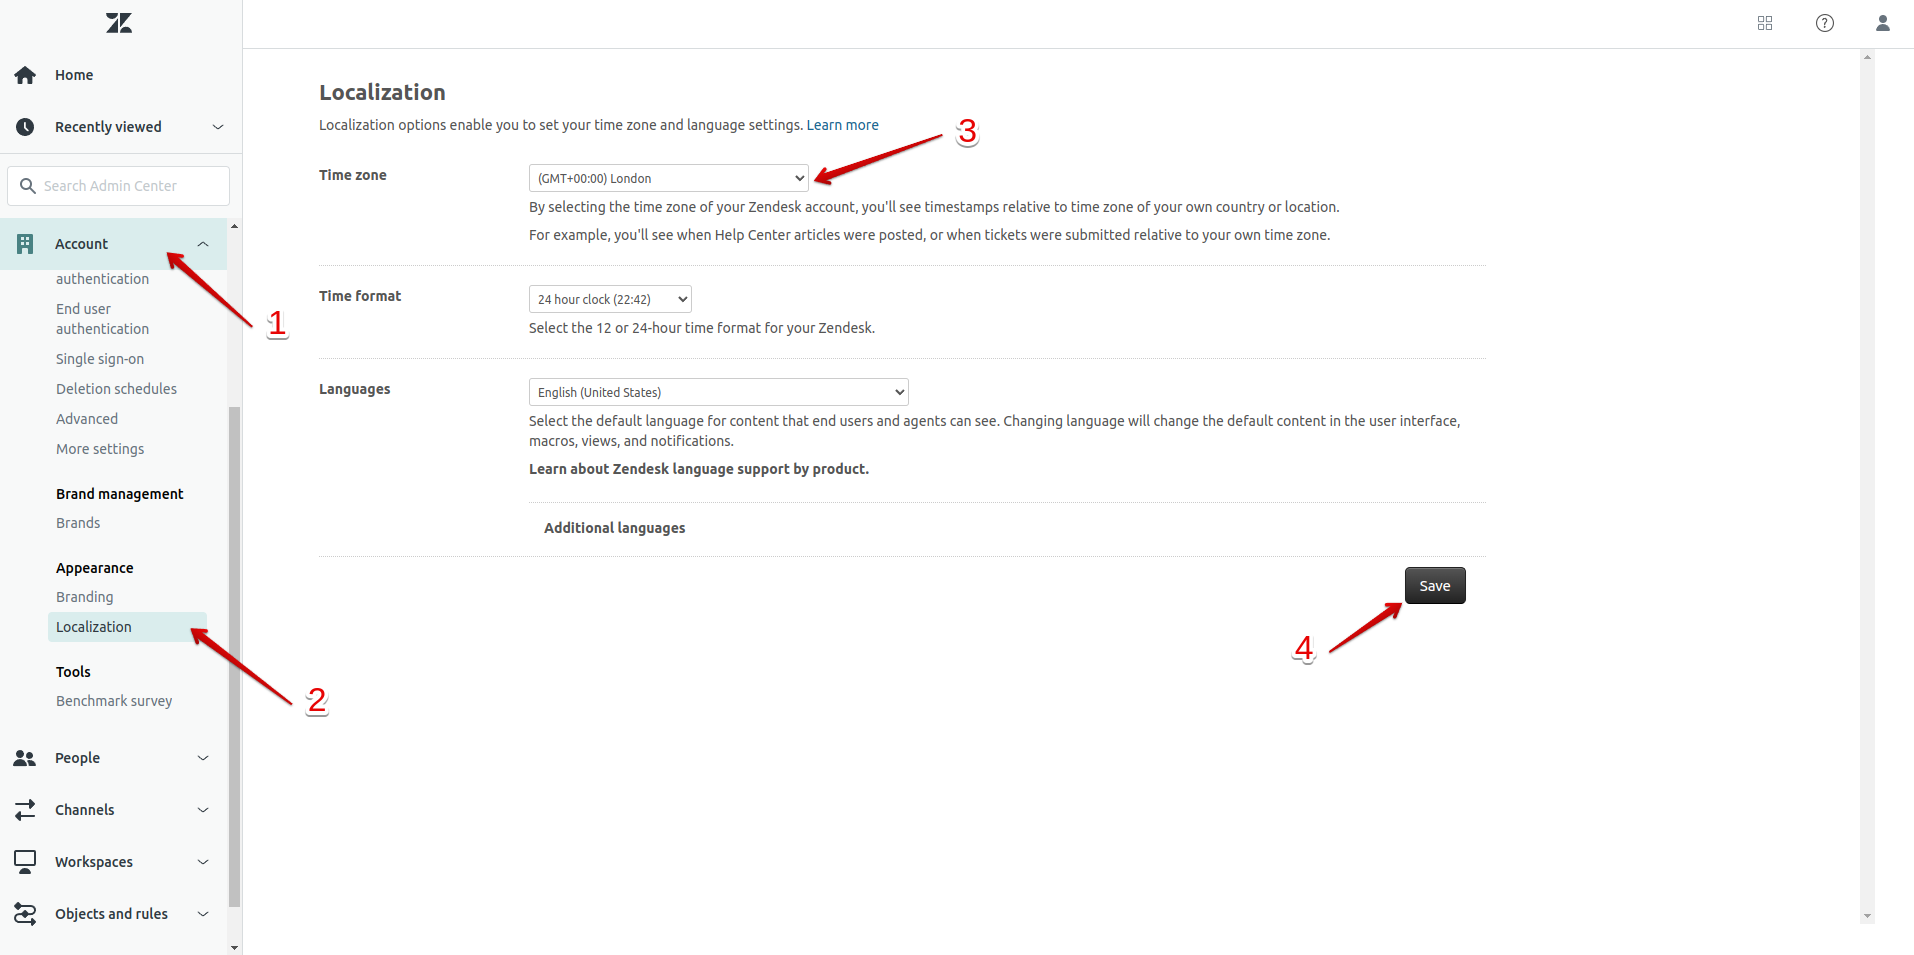
To avoid migration failures when Zendesk is connected to Migration Wizard as a Source, it's important to note that newly created accounts receive a default time zone. Therefore, before setting up your Zendesk migration, ensure that your time zone is configured appropriately.
Here’s a quick guide:
1. Go to the Admin > Go to Admin Center.
2. Go to Account > Localization > choose your time zone and click “Save.”
How to split one Zendesk instance into multiple?
There are times when splitting your Zendesk instance makes sense business-wise. Some cases we’ve seen include companies getting sold, splitting support teams to manage different products, etc. Regardless of why you need to split your Zendesk and extract data, we’re here to help.
All you need to do is send us a message in the live chat. Our team will respond and help with your data migration.
Here’s how it works:
- First, we will ask for your requirements to define the scope.
- Then, we’ll have some basic settings and write a custom code.
- Then, we’ll run a custom demo for you so you can verify the result. If any tweaks are needed, we’ll adjust the code to meet your needs.
- If you’re happy with the result, we will migrate all data.
- Once the migration is over, you check your Zendesk to see if you’re happy with the result.
How to split articles into multiple accounts?
Did you know our Migration Wizard is the perfect tool to transfer your knowledge base data within Zendesk smoothly? We have the solution whether you're relocating it to or from a specific brand. Just keep in mind that when you're prepared to get started, make sure to use the URL of that specific brand within Zendesk—no general account URLs will do.
Finding the brand URL is a simple process:
- Navigate to Admin
- Go to Admin Center
- Click on Account
- Explore Brand Management
- Choose your desired Brand
- Copy a URL of a needed brand
With the URL, you're all set to migrate your essential articles from one account or brand to another.
Ticket Splitting and Filtering
While we're unable to migrate individual tickets, fear not. There's a solution if you want to separate specific tickets from your Zendesk account. Request the ticket filtering option, and our dedicated support team will guide you.
What happens to contacts and companies when splitting Zendesk instances
We’ve seen companies use Zendesk groups or brands to run support for multiple products within the same instance. If that’s the case, then there’s one thing you should note. When migrating data, we filter tickets according to your requirements and move contacts and companies related only to those tickets. Some customer bases may be left out because we don’t pull data from other brands/groups. However, this ensures a more accurate data transfer.
How to migrate tickets with custom statuses to/from Zendesk
The Migration Wizard helps you map default and custom ticket statuses during data transfers to Zendesk, from Zendesk to other help desk systems, or even CSV files. This feature is particularly relevant when Zendesk's Agent Workspace is enabled, as it allows for creating and using custom statuses.
Agent Workspace and custom statuses
a) With Agent Workspace enabled:
- Create and use custom ticket statuses.
- Custom statuses are associated with main (default) statuses.
- Both custom and default statuses appear together in the Status field within the Migration Wizard.
- Map custom statuses as you would other fields.
b) With Agent Workspace disabled:
- Tickets revert to using main statuses only.
- Custom statuses are not available.
- Review the target/source step in the Migration Wizard to ensure accurate mapping without custom statuses.
- If you re-enable Agent Workspace, you must re-link custom statuses to main statuses.
Status mapping process
a) In the Migration Wizard:
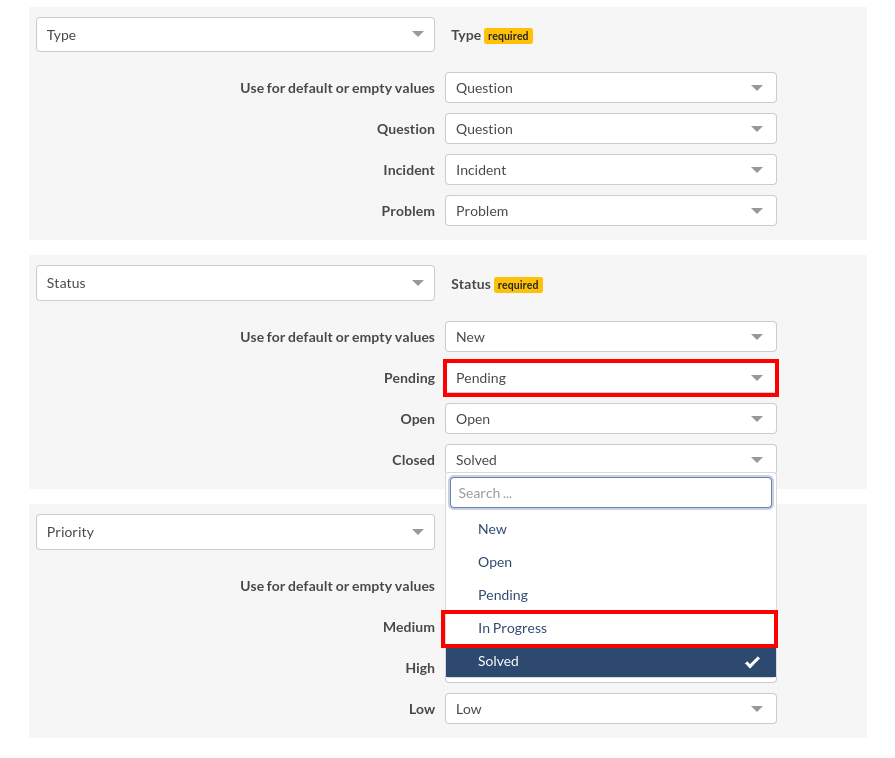
- The Status field is required for mapping.
- Default statuses like New, Pending, Open, and Solved are pre-filled.
- Custom statuses appear alongside default ones in dropdown menus.
b) Mapping options:
- Directly map statuses (e.g., “Pending” to “Pending”).
- Map custom statuses to default ones or other custom statuses.
- The Migration Wizard provides flexibility to match your specific needs.
Compatibility and data transfer
Custom statuses are supported, regardless of whether Zendesk is the source or target of migration. This feature operates independently of the other connected help desk systems. You can migrate custom statuses to and from Zendesk and CSV files.
Best practices for status mapping
- Review all statuses in both source and target systems before mapping.
- Consider how status mapping will affect your workflow.
- If migrating to customer service data without custom statuses, plan how to consolidate or remap to standard statuses.
- Document your mapping decisions for future reference and adjustments.
Troubleshooting and considerations
- If custom statuses aren’t showing up, check that Agent Workspace is enabled.
- Carefully map statuses between systems with different options to keep workflows consistent.
- After migration, confirm that tickets have the correct statuses according to your mapping.