CSV Migration Guides
How to migrate your help desk data to CSV?
Watch our video guide to learn how to migrate your help desk data to CSV quickly and easily.
To migrate your help desk data to CSV using Help Desk Migration, follow these steps:
1. Sign in to your Help Desk Migration account.
2. Create a new migration.
3. Select the platform from which you want to export the data.
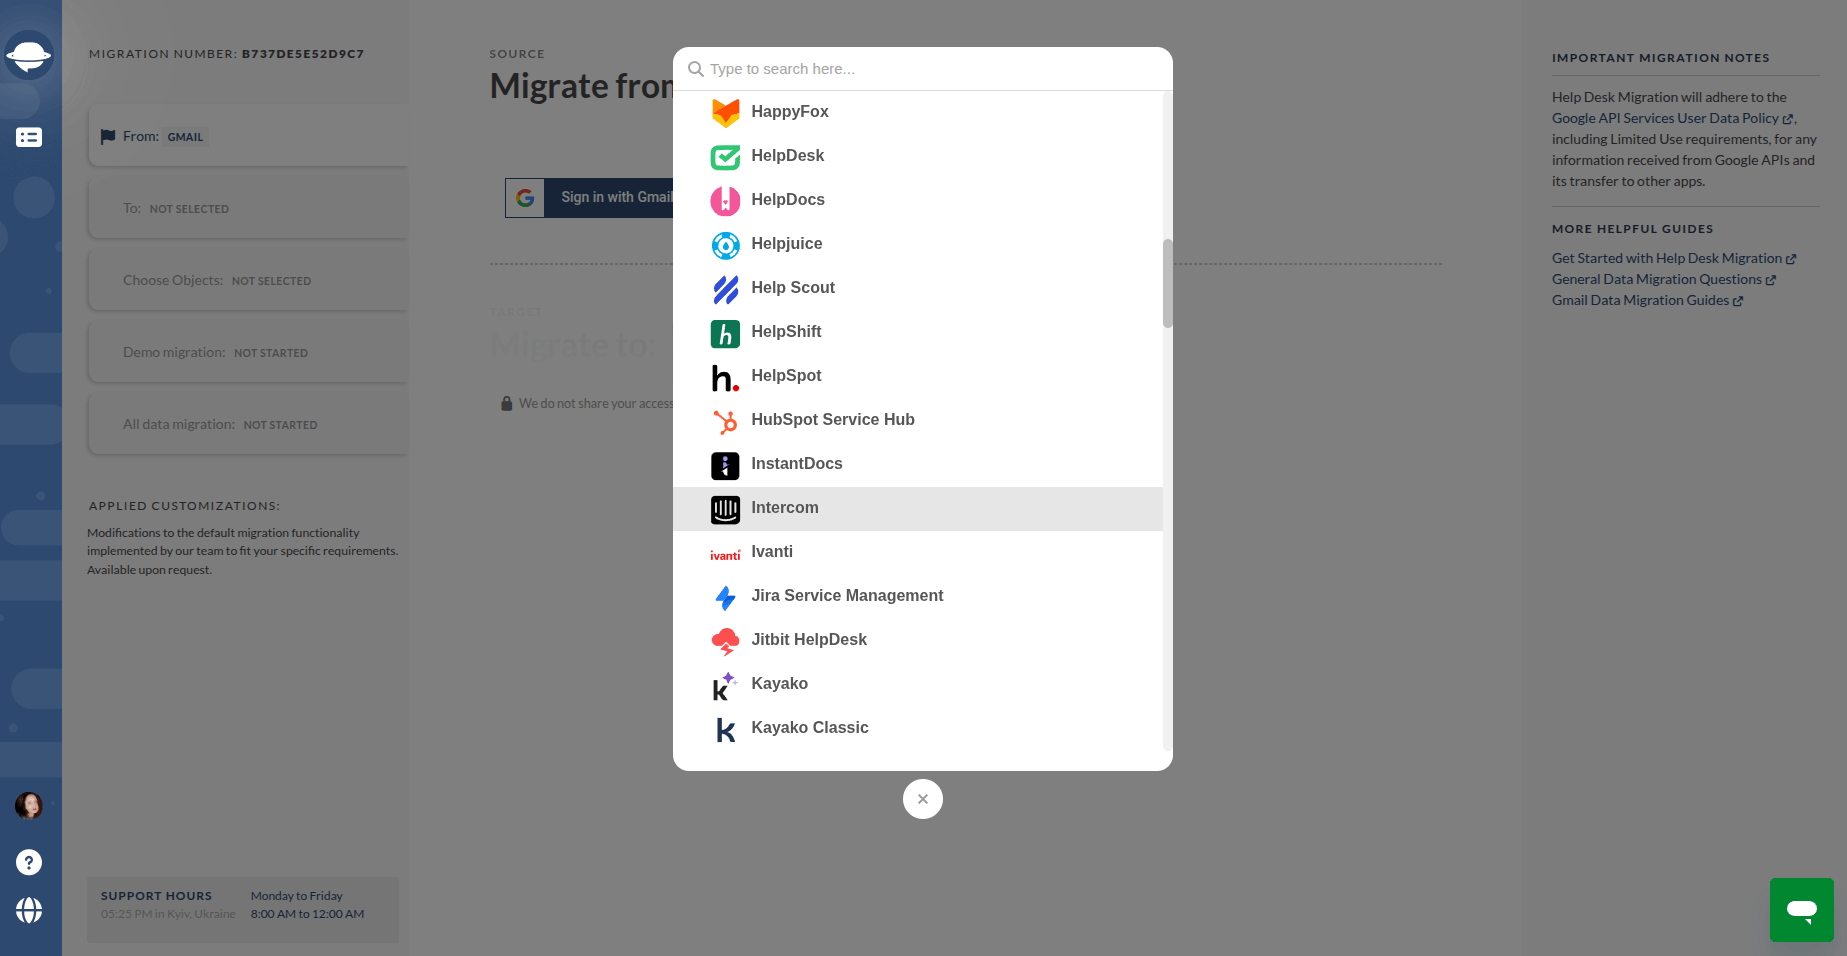
4. Choose CSV as the target.
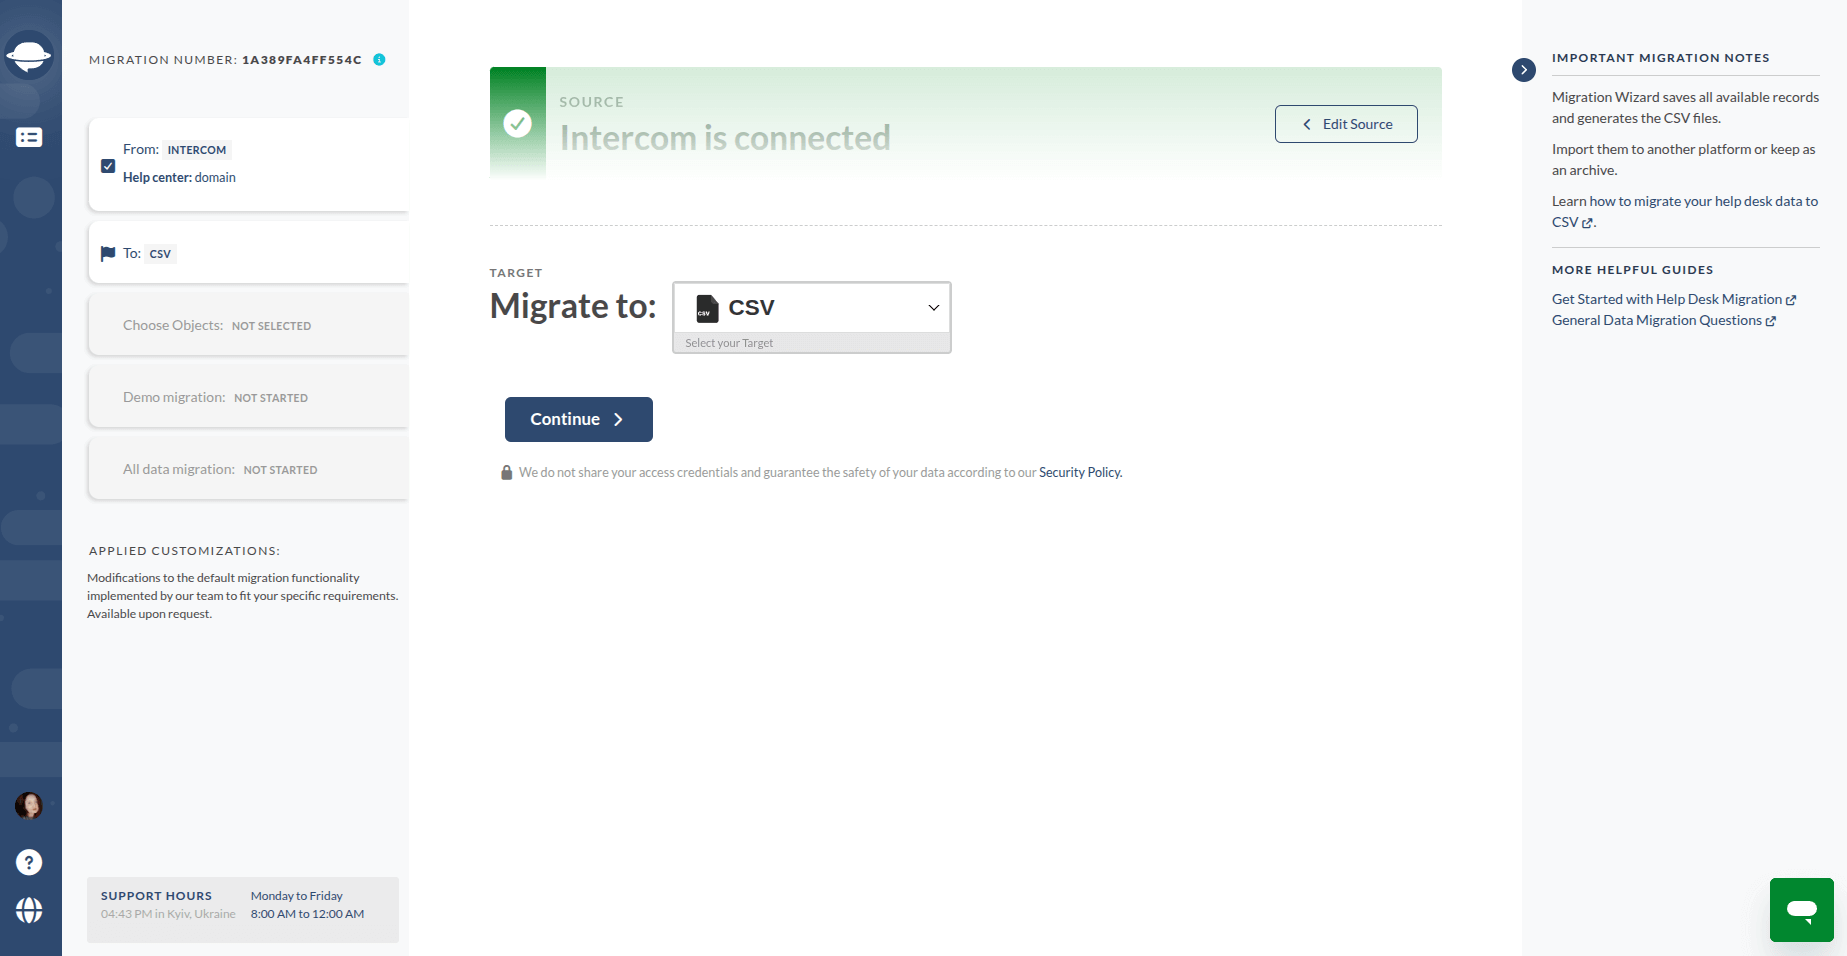
5. Select the entities you want to export and adjust the Ticket and Article fields mapping if needed. Click "Start Demo Migration" button, which exports a sample of the data into a CSV file.
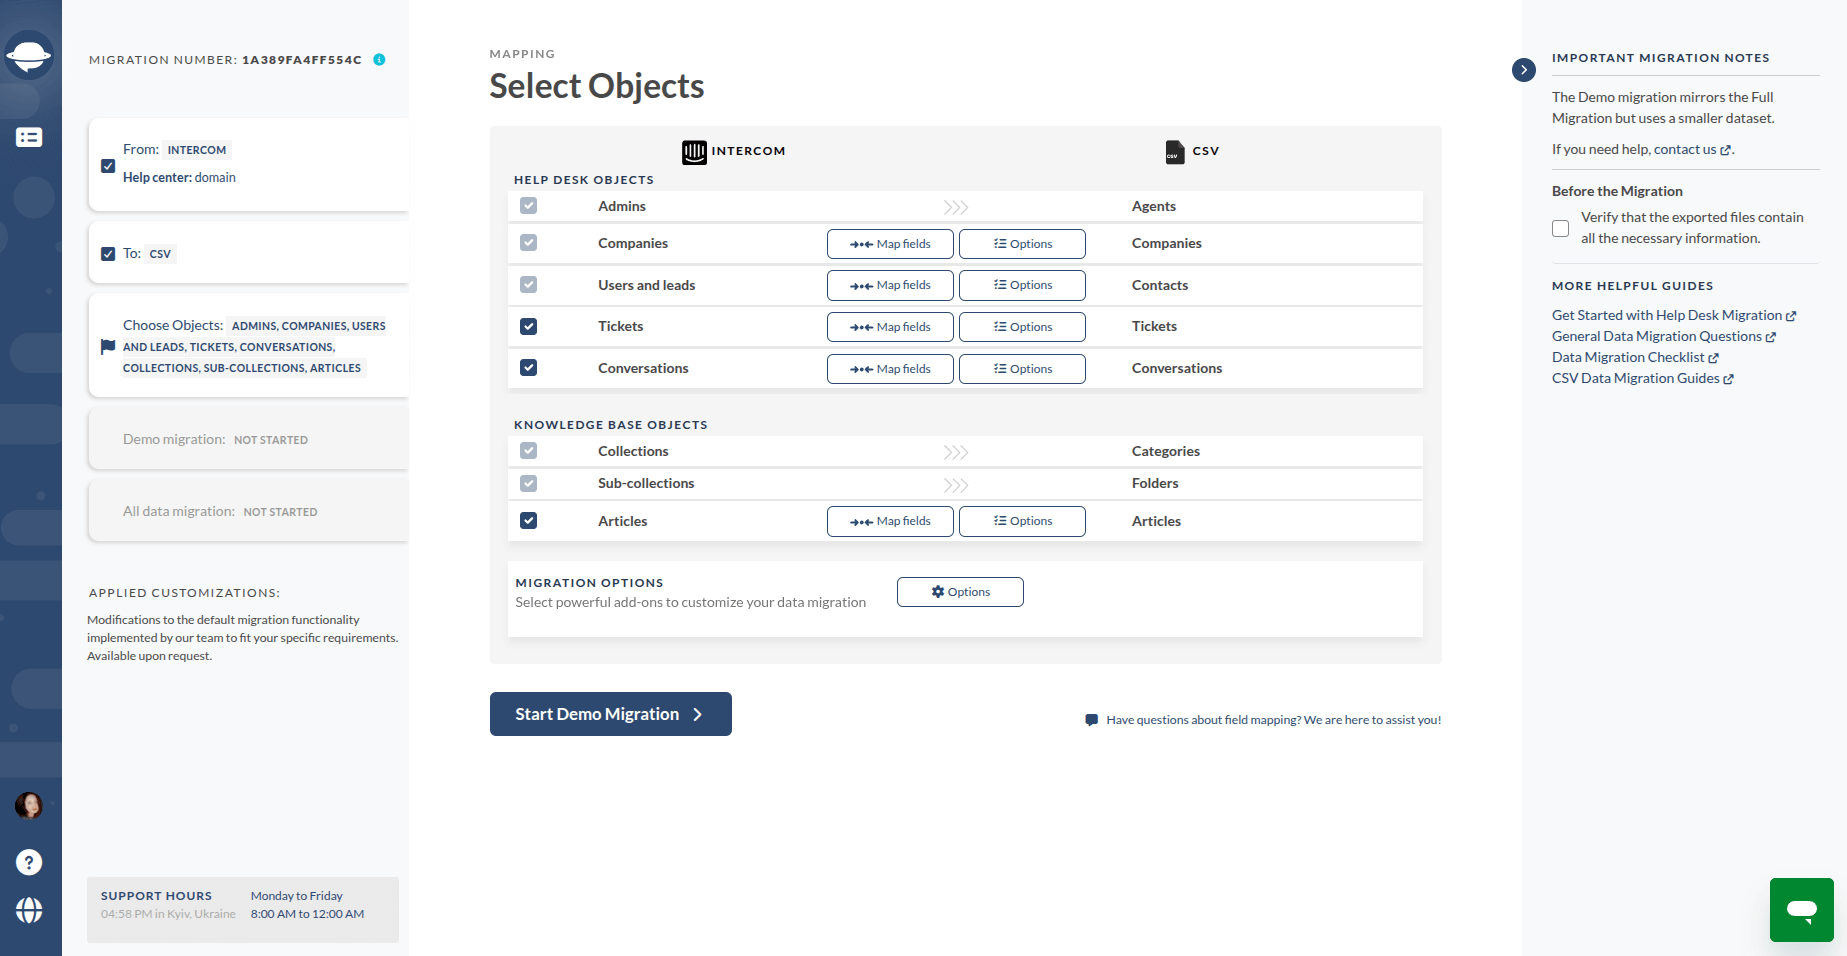
Click “Start Demo Migration”. This action will export 20 Tickets with related Agents, Contacts as well as 20 Articles into a CSV file.
6. Migration Wizard will generate .zip file containing ticket and ticket comments information, contact information, and article data. Download these files by clicking the "Download results" button.
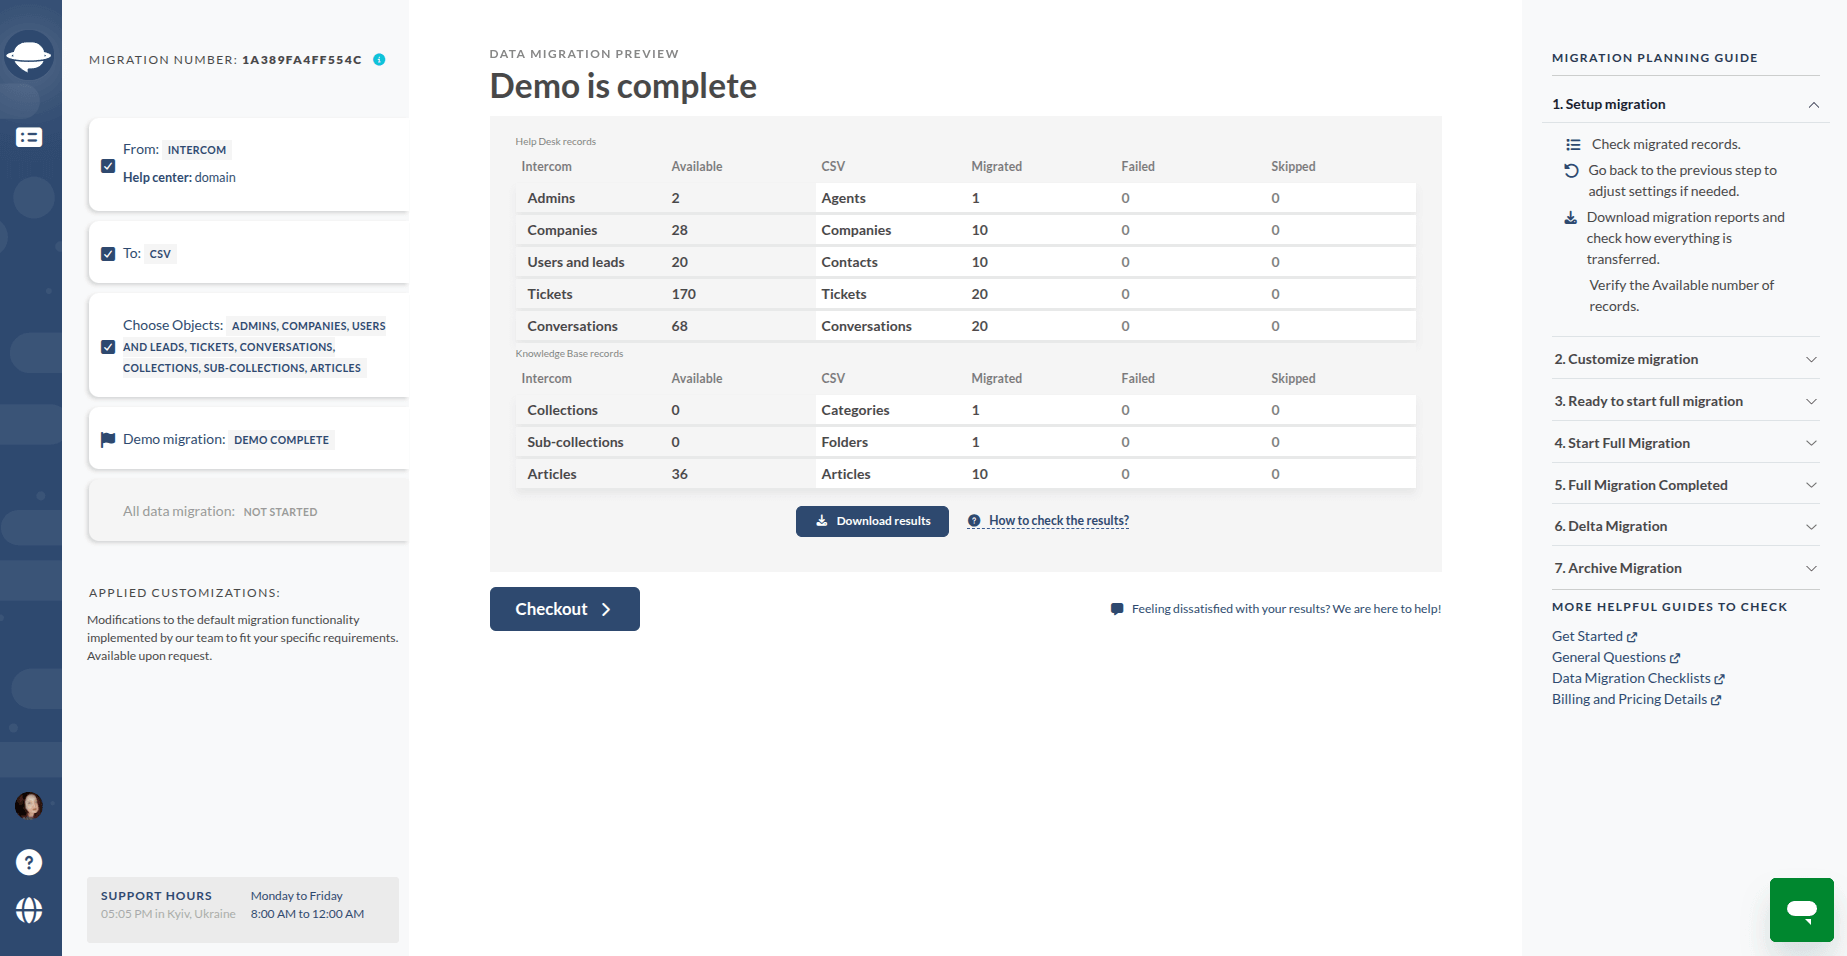
Once the export is complete, you'll receive an email notification or can check the progress in your account.
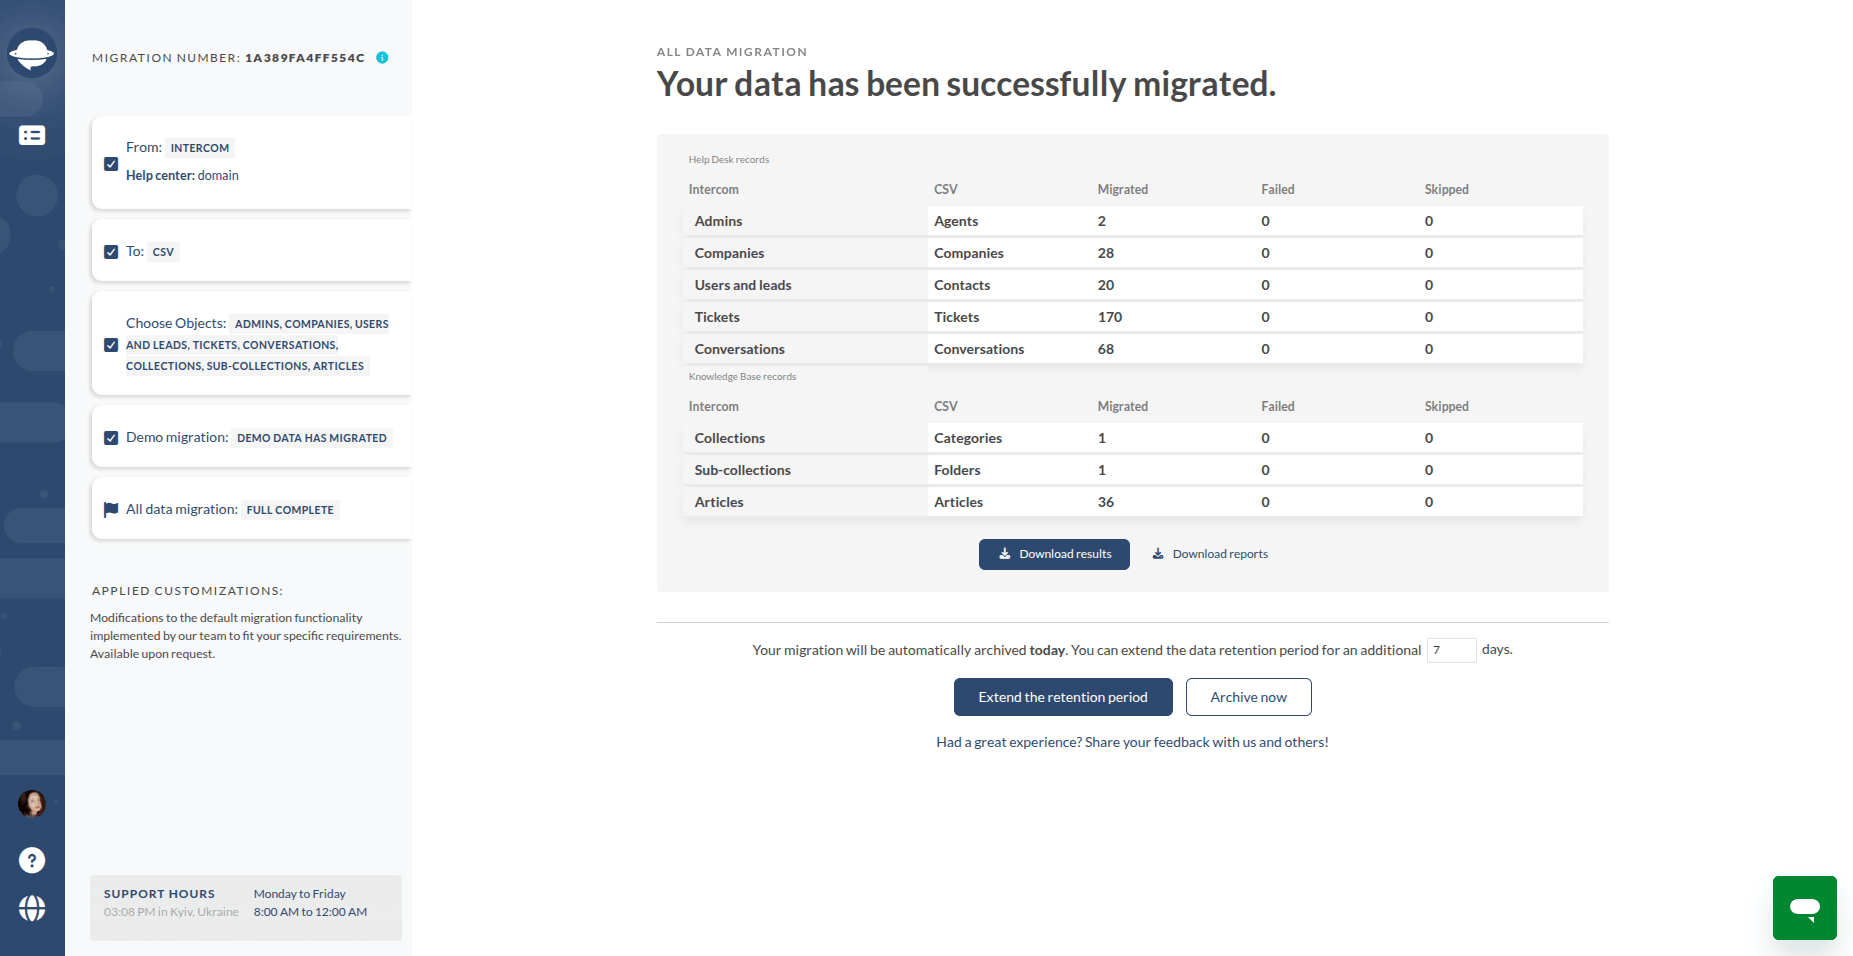
Download the final files by clicking the "Download results" button.
How to open a CSV
How to open a CSV file in Excel?
Opening a CSV (Comma-Separated Values) file in Excel is straightforward. The Migration Wizard provides you with CSV files where the delimiter is a comma (,) and the enclosure is a quotation mark (").
Here is a step-by-step guide on how to open a CSV in Excel:
- Open Excel: Launch Microsoft Excel on your computer.
- Go to the 'File' Menu: Click on the 'File' menu located in the top-left corner of the Excel window.
- Select 'Open': Choose the 'Open' option from the menu.
- Browse for the CSV file: Navigate to the location where your CSV file is stored. In the file type dropdown menu, make sure to select "Text Files (*.prn; *.txt; *.csv)" to see CSV files. Click on the CSV file you want to open.
- Click 'Open': Click the 'Open' button in the bottom-right corner of the window.
- Text Import Wizard: Ensure "Delimited" is selected, then click 'Next'. Select "Comma" as the delimiter, and ensure "Text qualifier" is set to the quotation mark ("). Click 'Finish'.
- CSV file in Excel: Your CSV file should now be open in Excel, displaying its contents in spreadsheet format.
How to open CSV in Numbers?
Do you need help with opening CSV files on your Mac without using Excel? No worries! To access CSV files in Numbers on your macOS device, follow these steps:
- Save the CSV file to your device and locate it.
- Right-click on the file and choose "Open With" → "Numbers."
- If the file doesn't display correctly, click on "Adjust Settings".
- In the Import Settings dialog, select your delimiter and click "Update Table." For more advanced adjustments like file encoding (e.g., UTF-8), click on "Advanced Settings."

The file will now open as a spreadsheet in Numbers, ready for editing.
How to Migrate Data from a CSV file?
Data migration from CSV files can be a valuable solution for many business needs. This guide covers various aspects of CSV data migration, including:
- Data entities and how to import them to your help desk, service desk, or ticketing system.
- CSV file requirements to ensure your customer service data migration will be a success.
- A CSV sample* for importing tickets and record types to include in your header and custom fields.
- A CSV sample* for importing ticket comments and record types to include in your header.
- A CSV sample* for importing knowledge base articles and record types to include in your header.
- Tips on how to save your data in a CSV format.
* You can download any of the samples and use them for a Demo migration, as well as to insert your own data and use it for data migration. Or simply rename the headers in your CSV file to correspond to our requirements to the CSV file.
What data can you import via CSV?
To import your data, provide three files that contain
- Tickets
- Comments
- Knowledge Base articles
- Customers and companies
- Requests, Request comments
- Changes, Change note, Change task, Change task note
- Problems, Problem note, Problem task, Problem task note
Create each file separately and then upload them to the Wizard. Make sure your CSV file corresponds to our Migration Wizard requirements. Check the guidelines for migrating data from CSV below.
Prepare your CSV files for help desk migration with our step-by-step video guide. Ensure a seamless transfer of tickets and knowledge base articles.
CSV file requirements
Each file must possess a heading row with a summary column. The heading row is necessary to identify and map data objects.
- The header row has no punctuation (apart from commas separating the columns).
- The header row is in English (the language of the content in the second and other rows might be in any other language).
- The header shouldn't include identical names. Be sure to double check this aspect.
- All columns in the header row begin with a capital letter.
Pay attention to the following aspects:
- Make sure your CSV file is encoded in UTF-8. This ensures proper recognition and display of special characters and symbols, and prevents hiccups during the import process.
- Fields are separated by commas.
- Use double-quote marks (") to capture data that spans multiple lines. Typically used for tags, attachments, and descriptions.
- To attach files you need to provide a URL following which our service can access the attachment. You may add multiple attachments - separate them by commas and quote the values in the field. Note that URLs for attachments support both HTTP and HTTPS protocols.
Preparing the file with Tickets (download sample)
To import tickets, prepare a CSV file which contains a heading row with the following columns:
| Header | Format | Field |
| TicketId | 468985 | Required |
| Subject | Test subject | Required |
| Tags | "tag 1, tag 2" | Optional |
| CC | john@yourcompany.com | Optional |
| DepartmentName | Support | Optional |
| Description | Test Description | Required |
| Type | Task | Required |
| Status | Open | Required |
| Priority | Low | Required |
| AgentEmail | a.lewis@yourcompany.com | Required |
| AgentName | Adam Lewis | Required |
| ContactEmail | s.gibbson@mail.com | Required |
| ContactName | Stacey Gibbson | Required |
| ContactPhone | 1234567890 | Optional |
| CompanyName | Faux Mart | Optional |
| CreatedTime | YYYY-MM-DD HH:MM:SS | Required |
| UpdatedTime | YYYY-MM-DD HH:MM:SS | Required |
| ClosedTime | YYYY-MM-DD HH:MM:SS | Optional |
| Attachments | "https://site.com/attachment1.jpg, https://site.com/attachment1.pdf" | Optional |
Double-check the following things:
- You can specify your time zone in the format 2021-09-07Т15:17:07+03:00.
- If you don’t fill in your time zone, the time zone +3 sets up automatedly during the data migration.
Importing custom fields
To migrate custom fields, add tags to column headers (ticket field names) so that the Migration Wizard can identify them. Here are the tags you need to use:
_select- dropdown (e.g.,ChooseProduct_select)_date- time (e.g.,due_date)_integer- number (e.g.,TicketInternal_integer)_decimal- decimal (e.g.,Cost_decimal)- Any other columns in a file without a tag will be treated as string(text) at mapping
Migrate and map other custom fields as text fields using the _textArea tag.
Preparing the file with ticket comments (download sample)
Ensure your CSV file with ticket comments possesses a heading row with the following columns:
| Header | Format | Field |
| CommentId | 468985 | Optional |
| TicketId | 485853 | Required |
| AuthorEmail | jeremy@yourcompanydomain.com | Required |
| Public | 0-private, 1-public | Required |
| Body | "Test comment" | Required |
| CreatedTime | YYYY-MM-DD HH:MM:SS | Required |
| Attachments | "https://site.com/attachment1.jpg, https://site.com/attachment1.pdf" | Optional |
You can only submit one file with comments. Make sure to collect all ticket comments in that file.
Check the following aspects:
- Make sure your CSV file is encoded in UTF-8. This ensures proper recognition and display of special characters and symbols, and prevents hiccups during the import process.
- Fields are separated by commas.
- The body of the comment or ticket description can contain HTML formatting.
- To attach files, you need to provide a public URL following which our service can access the attachment. You may add multiple attachments - separate them by commas.
- You can set up your time zone in the format 2021-09-07Т15:17:07+03:00. If you don’t fill in your time zone, the time zone +3 sets up automatedly during the data migration.
What to do with tickets that have more than one comment
Ensure that comments from the same ticket have the same TicketId. The Migration Wizard identifies where they belong. Double-check the CommentId set in the corresponding order. Ticket comments are sorted by creation date. Look at the example below:

Preparing the file with knowledge base articles (download sample)
To import knowledge base articles, provide a CSV file that contains a heading row with the following columns:
| Header | Format | Field |
| Title | Creating discount codes | Required |
| Category | Discounts | Required |
| Folder | Offering discounts and setting sale prices | Required |
| Description | "The body of the article" | Required |
| Status | Published | Required |
| Tags | "account, setup" | Optional |
| Attachments | "https://site.com/attachment1.jpg, https://site.com/attachment1.pdf" | Optional |
IMPORTANT
- The body of the article can contain HTML formatting. Also, you can add images and videos.
- Article statuses can differ. We accept all statuses, just make sure to map them when configuring your migration.
- Your CSV file can't have folders with identical names if they belong to different categories. Consider renaming these folders before importing them.
Preparing the file with Service Requests (download sample)
To import service requests, prepare a CSV file which contains a heading row with the following columns:
| Header | Format | Field |
| RequestId | 1 | Required |
| Subject | Test subject | Required |
| Description | Test description | Required |
| Type | Question | Required |
| Status | Open | Required |
| Priority | Low | Optional |
| AgentEmail | a.lewis@yourcompany.com | Optional |
| AgentName | Adam Lewis | Optional |
| ContactEmail | s.gibbson@mail.com | Required |
| CompanyName | Faux Mart | Optional |
| ContactName | Stacey Gibbson | Required |
| ContactPhone | 1234567890 | Optional |
| Tags | "tag 1, tag 2" | Optional |
| DepartmentName | Support | Optional |
| CreatedTime | YYYY-MM-DD HH:MM:SS | Required |
| UpdatedTime | YYYY-MM-DD HH:MM:SS | Required |
| ClosedTime | YYYY-MM-DD HH:MM:SS | Optional |
| Attachments | https://site.com/attachment1.jpg, https://site.com/attachment1.pdf | Optional |
Double-check the following things:
You can specify your time zone in the format 2021-09-07Т15:17:07+03:00.
If you don’t fill in your time zone, the time zone +3 sets up automatedly during the data migration.
Importing custom fields
To migrate custom fields, add tags to column headers (request field names) so that the Migration Wizard can identify them. Here are the tags you need to use:
_select- dropdown (e.g.,ChooseProduct_select)_date- time (e.g.,due_date)_integer- number (e.g.,RequestInternal_integer)_decimal- decimal (e.g.,Cost_decimal)- Any other columns in a file without a tag will be treated as string(text) at mapping
To be identified, tags should be in English.
Preparing the file with service request comments (download sample)
Ensure your CSV file with service request comments possesses a heading row with the following columns:
| Header | Format | Field |
| CommentId | 1 | Required |
| RequestId | 1 | Required |
| AuthorEmail | jeremy@yourcompanydomain.com | Required |
| Public | 0-private, 1-public | Required |
| Body | Comment html or text content | Required |
| CreatedTime | YYYY-MM-DD HH:MM:SS | Required |
| Attachments | https://site.com/attachment1.jpg, https://site.com/attachment1.pdf | Optional |
Check the following aspects:
- Fields are separated by commas.
- The body of the comment or request description can contain HTML formatting.
- To attach files, you need to provide a public URL, following which our service can access the attachment. You may add multiple attachments - separate them by commas.
- You can set up your time zone in the format 2021-09-07Т15:17:07+03:00. If you don’t fill in your time zone, the time zone +3 is set up automatedly during the data migration.
How to handle service requests that have more than one comment
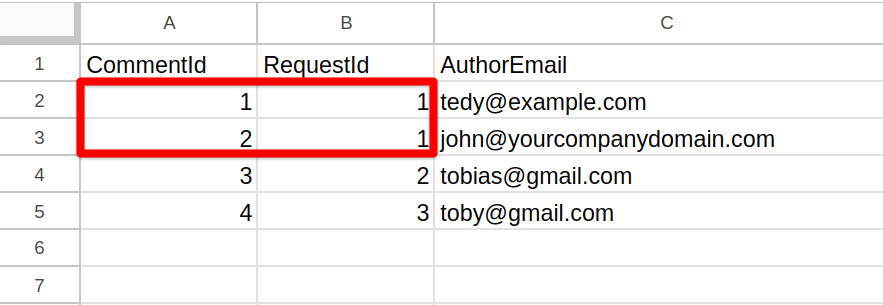
Ensure that comments from the same request have the same RequestId. The Migration Wizard identifies where they belong. Double-check the CommentId set in the corresponding order. Request comments are sorted by creation date. Look at the example below:
Preparing the file with Changes (download sample)
To import changes, prepare a CSV file which contains a heading row with the following columns:
| Header | Format | Field |
| ChangeId | 1 | Required |
| Subject | Test subject | Required |
| Description | Test description | Optional |
| Type | Question | Optional |
| Status | Pending | Required |
| Priority | High | Required |
| Impact | Medium | Required |
| Risk | Low | Required |
| DepartmentName | Support | Optional |
| AgentEmail | a.lewis@yourcompany.com | Required |
| AgentName | Adam Lewis | Required |
| ContactEmail | s.gibbson@mail.com | Required |
| ContactName | Stacey Gibbson | Required |
| ContactPhone | 1234567890 | Optional |
| PlanningReason | Reason1 | Optional |
| PlanningImpact | Impact1 | Optional |
| PlanningRollout | Rollout1 | Optional |
| PlanningBackout | Backout1 | Optional |
| CreatedTime | YYYY-MM-DD HH:MM:SS | Required |
| UpdatedTime | YYYY-MM-DD HH:MM:SS | Required |
| ClosedTime | YYYY-MM-DD HH:MM:SS | Optional |
| PlannedStartTime | YYYY-MM-DD HH:MM:SS | Required |
| PlannedEndTime | YYYY-MM-DD HH:MM:SS | Required |
| Attachments | https://site.com/attachment1.jpg, https://site.com/attachment1.pdf | Optional |
Double-check the following things:
You can specify your time zone in the format 2021-09-07Т15:17:07+03:00.
If you don’t fill in your time zone, the time zone +3 sets up automatedly during the data migration.
Importing custom fields
To migrate custom fields, add tags to column headers (field names) so that the Migration Wizard can identify them. Here are the tags you need to use:
_select- dropdown (e.g.,ChooseProduct_select)_date- time (e.g.,due_date)_integer- number (e.g.,ChangeInternal_integer)_decimal- decimal (e.g.,Cost_decimal)- Any other columns in a file without a tag will be treated as string(text) at mapping
To be identified, tags should be in English.
Preparing the file with change notes (download sample)
Ensure your CSV file with change notes possesses a heading row with the following columns:
| Header | Format | Field |
| NoteId | 1 | Required |
| ChangeId | 1 | Required |
| AuthorEmail | jeremy@yourcompanydomain.com | Required |
| Public | 0-private, 1-public | Required |
| Body | Comment html or text content | Required |
| CreatedTime | YYYY-MM-DD HH:MM:SS | Required |
| Attachments | https://site.com/attachment1.jpg, https://site.com/attachment1.pdf | Optional |
Check the following aspects:
- Fields are separated by commas.
- The body of the comment or change description can contain HTML formatting.
- To attach files, you need to provide a public URL, following which our service can access the attachment. You may add multiple attachments - separate them by commas.
- You can set up your time zone in the format 2021-09-07Т15:17:07+03:00. If you don’t fill in your time zone, the time zone +3 is set up automatedly during the data migration.
What to do with changes that have more than one note
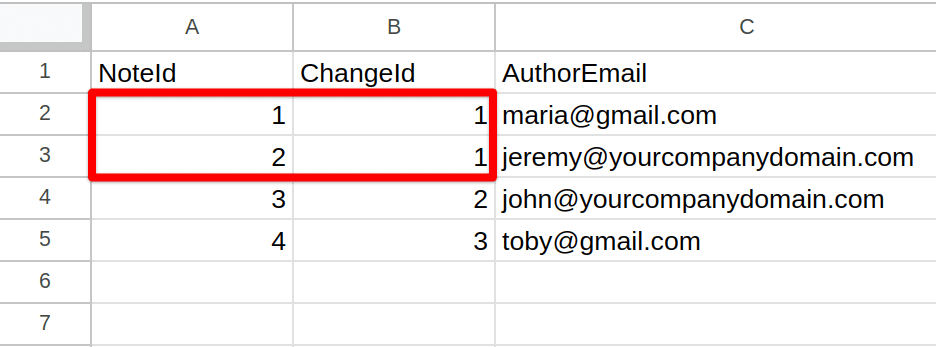
Ensure that notes from the same change have the same ChangeId. The Migration Wizard identifies where they belong. Double-check the NoteId set in the corresponding order. Change comments are sorted by creation date. Look at the example below:
Preparing the file with change tasks (download sample)
To import change tasks, prepare a CSV file which contains a heading row with the following columns:
| Header | Example |
| TaskId | 1 |
| ChangeId | 1 |
| Subject | Change internet provider |
| DepartmentName | IT |
| Status | New |
| Priority | High |
| Description | We need to change our internet provider as this fails too often |
| AgentEmail | jeremy@yourcompanydomain.com |
| AgentName | Jeremy Buck |
| DueTime | 1/10/2023 10:00:33 |
| CreatedTime | 1/10/2023 10:00:33 |
| UpdatedTime | 1/10/2023 10:00:33 |
| ClosedTime | 1/10/2023 10:00:33 |
| Attachments | https://site.com/attachment1.jpg, https://site.com/attachment1.pdf |
Importing custom fields
To migrate custom fields, add tags to column headers (field names) so that the Migration Wizard can identify them. Here are the tags you need to use:
_select- dropdown (e.g.,ChooseProduct_select)_date- time (e.g.,due_date)_integer- number (e.g.,ChangeTaskInternal_integer)_decimal- decimal (e.g.,Cost_decimal)- Any other columns in a file without a tag will be treated as string(text) at mapping
To be identified, tags should be in English.
Preparing the file with change task notes (download sample)
Ensure your CSV file with change task notes possesses a heading row with the following columns:
| Header | Example |
| NoteId | 1 |
| TaskId | 1 |
| AuthorEmail | john@yourcompanydomain.com |
| Public | 0 |
| Body | Please do this ASAP |
| CreatedTime | 1/1/2023 18:12:12 |
| Attachments | https://help-desk-migration.com/files/Help-Desk-Migration-Checklist.pdf |
| AgentEmail | jeremy@yourcompanydomain.com |
| AgentName | Jeremy Buck |
| DueTime | 1/10/2023 10:00:33 |
| CreatedTime | 1/10/2023 10:00:33 |
| UpdatedTime | 1/10/2023 10:00:33 |
| ClosedTime | 1/10/2023 10:00:33 |
How to handle change tasks that have more than one notes
Ensure that notes from the same change task have the same TaskId. The Migration Wizard identifies where they belong. Double-check the CommentId set in the corresponding order. Change task notes are sorted by creation date. Look at the example below:

Preparing the file with Problems (download sample)
To import problems, prepare a CSV file which contains a heading row with the following columns:
| Header | Format | Field |
| ProblemId | 1 | Required |
| Subject | Test subject | Required |
| Description | Test Description | Required |
| Status | Open | Required |
| Priority | Low | Required |
| Impact | Medium | Required |
| Urgency | Medium | Required |
| DepartmentName | Support | Optional |
| AgentEmail | a.lewis@yourcompany.com | Optional |
| AgentName | Adam Lewis | Optional |
| ContactEmail | s.gibbson@mail.com | Required |
| ContactName | Stacey Gibbson | Required |
| ContactPhone | 1234567890 | Optional |
| AnalysisCase | Case1 | Optional |
| AnalysisImpact | Impact1 | Optional |
| AnalysisSymptoms | Symptom1 | Optional |
| CreatedTime | YYYY-MM-DD HH:MM:SS | Required |
| UpdatedTime | YYYY-MM-DD HH:MM:SS | Required |
| DueTime | YYYY-MM-DD HH:MM:SS | Optional |
| Attachments | https://site.com/attachment1.jpg, https://site.com/attachment1.pdf | Optional |
Double-check the following things:
You can specify your time zone in the format 2021-09-07Т15:17:07+03:00.
If you don’t fill in your time zone, the time zone +3 sets up automatedly during the data migration.
Importing custom fields
To migrate custom fields, add tags to column headers (field names) so that the Migration Wizard can identify them. Here are the tags you need to use:
_select- dropdown (e.g.,ChooseProduct_select)_date- time (e.g.,due_date)_integer- number (e.g.,ProblemInternal_integer)_decimal- decimal (e.g.,Cost_decimal)- Any other columns in a file without a tag will be treated as string(text) at mapping
To be identified, tags should be in English.
Preparing the file with problem notes (download sample)
Ensure your CSV file with problem notes possesses a heading row with the following columns:
| Header | Format | Field |
| NoteId | 1 | Required |
| ProblemId | 1 | Required |
| AuthorEmail | jeremy@yourcompanydomain.com | Required |
| Public | 0-private, 1-public | Required |
| Body | Comment html or text content | Required |
| CreatedTime | YYYY-MM-DD HH:MM:SS | Required |
| Attachments | https://site.com/attachment1.jpg, https://site.com/attachment1.pdf | Optional |
| DepartmentName | Support | Optional |
| AgentEmail | a.lewis@yourcompany.com | Optional |
| AgentName | Adam Lewis | Optional |
| ContactEmail | s.gibbson@mail.com | Required |
| ContactName | Stacey Gibbson | Required |
| ContactPhone | 1234567890 | Optional |
| AnalysisCase | Case1 | Optional |
| AnalysisImpact | Impact1 | Optional |
| AnalysisSymptoms | Symptom1 | Optional |
| CreatedTime | YYYY-MM-DD HH:MM:SS | Required |
| UpdatedTime | YYYY-MM-DD HH:MM:SS | Required |
| DueTime | YYYY-MM-DD HH:MM:SS | Optional |
| Attachments | https://site.com/attachment1.jpg, https://site.com/attachment1.pdf | Optional |
Check the following details:
- Fields are separated by commas.
- The body of the note or problem description can contain HTML formatting.
- To attach files, you need to provide a public URL, following which our service can access the attachment. You may add multiple attachments - separate them by commas.
- You can set up your time zone in the format 2021-09-07Т15:17:07+03:00. If you don’t fill in your time zone, the time zone +3 is set up automatedly during the data migration.
What to do with problems that have more than one note
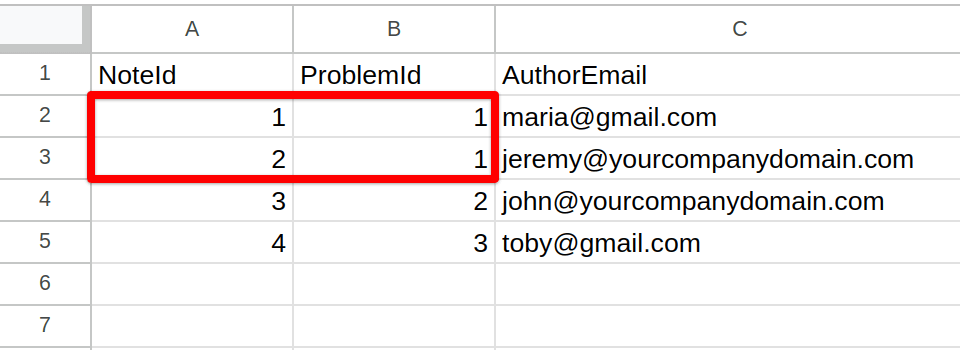
Ensure that notes from the same problem have the same ProblemId. The Migration Wizard identifies where they belong. Double-check the NoteId set in the corresponding order. Problem comments are sorted by creation date. Look at the example below:
Preparing the file with problem tasks (download sample)
To import problem tasks, prepare a CSV file which contains a heading row with the following columns:
| Header | Example |
| TaskId | 1 |
| ProblemId | 1 |
| Subject | Fix wifi drops |
| DepartmentName | IT |
| Status | New |
| Priority | High |
| Description | Fix regular wifi disconnects |
| AgentEmail | jeremy@yourcompanydomain.com |
| AgentName | Jeremy Buck |
| DueTime | 2023-01-10 10:00:33 |
| CreatedTime | 2023-01-10 10:00:33 |
| UpdatedTime | 2023-01-10 10:00:33 |
| ClosedTime | 2023-01-10 10:00:33 |
| Attachments | https://site.com/attachment1.jpg, https://site.com/attachment1.pdf |
Importing custom fields
To migrate custom fields, add tags to column headers (field names) so that the Migration Wizard can identify them. Here are the tags you need to use:
_select- dropdown (e.g.,ChooseProduct_select)_date- time (e.g.,due_date)_integer- number (e.g.,ProblemTaskInternal_integer)_decimal- decimal (e.g.,Cost_decimal)- Any other columns in a file without a tag will be treated as string(text) at mapping
To be identified, tags should be in English.
Preparing the file with problem task notes (download sample)
Ensure your CSV file with problem task notes possesses a heading row with the following columns:
| Header | Example |
| NoteId | 1 |
| TaskId | 1 |
| AuthorEmail | tedy@example.com |
| Public | 1 |
| Body | A persistent issue with the WiFi connection. These interruptions occur at various times throughout the day, disrupting work and causing inconvenience. |
| CreatedTime | 2023-01-01 18:12:12 |
| Attachments | https://help-desk-migration.com/files/Help-Desk-Migration-Checklist.pdf |
How to handle problem tasks that have more than one notes
Ensure that notes from the same problem task have the same TaskId. The Migration Wizard identifies where they belong. Double-check the CommentId set in the corresponding order. Problem task notes are sorted by creation date. Look at the example below:

Preparing the file with Contacts (download sample)
To import contacts, prepare a CSV file which contains a heading row with the following columns:
| Header | Example |
| ContactId | 1 |
| ContactEmail | john@email.com |
| ContactPhone | 1234567890 |
| ContactName | John Jones |
| CompanyName | Faux Mart LLC |
| CreatedTime | 2023-01-01 18:12:12 |
| Attachments | https://help-desk-migration.com/files/Help-Desk-Migration-Checklist.pdf |
Double-check the following things:
You can specify your time zone in the format 2021-09-07Т15:17:07+03:00.
If you don’t fill in your time zone, the time zone +3 sets up automatedly during the data migration.
Importing custom fields
To migrate custom fields, add tags to column headers so that the Migration Wizard can identify them. Here are the tags you need to use:
_select- dropdown (e.g.,ChooseOption_select)_date- time (e.g.,due_date)_integer- number (e.g.,ContactInternal_integer)_decimal- decimal (e.g.,Cost_decimal)- Any other columns in a file without a tag will be treated as string(text) at mapping
To be identified, tags should be in English.
Importing your CSV files
When your CSV files are ready, log into Help Desk Migration and start your CSV import.
CSV made easy: Simple tips to save your data in CSV format
Converting Excel, Numbers, LibreOffice Calc or Google Sheets to CSV
If you're working with data in a spreadsheet (Excel, Numbers, LibreOffice Calc, or Google Sheets), you can easily save it in CSV format. Simply select "Save As" and choose the ".CSV" option, similar to saving as ".XLS" or ".TXT".
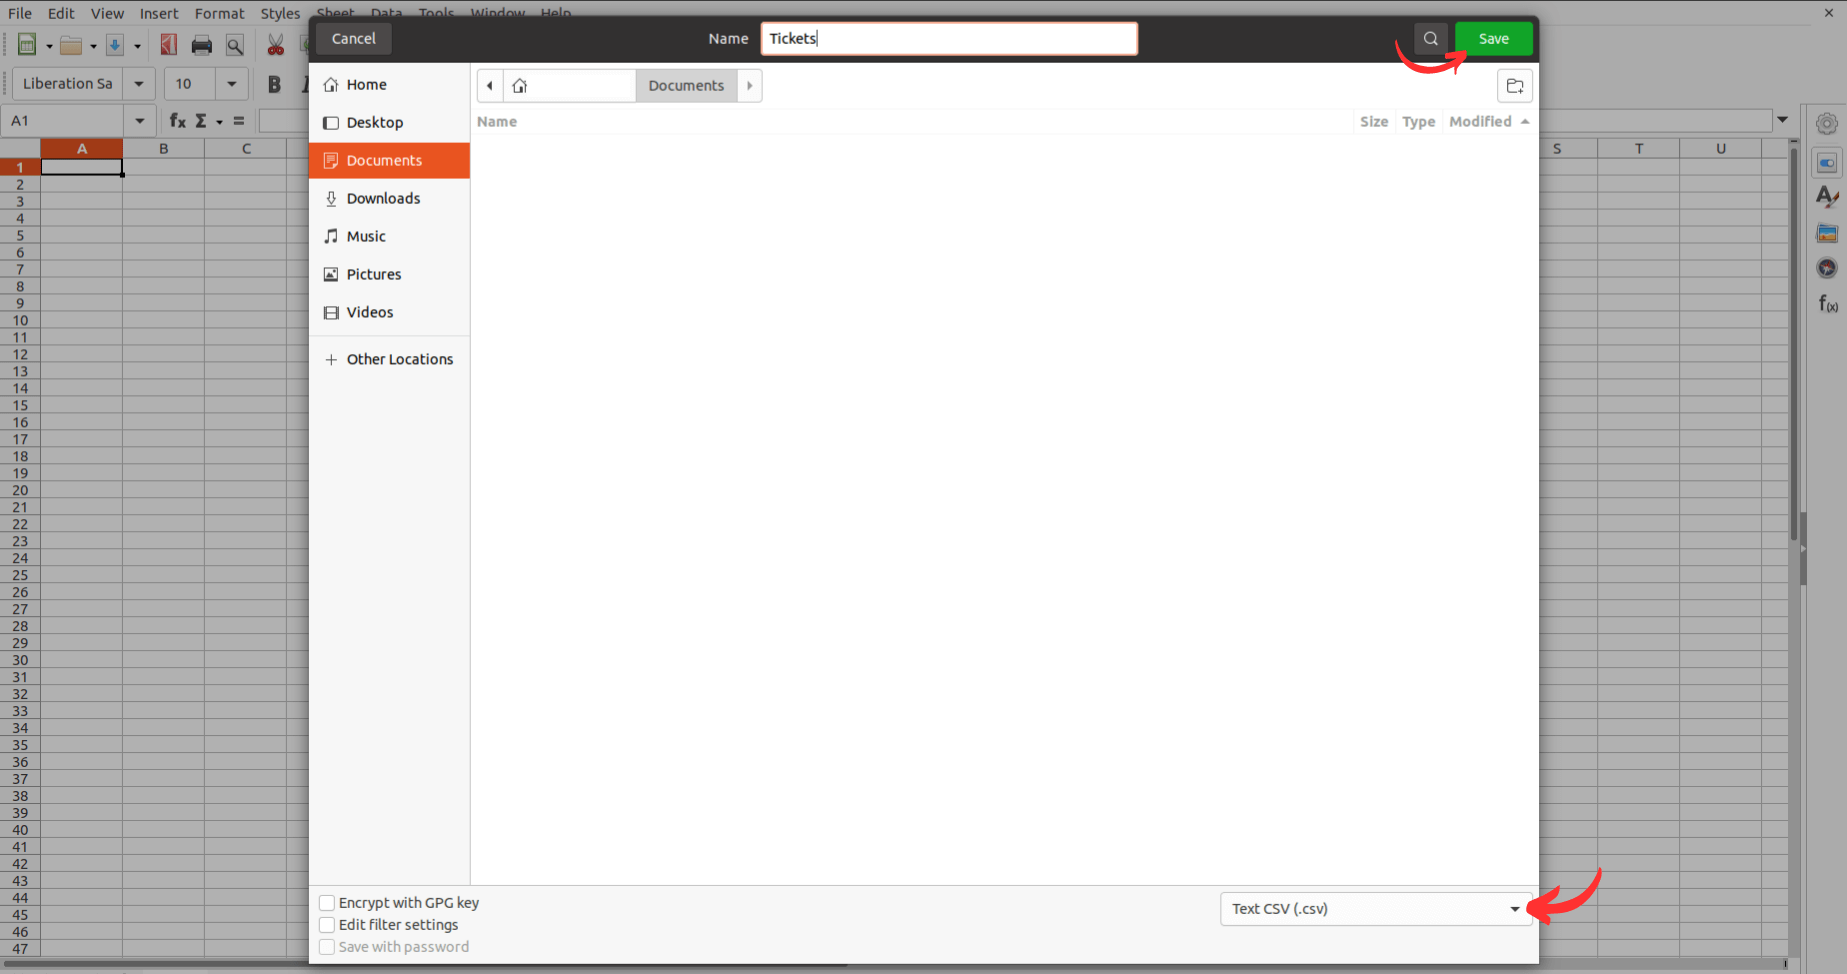
This will automatically convert and save your file in CSV format without altering the data. Alternatively, you can also use the "Export to" or "Download" option to obtain a CSV copy of your file.
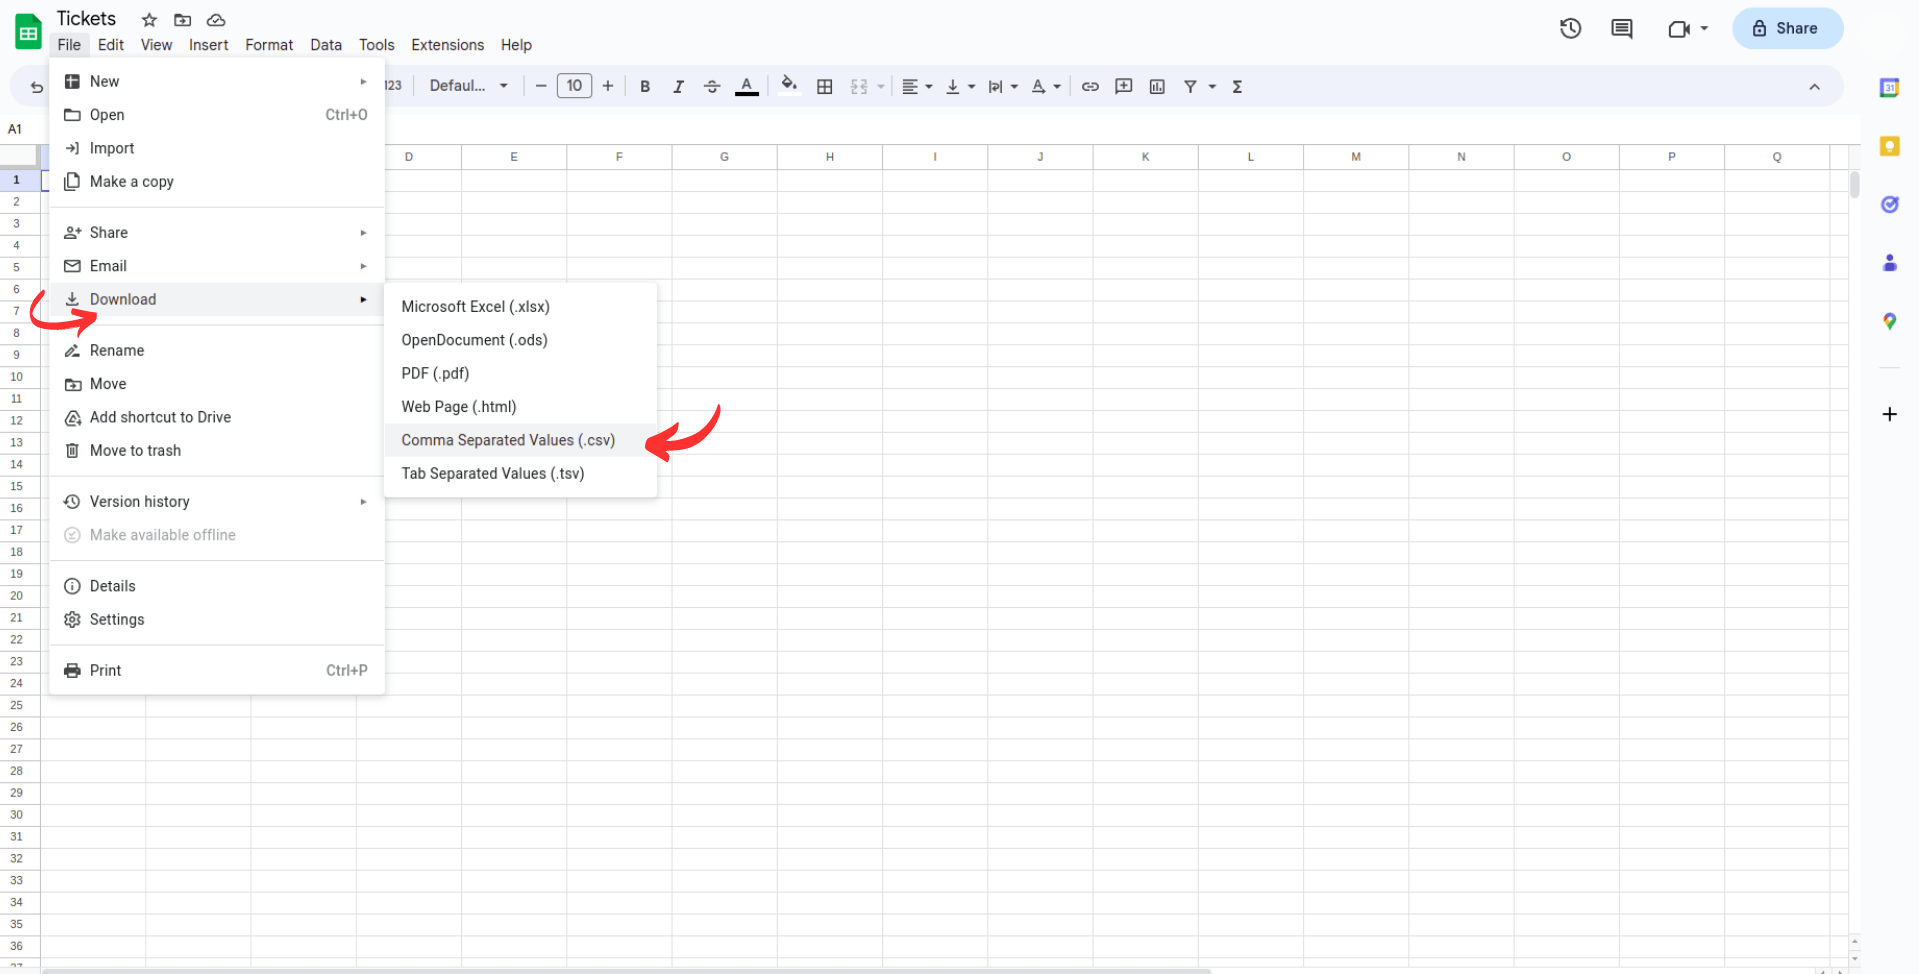
Exporting data to CSV
This method differs from the previous one as it involves downloading data directly from your database in CSV format. This allows for easy editing in other applications, as well as flexibility for moving or backing up the data as needed.
Note that not all programs or applications support CSV downloads, which may require the use of third-party tools to obtain the required data.
Using Notepad or Text Edit, etc. to CSV
While not common, you can manage small amounts of data using a text editing program. Structure the data using commas or another recognized delimiter, with each delimiter indicating a different "column" of data. Then, select "Save As" and choose the "CSV" option from the available formats.
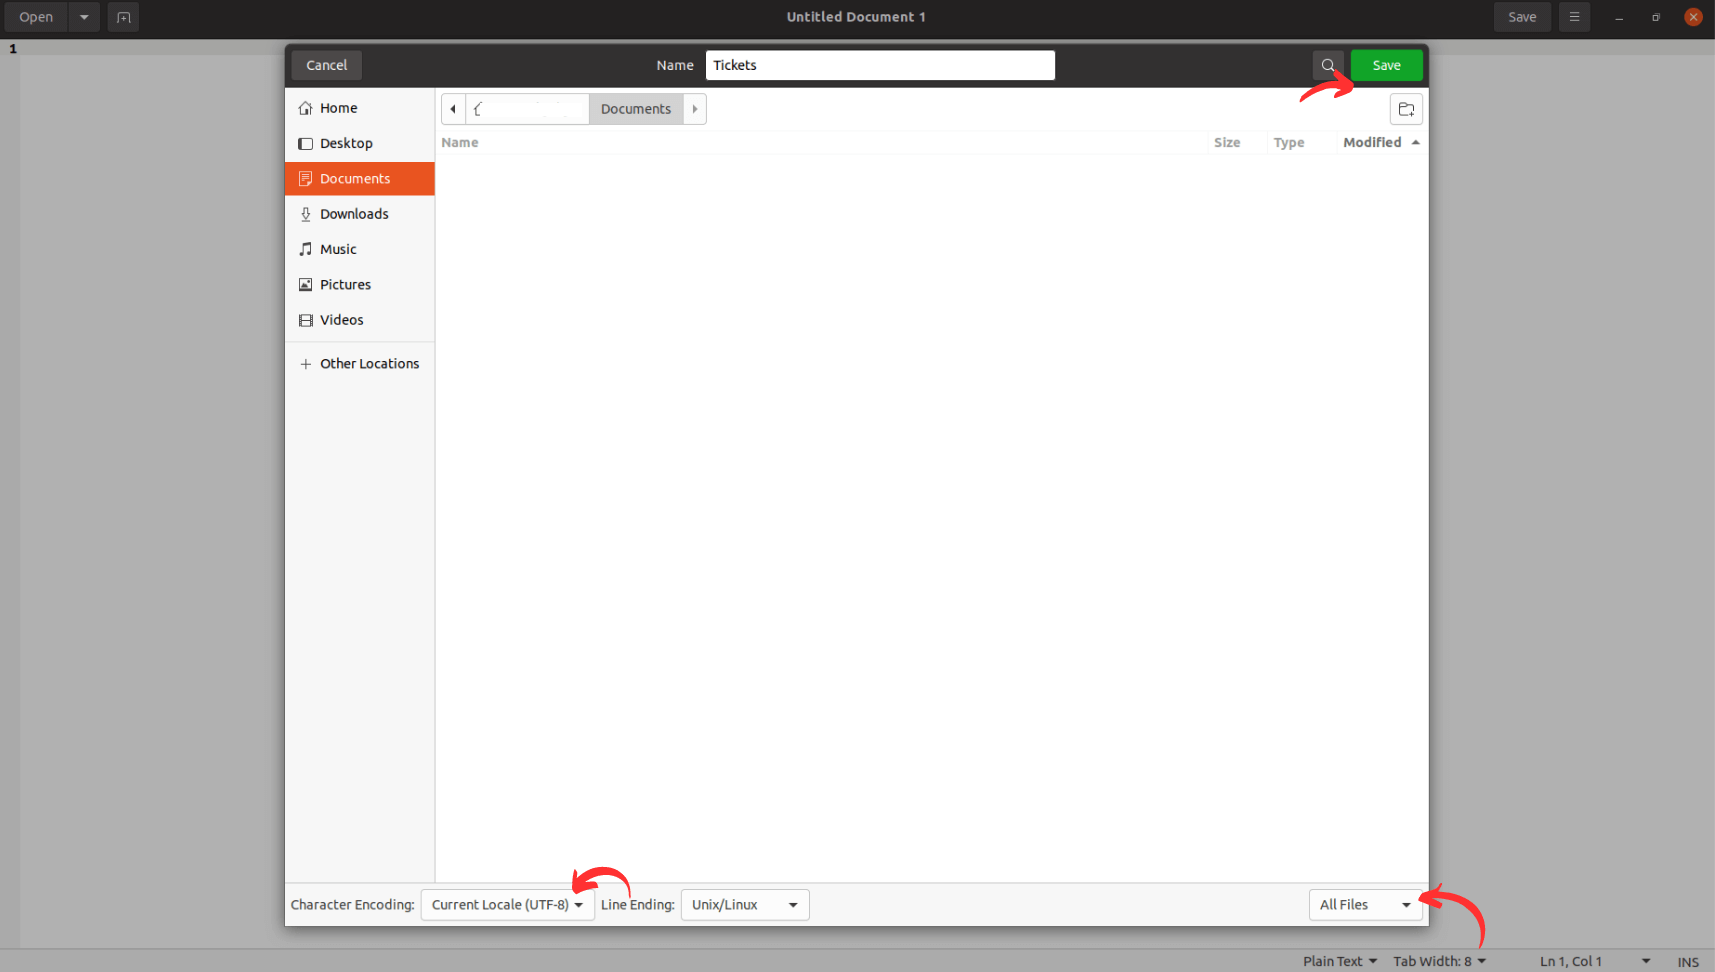
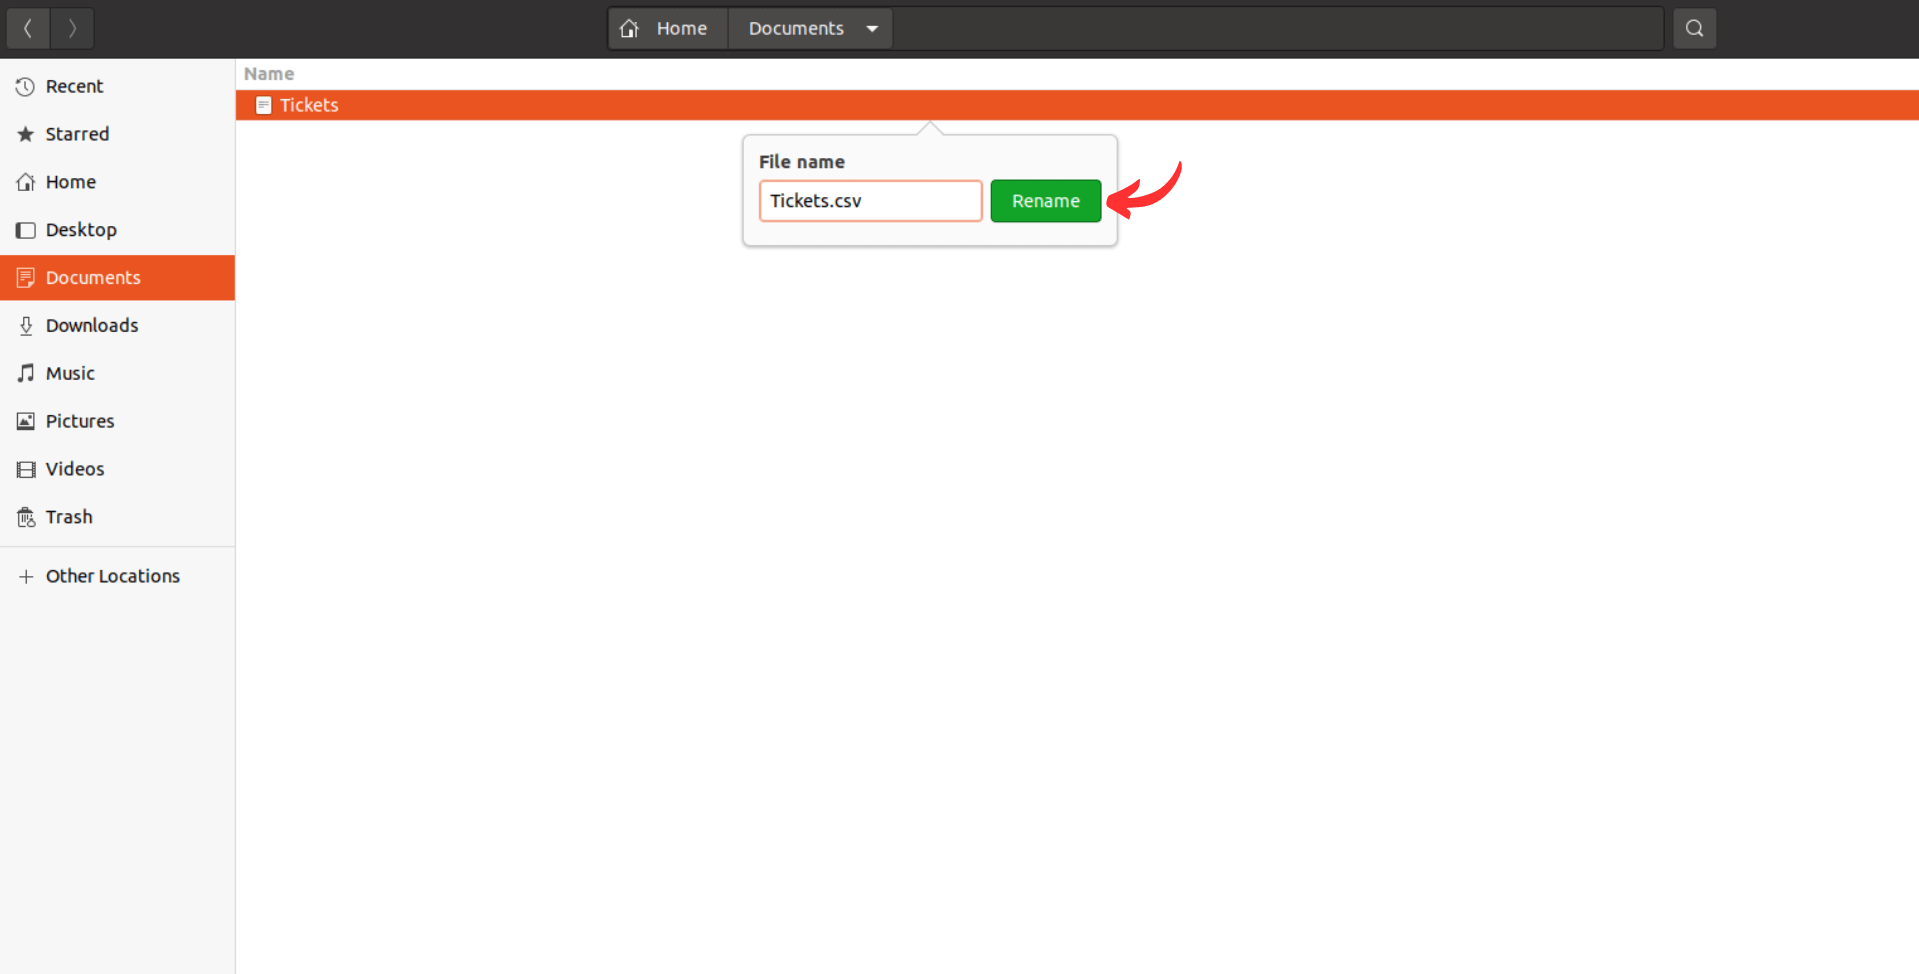
Some text editors may require manually adding the ".csv" extension in the file name, such as "File.csv".
How to Connect CSV to Migration Wizard?
When migrating data from CSV, you'll encounter a page prompting you to select the records you wish to export.
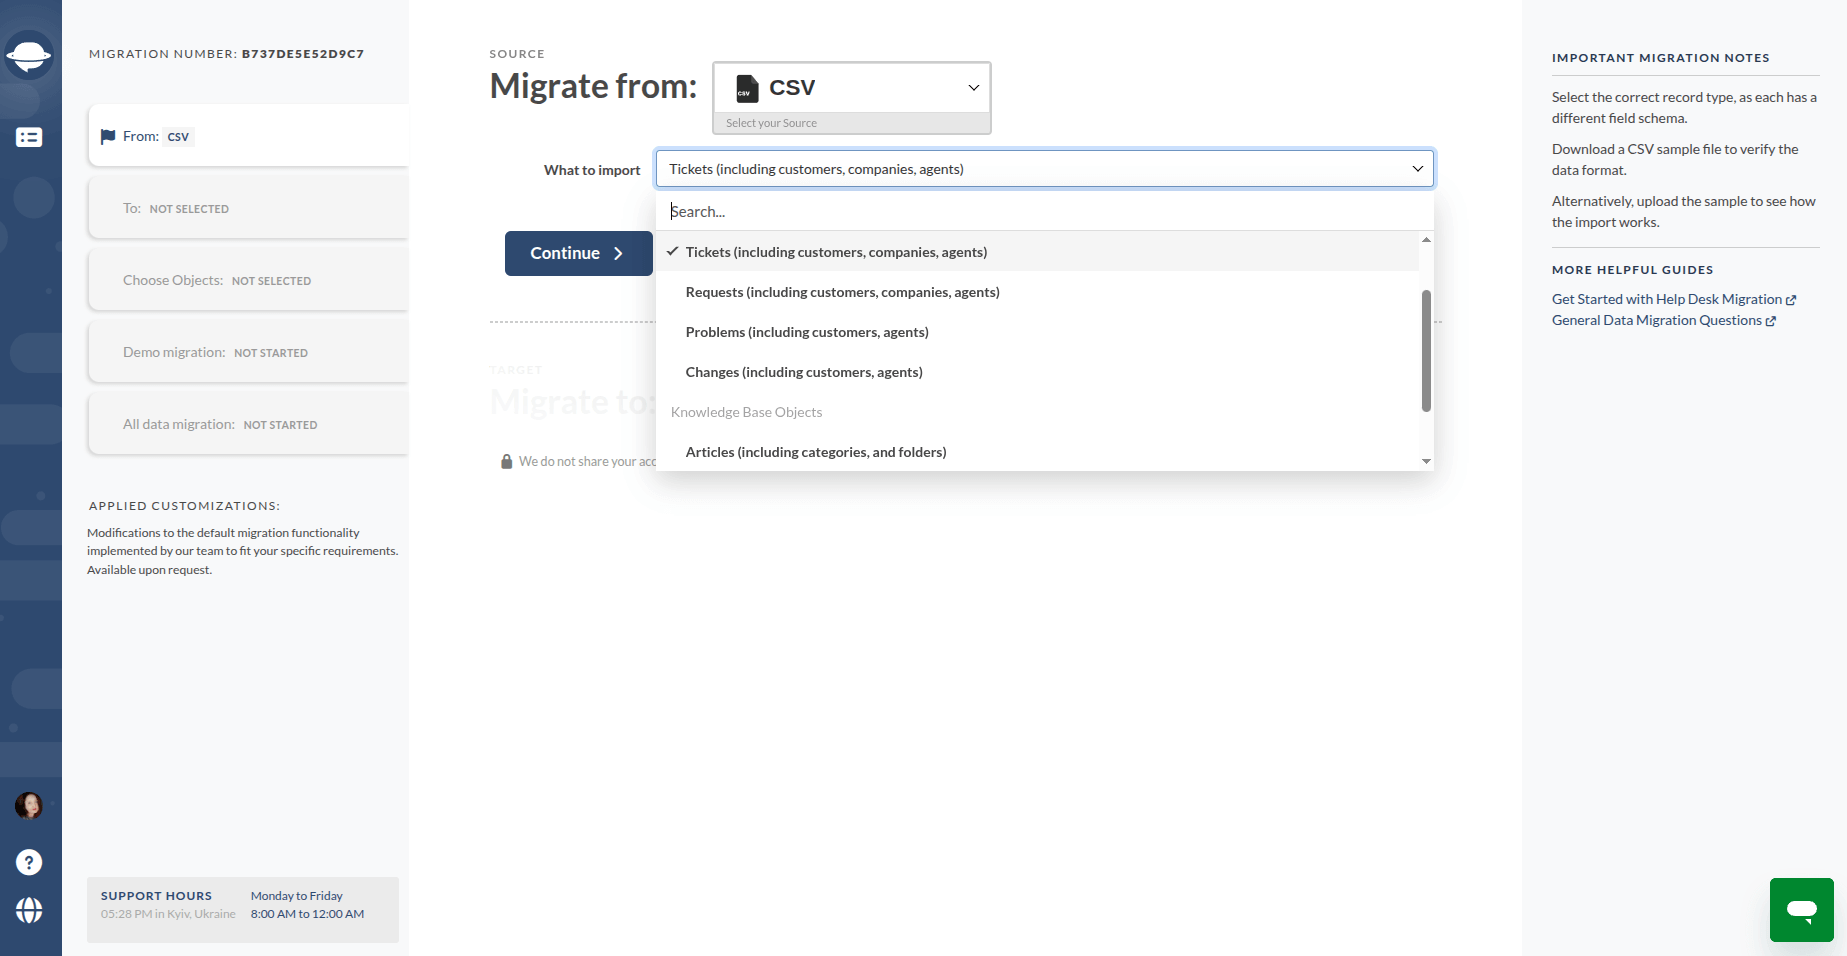
Regardless of your choice, you’ll need to configure your CSV connection by providing CSV files with Tickets, Comments, Changes, Problems, Requests, and Contacts (for Help Desk records) or a CSV file with Knowledge Base data (for KB records).
To understand the configuration process in detail, we've prepared a visual tutorial covering both options. Watch the video to learn how to upload files to Migration Wizard, check CSV compliance, and use sample files.
Discover how to effortlessly export your CSV files to a new help desk solution with our comprehensive tutorial. Watch our video for a step-by-step guide on configuring connections, setting up Demo Migration, and ensuring seamless data transfer.
Importing data to CSV is straightforward. Simply read the note and click the 'Continue' button. However, subsequent steps may require additional guidance. For this, we've created another visual tutorial.
Watch our video guide to effortlessly transfer your help desk and knowledge base records to a CSV file. Discover practical tips and step-by-step instructions for a smooth and secure data migration process.
How to check the result of the Demo Migration to CSV?
During the demo, the Migration Wizard generates a .zip archive containing:
- Contacts
- Groups
- Staffs
- Companies
- Tickets with comments, and attachments
- Knowledge Base articles and attachments
Once the Demo is complete, you will see a summary with the "Download results" buttons:

The archive includes a CSV file for each migrated record type. Review each CSV file to ensure all chosen record types are present.
During migration, attachments are moved to a separate folder. When viewing exported CSV files, you'll only see the names of attachments that exist in the folder.
The archive also contains an export.xlsx file with the CSV migration results. This file provides an overview of the exported data across different migrated record types.
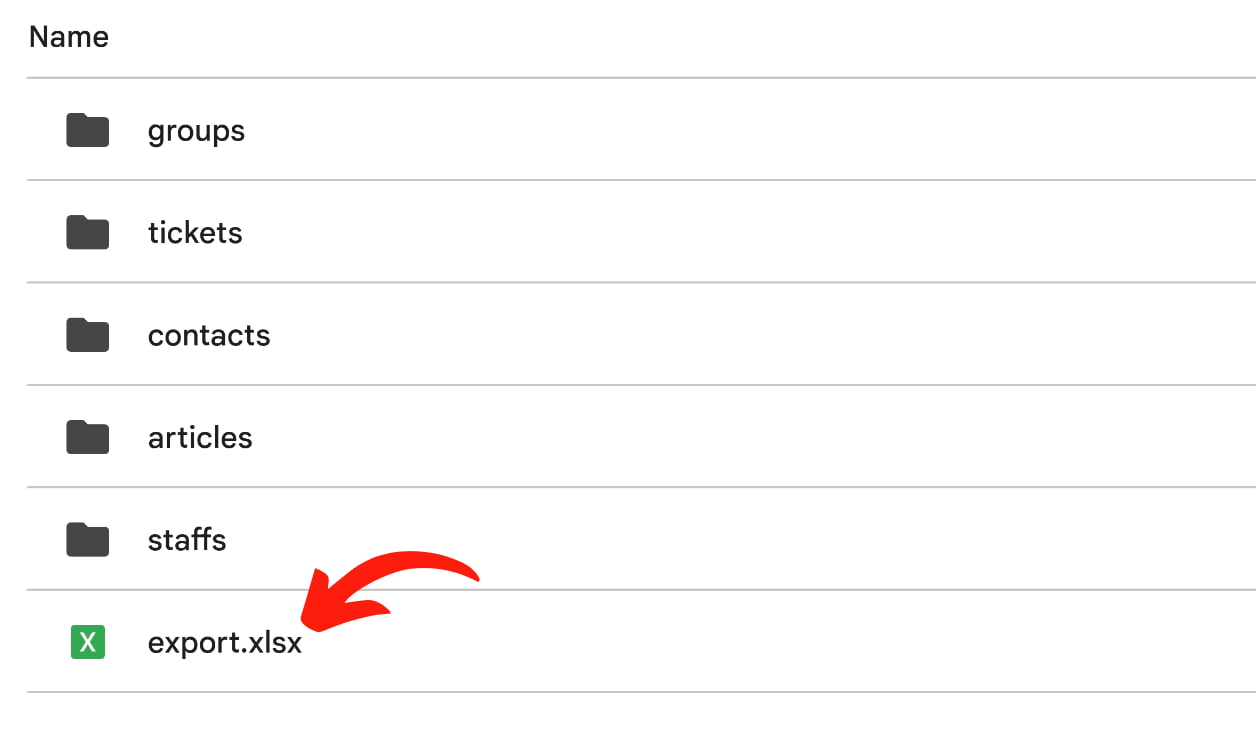
Contents of the export.xlsx file
- Tickets: Details of all exported tickets, including ticket ID, subject, description, tags, type, priority, and more.
- Ticket Comments: Includes all comments associated with each ticket ID, providing a comprehensive view of interaction history.
- Contacts: Information such as names, email addresses, and phone numbers.
- Staff: Details including names, email addresses, and department names.
- Groups: Information about the different groups that have been migrated.
- Articles: Details of the knowledge base articles that have been exported, including titles, descriptions, categories, and any associated attachments.
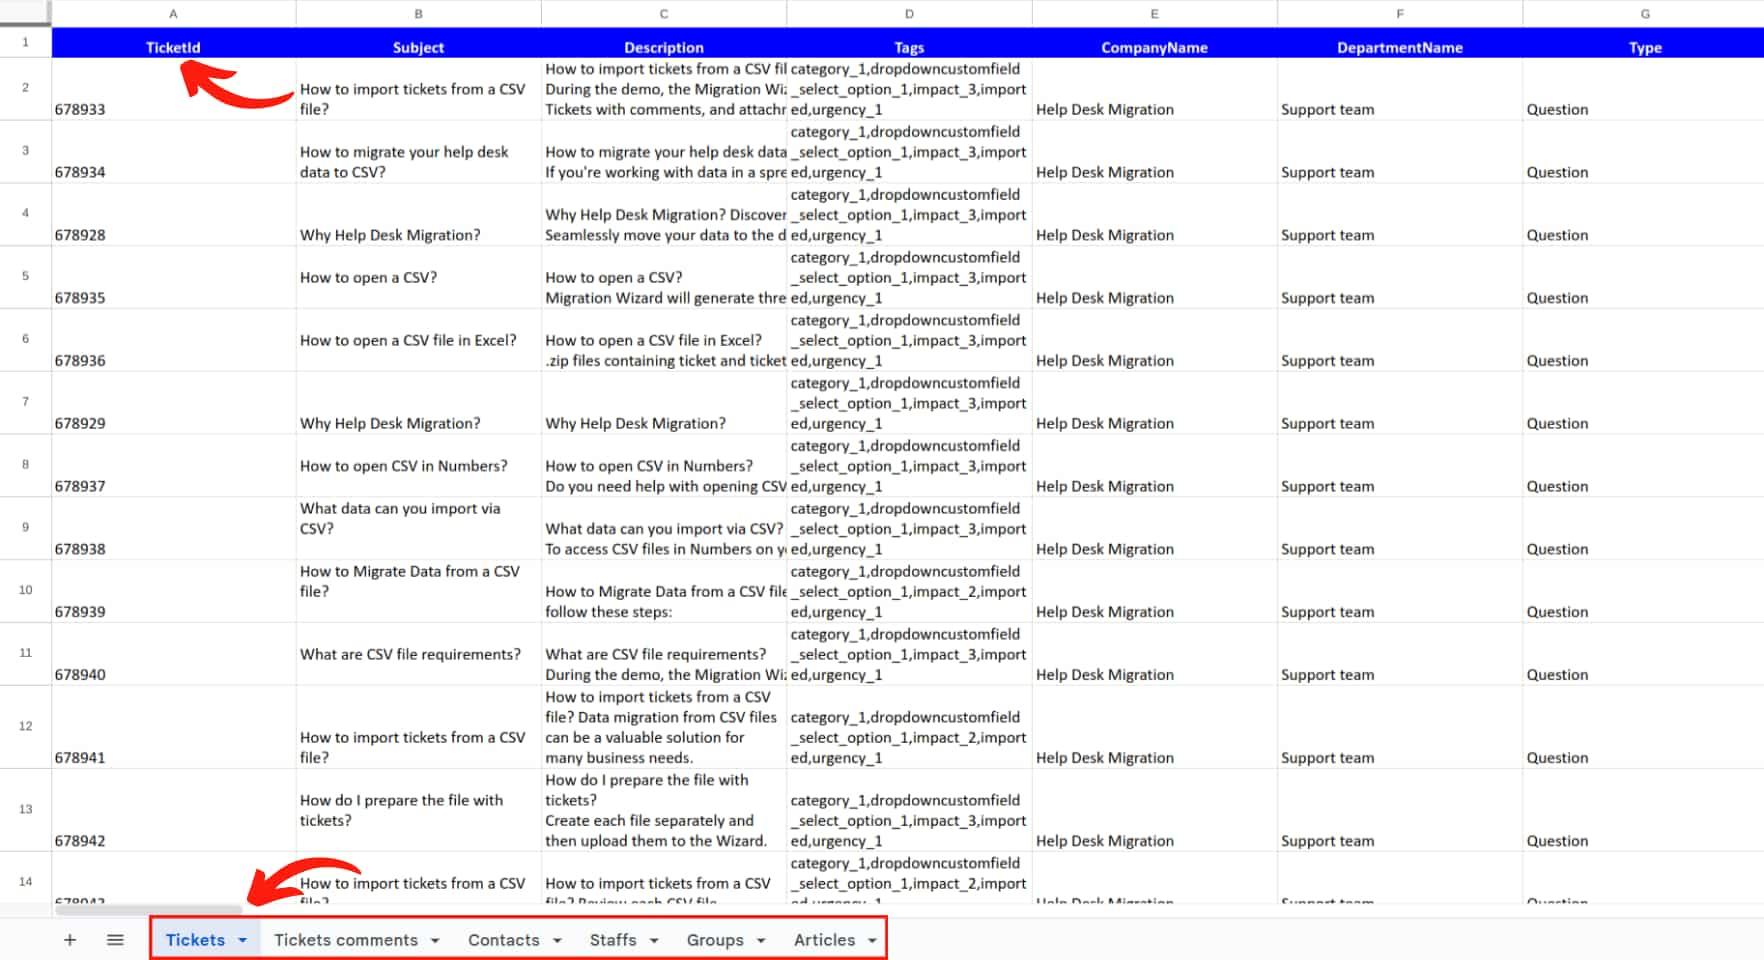
By reviewing the export.xlsx file, you can ensure that all necessary data has been accurately migrated and verify that the export process went as expected.
Why are rows with existing values being flagged as empty during data validation in Help Desk Migration?
This usually happens when at least one row in a column is missing a value. If a column is marked as required, every record in that column must have a filled-in value.
If you’re confident that all values are correctly entered, contact our support team via chat. We can review your file immediately and help identify why the validation is flagging specific rows